


GB
Multi-Channel IN-OUT Thermometer
with Cable Free Sensor and RF Clock
MODEL: RMR112
USER'S MANUAL
INTRODUCTION
Congratulations on your purchase of the RMR112 Multi-Channel In-Out Thermometer with 433MHz cable free sensor and radio-controlled calendar clock.
The basic package comes with a main unit, which is the temperature and calendar clock station, and a remote unit, the thermo sensor.
The main unit has large read-outs for indoors temperature, calendar clock and temperatures collected and transmitted by the remote unit. The main unit can support up to three remote units.
The main unit is capable of keeping track of the maximum and minimum temperature of different sites. And no wire installation is required and the RMR112 operates at 433MHz.
As for the calendar clock, it is radio-controlled. It automatically synchronizes its current time and date when it is brought within an approximate 1500km radius of the radio signal generated from Frankfurt, Germany (DCF77).
You can also set the calendar clock manually when it is off range. Other features include four-language display, four-step crescendo dual alarms and interchangeable display modes.
MAIN FEATURES
1
GB
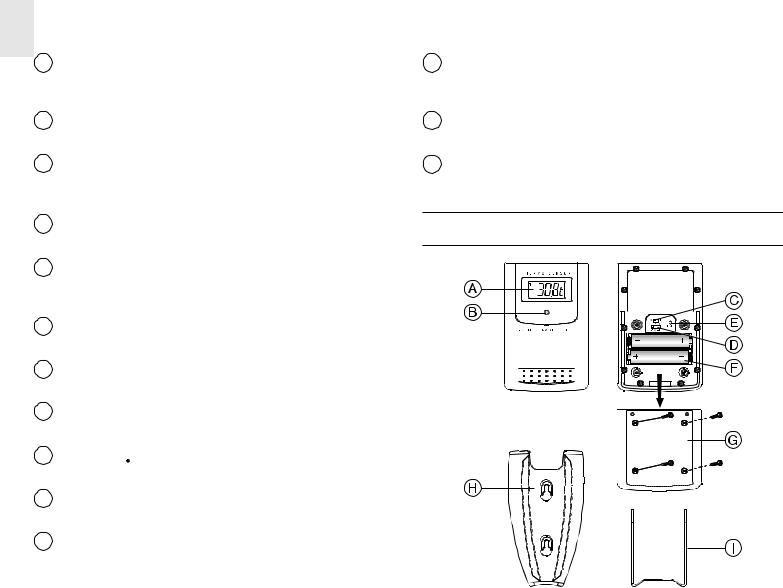
AFOUR-LINE DISPLAY
Facilitates easy reading of remote and indoors temperatures and calendar clock
BCHANNEL BUTTON
Selects among different channels
CMEMORY BUTTON
Recalls the maximum or minimum temperature of individual channels
D ALARM [24HR  OFF] BUTTON
Sets the time for the alarms
EMODE/SET BUTTON
Toggles the display modes and confirms entry while setting the values for display
FRADIO RECEPTION SIGNAL
Indicates the condition of radio reception
GUP ( ▲ ) BUTTON
Advances the value of a setting
HDOWN ( ▼) BUTTON
Decreases the value of a setting
I ALARM [ AL ON/OFF] BUTTON
Enables or disables the alarms
J RESET BUTTON
Returns all settings to default values
K ° C/° F SLIDE SWITCH
Selects between degree Centigrade ( C) and Fahrenheit° (° F)
2
L BATTERY COMPARTMENTS
Accommodates two UM-3 or “AA” size 1.5V alkaline batteries
MREMOVABLE TABLE STAND
For standing the main unit on a flat surface
NWALL-MOUNT RECESSED HOLE
For mounting the main unit on a wall
MAIN FEATURES: REMOTE UNIT
ALCD
Displays the current temperature monitored by the remote unit
BLED INDICATOR
Flashes when the remote unit transmits a reading
C° C/° F SLIDE SWITCH
Selects between Centigrade (° C) and Fahrenheit (° F)
DCHANNEL SLIDE SWITCH
Designates the remote unit Channel 1, Channel 2 or Channel 3
GB
reset the main unit after installing batteries. This will ensure easier synchronization between the transmission and reception of signals.
4.Position the remote unit and main unit within effective transmission range, which, in usual circumstances, is 20 to 30 meters.
Note that the effective range is vastly affected by the building materials and where the main and remote units are positioned. Try various set-ups for best result.
Though the remote units are weather proof, they should be placed away from direct sunlight, rain or snow.
ERESET BUTTON
Returns all settings to default values
FBATTERY COMPARTMENT
Accommodates two AAA-size batteries
GBATTERY DOOR
HWALL-MOUNT HOLDER
Supports the remote until in wall-mounting
IMOVABLE TABLE STAND
For standing the remote unit on a flat surface
BEFORE YOU BEGIN
BATTERY AND CHANNEL INSTALLATION: REMOTE UNIT
1.Remove the screws on the battery compartment.
2.Select the channel number on the CHANNEL slide switch.
3.Select the temperature display unit on the C/F slide switch.
For best operation,
1.Assign different channels to different remote units.
2.Insert batteries for remote units before doing so for the main unit.
3.Place the main unit as close as possible next to the remote unit,
4.Install 2 alkaline batteries (UM-4 or “AAA” size 1.5V) strictly according to the polarities shown.
5.Replace the battery compartment door and secure its screws.
3

GB
Note that once a channel is assigned to a remote unit, you can only change it by removing the batteries or resetting the unit.
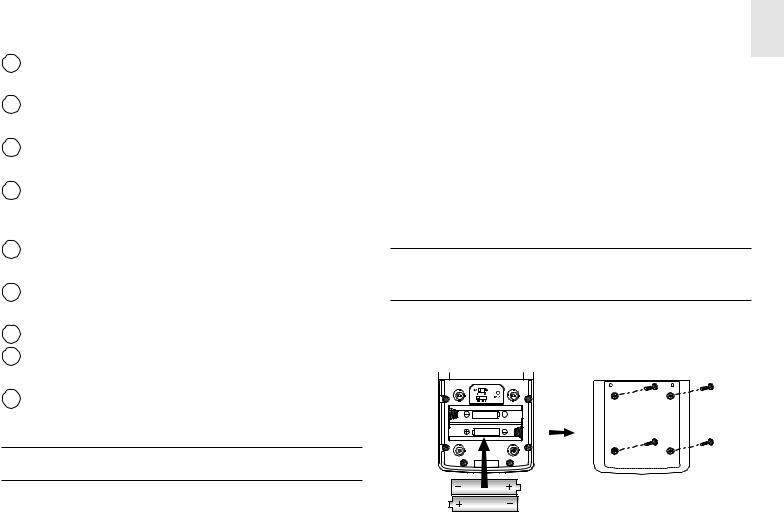
BATTERY INSTALLATION: MAIN UNIT
1.Slide open the battery compartment door.
2.Install 2 alkaline batteries (UM-3 or “AA” size 1.5V) strictly according to the polarities shown.
3. Replace the battery compartment door.
HOW TO USE THE TABLE STAND
OR WALL MOUNTING
The main unit has a removable table stand, which when connected, can support the unit on a flat surface. Or you can remove the stand and mount the unit on a wall using the recessed screw hole.
As for the remote unit, it comes with a wall-mount holder and a removable stand. Use either to hold the unit in place.
Main unit
Wall-mount |
Table Stand |
LOW BATTERY WARNING
Wall-mount |
Table Stand |
When it is time to replace batteries, the respective low-battery indicator will show up when the respective channel is selected. The battery level of the main unit will be shown on the indoor temperature when it is running low.
4
 Loading...