


Easy Fix Thermometer Pad |
|
with Ice Alert |
|
Model: EW102 |
|
USER MANUAL |
|
INDEX |
|
Overview......................................................................... |
2 |
Front view................................................................. |
2 |
Back view................................................................. |
2 |
Sensor...................................................................... |
3 |
Getting started............................................................... |
3 |
Main unit installation................................................. |
3 |
Sensor installation.................................................... |
3 |
Synchronising with sensor........................................ |
3 |
Temperature and humidity............................................ |
5 |
Ice warning............................................................... |
5 |
Placing of unit................................................................ |
5 |
Reset............................................................................... |
6 |
Troubleshooting............................................................. |
6 |
Specifications................................................................ |
6 |
Precautions.................................................................... |
7 |
About Oregon Scientific................................................ |
7 |
EU Declaration of conformity....................................... |
8 |
FCC Statement............................................................... |
8 |
EN
1
EN |
|
|
Overview |
||
|
||
|
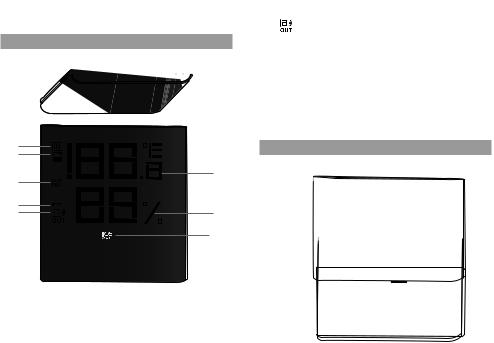
Front View
1 


 7
7
2 |
|
3 |
|
4 |
8 |
|
|
5 |
9 |
6 |
|
|
10 |
1.CHANNEL: toggle between indoor and outdoor channels (1-3); activate / deactivate / auto-toggle
2. : indoor temperature / humidity is displayed
3. : main unit batteries low
4.MIN/MAX: indicates type of data being displayed
5. : sensor batteries low
: remote sensor reception indicator and outdoor channel selected
7.MIN.MAX.: view current, maximum and minimum indoor
/outdoor temperature and humidity; clear records
8.Temperature
9.Humidity
10.Ice alert LED indicator
Back View
1
2
3
4
5
6
|
|
7 |
+ |
- + |
- |
|
1. |
Magnets for mounting |
|
|
|
2 |
2. |
Wall mount hole |
|
|
|
|
|
|
|
|
|

3.°C / °F: select temperature unit
4.RESET: reset unit to default settings
5.SENSOR: initiate search for sensor
6.Pole compartment
7.Battery compartment
Sensor
1 2
3
|
+ |
- |
|
5 |
4 |
|
|
|
1. |
LED indicator: flashes when remote unit transmits a |
|
|
reading |
|
2. |
Wall mount hole |
|
3. |
RESET: reset unit to default settings |
|
4. |
CHANNEL switch |
3 |
|
|
|
5. Battery compartment |
EN |
|
|
|
Getting started
main unit installation
Insert batteries:
1.Slide open the battery compartment cover.
2.Insert the batteries, matching the polarities.
3.Press RESET after each battery change.
4.Replace the battery compartment cover.
NOTE Batteries should not be exposed to excessive heat such as sunshine or fire.
Sensor installation
1.Slide open the battery compartment cover.
2.Insert the batteries matching the polarities (+/-).
Synchronising with sensor
1.Press CHANNEL on main unit to select a channel.
2.On sensor, slide channel switch to corresponding channel. (For additional sensors, select a different channel). Press RESET.
3.Press SENSOR on main unit to initiate search.
 Loading...