


GB
Multi digital clock radio with soothing sounds
MODEL: BARM123A
USER'S MANUAL
INTRODUCTION
BARM123A is a multi-functional device with:
-Digital-tuning AM/FM Radio
-Auto-synchronizing Radio Controlled Clock by radio signal from the U.S. Atomic Clock
-Indoor and Remote Thermometer with memories for Maximum and Minimum readings
-Weather Forecaster with Pressure Trend Indicator
-Soothing Sounds with a choice of 6 natural sounds
T7. [AM/FM] button
-Press to toggle between AM or FM radio band
T8. [TUNING |
▲] button |
-Press to increase the frequency setting when Radio is On
-Press and hold for 2 seconds to trigger radio auto-search function when Radio is On
T9. [TUNING |
▼] button |
-Press to decrease the frequency setting when Radio is On
-Press and hold for 2 seconds to trigger radio auto-search function when Radio is On
PACKAGE
In the package you will find the following items:
-1 x Main Unit (BARM123A)
-1 x Remote Thermo Sensor (THR268) with wall mount bracket
&table stand
-1 x Detachable Vibrating Alarm
-1 x 8 V AC/DC Adapter
KEYS CONFIGURATION & FEATURES
MAIN UNIT (BARM123A)
TOP KEY PANEL
T1. [SNOOZE/LIGHT] button
-Press to activate the EL back-light of the LCD Display for 5 seconds
-Press to stop the alarm sound and activate the 8-minute Snooze function
T2. [SLEEP] button
-Press to turn on the Radio and activate the Sleep Timer function
-Press to select the sleep-timer (auto-off) feature for 15, 30, 60, 90 or 120 minutes
T3. [ALARM ON/OFF |
] button |
-Press to select between Alarm-On and Alarm-Off status in the corresponding Alarm-time display mode
T4. [POWER |
|
] button |
-Press to turn on and off the Radio/Soothing Sounds Function
T5. [RADIO/SOUND] button
-Press to toggle between Radio or Soothing Sounds Function when Power is On
T6. [STATION] button
-Press to switch among the 8 preset radio stations in the respective AM/FM Radio band when the Radio is On
-Press and hold for 2 seconds to enter the preset radio station setting mode when Radio is On
FRONT KEY PANEL
F1. [ALARM] button
-Press to change to Alarm-time display mode from other display modes
-Press to toggle between Alarm 1 and Alarm 2 in the Alarm-time display mode
-Press and hold for more than 2 seconds to enter the setting modes of alarm time and alarm-sound mode
F2. [CLOCK] button
-Press to toggle between the calendar clock display modes
-Press to change back to Calendar display mode in the Alarmtime display mode
-Press and hold for more than 2 seconds to enter setting modes for 12-/24-hour display format, Hour, Minute, display language
of week-of-day, calendar display format (mm:dd:yy or dd:mm:yy), year, month and day
F3. [VOLUME |
▲] button |
-Press to increase the volume when Radio or Soothing Sounds is On (8-step volume settings)
-Press to increase the values in the setting modes
-Press to toggle between “Beep Alarm” or “Radio Alarm” mode in the corresponding alarm-time setting mode
-Press and hold for 2 seconds to activate the auto-reception of radio signal for RF clock manually when Radio or Soothing Sounds is off
F4. [VOLUME |
▼] button |
-Press to decrease the volume when Radio or Soothing Sounds is On (8-step volume settings)
-Press to decrease the values in the setting modes
-Press to toggle between “Beep Alarm” or “Radio Alarm” mode in the corresponding alarm-time setting mode
-Press and hold for 2 seconds to deactivate the auto-reception of radio signal for RF clock manually when Radio or Soothing Sounds is off
F5. [SELECT] button
-Press to toggle among the 6 natural Sounds modes when Soothing Sounds is On
1

GB
T2 |
T4 |
T6 |
T7 |
T8 |
T1 |
T3 |
T5 |
T9 |
F8 |
R5 |
F7 |
F2 |
F6 |
F1 |
F4 |
F3 |
F5 |
|
|
|
R3 |
|
|
|
R4 |
R6 |
R7 |
R2 |
R1 |
F6. [MEM] button
-Press to toggle among the current, maximum and minimum indoor and remote temperature records
-Press and hold for 2 seconds to clear the maximum or minimum temperature records
F7. Headset Jack
-Connection Jack for optional headset (not included)
F8. LED
REAR KEY PANEL
R1. [ |
° C / ° F] |
|
- |
Press to select |
° C or ° F temperature display unit |
R2. [SEARCH] button
-Press and hold for 2 seconds to activate search for remote thermo signal from sensor
R3. [RESET] button
-Press to reset all values to their default settings
R4. [ZONE]
-Press to toggle ammg the 4 US time-zones: Pacific (P), Mountain (M), Central (C) or Eastern (E)
R5. Extendable Antenna
-External Antenna for FM Radio
R6. Power Adapter Connector
- Connection Jack for AC power adapter
R7. Vibrator Jack
-Connection jack for Wake-Up Vibrator
REMOTE |
THERMO UNIT |
(THR268) |
S1 |
S3 |
S2 |
S4 |
|
S5 |
S6
S7
S8
2
S1. |
LCD |
|
|
|
Displays the current temperature monitored by the remote unit |
|
|
S2. |
LED INDICATOR |
|
|
|
Flashes when the remote unit transmits a reading |
|
|
S3. |
° C/ ° F SLIDE SWITCH |
|
|
|
Selects between Centigrade ( |
° C) and Fahrenheit ( |
° F) |
S4. RESET BUTTON
Returns all settings to default values
S5. BATTERY COMPARTMENT
Accommodates two UM-3 or AA size batteries
S6. BATTERY DOOR
S7. WALL-MOUNT HOLDER
Supports the remote unit in wall-mounting
S8. REMOVABLE TABLE STAND
For standing the remote unit on a flat surface
POWER REQUIREMENTS
The main unit operates on six (6) pieces of AA-sized or UM-3 1.5V batteries (alkaline batteries reecommended). The clock, radio and remote thermometer have separate low battery indicators. Change
the batteries accordingly when the respective indicator lights up.
Low Battery Indicator for Clock
|
For Radio |
|
|
For Remote Sensor |
|
|
|
|
|
|
|
|
|
|
An 8V AC Power Adapter is included. To connect, plug it into the power adapter connector and the other end to a wall socket. If you wish to turn on the radio for a long period, please use the adapter for power supply.
For the Remote Thermo Sensor THR268, it operates on two (2) pieces of AA-sized or UM-3 1.5V batteries. When its power level is low, the low battery indicator will be shown. In that case, change the batteries accordingly.
If not properly disposed of batteries can be harmful. Protect the environment by taking exhausted batteries to authorized disposal stations.
Note: Two (2) pieces of batteries should be installed in the upper battery compartment while the other four (4) pieces in the lower one. Please note that when adapter is connected, there is no need
to insert batteries into the lower battery compartment but two (2) pieces of batteries are still required to be installed in the upper compartment for clock operations.
GB
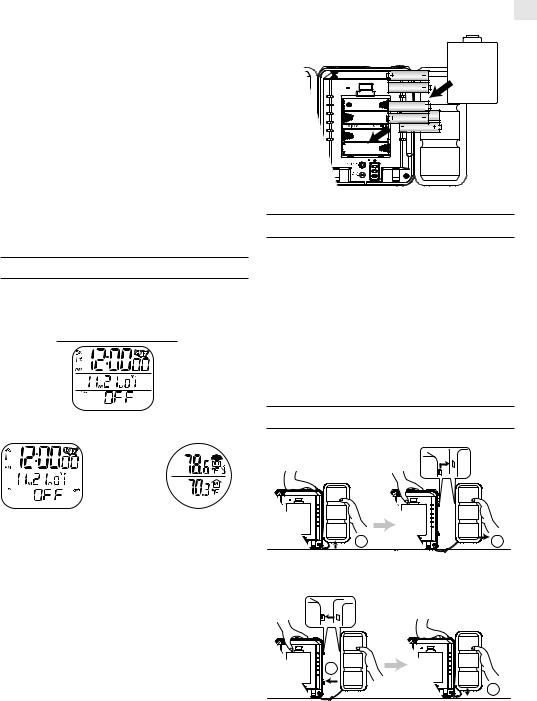
MAIN UNIT: BATTERY INSTALLATION
To install batteries into the main unit:
1.Press the door tab and click open the battery door at the back of the main unit.
2.Install six (6) pieces of AA-sized or UM-3 1.5V batteries by following the polarities shown inside the battery compartment.
For proper functioning it is advised to install batteries first into the lower compartment and then into the upper one (Please note
that if batteries are already installed into the unit, first pull out and remove the insulation tape in the remote sensor [marked 1].
After that pull out and remove the insulation tapes in the lower compartment [marked 2] and then the one in the upper one [marked 3] as well).
3. Replace the battery door and press |
[RESET] |
. |
NOTE ON DETACHABLE SPEAKER
1 |
2 |
Slide up |
Pull out |
1
2
Push In |
Slide Down |
3
 Loading...