Oregon Scientific BAR338PA User Manual

GB
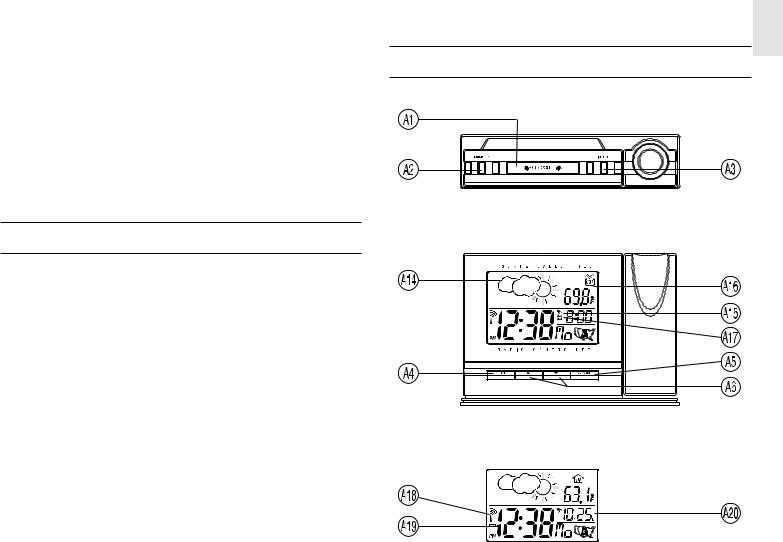
MAIN UNIT CONTROLS
RF Projection Barometer
With Remote Thermo Sensor
Model No.: BAR338PA
User’s Manual
INTRODUCTION
Congratulations on your purchasing the BAR338PA RF Projection
Barometer.
The BAR338PA is a multifunctional radio frequency (RF) controlled projection calendar clock that automatically synchronizes current time and date with the RF signal broadcast by the US Atomic Clock, one of the world's most accurate timekeepers.
The BAR338PA is very easy to use. No wire installation is required between the main unit and the remote unit.
Other features of BAR338PA include: weather forecast display, indoor and remote temperature display and daily alarm function.
1

GB
A1 SNOOZE / LIGHT BUTTON
Enables the snooze alarm feature when the alarm is sounding; also activates the backlight feature for five seconds
A2 MEMORY BUTTON
Sequence through temperature display selections of current, maximum and minimum temperatures
A3 IN/OUT BUTTON
Changes between indoor and outdoor temperature
A4 CLOCK BUTTON
Alternates between the time seconds display and the day- of-the-week display; also enables the clock setting mode
A5 ALARM BUTTON
Displays the alarm set time or activates the alarm function
A6 UP [ ] AND DOWN [
 ] BUTTONS
Increases or decreases the value of a setting
A7 °C/°F BUTTON
Selects between degrees Centigrade (°C) and Fahrenheit (°F)
A8 RESET BUTTON
Clears the user selected settings and causes the settings of the main display unit to return to the factory default settings
A9 ZONE BUTTON
Sequence through the 4 US time-zones of Pacific, Mountain, Central and Eastern
PROJECTOR CONTROLS
A10 IMAGE ROTATION KNOB 
Rotates the projected time image 90 degree in clockwise or counter-clockwise direction
A11 FOCUS KNOB
Adjusts the focus of the projected time image
2

A12 180 ° ROTATION BUTTON
Flips the projected time image upside-down
A13 PROJECTION ON SLIDE SWITCH
Activates continuous projected time image function when used with the included AC power adapter
MAIN UNIT INDICATORS
A14 WEATHER FORCAST ICONS
Graphically displays general weather forecast 12-24 hours in the future
A15 ALARM ON INDICATOR
Appears when the alarm is active
A16 IN / OUT INDICATOR
Indicates outdoor or indoor temperature
A17 ALARM TIME INDICATOR
Appears when the alarm time is displayed
A18 RADIO RECEPTION SIGNAL
Identifies the strength of signal received from the US Atomic Clock
A19 BATTERY-LOW INDICATOR
When displayed indicates that batteries are low and need to be replaced
A20 M / D INDICATOR
Indicates month-day (MD) calendar display
GB
REMOTE UNIT CONTROLS
B1 LED INDICATOR
Flashes when the remote unit transmits a reading
B2 RESET BUTTON
Clears the user selected settings and causes the settings of the remote sensor to return to the factory default settings
3

GB
HINTS FOR BEST OPERATION
•Insert batteries in the remote unit before doing so for the main unit.
•Position the main and remote unit within the transmission range (20 to 30 meters; 65.5 - 100 feet).
•Position the remote unit away from direct sunlight, rain or snow.
•After battery installation, the main unit will search for signal from the remote unit. Upon successful receipt of signal, the remote temperature reading received will be displayed on the main unit. Should the signal reception between the main unit and the remote sensor be unsuccessful, shorten the distance between them and/or reposition the main unit and/or the sensor so they are in a more direct line of sight to one another.
BATTERY INSTALLATION
1.Remove the battery compartment door.
2.Insert two AA-sized batteries (included) for the remote unit or four AA-sized batteries (included) for the main unit. Batteries are to be inserted with polarities in the direction shown in the diagram on page 3 for the remote sensor unit and page 4 for the main display unit.
3.Press [RESET].
4.Replace the battery compartment door.
MAIN UNIT
HOW TO USE THE PROJECTOR
The BAR338PA includes a projection function that projects the current time and remote sensor temperature onto a wall, ceiling or other flat surface.
To project the time-temperature onto a flat surface:
In a darkened room, press [ SNOOZE / LIGHT ], th activate for approximately 5 seconds.
This unit has several features to enhance the clarity of the projected image.
4
 Loading...