


Rainbow Clock with 8 Soothing Sounds and FM Radio Model: RRM902 / RRM902U / RRM902A
USER MANUAL

Rainbow Clock with 8 Soothing |
|
Sounds and FM Radio |
|
MODEL: RRM902 / RRM902U / |
|
RRM902A |
|
USER MANUAL |
|
INDEX |
|
Overview ........................................................................ |
2 |
Front view ................................................................ |
2 |
Back view................................................................. |
2 |
Bottom view ............................................................. |
3 |
Remote sensor......................................................... |
3 |
Getting started............................................................... |
3 |
Power supply ........................................................... |
3 |
Remote sensor .............................................................. |
4 |
Sensor data transmission ........................................ |
4 |
Clock .............................................................................. |
5 |
Clock reception ........................................................ |
5 |
Manually set clock.................................................... |
5 |
Audio options ................................................................ |
6 |
Soothing sounds ...................................................... |
6 |
Radio........................................................................ |
6 |
Music from external audio device ............................ |
7 |
Volume control ......................................................... |
7 |
Alarm .............................................................................. |
7 |
Color play....................................................................... |
8 |
Sleep timer..................................................................... |
8 |
Temperature................................................................... |
8 |
Backlight ........................................................................ |
8 |
Reset .............................................................................. |
8 |
Specifications................................................................ |
9 |
Precautions.................................................................... |
9 |
About Oregon Scientific............................................. |
10 |
EU Declaration of conformity..................................... |
10 |
FCC Statement ............................................................ |
10 |
EN
1
EN
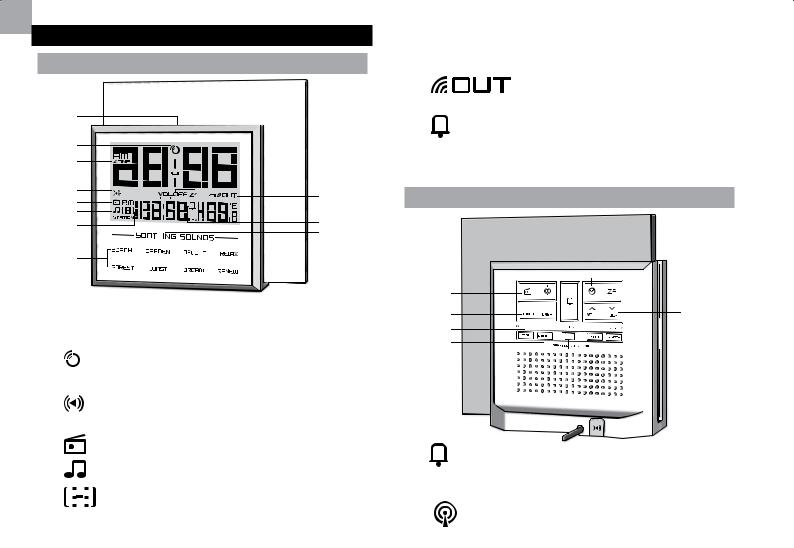
OVERVIEW
FRONT VIEW
1 |
|
2 |
|
3 |
|
4 |
9 |
5 |
10 |
6 |
11 |
7 |
12 |
|
|
8 |
|
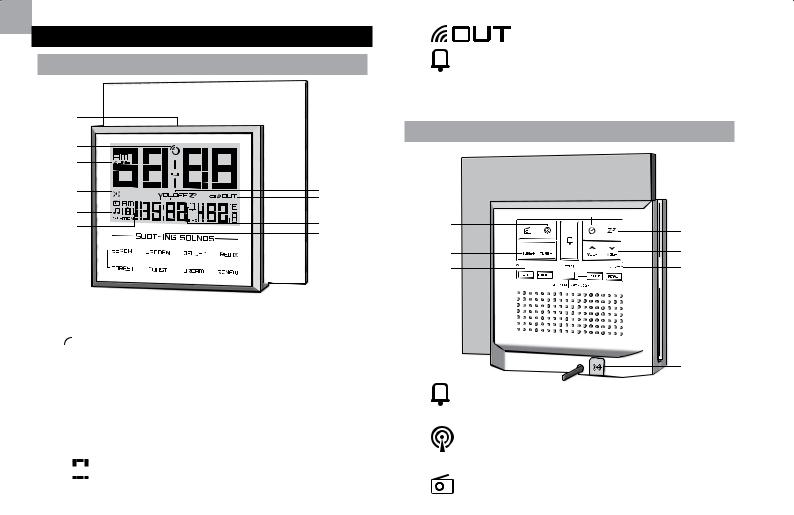
1.SNOOZE · SOUND: activate snooze alarm; turn soothing sound on / off; select soothing sound
2. : clock signal reception indicator
3.ZONE: time zone offset
4.
 : external audio device successfully connected
5. : radio is on
6. : soothing sound is on
7.


 : radio station selected (user can set up to 8 stations); soothing sound selected for alarm option
8.Name of soothing sound selected is displayed
9.OFF Zz: sleep function enabled (ZZ) / disabled (OFF ZZ)
:remote sensor reception indicator
:daily alarm is on
12.VOL: volume level is displayed
BACK
1 |
8 |
|
2 |
||
9 |
||
3 |
||
|
||
4 |
10 |
|
5 |
11 |
|
6 |
12 |
|
7 |
13 |
14
: activate / deactivate alarm function; set alarm; alarm status (when radio is on)
: toggle station number (when radio is on); save frequency
:turn radio on / off
4.TUNE +/-: auto search / adjust radio frequency
5.°C / °F: user selectable temperature units
2

6.DIMMER: select display brightness
7.COLOUR (OFF·PROGRAM·LOOP): activate / deactivate color-changing light show; select preprogrammed (sound specific) light show or rainbow
effect
:set clock
9.ZZ: activate sleep timer; adjust timer settings (120, 90,
60, 30, 15, 0)
10.VOL+ / VOL-: increase / decrease value of the setting; increase / decrease volume
11.RESET: reset unit to default settings
12.SEARCH: initiate sensor search
13.PAUSE: select a specific color lighting; restart colorchanging effect
14.Socket for audio line-in
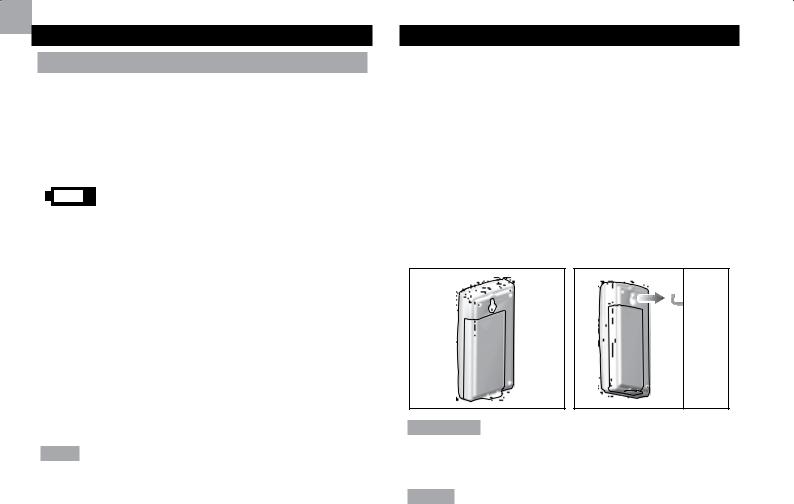
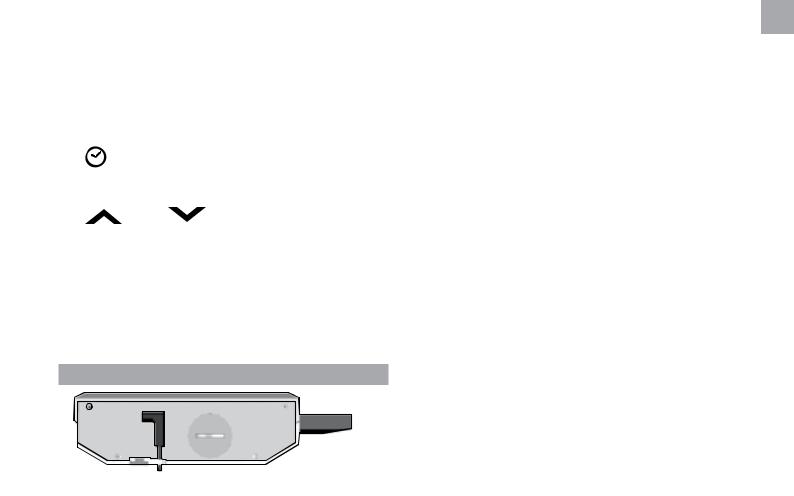
1
2
1.Adapter socket
2.Battery compartment
EN
REMOTE SENSOR
2
1
4
3
 5
5
1.LED status indicator
2.Wall mount hole
3.Battery compartment
4.RESET hole: reset unit to default settings
5.CHANNEL switch: select Channel 1
GETTING STARTED
POWER SUPPLY
Adapter
The adapter powers the unit. Plug adapter into socket, making sure the adapter is not obstructed and is easily accessible to the unit.
To completely disconnect from power, the adapter should be disconnected from the main unit.
3
EN
NOTE The main unit and adapter should not be exposed to wet conditions. No objects filled with liquid, such as vases, should be placed on the main unit and adapter.
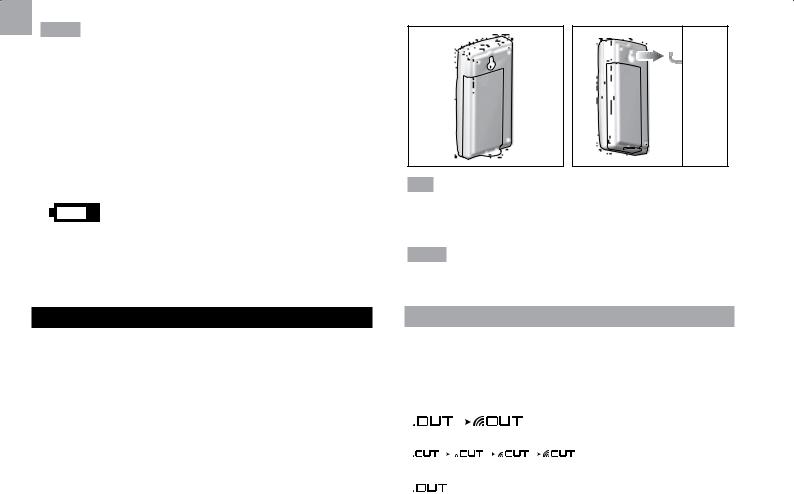
1 x CR2032 battery for memory back-up To insert batteries:
1.Remove the battery compartment cover.
2.Insert the battery, matching the polarities.
3.Press RESET after each battery change.
LOCATION |
MEANING |
|
|
|
|
Clock area |
Main unit batteries low |
|
|
|
|
Outdoor temperature |
Sensor batteries low |
|
area |
||
|
||
|
|
REMOTE SENSOR
To set up the remote sensor:
1.Slide open the battery compartment.
2.Slide channel switch to select channel 1.
3.Insert the battery, matching the polarities.
4.Press RESET after each battery change.
5.Close the battery compartment.
6.Press and hold SEARCH on main unit to initiate search and start receiving time and temperature data from the sensor.
7.Place the sensor within 30 m (98 ft) of the main unit using the table stand or wall mount.
4
TIP The transmission range may vary depending on many factors. You may need to experiment with various locations to get the best results.
NOTE Use alkaline batteries for longer usage and consumer grade lithium batteries in temperatures below freezing.
SENSOR DATA TRANSMISSION
Outdoor sensor:
The sensor reception icon in the remote sensor area shows the status:
ICON |
DESCRIPTION |
||||||||
|
|
|
|
|
|
|
|
|
|
|
|
|
|
|
|
|
|
|
Main unit is searching |
|
|
|
|
|
|
|
|
|
|
|
|
|
|
|
|
|
|
|
for sensor(s) |
|
|
|
|
|
|
|
|
|
|
|
|
|
|
|
|
|
|
|
A channel has been |
|
|
|
|
|
|
|
|
|
|
|
|
|
|
|
|
|
|
|
found |
|
|
|
|
|
|
|
|
|
|
|
|
|
|
|
|
|
|
|
The sensor cannot be |
|
|
|
|
|
|
|
|
|
found |
|
|
|
|
|
|
|
|
|
|

NOTE If the sensor is not found, check the batteries, obstructions and remote unit location. Press and hold SEARCH to force another sensor search.
For best results:
•Place the sensor out of direct sunlight and moisture.
•Position the sensor so that it faces the main unit, minimizing obstructions such as doors, walls and furniture.
•Place the sensor in a location with a clear view to the sky, away from metallic / electronic objects.
•Position the sensor close to the main unit during cold winter months as below-freezing temperatures may affect battery performance and signal transmission.
TIP Ideal placements for the sensor would be in any location on the exterior of the home at a height of not more than 1.5m (5 ft) and which can shield it from direct sunlight or wet conditions for an accurate reading.
CLOCK
CLOCK RECEPTION
This product is designed to synchronize its clock automatically with a clock signal.
RRM902: EU: DCF-77 signal: within 1500km (932 miles) of
Frankfurt, Germany.
RRM902U: UK: MSF-60 signal: within 1500km (932 miles) of Anthorn, England.
RRM902A: US: WWVB-60 signal: within 3200km (2000 miles) of Fort Collins, Colorado.
To enable / disable signal reception:
Press and hold |
VOL+ to enable, or |
VOL- to |
disable signal reception. |
|
|
NOTE Reception takes 2-10 minutes. If the signal is weak, it can take up to 24 hours to get a valid signal.
If signal reception is unsuccessful, place your unit next to
a window, press and hold |
VOL+ to force another |
|
signal search. |
|
|
Clock signal reception indicator: |
||
|
|
|
STRONG SIGNAL |
WEAK / NO SIGNAL |
|
|
|
|
|
|
|
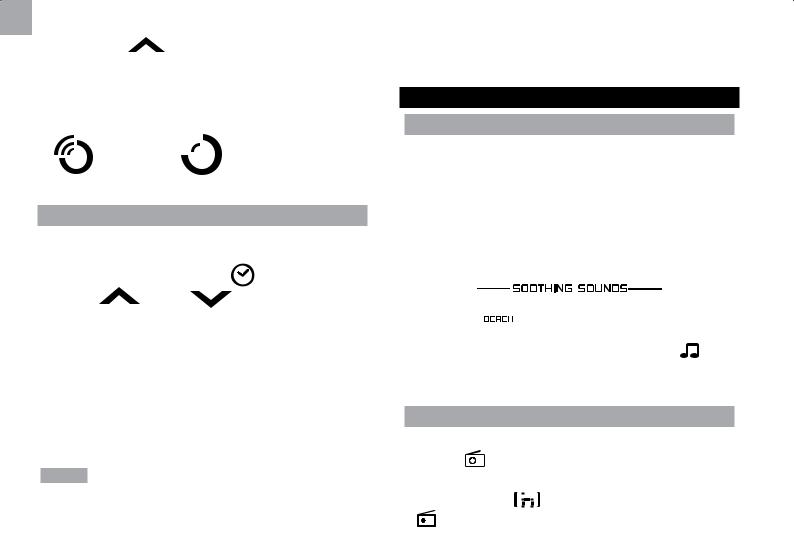
MANUALLY SET CLOCK
To set the clock manually, disable the clock signal reception first.
EN
5
EN
1. |
Press and |
. |
|
2. |
Press |
VOL+ or |
VOL- to change the |
|
settings |
|
|
3. |
Press |
to confirm. |
|
The setting order is: time zone offset, 12/24-hour format, hour, minute.
RMR902 / RMR902U: Time zone offset sets the clock +/- 23 hours from the received clock signal time. If you have deactivated the clock signal reception, do not set a value for time zone.
NOTE If you enter +1 in the time offset setting, this will give you your local time plus one hour. If you are in the US (RRM902A) set the clock to:
0 for Pacific time |
+1 for Mountain time |
+2 for Central time |
+3 for Eastern time |
AUDIO OPTIONS
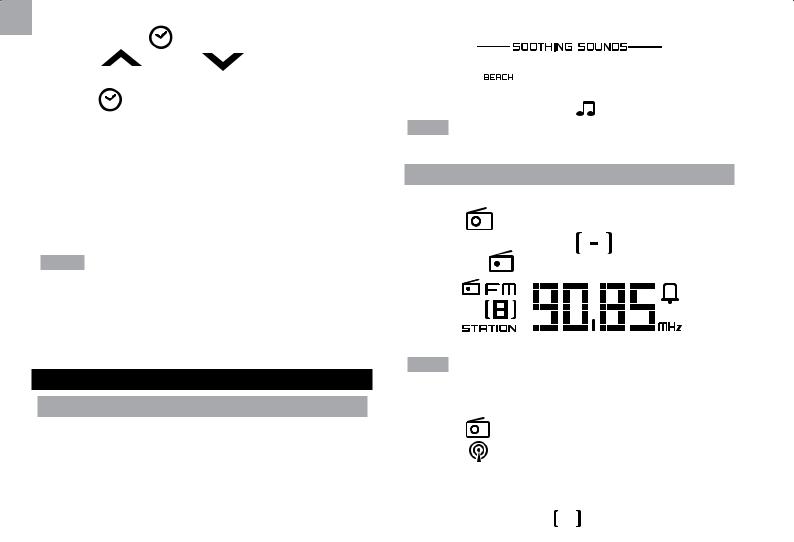
SOOTHING SOUNDS
To activate / deactivate soothing sounds:
•Place finger on SNOOZE·SOUND for 2 seconds.
To toggle soothing sounds:
•Touch SNOOZE · SOUND repeatedly to select desired sound (1-8).
|
|
|
|
The selected sound name |
will be displayed. |
||
NOTE This will automatically turn off the radio.
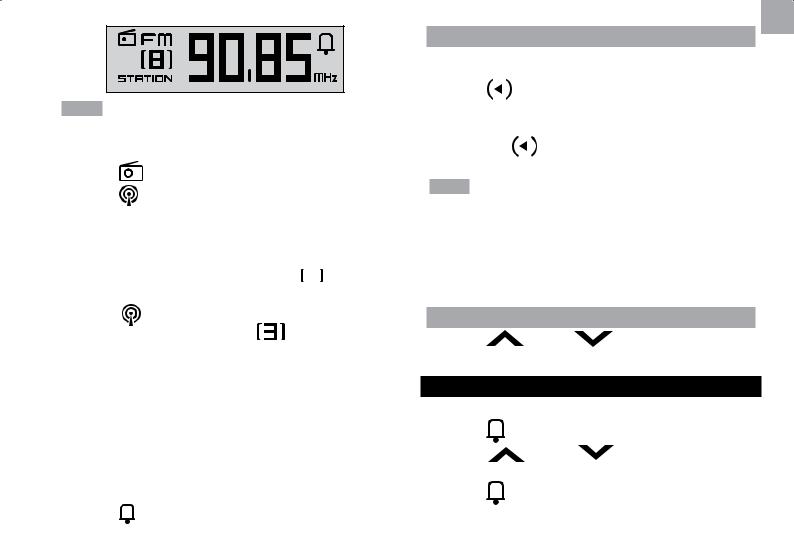
RADIO
To activate deactivate radio:
• |
Press |
to turn radio ON |
. |
|
|||||
|
|
|
|
|
|
|
|
with corresponding |
|
The |
radio |
selected |
|
|
|
|
|||
|
|
|
|
||||||
|
|
|
|
||||||
frequency |
|
|
|
|
|
|
|
||
displayed |
on. |
||||||||
|
|
|
|
|
|
|
|
|
|
|
|
|
|
|
|
|
|
|
|
NOTE This will automatically turn off the soothing sound.
To set |
station: |
1.Press to turn radio on.
2.Press repeatedly to navigate to desired station storage location (1-8).
3.Press and hold TUNE+ / TUNE- to auto search or press TUNE+ / TUNE- to manually select frequency. Station number will disappear
6
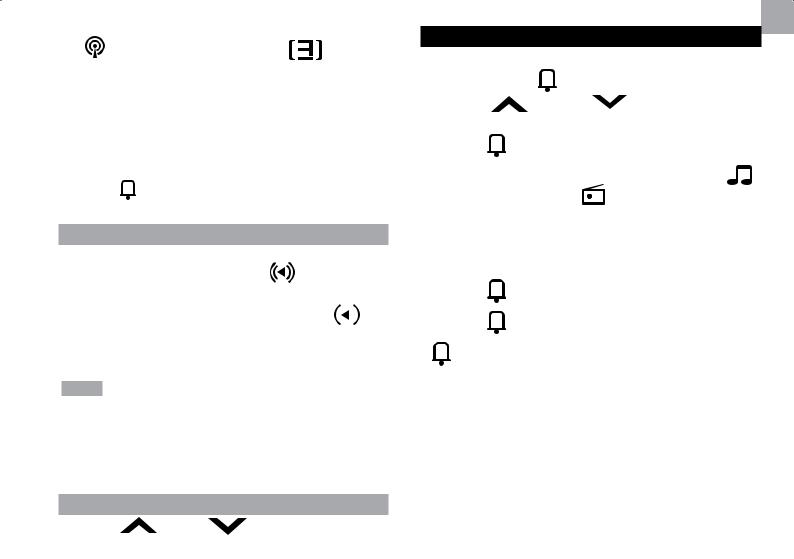
4. |
desired frequency has been |
and hold |
|
to save. Station number (e |
) indicates |
|
where it has been stored. |
|
5. Repeat steps 2 – 4 for all storage locations.
For your convenience, the volume and radio frequency will be stored in memory for the next time radio is turned on.
To view alarm display (when radio is on):
•.
MUSIC FROM EXTERNAL AUDIO DEVICE
Using a cable, plug one end to your music storage device
and one end to audio line-in socket ( |
|
) located at the |
|
||
back of unit. |
|
|
When cable has been successfully connected, 
 will be displayed on the LCD screen and sound will emit from speakers.
NOTE
•To play music from external audio device, ensure soothing sound and radio is turned off.
•Connecting / disconnecting of external audio device will turn the alarm off.
VOLUME CONTROL
• Press |
VOL+ or |
VOL-. |
EN
ALARM
To set the alarm:
1. |
Press and |
. |
|
2. |
Press |
VOL+ or |
VOL- to change the |
3.to confirm.
The setting order is: |
alarm option |
soothing sound / beep |
Radio), sound type (1-8: |
soothing sound, 9: beep) or radio station, volume (cannot be adjusted for beep alarm).
To toggle alarms ON / OFF:
1.to display alarm time.
again to turn alarm ON / OFF.
indicates alarm is on.
To silence the alarm:
•Touch SNOOZE · SOUND to silence it for 8 minutes
OR
•Press any other key (except DIMMER) to turn the alarm off and activate it again after 24 hours.
7

EN
COLOR PLAY
To activate light show (looped):
•Slide COLOR switch to LOOP.
To stop light show at a particular color:
• Press PAUSE when it reaches desired color. Press PAUSE again to restart loop.
Each soothing sound is programmed with a unique colorchanging light show which complements the music, improves the ambience and adds a decorative touch to any room.
To start programmed light show:
•Slide COLOR switch to PROGRAM.
To deactivate light show:
•Slide COLOR switch to OFF.
SLEEP TIMER
To activate audio sleep timer:
•Press SLEEP to activate sleep timer. Zz indicates sleep timer is on.
NOTE
•If neither soothing sound nor radio is activated when SLEEP is pressed, the unit will automatically activate the last audio type played.
8
•If either soothing sound or radio is playing when SLEEP is pressed, the unit will start counting down sleep timer and continue playing audio type.
To select duration:
•Press SLEEP repeatedly.
To view time remaining:
•Press SLEEP.
NOTE If external audio device is plugged in while sleep timer is on (and radio / soothing sound is not playing), OFFZZ will be displayed briefly to indicate sleep function has been temporarily disabled.
TEMPERATURE
To toggle temperature unit:
•Press °C / °F.
BACKLIGHT
To adjust brightness:
•Press DIMMER.
RESET
Press RESET to return to the default settings.

SPECIFICATIONS
TYPE |
DESCRIPTION |
|
|
|
|
Main unit |
|
|
|
|
|
L x W x H |
155 x 43 x 145 mm |
|
(6.1 x 1.7 x 5.7 in) |
||
|
||
|
|
|
Weight |
526 g (18.6 oz) without battery |
|
|
|
|
FM |
87.5 to 108 MHz |
|
|
|
|
Power |
4.5V adapter and 1x CR2032 for |
|
memory back-up |
||
|
||
|
|
|
Remote Sensor (THN132N) |
||
|
|
|
L x W x H |
92 x 60 x 20 mm |
|
(3.6 x 2.4 x 0.8 in) |
||
|
||
|
|
|
Weight |
62g (2.22 oz) |
|
|
|
|
Transmission |
30m (98 ft) unobstructed |
|
range |
||
|
||
|
|
|
Frequency |
433 MHz |
|
|
|
|
Temperature |
-30°C to 60°C |
|
range |
(-22°F to 140°F) |
|
|
|
|
Power |
1 x UM-3 (AA) 1.5V battery |
|
|
|
|
PRECAUTIONS
•Do not subject the unit to excessive force, shock, dust, temperature or humidity.
•Do not cover the ventilation holes with any items such as newspapers, curtains etc.
•Do not immerse the unit in water. If you spill liquid over it, dry it immediately with a soft, lint-free cloth.
•Do not clean the unit with abrasive or corrosive materials.
•Do not tamper with the unit’s internal components. This invalidates the warranty.
•Only use fresh batteries. Do not mix new and old batteries.
•Images shown in this manual may differ from the actual display.
•When disposing of this product, ensure it is collected separately for special treatment and not as normal household waste.
•Placement of this product on certain types of wood may result in damage to its finish for which Oregon Scientific will not be responsible. Consult the furniture manufacturer's care instructions for information.
•The contents of this manual may not be reproduced without the permission of the manufacturer.
•Do not dispose old batteries as unsorted municipal waste. Collection of such waste separately for special treatment is necessary.
•Please note that some units are equipped with a battery safety strip. Remove the strip from the battery compartment before first use.
NOTE The technical specifications for this product and the contents of the user manual are subject to change without notice.
NOTE Features and accessories will not be available in all countries. For more information, please contact your local
9 retailer.
EN
EN
ABOUT OREGON SCIENTIFIC
Visit our website (www.oregonscientific.com) to learn more about Oregon Scientific products.
If you're in the US and would like to contact our Customer Caredepartmentdirectly,pleasevisit:www2.oregonscientific. com/service/support.asp
For international inquiries, please visit: www2.oregonscientific.com/about/international.asp
EU DECLARATION OF CONFORMITY
Hereby, Oregon Scientific, declares that this Rainbow Clock with 8 Soothing Sounds and FM Radio (Model: RRM902 / RRM902U / RRM902A) is in compliance with the essential requirements and other relevant provisions of Directive 1999/5/EC. A copy of the signed and dated Declaration of Conformity is available on request via our Oregon Scientific Customer Service.
COUNTRIES RTTE APPROVAL COMPLIED
All EU countries,Switzerland CH andNorway N
FCC STATEMENT
This device complies with Part 15 of the FCC Rules. Operation is subject to the following two conditions: (1) This device may not cause harmful interference, and (2) This device must accept any interference received, including interference that may cause undesired operation.
WARNING Changes or modifications not expressly approved by the party responsible for compliance could void the user's authority to operate the equipment.
NOTE This equipment has been tested and found to comply with the limits for a Class B digital device, pursuant to Part 15 of the FCC Rules. These limits are designed to provide reasonable protection against harmful interference in a residential installation.
This equipment generates, uses and can radiate radio frequency energy and, if not installed and used in accordance with the instructions, may cause harmful interference to radio communications. However, there is no guarantee that interference will not occur in a particular installation. If this equipment does cause harmful interference to radio or television reception, which can be determined by turning the equipment off and on, the user is encouraged to try to correct the interference by one or more of the following measures:
•Reorient or relocate the receiving antenna.
•Increase the separation between the equipment and receiver.
10

•Connect the equipment into an outlet on a circuit different from that to which the receiver is connected.
•Consult the dealer or an experienced radio / TV technician for help.
DECLARATION OF CONFORMITY
The following information is not to be used as contact for support or sales. Please visit our website at www2. oregonscientific.com/service for all enquiries.
We |
|
Name: |
Oregon Scientific, Inc. |
Address: |
19861 SW 95th Ave.,Tualatin, |
|
Oregon 97062 USA |
Telephone No.: |
1-800-853-8883 |
declare that the product |
|
Product No.: |
RRM902 / RRM902U / RRM902A |
Product Name: |
Rainbow Clock with 8 Soothing |
|
Sounds and FM Radio |
Manufacturer: |
IDT Technology Limited |
Address: |
Block C, 9/F, Kaiser Estate, |
|
Phase 1, 41 Man Yue St., |
Hung Hom, Kowloon,
Hong Kong
is in conformity with Part 15 of the FCC Rules. Operation is subject to the following two conditions: 1) This device may
not cause harmful interference. 2) This device must accept any interference received, including interference that may cause undesired operation.
EN
11

Reloj arco iris con 8 sonidos calmantes y radio FM
Modelo: RRM902 / RRM902U /
RRM902A
MANUAL DE USUARIO |
|
ÍNDICE |
|
Resumen ........................................................................ |
2 |
Vista frontal .............................................................. |
2 |
Vista trasera............................................................. |
2 |
Vista inferior ............................................................. |
3 |
Sensor remoto ......................................................... |
3 |
Cómo empezar .............................................................. |
4 |
Suministro de corriente ............................................ |
4 |
Sensor remoto............................................................... |
4 |
Transmisión de datos del sensor ............................. |
5 |
Reloj ............................................................................... |
5 |
Recepción del reloj .................................................. |
5 |
Ajuste manual del reloj............................................. |
6 |
Opciones de audio ........................................................ |
6 |
Sonidos calmantes................................................... |
6 |
Radio........................................................................ |
6 |
Música del dispositivo de audio externo .................. |
7 |
Control del volumen ................................................. |
7 |
Alarma ............................................................................ |
7 |
Juego de colores........................................................... |
8 |
Temporizador de desconexión .................................... |
8 |
Temperatura................................................................... |
9 |
Iluminación de la pantalla ............................................ |
9 |
Reinicio .......................................................................... |
9 |
Ficha técnica ................................................................. |
9 |
Precaución..................................................................... |
9 |
Sobre Oregon Scientific............................................. |
10 |
EU – Declaración de conformidad............................. |
10 |
ES
1
ES
RESUMEN
VISTA FRONTAL
|
1 |
|
|
|
|
2 |
|
|
|
|
3 |
|
|
|
|
4 |
|
|
9 |
|
5 |
|
|
10 |
|
6 |
|
|
11 |
|
7 |
|
|
|
|
|
|
12 |
|
|
|
|
|
|
|
8 |
|
|
|
1. |
SNOOZE · SOUND: activar función de repetición |
|||
|
de alarma; activar / desactivar sonido calmante; |
|||
|
seleccionar sonido calmante |
|
||
2. |
|
: indicador de recepción de la señal del reloj |
|
|
3. |
ZONE: configuración de husos horarios |
|
||
4. |
|
|
: dispositivo de audio externo correctamente |
|
|
|
|||
|
conectado |
|
||
5. |
|
|
: la radio está encendida |
|
6. |
|
|
: sonido calmante activado |
|
7. |
|
|
: emisora de radio seleccionada (el usuario |
|
|
|
|||
|
|
|||
|
|
|||
|
puede configurar hasta 8 emisoras); sonido calmante |
|||
seleccionado como opción de alarma
2
8.Se muestra el nombre del sonido calmante
9.OFF Zz: función de repetición de alarma activada (ZZ) /
(OFF ZZ)
: indicador de recepción del sensor
:indica que la alarma diaria está activada
12.VOL: se muestra el volumen
VISTA
1 |
8 |
|
2 |
||
9 |
||
3 |
||
|
||
4 |
10 |
|
5 |
11 |
|
6 |
12 |
|
7 |
13 |
14
: activar / desactivar función de alarma; configurar alarma; ver estado de la alarma (si la radio está encendida)
: alternar entre emisoras (cuando la radio está

encendida); guardar frecuencia de radio
3. : encender / apagar la radio
4.TUNE +/-: búsqueda automática / ajustar frecuencia de radio
5.°C / °F: unidades de temperatura que puede elegir el usuario
6.ATENUADOR: seleccionar luminosidad de la pantalla
7.COLOUR (OFF·PROGRAM·LOOP): activar / desactivar espectáculo de luz que cambia de color; seleccionar espectáculo de luz preprogramado (específico del sonido) o efecto arco iris
8. : configurar el reloj
9.ZZ: activar temporizador de desconexión; configurar ajustes del temporizador (120, 90, 60, 30, 15, 0 minutos)
10.  VOL+ /
  VOL-: incrementar / reducir valor del ajuste; incrementar / reducir volumen
11.RESET: la unidad vuelve a los ajustes predeterminados
12.SEARCH: iniciar búsqueda de sensor
13.PAUSA: selecciona iluminación de un color específico; reiniciar efecto de cambio de color
14.Toma de entrada de audio
ES
VISTA INFERIOR
1
2
1.Compartimento para las pilas
2.Adaptador de corriente
SENSOR REMOTO
2
1
4
3
 5
5
1.Indicador LED de estado
2.Orificio para montaje en pared
3.Compartimento para las pilas
4.Orificio de REINICIO: la unidad vuelve a los ajustes predeterminados
5.Interruptor CHANNEL: seleccionar canal 1
3
ES
CÓMO EMPEZAR
SUMINISTRO DE CORRIENTE
1 pila CR2032 para almacenar la memoria Para introducir la pila:
1.Retire la cubierta del compartimento para pilas.
2.Introduzca la pila haciendo coincidir la polaridad.
3.Pulse RESET cada vez que cambie la pila.
UBICACIÓN |
SIGNIFICADO |
|
|
|
|
Área de reloj |
Las pilas de la unidad |
|
principal están casi gastadas |
||
|
||
|
|
|
Área de temperatura |
Sensor de pilas agotadas |
|
exterior |
||
|
||
|
|
|
Adaptador |
|
|
El adaptador alimenta la |
unidad. Conecte el adaptador |
a la toma asegurándose de que el adaptador no tenga obstáculos y de que sea accesible para la unidad.
Para desconectar completamente la entrada de energía, desconecte el adaptador de la unidad principal.
NOTA La unidad principal y el adaptador no deberían estar en entornos húmedos. No coloque ningún objeto lleno de líquido (como por ejemplo un jarrón) encima de la unidad principal ni del adaptador.
SENSOR REMOTO
Cómo configurar el sensor remoto:
1.Abra el compartimento para pilas.
2.Deslice el interruptor para seleccionar el canal 1.
3.Introduzca la pila haciendo coincidir la polaridad.
4.Pulse RESET cada vez que cambie la pila.
5.Cierre el compartimento para pilas.
6.Pulse SEARCH en la unidad principal y manténgalo pulsado para iniciar la búsqueda y empezar a recibir datos de hora y temperatura del sensor.
7.Coloque el sensor en un radio de 30 m (98 pies) de la unidad principal usando el montaje de pared o el soporte para la mesa.
CONSEJO El alcance de la transmisión puede variar debido a muchos factores. Es posible que tenga que probar varias ubicaciones para obtener los mejores resultados.
NOTA Use pilas alcalinas con este aparato para que funcione durante más tiempo, use pilas de litio con temperaturas bajo cero.
4

TRANSMISIÓN DE DATOS DEL SENSOR
Sensor exterior:
El icono de recepción del Área del sensor remoto muestra el estado:
ICONO |
DESCRIPCIÓN |
||||||||
|
|
|
|
|
|
|
|
|
|
|
|
|
|
|
|
|
|
|
La unidad principal está |
|
|
|
|
|
|
|
|
|
|
|
|
|
|
|
|
|
|
|
buscando sensor(es) |
|
|
|
|
|
|
|
|
|
|
|
|
|
|
|
|
|
|
|
Se ha encontrado un |
|
|
|
|
|
|
|
|
|
|
|
|
|
|
|
|
|
|
|
canal |
|
|
|
|
|
|
|
|
|
|
|
|
|
|
|
|
|
|
|
No se encuentra el |
|
|
|
|
|
|
|
|
|
sensor |
|
|
|
|
|
|
|
|
|
|
NOTA Si no ha encontrado el sensor, compruebe las pilas, obstrucciones y la localización de la unidad. Pulse SEARCH y manténgalo pulsado para forzar otra búsqueda de sensor.
Cómo conseguir los mejores resultados:
• Coloque el sensor en un lugar en el que no esté expuesto a la luz directa del sol ni a la humedad.
• Coloque el sensor de tal modo que quede de cara a la unidad principal, minimizando obstrucciones como puertas, paredes y muebles.
• Coloque el sensor en un lugar al aire libre, alejado de objetos metálicos o electrónicos.
• Coloque el sensor cerca de la unidad central durante los fríos meses del invierno, ya que las temperaturas bajo cero podrían afectar el rendimiento de las pilas y la
transmisión de la señal.
5
CONSEJO Los lugares idóneos para colocar un sensor son exteriores del hogar, a una altura no superior a 1,5 m (5 pies) y en un lugar en que no esté expuesto a la luz directa del sol ni a humedad excesiva para que nada influya en la lectura.
RELOJ
RECEPCIÓN DEL RELOJ
Este producto ha sido diseñado para sincronizar automáticamente su reloj con una señal de reloj.
RRM902: UE: señal DCF-77: a 1 500 km (932 millas) de Frankfurt, Alemania.
RRM902U: Reino Unido: señal MSF-60: a 1 500 km (932 millas) de Anthorn, Inglaterra.
RRM902A: EEUU: Señal WWVB-60: a 3 200 km (2 000 millas) de Fort Collins, Colorado.
Para activar / desactivar la recepción de señal del reloj:
Pulse VOL+ y manténgalo pulsado para activar o
VOL- desactivar la recepción de señal del reloj.
NOTA La recepción tarda entre 2 y 10 minutos. Si la señal de radio es débil, puede tardarse hasta 24 horas en conseguir una señal válida.
ES
ES
Si no se encuentra señal, coloque la unidad cerca de una
ventana, pulse VOL+ y manténgalo pulsado para forzar una búsqueda de señal.
Recepción del indicador de la señal del reloj:
SEÑAL FUERTE |
SEÑAL DÉBIL / SIN SEÑAL |
|
|
|
|
0 para hora del Pacífico |
+1 para hora de de Montaña |
+2 para hora Central |
+3 para hora del Este |
OPCIONES DE AUDIO
SONIDOS CALMANTES
Para activar o desactivar los sonidos calmantes:
•Pulse SNOOZE·SOUND y manténgalo pulsado durante 2 segundos.
AJUSTE MANUAL DEL RELOJ
Para configurar manualmente el reloj, primero deberá desactivar la señal de recepción del reloj.
1. |
Púlselo y manténgalo pulsado |
. |
|
2. |
Pulse |
VOL+ / |
VOL- para modificar la |
|
configuración. |
|
|
3. Pulse  para confirmar.
La secuencia de configuración es: zona horaria, formato de 12 ó 24 horas, hora, minuto.
RRM902 / RRM902U: La zona horaria ajusta el reloj a +/- 23 horas de la hora recibida por la señal del reloj. Si ha desactivado la recepción de señal del reloj, no ajuste un valor para la zona horaria.
NOTA Si introduce +1 en el ajuste de huso horario, le indicará su hora actual más una hora. Si está en los EEUU (RRM902A), configure el reloj tal y como se indica a continuación:
6
Para alternar entre sonidos calmantes:
•Pulse SNOOZE · SOUND repetidamente para seleccionar el
|
|
|
|
Se mostrará el nombre del sonido seleccionado |
. |
||
|
|
|
|
NOTA |
Esto apagará la radio automáticamente. |
|
|
RADIO
Para desactivar la radio:
•para encender/apagar la radio.
Cuando la radio |
encendida se mostrarán la emisora de |
|
seleccionada |
|
con la frecuencia correspondiente |
|
||
|
||
. |
|
|
NOTA Esto apagará el sonido calmante automáticamente.
Para guardar |
emisora de radio: |
|
1. |
Pulse |
para encender la radio. |
2. |
Pulse |
repetidamente para navegar al canal en que |
desee guardar la emisora (1-8).
3.Pulse TUNE+ / TUNE- y manténgalo pulsado para hacer una búsqueda automática o pulse TUNE+ /
TUNE- para seleccionar una frecuencia manualmente. Desaparecerá el número de la emisora .
4. En cuanto haya encontrado la frecuencia deseada,
pulse |
y manténgalo |
guardar. El |
número de la emisora (por ej |
) indica dónde se |
|
ha guardado. |
|
|
5. Repita los pasos 2 - 4 para cada canal.
Para su comodidad, el volumen y la frecuencia de radio se almacenarán en la memoria y la unidad los recordará para la próxima vez que se encienda la radio.
Para ver la pantalla de la alarma (cuando la radio está encendida):
• Pulse .
ES
MÚSICA DEL DISPOSITIVO DE AUDIO EXTERNO
Conecte un extremo de un cable a su dispositivo de almacenamiento de música y el otro en la toma de entrada
de audio ( 
 ) situada en la parte trasera de la unidad.
Cuando el cable esté conectado correctamente, la pantalla LCD mostrará 
 y los altavoces emitirán sonido.
NOTA
•Para reproducir música de un dispositivo de audio externo, asegúrese de que el sonido calmante y la radio estén desactivados.
•Si conecta o desconecta el dispositivo de audio externo, la alarma se desactivará.
CONTROL DEL VOLUMEN
• Pulse |
VOL+ o |
VOL-. |
ALARMA
Cómo configurar la alarma:
1. |
Pulse |
y manténgalo pulsado. |
|
2. |
Pulse |
VOL+ o |
VOL- para modificar los |
|
ajustes |
|
|
3. |
Pulse |
para confirmar. |
|
7

ES
La secuencia de configuración es: hora, minuto, opción de
alarma (  sonido calmante / pitido o
  radio), tipo de sonido (1-8: sonido calmante, 9: pitido) o emisora de radio, volumen (en el caso del pitido, no se puede modificar).
Para activar / desactivar la alarma:
1.Pulse  para mostrar la hora de la alarma.
2.Pulse  de nuevo para encender/apagar la alarma.
 indica que la alarma está activada.
Para silenciar la alarma:
•Pulse SNOOZE · SOUND para silenciarla durante 8 minutos
O bien
•Pulse cualquier botón (excepto DIMMER) para silenciar la alarma y que se active de nuevo pasadas 24 horas.
JUEGO DE COLORES
Para activar el espectáculo de luz (continuo):
•Deslice el interruptor COLOR a LOOP.
Para detener el espectáculo de luz en algún color en concreto:
•Pulse PAUSE cuando llegue al color determinado.
Pulse PAUSE de nuevo para reiniciar el espectáculo
continuo.
8
Cada sonido calmante está programado con un espectáculo de luz que cambia de color que combina con la música, mejora el ambiente y añade un toque decorativo a cualquier habitación.
Para iniciar el espectáculo de luces programado:
•Deslice el interruptor COLOR a PROGRAM.
Para desactivar el espectáculo de luz:
•Deslice el interruptor COLOR a OFF.
TEMPORIZADOR DE DESCONEXIÓN
Para activar el temporizador de desconexión del audio:
•Pulse SLEEP para activar el temporizador de desconexión.
Zz indica que el temporizador de desconexión está activado.
NOTA
•Si cuando se pulsa SLEEP no hay ningún sonido calmante activado ni la radio está encendida, la unidad pondrá en marcha automáticamente el último tipo de audio reproducido.
•Si cuando se pulsa SLEEP está sonando algún sonido calmante o la radio está encendida, la unidad empezará la cuenta atrás del temporizador de desconexión y continuará reproduciendo el audio.
Para seleccionar la duración:
•Pulse SLEEP repetidamente.
Para ver el tiempo restante:
•Pulse SLEEP.
NOTA SI el dispositivo de audio externo se conecta mientras el temporizador de desconexión está activado (y no se está reproduciendo ninguna emisora de radio o sonido relajante), aparecerá OFFZZ brevemente en pantalla para indicar que la función de desconexión está desactivada temporalmente.
TEMPERATURA
Para alternar unidad de temperatura:
•Pulse °C / °F.
ILUMINACIÓN DE LA PANTALLA
Para regular la luminosidad:
•Pulse DIMMER.
ES
FICHA TÉCNICA
TIPO |
DESCRIPCIÓN |
|
|
|
|
Unidad principal |
|
|
|
|
|
L x A x A |
155 x 43 x 145 mm |
|
(6,1 x 1,7 x 5,7 pulgadas) |
||
|
||
|
|
|
Peso |
526 g (18,6 onzas) sin pila |
|
|
|
|
FM |
87,5 a 108 MHz |
|
|
|
|
|
Adaptador de 4,5 V y 1 pila |
|
Potencia |
CR2032 para almacenar la |
|
|
memoria |
|
|
|
|
Unità remota (THN132N) |
||
|
|
|
L x A x A |
92 x 60 x 20 mm |
|
(3,6 x 2,4 x 0,8 pulgadas) |
||
|
||
|
|
|
Peso |
62 g (2,2 onzas) |
|
|
|
|
Cobertura de |
30 m (98 pies) sin obstáculos |
|
transmisión |
||
|
||
|
|
|
Frecuencia de la señal |
433 MHz |
|
|
|
|
Rango de temperatura |
-30°C a 60°C |
|
(-22°F a 140°F) |
||
|
||
|
|
|
Potencia |
1 pila UM-3 (AA) de 1,5V |
|
|
|
|
REINICIO |
|
PRECAUCIÓN |
Pulse RESET para volver a la configuración |
|
• No exponga el producto a fuerza extrema, descargas, |
predeterminada. |
|
polvo, fluctuaciones de temperatura o humedad. |
|
• |
No cubra los orificios de ventilación con objetos como |
|
|
periódicos, cortinas, etc. |
|
• |
No sumerja el dispositivo en agua. Si se vertiera |
9 |
|
líquido en la unidad, límpiela con un paño suave y sin |
|
|
ES
electricidad estática.
•No limpie la unidad con materiales abrasivos o corrosivos.
•No manipule los componentes internos. De hacerlo se invalidaría la garantía.
•Use siempre pilas nuevas. No mezcle pilas viejas con pilas nuevas.
•Las imágenes de esta guía para el usuario pueden ser distintas al producto en sí.
•Cuando elimine este producto, asegúrese de que no vaya a parar a la basura general, sino separadamente para recibir un tratamiento especial.
•La colocación de este producto encima de ciertos tipos de madera puede provocar daños a sus acabados. Oregon Scientific no se responsabilizará de dichos daños. Consulte las instrucciones de cuidado del fabricante para obtener más información.
•Los contenidos de este manual no pueden reproducirse sin permiso del fabricante.
•No elimine las pilas gastadas con la basura normal. Es necesario desecharlas separadamente para poder tratarlas.
•Tenga en cuenta que algunas unidades disponen de una cinta de seguridad para las pilas. Retire la cinta de compartimento para pilas antes de usarlo por primera vez.
NOTA La ficha técnica de este producto y los contenidos de este manual de usuario pueden experimentar cambios sin previo aviso.
NOTA No todas las funciones y accesorios estarán disponiblesentodoslospaíses. Sírvaseponerseencontacto con su distribuidor local si desea más información.
SOBRE OREGON SCIENTIFIC
Visite nuestra página web (www.oregonscientific.com) para conocer más sobre los productos de Oregon Scientific.
Si está en EE.UU y quiere contactar directamente con nuestro Departamento de Atención al Cliente, por favor visite www2.oregonscientific.com/service/support.asp
Si está en España y quiere contactar directamente con nuestro Departamento de Atención al Cliente, por favor visite www.oregonscientific.es o llame al 902 338 368.
Para consultas internacionales, por favor visite www2. oregonscientific.com/about/international.asp
EU – DECLARACIÓN DE CONFORMIDAD
Por medio de la presente Oregon Scientific declara que el Reloj arco iris con 8 sonidos calmantes y radio FM (modelo: RRM902 / RRM902U / RRM902A) cumple con los requisitos esenciales y cualesquiera otras disposiciones aplicables o exigibles de la Directiva 1999/5/CE. Tiene a su disposición una copia firmada y sellada de la Declaración de Conformidad, solicítela al Departamento de Atención al Cliente de Oregon Scientific.
PAÍSES BAJO LA DIRECTIVA RTTE
Todos los países de la UE, Suiza CH
y Noruega N
10

Regenbogenuhr mit 8 beruhigenden Klängen und UKW-Radio
Modell: RRM902 / RRM902U / RRM902A
BEDIENUNGSANLEITUNG |
|
INHALT |
|
Übersicht........................................................................ |
2 |
Vorderansicht ........................................................... |
2 |
Rückansicht ............................................................. |
2 |
Untere ansicht.......................................................... |
3 |
Funksendeeinheit..................................................... |
3 |
Erste Schritte................................................................. |
3 |
Stromversorgung ..................................................... |
3 |
Funksendeeinheit.......................................................... |
4 |
Datenübertragung .................................................... |
4 |
Funkuhr.......................................................................... |
5 |
Zeitsignalempfang.................................................... |
5 |
Die Uhr manuell einstellen ....................................... |
6 |
Audiooptionen............................................................... |
6 |
Beruhigende Klänge ................................................ |
6 |
Radio........................................................................ |
7 |
Musik von externem Audiogerät............................... |
7 |
Lautstärkeregelung .................................................. |
7 |
Alarm .............................................................................. |
8 |
Farbenspiel .................................................................... |
8 |
Einschlaftimer ............................................................... |
8 |
Temperatur..................................................................... |
9 |
Hintergrundbeleuchtung .............................................. |
9 |
Reset .............................................................................. |
9 |
Technische Daten.......................................................... |
9 |
Vorsichtsmaßnahmen................................................... |
9 |
Über Oregon Scientific............................................... |
10 |
EU-Konformitätserklärung ......................................... |
10 |
DE
1

DE
ÜBERSICHT
VORDERANSICHT
|
1 |
|
|
|
|
|
2 |
|
|
|
|
|
3 |
|
|
|
|
|
4 |
|
|
|
9 |
|
5 |
|
|
|
10 |
|
6 |
|
|
|
11 |
|
7 |
|
|
|
|
|
|
|
|
12 |
|
|
|
|
|
|
|
|
8 |
|
|
|
|
1. |
SNOOZE · SOUND: Schlummeralarm aktivieren; |
||||
|
beruhigenden Klang ein- / ausschalten; beruhigenden |
||||
|
Klang auswählen |
|
|||
2. |
|
|
: Indikator für Zeitsignalempfang |
|
|
3. |
ZONE: Zeitzonenausgleich |
|
|||
4. |
|
|
|
: Externes Audiogerät ist erfolgreich verbunden |
|
|
|
|
|||
5. |
|
|
|
: Radio ist aktiviert |
|
6. |
|
|
|
: Beruhigender Klang ist aktiviert |
|
7. |
|
|
|
: Radiosender ausgewählt (der Benutzer kann |
|
|
|
|
|||
|
|
|
|||
|
|
|
|||
|
bis zu 8 Sender einstellen); beruhigender Klang für |
||||
|
Alarmoption ausgewählt |
|
|||
8. |
Name des gewählten, beruhigenden Klanges wird |
||||
|
angezeigt |
2 |
|||
|
|
|
|
|
|
9. OFF Zz: Einschlaffunktion ist aktiviert (ZZ) / deaktiviert ZZ)
:Indikator für Zeitsignalempfang
:Täglicher Alarm ist aktiviert
12.VOL: Lautstärke wird angezeigt
1 |
8 |
|
2 |
||
9 |
||
3 |
||
|
||
4 |
10 |
|
5 |
11 |
|
6 |
12 |
|
7 |
13 |
14
: Alarmfunktion aktivieren / deaktivieren; Alarm einstellen; Alarmstatus anzeigen (bei aktiviertem
: Zwischen Sendernummer wechseln (bei Radio); Radiofrequenz speichern
: Radio ein- / ausschalten
4.TUNE +/-: autom. Suchlauf / Radiofrequenz einstellen
5.°C / °F: vom Benutzer auswählbare Temperatureinheiten
6.DIMMER: Anzeigehelligkeit auswählen
7.COLOUR (OFF·PROGRAM·LOOP): Farbwechselnde Lichtshow aktivieren / deaktivieren; vorprogrammierte
(klangspezifische) Lichtshow oder Regenbogenauswählen
:Uhr einstellen
9.ZZ: Einschlaftimer aktivieren; Timereinstellungen anpassen (120, 90, 60, 30, 15, 0)
10.VOL+ / VOL-: Einstellungwert erhöhen / verringern; Lautstärke erhöhen / verringern
11.RESET: Gerät auf Standardeinstellungen zurücksetzen
12.SEARCH: Suche nach Sendeeinheit veranlassen
13.PAUSE: Spezifische Farbbeleuchtung auswählen; farbwechselnden Effekt neustarten
14.Buchse für Audioeingang
1
2
1. Batteriefach
2. Anschluss für Netzadapter
DE
FUNKSENDEEINHEIT
2
1
4
3
 5
5
1.LED-Statusanzeige
2.Öffnung für Wandmontage
3.Batteriefach
4.RESET-Öffnung: Gerät auf Standardeinstellungen
Zurücksetzen
5.CHANNEL-Schalter: Kanal 1 auswählen
ERSTE SCHRITTE
STROMVERSORGUNG
1 x Batterie CR2032 für Speichersicherung So legen Sie die Batterie ein:
1.Entfernen Sie die Abdeckung des Batteriefachs.
2.Legen Sie die Batterie ein und achten Sie auf die Übereinstimmung der Polaritäten.
3.Drücken Sie nach jedem Batteriewechsel auf RESET.
3

DE
STELLE |
BEDEUTUNG |
|
|
|
|
Uhr-Bereich |
Batterien der Basiseinheit |
|
sind schwach |
||
|
||
|
|
|
Außentemperatur- |
Batterie der |
|
Funksendeeinheit ist |
||
Bereich |
||
schwach |
||
|
||
|
|
|
Netzadapter |
|
4.Nach jedem Batteriewechsel auf RESET drücken.
5.Schließen Sie das Batteriefach.
6.Halten Sie SEARCH auf der Basiseinheit gedrückt, um die Signalsuche zu veranlassen und mit dem Empfang der Zeitund Temperaturdaten von der Sendeeinheit zu beginnen.
7.Platzieren Sie die Funksendeeinheit mit dem Tischaufsteller oder der Wandaufhängung innerhalb von 30 m von der Basiseinheit.
Der Netzadapter versorgt das Gerät mit Strom. Stecken
Sie den Netzadapter in die Anschlussbuchse und stellen
Sie sicher, dass der Netzadapter nicht blockiert und für das
Gerät leicht zugänglich ist.
Um das Gerät vollständig vom Netzstrom zu trennen, sollte der Adapter von der Basiseinheit entfernt werden.
|
HINWEIS |
Die Basiseinheit und der Netzadapter dürfen |
|
|
|
|
|
|
|
|
|
|
TIPP |
Die Übertragungsreichweite |
kann |
von |
mehreren |
||||
keinen feuchten Bedingungen ausgesetzt werden. Es dürfen |
|
|||||||||
|
Faktoren abhängen. |
Sie müssen |
eventuell |
mehrere |
||||||
keine mit Flüssigkeit gefüllte Objekte, wie Blumenvasen, auf |
|
|||||||||
|
Standorte testen, um optimale Ergebnisse zu erzielen. |
|||||||||
Basiseinheit oder Netzadapter gestellt werden. |
|
|||||||||
|
|
|
|
|
|
|
|
|||
|
|
|
|
|
||||||
|
|
|
|
HINWEIS |
Verwenden Sie Alkaline-Batterien für längere |
|||||
|
|
|
|
Betriebsdauer sowie |
Lithium-Batterien für |
Gebrauch bei |
||||
FUNKSENDEEINHEIT |
|
|||||||||
|
Temperaturen unter dem Gefrierpunkt. |
|
|
|
||||||
So richten Sie die Funksendeeinheit ein: |
|
|
|
|
||||||
|
|
|
|
|
|
|
|
|||
|
1. Öffnen Sie das Batteriefach. |
|
|
|
|
|
|
|
|
|
|
2. Verschieben Sie den Channel-Schalter und wählen Sie |
|
DATENÜBERTRAGUNG |
|
|
|
||||
|
Kanal 1. |
|
Funksendeeinheit: |
|
|
|
|
|||
|
3. Legen |
Sie die Batterie ein und achten Sie auf die |
|
Das Empfangssymbol auf dem Uhrendisplay zeigt den |
||||||
|
Übereinstimmung der Polaritäten. |
4 |
Status an: |
|
|
|
|
|||
|
|
|
|
|
|
|
|
|
|
|
 Loading...