


Wireless Rain Gauge with Indoor / Outdoor Thermometer Model: RGR126
USER MANUAL

Wireless Rain Gauge
with Indoor / Outdoor Thermometer Model: RGR126
User Manual
CONTENTS |
|
|
Introduction............................................................... |
2 |
|
Product Overview ..................................................... |
2 |
|
Front View .............................................................. |
2 |
|
Back View............................................................... |
3 |
|
LCD Display ........................................................... |
3 |
|
Rain Gauge ............................................................ |
4 |
|
Remote Thermo Sensor......................................... |
4 |
|
Getting Started.......................................................... |
5 |
|
Main Unit ................................................................ |
5 |
|
Rain Gauge ............................................................ |
5 |
|
Thermo Sensor ...................................................... |
6 |
|
Data Transmission ................................................. |
7 |
|
Low Battery Warning................................................ |
8 |
|
Clock / Calendar Setting .......................................... |
8 |
|
Set Clock and Calendar ......................................... |
8 |
|
Rainfall....................................................................... |
8 |
|
Rainfall History ....................................................... |
8 |
|
Total Rainfall........................................................... |
9 |
|
|
|
EN
Rainfall Alarm ......................................................... |
9 |
Temperature .............................................................. |
9 |
Reset.......................................................................... |
9 |
Precautions ............................................................... |
9 |
Technical Specifications........................................ |
11 |
About Oregon Scientific ........................................ |
11 |
EU-Declaration of Conformity ............................... |
12 |
FCC Statement........................................................ |
12 |
Declaration of Conformity..................................... |
3 |

EN
INTRODUCTION
Congratulations on purchasing the Oregon ScientificTM
Wireless Rain Gauge with Indoor / Outdoor Thermometer (RGR 26).
PRODUCT OVERVIEW
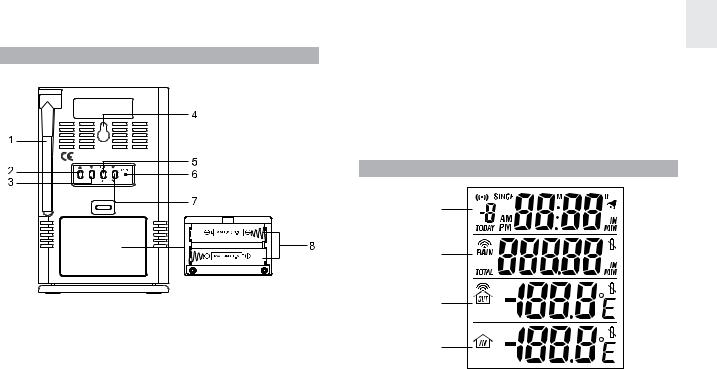
FRONT VIEW
1
22 |
5 |
33 |
6 |
44 |
7 |
|
8 |
. FOUR-LINE LCD DISPLAY: For displaying the total rainfall, current rainfall or rainfall history, indoor / outdoor temperature and clock / calendar
2.SEARCH: Press and hold to enforce a search for the rain gauge and remote thermo sensor
3.in-mm:Selects between inch and millimeter rainfall measurement
4.((.)): Displays the rain alarm setting; press and hold to enter the rain alarm setting mode
5.SINCE: Toggles between displaying the start day or start year for total rainfall; press and hold to clear the previous rainfall start time and reset the rainfall counter to start again
6.HISTORY: Toggles between rainfall history and daily rainfall
7. : Enables or disables the rainfall alarm
8.Removable table stand: For securing the main unit on a flat surface
2

BACK VIEW
. ANTENNA: Receives radio signal from rain gauge and remote thermo sensor
2. : Increases setting values; press and hold for rapid increase
3. : Decreases setting values; press and hold for rapid decrease
4.Wall mount hole
5.TIME / SET: Toggles among the time, day, year and rainfall display; press and hold to enter the time setting mode
6.RESET: Returns all settings to their default values
EN
7.°C / °F button: Selects between °C and °F
8.Battery compartment
LCD DISPLAY
|
2 |
3 |
4 |
. Today’s Rainfall, Rainfall History, Rainfall Alarm, Start Date of Total Rainfall Record, Time / Date
2.Rain Gauge RF Reception Status, Total Rainfall
3.Thermo RF Reception Status, Outdoor Temp
4.Indoor Temp
3

EN
RAIN GAUGE
Base and funnel:
1
. Rain gauge
2.Battery compartment
3.RESET button
1 
2
. Funnel
2.Indicator
2
 3
3
REMOTE THERMO SENSOR
. LED
1
. Wall mount hole 1 2. RESET hole
3. CHANNEL switch ( -3)
2 |
|
|
|
|
|
|
|
|
|
|
|
4. Battery |
|
|
|
|
|
|
|
|
|
|
|
compartment |
|
3 |
|
|
|
|
|
|
|
|
|
|
|
|
|
|
|
|
|
|
|
|
|
|
|
|
|
4 |
|
|
|
|
|
|
|
|
|
|
|
|
|
|
|
|
|
|
|
|
|
|
|
|
|
|
|
|
|
|
|
|
|
|
|
|
|
|
|
|
|
|
|
|
|
|
|
|
|
||
|
|
|
|
|
|
|
|
|
|
|
||
|
|
|
|
|
|
|
|
|
|
|
|
4

GETTING STARTED
Position the main unit, rain gauge, and thermo sensor within effective range:
•Rain gauge - 00 meters / 328 feet
•Thermo sensor - 00 meters / 328 feet
IMPORTANT It is recommended that you follow the sequence below when setting up the units:
. Set up the main unit.
2.Set up the rain gauge, then press and hold SEARCH on the main unit and wait until you receive a signal.
3.Set up the thermo sensor, then press and hold SEARCH on the main unit and wait until you receive a signal.
4.In the event that you do not obtain a signal from a remote unit please repeat the process above.
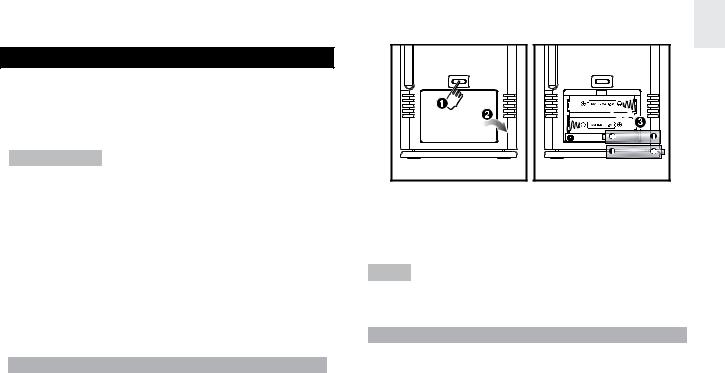
MAIN UNIT
. Insert the batteries, matching the polarity (+ and -) as shown in the battery compartment.
1 |
2 |
3 |
5
EN
2.Press RESET, or press and hold SEARCH on the main unit to initiate operation. The reception icon on the main unit will blink while it is searching for the sensor or rainfall gauge.
NOTE Every time the battery in the main unit is changed, repeat installation before use.
RAIN GAUGE
The rain gauge collects rain and takes readings of rainfall rate and the total rainfall over a period of time. The sensor can remotely transmit data to the base station.
The base station and rain gauge should be positioned within an effective range: about 00 meters (328 feet) in an open area.
The rain gauge should be mounted horizontally about meter (3 feet) from the ground in an open area away from trees or other obstructions to allow rain to fall naturally for an accurate reading.
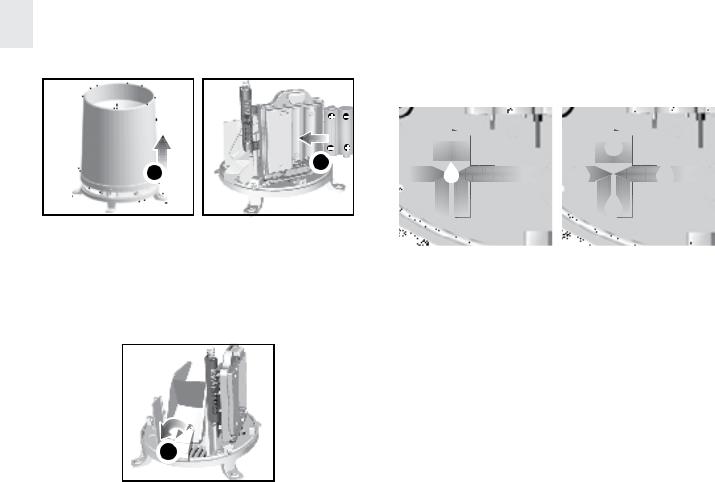
To set up the Rain Gauge:
2
1

EN
. Remove screws and slide the cover off in an upwards motion.
2.Insert the batteries (2 x UM-3 / AA), matching the polarities (+ / -). Press RESET after each battery change.
3. Remove the fibre tape.
To ensure a level plane:
Put a few drops of water on the cross at the base of the funnel to check the horizontal level.
Water will pool to the center of the cross when the rain gauge is level.
If water remains on -4, the gauge is not horizontal. If necessary, adjust the level using the screw.
NOTE For best results, ensure the base is horizontal to
allow maximum drainage of any collected rain.
THERMO SENSOR
. Insert the batteries, matching the polarity (+ and -) as shown in the battery compartment.
6

2.Set the channel switch to any channel. The switch is located in the battery compartment.
3.Press RESET on the sensor.
4.Close the remote sensor battery compartment.
5.Secure the sensor in the desired location using the wall mount or table stand.
For best results:
•Insert the batteries before you mount the sensor.
•Place the sensor out of direct sunlight and moisture.
•Do not place the sensor more than 00 meters (328 feet) from the main (indoor) unit.
•Position the sensor so that it faces the main (indoor) unit, minimizing obstructions such as doors, walls, and furniture.
•Place the sensor in a location with a clear view to the sky, away from metallic or electronic objects.
•Position the sensor close to the main unit during cold winter months as below-freezing temperatures
EN
may affect battery performance and signal transmission.
You may need to experiment with various locations to get the best results.
StandardAlkaline batteries contain significant amounts of water. Because of this they will freeze in low temperatures of approximately - 2°C ( 0°F). Disposable Lithium batteries have a much lower threshold for temperature with an estimated freezing range of below -40°C (-40°F).
Wireless ranges can be impacted by a variety of factors such as extremely cold temperatures. Extreme cold may temporarily reduce the effective range between the sensor and the base station. If the unit’s performance fails due to low temperature, the unit will resume proper functioning as the temperature rises to within the normal temperature range (i.e. no permanent damage will occur to the unit due to low temperatures).
DATA TRANSMISSION
Data is sent from the remote thermo sensor approx. every 78 seconds and every 94 seconds from the rain gauge. The reception icon shows the status - see table.
7

EN
THERMO SENSOR |
RAIN GAUGE |
DESCRIPTION |
Searching
Connected
Disconnected
If without obvious reason the main unit display shows that the thermo sensor or rainfall connector is disconnected, press and hold SEARCH to enforce an immediate search.
If that fails, check:
•The remote rain gauge and thermo sensor are still in place.
•The batteries of the main unit, rain gauge, and thermo sensor are still good. Replace them if necessary.
•The transmission is within range and path is clear of obstacles and interference. Shorten the distance if necessary. Then press and hold SEARCH again.
LOW BATTERY WARNING
There are 3 low-battery indicators - see table.
UNIT |
LOCATION ON MAIN UNIT DISPLAY |
|
|
Main |
Indoor Temperature Area |
|
|
Remote Thermo |
Outdoor Temperature Area |
Sensor |
|
Rain Gauge |
Total Rainfall Area |
Replace the batteries immediately when the respective indicator lights up.
CLOCK / CALENDAR SETTING
Press TIME / SET to toggle among today’s rainfall, time, date, and year.
SET CLOCK AND CALENDAR
. Press TIME / SET to display the clock or calendar.
2.Press and hold TIME / SET for two seconds.
3.Use  or
or  to set the desired value.
4.Press TIME / SET to confirm.
5.Repeat steps 3 and 4 to complete all settings.
6.The order of the settings is hour, minute, year, month and day.
RAINFALL
Today’s rainfall appears on the st line of the display and total rainfall is shown on the 2nd line. Press in / mm to toggle between inches and millimeters as the unit of measurement.
RAINFALL HISTORY
The rainfall history is displayed on the st line of the LCD display. The main unit can record up to 9 days of rainfall.
8

Use HISTORY to display the record for a particular day. The day of the record will be displayed with a minus (-) sign.
Caution: Other sensors using the 433 MHz transmission frequency may influence the rainfall reading. Please avoid placing those sensors too close to the unit.
TOTAL RAINFALL
The total rainfall is displayed on the 2nd line of the LCD display.
To display the commencing date of the total rainfall record, press SINCE. The date will appear on the st line of the display. Press again to show the commencing year.
To clear the existing commencing date and reset it to start again, press and hold SINCE. The total rainfall will now be equal to the today rainfall and the unit will start again to collect the rainfall data.
RAINFALL ALARM
The rain alarm value can be displayed at any time by pressing (( • )).
To set the rainfall alarm:
. Press and hold (( • )) for two seconds.
2.Use  or
or  to set the desired value.
3.Press (( • )) to confirm. The alarm will be activated.
The rain alarm indicator will light up.
EN
The alarm will go off for one minute when the rainfall reaches the preset value and the rain alarm indicator will flash.Areminder beep will be emitted every minute. Once the rain alarm is on the indicator will not stop flashing unless is pressed or the rain alarm value is changed. To stop the alarm and reminder beep, press any button or change the rainfall alarm value.
To deactivate the alarm, press .
.
TEMPERATURE
The outdoor temperature is displayed on the 3rd line of the LCD display. Use the °C / °F button to select between Centigrade and Fahrenheit display units.
The indoor temperature is displayed on the 4th line of the LCD display. Use the °C / °F button to select between Centigrade and Fahrenheit display units.
RESET
This button should only be used when the unit is operating in an unfavorable way. Use a blunt stylus to hold down the button. All settings will return to their default values.
PRECAUTIONS
This product is engineered to give you years of satisfactory service if you handle it carefully. Here are a few precautions:
9
EN
•Placement of this product on wood surfaces with certain types of finishes, such as clear varnish, may result in damage to the finish. Consult the furniture manufacturer’s care instructions for direction as to the types of objects that may safely be placed on the wood surface. Oregon Scientific shall not be responsible for any damage to wood surfaces from contact with this product.
•Do not immerse the unit in water.
•Do not clean the unit with abrasive or corrosive materials. They may scratch the plastic parts and corrode the electronic circuit.
•Do not subject the unit to excessive force, shock, dust, temperature or humidity, which may result in malfunction, shorter electronic life span, damaged battery and distorted parts.
•Do not tamper with the unit’s internal components. Doing so will invalidate the warranty on the unit and may cause unnecessary damage. The unit contains no user-serviceable parts.
•Only use fresh batteries as specified in the user’s manual. Do not mix new and old batteries as the old ones may leak.
•Oregon Scientific will not be held liable for any bodily injury, death, property damages, or any other claims of whatever nature resulting from the misuse or negligence of the product, whether intentional or unintentional.
0
•Oregon Scientific will not be responsible for any deviations in the usage of the device from those specified in the user instructions or any or repairs of the product.
•Placement of this product on wood surfaces with certain types of finishes, such as clear varnish, may result in damage to the finish. Consult the furniture manufacturer’s care instructions for direction as to the types of objects that may safely be placed on the wood surface. Oregon Scientific shall not be responsible for any damage to wood surfaces from contact with this product.
•Do not dispose this product as unsorted municipal waste. Collection of such waste separately for special treatment is necessary.
NOTE Features and accessories will not be available in all countries. For more information, please contact your local retailer.

TECHNICAL SPECIFICATIONS
TYPE |
DESCRIPTION |
Main Unit Dimensions |
|
L x W x H |
90 x 25 x 42 mm |
|
(3.54 x 0.98 x 5.59 inches) |
Weight (without battery) |
73 g (6. oz) |
Main unit |
|
Display rainfall range (total) |
0 - 25,400 |
|
(0 - 999.99 inch) |
Display rainfall range |
0 - 2,540 mm (0 - 99.99 inch) |
(history / daily) |
|
Rainfall resolution |
mm (0.04 inch) |
Operating range |
-5°C to +50°C |
|
(23°F to 22°F) |
Temperature resolution |
0. °C (0.2°F) |
Remote Rain Gauge (PCR122) |
|
Dimensions (L x W x H) |
4 x 4 x 45 mm |
|
(4.5 x 4.5 x 5.7 inches) |
Weight (without battery) |
24 g (8.5 oz) |
Operating range |
.0°C to 60.0°C |
|
(33.8°F to 40.0°F) |
Remote Thermo Sensor (THN122N) |
|
Dimensions (L x W x H) |
92 x 60 x 20 mm |
|
(3.6 x 2.4 x 0.79 inches) |
Weight (without battery) |
63 g (2.22 oz) |
Proposed operating range |
-30°C to 60°C |
|
(-22°F to 40°F) |
EN
Power
Main unit |
2 x UM-3 / AA .5V batteries |
Rain gauge |
2 x UM-3 / AA .5V batteries |
Remote thermo sensor |
2 x UM-4 / AAA .5V batteries |
General |
|
RF Transmission Frequency |
433 MHz |
RF Transmission Range |
Rain gauge - 00 meters |
(unobstructed) |
(328 feet ) |
|
Remote thermo sensor - 00 |
|
meters (300 feet) |
Temperature sensing cycle |
Around 78 seconds |
Rainfall sensing cycle |
Around 94 seconds |
NOTE It is recommended that you use alkaline batteries with this product for longer performance or lithium batteries in temperatures below freezing.
NOTE Design and specifications are subject to change without notice.
ABOUT OREGON SCIENTIFIC
Visit our website (www.oregonscientific.com) to learn more about Oregon Scientific products.
If you're in the US and would like to contact our Customer Care department directly, please visit: www2.oregonscientific.com/service/support.asp
For international inquiries, please visit: www2.oregonscientific.com/about/international.asp

EN
EU-DECLARATION OF CONFORMITY
Hereby, Oregon Scientific, declares that this Wireless
Rain Gauge with Indoor / Outdoor Thermometer (Model RGR 26) is in compliance with the essential requirements and other relevant provisions of Directive999/5/EC.
A copy of the signed and dated Declaration of Conformity is available on request via our Oregon Scientific Customer Service.
COUNTRIES RTTE APPROVAL COMPLIED
All EU countries, Switzerland CH and Norway N
2
FCC STATEMENT
This device complies with Part 5 of the FCC Rules.
Operation is subject to the following two conditions: ( ) This device may not cause harmful interference, and
(2) This device must accept any interference received, including interference that may cause undesired operation.
WARNING Changes or modifications not expressly approved by the party responsible for compliance could void the user’s authority to operate the equipment.
NOTE This equipment has been tested and found to comply with the limits for a Class B digital device, pursuant to Part 5 of the FCC Rules. These limits are designed to provide reasonable protection against harmful interference in a residential installation.
This equipment generates, uses and can radiate radio
frequency energy and, if not installed and used in accordance with the instructions, may cause harmful interference to radio communications. However, there is no guarantee that interference will not occur in a particular installation. If this equipment does cause harmful interference to radio or television reception, which can be determined by turning the equipment off and on, the user is encouraged to try to correct the interference by one or more of the following measures:
•Reorient or relocate the receiving antenna.

•Increase the separation between the equipment and receiver.
•Connect the equipment into an outlet on a circuit different from that to which the receiver is connected.
•Consult the dealer or an experienced radio / TV technician for help.
DECLARATION OF CONFORMITY
The following information is not to be used as contact for support or sales. Please visit our website at www2. oregonscientific.com/service for all enquiries.
We |
|
Name: |
Oregon Scientific, Inc. |
Address: |
986 SW 95th Ave.,Talatin, |
|
Oregon 97062 USA |
Telephone No.: |
-800-853-8883 |
declare that the product |
|
Product No.: |
RGR26 |
Product Name: |
Wireless Rain Gauge with |
|
Indoor / Outdoor Thermometer |
Manufacturer: |
IDT Technology Limited |
Address: |
Block C, 9/F, Kaiser Estate, |
|
Phase ,4 Man Yue St., |
|
Hung Hom, |
|
Kowloon, |
|
Hong Kong |
3
EN
is in conformity with Part 5 of the FCC Rules.Operation is subject to the following two conditions: ) This device may not cause harmful interference. 2) This device must accept any interference received, including interference that may cause undesired operation.

Pluviómetro inalámbrico con termómetro interior / exterior
Modelo: RGR126 Manual de usuario
CONTENIDOS |
|
Introducción ............................................................. |
2 |
Panorámica general del producto.......................... |
2 |
Vista frontal .......................................................... |
2 |
Vista trasera .......................................................... |
3 |
Pantalla LCD ......................................................... |
3 |
Pluviómetro ............................................................ |
4 |
Sensor térmico remoto.......................................... |
4 |
Para empezar ........................................................... |
5 |
Unidad principal ..................................................... |
5 |
Pluviómetro ........................................................... |
5 |
Sensor térmico ....................................................... |
7 |
Transmisión de datos ............................................ |
8 |
Aviso de pila gastada............................................... |
8 |
Configuración de reloj y calendario ...................... |
8 |
Ajuste de reloj y calendario .................................. |
8 |
Precipitación ............................................................. |
9 |
Historia de precipitación ........................................ |
9 |
Precipitación total ................................................. |
9 |
ES
Alarma de precipitación.......................................... |
9 |
Temperatura ............................................................ |
10 |
Reinicio .................................................................. |
10 |
Precaución ............................................................ |
10 |
Ficha técnica........................................................... |
11 |
Sobre Oregon Scientific......................................... |
12 |
EU - Declaración de Conformidad ........................ |
12 |

ES
INTRODUCCIÓN
Felicidades por haber adquirido el pluviómetro inalámbrico con termómetro interior / exterior de Oregon
ScientificTM (RGR126). El pluviómetro es compatible
con las siguientes funciones:
•Precipitación total y diaria
•Historia de precipitación de 9 días
•Alarma de precipitación
• Met de tee t intei / extei
• Cnfig cin de e j de h e y c endi
• C e t de tn iin de 328 ie (100
et )
RGR126 e 433MHz. N e nece it in t
cables.
PANORÁMICA GENERAL DEL PRODUCTO
VISTA FRONTAL
. PANTALLA LCD de CUATRO LÍNEAS: Para mostrar la precipitación total, actual o histórica, temperatura interior/exterior y reloj/calendario
2.BUSCAR: Púlselo y manténgalo pulsado para
f z n úqed de pluviómetro y el sensor térmico remoto
3.in - mm: Selecciona entre medición de precipitación en pulgadas o milímetros
4. ((.)): M et e j te de de i; apriételo y manténgalo pulsado para acceder al
d de c nfig cin de
5.Desde: Alterna entre mostrar el día o año de inicio
de eci it cin t t ; ú e nténg d para borrar la última hora de precipitación y reiniciar el contador
6. Histórico: Alterna entre historia de precipitación y precipitación diaria
7. : Activa o desactiva la alarma de precipitación
8.Soporte de mesa extraíble: Para colocar la unidad
inci en n eficie n
1
2 |
5 |
3 |
6 |
4 |
7 |
|
8 |
2

VISTA TRASERA
. Antena: Reci e eñ e de di de iet
y del sensor térmico remoto
2. |
: Inc e ent e de |
j |
te; |
nténg |
|
|
pulsado para incrementos rápidos |
|
|||
3. |
: Red ce e de |
j |
te; |
nténg |
|
|
pulsado para reducirlo rápidamente |
|
|||
4. |
Oifici |
nt je en |
ed |
|
|
5.TIME / SET: Alterna entre la pantalla de hora, día,
ñ y eci it ci n; e y nteng d
ccede d de cnfig ci n de tie
6. REINICIO: Todos los ajustes vuelven a los valores predeterminados
ES
7.°C / °F Botón: Selecciona entre grados °C y °F
8.Compartimento para las pilas: Funciona con dos
i 2 i UM-3 AA
PANTALLA LCD
|
2 |
3 |
4 |
. Precipitación de hoy, Historia de precipitación, Alarma de precipitación, Fecha de inicio de registro total de precipitación, Hora / fecha
2. t d de ece ci n RF de iet ,
Precipitación total
3. t d de ece ci n RF de en téic, temperatura exterior
4.Temperatura interior
3

ES
PLUVIÓMETRO |
|
SENSOR TéRMICO REMOTO |
Base y embudo:
. Indicador LED de estado
1
2
1
 3
3
1. Medid de i
2.Compartimento para las pilas
3.Botón de REINICIO
1
1 
2
3
2
4
. Embudo
2.Indicador
. O r i f i c i o p a r a m o n t a j e e n
|
pared |
2. |
O r i f i c i o d e |
|
REINICIO |
3. |
Nú e de c n |
|
(1-3) |
4.Compartimento para las pilas
4
PARA EMPEZAR
Coloque la unidad principal, pluviómetro y el sensor térmico en un alcance efectivo:
• P iet – 100 ie / 328 et
• Sen té ic – 100 ie / 328 et
IMPORTANTE Se recomienda seguir la secuencia que
ece c ntincin c nfig nid de:
. Ajuste de la unidad principal.
2.Coloque el pluviómetro, pulse BUSCAR en la unidad principal y manténgalo pulsado hasta recibir una señal.
3.Coloque el sensor térmico, pulse BUSCAR en la unidad principal y manténgalo pulsado hasta recibir una señal.
4.Si no consigue señal de la unidad remota, repita este proceso.
UNIDAD PRINCIPAL
1. Int d zc i hciend c incidi idd (+ y -) de i c n indiccine q e h y en el compartimento de pilas.
ES
2.A continuación, pulse REINICIO o pulse BUSCAR y manténgalo pulsado en la unidad principal para iniciar la operación. El icono de recepción de la unidad principal parpadeará mientras busca el sensor o el medidor de lluvia.
NOTA C d ez q e e c i i de nidd principal, repita la instalación antes de usar el producto.
PLUVIÓMETRO
El medidor de lluvia recoge lecturas de una precipitación y eci it cin t t g de n z de tie.
El sensor puede transmitir datos remotamente a la unidad principal.
La unidad principal y el medidor de lluvia deberían estar |
|||||
en n cnce efecti : h |
t 100 et |
(328 ie) en |
|||
un espacio abierto. |
|
|
|
||
El |
medidor de lluvia |
debería estar montado |
|||
h |
iznt |
ente 1 et |
(3 ie) |
enci |
de |
|
suelo en un espacio abierto, alejado de árboles u |
|
otras obstrucciones para permitir que la lluvia caiga |
5 |
naturalmente y la lectura sea correcta. |
|
ES
Para ajustar la función de medición de lluvia:
2
1
1. Reti e t ni y de ice cie t h ci i para retirarla.
2. Int d zc i (2 x UM-3 / AA) en e compartimento, asegurándose de que la polaridad
(+ / -) cincid. P e REINICIO c d ez q e cambie las pilas.
Para asegurarse de que la superficie sea plana:
Ponga algunas gotas de agua en la base del embudo para comprobar que esté plana.
Si etá h iznt , e g e e ni á en e edi .
Si e g e q ed en icine 1-4, ignific q e e edid n etá h iznt.
Si es necesario, ajuste el nivel con el destornillador.
3. Reti e cint. |
NOTA |
Para obtener los mejores resultados, asegúrese |
|||
de q e |
e etá h iznt |
eiti e de güe |
|||
|
|||||
de la lluvia recogida.
6
SENSOR TéRMICO
1. Int d zc i h ciend cincidi id d (+ y -) de i cn indic cine q e h y en el compartimento de pilas.
2. Cnfig e e c n y cti e gún cn. inte t
se encuentra en el compartimiento para pilas.
3.Pulse RESET en el sensor.
4.Cierre el compartimento para pilas del sensor.
5.Coloque el sensor en el lugar deseado usando el montaje en pared o el soporte para mesa.
ES
Para conseguir los mejores resultados:
• Int d zc i nte de nt e en.
• N c q e e en j z di ect de ni expuesto a la humedad.
• N c q e e en á de 328 ie (100 et ) de nid d inci (inte i ).
•Coloque el sensor de tal manera que quede de
c nid d inci (inte i ), ini iz nd obstrucciones como puertas, muros y muebles.
•Coloque el sensor en un lugar con una vista clara sobre el cielo y alejado de objetos metálicos o electrónicos.
•Coloque el sensor cerca de la unidad principal durante los fríos meses de invierno, puesto que las temperaturas bajo cero podrían afectar el rendimiento de las pilas y la transmisión de señal.
Podría tener que experimentar con distintas
c iz cine tene ej e e t d.
Las pilas alcalinas estándar contienen importantes cantidades de agua, Por este motivo, se congelan en
j teet ( xidente 10 ºF (-12°C)).
Las pilas de litio tienen un umbral de temperatura mucho más bajo, con un punto de congelación estimado por dej de -40ºF (-40°C).
Las coberturas inalámbricas pueden recibir el impacto de una serie de factores, como las temperaturas extremadamente bajas. El frío extremo podría reducir temporalmente la cobertura efectiva entre la estación base y el sensor. Si el rendimiento de la unidad se
7

ES
interrumpe debido a las bajas temperaturas, la unidad
e á eez f ncin cnd teet
e n id d (e deci , j teet
n c n d ñ e nente nid d).
TRANSMISIÓN DE DATOS
El sensor térmico remoto enviará datos aproximadamente cada 78 segundos, y el pluviómetro cada 94 segundos. El icono de recepción muestra el estado. Consulte la tabla.
SENSOR TéRMICO PLUVIÓMETRO |
DESCRIPCIÓN |
|
Desconectar |
|
Buscando |
|
Conectar |
Si sin motivo aparente la unidad principal muestra que el sensor térmico o el conector de precipitación está desconectado, pulse SEARCH y manténgalo pulsado
f z n úq ed in edi t.
Si no funciona, compruebe que:
•El pluviómetro remoto y el sensor térmico sigan en su sitio.
•Las pilas de la unidad principal, pluviómetro y el
en téic n etén g t d. Ree áce
si es necesario.
•La transmisión esté dentro de su alcance y el camino no tenga obstáculos ni interferencias.
Red zc dit nci i e nece i . P e
SEARCH y manténgalo pulsado de nuevo.
AVISO DE PILA GASTADA
Hay 3 indicadores de pila gastada. Consulte la tabla.
UNIDAD |
LOCALIZACIÓN EN LA PANTALLA |
|
DE LA UNIDAD PRINCIPAL |
Principal |
Área de Temperatura Interior |
Sensor térmico remoto |
Área de Temperatura Exterior |
|
|
Medid de i |
Á e de eci it ci n tt |
|
|
Cambie las pilas inmediatamente cuando se encienda el indicador correspondiente.
CONFIGURACIÓN DE RELOj y CALENDARIO
Pulse TIME / SET para alternar entre la precipitación de hoy, la hora, la fecha y el año.
AjUSTE DE RELOj y CALENDARIO
. Pulse TIME / SET para mostrar el reloj o el calendario.
2.Pulse TIME / SET y manténgalo pulsado durante dos segundos.
3. A cntinci n e tne ( ) (
) ( )
)
seleccionarel valor deseado.
8

4. Pulse TIME / SET cnfi.
5. Re it 3 y 4 c et td
ajustes.
6. den de j te e: h , in t, ñ, e y día.
PRECIPITACIÓN
La precipitación del día de hoy aparece en la primera línea de la pantalla, y la precipitación total en la segunda línea. Pulse in / mm para alternar entre pulgadas y milímetros como unidad de medición.
HISTÓRICO DE PRECIPITACIÓN
El histórico de precipitación se muestra en la primera línea de la pantalla LCD. La unidad principal puede registrar hasta 9 días de precipitación.
Use HISTORICO para mostrar el registro de un día concreto. El día del registro se mostrará con un signo
en (-).
Precaución: Otros sensores que usen la frecuencia de tn ii n 433 MHz d ín infli ect de precipitación. Evite colocar otros sensores cerca de la unidad.
PRECIPITACIÓN TOTAL
La precipitación total se muestra en la segunda línea de la pantalla LCD.
ES
Para mostrar la fecha de inicio del registro de precipitación total, pulse DESDE. La fecha se muestra en la primera línea de la pantalla LCD. Vuélvalo a pulsar para mostrar el año inicial.
Para borrar la fecha de inicio y volver a reiniciar, pulse DESDE y manténgalo pulsado. Ahora la precipitación total será igual a la precipitación del día y la unidad
e á eez ec d t.
ALARMA DE PRECIPITACIÓN
El valor de la alarma de lluvia se puede mostrar en cualquier momento pulsando (( • )).
Para configurar la alarma de precipitación,
. Pulse (( • )) y manténgalo pulsado durante dos segundos.
2. A continuación use los botones |
o |
para |
seleccionar el valor deseado. |
|
|
3.Pulse (( • )) cnfi. L e cti á.
El indicador de alarma de lluvia se encenderá.
La alarma se activará durante un minuto cuando la precipitación llegue al valor predeterminado, y el indicador de alarma de lluvia parpadeará. Cada minuto se emitirá un pitido de aviso. Cuando la alarma de lluvia esté en el indicados, no parará de parpadear hasta que se pulse o se cambie el valor de la alarma. Para detener la alarma y el pitido de aviso, pulse cualquier botón o cambie el valor de la alarma de precipitación.
Pulse para desactivar la alarma.
9

ES
TEMPERATURA
EXTERIOR
La temperatura exterior se muestra en la tercera línea de la pantalla LCD. Use el botón ºC y ºF para seleccionar entre grados centígrados o Fahrenheit.
INTERIOR
La temperatura interior se muestra en la cuarta línea de la pantalla LCD. Use el botón ºC y ºF para seleccionar entre unidad de temperatura centígrada o Fahrenheit.
REINICIO
Use este botón sólo cuando la unidad esté funcionando incorrectamente. Use un bolígrafo sin punta para aguantar el botón pulsado. Todos los ajustes volverán a sus valores predeterminados.
PRECAUCIÓN
Este producto está diseñado para funcionar durante muchos años, si se usa correctamente. Aquí tiene algunos consejos:
•N e j e di iti en g .
•N i ie nid d c n te i e i
corrosivos. El hacerlo podría provocar rayones en los componentes de plástico y corroer el circuito electrónico.
•N ex ng nid d fe z exce i , de c g , polvo, temperatura o humedad excesivas, lo cual
podría resultar en problemas de funcionamiento, disminución de la vida útil, pilas gastadas y componentes dañados.
• N ni e c nente inte n. De hacerlo anulará la garantía de la unidad y podría causar daños innecesarios. La unidad contiene componentes que el usuario no debe manipular.
•Use solamente pilas nuevas como las indicadas
en in t cci ne de i. N ezc e i
nuevas con pilas viejas, ya que las viejas podrían tener fugas.
•Lea siempre el manual de usuario detenidamente antes de operar la unidad.
• L c c ci n de e te d ct en eficie de madera con cierto tipo de acabados, como por eje niz c , ede c q e e te acabado sufra daños. Consulte las instrucciones del fabricante del mueble para saber qué tipo de jet e eden c c e eficie de de. Oegn Scientific n e ning n
e n i id d en c de dñ en eficie de madera como resultado del contacto con este producto.
• N ti e e te d ct n c ntened de
nici in c ific. nece i q e ec i e este tipo de basura para un tratamiento especial.
NOTA N t d f nci ne y cce i e t án disponibles en todos los países. Sírvase ponerse en contacto con su distribuidor local si desea más información.
10

ES
FICHA TéCNICA
TIPO |
|
|
|
|
DESCRIPCIÓN |
|
|
|
||
Tamaño de la unidad principal |
|
|
|
|
|
|||||
P X A X A |
|
|
90 x 25 x 142 |
|
|
|
||||
|
|
|
|
|
(3,54x0,98x5,59 |
g d |
) |
|
||
Pe |
( in i |
) |
|
173 g (6,1 |
z) |
|
|
|
||
Unidad principal |
|
|
|
|
|
|
||||
P nt |
|
de |
c nce de |
0 – 999,99 |
g d |
|
|
|||
eci it ci n (t |
t ) |
(0 - 25,400 |
) |
|
|
|
||||
P nt |
|
de |
c nce de |
0 – 99,99 |
g d |
|
|
|
||
eci it ci n(hi t |
ic /di i ) |
(0 - 2,540 |
) |
|
|
|
||||
Re |
ci n de |
|
eci it ci n |
0,04 |
g d |
(1 |
) |
|
|
|
Alcance funcional |
23°F to 22°F |
|
|
|
||||||
|
|
|
|
|
(-5°C t |
+ 50°C) |
|
|
|
|
Re |
ci n de te |
e t |
0,2°C t |
(0,1°F) |
|
|
|
|||
Pluviómetro (PCR122) |
|
|
|
|
|
|
||||
Di en i ne |
(P x A x A) |
114 x 114 x 145 |
|
|
|
|||||
|
|
|
|
|
(4,5 x 4,5 x 5,7 |
g d |
) |
|
||
Pe |
( in i |
) |
|
241 g (8,5 |
z) |
|
|
|
||
A c nce f nci |
n |
33,8°F t |
140,0°F |
|
|
|||||
|
|
|
|
|
(1,0°C t |
60,0°C) |
|
|
|
|
Sensor térmico remoto (THN122N) |
|
|
|
|
|
|||||
Di en i ne |
(P x A x A) |
92 x 60 x 20 |
|
|
|
|||||
|
|
|
|
|
(3,6x2,4x0,79 |
g d |
) |
|
||
Pe |
( in i |
) |
|
63 g (2,22 |
z) |
|
|
|
||
A c nce f nci n |
e t |
-22°F t |
140°F |
|
|
|
||||
|
|
|
|
|
(-30°C t |
60°C) |
|
|
|
|
Power |
|
|
|
|
|
|
|
|
|
|
Unid d |
inci |
|
|
2 i UM-3 / AA 1,5V |
|
|
||||
Medid |
de |
|
i |
2 i UM-3 / AA 1,5V |
|
|
||||
|
|
|
|
|
|
|
|
|
|
|
Sen |
té ic |
e |
t |
2 i UM-4 /AAA1,5V |
||
General |
|
|
|
|
|
|
F ec enci de t |
n |
i i n RF |
433 |
MHz |
|
|
C e t |
de t |
n |
i i n RF |
Medid de |
i - |
|
( in |
tác |
) |
|
100 |
et |
(328 ie ) |
|
|
|
|
Sen |
té |
ic 100 |
|
|
|
|
et |
(328 ie ) |
|
Ciclo de toma de temperatura |
Aprox. 78 segundos |
|||||
Ciclo de toma de precipitación |
Aprox. 94 segundos |
|||||
NOTA Rec end ti iz i c in c n e te producto para que funcione durante más tiempo, y el uso de pilas de litio en temperaturas bajo cero.
NOTA El diseño y la ficha técnica están sujetos a cambios sin previo aviso.

ES
SOBRE OREGON SCIENTIFIC
Vi ite n e t ágin we (www. eg n cientific. c ) para conocer más sobre los productos de Oregon
Scientific.
Si está en EE.UU y quiere contactar directamente con nuestro Departamento de Atención al Cliente, por favor visite www2. eg n cientific. c / e ice/ t. .
Si está en España y quiere contactar directamente con nuestro Departamento de Atención al Cliente, por favori ite www. eg n cientific. e e 902 338 368
Para consultas internacionales, por favor visite www2.
eg n cientific. c / t/inte n ti n . .
EU - DECLARACIÓN DE CONFORMIDAD
P edi de e ente O eg n Scientific dec que el Pluviómetro inalámbrico con termómetro interior / exte i (RGR126) c e c n eq i it e enci e y cualesquiera otras disposiciones aplicables o exigibles de la Directiva 999/5/CE. Tiene a su disposición una copia firmada y sellada de la Declaración de Conformidad, solicítela al Departamento de Atención
C iente de O eg n Scientific.
PAÍSES BAjO LA DIRECTIVA RTTE
Todos los paí e de U , S iz CH
y N eg N
2

Kabelloser Regenmesser |
|
mit Innen- / Außenthermometer |
|
Modell: RGR126 |
|
Bedienungsanleitung |
|
INHALT |
|
Einleitung .................................................................. |
2 |
Produktübersicht...................................................... |
2 |
Vorderansicht.......................................................... |
2 |
Rückansicht............................................................ |
3 |
LCD-Anzeige.......................................................... |
3 |
Regenmesser......................................................... |
4 |
Externer.Thermo-Sensor........................................ |
4 |
Erste Schritte ............................................................ |
5 |
Basiseinheit............................................................ |
5 |
Regenmesser......................................................... |
5 |
Thermo-Sensor....................................................... |
7 |
Datenübertragung................................................... |
8 |
Warnhinweis für schwache Batterien..................... |
8 |
Uhr- / Kalendereinstellung....................................... |
8 |
So.Stellen.Sie.Uhrzeit.und.Kalender.Ein................ |
8 |
Regenmenge ............................................................. |
9 |
Regenentwicklung.................................................. |
9 |
Gesamtregen.......................................................... |
9 |
DE
Regenalarm.......................................................... |
0 |
Temperatur .............................................................. |
10 |
Reset........................................................................ |
10 |
Vorsichtsmaßnahmen ............................................ |
10 |
Technische Daten ................................................... |
12 |
Über Oregon Scientific........................................... |
13 |
EU-Konformitätserklärung..................................... |
13 |

DE
EINLEITUNG
...Herzlichen.Glückwunsch.zum.Erwerb.des.kabellosen....
Oregon ScientificTM..Regenmessers.mit.Innen-./..
...Außenthermometer.(RGR 26).
PRODUKTÜBERSICHT
VORDERANSICHT
1
2 |
5 |
3 |
6 |
4 |
7 |
|
8 |
.. 4-ZEILIGE LCD-ANZEIGE:. Zur. Anzeige. des. gesamten.Regens,.der.aktuellen.Regenmenge.oder. Regenentwick-lung,.der.Innen-./.Außentemperatur. sowie.Uhrzeit.und.Kalender
2..SEARCH:. Suchtaste. gedrückt. halten,. um. eine. Suche. des. Regenmessers. und. des. externen. Thermosensors.zu.veranlassen
3..in - mm:. Wählt. zwischen. der. Maßeinheit. der. Regenmenge.in.Zoll.(Inch).oder.Millimeter
4..((.)):. Zeigt. die. Alarmeinstellung. für. den. Regen. an;. Taste. gedrückt. halten,. um. den. Alarmeinstellungsmodus. für. den. Regen. aufzurufen
5..SINCE:. Wechselt. zwischen. der. Anzeige. des. Starttages. oder. des. Startjahres. für. den. Gesamtregen;. Taste. gedrückt. halten,. um. die. vorhergehende. Startzeit. für. die. Regenmenge. zu. löschen.und.den.Zähler.der.Regenmenge.für.einen. Neustart.zurückzusetzen
6..HISTORY:. Wechselt. zwischen. dem. zeitlichen. Verlauf.des.Regens.und.dem.täglichen.Regen
7.. .:.Aktiviert.oder.deaktiviert.den.Regenalarm
8..ABNEHMBARER TISCHSTÄNDER:. Zum. Aufstellen. der. Basiseinheit. auf. einer. ebenen. Fläche
2
RÜCKANSICHT |
.. ANTENNE:. Empfängt. das. Funksignal. des. Regenmessers. und. des. externen. ThermoSensors
2...  .:.Erhöht.die.Einstellungswerte;.Taste.gedrückt. halten,.um.den.Wert.rasch.zu.erhöhen
3.. .:.Verringert.die.Einstellungswerte;.Taste.gedrückt. halten,.um.den.Wert.rasch.zu.verringern
4..Öffnung.für.Wandmontage
5.TIME / SET :.Wechselt.zwischen.der.Anzeige.der. Zeit,.des.Tages,.Jahres.und.der.Regenmenge;.Taste. gedrückt. halten,. um. den. Zeiteinstellungsmodus. aufzurufen
DE
6..RESET:. Setzt. alle. Einstellungen. auf. die. Standardwerte.zurück
7..TASTE C/:.Wählt.zwischen. C.und. F
8..Batteriefach:. Enthält. 2. Batterien. des. Typs. UM-3. oder.AA
LCD-ANZEIGE
|
2 |
3 |
4 |
.. Heutige. Regenmenge,. Regenent-wicklung,.
Regenalarm,. Startdatum. der. Speicherung. des.
Gesamtregen,.Uhrzeit./.Datum
2..Funkempfangsstatus . für . Regenmesser,. Gesamtregen
3..Funkempfangsstatus. für. Thermo-Sensor,. Außentemperatur
4..Innentemperatur
3

DE
REGENMESSER
Unterteil und Trichter:
.
1
.. Regenmesser
2..Batteriefach
3..RESET.-.Taste
1 
. |
2 |
|
|
.. |
Trichter |
2.. |
Indikator.für.Ausrichtung |
2
 3
3
EXTERNER THERMOSENSOR
.....LED-Indikator
1
|
|
|
|
|
|
|
|
|
|
|
|
|
.. Öffnung.für. |
1 |
|
|
|
|
|
|
|
|
|
|
|
|
Wandmontage |
|
|
|
|
|
|
|
|
|
|
|
|
2.. RESET-Öffnung |
|
|
|
|
|
|
|
|
|
|
|
|
|
||
|
|
|
|
|
|
|
|
|
|
|
|
|
|
|
|
|
|
|
|
|
|
|
|
|
|
|
3.. CHANNEL. |
2 |
|
|
|
|
|
|
|
|
|
|
|
|
Kanalnummer.( -3) |
|
|
|
|
|
|
|
|
|
|
|
|
||
|
|
|
|
|
|
|
|
|
|
|
|
4.. Batteriefach |
|
3 |
|
|
|
|
|
|
|
|
|
|
|
|
|
|
|
|
|
|
|
|
|
|
|
|
|
|
|
4 |
|
|
|
|
|
|
|
|
|
|
|
|
|
|
|
|
|
|
|
|
|
|
|
|
|
|
|
|
|
|
|
|
|
|
|
|
|
|
|
|
|
|
|
|
|
|
|
|
|
|
|
|
|
||
|
|
|
|
|
|
|
|
|
|
|
|
||
|
|
|
|
|
|
|
|
|
|
|
|
|
4
 Loading...