


Nice Touch Zoom
Nikon NiceoIouchZoom
Instruction Manual
Manual
de
instrucciones
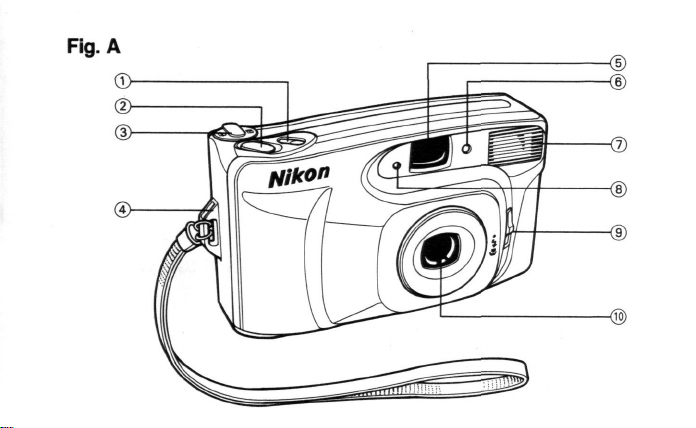
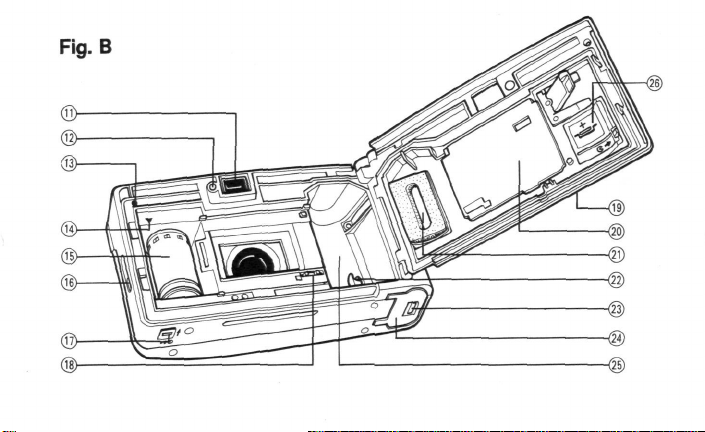
Fig.
B
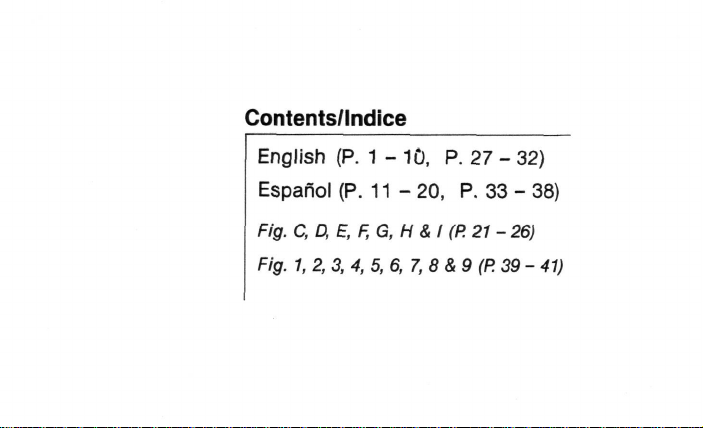
Contents/lndice
English
Espafiol
Fig.
C,
Fig.
1,
2,
(P. 1-10, P. 27 - 32)
(P. 11 -
D,
3,
E,
F,
4,
5,6,7,8
20,
P. 33 - 38)
G, H & I (P.
8,9
(P.
21 - 26)
39 - 41)
English
Foreword
Thank you for purchasing the Nikon Nice Touch Zoom camera. In order to take
better pictures with this easy-to-use camera, be sure to read this instruction
manual thoroughly before use.
For instructions on imprint functions, see "Data imprinting functions" on pages
27 to 32.
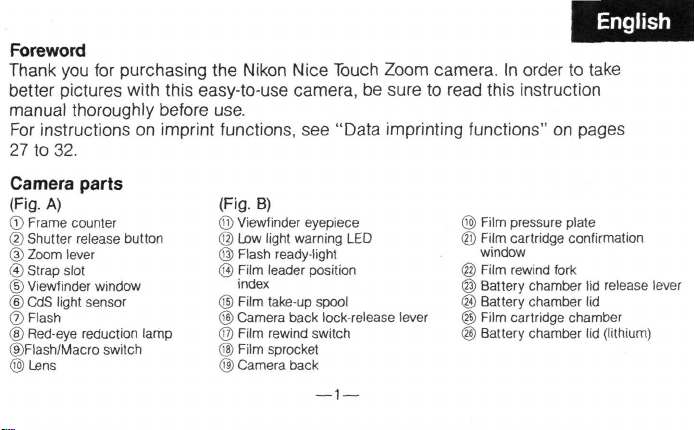
Camera parts
(Fig.
A)
© Frame counter
© Shutter release button
© Zoom lever
© Strap slot
© Viewfinder window
© CdS light sensor
© Flash
® Red-eye reduction lamp
©Flash/Macro switch
© Lens
(Fig.
B)
® Viewfinder eyepiece
@ Low light warning LED
© Flash ready-light
© Film leader position
index
© Film take-up spool
© Camera back lock-release lever
@ Film rewind switch
© Film sprocket
@ Camera back
® Film pressure plate
® Film cartridge confirmation
window
@ Film rewind fork
@ Battery chamber lid release lever
® Battery chamber lid
© Film cartridge chamber
@ Battery chamber lid (lithium)
1.
Installing batteries
1.
Slide the battery chamber lid release lever to open the battery chamber lid.
2.
Install two AA-size batteries (LR6 type) with correct positive (+) and negative
(-) poles oriented as shown inside the battery chamber lid.
3. Push the battery chamber lid to close securely until it clicks shut.
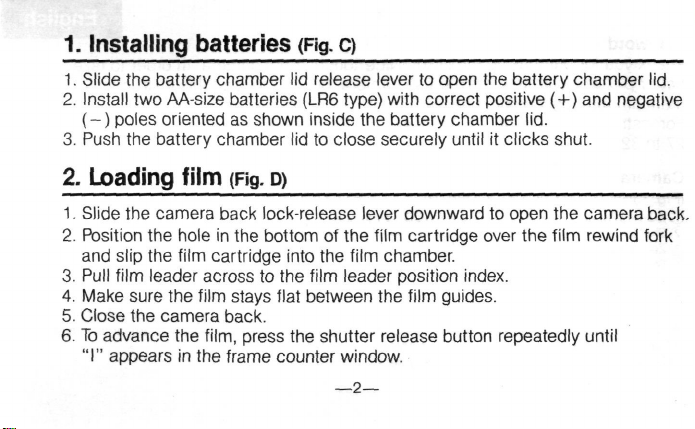
2.
Loading film
1.
Slide the camera back lock-release lever downward to open the camera back.
2.
Position the hole in the bottom of the film cartridge over the film rewind fork
and slip the film cartridge into the film chamber.
3. Pull film leader across to the film leader position index.
4.
Make sure the film stays flat between the film guides.
5. Close the camera back.
6. To advance the
"I"
appears in the frame counter window.
(Fig.
film,
(Fig,
q
D)
press the shutter release button repeatedly until
—2—
Film speed
The camera is designed to use DX-coded films with ISO 100 and 400. With ISO
100 or 400
DX-coded film is loaded, film speed is automatically set to ISO 100.
film,
the exact film speed is automatically set in the camera. If non
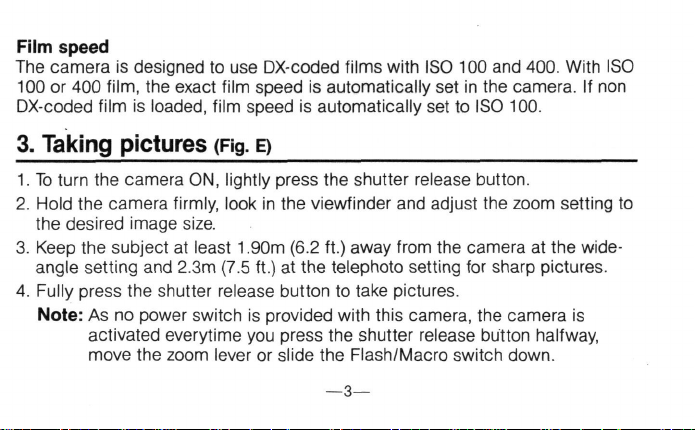
3. Taking pictures
1.
To turn the camera ON, lightly press the shutter release button.
2.
Hold the camera firmly, look in the viewfinder and adjust the zoom setting to
the desired image size.
3. Keep the subject at least 1.90m (6.2 ft.) away from the camera at the wideangle setting and 2.3m (7.5 ft.) at the telephoto setting for sharp pictures.
4.
Fully press the shutter release button to take pictures.
Note:
As no power switch is provided with this camera, the camera is
activated everytime you press the shutter release button halfway,
move the zoom lever or slide the Flash/Macro switch down.
(Fig.
E)
—3—
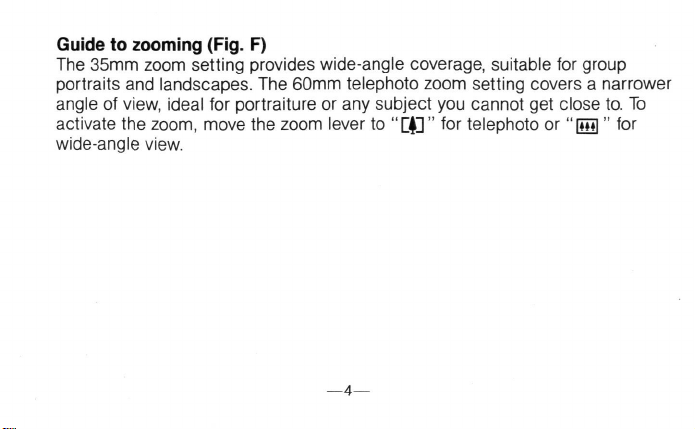
Guide to zooming (Fig. F)
The 35mm zoom setting provides wide-angle coverage, suitable for group
portraits and landscapes. The 60mm telephoto zoom setting covers a narrower
angle of view, ideal for portraiture or any subject you cannot get close to. To
activate the zoom, move the zoom lever to "GO" for telephoto or "rng" for
wide-angle view.
4. Flash photography
1.
Under dim lighting conditions, the low light warning LED (red) next to the
(Fig.
G)
viewfinder lights up when the shutter release button is lightly pressed. Next,
slide the Flash/Macro switch downward to turn the Flash switch ON.
2.
When the Flash ready-light turns ON, fully press the shutter release button.
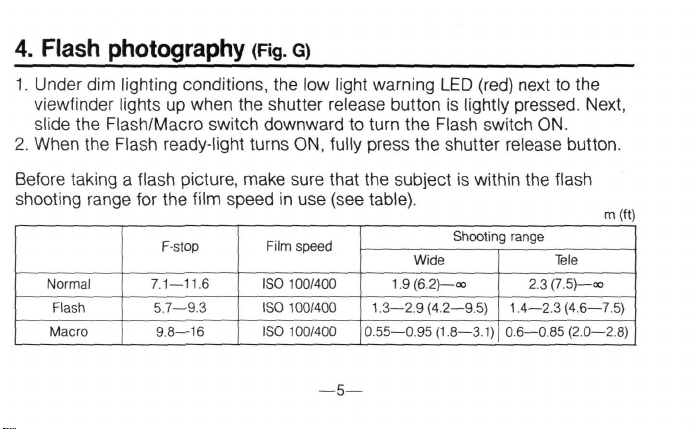
Before taking a flash picture, make sure that the subject is within the flash
shooting range for the film speed in use (see table).
Shooting range
Wide
Tele
2.3 (7.5)—oo
1.4—2.3(4.6—7.5)
0.6—0.85 (2.0—2.8)
Normal
Flash
Macro
F-stop
7.1—11.6
5.7—9.3
9.8—16
Film speed
ISO 100/400
ISO 100/400
ISO 100/400
1.9 (6.2)—oo
1.3—2.9(4.2—9.5)
0.55—0.95(1.8—3.1)
—5—
m(ft)
Caution:
Remember to turn OFF the Flash/Macro switch after finishing your
picture taking or the battery power will be exhausted.
Red-eye reduction
In flash photography, the subject's eyes sometimes appear bright red in color
pictures (white in b/w ones) due to a phenomenon known as "red-eye."
To counteract this effect, your camera comes with a red-eye reduction lamp.
When the shutter release button is pressed lightly, the red-eye reduction lamp
lights up, causing the size of the subject's pupil to grow smaller, thus reducing
the possibility of red-eye effect.
To activate red-eye reduction lamp, be sure to turn the Flash/Macro switch ON
first. Then hold down the shutter release button halfway for a few seconds
before pressing the button all the way to fire the flash.
—6—
5. Macro (close-up) photography
This camera is designed to take close-up pictures of a subject from 0.55 to
0.95m (1.8 to 3.1 ft.) at the wide-angle setting, and 0.60 to 0.85m (2.0 to 2.8 ft.)
at the telephoto setting away from the camera.
1.
Set the Flash/Macro switch to "ON" and wait until the flash ready-light turns ON.
2.
Compose your subject within the viewfinder.
3. While holding the Flash/Macro switch all the way down, fully depress the
shutter release button.
Important: Depending on the ISO number of the film in use, the effective
close-up range for close-up picture varies. (See the table on
page 5.)
Caution:
For macro photography, make sure that your subject is within the
shaded area of the viewfinder as shown in Fig. H
of the viewfinder will be omitted; only the shaded portion is exposed.
—7—
(Fig,
H)
(2).
The upper portion
Caution:
Remember to turn OFF the Flash/Macro switch after finishing your
picture taking or the battery power will be exhausted.
6. Rewinding film
1.
At the end of the
2.
Slide the film rewind switch in the direction of the arrow to rewind the
3. Check to see if the frame counter has returned back to "S".
4.
Open the camera back and remove the film for processing without delay.
Important: Film does not automatically start rewinding when film reaches
the end of the
(Fig,
i)
roll,
the film advance motor stops and the shutter is locked.
roll.
—8—
film.
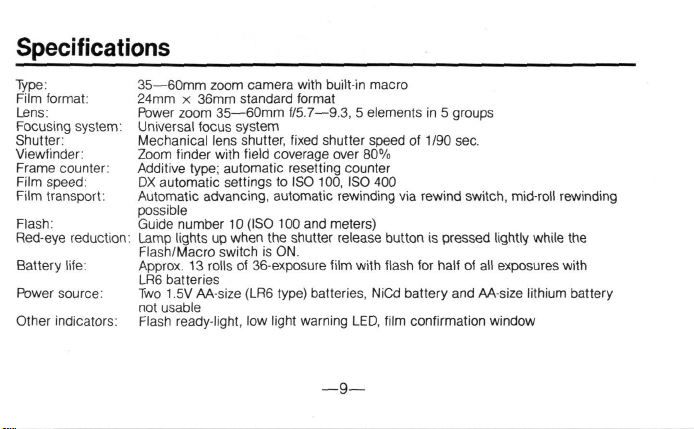
Specifications
Type:
35—60mm zoom camera with built-in macro
Film format: 24mm x 36mm standard format
Lens:
Power zoom 35—60mm f/5.7—9.3, 5 elements in 5 groups
Focusing system: Universal focus system
Shutter: Mechanical lens shutter, fixed shutter speed of 1/90 sec.
Viewfinder: Zoom finder with field coverage over 80%
Frame counter: Additive type: automatic resetting counter
Film speed: DX automatic settings to ISO 100, ISO 400
Film transport. Automatic advancing, automatic rewinding via rewind switch, mid-roll rewinding
Flash:
Guide number 10 (ISO 100 and meters)
Red-eye reduction: Lamp lights up when the shutter release button is pressed lightly while the
Battery life: Approx. 13 rolls of 36-exposure film with flash for half of all exposures with
Power source: Two 1,5V AA-size (LR6 type) batteries, NiCd battery and AA-size lithium battery
Other indicators: Flash ready-light, low light warning LED, film confirmation window
possible
Flash/Macro switch is ON.
LR6 batteries
not usable
—9-
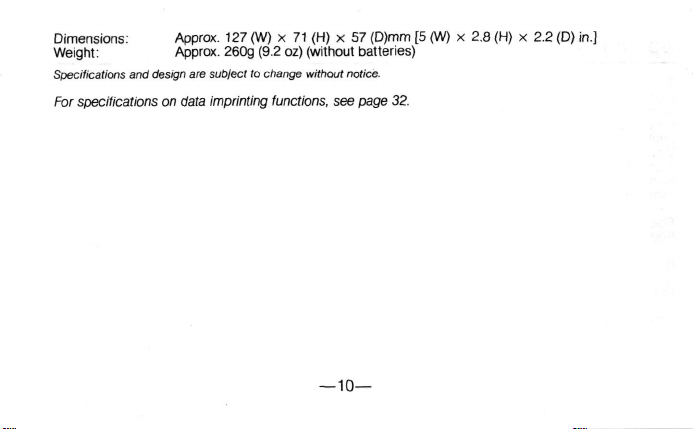
Dimensions: Approx. 127 (W) x 71 (H) x 57 (D)mm [5 (W) X 2.8 (H) X 2.2 (D) in.]
Weight: Approx. 260g (9.2 oz) (without batteries)
Specifications and design are subject to change without
For
specifications
on
data imprinting
functions,
—
10—
notice.
see page 32.
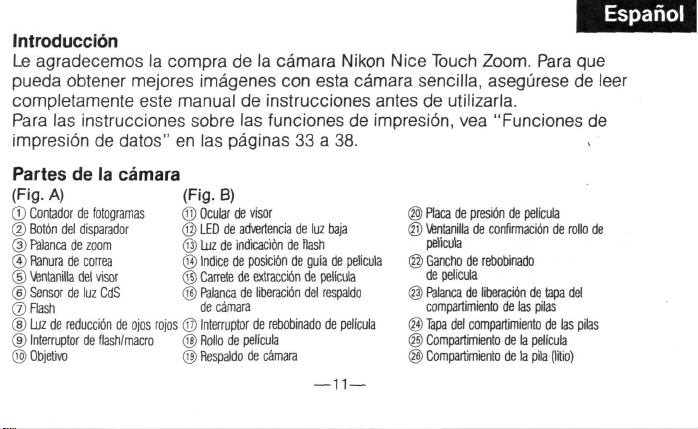
Espanol
Introduction
Le agradecemos la compra de la camara Nikon Nice Touch Zoom. Para que
pueda obtener mejores imageries con esta camara sencilla, asegurese de leer
completamente este manual de instrucciones antes de utilizarla.
Para las instrucciones sobre las funciones de impresion, vea "Funciones de
impresion de datos" en las paginas 33 a 38.
Partes de la camara
(Fig.
A)
© Contactor de fotogramas
© Boton del disparador
© Palanca de zoom
© Ranura de correa
© Venlanilla del visor
© Sensor de luz CdS
©Flash
® Luz de reduccion de ojos rojos
© Interrupter de flash/macro
® Objetrvo
(Fig.
B)
© Ocular de visor
@ LED de advertencia de luz baja
@ Luz de irtdicacion de flash
® Indice de position de guia de pelicula
© Carrete de extraccidn de pelicula
© Palanca de liberacidn del respaldo
de camara
© Interruptor de rebobinado de pelicula
@ Rollo de pelicula
© Respaldo de camara
—
11
—
© Placa de presibn de pelicula
® ventanilla de confirmation de rollo de
pelicula
® Gancho de rebobinado
de pelicula
© Palanca de liberacidn de tapa del
compartimiento de las pilas
@ Tapa del compartimiento de las pilas
@ Compartimiento de la pelicula
© Compartimiento de la pila (litio)
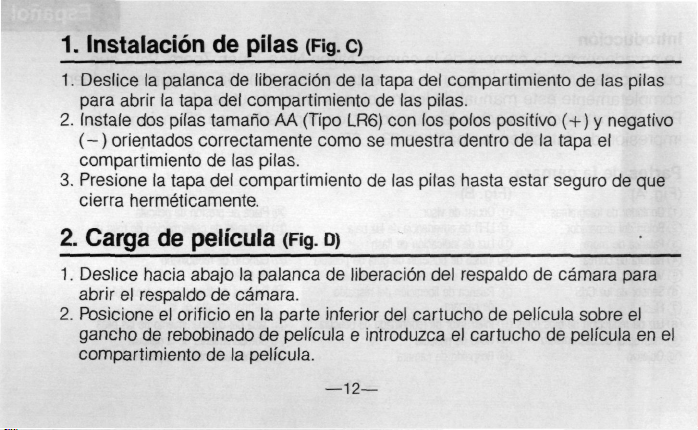
1.
Instalacion de pilas
1.
Deslice la palanca de liberacion de la tapa del compartimiento de las pilas
para abrir la tapa del compartimiento de las pilas.
2.
Instale dos pilas tamano AA (Tipo LR6) con los polos positivo (+) y negativo
(-) orientados correctamente como se muestra dentro de la tapa el
compartimiento de las pilas.
3. Presione la tapa del compartimiento de las pilas hasta estar seguro de que
cierra hermeticamente.
2.
Carga de pelfcula
1.
Deslice hacia abajo la palanca de liberacion del respaldo de camara para
abrir el respaldo de camara.
2.
Posicione el orificio en la parte inferior del cartucho de pelfcula sobre el
gancho de rebobinado de pelfcula e introduzca el cartucho de pelfcula en el
compartimiento de la pelfcula.
(Fig.
o
(Fig,
p) •
—
12—
3. Tire de la guia de pelicula a traves del fndice de posicion de guia de pelicula.
4.
Asegiirese que la pelicula quede plana entre las guias de pelicula.
5. Cierre el respaldo de la camara.
6. Presione repetidamente el boton del disparador para avanzar automaticamente la pelicula hasta que aparezca el numero
contador de fotogramas.
Velocidad de pelicula
La camara esta disenada para utilizar peliculas codificadas DX con ISO 100 y
400.
Con pelicula ISO 100 6 400, la sensibilidad exacta de pelicula se fija auto-
maticamente en la camara. Si se carga pelicula que no es codificada DX, la
sensibilidad de pelicula se fija automaticamente en ISO 100.
"1"
en la ventanilla de
3. Toma de fotos
1.
Para conectar la camara, presione ligeramente el disparador.
2.
Sujete firmemente la camara, mire por el visor y ajuste el zoom para que la
imagen tenga el tamano deseado.
(Fig.
E)
—13—
 Loading...