


E
F
S
G
Instruction Manual (Pages 2– 37)
Bedienungsanleitung (Seiten 38–73)
Manuel d’utilisation (Pages 74–109)
Manual de instrucciones (Páginas 110–145)

2
Foreword
Thank you for purchasing the Nikon Nuvis S camera.
Your new Nikon camera employs the Advanced Photo System (IX240 system).
The symbol T* appears on all Advanced Photo System (APS) format cameras.
Be sure to read this instruction manual thoroughly before use,
and keep it close at hand.
*The Advanced Photo System symbol is a trademark of all IX240 products.
Take some trial shots.
Before taking important pictures, be sure to take a few trial shots first
to familiarize yourself with the camera and all of its features.
E

3
Attaching the strap
Neck strap AN-L16
Check that you have the item shown below before using
your camera.
E
Accessories
Optional accessories
•Camera case CS-L20
(Remote control unit can be stored inside pocket.)
•Remote control unit (- P. 25)
•Remote control unit case CML-L1
Attach the strap by inserting it through the strap slot and adjust the
length using the lug on the strap as shown.
Put your head
through this loop.
■
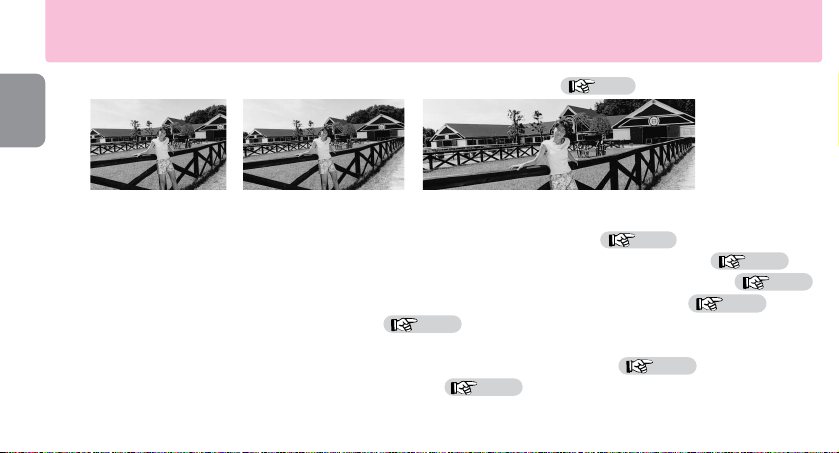
Choice of three print types (C, H, P), which can be mixed on the same roll.
■
The 3x power zoom lens covers the range of focal length from 22.5mm to 66mm.
■
Title imprinting (ex. “MERRY CHRISTMAS” or “CONGRATULATIONS”) on the back of the pictures.
■
The number of desired prints (1 to 9) can be specified frame by frame at any time while the film is loaded.
■
When the available light is low or the subject is backlit, the camera automatically fires the flash.
■ Remote-controlled operation (optional) is possible.
■ MRC (Mid-Roll Change) allows you to switch film cartridges whenever you want. When the film cartridge is reloaded, the
camera automatically advances the film to the frame immediately after the last exposed frame.
■ Photographing subjects as close as 0.45m (1.5 ft.) is possible.
■ A stainless steel slide cover protects the lens, viewfinder window, and LCD panel when the camera is not in use.
P. 25
4
C-type (classic)
Aspect ratio = 2:3
H-type (wide-vision)
Aspect ratio = 9:16
P-type (panorama)
Aspect ratio = 1:3
Your Nikon camera features:
P. 27
P. 15
P. 28
P. 21
P. 26
P. 14
P. 19

Contents
Foreword ...................................................................................2
Accessories ...................................................................................... 3
Your Nikon camera features .............................................................. 4
Camera parts ................................................................................ 6-7
LCD panel indications .......................................................................7
Tips on using the Nuvis S ................................................................ 8
Getting started
Installing the battery ........................................................................ 9
Checking battery power .................................................................... 9
Loading the film ....................................................................... 10-11
IX240 film cartridge ....................................................................... 11
Data recording function .................................................................. 12
Basic operation
Holding the camera properly .......................................................... 13
Shutter release operation ............................................................... 13
Viewfinder indications .................................................................... 14
Selecting a print type ...................................................................... 14
Adjusting diopter ............................................................................15
Zooming ........................................................................................ 15
Focusing and shooting ..............................................................16-17
Difficult-to-focus subjects ...............................................................17
Removing the film .................................................................... 17-18
Take the exposed film cartridge to a photo lab ............................... 18
To rewind the film in mid-roll ........................................................ 19
Advanced operation
How to use focus lock .................................................................... 20
Selecting the flash mode ................................................................ 21
Auto flash photography .................................................................. 21
Flash cancel mode ......................................................................... 22
Anytime flash mode .................................................................. 22-23
Slow sync flash mode .....................................................................23
Red-eye reduction mode ................................................................ 24
Remote control photography (optional) .......................................... 25
Self-timer operation ....................................................................... 26
Close-up shooting ......................................................................... 26
Specifying the number of desired prints ......................................... 27
Title recording function ............................................................ 28-29
Setting the date and time .......................................................... 30-31
Other information
Troubleshooting ....................................................................... 32-33
Specifications ........................................................................... 34-35
For safe handling of the camera (WARNING/CAUTION) ........... 36-37
5
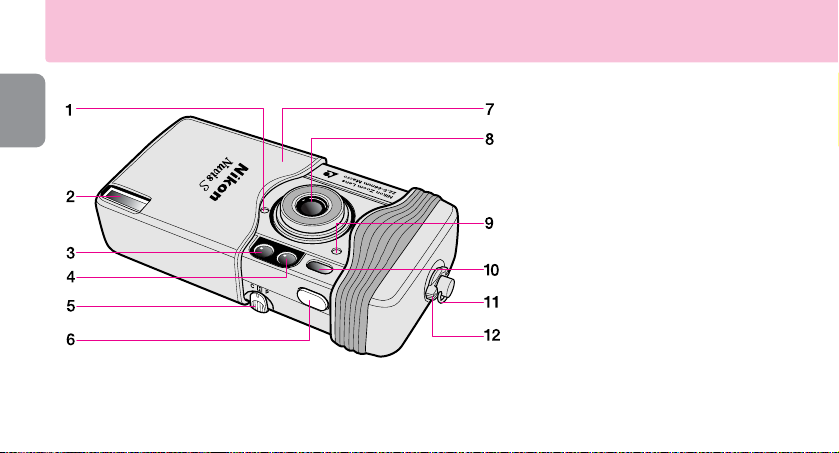
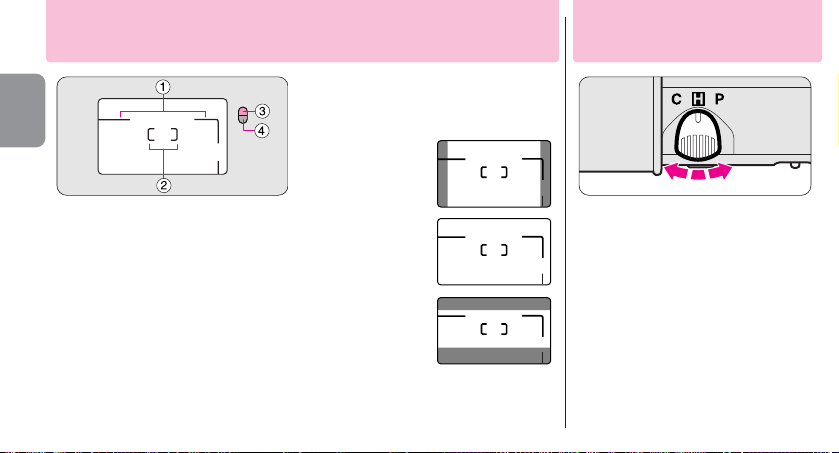
1 Auto exposure metering window
2 Flash (-P. 21)
3
AF assist illuminator/Red-eye reduction lamp (-P. 24)
4 Viewfinder window (-P. 14)
5 CHP selector (-P. 14)
6 Shutter release button (-P. 13)
7 Slide cover (power switch) (-P. 9)
8 Lens
9 Remote control reception sensor (-P. 25)
10 Autofocus window
11 Neck strap slot (-P. 3)
12 Cartridge lock release lever (-P. 10)
13 Diopter adjustment lever (-P. 15)
14
Orange LED/Green LED (in-focus indicator) (-P. 14)
15 Viewfinder eyepiece (-P. 14)
16
@
C/Red-eye reduction/Self-timer indicator/Remote
control button (-PP. 24-26)
17 Mid-roll rewind button (-P. 19)
18 J
/
Flash mode button (-PP. 21-23)
19 Battery chamber lid (-P. 9)
6
Camera parts
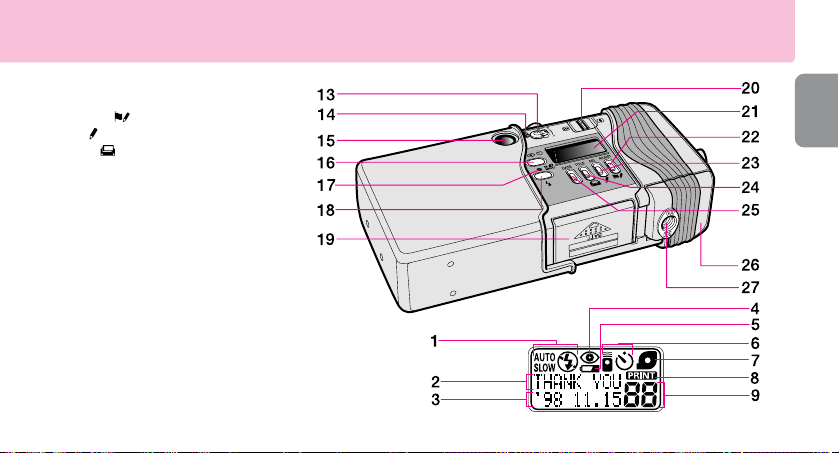
20 Zoom lever (-P. 15)
21 LCD panel
22 ADJUST/ button (-PP. 27, 28, 30)
23 SEL/ button (-PP. 28, 30, 31)
24 TITLE/ button (-PP. 27-29)
25 DATE button (-P. 12)
26 Cartridge chamber cover (-P. 10)
27 Tripod socket (-P. 25)
LCD panel indications
1 Flash mode indicator (-PP. 21-23)
2 Title recording indicator (-PP. 28-29)
3 Date and time/Number of desired
prints recording indicator (-PP. 12, 27)
4 Red-eye reduction indicator (-P. 24)
5 Low battery power indicator (-P. 9)
6
Remote control/Self-timer indicator (-PP. 25, 26)
7 Cartridge indicator (-P. 11)
8 Data recording indicator (-P. 12)
9 Frame counter (-P. 11)
7
LCD panel

8
Tips on using the Nuvis S
Camera care tips
•Close the slide cover to turn the camera off when not in use.
This prevents accidental release of the shutter and resulting
battery drain.
•The Nuvis S is not a waterproof and therefore should not be
exposed to rain or saltwater. If water gets on the camera, wipe it
off with a dry cloth immediately.
•Do not subject the camera to high temperatures such as those
encountered near a heater or stove or the interior of a car during
summer.
•Store the camera in a cool, dry, clean place. Do not expose it to
chemicals such as camphor or naphthalene. Using a desiccant
during storage is recommended.
•Firing the flash repeatedly makes the battery and camera hot.
Allow enough time for them to cool off before taking pictures
again.
•Do not drop the camera or hit it against a hard surface.
•Use a dry, soft cotton cloth or commercially available blower
brush or lens cleaner to remove dirt and smudges.
•When storing the camera for a long time, remove the battery.
Also once a month, insert a battery and fire the flash several
times to reform its capacitor.
Notes on battery
•Be sure to check battery power when taking important pictures.
Carry spare batteries when traveling abroad.
•Battery power becomes less when the temperature drops below
0°C (32°F). When taking pictures at low temperatures, keep the
battery warm. Battery power will recover when the temperature
goes back to normal.
Notes on IX240 film cartridge
•Carrying spare IX240 film cartridges is recommended when
traveling abroad where the IX240 film cartridges may not
be available.
Nikon cannot be held responsible for malfunctions caused by using the Nuvis S in ways not specified in this manual.
9
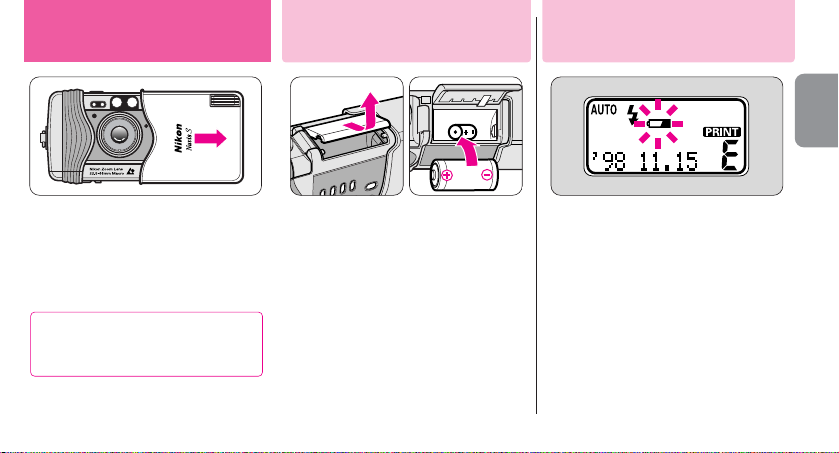
CR2
2
Install the battery.
▼
Open the battery chamber lid.
▼
Install one 3V lithium battery
CR2 inside the battery chamber
as shown.
▼
Close the battery chamber lid.
•Remember to reset the date and time
when the battery is replaced. (- P. 30)
1
Open the slide cover until it
click-stops.
Getting started
Checking battery power
Installing the battery
Check battery power.
▼
Open the slide cover to turn the
camera on.
•The lens automatically extends out to
the W (wide-angle) position.
•If “b” blinks or nothing appears on
the LCD panel, the battery is exhausted
and needs to be replaced.
•If a low battery power indicator “b”
does not appear, battery power is full.
When closing the slide cover, do
not close it too quickly, as this
may damage the lens.
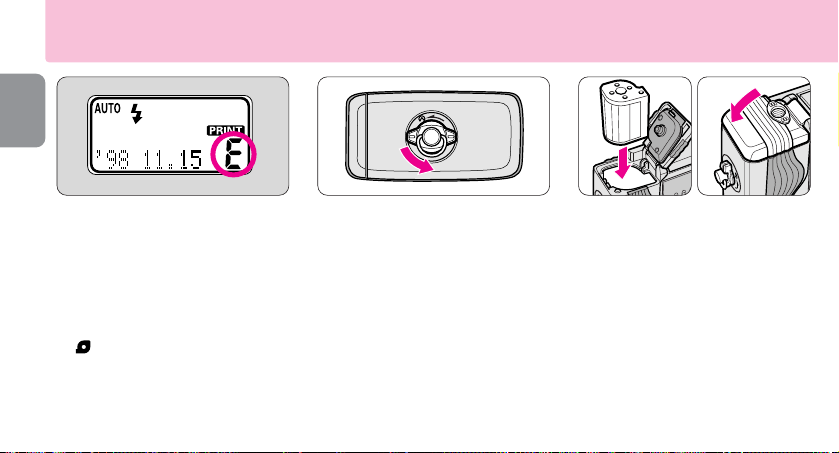
10
Loading the film
1
Open the slide cover to
check that the letter “´ ”is
visible on the LCD panel.
•If the number of frames appears on the
LCD panel, a partially exposed cartridge
is already loaded.
•If the letter “´” and the cartridge indicator
“” appear on the LCD panel, a cartridge
that is fully exposed is loaded and should
be removed. (- P. 17)
2
Turn the cartridge lock
release lever in the direction
of the arrow to open the
cartridge chamber cover.
3
Insert a film cartridge in the
cartridge chamber and close
the cover.
•Use only IX240 film cartridge. (Regular
35mm film cannot be used.)
•Check that the VEI (Visual Exposure
Indication) shows “○” (unexposed) or
“;” (partially exposed) before loading.
(- P. 11)
•Close the cartridge chamber cover until
it clicks shut.
11
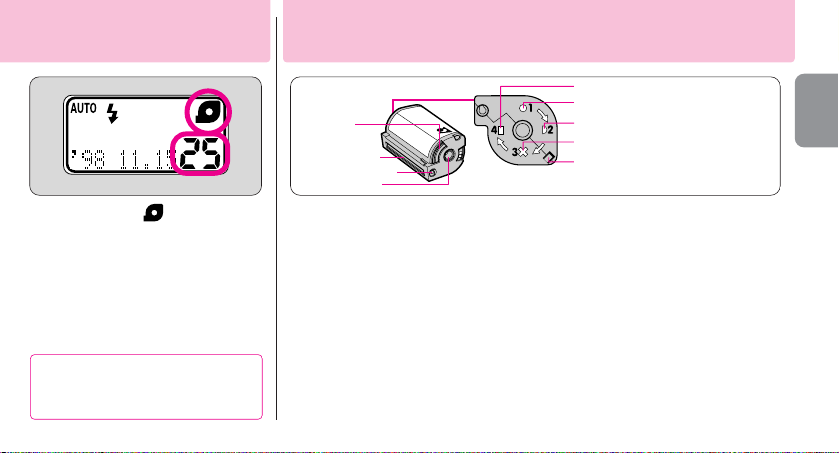
=
;
:
<
*Visual Exposure Indication (VEI)
Unexposed film*
Partially exposed film*
Irreversible Processed Indicator
Fully exposed but unprocessed film*
Processed film inside the cartridge*
Lightlock door
Lightlock door drive
Data disk
Cartridge spool
•Available film cartridges: 40-exposure,
25-exposure, and 15-exposure films.
•IX240 film cartridges do not have a film
leader. The film is automatically pulled
out and set inside the camera.
•The VEI (Visual Exposure Indicator)
shows the four states of the film.
Notes on handling IX240 film
cartridges
•Do not touch, disassemble or apply
strong physical shock to the Data disk,
Lightlock door or Cartridge spool.
•Do not break the Irreversible Processed
Indicator. If broken, consult your
nearest photo lab.
•Do not subject the film to direct
sunlight, high temperatures near a
heater or stove, dust and humidity, or a
strong magnetic field.
IX240 film cartridge
4
Check that “ ” and the
available number of frames
appear on the LCD panel.
•If the number of frames does not appear,
reload the film.
•The letter “
´
” blinks if a fully exposed
film cartridge (the VEI shows “<”) is
inserted.
The cartridge chamber cover locks
automatically after loading. Do not try to open
the cover until film rewinding is completed.
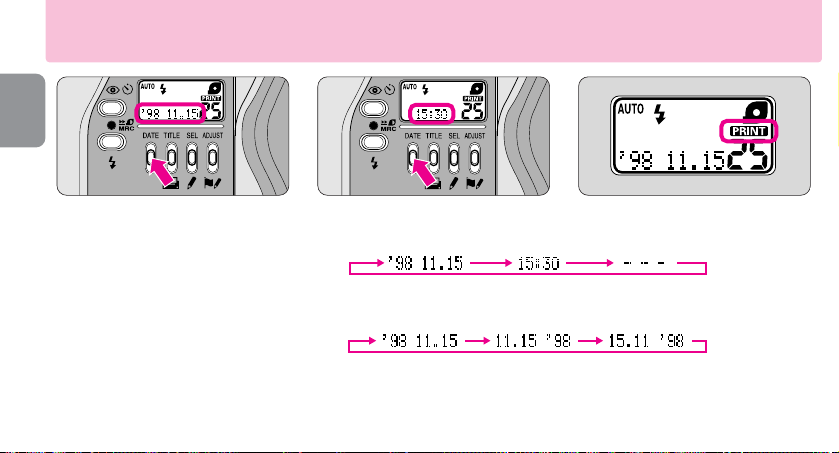
•Press the DATE button to select one of three displays. Each time the button is pressed,
the display changes in the order indicated:
Year/Month/Day Hour/Minute No recording
•Press and hold the DATE button for more than 2 sec. while “
---
” is displayed. The
display changes in the order indicated:
Year/Month/Day Month/Day/Year Day/Month/Year
•When shooting while “Å”appeared on the LCD panel, data on the LCD will be
recorded. No data is recorded when the “
---
” mode is selected.
•Ask your photo lab that displays an “Authorized Photo Lab Mark” sign for the location
of the recorded data.
12
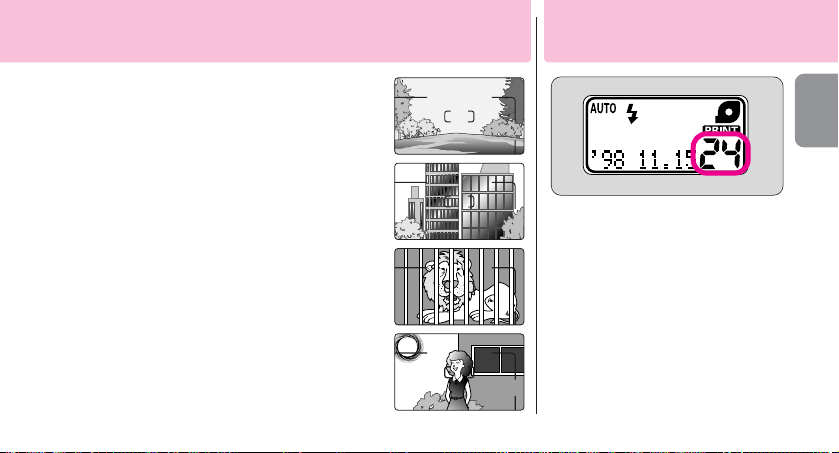
Set your preferable display mode.
▼
Press the DATE button.
•The “Year” section is displayed and
printed in two digits and the “time” is in
24-hour cycle.
•“
---
” appears when “No recording”
mode is selected.
Data recording function
13
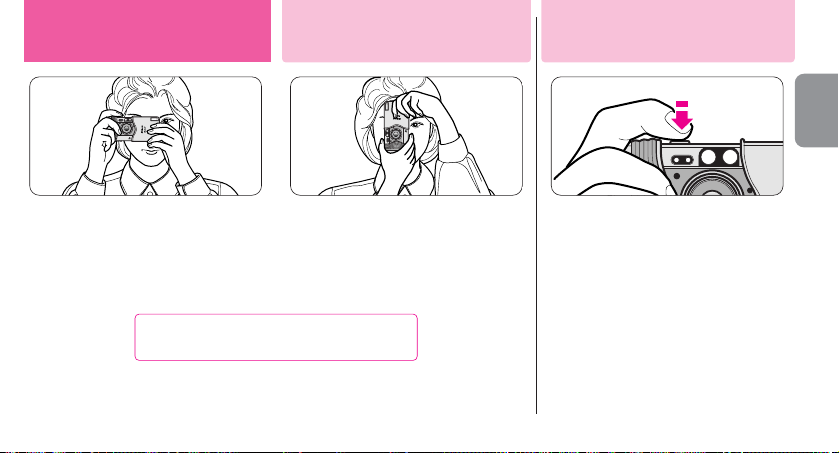
•When holding the camera horizontally,
keep your elbows against the body with
both hands on the camera as shown.
•To avoid camera shake, hold the
camera steady.
•When holding the camera vertically,
make sure that the flash is on top as
shown.
•Lightly press the shutter release button
to achieve focus and exposure and the
green LED (in-focus indicator) lights
up. While the shutter release button is
depressed lightly, the focus is locked.
(- P. 20) Press the button all the
way until you hear a click to release the
shutter.
Basic operation
Holding the camera
properly
Shutter release
operation
Do not block the lens, flash, or autofocus
window with your fingers or hair.
Available picture area
Areas cut off in the final print differ
depending on the print type (C/H/P).
14
1
Parallax compensation marks
For close-up shooting in C and H print
types at a distance of approx. 1m to
0.45m(3.3 ft to 1.5 ft.) (- P. 26)
2
Autofocus frame mark
Center this mark on the subject.
3
Orange LED
If lit continuously: Flash is ready to fire.
If blinking: Flash is being charged and
not ready to fire.
4
Green LED
If lit continuously: Correct focus has been
achieved.If blinking: Correct focus has not
been achieved or the shooting distance is
closer than approx. 0.45m (1.5 ft.)
Use the CHP selector to select your
desired print type before shooting.
•You can select any one of three print types
(C, H or P) by switching the CHP selector at
any time while film is loaded. (- P. 4)
Available picture area differs depending on
the print type selected.
•You can also change the type of print when
ordering extra prints at the photo lab.
CAUTION!
To prevent possible injury to your eye,
hold the camera away from your face
when you operate the CHP selector.
C-type
(classic)
Aspect ratio = 2 : 3
H-type
(wide-vision)
Aspect ratio = 9 : 16
P-type
(panorama)
Aspect ratio = 1 : 3
(Parallax compensation
marks not usable.)
Viewfinder indications
Selecting a print type

15
•Turn the diopter adjustment lever
toward + or - to make the image
sharper in the viewfinder.
CAUTION!
As you look into the viewfinder and
operate the diopter adjustment lever,
make sure not to injure your eye with
your finger or fingernail during
adjustment.
Look through the viewfinder
and compose the picture by
moving the zoom lever.
▼
When the desired image size
has been achieved, remove your
finger from the zoom lever.
•
When the camera is not in use for approx.
2 min., the lens automatically retracts to the
(wideangle) position and the power
turns off. Lightly press the shutter release
button to turn the camera back on and the
LCD panel will light up.
Move the zoom lever in the direction (66mm)
to extend the lens for taking telephoto pictures.
Move the zoom lever in the direction (22.5mm)
to retract the lens for taking wide-angle pictures.
Zooming
Adjusting diopter
16
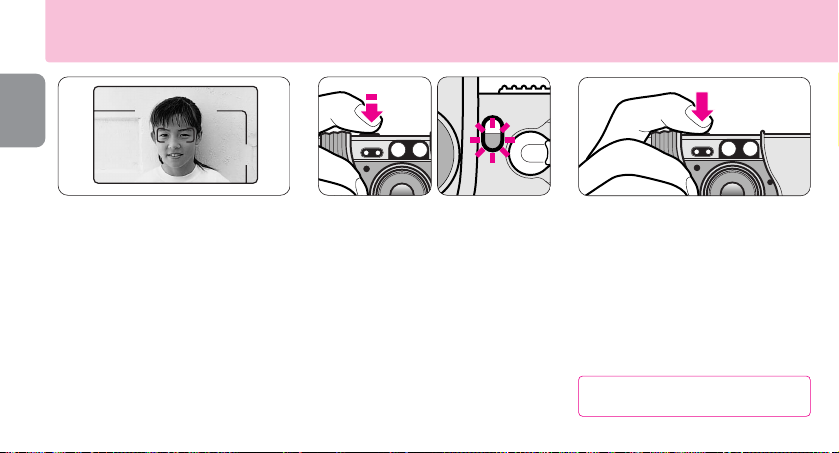
Focusing and shooting
1
Compose the picture.
•Center the autofocus frame mark on
the subject.
2
Focus on the subject.
▼
Lightly press the shutter release
button.
▼
Make sure the green LED lights up.
•
The green LED lights up when the correct
focus has been achieved.
•
When the green LED blinks, the subject is
out of focus. If the green LED blinks slowly,
move more than 0.45m (1.5 ft) away from the
subject and reshoot. If the green LED blinks
quickly, the subject is difficult to focus. In
this case, use focus lock. (- P. 20)
3
Gently depress the shutter release
button all the way to take a picture.
•If there is not enough light or the subject
is backlit, the orange LED lights up and
the flash fires automatically. (- P. 21)
•After shooting, the number of available
frames is reduced on the LCD panel
one-by-one.
•Pressing the shutter release button with
a jerky motion may cause camera shake.
Close the slide cover to turn the camera
power off to save battery power.
17
Difficult-to-focus subjects:
The following subjects may be too difficult to focus.
In these cases, use focus lock (- P. 20) by
focusing on another subject equidistant from the
camera.
A.Low-contrast subjects such as the blue sky or
highly reflective surfaces like shiny cars or water.
B.Subjects with continuous and repeated
patterns.
C.Both near and far subjects present at the same
time within the autofocus frame mark.
D.Strongly backlit subjects or those having a
bright shiny background.
Removing the film
1
The film starts rewinding
automatically.
•At the end of the film roll, the film
rewinds automatically.
•While the film is rewinding, the frame
counter counts down one by one and
the orange LED blinks.
•If you want to remove the film while the
number of available frames still appears
on the LCD panel, rewind the film
midway through the roll. (- P. 19)
A
B
C
D
18
Removing the film
Take the exposed film
cartridge to a photo lab.
•We recommend bringing your film
cartridge to a photo lab that displays an
“Authorized Photo Lab Mark” sign
above for processing and printing.
•Your negatives are returned inside the
cartridge for easy storage.
•Index prints (small images of each
frame exposed on the roll of film) are
supplied with the negatives.
•For more information, consult your
photo lab.
2
Make sure the blinking letter
“´” is visible on the LCD
panel.
•When the film is completely rewound,
the orange LED goes out and the letter
“´” blinks.
•If film rewind stops midway through the
roll due to a dead battery, it resumes
automatically as soon as the battery is
replaced.
3
Open the cartridge chamber
cover and remove the film.
•Releasing the shutter or setting the date
and time cannot be performed unless
the rewound film is removed.
•When opening the cartridge chamber
cover, make sure that the camera bottom
faces up, or the cartridge may fall out.
Do not open the cartridge chamber
cover until the orange LED goes out
and the letter “
´
” starts blinking.
19
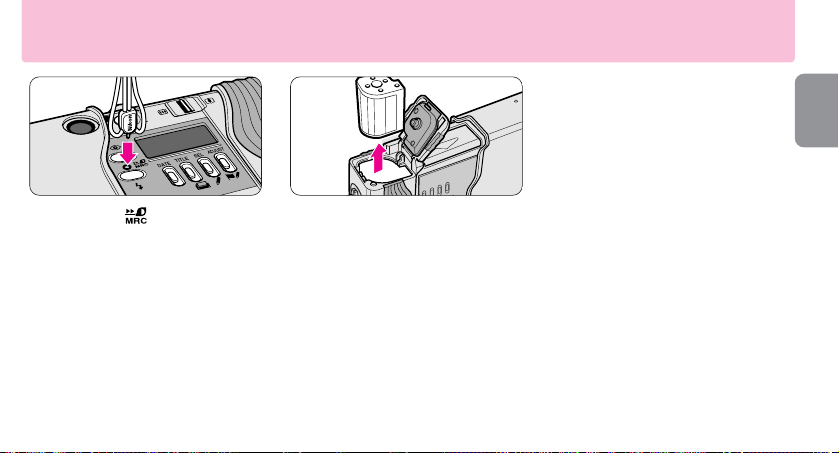
To rewind the film in mid-roll
1
Press the button using
the stud on the strap lug or
the point of ball-point pen.
•Once rewinding starts, there is no need
to continue pressing the mid-roll
rewind button.
•When rewind is completed, the orange
LED goes out and the letter“´”starts
blinking. Do not try to open the cover
until the letter“´” starts blinking.
Notes on MRC
(Mid-Roll Change)
•A partially exposed film can be
switched at any time among cameras
that feature MRC, such as Nikon
Pronea 600i/6i, Nuvis 160i, and
Pronea S cameras.
•When reloading a partially exposed
film, avoid an environment subject to
strong electric or electromagnetic
fields (for example, near a TV,
personal computer, audio speaker,
or an electric fan).
2
Remove the film.
▼
Open the cartridge chamber
cover.
▼
Remove the film.
▼
Check if the VEI (Visual
Exposure Indication) shows
;
.
•If the VEI shows ;(partially exposed film),
the camera automatically advances the
film to the frame immediately after the last
exposed frame when the film is reloaded.
20
1
Compose the picture.
•When the main subject is outside the
autofocus frame mark “ ”, the area
behind the subject will be in focus.
2
Center the autofocus frame
mark on the main subject.
▼
Lightly press the shutter
release button.
•Make sure that the green LED lights up.
3
Recompose the picture
and shoot.
▼
While depressing the shutter
release button lightly,
recompose the picture.
▼
Then depress the shutter
release button all the way.
•As long as the shutter button is depressed lightly,
the green LED lights up and focus is locked.
•Do not change the camera-to-subject distance
while lightly pressed the shutter release button.
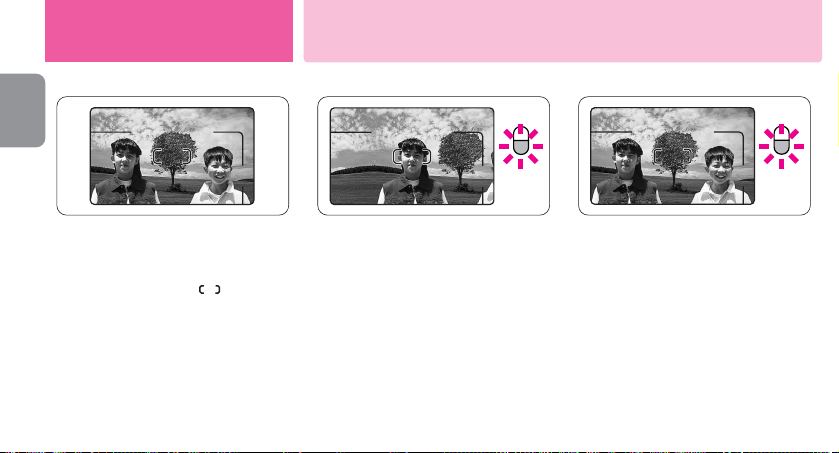
When your main subject is not in the center of the frame:
Advanced operation
How to use focus lock

†
Press theJbutton until the desired
flash mode indicator appears.
•For details, see the reference page of each
flash mode.
AUTOJ Auto flash (-P. 21)
↓
#
Flash cancel
(-P. 22)
↓
J Anytime flash (-P. 22)
↓
Auto flash with slow sync
(-P. 23)
•When the camera power is turned off,
the flash mode reverts to auto flash.
21
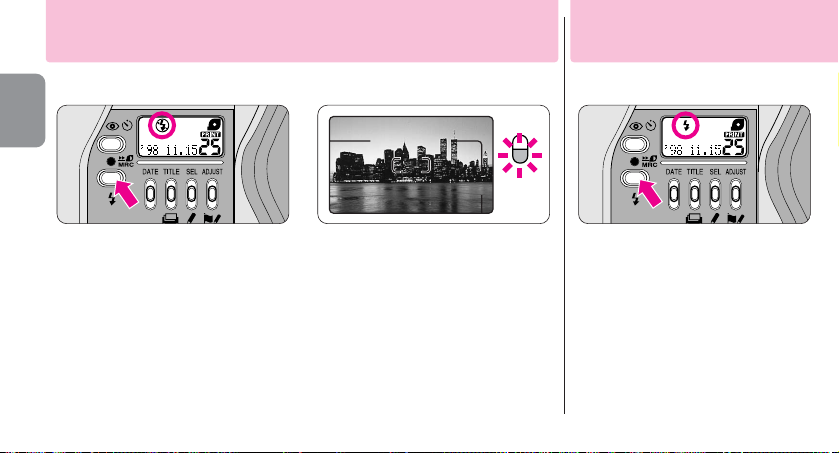
1
Open the slide cover to turn
the camera on.
•When the camera is turned on,
AUTOJ
appears on the LCD panel.
Auto flash mode is automatically
activated.
•The camera senses when the available
light is low or the subject is backlit and
automatically fires the flash.
•When “#”
appears on the LCD panel, the
flash does not fire.
→
2
Check that the orange LED
comes on, then shoot.
•Before shooting with flash, make sure
the subject is within the flash shooting
distance range. Refer to the following
guide (ISO 200).
(22.5mm): approx. 0.45 to 3.7m (1.5 to 12.1 ft.)
(66mm) : approx. 0.45 to 2.6 m(1.5 to 8.5 ft.)
•
If the orange LED is blinking, the flash is being
charged and the shutter is locked. Reshoot after
making sure that the orange LED lights up.
The flash automatically fires when the available light is low or the subject is backlit.
Auto flash photography
Selecting the flash mode
22
1
Press the J button until
“#” appears on the LCD
panel.
•Since slow shutter speeds are usually
selected in this mode, use a tripod to
prevent camera shake.
2
Compose the picture and
shoot.
▼
Lightly press the shutter
release button.
▼
Make sure the green LED
lights up, then depress the
shutter release button all the
way to take the picture.
1
Press the J button until “J”
appears on the LCD panel.
Use this mode where flash photography is prohibited or to achieve a natural
lighting effect in night scenes.
Use this mode to fire the flash intention
Flash cancel mode
Anytime flash mode
23
2
Compose the picture and
shoot.
▼
Lightly press the shutter
release button.
▼
Make sure the orange and green
LEDs light up, then depress the
shutter release button all the
way to take the picture.
•If the orange LED is blinking, the flash is
being charged. Reshoot after making
sure that the orange LED lights up.
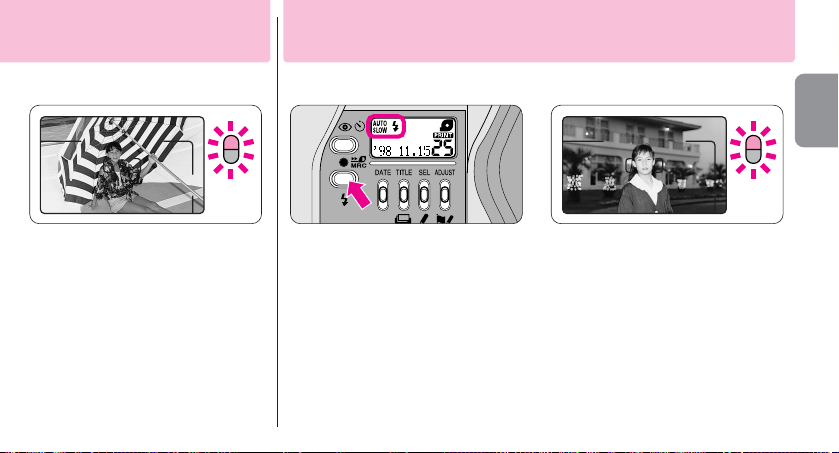
1
Pressthe Jbutton until
“
†
”appears on the LCD
panel.
•Since slow shutter speeds are usually
selected in this mode, use a tripod to
prevent camera shake.
•When the subject is bright, “#”
appears on the LCD panel and flash
does not fire.
2
Compose the picture
and shoot.
▼
Lightly press the shutter
release button.
▼
Make sure the orange and green
LEDs light up, then depress the
shutter release button all the way
to take the picture.
•If the orange LED is blinking, the flash
is being charged. Reshoot after making
sure that the orange LED lights up.
Use this mode to obtain the correct exposure for both the main subject
and background in low-light situations or at night.
Slow sync flash mode
ally regardless of the available light.
24
2
Compose the picture and
lightly press the shutter
release button.
•Because the red-eye reduction lamp
lights up for a second before the flash
fires, be careful not to move the camera
or let the subject move until the flash
fires.
•The red-eye reduction mode is not
recommended when shooting fastmoving subjects.
1
Press the
@C
button until
“@”appears on the LCD panel.
•Each time the @C button is pressed,
the display changes in the order indicated.
Cancel
↓
@
Red-eye reduction indicator
↓
@
SCRemote control/Self-timer indicator
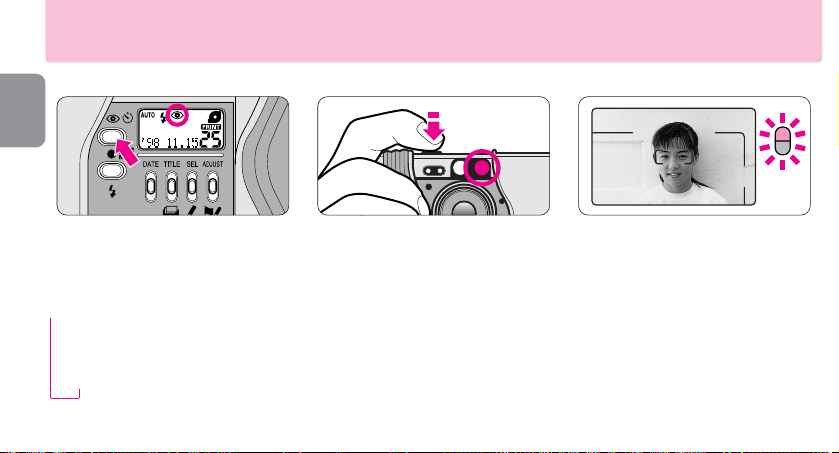
In flash photography, the subject’s eyes may sometimes appear bright red. To reduce the “red-eye” effect, use this mode.
→
(-PP. 25, 26)
Red-eye reduction mode
3
Check that the orange and green
LEDs light up before shooting.
•
If the orange LED is blinking, the flash is
being charged. Reshoot after making sure that
the orange LED lights up.
•
To cancel the red-eye reduction mode, press
the @Cbutton until “@”disappears from
the LCD panel. This mode cannot be canceled
by turning the power off.
•
Red-eye reduction and flash cancel modes
can be set together, but in this case red-eye
reduction cannot be performed.
25
3
Compose the picture and
shoot.
▼
Aim the remote control unit at
the camera and press the shutter
release button on the unit.
•
The red-eye reduction lamp lights up for
approx. 2 sec. before the shutter is released.
•
If the shutter cannot be released with the
remote control, change the battery inside the
remote control unit. (The life of the battery is
approx. 10 years.) Visit an authorized Nikon
dealer or service center to change it.
1
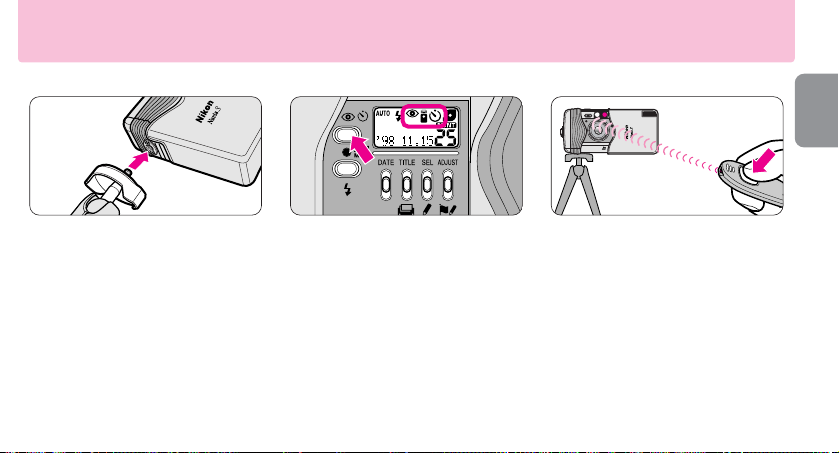
Place the camera on a tripod
or a secure flat surface.
•Remote control extends up to approx.
5m (16.4 ft.) while facing the camera. If
the camera-to-subject distance is more
than 5m (16.4 ft.) away, use the selftimer mode. (-P. 26)
•If the reception sensor on the camera is
exposed to direct sunlight or other
strong light, the remote controller will
not operate properly.
2
Press the @Cbutton until
“@
S
C”appears on the
LCD panel.
•Remote control will be automatically
canceled if not used for more than
approx. 2 minutes or the slide cover is
closed. That means that within 2
minutes after taking the last shots, you
can still continue to shoot remotely.
Remote control photography (optional)
For releasing the shutter remotely:
26
•
When taking subjects within the range of
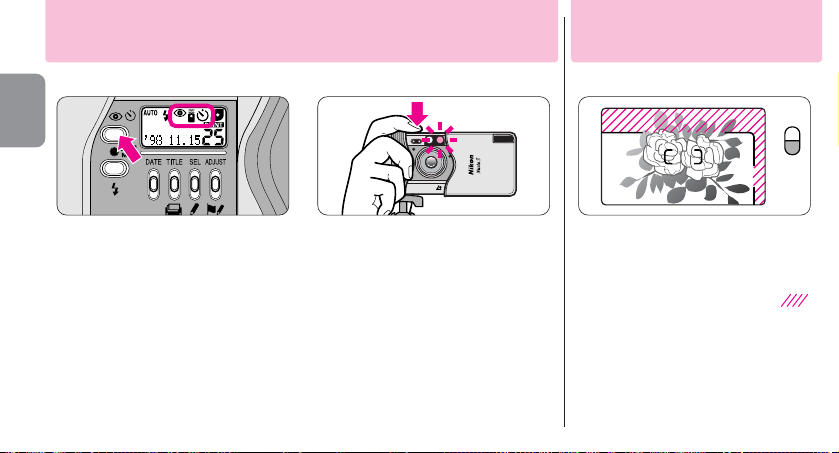
approx. 1m to 0.45m (3.3 ft. to 1.5 ft.), compose
the picture within the parallax compensation
marks. (The parallax compensation marks
cannot be used in P print type.) The area
as shown above will be cut off in the final print.
•
When the subject is closer than approx. 0.45m
(1.5 ft.), the green LED blinks slowly and the
shutter is locked.
•
If the subject is very close, the green LED blinks
quickly and the shutter can be released,
resulting in out-of-focus pictures.
1
Press the @C button until
“@
S
C”appears on the
LCD panel.
•Self-timer operation will be automatically
canceled if not used more than approx.
2 minutes or the slide cover is closed.
•Placing the camera on a tripod is
recommended.
2
Compose the picture and
depress the shutter release
button all the way.
•The red-eye reduction lamp blinks for
8 sec., then lights up for 2 sec. before
the shutter is released.
•Self-timer operation is canceled after
shooting.
•To cancel self-timer operation, close the
slide cover.
Self-timer operation
Close-up shooting
When you want to include yourself in the picture:
For taking subjects such as close-ups of flowers:
27
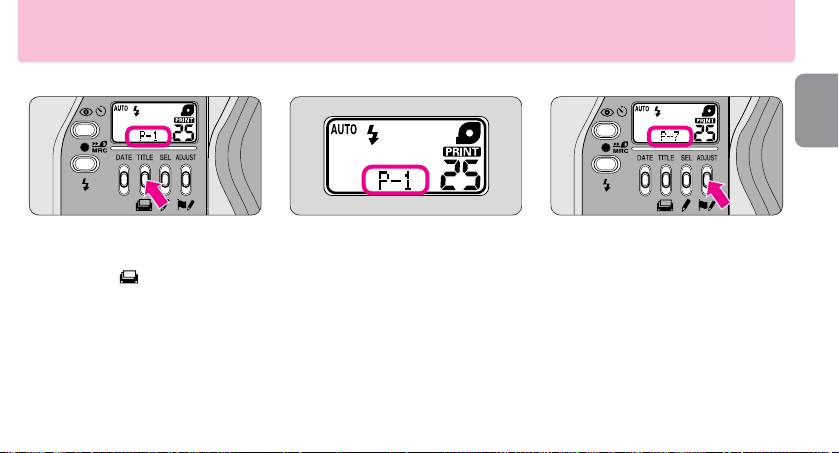
1
Set the number of desired
prints before shooting.
▼
Press the button for more
than 3 seconds until “P-1”
appears.
•The number of desired prints (1 to 9)
can be specified frame by frame.
•Be sure to cancel the title recording
function when specifying the number of
desired prints.(- P. 29)
2
Set the number of desired
prints.
▼
Press the ADJUST button to set
the desired number of prints.
•Each time the ADJUST button is
pressed, the number changes in
increments of one from 1 to 9.
•The specified number is canceled after
shooting.
•To cancel the number before shooting,
set the number to “P-1”.
•
“P-1” is displayed when the language
code is set to other than JPN (Japanese).
(- P. 28)
Specifying the number of desired prints
The number of desired prints (1 to 9) can be specified frame by frame.
28
1
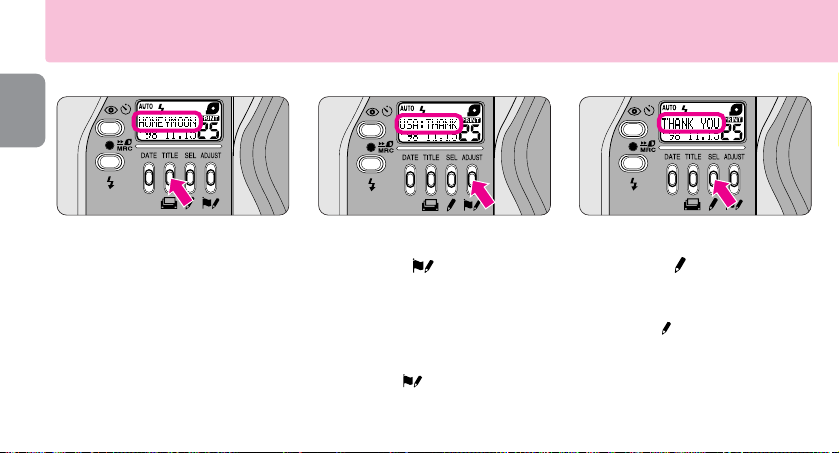
Press the TITLE button
before shooting.
•The title “HONEYMOON” (in British
English) is initially set at the factory and
appears on the LCD panel when the
TITLE button is pressed for the first time.
•Your preferred title and language can be
selected among 30 titles and
12 languages. (+P. 29)
•The title you set on the LCD panel can
be recorded when a picture is taken.
2
Set the language.
▼
Press the button until the
preferred language appears
on the LCD panel.
•For example, if [USA] appears on the
LCD panel, the language is American
English.
•Pressing the button continuously
for more than 2 sec. changes the
language quickly.
Title recording function
For imprinting a title on the back of pictures:
3
Set a title.
▼
Press the button until the
preferred title appears on the
LCD panel.
•Pressing the button continuously for
more than 2 sec. changes the title quickly.
•The title set scrolls on the LCD panel
and the first 9 letters are displayed after
the scrolling stops.

Code
Language
DEN
Danish
FIN
Finnish
FRA
French
GER
German
ITA
Italian
JPN
Japanese
NOR
Norwegian
POR
Portuguese
ESP
Spanish
SWE
Swedish
GBR
British English
USA
American English
29
Language provided
For titles in other language, see the attached “List of Imprinted User Title”.
•To cancel the title recording function,
press the TITLE button and make sure
the title has disappeared.
Titles provided for British English
HONEYMOON
WEDDING
HANUKKAH
GRADUATION
FAMILY
PARTY
HOLIDAY
ANNIVERSARY OF MARRIAGE
FRIENDS
SCHOOL EVENT
TRIP
I LOVE YOU
THANK YOU
SEASON’S GREETINGS
HAPPY BIRTHDAY
CONGRATULATIONS
MERRY CHRISTMAS
FESTIVAL
FIRST DAY OF SCHOOL
HAPPY NEW YEAR
REUNION
FATHER’ S DAY
MOTHER’ S DAY
BAPTISM
ST. VALENTINE’ S DAY
GOOD FRIDAY
EASTER MONDAY
HAPPY EASTER
ST. GEORGE’S DAY
MAY DAY HOLIDAY
30
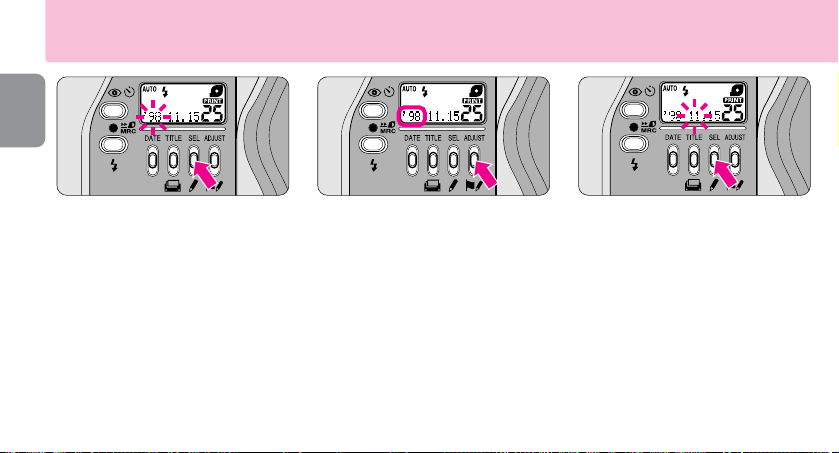
1
Entering the setting mode
▼
Press the SEL button for
more than 2 seconds.
•The “year” section starts blinking.
•Be sure to cancel the title recording
function when setting the date and time.
2
Setting the “year”
▼
Press the ADJUST button to
set the correct year.
•Each time the ADJUST button is
pressed, the number changes in
increments of one.
•Pressing the ADJUST button
continuously for more than 2 sec.
changes the number quickly.
3
Setting the “month”
▼
Press the SEL button. The
“month” section starts
blinking.
▼
Press the ADJUST button to
set the correct month.
▼
Press the SEL button.
•Repeat procedures 2 and 3 to set the
day, hour and minute.
Setting the date and time

31
4
Getting out of the setting
mode
▼
Press the SEL button and the
corrected date appears on the
LCD panel.
•If the slide cover is closed or the zoom
lever is operated while the date/time
setting is in progress, all the previously
set data will be set at this time.
When the battery is replaced
•Note that 00 00 00 appears on the LCD
panel when the battery is replaced.
•No data will be recorded if 00 00 00
appears on the LCD.
•Repeat procedures from 1 to 4 to set the
date and time.

Problem Check this Ref. page
•If the orange LED blinks when the shutter is released, the flash is being charged. Remove your
finger from the shutter release button, wait until the orange LED lights up, then shoot.
•If the green LED blinks slowly when shutter is released, the subject is too close. Move farther
away from the subject.
•If the letter´and the cartridge indicator “” appear on the LCD panel, the film loaded is not
usable. Replace the film with a new cartridge.
•The slide cover is not fully opened and the power is not on. Open the slide cover until it click-stops.
•The flash will not fire and the orange LED blinks while the flash is being charged. Simply wait
until the orange LED lights up before releasing the shutter.
•Check battery power. If the battery is exhausted, replace the battery with a fresh one.
•If the “#” mark appears on the LCD panel, the flash will not fire.
•Clean the autofocus windows if dirty.
•To avoid camera shake, gently depress the shutter release button.
•When photographing difficult-to-focus subjects, be sure to center the autofocus frame mark on
the subject, or use focus lock.
•The film is not completely exposed. Take pictures up to the end of the roll, or rewind the film in
mid-roll.
32
14, 21
14, 26
10, 17, 18
9
14, 21
9
21
6
13
17, 20
11, 19
Troubleshooting
Check the cause of the trouble using the following chart. It may save you a trip to your nearest Nikon service center.
The shutter cannot be
released.
The flash does not fire.
The subject appears out of
focus in the print.
The cartridge chamber
cover does not open.

33
No indicators appear on
the LCD panel when the
slide cover is opened.
The shutter cannot be
released even if the shutter
release button on the
remote control unit is
pressed.
•The battery was not properly loaded in the battery chamber. Make sure to orient the
positive (+) and negative (-) poles correctly.
•The battery is exhausted or no battery is installed. Install a new battery.
•If no indicators appear after installing a new battery, the camera is broken. In this case,
contact your nearest Nikon dealer or a camera shop for repair.
•You are out of the remote control working range. Move closer to the camera.
•If the remote control is exposed to direct sunlight or other strong light, change the
location of the remote control.
•The battery in the remote control is exhausted. Do not attempt to replace the battery
yourself, but go to a Nikon service center.
•Press the @C button once again until “@
S
C” appears on the LCD panel if the remote
controller is not used for more than approx. 2 minutes.
9
9
–
25
25
–
25
Problem Check this Ref. page
A characteristic of electronic camera
In rare cases, when strong static electricity or the like is applied to the camera, the camera may not work properly.
If this happens, remove the battery. Please note that the date and time must be reset when the battery is replaced,
because settings are erased when the battery is removed. (+P. 30)

34
Type of camera
IX240 (Advanced Photo System) type autofocus AE lens-shutter camera with
Nikon Zoom 22.5–66mm f/5.2–7.5 lens
Usable film
IX240 System (Advanced Photo System) film cartridge (16.7 x 30.2mm)
Print aspect ratio
C, H and P-type available
Lens
22.5mm f/5.2–66mm f/7.5 (28mm–82.5mm converted to 35mm type);
6 elements in 6 groups
Shutter
Programmed electronic shutter; also serves as diaphragm blades
Viewfinder
Real-image zoom viewfinder; frame coverage approx. 85% for H-type printed
image area; approx. 0.34x magnification at 22.5mm, approx. 0.85x at 66mm;
diopter adjustment: -1.5 to +1.5 DP
Viewfinder information
C/H/P-type image size frame marks (C-type and H-type with parallax
compensation marks); Autofocus frame; Orange LED (flash ready-light)—Lights
up: flash ready; Blinks: flash being charged; Green LED (in-focus indicator)—
Lights up: subject focused, Blinks slowly (at 2Hz): subject is too close to achieve
correct focus, Blinks quickly (at 8Hz): Subject is difficult to focus.
Focusing
Wide-area passive autofocus system; Activated by lightly pressing shutter
release button; Distance range from 0.45m (1.5 ft.) to infinity
Focus lock
Focus is locked as long as shutter button is lightly pressed.
Exposure control
Electronically controlled program AE; Auto exposure range (ISO 200):
EV 6-17 at 22.5mm, EV 6-18 at 66mm; Flash fires automatically if the
available light is low.
Film speed setting
ISO 50, 100, 200, 400, 800 and 1600 film automatically set.
Film operation
Drop-in loading system; Wrong film loading prevention mechanism
Frame counter
Shown in the LCD panel; Count-down type
Self-timer
Electronically controlled; Activated by depressing shutter release button;
10 sec. duration, blinking/lighting up in 2 steps
Specifications

35
Film advance
Film is automatically thrust to the first frame after inserting cartridge; Film
automatically advances by one frame after each shot; Auto rewind at the end of
film roll; Mid-roll rewind function available
Remote control (optional)
Infrared wireless remote control; 2 sec. delay shutter release; Automatically
canceled after 2 min. if not used; Effective range is within approx. 5m (16 ft.)
straight in front of the camera; Battery will last for approx. 10 years;
Dimensions (W x H x D): approx. 60 x 27 x 10 mm (2.4 x 1.1 x 0.4 in.);
Weight (including battery): approx. 13g (0.5 oz.)
Built-in flash
Four flash modes available: Auto flash, Flash cancel, Anytime flash, and Slow
sync flash; Flash automatically fires when available light is low or subject is
backlit; Flash shooting range: approx. 0.45–3.7m (1.5–12.1 ft.) at 22.5 mm,
approx. 0.45–2.6 m (1.5–8.5 ft.) at 66mm (ISO 200); Shutter release button is
locked during flash charging; Recycling time approx. 6 sec.
Red-eye reduction mode
Red-eye reduction lamp lights up for approx. 1 sec. before flash fires
Battery life
Approx. 10 rolls of 25-exposure film when flash is used for half of exposures.
LCD panel (Power is on)
Frame counter, Flash mode, Red-eye reduction, Remote control/Self-timer,
Cartridge, Low battery power, Data recording, Title, and Number of desired
prints
Power source
One 3V lithium battery CR2
Data recording function
Magnetic recording system; Date/Title/No. of desired prints; Date displaying
in the LCD panel with five choices: Year/Month/Day, Hour/Minute,
Month/Day/Year, Day/Month/Year, or No recording; 24-hour cycle with no
AM/PM; leap year adjustment until 2030; Built-in clock with timing accuracy
within ±90 sec. a month; Power source is the same as the camera body;
Number of desired prints (1 to 9) can be specified; Title recording function:
selectable from 30 titles in 12 languages which can be printed on the back of
pictures
Dimensions (W x H x D)
Approx. 93 x 65 x 32 mm (3.7 x 2.6 x 1.3 in.) (with slide cover closed)/
approx. 130.5 x 65 x 32 mm (5.1 x 2.6 x 1.3 in.) (with slide cover open)
Weight (without battery)
Approx. 230g (8.1 oz.)
Specifications apply when a fresh battery is used at normal temperature (20 °C or 68 °F).
Specifications and design are subject to change without notice.

36
For safe handling of the camera
WARNING
•Do not attempt to disassemble, repair, or modify the camera
yourself, as it houses high-voltage circuitry which can cause an
electric shock. Another reason is that these actions could cause
the camera to malfunction.
•If the camera is dropped and damaged, do not touch any
exposed interior metal parts, as it houses high-voltage circuitry
which can cause an electric shock. Remove the battery and take
the camera to your local Nikon dealer for repair.
•If you detect smoke coming from the camera, stop operation
immediately and turn the camera off. Let the camera cool off
before removing the battery. Then take the camera to your local
Nikon dealer for repair.
•Do not submerge the camera in water or allow water to splash
on it, as this may cause an electric shock or a fire.
•Do not operate the camera in an environment containing a
combustible gas, as this may cause a fire or explosion.
•Do not look at the sun or a strong light source directly through
the viewfinder, as this may damage your retina, resulting in
permanent eye damage.
•Do not let the strap wind around your neck. In particular, never
put the strap around a child’s neck, as this may cause
suffocation.
•Keep batteries out of the reach of children. If a battery is
accidentally swallowed, call a doctor immediately.
•Never use thinner, benzene, or other active agents for cleaning
the camera, as this may damage the camera, cause it to catch
on fire, or harm your health.

37
CAUTION
•Do not operate the camera with wet hands, as this may cause an
electric shock.
•Keep the camera out of reach of children. This will prevent them
from swallowing batteries or small accessories.
•To prevent possible injury to your eye, hold the camera away
from your face when you operate the CHP selector.
•Do not fire the flash close to a person’s eyes, as this may cause
temporary blindness.
•When the camera is not in use, close the slide cover and avoid
placing it in direct sunlight. Strong sunlight entering the lens
may cause the camera to catch on fire.
•Do not carry the camera while it’s mounted on a tripod, as you
might bump into something and injure yourself or others.
•Do not walk around while looking through the viewfinder, as you
might lose your step, fall down, and injure yourself.
•Do not throw used batteries into a fire. Also do not short-circuit,
disassemble, or heat the battery, as this may cause it to catch on
fire or explode.
•Always follow the warning instructions printed on batteries to
prevent them from catching on fire or exploding.
•Never use batteries not specified in this instruction manual, as
this may cause them to generate heat or catch on fire.
•If corrosive liquids seep from the battery and get on your skin or
clothes, wash immediately with running water. If they get in your
eyes, wash immediately with water and see a doctor.
•As you look into the viewfinder and operate the diopter
adjustment lever, make sure not to injure your eye with your
finger or fingernail during adjustment.

38
Vorwort
Herzlichen Glückwunsch zu Ihrer neuen Nikon Nuvis S
für das Advanced Photo System (IX240).
Kameras für das Advanced Photo System
(APS) sind durch das Symbol T* gekennzeichnet.
Bitte lesen Sie diese Anleitung vor Benutzung der
Kamera aufmerksam durch und bewahren Sie sie gut auf.
*Das Symbol des Advanced Photo System erscheint auf allen Produkten für das Format IX240.
G
Machen Sie einige Probeaufnahmen
Wir empfehlen Ihnen, vor wichtigen Anlässen zunächst einige Probeaufnahmen zu machen, damit
Sie Gelegenheit haben, sich voll mit der Kamera und all ihren Funktionen vertraut zu machen.

39
Anbringung der Trageschnur
Die nachstehend aufgeführte Position gehört zum
Lieferumfang der Kamera.
Zubehör
Getrennt lieferbares Zubehör
•Etui CS-L20
(mit Tasche für Fernbedienung)
•Fernauslöser (- S. 61)
•Etui CML-L1 für Fernbedienung
Führen Sie die Schnur durch die Halterung an der Kamera, und stellen
Sie die Länge wie abgebildet mit Hilfe der Kunststoffklemme ein.
G
Schlüpfen Sie mit
dem Kopf durch die
Schlaufe.
Trageschnur AN-L16

■ Drei vor jeder Aufnahme wählbare Bildformate (C, H, P)
■ Das Dreifach-Zoomobjektiv überstreicht den Brennweitenbereich von 22,5 mm bis 66 mm.
■ Rückseitenaufdruck von Titeln (z.B. "Frohe Weihnachten" oder "Herzlichen Glückwunsch").
■ Jederzeitige Einstellung der gewünschten Kopienzahl (1 bis 9) für jede Aufnahme, solange sich der Film in der
Kamera befindet.
■ Bei schwachem oder Gegenlicht zündet die Kamera automatisch den Blitz.
■ Mit der als Zubehör lieferbaren Fernbedienung ist Fernsteuerung der Kamera möglich.
■ Die MRC-Funktion gestattet jederzeitigen Wechsel teilbelichteter Filme. Einen wiedereingelegten, teilbelichteten
Film spult die Kamera automatisch bis zur nächsten freien Aufnahme vor.
■ Der kürzeste Aufnahmeabstand beträgt bloße 0,45 m.
■ Bei Nichtbenutzung legt sich ein Schieber aus rostfreiem Stahl schützend über Objektiv, Sucherfenster und LCD-Feld.
40
Classic-Bild C
Seitenverhältnis 2:3
Breitbild H
Seitenverhältnis 9:16
Panorama-Bild P
Seitenverhältnis 1:3
Die besonderen Merkmale Ihrer Nuvis S:
S. 51
S. 64
S. 57
S. 61
S. 55
S. 62
S. 63
S. 50

Inhalt
Vorwort ......................................................................................... 38
Zubehör ......................................................................................... 39
Die besonderen Merkmale Ihrer Nuvis S ........................................ 40
Teilebezeichnungen ...................................................................42-43
Anzeigedaten in der LCD ................................................................ 43
Tips zum Gebrauch der Nuvis S...................................................... 44
Aufnahmevorbereitungen
Einlegen der Batterie ...................................................................... 45
Batterieprüfung .............................................................................. 45
Einlegen des Films ................................................................... 46-47
Die Filmpatrone IX240 ................................................................... 47
Datenaufzeichnung ......................................................................... 48
Normaler Aufnahmebetrieb
Richtige Kamerahaltung ................................................................. 49
Auslösung ...................................................................................... 49
Sucheranzeige ................................................................................ 50
Wahl des Bildformats...................................................................... 50
Dioptrieneinstellung ........................................................................51
Brennweiteneinstellung (Zoomen) .................................................. 51
Scharfeinstellung und Aufnahme ...............................................52-53
Grenzfälle der automatischen Scharfeinstellung ..............................53
Entnehmen des Films ................................................................ 53-54
Entwicklung des Films ................................................................... 54
Rückspullung teilbelichteter Filme ................................................. 55
Funktionen für Fortgeschrittene
Schärfenspeicherung ..................................................................... 56
Wahl der Blitzbetriebsart ................................................................ 57
Blitzautomatik ................................................................................ 57
Blitzabschaltung ............................................................................. 58
Blitz bei jeder Aufnahme ........................................................... 58-59
Langzeitsynchronisation .................................................................59
Verringerung roter Augen ............................................................... 60
Fernauslösung der Kamera (mit getrennt lieferbarer Fernbedienung) ... 61
Selbstauslöser ............................................................................... 62
Nahaufnahmen ............................................................................... 62
Einstellung der gewünschten Anzahl Kopien .................................. 63
Titelfunktion ............................................................................. 64-65
Einstellung das Datums und der Uhrzeit ................................... 66-67
Verschiedenes
Fehlersuche .............................................................................. 68-69
Technische Daten ..................................................................... 70-71
Sicherheitshinweise
.................................................................. 72-73
41

1 Belichtungsmeßfenster
2 Blitzgerät (-S. 57)
3 AF-Hilfsilluminator/Lampe zur Verringerung roter
Augen (-S. 60)
4 Sucherfenster (-S. 50)
5 Formatwähler (-S. 50)
6 Auslöser (-S. 49)
7 Schutzschieber (Hauptschalter) (-S. 45)
8 Objektiv
9 Fernsteuerungssensor (-S. 61)
10 Autofokus-Fenster
11 Halterung für Trageschnur (-S. 39)
12 Entriegelung des Filmpatronenfachs (-S. 46)
13 Dioptrieneinstellung (-S. 51)
14 Orange/grüne LED (Schärfenindikator) (-S. 50)
15 Sucherokular (-S. 50)
16@C/Taste für Verringerung roter Augen/
Selbstauslöseranzeige/Fernauslösung (-S. 60-62)
17 Taste zur Rückspulung teilbelichteter Filme (-S. 55)
18 J/ Taste für Blitzbetriebsart (-S. 57-59)
42
Teilebezeichnungen

19 Batteriefachdeckel (-S. 45)
20 Zoomhebel (-S. 51)
21 LCD-Feld
22 Taste ADJUST/ (-S. 63, 64, 66)
23 Taste SEL/ (-S. 64, 66, 67)
24 Taste TITLE / (-S. 63-65)
25 DATE-Taste (-S. 48)
26 Patronenfachdeckel (-S. 46)
27 Stativbuchse (-S. 61)
Anzeigedaten der LCD
1 Blitzbetriebsart (-S. 57-59)
2 Titelaufdruck (-S. 64-65)
3 Anzeige von Datum und Uhrzeit/Anzahl
gewünschter Kopien (-S. 48, 63)
4 Verringerung roter Augen (-S. 60)
5 Batteriewarnung (-S. 45)
6
Fernauslösung/Selbstauslöser
(-S. 61, 62)
7 Filmpatronensymbol (-S. 47)
8 Datenaufzeichnung (-S. 48)
9 Bildzähler (-S. 47)
43
Anzeigedaten der LCD

44
Tips zum Gebrauch der Nuvis S
Kamerapflege
•Schließen Sie bei Nichtbenutzung grundsätzlich den
Schutzschieber. Damit wird die Kamera ausgeschaltet; eine
versehentliche Auslösung ist unmöglich, und unbeabsichtigter
Stromverbrauch wird vermieden.
•Die Nuvis S ist nicht wetterfest und darf deshalb weder Regen
noch Salzwasser ausgesetzt werden. Eine feucht gewordene
Kamera sollte unverzüglich mit einem weichen Tuch
trockengerieben werden.
•Setzen Sie die Kamera keinen hohen Temperaturen aus, wie sie in
der Nähe eines Heizkörpers oder in einem in der Sonne geparkten
Wagen entstehen.
•Bewahren Sie die Kamera an einem kühlen, trockenen und
staubfreien Ort auf. Meiden Sie die Nähe von Chemikalien wie
Kampfer oder Naphthalin. In feuchtem Klima empfiehlt sich die
Aufbewahrung mit einem Trockenmittel.
•Bei wiederholtem Blitzen in kurzen Abständen heizen sich
Blitzgerät und Kamera auf. Lassen Sie der Kamera deshalb Zeit,
abzukühlen, bevor Sie die Aufnahmen fortsetzen.
•Lassen Sie die Kamera nicht fallen, und vermeiden Sie harte
Stöße.
•Verwenden Sie zur Reinigung der Glasflächen ein trockenes,
weiches Baumwolltuch oder einen Blasepinsel und
gegebenenfalls Optik-Reinigungspapier.
•
Entnehmen Sie bei längerer Aufbewahrung die Batterie. Einmal im
Monat sollten Sie die Batterie wieder einlegen und den Blitz
mehrmals zünden, um den Blitzkondensator zu formieren.
Batteriehinweise
•Prüfen Sie vor wichtigen Aufnahmen den Batteriezustand, und
nehmen Sie auf Reisen stets Ersatzbatterien mit.
•Bei Temperaturen unter 0°C fällt die Batterieleistung ab.
Temperieren Sie die Batterie deshalb bei niedrigen
Temperaturen bis unmittelbar vor den Aufnahmen. Eine bei Kälte
nachlassende Batterie erholt sich bei Normaltemperatur wieder.
Hinweis zur Filmpatrone IX240
•Bei Auslandsreisen empfiehlt sich die Mitnahme einer
ausreichenden Anzahl von Filmen IX240.
Nikon übernimmt keine Haftung für Betriebsstörungen, die sich aus unsachgemäßer Benutzung der Nuvis S ergeben.

45
Aufnahmevorbereitungen
Einlegen der Batterie
Batterieprüfung
1
Öffnen Sie den
Schutzschieber, so daß er
einrastet.
2
Setzen Sie die Batterie ein.
▼
Öffnen Sie den
Batteriefachdeckel.
▼
Setzen Sie eine 3-V-LithiumBatterie CR2 wie abgebildet ein.
▼
Schließen Sie den
Batteriefachdeckel.
•Denken Sie daran, daß nach einem
Batteriewechsel Datum und Uhrzeit neu
eingestellt werden müssen. (- S. 66)
Prüfen Sie den Batteriezustand.
▼
Öffnen Sie den Schutzschieber,
um die Kamera einzuschalten.
•
Das Objektiv fährt in Weitwinkelstellung (W).
•Blinkt “b” oder bleibt die LCD leer,
ist die Batterie erschöpft und muß
erneuert werden.
•Erscheint die Batteriewarnung “b”
nicht, ist die Spannungsversorgung
ausreichend.
Schließen Sie den Schutzschieber
nie zu hastig, um eine Beschädigung
des Objektivs zu vermeiden.
CR2

46
Einlegen des Films
1
Öffnen Sie den
Schutzschieber, und
vergewissern Sie sich, daß
“´” in der LCD erscheint.
•Erscheint eine Zahl im Bildzähler der
LCD, befindet sich ein teilbelichteter Film
in der Kamera.
•Erscheinen “´” und das Patronensymbol
“” in der LCD, befindet sich ein voll
belichteter Film in der Kamera und sollte
entnommen werden. (- S. 53)
2
Drehen Sie die Entriegelung
des Filmpatronenfachs in
Pfeilrichtung, und öffnen
Sie das Fach.
3
Schieben Sie eine
Filmpatrone in das Fach,
und schließen Sie den
Deckel.
•Die Kamera ist für IX240-Film konstruiert;
Kleinbildfilm 135 ist nicht verwendbar!
•Vergewissern Sie sich vor dem
Filmeinlegen, daß die Filmstatusanzeige
(VEI) auf “○” (unbelichtet) oder “;”
(teilbelichtet) steht. (- S. 47)
•Schließen Sie den Deckel des
Patronenfachs, so daß er einrastet.

47
•IX240-Film ist in Patronen zu 40, 25
und 15 Aufnahmen erhältlich.
•IX240-Patronen sind stets geschlossen.
Der Film wird nach dem Einlegen
automatisch herausgezogen und
eingefädelt..
•Die Filmstatusanzeige gibt Aufschluß
über den Zustand des Films.
Hinweise zur Behandlung der
IX240-Filmpatronen
•Vermeiden Sie die Berührung oder
starken Druck auf die Datenscheibe, die
Lichtschleuse und die Patronenspule.
•Brechen Sie die mechanische
Doppelentwicklungssperre keinesfalls ab.
Sollte sie abgebrochen sein, wenden Sie
sich bitte an Ihren Fotohändler.
•
Setzen Sie den Film keiner direkten
Sonnenbestrahlung, hohen Temperaturen
(Heizkörper), Staub, Feuchtigkeit oder
starken Magnetfeldern aus.
Die Filmpatrone IX240
4
Vergewissern Sie sich,
“”
und die Anzahlverfügbarer
Aufnahmen in der LCD erscheinen.
•Sollte die verfügbare Anzahl Aufnahmen
nicht angezeigt werden, wiederholen Sie
den Einlegevorgang.
•“
´
” blinkt, wenn ein voll belichteter Film
(Filmstatusanzeige “<”) eingelegt wurde.
Das Patronenfach verriegelt sich nach
dem Filmeinlegen automatisch.
Versuchen Sie nicht, es zu öffnen,
bevor der Film völlig zurückgespult ist!
=
;
:
<
*Filmstatusanzeige (VEI)
Unbelichteter Film*
Teilbelichteter Film*
Mechanische Doppelentwicklungssperre
Film voll belichtet, jedoch noch unentwickelt*
Film entwickelt*
Lichtschleuse
Lichtschleusenantrieb
Datenscheibe
Patronenspule

•Wählen Sie eine der drei möglichen Schreibweise durch Druck auf die DATE-Taste. Bei
jedem Druck schaltet die Anzeige wie folgt durch:
Jahr/Monat/Tag Stunde/Minute keine Aufzeichnung
•Halten Sie bei der Anzeige “
---
” die DATE-Taste über 2 s lang gedrückt. Die Anzeige
schaltet wie folgt durch:
Jahr/Monat/Tag Monat/Tag/Jahr Tag/Monat/Jahr
•Die Datenaufzeichnung erfolgt, wenn bei der Aufnahme “Å” in der LCD erscheint.
Bei Anzeige “
---
” werden keine Daten aufgezeichnet.
•Die Lage des Aufdrucks können Sie bei Ihrem Fotohändler erfragen, der mit einem für
das Advanced Photo System autorisierten Labor zusammenarbeitet.
48
Stellen Sie die gewünschte
Schreibweise des Datums
ein.
▼
Drücken Sie die DATE-Taste.
•Die Jahreszahl erscheint, die Uhrzeit
befindet sich im 24-Stundentakt.
•“---” erscheint, wenn "keine
Aufzeichnung" gewählt wurde.
Datenaufzeichnung

49
•Für Aufnahmen im Querformat nehmen
Sie die Kamera wie abgebildet in beide
Hände und stützen die Ellenbogen am
Körper ab.
•Halten Sie die Kamera bei der
Aufnahme betont ruhig, um
Verwacklungsunschärfe zu vermeiden.
•Halten Sie die Kamera für
Hochformataufnahmen so, daß sich der
Blitz wie abgebildet oben befindet.
•Tippen Sie den Auslöser zur Scharf- und
Belichtungseinstellung an; die grüne
LED (Schärfenindikator) leuchtet auf.
Solange Sie den Auslöser angetippt
halten, bleibt die Schärfe gespeichert
(- S. 56) . Zur Aufnahme drücken
Sie den Auslöser voll durch.
Normaler Aufnahmebetrieb
Richtige
Kamerahaltung
Auslösung
Verdecken Sie das Objektiv, den Blitz und
die Autofokus-Fenster nicht mit den
Fingern oder Haaren.

Verfügbare Bildformate
Der Sucher zeigt das Bildfeld je nach
dem gewählten Bildformat.
50
1Parallaxenmarken:
Bildbegrenzung bei
Aufnahmeabständen von ca. 1 m bis 0,45 m bei
den Formaten C und H. (- S. 62)
2Autofokus-Meßfeld: Legen Sie dieses
Feld zur Scharfeinstellung auf das
gewünschte Objekt.
3Orange LED: Konstantes Leuchten:
Zündbereitschaft. Blinken: Aufladung des
Blitzgeräts, der Blitz ist nicht
betriebsbereit.
4Grüne LED: Konstantes Leuchten: Schärfe
eingestellt; Blinken: Scharfeinstellung
unmöglich oder Aufnahmeabstand kürzer
als 0,45 m.
Vor jeder Aufnahme kann das
gewünschte Bildformat
eingestellt werden (C, H, P).
•Die Umschaltung des Bildformats mit
dem Formatwähler ist an beliebiger
Stelle im Film möglich. (- S. 40)
•Bei der Nachbestellung von Bildern ist
gleichfalls jederzeit ein Formatwechsel
möglich.
ACHTUNG!
Halten Sie die Kamera bei der
Formatumschaltung nicht zu nah am
Auge, um Verletzungen auszuschließen.
Classic-Bild (C)
Seitenverhältnis = 2 : 3
Breitbild (H)
Seitenverhältnis = 9 : 16
Panorama-Bild (P)
Seitenverhältnis = 1 : 3
(Parallaxenmarken
gelten nicht für P)
Sucheranzeige
Wahl des Bildformats

51
•Verstellen Sie den Einstellhebel, bis das
Sucherbild optimale Schärfe aufweist.
ACHTUNG!
Beim Blicken durch den Sucher und
Drehen des Einstellhebels nicht die
Augen mit Finger oder Fingernagel
beschädigen.
Blicken Sie in den Sucher, und
wählen Sie den Bildausschnitt
durch Betätigung des
Zoomhebels.
▼
Geben Sie den Zoomhebel frei,
wenn der gewünschte
Ausschnitt erreicht ist.
•
Wird die Kamera etwa zwei Minuten lang nicht
genutzt, so fährt das Objektiv automatisch auf
Weitwinkelstellung zurück. Durch Antippen
des Auslösers wird die Kamera wieder
eingeschaltet, worauf zur Bestätigung die LCD
aufleuchtet.
Für Tele-Aufnahmen schieben Sie den
Zoomhebel in Richtung (66 mm).
Für Weitwinkelaufnahmen schieben Sie den
Zoomhebel in Richtung (22,5 mm).
Brennweiteneinstellung (Zoomen)
Dioptrieneinstellung

52
Scharfeinstellung und Aufnahme
1
Wählen Sie den
Bildausschnitt.
•Bringen Sie das AF-Meßfeld mit dem
Hauptobjekt zur Deckung.
2
Stellen Sie scharf.
▼
Tippen Sie den Auslöser an.
▼
Vergewissern Sie sich, daß die
grüne LED aufleuchtet.
•Die grüne LED leuchtet auf, sobald die
Scharfeinstellung abgeschlossen ist.
•
Blinkt die grüne LED, so ist das Hauptobjekt
unscharf. Bei langsamem Blinken sind Sie zu nah
am Objekt (näher als 0,45 m). Treten Sie weiter
zurück, und machen Sie einen erneuten Versuch.
Bei schnellem Blinken der LED ist das Objekt für
die automatische Scharfeinstellung ungeeignet.
Greifen Sie zur Schärfenspeicherung. (- S. 56)
3
Drücken Sie den Auslöser
zur Aufnahme sanft durch.
•Bei schwachem oder Gegenlicht leuchtet
die orange LED auf, und der Blitz zündet
automatisch. (- S. 57)
•Nach der Aufnahme schaltet der
Bildzähler in der LCD um jeweils
eine Stelle zurück.
•Ruckartige Auslösung kann zu
Verwacklungsunschärfe führen.
Schließen Sie den Schutzschieber, um die
Kamera abzuschalten und Strom zu sparen.

53
Grenzfälle der automatischen
Scharfeinstellung
In den nachstehend genannten Fällen kann der Kamera
eine Scharfeinstellung unmöglich sein. Speichern Sie
in einem solchen Fall die Schärfe auf ein Ersatzobjekt
in gleicher Entfernung. (- S. 56)
A.Bei schwachem Kontrast, zum Beispiel blauem
Himmel, oder stark reflektierenden Flächen, wie
Autolack oder Wasser.
B.Bei wiederholten, gleichförmigen Strukturen.
C.Bei verschiedenen Entfernungsebenen
innerhalb des AF-Meßfeldes.
D.Bei starkem Gegenlicht oder sehr hellem
Hintergrund.
Entnehmen des Films
1
Die Filmrückspulung setzt
automatisch ein.
•Am Filmende schaltet die Kamera
automatisch auf Filmrückspulung.
•Während der Rückspulung zählt der
Bildzähler rückwärts, und die orange
LED blinkt.
•Zur Rückspulung teilbelichteter Filme
kann die Rückspulung manuell
ausgelöst werden. (- S. 55)
A
B
C
D

54
Entnehmen des Films
Entwicklung des Films
•Wir empfehlen, den Film zur
Bearbeitung einem Labor zu übergeben,
das sich durch das obenstehende Logo
als autorisiertes Fotolabor für das
Advanced Photo System ausweist.
•Der entwickelte Film wird zur sicheren
Aufbewahrung in der verschlossenen
Filmpatrone zurückgegeben.
•Zusammen mit den Vergrößerungen
erhalten Sie einen Index Print, der alle
Bilder des Films im Kleinformat zeigt.
•Weitere Informationen erhalten Sie
gegebenenfalls von Ihrem Fotohändler.
2
Vergewissern Sie sich, daß
“´”
in der LCD blinkt.
•Nach der Rückspulung erlischt die
orange LED, und “´” blinkt in der LCD.
•Sollte die Filmrückspulung wegen einer
schwachen Batterie vorzeitig abbrechen,
wird sie automatisch fortgesetzt, sobald
eine neue Batterie eingelegt wurde.
3
Öffnen Sie den Patronenfachdeckel,
und entnehmen Sie den Film.
•
Solange der belichtete Film nicht
entnommen wurde, ist weder eine
Auslösung noch die Einstellung von
Datum und Uhrzeit möglich.
•
Halten Sie die Kamera beim Öffnen des
Patronenfachdeckels so, daß die
Filmpatrone nicht herausfallen kann.
Versuchen Sie nicht, den Patronenfachdeckel
zu öffnen, bevor die orange LED erlischt und
“´” in der LCD zu blinken beginnt.

55
Rückspulung teilbelichteter Filme
1
Drücken Sie die Taste mit
der Nase in der
Schlaufenklemme oder
einem Kugelschreiber.
•Sie können die Taste freigeben, sobald
die Rückspulung einsetzt.
•Nach beendeter Rückspulung erlischt
die orange LED, und “´ ”blinkt in der
LCD. Versuchen Sie nicht, den
Patronenfachdeckel zu öffnen, bevor
das “´ ” zu blinken beginnt!
Hinweise zu MRC (Wechsel
teilbelichteter Filme)
•Teilbelichtete Filme können
jederzeit zwischen Kameras
ausgetauscht werden, die eine
MRC-Funktion bieten, wie Nikon
Pronea 600i, Nuvis 160i oder
Pronea S.
•Vermeiden Sie das Wiedereinlegen
eines teilbelichteten Films in der
Nähe starker elektrischer oder
Magnetfelder (zum Beispiel in der
Nähe eines Fernsehgeräts, Personal
Computers, Lautsprechers oder
Ventilators).
2
Entnehmen Sie den Film.
▼
Öffnen Sie das Patronenfach.
▼
Entnehmen Sie die Filmpatrone.
▼
Vergewissern Sie sich, daß
die Filmstatusanzeige auf “
;
”
steht.
•Beim Wiedereinlegen eines teilbelichteten
Films (Statusanzeige auf “;” ) spult die
Kamera den Film automatisch bis zu
nächsten freien Aufnahme vor.

56
1
Wählen Sie den
Bildausschnitt.
•Beachten Sie, daß die Kamera auf jenes
Motivdetail scharfstellt, mit dem sich
das AF-Meßfeld “ ” deckt.
2
Bringen Sie das AFMeßfeld mit dem
Hauptobjekt zur Deckung.
▼
Tippen Sie den Auslöser an.
•Vergewissern Sie sich, daß die grüne
LED aufleuchtet.
3
Schwenken Sie auf den endgültigen
Ausschnitt, und lösen Sie aus.
▼
Der Auslöser muß nach der Schärfenspeicherung angetippt gehalten werden.
▼
Erst nach dem Schwenk auf den
endgültigen Ausschnitt drücken Sie
ihn zur Belichtung voll durch.
•Solange der Auslöser angetippt bleibt,
leuchtet die grüne LED, und die Schärfe
bleibt gespeichert.
•Es versteht sich, daß der Aufnahmeabstand
nach Speicherung der Schärfe nicht mehr
geändert werden darf.
Wenn sich das Hauptobjekt nicht in der Bildmitte befindet, verfahren Sie wie folgt:
Funktionen für
Fortgeschrittene
Schärfenspeicherung

Drücken Sie die Taste J, bis
die gewünschte Blitzbetriebsart
angezeigt wird.
•
Einzelheiten finden Sie auf den für die einzelnen
Betriebsarten angegebenen Seiten.
AUTOJ Blitzautomatik
(-S. 57)
↓
#
Blitzabschaltung
(-S. 58)
↓
J
Blitz bei jeder Aufnahme
(-S. 58)
↓
†
Blitzautomatik mit
Langzeitsynchronisation
•
Mit Abschaltung der Kamera erfolgt
automatische Rückstellung auf Blitzautomatik.
57
1
Öffnen Sie den Schutzschieber,
um die Kamera einzuschalten.
•Bei eingeschalteter Kamera erscheint
“AUTOJ” in der LCD. Die Kamera ist
auf Blitzautomatik geschaltet.
•Die Kamera erkennt schwaches bzw.
Gegenlicht und zündet den Blitz dann
automatisch.
•Erscheint “#”
in der LCD, zündet der
Blitz nicht.
→
2
Vergewissern Sie sich, daß die orange
LED leuchtet, und lösen Sie aus.
•
Vergewissern Sie sich vor einer
Blitzaufnahme, daß sich das Hauptobjekt
innerhalb der Blitzreichweite befindet. Für ISO
200/24° gelten die folgenden Werte:
(22,5 mm): ca. 0,45 bis 3,7 m
(66 mm): ca. 0,45 bis 2,6 m.
•Solange die orange LED blinkt, lädt das
Blitzgerät auf, und der Auslöser bleibt gesperrt.
Wenn die orange LED konstant leuchtet, ist die
Kamera für die nächste Aufnahme bereit.
Bei schwachem oder Gegenlicht zündet der Blitz automatisch.
Blitzautomatik
Wahl der
Blitzbetriebsart
(-S. 59)

58
1
Drücken Sie die Taste J bis
“#” in der LCD erscheint.
•Nachdem in dieser Betriebsart längere
Verschlußzeiten wirksam werden, sollte
die Kamera zur Ausschaltung von
Verwacklungsunschärfe auf ein Stativ
gestellt werden.
2
Wählen Sie den
Bildausschnitt, und lösen
Sie aus.
▼
Tippen Sie den Auslöser an.
▼
Vergewissern Sie sich, daß
die grüne LED leuchtet, und
drücken Sie den Auslöser zur
Belichtung voll durch.
1
Drücken Sie die Taste Jbis
“J” in der LCD erscheint.
Diese Betriebsart eignet sich für Aufnahmen an Orten, an denen Blitzen verboten
ist, bzw. zur Erhaltung der natürlichen Lichtstimmung bei Nachtaufnahmen.
In dieser Einstellung zündet der Blitz auch
Blitzabschaltung
Blitz bei jeder Aufnahme

59
2
Wählen Sie den Bildausschnitt,
und lösen Sie aus.
▼
Tippen Sie den Auslöser an.
▼
Vergewissern Sie sich, daß die
orange und die grüne LED
leuchten, und drücken Sie den
Auslöser zur Belichtung voll durch.
•Sollte die orange LED blinken, so wird das
Blitzgerät noch aufgeladen. Drücken Sie
den Auslöser erst, wenn diese LED
konstant leuchtet.
1
Drücken Sie die Taste Jbis
“
†
” in der LCD
erscheint.
•Da in dieser Betriebsart längere
Verschlußzeiten zur Anwendung
kommen, sollte die Kamera zur
Ausschaltung von
Verwacklungsunschärfe auf ein Stativ
gestellt werden.
•Bei hellem Licht erscheint “#” in der
LCD, und der Blitz zündet nicht.
2
Wählen Sie den
Bildausschnitt, und lösen
Sie aus.
▼
Tippen Sie den Auslöser an.
▼
Vergewissern Sie sich, daß die
orange und die grüne LED
leuchten, und drücken Sie den
Auslöser zur Belichtung voll durch.
•
Sollte die orange LED blinken, wird das
Blitzgerät noch aufgeladen. Drücken Sie den
Auslöser erst, wenn die LED konstant leuchtet.
In dieser Betriebsart ergibt sich bei schwachem Licht bzw. bei Nacht eine
ausgewogene Belichtung von Vorder- und Hintergrund.
Langzeitsynchronisation
bei gutem Licht bei jeder Auslösung.

60
2
Wählen Sie den
Bildausschnitt, und tippen
Sie den Auslöser an.
•Die Lampe zur Verringerung roter
Augen leuchtet vor dem Blitz eine
Sekunde lang auf. Deshalb darf sich
weder die Kamera noch die Person
bewegen, bevor der Blitz zündet.
•Die Funktion zur Verringerung roter
Augen ist nicht für Aufnahmen von
schnellbewegten Objekten geeignet.
1
Drücken Sie die Taste
@C
,
bis
“@”
in der LCD erscheint.
•Bei jedem Druck auf die Taste schaltet
die Anzeige wie folgt durch.
Blitzabschaltung
↓
@ Verringerung roter Augen
↓
@
SCFernauslösung/Selbstauslöser
Bei Blitzaufnahmen erscheinen die Augen der fotografierten Personen zuweilen rot. Dieser Effekt kann
mit dieser Betriebsart verringert werden.
→
(-S. 61, 62)
Verringerung roter Augen
3
Vergewissern Sie sich, daß die orange und die
grüne LED aufleuchten, bevor Sie auslösen.
•
Sollte die orange LED blinken, wird das Blitzgerät
noch aufgeladen. Drücken Sie den Auslöser erst,
wenn die LED konstant leuchtet.
•
Zur Abschaltung der Funktion drücken Sie die Taste
@C
bis “@” in der LCD erlischt. Abschaltung
der Kamera führt nicht zur Löschung der Funktion!
•
Es ist möglich, die Funktionen zur Verringerung
roter Augen und Blitzabschaltung zu
kombinieren. In diesem Fall wird die
Verringerung roter Augen jedoch nicht wirksam.

61
3
Wählen Sie den Bildausschnitt,
und lösen Sie aus.
▼
Richten Sie die Fernbedienung auf
die Kamera, und drücken Sie den
Auslöser der Fernbedienung.
•Die Lampe zur Verringerung roter Augen
leuchtet etwa 2 s vor der Belichtung auf.
•Sollte eine Fernauslösung der Kamera
nicht möglich sein, muß die Batterie in der
Fernbedienung gewechselt werden. (Die
Lebensdauer der Batterie beträgt etwa 10
Jahre.) Übergeben Sie die Fernbedienung
Ihrem Nikon Händler oder dem Nikon
Kundendienst zum Batteriewechsel.
1
Stellen Sie die Kamera auf
ein Stativ oder eine feste,
ebene Unterlage.
•Die Fernauslösung ist frontal bis aus
einer Entfernung von etwa 5 m möglich.
Bei größeren Abständen sollten Sie auf
Selbstauslöser schalten. (-S. 62)
•Wenn der Fernsteuerungssensor an der
Kamera direktem Sonnenlicht oder
einer anderen starken Lichtquelle
ausgesetzt ist, ist einwandfreie
Fernauslösung nicht gewährleistet.
2
Drücken Sie die Taste
@C, bis “@SC” in der
LCD erscheint.
•Die Fernauslösefunktion wird
automatisch gelöscht, wenn sie nicht
innerhalb von zwei Minuten benutzt
oder der Schutzschieber geschlossen
wird.
Fernauslösung der Kamera (mit getrennt lieferbarer Fernbedienung)

62
•Bei Aufnahmen im Abstand von etwa 1 m
bis 0,45 m gelten die Parallaxenmarken im
Sucher als Bildbegrenzung. (Bei PanoramaAufnahmen sind die Parallaxenmarken
ungültig!) Der in der obigen Abbildung
schattierte Bereich kommt nicht aufs Bild.
•Bei kürzeren Abständen als ca. 0,45 m
blinkt die grüne LED langsam, und der
Auslöser bleibt gesperrt.
•Bei sehr kurzen Abständen blinkt die grüne
LED hastig, und eine Auslösung ist
möglich. Sie würde jedoch zu einer
unscharfen Aufnahme führen.
1
Drücken Sie die Taste@C,
bis “@
S
C” in der LCD
erscheint.
•Die Selbstauslöserfunktion wird
gelöscht, wenn die Auslösung nicht
innerhalb von etwa zwei Minuten
erfolgt oder der Schutzschieber
geschlossen wird.
•Es empfiehlt sich, die Kamera auf ein
Stativ zu stellen.
2
Wählen Sie den
Bildausschnitt, und tippen
Sie den Auslöser an.
•Die Lampe zur Verringerung roter
Augen blinkt 8 s lang und leuchtet die
letzten zwei Sekunden vor der
Belichtung konstant.
•Die Selbstauslöserfunktion ist nach der
Aufnahme gelöscht.
•Zum Abschalten des Selbstauslösers
schließen Sie den Schutzschieber.
Selbstauslöser Nahaufnahmen
Damit Sie selbst im Bild nicht fehlen.
Zum Beispiel für Blumenaufnahmen

63
1
Stellen Sie die gewünschte
Kopienzahl vor der
Aufnahme ein.
▼
Drücken Sie die Taste
über drei Sekunden lang, bis
"P-1" erscheint.
•Bei Einstellung der gewünschten
Kopienzahl darf die Titelfunktion nicht
aktiv sein. (- S. 65)
2
Stellen Sie die gewünschte
Kopienzahl ein.
▼
Zur Einstellung der
gewünschten Kopienzahl
drücken Sie die Taste ADJUST.
•Bei jedem Druck auf die ADJUST-Taste
schaltet die Anzeige von 1 bis 9 um eine
Stelle weiter.
•Nach der jeweiligen Aufnahme wird die
Einstellung gelöscht.
•Zur Löschung der Einstellung noch vor der
Aufnahme schalten Sie wieder auf "P-1".
•"P-1" erscheint, wenn eine andere
Sprache als Japanisch (JPN) eingestellt
ist. (- S. 64)
Einstellung der gewünschten Anzahl Kopien
Für jedes einzelne Bild kann die Anzahl der gewünschten Kopien (1 bis 9) eingestellt werden.

64
1
Drücken Sie vor der
Aufnahme die TITLE-Taste.
•Als Werkseinstellung erscheint beim
ersten Druck auf die TITLE-Taste der
Titel "HONEYMOON" (britisches
Englisch) in der LCD.
•30 verschiedene Titel stehen in 12
Sprachen zur Einstellung zur
Verfügung. (+S. 65)
•Der in der LCD eingestellte Titel wird
bei der Aufnahme aufgezeichnet.
2
Stellen Sie die gewünschte
Sprache ein.
▼
Drücken Sie die Taste bis
die gewünschte Sprache in
der LCD erscheint.
•So gilt beispielsweise die Anzeige
[USA] für amerikanisches Englisch.
•Wird die Taste über 2 s lang
gedrückt gehalten, laufen die Sprachen
schnell durch.
Titelfunktion
Für den Rückseitenaufdruck von Titeln
3
Stellen Sie den
gewünschten Titel ein.
▼
Drücken Sie die Taste bis
der gewünschte Titel in der
LCD erscheint.
•Über 2 s anhaltender Druck auf die
Taste läßt die Titel schnell durchlaufen.
•Nach dem Durchlaufen wird der
stehende Titel mit seinen ersten neun
Buchstaben angezeigt.

65
Verfügbare Sprachen
Die Titel in anderen Sprachen finden Sie in der beigefügten Aufstellung.
Code Sprache
DEN Dänish
FIN Finnisch
FRA Französisch
GER Deutsch
ITA Italienisch
JPN Japanisch
NOR Norwegisch
POR Portugiesisch
ESP Spanisch
SWE Schwedisch
GBR britisches Englisch
USA amerikanisches Englisch
•Zur Löschung der Titelfunktion drücken
Sie die TITLE-Taste und vergewissern
sich, daß der Titel nicht mehr angezeigt
wird.
In Deutsch verfügbare Titel
WEIHNACHTEN
GEBURTSTAG
URLAUB
HOCHZEITSREISE
HOCHZEIT
ABSCHLUßFEIER
JUBILÄUM
SCHULVERANSTALTUNG
ICH LIEBE DICH
DANKESCHÖN
HERZLICHEN GLÜCKWUNSCH ZUM GEBURTSTAG
HERZLICHE GLÜCKWÜNSCHE
FRÖHLICHE WEIHNACHTEN
ERSTER SCHULTAG
NEUJAHR
OSTERN
FROHES NEUES JAHR
VATERTAG
MUTTERTAG
TAUFE
FROHE OSTERN
HEILIGABEND
SYLVESTER
FROHE PFINGSTEN
FASCHING
OKTOBERFEST
ST. NIKOLAUSTAG
SHÜTZENFEST
ADVENT
ST. MARTINS TAG

66
1
Aktivierung des
Einstellmodus
▼
Drücken Sie die SEL-Taste
länger als zwei Sekunden.
•Die Jahreszahl beginnt zu blinken.
•Beachten Sie, daß die Titelfunktion bei
Einstellung von Datum und Uhrzeit
ausgeschaltet sein muß!
2
Einstellung des Jahres
▼
Stellen Sie die Jahreszahl
durch Druck auf die ADJUSTTaste ein.
•Bei jedem Druck auf die ADJUST-Taste
schaltet die Zahl um eine Stelle weiter.
•Wird die ADJUST-Taste länger als zwei
Sekunden gedrückt, laufen die Zahlen
schnell durch.
3
Einstellung des Monats
▼
Drücken Sie die SEL-Taste.
Die Monatszahl beginnt zu
blinken.
▼
Stellen Sie den Monat durch
Druck auf die ADJUST-Taste
ein.
▼
Drücken Sie die SEL-Taste.
•Zur Einstellung des Tages, der Stunde
und der Minute wiederholen Sie die
Schritte 2 und 3.
Einstellung des Datums und der Uhrzeit

67
4
Verlassen des
Einstellmodus
▼
Bei Druck auf die SEL-Taste
erscheint das eingegebene
Datum in der LCD.
•Wird der Schutzschieber während der
Einstellung des Datums bzw. der Uhrzeit
geschlossen oder der Zoomhebel betätigt,
werden alle bis dahin eingestellten Daten
übernommen.
Batteriewechsel
•Beachten Sie, daß nach einem
Batteriewechsel 00 00 00 in der LCD
erscheint.
•Bei Anzeige 00 00 00 werden keine
Daten aufgezeichnet.
•Wiederholen Sie zur Einstellung von
Datum und Uhrzeit die Schritte 1 bis 4.

Problem Abhilfe
Siehe Seite
•Wenn die orange LED beim Druck auf den Auslöser blinkt, wird das Blitzgerät noch geladen.
Geben Sie den Auslöser frei, und warten Sie, bis die LED konstant leuchtet. Lösen Sie dann aus.
•Wenn die grüne LED beim Druck auf den Auslöser langsam blinkt, sind Sie zu nah am Objekt.
Treten Sie weiter zurück.
•Wenn “´” und das Patronensymbol “ ” in der LCD erscheinen, ist der eingelegte Film
unbrauchbar. Legen Sie einen neuen Film ein.
•Der Schutzschieber ist nicht voll geöffnet und die Kamera damit nicht eingeschaltet. Öffnen Sie den
Schieber, bis er einrastet.
•Während der Aufladung zündet der Blitz nicht, und die orange LED blinkt. Warten Sie, bis die
orange LED konstant leuchtet, und lösen Sie dann aus.
•Prüfen Sie die Batterieanzeige. Ersetzen Sie gegebenenfalls die Batterie.
•Wenn “#” in der LCD erscheint, zündet der Blitz nicht.
•Säubern Sie gegebenenfalls die Autofokus-Fenster.
•Drücken Sie den Auslöser stets sanft durch, um Verwacklungsunschärfe zu vermeiden.
•Achten Sie stets darauf, daß das AF-Meßfeld auf dem Hauptobjekt liegt, und nehmen Sie bei
schwierig zu fokussierenden Motiven gegebenenfalls eine Ersatzmessung vor (Schärfenspeicherung).
•Der Film ist noch nicht völlig belichtet. Machen Sie die verbleibenden Aufnahmen, oder spulen
Sie den Film mit Handauslösung (teilbelichtet) zurück.
68
50, 57
50, 62
46, 53, 54
45
50, 57
45
57
42
49
53, 56
47, 55
Fehlersuche
Bitte prüfen Sie bei vermeintlichen Fehlern zunächst anhand der nachstehenden Hinweise, ob Sie das Problem nicht leicht selbst beheben können.
Verschluß bleibt gesperrt
Blitz zündet nicht
Hauptobjekt unscharf
Filmpatronenfach läßt sich
nicht öffnen

69
Keine Anzeige in der LCD
beim Öffnen des
Schutzschiebers
Kamera löst bei Druck auf
Fernbedienung nicht aus
45
45
–
61
61
–
61
Problem Abhilfe
Siehe Seite
Eine Besonderheit elektronischer Kameras
In seltenen Fällen kann es vorkommen, daß die Kamera durch starke statische Aufladung oder ähnliche Ursachen
nicht einwandfrei funktioniert. Entnehmen Sie in einem solchen Fall die Batterie, und legen Sie sie wieder ein.
Beachten Sie, daß anschließend Datum und Uhrzeit neu eingestellt werden müssen. (+S. 66.)
•Die Batterie ist falsch gepolt. Achten Sie beim Einlegen auf die Plus- und Minuspole.
•Die Batterie ist erschöpft, oder es ist keine Batterie eingelegt. Legen Sie eine frische
Batterie ein.
•
Wenn auch nach dem Einlegen einer neuen Batterie keine Anzeige erscheint, liegt eine
Betriebsstörung vor. Wenden Sie sich an Ihren Nikon Händler oder den Nikon Kundendienst.
•Die Kamera befindet sich außerhalb der Reichweite der Fernbedienung. Treten Sie näher heran.
•Sollte die Fernbedienung direktem Sonnenlicht oder einer anderen starken Lichtquelle
ausgesetzt sein, muß sie abgeschattet werden.
•Die Batterie der Fernbedienung ist erschöpft. Versuchen Sie keinesfalls, den Batteriewechsel
selbst vorzunehmen. Übergeben Sie die Fernbedienung vielmehr dem Nikon Kundendienst.
•Wenn die Fernbedienung länger als etwa zwei Minuten unbenutzt blieb, genügt ein Druck
auf die Taste
@
C , um die Fernauslösefunktion erneut zu aktivieren; in der LCD
erscheint “
@
S
C ”.

70
Kameratyp
IX240-Autofokus-Kamera für das Advanced Photo System mit
Belichtungsautomatik, Zentralverschluß und Nikon Zoomobjektiv 22.566 mm/5.2-7.5
Geeignet für
IX240-Filmpatrone (Advanced Photo System) [für Aufnahmeformat 16,7 mm x
30,2 mm]
Bildformate
Classic-Bild C, Breitbild H und Panorama-Bild P
Objektiv
22.5-66 mm/5.2-7.5 (Kleinbild-Äquivalentbrennweiten 28-82,5 mm);
sechs einzelnstehende Linsen
Verschluß
Elektronischer Programmverschluß mit Blendenfunktion
Sucher
Realbild-Zoomsucher; Gesichtsfeld ca. 85% bei Bildformat H; Vergrößerung
ca. 0,34fach bei 22,5 mm, ca. 0,85fach bei 66 mm; Dioptrieneinstellung: –1,5
bis +1,5 dpt
Sucheranzeige
Bildbegrenzung C/H/P (C und H mit Parallaxenmarken); AF-Meßfeld;
orange LED (Blitzbereitschaftslampe) - konstantes Leuchten:
Zündbereitschaft; Blinken: Aufladung des Blitzgeräts; grüne LED
(Schärfenindikator) - konstantes Leuchten: Schärfe eingestellt; langsames
Blinken (mit 2 Hz): Objekt zu nah; schnelles Blinken (mit 8 Hz):
Scharfeinstellung nicht möglich.
Scharfeinstellung
Mittels passivem Breitfeld-Autofokus-Systems; Aktivierung durch Antippen
des Auslösers; Einstellbereich 0,45 m - unendlich
Schärfenspeicherung
Schärfe bleibt gespeichert, solange Auslöser angetippt gehalten wird.
Belichtungsregelung
Mittels elektronisch gesteuerter Programmautomatik; Arbeitsbereich (ISO
200/24°): LW 6-17 bei 22,5 mm, LW 6-18 bei 66 mm; Blitz zündet bei
schwachem Licht automatisch.
Filmempfindlichkeitseinstellung
Automatisch auf ISO 50/18°, 100/21°, 200/24°, 400/27°, 800/30° bzw.
1600/33°.
Filmfunktionen
Filmeinlegen mittels Drop-in-Automatik; Einlegesicherung
Bildzähler
In LCD; rückwärtszählend
Selbstauslöser
Elektronisch gesteuert; Aktivierung über Auslöser; Vorlaufzeit 10 s, zweistufige
Blink-/Leuchtkontrolle
Technische Daten

71
Filmtransport
Film wird nach dem Einlegen automatisch aus der Patrone ausgestoßen und
nach jeder Aufnahme weitertransportiert; automatische Rückspulung am
Filmende; Rückspulung teilbelichteter Filme möglich
Fernbedienung (getrennt lieferbares Zubehör)
Infrarot-Fernbedienung zur Fernauslösung; 2 s Auslöseverzögerung;
automatische Abschaltung nach 2 min Nichtbenutzung; Reichweite frontal ca.
5 m; Batterielebensdauer ca. 10 Jahre; Abmessungen (mm/B x H x T): ca. 60 x
27 x 10; Gewicht (einschließlich Batterie): ca. 13 g
Eingebautes Blitzgerät
Vier Betriebsarten: Blitzautomatik, Blitzabschaltung, Blitz bei jeder Aufnahme
und Langzeitsynchronisation; automatische Zündung bei schwachem oder
Gegenlicht; Reichweite ca. 0,45-3,7 m bei 22,5 mm, ca. 0,45 - 2,6 m bei
66 mm (ISO 200/24°); Auslöser bleibt während Aufladung gesperrt;
Blitzfolgezeit ca. 6 s
Verringerung roter Augen
Lampe leuchtetet vor Blitzzündung ca. 1 s lang auf
Batteriekapazität
Ca. 10 Filme zu 25 Aufnahmen bei 50% Blitzeinsatz
Anzeige im LCD-Feld (bei eingeschalteter Kamera)
Bildzähler, Blitzbetriebsart, Verringerung roter Augen,
Fernauslösung/Selbstauslöser, Filmpatronensymbol, Batteriewarnung,
Datenaufzeichnung, Titel und Kopienanzahl
Spannungsquelle
Eine 3-V-Lithium-Batterie CR2
Datenaufzeichnung
Magnetisch; Datum/Titel/Kopienzahl; Datenanzeige in LCD in fünf Formaten:
Jahr/Monat/Tag, Stunde/Minute, Monat/Tag/Jahr, Tag/Monat/Jahr bzw. keine
Einbelichtung; 24-Stunden-Uhr; Ausgleich für Schaltjahre bis 2030;
Ganggenauigkeit der Uhr ±90 s/Monat; Spannungsversorgung über
Kamerabatterie; Möglichkeit der Einstellung gewünschter Kopienzahl (1 bis 9);
Titelaufzeichnung: 30 Titel in 12 Sprachen für Rückseitenaufdruck
Abmessungen (mm/B x H x T)
Ca. 93 x 65 x 32 (mit geschlossenem Schutzschieber);
ca. 130,5 x 65 x 32 (mit geöffnetem Schutzschieber)
Gewich (ohne Batterie)
Ca. 230 g
Sämtliche Daten gelten für frische Batterie bei Normaltemperatur (20°C).
Änderungen im Sinne des technischen Fortschritts vorbehalten.

72
Sicherheitshinweise
ACHTUNG!
•Versuchen Sie keinesfalls, die Kamera zu zerlegen, zu reparieren
oder in irgend einer Form zu verändern, da
Hochspannungskreise zu elektrischen Schlägen führen können.
Außerdem könnte die Funktionsfähigkeit der Kamera dadurch
beeinträchtigt werden.
•Sollte die Kamera durch einen Sturz beschädigt werden, dürfen
keinesfalls bloßgelegte innere Teile berührt werden, da
Hochspannung zu elektrischen Schlägen führen könnte.
Entnehmen Sie in einem solchen Fall die Batterie, und
übergeben Sie die Kamera Ihrem Nikon Händler zur
Instandsetzung.
•Bei Rauchentwicklung muß die Kamera unverzüglich
ausgeschaltet werden. Lassen Sie die Kamera abkühlen, bevor
Sie die Batterie entnehmen. Übergeben Sie die Kamera dann
Ihrem Nikon Händler zur Instandsetzung.
•Tauchen Sie die Kamera keinesfalls in Wasser ein, und halten
Sie Spritzwasser fern, da dies zu elektrischen Schocks führen
oder einen Brand auslösen könnte.
•Benutzen Sie die Kamera nicht in der Nähe brennbarer Gase, da
dies einen Brand oder eine Explosion auslösen könnte.
•Blicken Sie durch den Sucher nie direkt in die Sonne oder eine
andere starke Lichtquelle, da dies zu Netzhautschäden und
permanenter Beeinträchtigung des Sehvermögens führen könnte.
•Achten Sie darauf, daß sich die Trageschnur nicht um Ihren Hals
wickelt. Verhindern Sie dies insbesondere bei Kindern, um ein
Ersticken auszuschließen.
•Halten Sie Batterien von Kindern fern. Sollte eine Batterie
versehentlich verschluckt werden, rufen Sie unverzüglich einen
Arzt.
•Reinigen Sie die Kamera nie mit Verdünnung, Benzol oder
anderen aggressiven Reinigungsmitteln, um eine Beschädigung,
Brandgefahr und Gesundheitsschäden zu vermeiden.

73
ZUR BESONDEREN BEACHTUNG:
•Benutzen Sie die Kamera nicht mit nassen Händen, um
elektrische Schläge zu vermeiden.
•Halten Sie die Kamera von Kindern fern, damit diese nicht
Batterien oder Kleinzubehör verschlucken.
•Halten Sie die Kamera bei der Wahl des Bildformats nicht zu nah
am Gesicht, um eine versehentliche Verletzung des Auges zu
vermeiden.
•Zünden Sie den Blitz nie direkt vor den Augen einer Person vorübergehende Blindheit könnte die Folge sein!
•Schließen Sie bei Nichtbenutzung der Kamera den
Schutzschieber, und lassen Sie die Kamera nicht im direkten
Sonnenlicht liegen. Direkte, intensive Bestrahlung des Objektivs
könnte die Kamera in Brand setzen.
•Tragen Sie die Kamera nicht, wenn sie auf einem Stativ befestigt
ist - Sie könnten anstoßen und sich oder andere verletzen.
•Laufen Sie nicht mit dem Auge am Sucher - Sie könnten
stolpern, fallen und sich verletzen.
•Leere Batterien dürfen nicht ins Feuer geworfen,
kurzgeschlossen, zerlegt oder erhitzt werden, da dies einen
Brand oder eine Explosion auslösen könnte.
•Beachten Sie stets die Warnhinweise auf Batterien, damit sich
diese nicht entzünden oder explodieren.
•Verwenden Sie keinesfalls andere Batterien als in dieser
Anleitung angegeben, da dies zur Hitzeentwicklung oder einem
Brand führen könnte.
•Waschen Sie auslaufende Batteriesäure unmittelbar unter
laufendem Wasser von der Haut oder Kleidung. Bei Eintritt in die
Augen sofort gründlich mit Wasser spülen und einen Arzt
aufsuchen.
•Beim Blicken durch den Sucher und Drehen des Einstellhebels
nicht die Augen mit Finger oder Fingernagel beschädigen.

74
Avant-propos
Merci pour votre acquisition de l'appareil Nikon Nuvis S.
Votre nouvel appareil photo Nikon utilise le nouveau standard
(Advanced Photo System: IX240 System).
Le symbole T* apparaît sur tous les appareils de
format Advanced Photo System (APS).
Prenez soin de lire attentivement ce mauel avant d'utiliser
votre nouvel appareil et gardez-le à portée de main.
*Le symbole du format Advanced Photo System est une marque de fabrique de tous les produits IX240.
F
Faites quelques essais.
Avant de procéder à d'importantes prises de vue, prenez le temps de faire quelques
essais pour vous familiariser avec l'appareil et toutes ses fonctions.

75
Fixation de la bandoulière
Bandoulière AN-L16
Vérifiez la présence de l'article ci-dessous avant
d'utiliser votre appareil.
Accessoires
Accessoires en option
•Etui d'appareil CS-L20
(La télécommande peut se ranger dans la poche.)
•Télécommande (- P. 97)
•Etui de télécommande CML-L1
Fixez la bandoulière en la passant par la boucle pour bandoulière et
ajustez sa longueur en utilisant la barrette sur la bandoulière.
F
Placez votre tête
dans la boucle.

■
Choix de trois formats d'impression (C, H, P) pouvant se combiner sur le même film.
■
Un objectif zoom puissant 3x qui couvre une gamme de focales allant de 22,5 à 66 mm.
■
Impression de titre (par ex. "NOËL" ou "FÉLICITATIONS") au dos des photos.
■
Le tirage souhaité (1 à 9) peut être spécifié vue par vue à tout moment quand le film est chargé.
■
Le flash se déclenche automatiquement en lumière faible ou quand le sujet est en contre-jour.
■ Fonctionnement télécommandé (en option) possible.
■
Le changement en cours de film (MRC: Mid-Roll Change) vous permet de changer de cassette de film à tout moment.
Au rechargement de la cassette de film, l'appareil avance automatiquement le film jusqu'à la vue suivant la dernière vue exposée.
■ La photographie rapprochée est possible jusqu'à 0,45 m.
■ Un couvercle coulissant en acier inoxydable protège l'objectif, la fenêtre du viseur et l'écran de contrôle CL quand l'appareil n'est pas utilisé.
76
Format C (classique)
Rapport vertical/horizontal = 2:3
Format H (vision large)
Rapport vertical/horizontal = 9:16
Format P (panorama)
Rapport vertical/horizontal = 1:3
Caractéristiques de votre appareil Nikon:
P. 99
P. 87
P. 100
P. 93
P. 91
P. 97
P. 98
P. 86

Table des matières
Avant-propos ...................................................................................74
Accessoires .................................................................................... 75
Caractéristiques de votre appareil Nikon:........................................ 76
Descriptif de l'appareil .............................................................. 78-79
Ecran de contrôle CL .......................................................................79
Conseils sur l'emploi du Nuvis S ................................................... 80
Démarrage
Installation de la pile ...................................................................... 81
Vérification de la tension de la pile ................................................ 81
Chargement du film .................................................................. 82-83
Cassette de film IX240 ................................................................... 83
Enregistrement des données .......................................................... 84
Opération de base
Maintien correct de l'appareil ......................................................... 85
Déclencheur ................................................................................... 85
Viseur ............................................................................................ 86
Sélection du format d'impression.................................................... 86
Ajustement dioptrique .....................................................................87
Cadrage au zoom ........................................................................... 87
Mise au point et prise de vues ...................................................88-89
Sujets difficiles à mettre au point ....................................................89
Retrait du film ........................................................................... 89-90
Emportez la cassette de film exposé à un laboratoire photo ........... 90
Rebobinage du film partiellement exposé ....................................... 91
Fonctions évoluées
Comment utiliser la mémorisation de la mise au point .................. 92
Sélection du mode de flash ............................................................ 93
Photographie avec flash auto ......................................................... 93
Flash annulé .................................................................................. 94
Flash imposé ............................................................................ 94-95
Flash auto en synchronisation lente ................................................95
Atténuation des yeux rouges .......................................................... 96
Prise de vues avec télécommande (en option) ............................... 97
Retardateur ..................................................................................... 98
Prise de vues rapprochée ............................................................... 98
Spécification du tirage souhaité ..................................................... 99
Enregistrement du titre ......................................................... 100-101
Programmation de la date et de l'heure ................................. 102-103
Informations complémentaires
Dépannage ............................................................................104-105
Caractéristiques .................................................................... 106-107
Pour l'utilisation sans risque de l'appareil
(ATTENTION/PRECAUTIONS)
.... 108-109
77

1 Fenêtre de mesure d'exposition auto
2 Flash (-P. 93)
3
Illuminateur d'assistance AF/d'atténuation des yeux rouges
(-P. 96)
4 Fenêtre du viseur (-P. 86)
5 Sélecteur CHP (-P. 86)
6 Déclencheur (-P. 85)
7
Couvercle coulissant (interrupteur d'alimentation)
(-P. 81)
8 Objectif
9 Capteur pour la télécommande (-P. 97)
10 Fenêtres de mise au point auto
11 Boucle pour bandoulière (-P. 75)
12
Déverrouillage du logement de la cartouche
(-P. 82)
13 Manette d'ajustement dioptrique (-P. 87)
14 Témoin lumineux orange/témoin lumineux vert
(indicateur de mise au point correcte) (-P. 86)
15 Oculaire du viseur (-P. 86)
16
@
C/Commande d'atténuation des yeux rouges/de
télécommande/retardateur (-P. 96-98)
17
Commande de rebobinage du film partiellement exposé
(-P. 91)
18 J/Commande de mode flash (-P. 93-95)
19 Couvercle du logement de la pile (-P. 81)
78
Descriptif de l'appareil

20 Commande de zoom (-P. 87)
21 Ecran de contrôle CL
22
Commande ADJUST/ (-P. 99,100,102)
23 Commande SEL / (-
P. 100,102,103
)
24 Commande TITLE/ (-P. 99-101)
25 DATE button (-P. 84)
26
Couvercle du logement de la cartouche
(-P. 82)
27 Filetage de fixation pour pied (-P. 97)
Ecran de contrôle CL
1 Indicateur de mode de flash (-P. 93-95)
2
Indicateur d'enregistrement de titre
(-P. 100-101)
3 Indicateur de date et heure/tirage souhaité
(-P. 84, 99)
4 Témoin d'atténuation des yeux rouges (-P. 96)
5 Indicateur de tension de pile insuffisante(-P. 81)
6
Indicateur de télécommande/retardateur (-P. 97, 98)
7 Indicateur de présence de cartouche (-P. 83)
8
Indicateur d'enregistrement des données
(-P. 84)
9 Compteur de vues (-P. 83)
79
Ecran de contrôle CL

80
Conseils sur l'emploi du Nuvis S
Conseils pour l'utilisation de l'appareil
•Refermez le couvercle coulissant pour couper l'appareil quand il
n'est pas utilisé. Cela évitera tout déclenchement accidentel
susceptible de se traduire par le déchargement de la pile.
•Le Nuvis S n'est pas étanche et ne doit donc pas être exposé à la
pluie ou à l'eau salée. Si l'appareil est mouillé, séchez-le
immédiatement en l'essuyant avec un chiffon sec.
•Ne soumettez pas l'appareil à des températures élevées, par
exemple à proximité d'un appareil de chauffage, ou bien à
l'intérieur d'une voiture pendant l'été.
•Rangez l'appareil à un endroit frais, sec et propre. Mettez-le à
l'abri de tout produit chimique tel que camphre ou naphtaline.
L'emploi d'un agent dessicant est préconisé lors du stockage.
•Le déclenchement répété du flash peut rendre la pile et l'appareil
chauds. Laissez-leur le temps de refroidir avant de continuer la
prise de vues.
•
Ne laissez pas tomber l'appareil et évitez tout choc contre des surfaces dures.
•Utilisez un chiffon en coton doux et sec, un pinceau soufflant
disponible dans le commerce ou bien un dispositif de nettoyage
de lentilles pour éliminer la saleté et les taches.
•Si l'appareil doit rester inutilisé pendant longtemps, retirez la
pile. Une fois par mois, insérez une pile et déclenchez le flash
plusieurs fois pour rétablir sa capacité.
Remarques sur la pile
•N'oubliez pas de vérifier la tension de la pile lors de la prise de
photos importantes. Emportez des piles de rechange si vous
voyagez à l'étranger.
•La tension de la pile a tendance à diminuer quand la
température tombe en dessous de 0˚C. Lors de la prise de vues
à faibles températures, gardez la pile au chaud. La pile se
rétablira quand la température redeviendra normale.
Remarques sur la cartouche de film IX240
•Il est recommandé d'emporter des cassettes de film IX240 de
rechange si vous voyagez à l'étranger, dans des pays où de
telles cassettes ne seront peut-être pas disponibles.
Nikon ne saurait être tenu responsable de mauvais fonctionnements survenant si le Nuvis S n'est pas utilisé conformément aux instructions de ce manuel.

81
Ne refermez pas trop vite le
couvercle coulissant, cela pourrait
endommager l'objectif.
CR2
2
Insérez la pile.
▼
Ouvrez le couvercle du logement
de la pile.
▼
Insérez une pile au lithium 3 V
CR2 dans le logement comme
indiqué.
▼
Refermez le couvercle du
logement de la pile.
•N'oubliez pas de reprogrammer la date
et l'heure après le remplacement de la
pile. (- P. 102)
1
Ouvrez le couvercle
coulissant jusqu'au déclic de
mise en place.
Démarrage
Vérification de la tension
de la pile
Installation de la pile
Vérifiez la tension de la pile.
▼
Ouvrez le couvercle coulissant pour
mettre l'appareil sous tension.
•L'objectif se met automatiquement en
position W (grand-angulaire).
•Si “b” clignote ou si rien n'apparaît
sur l'écran de contrôle CL, la pile est
totalement déchargée et doit être
remplacée.
•Si l'indicateur de tension de pile
insuffisante “b ” n'apparaît pas, la
pile est entièrement chargée.

82
Chargement du film
1
Ouvrez le couvercle
coulissant pour vérifier si la
lettre “´” est visible sur
l'écran de contrôle CL.
•Si le nombre de vues apparaît sur
l'écran de contrôle CL, une cassette
partiellement exposée est chargée.
•Si la lettre “´”et l'indicateur de présence de
cassette “ ” apparaissent sur l'écran de
contrôle CL, une cassette entièrement
exposée est chargée et doit être retirée.
(- P. 89)
2
Tournez le déverrouillage du
logement de la cassette
dans le sens de la flèche
pour ouvrir le couvercle du
logement de la cassette.
3
Insérez une cassette de film dans
le logement de la cassette et
refermez le couvercle.
•Utilisez uniquement une cassette de film
IX240. (Le film 24 x 36 mm ordinaire
est inutilisable.)
•Vérifiez que le VEI (indicateur visuel
d'exposition) indique “○” (non exposé)
ou “
;
” (partiellement exposé) avant le
chargement. (- P. 83)
•Refermez le couvercle du logement de la
cassette jusqu'à son encliquetage.

83
=
;
:
<
* Indicateur visuel d'exposition (VEI)
Film non exposé*
Film partiellement exposé*
Ergot de condamnation de la réexposition
Film totalement exposé mais non traité*
Film traité à l'intérieur de la cartouche*
Volet de
protection
Mécanisme d'
ouverture du volet
de protection
Disque de données
Bobine enrouleuse
•Cassettes de film disponibles: films de
40 vues, 25 vues et 15 vues.
•Les cassettes de film IX240 ne
présentent pas d'amorce. Le film est
automatiquement extrait et placé dans
l'appareil.
•L'indicateur visuel d'exposition (VEI)
indique les quatre états du film.
Remarques sur les cassettes de
film IX240
•Ne touchez pas, ne démontez pas et
n'appliquez pas d'impacts violents sur le
disque de données, le volet de protection
ou la bobine enrouleuse.
•Ne cassez pas l'ergot de condamnation de
la réexposition (IPI). Adressez-vous au
laboratoire photo le plus proche si cet
ergot est cassé.
•N'exposez pas le film en plein soleil, à des
températures élevées près d'un appareil de
chauffage, à la poussière ou à l'humidité,
ou à un champ magnétique puissant.
Cassette de film IX240
4
Vérifiez que “ ” et le nombre
de vues disponibles apparaissent
sur l'écran de contrôle CL.
•Si le nombre de vues n'apparaît pas,
rechargez le film.
•La lettre “
´
”clignote si une cartouche de
film entièrement exposé (le VEI indique
“<”) est insérée.
Le couvercle du logement de la cartouche se verrouille
automatiquement après le chargement. N'essayez pas
de l'ouvrir avant la fin du rebobinage du film.

•Pressez la commande DATE pour sélectionner l'un des trois affichages. A chaque
pression, l'affichage change dans l'ordre indiqué:
Année/Mois/Jour Heure/Minutes Pas d'enregistrement
•Maintenez la commande DATE pressée pendant plus de 2 sec. pendant l'affichage de
“
---
”. L'affichage changera dans l'ordre suivant:
Année/Mois/Jour Mois/Jour/Année Jour/Mois/Année
•
Lors de la prise de vues avec "Å” apparaissant sur l'écran de contrôle CL, les données sur
l'écran seront enregistrées. Aucune donnée n'est enregistrée quand le mode “---” st sélectionné.
•Demandez à votre laboratoire photo affichant la "Marque de laboratoire photo autorisé"
l'emplacement des données enregistrées.
84
Réglez au mode d'affichage de
votre choix.
▼
Pressez la commande DATE.
•La section "Année" est affichée et
imprimée en deux chiffres et "Heure"
est en cycle 24 heures.
•“
---
” apparaît quand le mode "Pas
d'enregistrement" est sélectionné.
Enregistrement des données

85
•Quand vous tenez l'appareil
horizontalement, collez les coudes au
buste et maintenez-le avec les deux
mains comme indiqué.
•Maintenez fermement l'appareil pour
éviter tout bougé.
•Quand vous tenez l'appareil
verticalement, vérifiez que le flash est
en haut comme indiqué.
•Sollicitez légèrement le déclencheur
pour activer la mise au point et
l'exposition, le témoin lumineux vert
(indicateur de mise au point correcte)
s'allumera. La mise au point est
bloquée quand le déclencheur est
pressé à mi-course. (- P. 92)
Pressez franchement jusqu'au
retentissement du déclic pour
déclencher.
Opération de base
Maintien correct de
l'appareil
Déclencheur
N'occultez pas l'objectif, le flash ou les
fenêtres de mise au point automatique
avec vos doigts ou vos cheveux.

Zone image disponible
Les zones coupées sur l'impression
finale varient selon le format
d'impression (C/H/P).
86
1
Repères de correction de parallaxe
Pour la prise de vue rapprochée en
formats C et H à une distance d'env. 1 m
à 0,45 m. (- P. 98)
2
Zone de mise au point automatique
Positionnez-la sur le sujet.
3
Témoin lumineux orange
S'il est allumé: le flash est prêt à se déclencher.
S'il clignote: Le flash se recycle et n'est
pas encore prêt.
4
Témoin lumineux vert
S'il est allumé: La mise au point correcte est
réalisée. S'il clignote: La mise au point
correcte n'est pas réalisée ou la distance de
prise de vues est inférieure à env. 0,45 m.
Sélectionnez le format d'impression souhaité
avec le sélecteur CHP avant la prise de vues.
•
Vous pouvez choisir l'un des trois format d'impression
(C, H ou P) en agissant sur le sélecteur CHP à tout
moment quand le film est chargé. (- P .76)
La zone image varie selon le format d'impression
sélectionné.
•
Vous pouvez également changer de format
d'impression en commandant des tirages additionnels
à un laboratoire photo.
ATTENTION!
Pour éviter tout risque de lésion oculaire, tenez
l'appareil à l'écart de votre visage lorsque vous
manipulez le sélecteur CHP.
Format C
(classique)
Rapport vertical/
horizontal = 2:3
Format H
(vision large)
Rapport vertical/
horizontal = 9:16
Format P
(panorama)
Rapport vertical/
horizontal = 1:3
(repères de correction
de parallaxe inutilisables)
Viseur
Sélection du format
d'impression

87
•Tournez le levier d'ajustement
dioptrique vers + ou - pour rendre
l'image dans le viseur plus nette.
ATTENTION!
Quand vous regardez dans le viseur et
opérez le levier d'ajustement dioptrique,
faites attention de ne pas vous blesser
aux yeux avec vos doigts ou ongles
pendant l’opération.
Regardez dans le viseur et
composez l'image en
déplaçant le curseur de zoom.
▼
Une fois la taille d'image
souhaitée obtenue, relâchez le
curseur de zoom.
•
Si l'appareil reste inutilisé pendant plus de 2
minutes, l'objectif se rétracte automatiquement
en position (grand angle) et l'appareil se
met hors tension. Appuyez légèrement sur le
déclencheur pour remettre l'appareil sous
tension, l'écran CL s'allumera.
Déplacez le curseur de zoom dans le sens (66mm)
pour étendre l'objectif pour le cadrage serré au téléobjectif.
Déplacez le curseur de zoom dans le sens (22,5
mm) pour rétracter l'objectif pour le cadrage large au
grand angle.
Cadrage au zoom
Ajustement dioptrique

88
Mise au point et prise de vues
1
Composez l'image
•Centrez la zone de mise au point auto
sur le sujet.
2
Mettez au point sur le sujet.
▼
Sollicitez légèrement le déclencheur.
▼
Vérifiez que le témoin lumineux vert est
allumé.
•Le témoin lumineux vert s'allume quand
la mise au point correcte est réalisée.
•
Quand le témoin vert clignote, le sujet n'est
pas net. Si le témoin lumineux vert clignote
lentement, éloignez-vous à plus de 0,45 m du
sujet et redéclenchez. S'il clignote
rapidement, le sujet est difficile à mettre au
point. Dans ce cas, recourez à la
mémorisation de la mise au point.(- P. 92)
3
Pressez franchement mais en douceur le
déclencheur pour prendre la photo.
•
Si la lumière est insuffisante ou si le sujet est en
contre-jour, le témoin lumineux orange
s'allume et le flash se déclenche
automatiquement. (- P. 93)
•
Après la prise de vues, le nombre de vues
disponibles est réduit un à un sur l'écran de
contrôle CL.
•
La pression hésitante du déclencheur peut
provoquer un bougé.
Refermez le couvercle coulissant pour mettre l'appareil
hors tension et économiser l'énergie de la pile.

89
Sujets difficiles à mettre au point
Les sujets suivants peuvent être trop difficiles à
mettre au point. Dans ce cas, recourez à la
mémorisation de la mise au point (- P. 92) en
mettant au point sur un autre sujet équidistant de
l'appareil.
A. Sujets à faible contraste, tels que ciel bleu ou
surfaces très réfléchissantes comme une
voiture brillante ou de l'eau
B. Sujets à motifs continus ou répétés
C. Sujets proches et lointains présents
simultanément dans la zone de mise au
point auto
D. Sujets en fort contre-jour ou sur fond brillant
lumineux
Retrait du film
1
Le film se rebobine
automatiquement.
•En fin de rouleau, le film se rebobine
automatiquement
•Pendant le rebobinage, le compteur de
vues décompte les vues une à une et le
témoin lumineux orange clignote.
•Si vous souhaitez retirer le film alors
que le nombre de vues encore
disponibles apparaît sur l'écran de
contrôle CL, rebobinez le film
partiellement exposé. (- P. 91)
A
B
C
D

90
Retrait du film
Emportez la cassette de film
exposé à un laboratoire photo
•Nous vous recommandons d'emporter
votre cassette de films à un laboratoire
photo portant la "Marque de laboratoire
photo autorisé" ci-dessus pour le
traitement et l'impression.
•Vos négatifs seront remis dans la cassette
pour faciliter le rangement.
•Des impressions d'index (petites images
de chaque vue exposée sur le rouleau de
film) sont fournies avec les négatifs.
•Pour de plus amples informations,
consultez votre laboratoire photo.
2
Vérifiez que la lettre
“´”
clignotante est visible sur
l'écran de contrôle CL.
•Une fois le rebobinage terminé, le
témoin lumineux orange s'éteint et la
lettre “´ ” clignote.
•Si le rebobinage du film s'arrête à micourse parce que la pile est déchargée,
il reprendra automatiquement dès le
remplacement de la pile.
3
Ouvrez le couvercle du logement
de la cassette et retirez le film.
•Le déclenchement ou le réglage de la
date et de l'heure sont impossibles tant
que le film rebobiné n'est pas retiré.
•
A l'ouverture du couvercle du logement de la
cassette, vérifiez que l'appareil est retourné,
sinon la cartouche pourra tomber.
N'ouvrez pas le couvercle du logement de la
cassette avant que le témoin lumineux orange
s'éteigne et que la lettre “´”se mette à clignoter.

91
Rebobinage du film partiellement exposé
1
Pressez la commande en
utilisant la barrette de la bandoulière
ou la pointe d'un stylo à bille.
•Une fois le rebobinage commencé, il
est inutile de continuer à appuyer sur la
commande de rebobinage de film
partiellement exposé.
•Une fois le rebobinage terminé, le
témoin lumineux orange s'éteint et la
lettre “´ ” se met à clignoter. N'essayez
pas d'ouvrir le couvercle avant que la
lettre “´ ” se mette à clignoter.
Remarques sur le MRC
(changement de rouleau
partiellement exposé)
•Un film partiellement exposé peut
être placé à tout moment dans un
appareil MRC, tel que Pronea
600i/6i, Nuvis 160i et Pronea S
Nikon.
•Au rechargement d'un film
partiellement exposé, évitez les
environnements soumis à des
champs électriques ou
électromagnétiques puissants (par
exemple près d'un téléviseur, d'un
ordinateur personnel, d'une enceinte
audio ou d'un ventilateur électrique).
2
Retirez le film.
▼
Ouvrez le couvercle du
logement de la cartouche.
▼
Retirez le film.
▼
Vérifiez que l'indicateur visuel
d'exposition (VEI) indique
;
.
•
Si le VEI indique ;(film partiellement exposé),
l'appareil avancera automatiquement le film
jusqu'à la position où la prise de vue suivant la
dernière vue exposée à son rechargement.

92
1
Composez l'image.
•Si le sujet principal se trouve en dehors
de la zone de mise au point auto
“ ”
,
la zone derrière le sujet sera mise au
point.
2
Axez la zone de mise au
point auto sur le sujet
principal.
▼
Sollicitez légèrement le
déclencheur.
•Vérifiez que le témoin lumineux vert
s'allume.
3
Recomposez l'image et
déclenchez.
▼
Sollicitez légèrement le déclencheur
et recomposez l'image.
▼
Puis pressez franchement le
déclencheur.
•Tant que le déclencheur est légèrement sollicité, le
témoin lumineux vert reste allumé et la mise au
point mémorisée.
•Ne modifiez pas la distance appareil-sujet pendant
que le déclencheur est légèrement sollicité.
Si votre sujet principal n'est au centre de la vue
Fonctions évoluées
Comment utiliser la mémorisation de la mise au point

Pressez la commande Jjusqu'à ce
que l'indicateur de mode de flash
souhaité apparaisse.
AUTOJ Flash auto (-P. 93)
↓
#
Flash annulé
(-P. 94)
↓
J Flash imposé (-P. 94)
↓
†
Flash auto en synchronisation
lente
(-P. 95)
•Le mode de flash revient à flash auto à
la mise hors tension de l'appareil.
93
1
Ouvrez le couvercle
coulissant pour mettre
l'appareil sous tension.
•A la mise sous tension, “AUTOJ” apparaît
sur l'écran de contrôle CL. Le mode flash
auto est automatiquement activé.
•L'appareil détecte l’insuffisance de
lumière ou le sujet en contre-jour et
déclenche automatiquement le flash.
•Quand “#”
apparaît sur l'écran de
contrôle CL, le flash ne se déclenche pas.
→
2
Vérifiez que le témoin lumineux
orange s'allume, et déclenchez.
•Avant la prise de vues au flash, vérifiez
que le sujet se trouve à portée du flash.
Voir le guide suivant (à 200 ISO).
(22,5 mm): d'env. 0,45 à 3,7 m
(66 mm) : d'env. 0,45 à 2,6 m
•
Si le témoin lumineux orange clignote, le flash est
en cours de recyclage et le déclencheur est bloqué.
Attendez que le témoin lumineux orange s'allume et
reprenez la photo.
Le flash automatique se déclenche quand la lumière disponible est
faible ou quand le sujet est en contre-jour.
Photographie avec flash auto
Sélection du mode de flash

94
1
Pressez la commandee
J
jusqu'à ce que “#”
apparaisse sur l'écran de
contrôle CL.
•Comme des vitesses d'obturation lentes
sont ordinairement sélectionnées en ce
mode, servez-vous d'un pied pour
éviter le bougé.
2
Composez l'image et prenez
la photo.
▼
Sollicitez légèrement le
déclencheur.
▼
Vérifiez que le témoin
lumineux vert est allumé, puis
pressez franchement le
déclencheur pour prendre la
photo.
1
Pressez la commande
J
jusqu'à ce que “J”
apparaisse sur l'écran de
contrôle CL.
Utilisez ce mode de flash aux endroits où la photographie au flash est interdite
ou pour conserver lumière naturelle pour des scènes nocturnes.
Utilisez ce mode pour déclencher le flash
de la lumière disponible.
Flash annulé Flash imposé

95
2
Composez l'image et déclenchez.
▼
Sollicitez légèrement le déclencheur.
▼
Vérifiez que les témoins
lumineux vert et orange sont
allumés, puis pressez
franchement le déclencheur
pour prendre la photo.
•Si le témoin orange clignote, le flash est en
train de se recycler. Vérifiez que le témoin
lumineux orange s'allume, et prenez la photo.
1
Pressez la commande
J
jusqu'à ce que “
†
”
apparaisse sur l'écran de
contrôle CL.
•Comme des vitesses d'obturation lentes
sont ordinairement sélectionnées en ce
mode, servez-vous d'un pied pour
éviter le bougé.
•Si le sujet est lumineux,“#” apparaît
sur l'écran de contrôle CL et le flash ne
se déclenche pas.
2
Composez l'image et prenez
la photo.
▼
Sollicitez légèrement le
déclencheur.
▼
Vérifiez que les témoins lumineux
vert et orange sont allumés, puis
pressez franchement le
déclencheur pour prendre la photo.
•Si le témoin orange clignote, le flash est en
train de se recycler. Vérifiez que le témoin
lumineux orange s'allume, et prenez la photo.
Utilisez ce mode pour obtenir l'exposition correcte pour le sujet principal et
l'arrière-plan dans des situations en faible lumière ou de nuit.
Flash auto en synchronisation lente
volontairement, indépendamment

96
2
Composez l'image et
sollicitez légèrement le
déclencheur.
•Comme l'illuminateur d'atténuation des
yeux rouges s'allume pendant une
seconde avant le déclenchement, faites
attention de ne pas bouger l'appareil et
ne laissez pas le sujet bouger tant que
le flash ne s'est pas déclenché.
•Le mode d'atténuation des yeux rouges
n'est pas recommandé lors de la prise
de sujets en déplacement rapide.
1
Pressez la commande
@C
jusqu'à ce que “@” apparaisse
sur l'écran de contrôle CL.
•
A chaque pression de la commande
@C
l'affichage change dans l'ordre indiqué.
Annulé
↓
@
Illuminateur d'atténuation des
yeux rouges
↓
@SC
Indicateur de
télécommande/retardateur
(-P. 97, 98)
En photographie au flash, les yeux du sujet peuvent parfois apparaître rouges. Utilisez ce mode pour réduire
ce phénomène des "yeux rouges".
→
Atténuation des yeux rouges
3
Vérifiez que les témoins lumineux
vert et orange sont allumés avant
de prendre la photo.
•Si le témoin orange clignote, le flash est en train
de se recycler. Vérifiez que le témoin lumineux
orange s'allume, et prenez la photo.
•
Pour annuler le mode atténuation des yeux rouges.
pressez la commande
@C
jusqu'à ce que “@”
disparaisse de l'écran de commande CL. Ce mode
ne s'annule pas en mettant l'appareil hors tension.
•Les modes d'atténuation des yeux rouges et de
flash annulé peuvent être réglés ensemble,
mais dans ce cas, l'atténuation des yeux
rouges sera impossible.

97
3
Composez l'image et prenez
la photo.
▼
Pointez la télécommande vers
l'appareil et pressez le
déclencheur sur l'appareil.
•L'illuminateur d'atténuation des yeux rouges
s'allumera pendant env. 2 secondes avant le
déclenchement.
•
Si le déclenchement à distance est impossible,
remplacez la pile dans la télécommande.
(L'autonomie de la pile est d'environ 10 ans.)
Faites la remplacer par un revendeur ou dans
un centre de service Nikon autorisé.
1
Placez l'appareil sur un pied
ou une surface plate stable.
•La télécommande est efficace jusqu'à
5 m si pointée directement sur l'appareil.
Si la distance appareil-sujet est
supérieure à 5 m, utilisez toujours le
mode retardateur. (-P. 98)
•Si le capteur de l'appareil est exposé en
plein soleil ou à toute autre lumière
puissante, la télécommande ne
fonctionnera pas correctement.
2
Pressez la commande
@Cjusqu'à ce que
“@
S
C” apparaisse sur
l'écran de contrôle CL.
•
Le mode télécommande sera
automatiquement annulé s'il n'est pas
utilisé pendant plus de 2 minutes environ
ou si le couvercle coulissant est fermé.
Cela signifie que vous pouvez continuer à
déclencher à distance pendant 2 minutes
après la dernière prise.
Prise de vues avec télécommande (en option)
Pour le contrôle à distance du déclenchement

98
•Quand le sujet se trouve sur une plage d'env.
1 m à 0,45 m, composez l'image avec les
repères de correction de parallaxe. (Ces
repères sont inutilisables pour le format
d'impression P.) La zone indiquée cidessus sera coupée sur le tirage final.
•Quand le sujet se trouve à moins d'env.
0,45 m. le témoin lumineux vert clignote
lentement et l'obturateur est verrouillé.
•Si le sujet est très rapproché, le témoin
lumineux vert clignote rapidement et le
déclenchement est possible, mais se traduira
par des photos floues.
1
Pressez la commande @C
jusqu'à ce que “@
S
C”
apparaisse sur l'écran de
contrôle CL.
•Le mode retardateur sera automatiquement
annulé s'il n'est pas utilisé pendant plus de
2 minutes environ ou si le couvercle
coulissant est fermé.
•Il est recommandé de placer l'appareil
sur un pied.
2
Composez l'image et
prenez la photo.
•L'illuminateur d'atténuation des yeux
rouges clignotera pendant environ
8 sec., puis s'allumera pendant env.
2 sec. avant le déclenchement.
•Le retardateur sera annulé aprés le
déclenchement.
•Fermez le couvercle coulissant pour
annuler le retardateur.
Retardateur
Prise de vues rapprochée
Pour figurer vous aussi sur la photo.
Pour prendre des sujets comme des gros plans de fleurs

99
1
Réglez le tirage souhaité
avant la prise de vues.
▼
Pressez la commande
pendant plus de 3 secondes
jusqu'à l'apparition de “P-1”.
•Le tirage souhaité (1 à 9) peut se
spécifier vue par vue.
•N'oubliez pas d'annuler la fonction
d'enregistrement de titre lors de la
spécification du tirage. (- P. 101)
2
Réglez le tirage souhaité.
▼
Appuyez sur la commande
ADJUST pour régler le tirage
souhaité.
•A chaque pression de la commande
ADJUST, le nombre augmente de un
de 1 à 9.
•Le nombre spécifié est annulé après la
prise de vues.
•Réglez le nombre à “P-1” pour l'annuler
avant la prise de vues.
•“P-1” s'affiche quand le réglage du
code de langue est autre que JPN
(Japonais). (- P. 100)
Spécification du tirage souhaité
Le tirage souhaité (1 à 9) peut se spécifier vue par vue.

100
1
Pressez la commande TITLE
avant la prise de vues.
•Le titre "HONEYMOON" (en anglais) est
initialement réglé à l'usine et apparaît sur
l'écran de contrôle CL à la première
pression de la commande TITLE.
•Vous pouvez choisir le titre et la langue
de votre choix parmi les 30 titres et 12
langues disponibles. (+P. 101)
•Le titre réglé à l'écran de contrôle CL
sera enregistré à la prise de la photo.
2
Réglez la langue.
▼
Pressez la commande
jusqu'à ce que la langue de
votre choix apparaisse sur
l'écran de contrôle CL.
•Par exemple, si [FRA] apparaît sur
l'écran de contrôle CL, la langue sera
Le Français.
•La pression continue de la commande
pendant plus de 2 sec. changera
rapidement de langue.
Enregistrement du titre
Pour imprimer un titre au dos des photos.
3
Réglez un titre.
▼
Pressez la commande jusqu'à ce
que le titre de votre choix apparaisse
sur l'écran de contrôle CL.
•La pression continue de la commande
pendant plus de 2 sec. changera
rapidement de titre.
•Le titre réglé défile sur l'écran de
contrôle CL et les 9 premières lettres
sont affichées après le défilement.
 Loading...