


Data Reader MV-1 |
|
Instruction Manual |
PP. 2-25 |
Datenlesers MV-1 |
|
Bedienungsanleitung |
S. 26-49 |
Lecteur de données MV-1 |
|
Manuel d’instructions |
P. 50-73 |
Lector de Datos MV-1 |
|
Manual de instrucciones |
PP. 74-97 |
Lettore dati Nikon MV-1 |
|
Manuale d’istruzioni |
PP. 98-121 |
MV-1
En
De
Fr
Es
It
DATA READER MV-1
ACCESS
ERROR
START


 Index
Index


Introduction .............................................................................................. |
3 |
|
Notices ....................................................................................................... |
4 |
|
Nomenclature............................................................................................ |
5 |
|
Precautions............................................................................................. |
6-7 |
|
Basic operation .................................................................................... |
8-16 |
|
1. |
Connecting to camera and inserting memory card ................... |
8-9 |
2. |
Transferring shooting data in the camera to memory card for |
|
|
storage....................................................................................... |
10-11 |
3. |
Transferring shooting data in the memory card to PC for |
|
|
storage....................................................................................... |
12-13 |
4. |
Opening shooting data (text file) using spreadsheet |
|
|
software .................................................................................... |
14-16 |
Details of Shooting Data................................................................... |
17-19 |
|
Setting and Changing Recording Mode with the F5/F100 ............. |
20-23 |
|
Approved Memory Cards ....................................................................... |
24 |
|
Blinking Error Lamp (red)....................................................................... |
25 |
|
Specifications........................................................................................... |
25 |
|
Marks used in this manual
This icon marks cautions, information that should be read before use to prevent damage to the MV-1.
This icon marks notes, information that should be read before using the MV-1.
This icon marks tips, additional information that may be helpful when using the MV-1.
This icon indicates that more information is available elsewhere in this manual.
* Personal computer is abbreviated as “PC” in this manual.
2


 Introduction


Thank you for purchasing the Nikon Data Reader MV-1. Please read this document completely to use the MV-1 correctly and enjoy its full capabilities. After reading, please keep this manual available so you can refer to it again when needed.
The data reader MV-1 offers the following features:
•Transfer shooting data stored in the Nikon F6, F5 and F100 to a memory card set in the MV-1 and store.
•Data can be transferred from the memory card to a personal computer (PC).
•Using the memory card and a PC, recording mode of the F5 and F100 can be set and changed.
 Record setting with the F6 and F100
•It is necessary to set the camera to record shooting data. (Default setting is no recording.) With the F6, setting is possible with the camera, while with the F100, the MV-1 and a PC are needed (x 20).
 Using shooting data with a PC
•Data is stored to the memory card as a CSV (comma-separated value) format text file, so it can be easily viewed and manipulated using a spreadsheet application such as Microsoft® Excel.
•Transferring data stored in the memory card to a PC requires additional equipment such as the PC Card Adapter EC-AD1, commercial PC card adapter for memory cards, or memory card reader (Data Reader MV-1 cannot be connected to a personal computer).
•With the MV-1, CompactFlash™ card is used to copy shooting data stored in the F6. For a list of approved memory cards, see “Approved Memory Cards” on page 24.
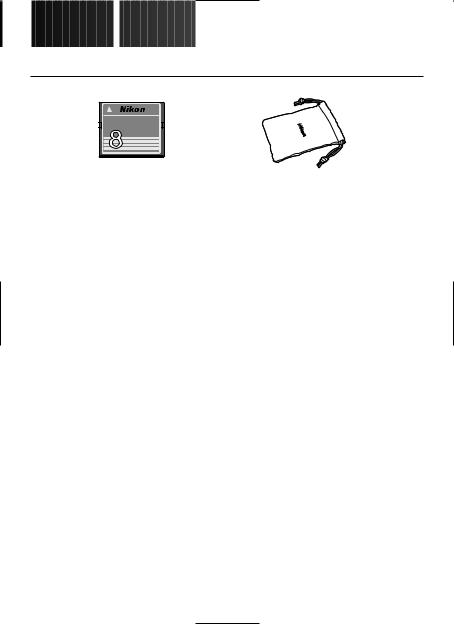
•Accessories
Please verify that the following accessories have been included with this product.
CompactFlash CardTM 
EC-8CF
MB |
|
|
CompactFlash™ |
Case |
|
memory card (x 8) |
||
|
3


 Notices


Notice for customers in the U.S.A.
Federal Communications Commission (FCC) Radio Frequency Interference Statement
This equipment has been tested and found to comply with the limits for a Class B digital device, pursuant to Part 15 of the FCC rules. These limits are designed to provide reasonable protection against harmful interference in a residential installation. This equipment generates, uses, and can radiate radio frequency energy and, if not installed and used in accordance with the instructions, may cause harmful interference to radio communications. However, there is no guarantee that interference will not occur in a particular installation. If this equipment does cause harmful interference to radio or television reception, which can be determined by turning the equipment off and on, the user is encouraged to try to correct the interference by one or more of the following measures:
•Reorient or relocate the receiving antenna.
•Increase the separation between the equipment and receiver.
•Connect the equipment into an outlet on a circuit different from that to which the receiver is connected.
•Consult the dealer or an experienced radio/television technician for help.
CAUTIONS
Modifications
The FCC requires the user to be notified that any changes or modifications made to this device that are not expressly approved by Nikon Corporation may void the user's authority to operate the equipment.
Interface Cables
Use the interface cables sold or provided by Nikon for your equipment. Using other interface cables may exceed the limits of Class B Part 15 of the FCC rules.
Notice for customers in the State of California
WARNING: Handling the cord on this product will expose you to lead, a chemical known to the State of California to cause birth defects or other reproductive harm.
Wash hands after handling.
Notice for customers in Canada
CAUTION
This class B digital apparatus meets all requirements of the Canadian Interference Causing Equipment Regulations.
ATTENTION
Cet appareil numérique de la classe B respecte toutes les exigences du règlement sur le matériel brouilleur du Canada.
4


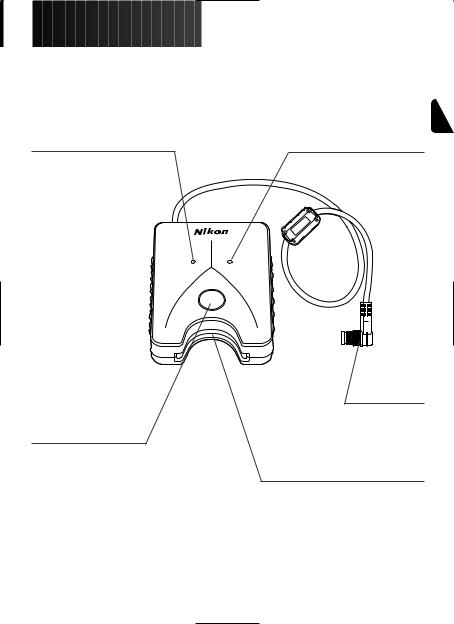
 Nomenclature


Access lamp (green) (x 11) |
Error lamp (red) (x 25) |
DATA READER MV-1
ACCESS
ERROR
START
Plug (x 8)
Start button (x 10)
Memory card slot (x 8)
5


 Precautions


• Do not subject the MV-1 to strong shocks
Do not drop or otherwise hit the MV-1. This can cause malfunctions.
• Protect it from water
Take care to protect the MV-1 from water. If water gets inside the case, it may lead to corrosion. This can be expensive to repair, and in severe cases it may be impossible to repair at all.
• Avoid sudden temperature changes
If you expose the MV-1 to a sudden temperature change (for example, taking it from the cold outdoors into a warm house, or vice-versa), water drops may form on the inside and outside of the case, and can cause damage. Place the MV-1 in a plastic bag or other container in advance and allow it to adjust to the new temperature before using it.
• Do not use near strong electromagnetic waves or magnetic fields
In places where strong electromagnetic waves or fields exist, such as near television broadcasting towers, or where strong static electricity is present, recorded data may be corrupted or deleted, and the MV-1 may not function normally.
• Always turn camera power off before connecting the MV-1
Always turn camera power off before connecting the MV-1 to the camera, or disconnecting it.
• Maintain sufficient battery power
Be sure to use the MV-1 with a reasonable level of power in the camera batteries. Check your camera instruction manual for information on how to check battery power.
• Caring for the MV-1
Use a blower to remove most of the dust and dirt, then wipe gently with a clean, soft cloth.
• Store the MV-1 in a cool, dry place
Store the MV-1 in a cool, dry place to prevent mold and malfunctions.
Keep it away from naphthalene or camphor (moth repellent), electric appliances that generate magnetic fields or any excessively hot place such as inside a vehicle during the summer or near a heater.
6

• Static electricity may interfere with normal operation
While rare, there are cases where an external electrostatic field can affect the operation of the electronic circuitry, preventing the MV-1 from operating normally. If this occurs, disconnect the MV-1 from the camera and then reconnect it.
• Avoid operation while access lamp (green) is on
When the access lamp is on (blinking or continuous), do not perform any of the following operations, as they may corrupt the files or folders stored on the memory card, or the shooting data in the camera itself. It is possible to damage the memory card as well.
Prohibited operation when the access lamp is on (blinking or steady): Removing or inserting a memory card; attaching/detaching plug to the 10-pin
terminal; removing or installing camera batteries; rewinding film; releasing shutter. The memory card and the plug may be inserted or removed freely while the error lamp is on, however.
•Timestamp for files and folders
•With F6: The timestamp on folders and shooting data files in the F6 is based on data received from the internal F6 clock when the start button of the MV-1 is pressed. The timestamp is applied to every folder and file produced in the memory card with one operation.
•With F5 and F100: Folders and files in the F5 and F100 use a fixed timestamp for shooting data “Sep. 1, 2004, 00 hours, 00 minutes and 00 sec.".
•Folders and files other than shooting data (folders such as nikon_dr, modeset, modelist or files automatically created in those folders) use a fixed timestamp of “Sep. 1, 2004, 00 hours, 00 minutes and 00 sec." with any camera.
•Other precautions
•The MV-1 cannot be used with cameras other than the F6, F5 or F100, even if they do have 10-pin terminals (for example, the F90/F90X, D2H or D100+MB-D100).
•The MV-1 does not offer a function to transfer data to a PC.
•Once written to the memory card in the MV-1, shooting data cannot be transferred back to the camera, or displayed by the camera.
7
Basic operation
1. Connecting to camera and inserting memory card
(Illustrations show the F6)
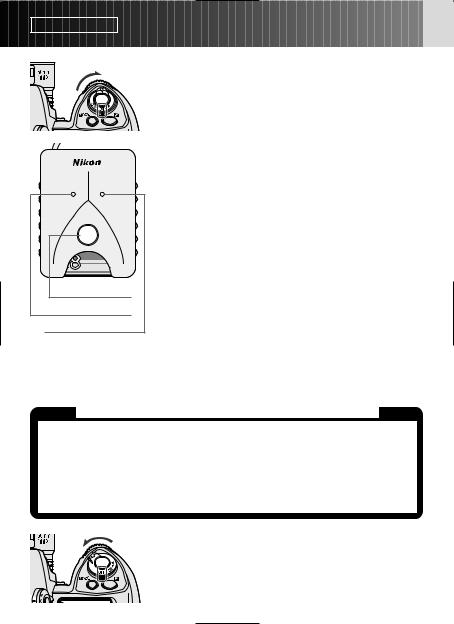
1 Confirm film is not loaded in the camera (E is displayed in the frame counter) and battery power is sufficient.
• If shooting data stored in the camera is too large and/or data remains in the memory card, data transfer from the camera to the memory card will take a long time. Change batteries for new ones when necessary.
xSee camera’s instruction manual for battery power confirmation.
2
 3
3
Turn the camera power off.
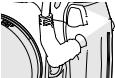
Remove the cap on the 10-pin terminal, insert the MV-1 plug so that the Y mark on the plug aligns with the index mark • on the camera terminal, then rotate in the direction shown to lock it in place.
•The position of the 10-pin terminal may vary depending on your camera model. Refer to your camera’s instruction manual for details.
•The Extension Cord MC-21 cannot be used.
START
CompactFlashCard
EC-8CF
4Insert the memory card into the memory card slot.
•Supplied memory card has been formatted in FAT file system (x 13) and can be used as it is.
•Hold the memory card so that the label is on the same side as the MV-1 start button, and insert it pins-first into the memory card slot.
•Use a memory card in which no data remains.
•Refer to the list of supported memory card types on p. 24 for more information.
8

 Insert a memory card straight and in the right direction.
•Do not push a memory card bent or in the wrong direction. This may cause damage to the MV-1 or memory card.
 Record setting with the F6 and F100
•It is necessary to set the camera to record shooting data. (Default setting is no recording.) With the F6, setting is possible with the camera, while with the F100, the MV-1 and a PC are needed (x 20).
 Use a memory card in which no data remains
•If previous shooting data remains in a memory card, it may take a long time to transfer data from a camera. Refer to "If access lamp keeps blinking for a long time" (x 11).
9
Basic operation
2. Transferring shooting data in the camera to memory card for storage
1 Turn on the camera power.
• Confirm film is not loaded in the camera (E is displayed in the frame counter) and battery power is sufficient (x 8).
|
Press start button of the MV-1 for at least one |
DATA READER MV-1 |
2second. |
ACCESS ERROR
START |
CompactFlash CardTM |
EC-8CF |
MB |
Start button |
Access lamp
Error lamp
•The MV-1 access lamp will blink as it communicates with the camera.
•Folders (x 13) will be automatically created in the memory card to store shooting data. Shooting data recorded in the camera will be transferred here for storage.
•If data transfer completes normally, shooting data in the camera is deleted, and the access lamp will change from blinking to continuous for about six seconds, then go off. Blinking of access lamp may continue for a long time (x 11).
•If the error lamp (red) blinks, it indicates a fault has been detected. In this case, by referring to "Blinking Error Lamp" (x 25), turn off camera power, make sure access lamp turns off, replace memory card if necessary, then repeat the above procedure from step 1.
For F5 and F100 users (setting and changing recording mode)
Besides transferring shooting data, "modelist" and "modeset" folders are created on the memory card each time the start button of the MV-1 is pressed. When the start button is pressed, the recording mode of the F5 or F100 is set/changed after transferring shooting data if certain files in the modelist folder are placed in the modeset folder beforehand. With the F100, this operation is required at the beginning since shooting data is set not to be recorded at the default setting (x 20-23).
3 Confirm access lamp is off, turn the camera power off, remove the memory card and disconnect the MV-1 (x 11).
10
If shooting data is transferred/stored while film is loaded in camera
•If shooting data is transferred while film is loaded in the camera, processing will be as below. With the F5 and F100, shooting data is retained in the camera even after transfer, so we recommend transferring data with no film loaded.
F6 |
• Shooting data in the camera other than the current film data will be transferred. |
|
• Shooting data in the camera other than the current film data will be deleted (shooting data for the |
||
|
current film will be left untouched). |
|
|
|
|
F5 |
• Shooting data in the camera other than the current film data will be transferred. |
|
• No shooting data in the camera including the data of the current film in use will be deleted. |
||
|
||
|
|
|
F100 |
• All shooting data in the camera including the data of the current film in use will be transferred. |
|
• No shooting data in the camera including the data of the current film in use will be deleted. |
||
|
||
|
|
 If access lamp keeps blinking for a long time
In any of the following cases, make sure the access lamp is off before turning the power off.
•The MV-1 checks the files on the memory card while transferring shooting data. If the memory card already holds many shooting data (files), it could take a long time to store data (several dozen minutes for hundreds of files, or even several hours for thousands of files). To avoid this problem, transfer shooting data from the memory card to the PC hard disk, and delete it from the memory card when no longer needed (x 12).
•When large amounts of shooting data are recorded in the camera, even if no data (file) remains in the memory card, the access lamp may blink for several minutes.
•The F5 is set to always record shooting data regardless of current camera settings, so even if the MV-1 is being connected for the first time it will automatically transfer recorded shooting data to the memory card. This may cause blinking of the access lamp for several minutes.
 Disconnecting from camera
1.Confirm access lamp is off and turn off camera power.
2.Rotate the MV-1 plug in the opposite direction from that used to connect it, and then pull the plug out straight when it is sufficiently loose.
 Removing memory cards
•If the MV-1 is connected to the camera;
1.Confirm that the access lamp is off.
2.Turn off camera power and remove the memory card by holding it with your fingers.
•If the MV-1 is not connected to the camera, the memory card can be removed with your fingers without any additional procedure.
CompactFlashCard
EC-8CF
11
Basic operation
3. Transferring shooting data in the memory card to PC for storage
(Illustrations show Windows XP Home Edition/Professional operating system.)
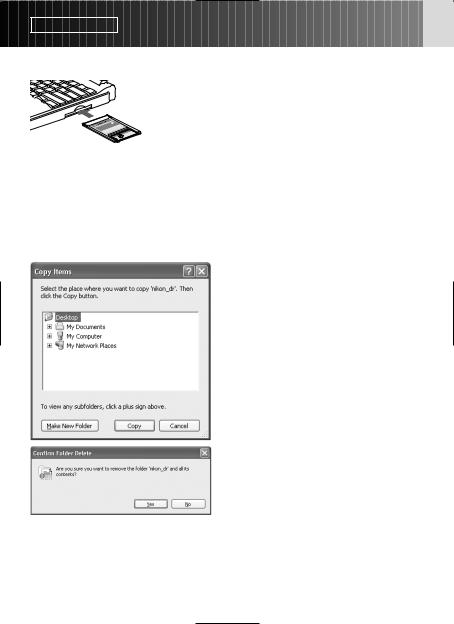
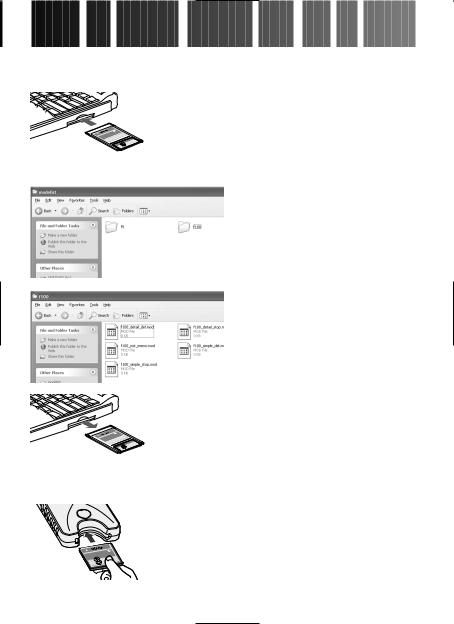
1 Connect the memory card to the PC.
• Connect the memory card using the Card Adapter EC-AD1 (sold separately), commercial PC card adapter for memory cards, or memory card reader. When connection is completed, memory card will appear on the PC as a removable disk.
•Refer to the instruction manuals for your PC, PC card adapter or memory card reader when connecting the memory card, as details may vary.
•With Windows 95, it may be impossible to recognize the memory card. Refer to your PC instruction manual for additional information.
2Save the "nikon_dr" folder to the PC.
• To prevent deleting "nikon_dr" folder saved in the PC by overwriting, change the name of the folder.
• Refer to your PC instruction manual for details on how to save the shooting data for your particular PC and operating system.
3 Delete the shooting data from the memory card.
• If the shooting data is no longer needed, delete it from the memory card so that you can store the next batch of shooting data on the card.
• Refer to the instruction manuals for your specific PC and operating system for information on deleting files and folders, as details may vary.
• Shooting data can also be deleted by formatting the memory card (x 13).
12
 Names of memory cards connected to a PC
•Depending on your specific PC and operating system, the name assigned to the connected memory card may vary. Common names are "UNTITLED (E:)" and "NO_NAME".
 Shooting data folders and files on memory card
•The folders and files used to store the shooting data on the memory card (x 10) have the following structure (example shown is for the F6):
|
For shooting data storage |
|
|
Data reader folder |
Camera model folder |
Camera ID folder |
Shooting data files |
nikon_dr |
F6 |
ID012 |
n00001.txt |
|
|
|
n00002.txt |
|
|
|
n00003.txt |
For setting/changing recording mode of F5/F100
modelist
 For details on these folders (x 21).
  modeset
•The camera model (F6, F5, F100) is automatically detected, and the camera model folder name automatically set.
•The camera ID folder name identifies the same model type.
The camera ID folder name is "IDxxx" where "xxx" is one of the following: F6: The ID number of the camera (000~999)
F5: “255” (fixed) (Changed ID number of the camera if the camera ID number has been changed using the AC-1WE or AC-1ME Photo Secretary for F5*.)
*Photo Secretary for F5 is no longer available.
F100: Three underbars (fixed)
•If there are 8,192 shooting data files in the camera ID folder, a new camera ID folder of the same name followed by "_xx" (where xx is a number from 01 to 99) will be created, and new shooting data files stored in that folder.
•The shooting data file names are displayed as "nxxxxx.txt" where xxxxx is a numeral from 00001 to 09999, and indicates the film number. If a file name already exists in the folder it will not be rewritten, but the new file will instead have "_xxxx" appended to it, where xxxx is a numeral from 0001 to 9999.
 Memory card formatting (initialization)
•Memory cards should be formatted by a PC using FAT12, FAT16 or FAT32 file systems (The MV-1 cannot format memory cards). The file system will vary with your specific PC and operating system. Refer to the corresponding instruction manuals for details.
13
Basic operation
4. Opening shooting data (text file) using spreadsheet software
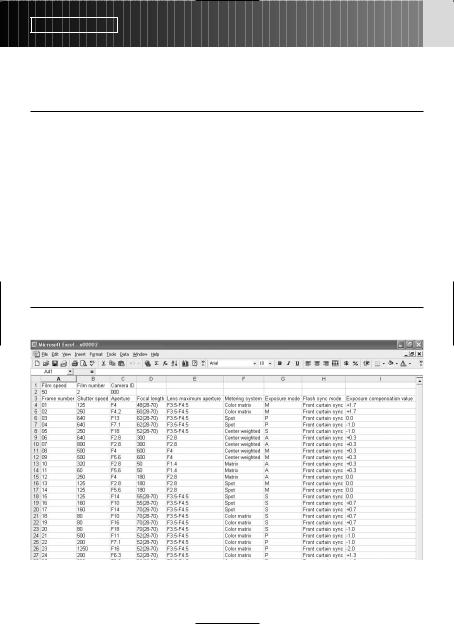
Shooting data is saved as a CSV text file for each film. This text file can be easily opened and manipulated with spreadsheet applications such as Microsoft® Excel.
• Text data (example using the F6)
The shooting data for each film is saved as the text data shown here.
Film speed,Film number,Camera ID 50,2,000
Frame number,Shutter speed,Aperture,Focal length,Lens maximum aperture,Metering system,Exposure mode,Flash sync mode,Exposure compensation value,EV difference in Manual,Flash exposure compensation value,Speedlight setting,Multiple exposure,Lock,Vibration Reduction,Date(yy/mm/dd),Time 01,125,F4,48(28-70),F3.5-F4.5,Color matrix,M,Front curtain sync,+1.7,+0.3,0.0,non-TTL auto flash,None,AE Unlock,VR off,2005/07/25,10:01 02,250,F4.2,60(28-70),F3.5-F4.5,Color matrix,M,Front curtain sync,+1.7,0.0,0.0,non-TTL auto flash,None,AE Unlock,VR off,2005/07/25,10:02 03,640,F13,62(28-70),F3.5-F4.5,Spot,P,Front curtain sync,0.0,0.0,0.0,non-TTL auto flash,None,AE Unlock,VR off,2005/07/25,10:04 04,640,F7.1,62(28-70),F3.5-F4.5,Spot,P,Front curtain sync,-1.0,0.0,0.0,non-TTL auto flash,None,AE Unlock,VR off,2005/07/25,10:04 05,250,F18,52(28-70),F3.5-F4.5,Center weighted,S,Front curtain sync,-1.0,0.0,0.0,non-TTL auto flash,None,AE Unlock,VR off,2005/07/25,10:04 06,640,F2.8,300,F2.8,Center weighted,A,Front curtain sync,+0.3,0.0,0.0,non-TTL auto flash,None,AE Unlock,VR off,2005/07/25,10:07 07,800,F2.8,300,F2.8,Center weighted,A,Front curtain sync,+0.3,0.0,0.0,non-TTL auto flash,None,AE Unlock,VR off,2005/07/25,10:07 08,500,F4,600,F4,Center weighted,M,Front curtain sync,+0.3,+0.8,0.0,non-TTL auto flash,None,AE Unlock,VR off,2005/07/25,10:10 09,500,F5.6,600,F4,Center weighted,M,Front curtain sync,+0.3,-0.2,0.0,non-TTL auto flash,None,AE Unlock,VR off,2005/07/25,10:10 10,320,F2.8,50,F1.4,Matrix,A,Front curtain sync,+0.3,0.0,0.0,non-TTL auto flash,None,AE Unlock,VR off,2005/07/25,10:11 11,60,F5.6,50,F1.4,Matrix,A,Front curtain sync,+0.3,0.0,0.0,non-TTL auto flash,None,AE Unlock,VR off,2005/07/25,10:11 12,250,F4,180,F2.8,Matrix,A,Front curtain sync,0.0,0.0,0.0,non-TTL auto flash,None,AE Unlock,VR off,2005/07/25,10:12
• Using spreadsheet software to make a table (example using the F6)
If the shooting data file is opened in a spreadsheet application such as Microsoft® Excel, it can be converted for readability very easily.
•For details on converting your data, refer to the instruction manual for your spreadsheet application software.
14
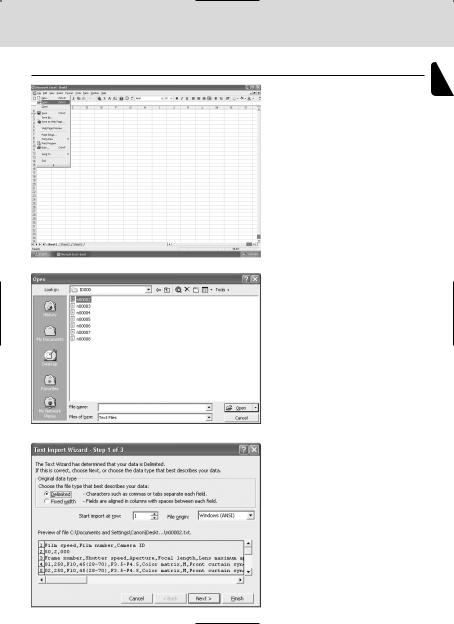
•Example of making a table using Excel 2000
1Start Microsoft Excel, and choose ‘Open file’ from file menu.
2Set file to ‘Text’, and choose file to be imported, and click ‘Open’.
3 Choose the file type ‘Delimited—Characters such as commas or tabs separate each field’. Confirming ‘1’ is selected for ‘Start import at row’ and ‘Windows (ANSI) is selected for ‘File origin’, click ‘Next.’
15

Basic operation |
—continued |
4. Opening shooting data (text file) using spreadsheet software
4Select ‘Comma’ as ‘Delimiters’ (cancel other checks), confirm ‘Treat consecutive delimiters as one’ is not checked, ‘{none}’ is selected for ‘Text qualifier’, and click ‘Next.’
5 Select all the columns except for the date column and set ‘Column data format’ to ‘Text’.
6Highlight the date column and set ‘Column data format’ to ‘Date’, then click ‘Finish’.
Import is finished
• If desired, change the date display order of the date column. Make adjustments to column width and character size for easy viewing.
16


 Details
 of
of
 Shooting
 Data
Data


In the text file stored in the PC, data is recorded according to the camera and selected recording mode as shown below. Data is displayed in English.
• Shooting data and support by various camera recording modes
Recorded item |
Camera |
|
F6 |
|
|
F5 |
|
|
F100 |
||
Recording mode |
Basic |
Detailed |
A |
B |
|
C |
D |
Basic Detailed |
|||
|
|
||||||||||
Film speed |
|
R |
R |
R |
R |
|
R |
R |
R |
|
R |
Film number |
|
R |
R |
R |
R |
|
R |
R |
R |
|
R |
Camera ID |
|
R |
R |
R |
R |
|
R |
R |
|
|
|
Frame number |
|
R |
R |
R |
R |
|
R |
R |
R |
|
R |
Shutter speed |
|
R |
R |
R |
R |
|
R |
R |
R |
|
R |
Aperture |
|
R |
R |
R |
R |
|
R |
R |
R |
|
R |
Focal length |
|
R |
R |
R |
R |
|
R |
R |
R |
|
R |
Lens maximum aperture |
|
|
R |
R |
R |
|
R |
R |
|
|
R |
Metering system |
|
R |
R |
|
|
|
|
R |
|
|
R |
Exposure mode |
|
R |
R |
|
|
|
|
R |
|
|
R |
Flash sync mode |
|
|
R |
|
|
|
|
R |
|
|
R |
Exposure compensation value |
|
R |
R |
|
|
|
|
R |
|
|
R |
EV difference in Manual |
|
R |
R |
|
|
|
|
R |
|
|
R |
Flash exposure compensation value |
|
R |
|
|
|
|
|
|
|
R |
|
Speedlight setting |
|
|
R |
|
|
|
|
|
R |
|
R |
Multiple exposure |
|
R |
R |
R |
R |
|
R |
R |
R |
|
R |
Lock |
|
|
R |
|
|
|
|
|
|
|
|
Vibration Reduction |
|
|
R |
|
|
|
|
|
|
|
|
Date (yy/mm/dd) |
|
R |
R |
|
R |
|
R |
R |
|
|
|
Time |
|
|
R |
|
R |
|
R |
R |
|
|
|
Data imprinting |
|
|
|
|
|
|
R |
R |
|
|
|
|
|
|
|
|
|
|
|
|
|
|
|
gG indicates data recorded on each film. gG indicates data recorded on each film frame. Notes
1:For metering system, flash sync mode, speedlight setting, multiple exposure, AE lock and VR function, refer to record data item on page 19.
2:With the F5, Date (year/month/day), Time (hour/minute/second) and imprinted characters are recorded when using Multi-Control Back MF-28. Do not use comma for imprinted characters.
3:Lens aperture, focal length and maximum aperture are recorded only when using a CPU lens. (With the F6, even with non-CPU lens, data can be recorded if the lens data is specified. For details, refer to the F6 instruction manual.)
4:In Time setting, hour/minute/second is recorded with the F5, and hour/minute with the F6.
5:In multiple exposure with the F6/F100, the data is recorded for first exposure only regardless of the number of exposures. With the F5, although the number of data is decreased, up to 15 exposure data can be recorded (from the second exposure, data would be the same as "A"). However, for the first exposure, "multiple exposure" is not indicated.
17


 Details
 of
of
 shooting
 data—continued


• Camera data record capacity
Record capacity (number of films whose shooting data can be recorded by each camera) differs with the camera and recording mode.
xFor details on recording modes, refer to instruction manual (F6) or this manual (F5/F100).
Camera |
Recording mode |
Record capacity (36-exposure film) |
|
|
|
|
|
F6 |
Basic |
Approx. 57 rolls |
|
|
|
||
Detailed |
Approx. 31 rolls |
||
|
|||
|
|
|
|
|
A |
Approx. 78 rolls |
|
|
|
|
|
F5 |
B |
Approx. 36 (78*) rolls |
|
|
|
||
C |
Approx. 12 (78*) rolls |
||
|
|||
|
|
|
|
|
D |
Approx. 10 (39*) rolls |
|
|
|
|
|
F100 |
Basic |
Approx. 70 rolls |
|
|
|
||
Detailed |
Approx. 30 rolls |
||
|
|||
|
|
|
*Numbers in parentheses can be obtained when using the MF-28.
When using the additional memory, record capacity for the F5 would be approximately double. In multiple exposure using the F5, the number of films would be less.
•Examples of recorded data (focal length and maximum aperture using a CPU zoom lens)
Using 24-50mm f/3.3-4.5 lens at 35mm zoom setting
|
|
|
F6 |
F5 |
|
F100 |
|
|
|
Basic |
Detailed |
A to D |
Basic |
|
Detailed |
Focal |
Focal length at the time of exposure |
R |
R |
R |
R |
|
R |
Zoom range |
— |
R |
— |
— |
|
R |
|
length |
|
||||||
Example |
35 |
35 (24-50) |
35 |
35 |
|
35 (24-50) |
|
|
|
||||||
Lens |
Maximum aperture at the time of exposure |
— |
— |
R |
— |
|
— |
maximum |
Maximum aperture within zoom range |
— |
R |
— |
— |
|
R |
aperture |
Example |
none |
F3.3-F4.5 |
F3.8 |
none |
|
F3.3-F4.5 |
|
|
||||||
|
|
|
|
|
|
|
|
18

• Recorded data items
Mode |
Recorded item |
Metering system |
Color matrix |
|
Matrix |
|
Center weighted |
|
Spot |
Flash sync mode*1 |
Front curtain sync |
|
Slow sync |
|
Rear curtain sync |
|
Red eye reduction |
Speedlight setting |
None |
|
TTL auto flash*2 |
|
non-TTL auto flash*3 |
|
Optional speedlight |
|
Multiple flash |
|
FP sync |
|
FV lock |
Multiple exposure |
None |
|
Multiple exposure |
Lock (AE lock) |
AE unlock |
|
AE lock |
Vibration Reduction |
VR off |
|
VR on |
gG is for the F100 only. gG is for the F6 only.
*1 In Red-Eye Reduction with Slow Sync, both “Red eye reduction” and “Slow sync” are recorded.
*2 Includes i-TTL Balanced Fill-Flash, Standard i-TTL Flash, 3D Multi-Sensor Balanced Fill-Flash, Multi-Sensor Balanced-Fill Flash, Center-Weighted Fill-Flash and Standard TTL Flash.
*3 With the F6, “non-TTL auto flash” is always recorded when the TTL auto flash is not executed (even when a Nikon Speedlight is not used). “Optional speedlight” is also recorded when Nikon Speedlight is used.
19


 Setting
 and
and Changing
 Recording
 Mode
Mode
 with
with the
the F5/F100

(Illustrations show the F100 camera and Windows XP Home Edition/Professional operating system.)
1 Connect the memory card, in which "modelist" and "modeset" folders are created, to the PC.
• For details on creating folders and files, see page 10.
•For details on connecting the memory card to the PC, see page 12.
START
shCard CompactFla EC-8CF
20
2Open the ‘modelist’ folder in the mounted memory card removable disk and open the ‘f5’ or ‘f100’ camera model folder, depending on your specific camera.
3 Select desired recording mode file from camera model folder ‘f5’ or ‘f100’, and copy or transfer it in the modeset folder.
xFor details on recording mode file setting, refer to the chart on page 22.
4Remove the memory card from the PC.
•The memory card may be removed differently depending on your specific PC, operating system, PC card adapter and memory card reader. Refer to the respective instruction manuals for more information.
5 Insert the memory card into the MV-1 attached the camera (x 8) and set recording mode on the camera.
•Follow the same procedure as transfer/save shooting data on memory card (x 10).
•When the recording mode is properly set on camera, the recording mode file moved in the "modeset" folder is deleted automatically.
 Folders and files that are created automatically
•The folders and files automatically created in the memory card by the MV-1 are as shown below.
|
For shooting data storage |
|
nikon_dr |
For details on shooting data storage folders (x 13). |
|
For setting/changing recording mode of F5/F100 |
||
Mode list folder |
Camera model folder |
Recording mode files |
modelist |
f100 |
f100_simple_del.mod |
|
|
f100_detail_del.mod |
|
|
f100_simple_stop.mod |
|
f5 |
f5_a_del_display.mod |
|
|
f5_b_del_display.mod |
|
|
f5_c_del_display.mod |
Mode set folder |
|
|
modeset |
|
|
•If the MV-1 with memory card is attached to the camera and the start button is pressed, "modelist" folder, camera model folder ("f5" or "f100") and recording mode file are overwritten each time. "modeset" folder is created only when it is not present.
•Do not set/change recording mode while files besides the files in “modelist” folder are present in the “modeset” folder.
If recording mode set/change is done with a film loaded in the camera
With the F5
Error indication will not appear, however, recording mode set/change is available from the next film.
With the F100
Error lamp blinks rapidly (x 25), recording mode cannot be set or changed. Rewind the film in the camera, remove it, then press the start button of the MV-1 for approximately one second.
21


 Setting
 and
and changing
 recording
 mode
mode
 with
with the
the F5/F100—continued

 Recording mode file
F5:
Priority |
Recording mode |
Recording |
Overwriting |
Warning lamp |
|
file |
mode |
data |
|
1 |
f5_a_del_display.mod |
A |
Yes |
Displayed |
2 |
f5_b_del_display.mod |
B |
Yes |
Displayed |
3 |
f5_c_del_display.mod |
C |
Yes |
Displayed |
4 |
f5_d_del_display.mod |
D |
Yes |
Displayed |
5 |
f5_a_del_notdisplay.mod |
A |
Yes |
Not displayed |
6 |
f5_b_del_notdisplay.mod |
B |
Yes |
Not displayed |
7 |
f5_c_del_notdisplay.mod |
C |
Yes |
Not displayed |
8 |
f5_d_del_notdisplay.mod |
D |
Yes |
Not displayed |
9 |
f5_a_stop_display.mod |
A |
No/Stop recording |
Displayed |
10 |
f5_b_stop_display.mod |
B |
No/Stop recording |
Displayed |
11 |
f5_c_stop_display.mod |
C |
No/Stop recording |
Displayed |
12 |
f5_d_stop_display.mod |
D |
No/Stop recording |
Displayed |
13 |
f5_a_stop_notdisplay.mod |
A |
No/Stop recording |
Not displayed |
14 |
f5_b_stop_notdisplay.mod |
B |
No/Stop recording |
Not displayed |
15 |
f5_c_stop_notdisplay.mod |
C |
No/Stop recording |
Not displayed |
16 |
f5_d_stop_notdisplay.mod |
D |
No/Stop recording |
Not displayed |
|
|
|
|
|
F100:
Priority |
Recording mode |
Record |
Recording |
Overwriting |
|
file |
yes/no |
mode |
data |
1 |
f100_simple_del.mod |
Yes |
Basic |
Yes |
2 |
f100_detail_del.mod |
Yes |
Detailed |
Yes |
3 |
f100_simple_stop.mod |
Yes |
Basic |
No/stop recording |
4 |
f100_detail_stop.mod |
Yes |
Detailed |
No/stop recording |
5 |
f100_not_memo.mod |
No |
— |
— |
22

 Recording mode items
Priority
If more than one recording mode file is copied or transferred to the ‘modeset’ folder, the recording mode with the higher priority will be used.
•If recording mode files for both F5 and F100 exist in the ‘modeset’ folder, only the recording mode for the camera being used will be effective.
Record yes/no (F100 only)
Set whether shooting data is recorded or not. (The F5 is always set to record.)
Recording mode
Set the shooting data items to be recorded.
•The shooting data items used will vary with the camera. For details on data items for each recording mode, see page 17.
Overwriting data
If the film quantity exceeds the storable shooting data limit (x 18), you can specify whether data will be deleted from the oldest first, or no new shooting data will be recorded.
•With the F100, if the setting is to stop recording new data, and the film quantity exceeds the storable shooting data limit, the shutter button will be locked. In this case, take the following actions:
Turn the power switch off and then back on again to release the shutter lock. You will be able to take the next shot, but new shooting data will not be recorded.
•The F5 can continue to shoot photographs even though shooting data recording is halted.
•With either F5 or F100, store the shooting data to the memory card. If you remove the film from the camera and store the shooting data, shooting data in the camera will be deleted and it will be possible to record new shooting data.
Warning lamp (F5 only)
You can set whether or not a warning lamp lights on the rear panel (the PC link mark  will flash) when the film quantity exceeds the storable shooting data limit.
23


 Approved
 Memory
 Cards
Cards


•In addition to the included CompactFlash card, the following Type I CompactFlash cards are also supported. Type II CompactFlash cards and Microdrives cannot be used.
SanDisk:
SDCFB series 16MB, 32MB, 48MB, 80MB, 128MB, 160MB, 192MB, 256MB, 384MB, 512MB, 1 GB
SDCFH series 128MB, 192MB, 256MB, 384MB, 512MB
Lexar Media:
4x USB series 16MB, 32MB, 48MB, 64MB
8x USB series 16MB, 32MB, 48MB, 64MB
10x USB series 160MB
12x USB series 64MB, 128MB, 192MB
16x USB series 192MB, 256MB, 320MB, 512MB, 640MB
24x USB series 256MB, 512MB
24x WA USB series 256MB, 512MB
40x WA USB series 256MB, 512MB, 2 GB
Hitachi (Renesas Technology):
CompactFlash HB28 C8x series 64MB, 80MB CompactFlash HB28C016C6 (16MB) CompactFlash HB28D032C6 (32MB)
*Operation is not guaranteed with other makes of memory card. For more details on the above cards, please contact the manufacturer.
24


 Blinking
 Error
Error
 Lamp
Lamp
 (red)/Specifications


•Blinking Error Lamp (red)
•Repeat operation from step 1 on page 10 after the following remedies.
Blinks slow (once a second): Communication error with camera
Cause |
Remedy |
Page |
|
|
|
Camera power is off |
Turn camera power on |
10 |
|
|
|
Shutter is released during communication |
Do not release shutter during |
7 |
with camera |
communication |
|
|
|
|
Plug is loose |
Attach plug properly |
8 |
|
|
|
Blinks fast (4 times a second): Memory card error |
|
|
Cause |
Remedy |
Page |
Writing error |
Insert new card |
8 |
Card is not properly inserted into the slot |
Insert card properly |
8 |
Card’s available memory is insufficient |
Insert new (empty) card |
9 |
Card is not formatted correctly |
Insert correctly formatted card |
13 |
With F100, a film in use is loaded when |
Remove the film in use |
21 |
setting/changing recording data |
|
|
•The memory card and the plug may be inserted or removed freely while the error lamp is on.
•Specifications
Power |
Supplied by camera |
Dimensions (WxHxD) |
Approx. 78 x 25 x 109mm or 3.1 x 1.0 x 4.3 in. |
Cable length |
Approx. 400mm or 15.7 in. |
Weight |
Approx. 100g or 3.5 oz. (main unit only, excluding |
|
memory card) |
Operating conditions |
Temperature: 0-40°C or 32-104°F, humidity: under 85% |
|
|
Specifications and design are subject to change without notice.
•CompactFlash™ is a trademark of SanDisk Corporation.
•Microsoft®, Microsoft® Excel and Windows® are registered trademarks or trademarks of Microsoft Corporation in the United States and/or other countries.
•Microdrive is a trademark of Hitachi Global Storage Technologies in the United States and/or other countries.
•Products and brand names are trademarks or registered trademarks of their respective companies.
25


 Inhalt


Vorwort .............................................................................................. |
27-28 |
|
Teilebezeichnung .................................................................................... |
29 |
|
Vorsichtsmaßnahmen ........................................................................ |
30-31 |
|
Grundlegende Bedienung................................................................. |
32-40 |
|
1. |
Anschluss an die Kamera und Einsetzen der |
|
|
Speicherkarten .......................................................................... |
32-33 |
2. |
Übertragung von Aufnahmedaten auf die Speicherkarten zur |
|
|
Speicherung .............................................................................. |
34-35 |
3. |
Übertragung der Aufnahmedaten auf der Speicherkarten zum |
|
|
PC zur Speicherung................................................................... |
36-37 |
4. |
Öffnen der Aufnahmedaten (Textdatei) mit |
|
|
Tabellenkalkulationsprogramm............................................... |
38-40 |
Aufnahmedaten-Details .................................................................... |
41-43 |
|
Einstellung und Änderung des Aufnahmemodus mit F5/F100....... |
44-47 |
|
Zulässige Speicherkarten........................................................................ |
48 |
|
Blinkende Fehleranzeige (rot) ............................................................... |
49 |
|
Technische Daten .................................................................................... |
49 |
|
Symbol
Dieses Symbol kennzeichnet wichtige Sicherheitshinweise. Sie sollten die Sicherheitshinweise vor Gebrauch der Kamera lesen, um Schäden an der MV-1 zu vermeiden.
Dieses Symbol kennzeichnet Tipps mit zusätzlichen nützlichen
Informationen zur Verwendung der MV-1.
Dieses Symbol kennzeichnet wichtige Hinweise, die Sie vor Gebrauch der MV-1 ebenfalls lesen sollten.
Dieses Symbol steht vor Verweisen auf andere informative Abschnitte dieses Handbuchs.
26


 Vorwort


Vielen Dank in das Vertrauen, das Sie uns mit dem Kauf des NikonDatenlesers MV-1 erwiesen haben. Machen Sie sich bitte gründlich mit dem Inhalt der vorliegenden Bedienungsanleitung vertraut, damit stets ein sachgemäßer und optimaler Gebrauch des MV-1 garantiert ist. Nach der Lektüre bewahren Sie bitte diese Bedienungsanleitung griffbereit auf, damit sie ggf. stets zum Nachschlagen zur Hand ist.
Der Datenleser MV-1 hat die folgenden Merkmale:
•Übertragung von Aufnahmedaten in der Nikon F6, F5 und F100 auf eine Speicherkarten im MV-1 zur Speicherung.
•Übertragung der Daten auf der Speicherkarten in einen PC.
•Einstellung und Änderung des Aufzeichnungsmodus der F5 und F100 mittels Speicherkarten und PC.
 Aufzeichnungseinstellung bei F6 und F100
•Die Kamera muss auf die Aufzeichnung von Aufnahmedaten eingestellt werden. (Die werkseitige Einstellung ist "non-record" (keine Aufzeichnung).) Bei Modell F6 ist die Einstellung über die Kamera möglich, während bei F100 der MV-1 und ein PC erforderlich sind (x 44).
 Nutzung der Aufnahmedaten mit PC
•Die Speicherung von Daten auf der Speicherkarten erfolgt als Textdatei im CSVFormat (Comma-Separated Value), sodass sie sich mithilfe eines Tabellenkalkulationsprogramms wie Microsoft® Excel einfach betrachten und manipulieren lassen.
•Die Übertragung von Daten auf der Speicherkarten in einen PC erfordert zusätzliches Gerät wie etwa den PC-Kartendapter EC-AD1, einen handelsüblichen PC-Kartenadapter für Speicherkarten oder einen Speicherkartenleser (der Datenleser MV-1 ist nicht an PC anschließbar).
•Beim MV-1 dient eine CompactFlash-Karte zum Kopieren von Aufnahmedaten, die in der F6 gespeichert sind. Eine Liste der zulässigen Speicherkarten finden Sie unter “Zulässige Speicherkarten” auf Seite 48.
27


 Vorwort
 —Forts.—


• Zubehör
Vergewissern Sie sich bitte, dass die folgenden Zubehörteile zum Lieferumfang gehören.
CompactFlash CardTM 
EC-8CF
MB
CompactFlash-Karte (x 32)
Etui
28


 Teilebezeichnung


Zugriffsanzeige (grün) (x 35) |
Fehleranzeige (rot) (x 49) |
DATA READER MV-1
ACCESS
ERROR
START
Stecker (x 32)
Starttaste (x 34)
Speicherkartenchlitz (x 32)
29


 Vorsichtsmaßnahmen


• MV-1 vor heftigen Stößen schützen
Vermeiden Sie unbedingt, dass der MV-1 zu Boden fällt oder Stößen ausgesetzt ist. Andernfalls drohen Störungen.
• Vor Wassereinwirkung schützen
Vermeiden Sie unbedingt, dass der MV-1 mit Wasser in Berührung kommt. Falls Wasser in das Gehäuse eindringt, kommt es zu Korrosion. Dies kann zu kostspieligen Reparaturen führen, wobei in schweren Fällen das Gerät u.U. irreparabel wird.
• Abrupte Temperaturschwankungen unbedingt vermeiden
Wird der MV-1 einem abrupten Temperaturwechsel ausgesetzt (z.B. Transport des Geräts bei kalter Witterung vom Freien in eine warme Wohnung oder umgekehrt), so schlägt sich im Inneren und an der Außenseite des Gehäuses Feuchtigkeit nieder, wodurch u. U. Schäden drohen. Legen Sie in solch einem Fall den MV-1 zuvor in einen Kunststoffbeutel oder anderen Behälter, damit er sich dort allmählich an die Umgebungstemperatur anpassen kann.
•Nicht neben Quellen starker elektromagnetischer Wellen oder Magnetfeldern einsetzen
An Orten, die starken elektromagnetischen Wellen (z. B. neben TV-Sendetürmen) oder starken elektrostatischen Feldern ausgesetzt sind, werden u. U. die Aufzeichnungsdaten verfälscht und gelöscht bzw. die Funktion des MV-1 gestört.
•Vor dem Anschluss des MV-1 stets die Stromversorgung der Kamera ausschalten
Schalten Sie stets die Stromversorgung der Kamera aus, bevor Sie den MV-1 mit der Kamera verbinden oder von ihr trennen.
• Für ausreichende Batteriekapazität sorgen
Sorgen Sie beim Gebrauch des MV-1 stets für eine ausreichend hohe Kapazität der Kamerabatterien. Näheres zur Überprüfung der Batteriekapazität finden Sie in der Bedienungsanleitung der Kamera.
• Pflege des MV-1
Reinigen Sie das Gerät zunächst mit Druckluft weitgehend von Staub und Schmutz und wischen Sie es dann behutsam mit einem sauberen weichen Tuch ab.
• MV-1 an einem kühlen und trockenen Ort aufbewahren
Bewahren Sie den MV-1 zum Schutz vor Schimmelbefall und Störungen an einem kühlen und trockenen Ort auf.
Halten Sie das Gerät entfernt von Naphthalin oder Kampfer (Mottenkugeln), Elektrogeräten mit starken Magnetfeldern oder extrem hohen Temperaturen, wie sie z.B. in der Nähe einer Heizung oder im Sommer in einem Pkw herrschen.
30
 Loading...