


INSTRUCTION MANUAL
1

N O M E N C L A T U R E
S hu t t e r |
S p eee d / A S A se l e c t o r r i ng |
S hu t t e r r e l e a se b u t t o n |
|
S hu t t e r |
r e l e a se f i ng e r g u a r d |
N e c k st r a p ey e l e t |
|
D e p t h- o f |
f i e l d p r e vi ew l e ve r |
S e l f - t i m e r |
l e ve r |
L ens m o u nt i n g f l a ng e
Motor drive shutter couplling
M o t o r d r i ve c o u p l i n g
Film rewind button
L ens a p er t u r e dir ec t r e a d o u t wind ow
M e t e r c o u p l i n g l e ve r
M et er c ou p l ing l ever r el e a se
Sync terminal (cover provided)
L ens m o u nt i ng i n d ex
Lens release button
R ef l ex mir r or
Tr i p o d so c k e t
B a t t er y c h a m b er l id
Motor drive electrical contacts
M e m o ho l d e r
2
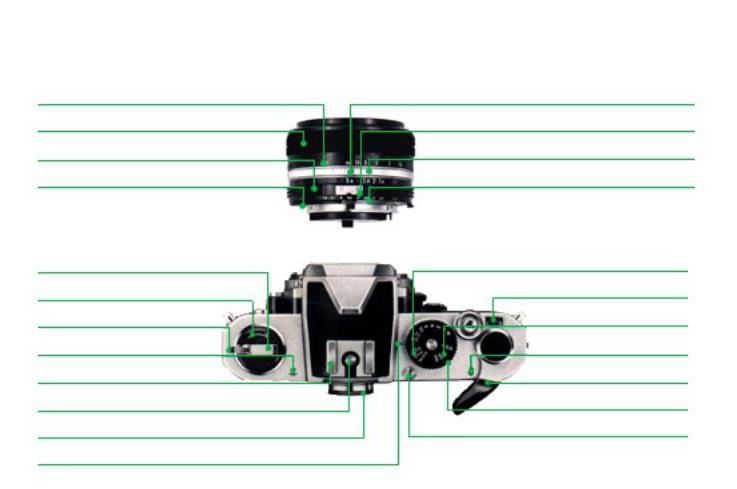
F o c u si ng |
d i st a nc e sc a l e |
F o c u si ng |
r i n g |
A p e r t u r e r i ng
M e t e r c o u p l l i ng r i d g e
F i l m r ew i n d c r a nk
F i l m r ewi nd k no b
S a f e t y |
l o c k |
|
F i l m |
p l a ne |
i n d i c a t o r |
Hot -sync shoe |
|
|
Hot -shoe c ont a c t
Vi ewf i nd er eyep i ec e
S hu t t e r sp ee d i n d ex
A p er t u r e / di st a nc e sc a l e i nd ex
M e t e r c o u p l i ng sho e
D e p t h- o f - f i e l d i n d i c a t o r s
A p er t u r e- di r ec t - r e a d o u t sc a l e
S hu t t e r |
sp ee d |
se l e c t o r |
|
F r a m e c o u nt e r |
|
A S A f i l m sp ee d wi nd o w |
||
|
M e t e r |
O N i n d ex |
F i l m - a d va nc e l ever
A S A f i l m sp ee d i n d x
M u l t i - ex p o su r e b u t t o n
3

C O N T E N T S
Foreword........................................ |
5 |
Preparation for use......................................... |
6 |
Installing the batteries . ......................... |
6 |
Checking battery power.......................... |
6 |
Loading film....................................... |
7 |
Prior to shooting................................ |
8 |
Memo holder........................................ |
9 |
Setting the film speed....................... |
9 |
Operation of camera controls........................ |
10 |
Setting the shutter speed.................. |
10 |
Setting the aperture................................ |
10 |
Film-advance lever............................. |
11 |
Frame counter................................... |
11 |
Self-timer........................................ |
12 |
Unloading film......................................... |
13 |
Holding the camera.................................. |
14 |
Shutter release operation................... |
15 |
Operation by cable release................... |
15 |
Focusing..................................................... |
16 |
Infrared photography......................... |
18 |
Film-planeindicator................................ |
18 |
Depth of field............................................ |
19 |
Depth-of-field preview lever.............. |
19 |
Depth-of-field indicators................. |
20 |
Exposure measurement............................... |
22 |
Determining degree of exposure........... |
22 |
Exposure control................................ |
24 |
Metering range .................................... |
24 |
High-contrast lighting..................... |
25 |
Stop-down exposure measurement................... |
26 |
Exposure compensation adjustment................... |
27 |
Multiple exposures....................................... |
28 |
Flash synchronization .................................... |
29 |
Tips on camera care.................................... |
30 |
Mounting and removing lenses .................... |
31 |
Accessories. .. . . . . . . . .. . . ............................ |
32 |
Features/Specifications.. ..............................34 |
|
4

F OR E W OR D
The Nikon FM is a compact 35mm single-lens reflex camera that offers a host of advanced features amateur photographers and professionals alike will appreciate.It is designed to accept virtually every accessory of the Nikon System-the most comprehensive ever created for photography-so it can do virtually everything the top rated SLR’s can do . .
. with that unique precision and reliability which you have come to associate with Nikon. To get the most out of this camera, study the instructions in this manual carefully, as well as those in related manuals, and practice using the controls—before loading the camera with film. Keep the manual on hand for ready reference until you have mastered operation. The few minutes you spend familiarizing yourself with the camera will guarantee you the best results and increase your pleasure in taking pictures many times over.
5
PREPARATION FOR USE
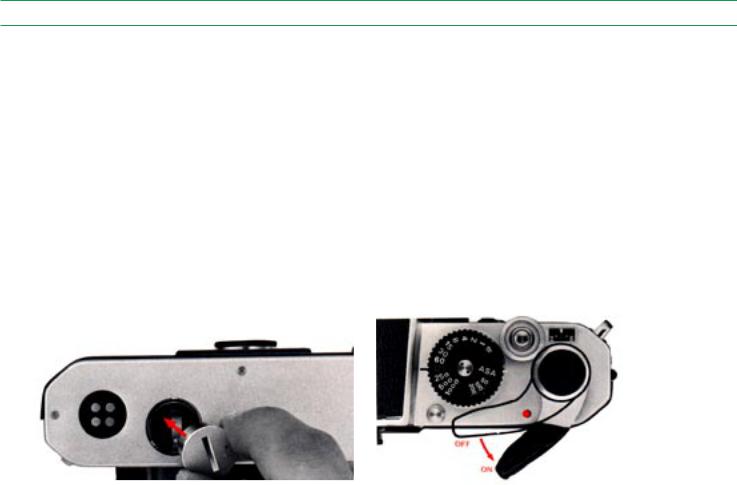
Installing the Batteries |
Checking Battery Power |
The Nikon FM’s built-in exposure meter is powered by two button-cell type 1.5V silver-oxide batteries. These are mounted in the battery clip, which forms a single unit with the battery chamber’s coin-slotted lid, in the camera’s baseplate. To install the batteries, first unscrew the lid by turning it counterclockwise, with a coin or something similar, until it can be freely removed by hand. Then, seat the two batteries in the battery clip, one on top of the other, making sure that their respective plus (+) and minus ( - ) indications correspond with similar marks provided in the clip. After seating the batteries correctly, replace the lid, and secure the connection by turning it clockwise with the coin as far as it will go. It is advisable to remove the batteries, when the camera is not to be used for a long period, to prevent battery leakage within the camera; for additional information on this, refer to “Tips on Camera Care” on page
To check battery power, move the camera’s film advance lever from the flush to the stand off position by pulling it just far enough to uncover the red index on top of the camera. Then, look through the viewfinder. If any of the LED (light emitting diode) exposure indicators is on, battery power is sufficient for proper operation. Otherwise, check battery seating and make adjustments, if necessary. Should the LED display still fail to light up, change batteries.
Important: When the camera is not in use, make sure that the film advance lever is positioned flush with the camera body.As the lever doubles as the meter on/off switch, leaving it in the stand-off position will result in the camer4’s battery being completely drained in just a few days.
6
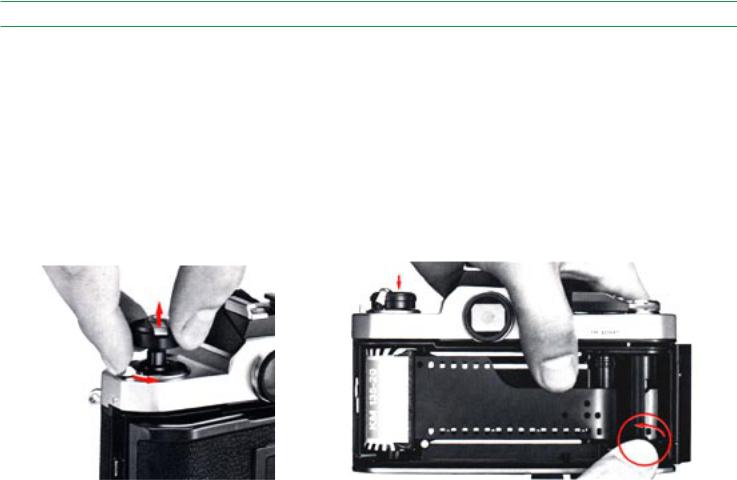
Loading Film
First, open the camera back by sliding its safety lock to the rear and lifting the film rewind knob as far as it will go. Position the film cartridge or cassette in the film chamber, which is located on the left-hand side, with the film leader aligned along the film guide rails; then, push the rewind knob to hold the cartridge in place. Pull the film leader out sufficiently for feeding into the film take-up spool, and insert its end into any of the spool’s slots. Rotate the take-up spool as shown in the illustration so that the film passes under the spool with its emulsion
side (dull side) facing out. Make sure that the perforations along the edges of the film mesh with the sprockets. If necessary, release the shutter by cocking the shutter release button, and stroke the film advance lever slowly to make sure that the leader winds smoothly on the spool and that the film edge perforations engage the film sprocket roller. When you are certain that the film is being fed properly onto the spool and traveling correctly along the film guide rails, close the camera back by pressing it until it snaps into place.
7

PREPARATION FOR USE - continued
Prior to Shooting
Fold out the film rewind crank, and turn it gently in the direction of the engraved arrow until you feel a slight resistance; this will indicate that any slack in the film cartridge has been taken up. Then, fold the rewind crank into place.
Advance the film (refer to page 11 for film advance operation), and make two blank exposures; this will dispose of the initial portion of the film exposed during loading. As you
advance the film, confirm that the rewind crank turns in the direction opposite the arrow. This indicates that the film has been loaded properly and is being advanced.
After advancing the film two frames, check that the frame counter is at “O”; then, advance the film one more frame to prepare the camera for taking the first picture.
8
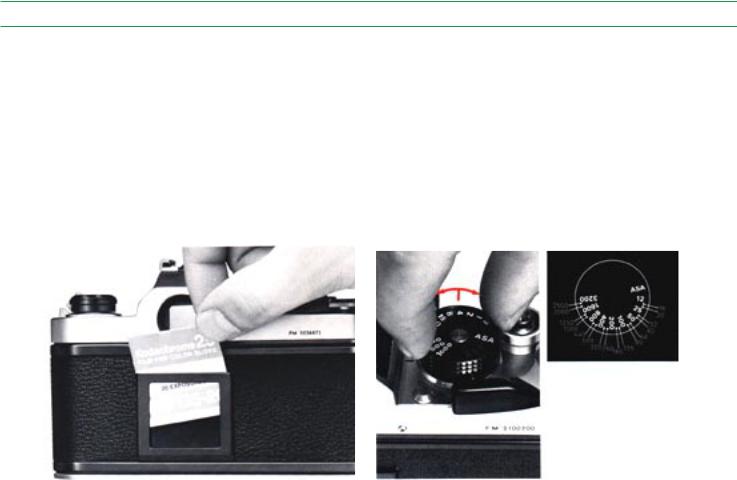
Memo Holder |
Setting the Film Speed |
A special holder is provided on the camera back for convenient storage of any relevant information. You can use it, for instance, to hold the end flap of a film carton to remind you of the type of film loaded in the camera, the ASA film speed and the total number of exposures available.
The camera’s exposure meter must be adjusted to the speed of the film in use to ensure correct measurement. Accordingly, the camera is provided with anASAfilm speed scale. To make the necessary adjustment, lift the knurledASAfilm speed ring, and turn it until the triangular red index is aligned with the ASA value of the film loaded in the camera. The meter is sensitive across the full range of from ASA 12 to ASA 3200; there are two dots between each number for intermediateASA settings, i.e., 64, 80, 125, etc.
9
OPERATION OF CAMERA CONTROLS
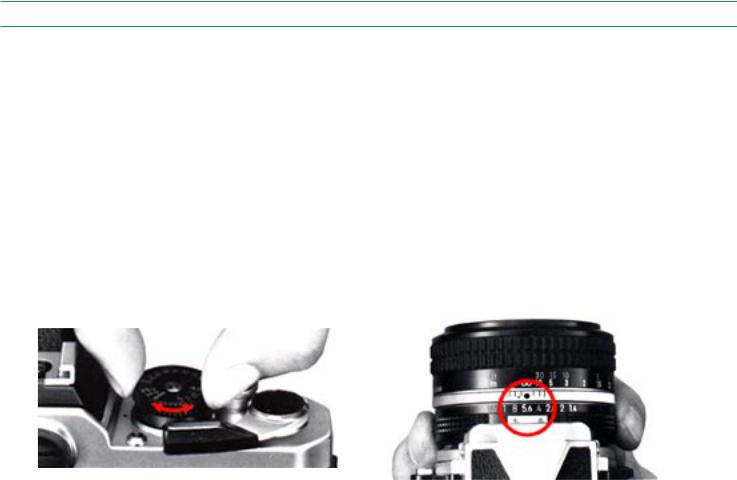
Setting the Shutter Speed
The Nikon FM’s shutter speed selector is knurled for slipfree, easier manipulation; the face of the dial is engraved with the 11 shutter speed settings available: 1 for one second, and 2, 4, 8, 15, 30, 60, 125, 250, 500 and 1000 for fractional values of from 1/2 to 1/1000th of a second. A “B” setting, also engraved, is provided for longer time exposures. To set the shutter speed, turn the shutter speed selector until the desired speed is aligned with the shutter speed index. The speed selected (including “ B”) is shown on the lefthand side of the viewfinder, too, for instant reference.
Note that the 125 setting is engraved in red; this indicates 1/ 125 sec., the fastest shutter speed available for flash synchronization with electronic flash units. (Refer to page 29 for additional information on flash photography.) Also, at
the “B” setting, the shutter remains open for as long as the shutter release button is kept depressed.
Setting the Aperture
The Nikon FM works best with Nikkor lenses. The aperture rings of these lenses are knurled for slip-free, easier manipulation.
To set the lens aperture, turn the lens aperture ring until the desired f/number setting on the lens aperture scale is aligned with the index mark on the lens; intermediate settings are also usable, when required.
Note that, with Nikkor lenses provided with an aperturedirectreadout (ADR) secondary lens aperture scale, the f/number for the aperture selected appears on the upper portion of the viewfinder for convenient reference when shooting.
10
Film-Advance Lever |
Frame Counter |
The film-advance lever simultaneously advances the film, cocks the shutter and operates the frame counter. It also doubles as the Nikon FM’s meter on/off switch and shutter button lock.
To advance the film, stroke the lever with your right thumb as far as it will go. The film will be advanced a full frame. The lever automatically returns to its 30° stand-off position when released upon the completion of the film advance.
The film-advance lever switches the meter on when moved to its stand-off position; it switches the meter off when moved back flush with the camera body. With the lever set flush against the camera body, it serves also as a lock to prevent accidental tripping when the shutter is cocked.
Each time the film is advanced one frame by a full stroke of the film advance lever, the frame counter operates to show how many frames have been exposed. It is automatically reset to S (start), two frames before 0, when the camera back is opened to remove an exposed film cartridge and/or load a new roll of film. The frame counter dial has indications for up to a maximum of 36 frames, with all odd numbers calibrated in dots and all even numbers in figures. The figures are in white, except for 12, 20 and 36 which appear in red to indicate the maximum number of exposures available, respectively, with standard film cartridges.
11
 Loading...