


Nikon Motor Drive
MD-12
INSTRUCTION MANUAL
www.mynikon.com.pl

NOMENCLATURE
Battery chamber lid
Battery chamber lid
S-C selector lock
S-C selector
Camera electrical contacts
Attachment thumb wheels
Pilot lamp
Power switch
Rewind slide
Tripper button
Shutter release pin
Drive shaft coupling
Rewind button extension
www.mynikon.com.pl
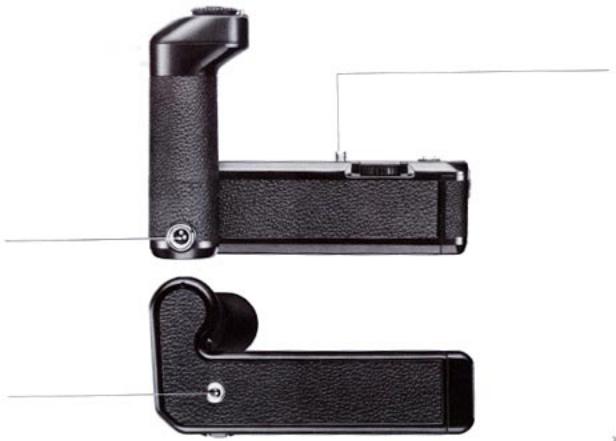
Attachment screw
Remote control socket
Tripod socket
www.mynikon.com.pl

CONTENTS
Foreword . . . . . . . . . . . . . . . . . . . . . . . . . . . . . . . . . . . . 4 Loading the batteries . . . . . . . . . . . . . . . . . . . . . . . . . . . 5 Attaching the motor drive . . . . . . . . . . . . . . . . . . . . . . . 6 Operation . . . . . . . . . . . . . . . . . . . . . . . . . . . . . . . . . . . . 8 Single-frame shooting . . . . . . . . . . . . . . . . . . . . . . . 8 Continuous shooting . . . . . . . . . . . . . . . . . . . . . . . . . 9 Film rewinding . . . . . . . . . . . . . . . . . . . . . . . . . . . . . . 10 Manual film advance . . . . . . . . . . . . . . . . . . . . . . . . . . 10 Double/multiple exposures . . . . . . . . . . . . . . . . . . . . . 11 Time lapse . . . . . . . . . . . . . . . . . . . . . . . . . . . . . . . . . . 12 Accessories . . . . . . . . . . . . . . . . . . . . . . . . . . . . . . . . . 13 Remote Cord MC-4 . . . . . . . . . . . . . . . . . . . . . . . . 13 Remote Cord MC-10 . . . . . . . . . . . . . . . . . . . . . . . 14
Pistol Grip Model 2 and Connecting
Cord MC-3 . . . . . . . . . . . . . . . . . . . . . . . . . . . . . . 14 Intervalometer MT-1 and Connecting
Cord MC-5 . . . . . . . . . . . . . . . . . . . . . . . . . . . . . . 15 Modulite Remote Control Set ML-1 and
Connecting Cord MC-8 . . . . . . . . . . . . . . . . . . . . 15 Radio Control Set MOO-1 and Connecting
Cord MC-5 . . . . . . . . . . . . . . . . . . . . . . . . . . . . . . 16 Terminal Release MR-2 . . . . . . . . . . . . . . . . . . . . . 16 Troubleshooting . . . . . . . . . . . . . . . . . . . . . . . . . . . . . . 17 Battery performance . . . . . . . . . . . . . . . . . . . . . . . . . . 18 Specifications . . . . . . . . . . . . . . . . . . . . . . . . . . . . . . . 18
FOREWORD
Although supplied as an accessory for the Nikon FM and FE compact cameras, the MD-12 was, in fact, a major feature in their design concept. Consequently, the only significant difference between operating these cameras with the motor drive attached, as opposed to without it, is that their operation is made considerably easier. So, rather than regarding your Motor Drive MD-12 unit as a special accessory for use only on rare occasions, you should consider it as the normal complement to your Nikon compact camera. For, in fact, the two together represent a major advance in camera-handling technique.
To obtain the best results from your Motor Drive MD-12, read the instructions in this manual carefully before use. Keep this booklet handy for quick reference until you have fully mastered operation. A few minutes preparation will help you avoid costly mistakes.
www.mynikon.com.pl
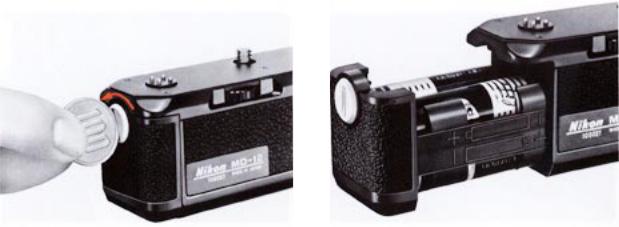
LOADING THE BATTERIES
The MD-12 is powered by eight 1.5V penlight (AA size) batteries which are housed in the unit's battery chamber. To load or replace batteries, turn the coinslotted locking screw on the battery chamber lid counterclockwise. The lid will come loose and the battery clip, which forms a single unit with the lid, can be removed. Load the batteries, taking care that they are inserted correctly. Referring to the diagrams on the sides of the clip that show the correct ~vay to insert the batteries, ensure that the
positive (+) and negative ( - ) terminals of the batteries are properly positioned. If the batteries are loaded incorrectly, not only will they be depleted—the motor drive could also be damaged.
When the batteries are correctly positioned, replace the battery clip. Push the chamber iid down gently until it seats correctly; then, tighten the locking screw on the lid with a coin or similar object until the battery clip fits securely into the battery chamber.
www.mynikon.com.pl

ATTACHING THE MOTOR DRIVE
Mounting the MD-12 on your camera is simple; the unit has been designed such that it can be attached or removed at any time regardless of whether or not the camera is loaded with film. Before attaching the MD-12, make sure that its power switch is turned off. Then, position the motor drive on the camera's bottom plate, its handgrip should be at the same end of the camera as the film advance lever. Ensure that the raised ring around the drive shaft is correctly seated inside the locating collar, coaxial with the camera's film advance coupling. Then, fasten the motor drive's attachment screw, turning it clockwise by means of the thumb wheels on either side. Simultaneous use of both fore finger and thumb will speed up attachment. Make sure there is
no gap between the motor drive and the camera body; then tighten the attachment screw firmly.
When the MD-12 is mounted on an FM camera (Serial No. below 3,000,000) *, the camera's mode selector switch around the shutter release button should be set to "M" (motor)—the red line on the selector being aligned with the line on the camera body. This is not necessary with FM cameras (Serial No. over 3,000,000)* or the FE, because the switchover from manual film advance to motor drive operation is made electronically and automatically when the motor drive is switched on. Then, turn the motor drive's power switch to "ON." If the film has been advanced prior to attaching the motor drive, the motor drive
www.mynikon.com.pl
 Loading...