


N6006
Table of contents
 Loading...
\
\V\S

FOREWORD
Thank you for purchasing the Nikon N6006. We
hope you enjoy the Nikon N6006, and we’re sure it
will make photography a bigger part of your life.
Get to know your N6006, but before using it, be
sure to read this manual thoroughly, as well as the
supplemental manual "FLASH PHOTOGRAPHY."
CONTENTS
FOREWORD
...........................................................................
2
NOMENCLATURE ....................................................... 4- 8
BASIC OPERATION..................................................................... 9-22
MOUNTING THE LENS
........................................................
10
INSTALLING BATTERY
......................................................
11
CHECKING BATTERY POWER...........................................12
LOADING FILM
..........................................................
13-15
BASIC SHOOTING
....................................................
16-21
REWINDING FILM....................................................... 21-22
CONTROLS IN DETAIL/
PHOTOGRAPHIC TECHNIQUES
........................................
23-80
FILM SPEED SETTING
...............................................
24-27
USING AUTOMATIC FILM SPEED SETTING
FOR DX-CODED FILMS
..................................................
24-25
MANUAL FILM SPEED SETTING
.......................................
25-26
2

FILM ADVANCE MODE SETTING
.......................................
27
SINGLE-FRAME SHOOTING
...........................................
27
CONTINUOUS SHOOTING
.............................................
27
FOCUSING
..................................................................
28-38
AUTOFOCUS........................................................... 28-35
FOCUS-PRIORITY SINGLE AUTOFOCUS
------
28-29
FOCUS-PRIORITY CONTINUOUS
AUTOFOCUS
..................................................
30-31
AUTOFOCUS WITH MAIN SUBJECT
OFF CENTER - SETTING
AF-L (AUTOFOCUS LOCK) FUNCTION
------
32-34
IN FOCUS-PRIORITY SINGLE AUTOFOCUS
.........
33
IN FOCUS-PRIORITY CONTINUOUS
AUTOFOCUS........................................................34
SPECIAL FOCUSING SITUATIONS
...........................
35
MANUAL FOCUS
...................................................
36-38
MANUAL FOCUS WITH
ELECTRONIC RANGEFINDER
......................
36-37
MANUAL FOCUS USING
CLEAR MATTE FIELD..............................................38
EXPOSURE
.................................................................
39-72
EXPOSURE METERING SYSTEMS
.......................
39-45
MATRIX METERING.....................................................39
CENTER-WEIGHTED METERING
...............................
40
SPOT METERING.........................................................40
METERING SYSTEM SETTING...................................41
METERING SYSTEM SELECTION -
WHEN TO USE MATRIX OR
CENTER-WEIGHTED METERING
..................
42-45

EXPOSURE MODE
.................................................
46-63
EXPOSURE MODE SETTING.......................................47
PROGRAMMED (PM AND P) AUTO
...................
48-50
FLEXIBLE PROGRAM
..............................................
50
SHUTTER-PRIORITY AUTO EXPOSURE
MODE
...............................................................
51-54
OPERATION IN SHUTTER-PRIORITY
AUTO EXPOSURE MODE
...........................
52-54
APERTURE-PRIORITY AUTO EXPOSURE
MODE
...............................................................
55-58
OPERATION IN APERTURE-PRIORITY
AUTO EXPOSURE MODE
...........................
56-58
MANUAL EXPOSURE MODE
.
............................ 59-63
OPERATION IN MANUAL EXPOSURE MODE.. 59-61
TO OBTAIN EXPOSURE READING
FOR A MAIN SUBJECT OFF CENTER
OR TOO SMALL SUBJECT .................................62
BULB SETTING ........................................................63
EXPOSURE COMPENSATION................................ 64-72
AE (AUTO EXPOSURE) LOCK LEVER
.............
64-65
EXPOSURE COMPENSATION BUTTON........... 66-67
AUTO EXPOSURE BRACKETING...................... 68-72
SELF-TIMER OPERATION
.........................................
73-74
ONE-SHOT SELF-TIMER..................................................73
TWO-SHOT SELF-TIMER
.................................................
74
BUILT-IN TTL FLASH
.................................................
75-80
USING BUILT-IN TTL FLASH ................................. 76-78
BUILT-IN TTL FLASH SPECIFICATIONS
..............
78-80
GUIDE NUMBER
...........................................................
78
ANGLE OF COVERAGE
..............................................
78

USABLE LENSES
.......................................................
- 79
FLASH SHOOTING DISTANCE RANGE......................80
CONTROLLED MAX. APERTURE IN
PROGRAMMED AND SHUTTER-PRIORITY
AUTO EXPOSURE MODE
........................................
80
ACCESSORIES................................................................. 81-90
LENS COMPATIBILITY................................................ 82-83
ACCESSORIES
...........................................................
84-90
OPTIONAL SPEEDLIGHTS
..............................................
84
CLOSE-UP ACCESSORIES
....................................
85-87
VIEWING ACCESSORIES ................................................87
OTHER ACCESSORIES
..........................................
88-90
MISCELLANEOUS........................................................... 91 -106
CAMERA CARE TIPS
..................................................
92-93
NOTES ON BATTERIES
......................................................
94
SPECIFICATIONS
.......................................................
95-98
GLOSSARY................................................................... 99-101
WARNING INDICATIONS ............................................102-105
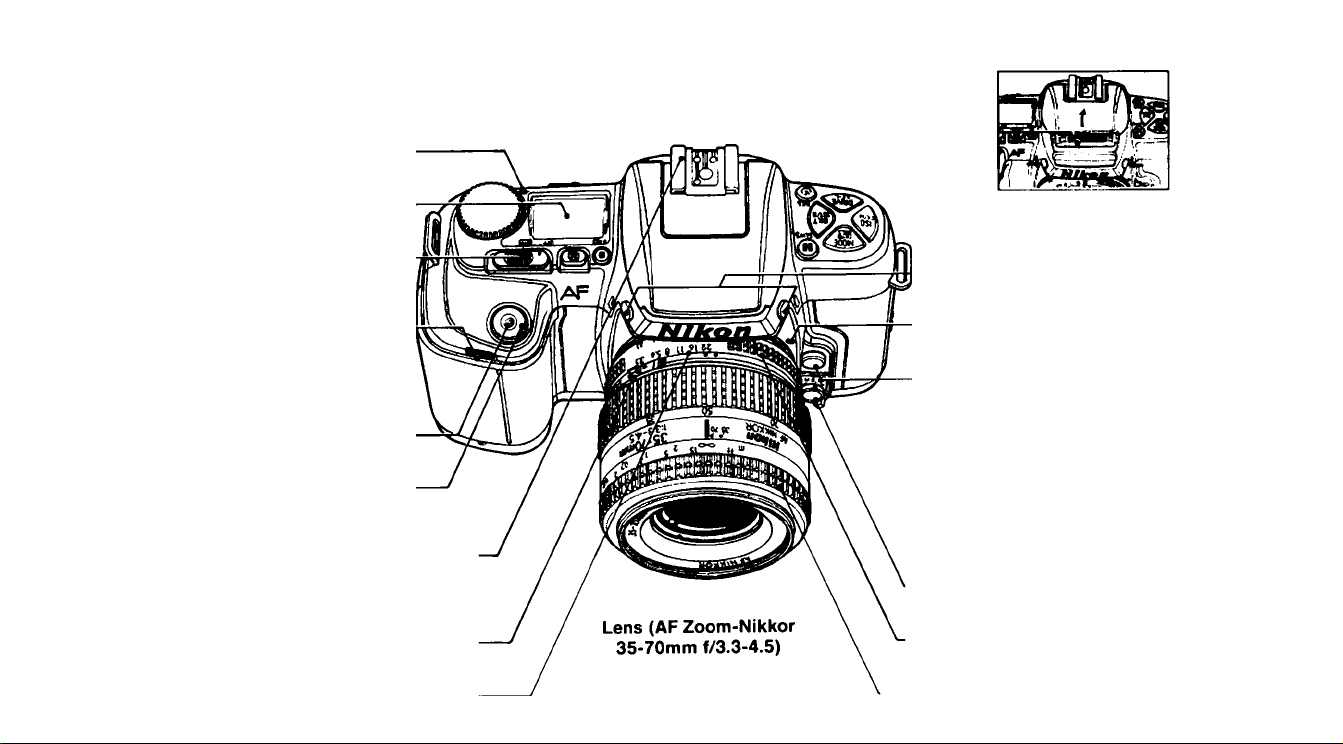
NOMENCLATURE
Film plane indicator: Exact distance
from lens mounting flange to film plane
is 46.5mm.
LCD panel: See page 8.
Power switch
Self-timer indicator LED:
See pages 73 to 74.
Release terminal: Accepts
optional Nikon Cable Release
AR-3 or Double Cable Release
AR-7.
Shutter release button
Accessory shoe: Accepts Nikon dedi
cated Speedlights.
Minimum aperture lock: Lock for
programmed auto or shutter-priority auto
exposure mode.
Aperture scale
Built-in TTL flash: See
pages 75 to 80.
Flash lock-release buttons:
To use the built-in TTL flash,
push them.
Lens mounting index
Lens release button
Focus mode selector:
S for Focus-Priority Single auto
focus (see pages 28 to 29).
CF for Focus-Priority Continuous
autofocus (see pages 30 to 31).
M for manual focus (see pages
36 to 38).
Aperture ring
Focusing ring: Used for manual focus
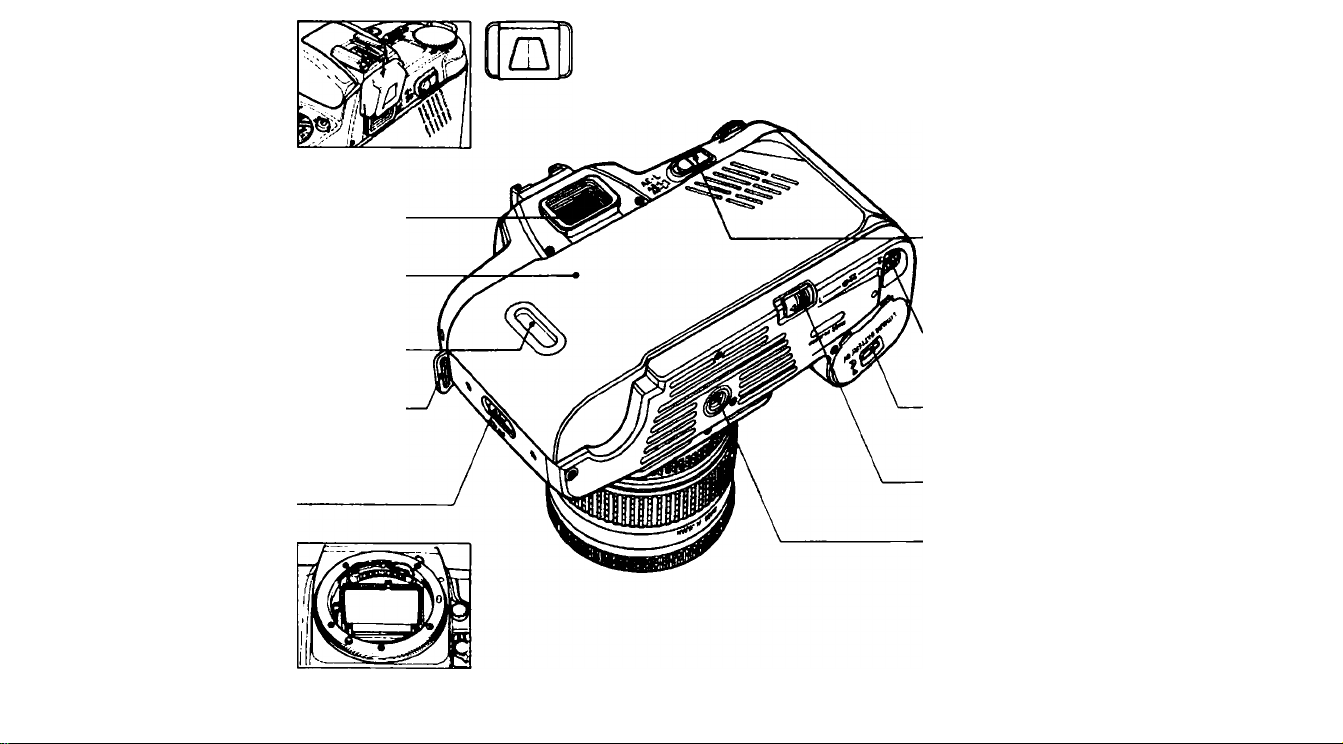
Eyepiece cover DK-5 (pro
vided): Prevents stray light from
entering viewfinder.
Viewfinder eyepiece
Camera back
Film cartridge confirmation
window
Camera strap eyelet
Camera back lock release
Push down to open camera
back.
AE-L (Auto Exposure Lock)/
AF-L (Auto Focus Lock) lever:
See page 34 for autofocus lock
or pages 64 to 65 for auto expo
sure lock.
Film rewind button: Press
while sliding lever.
Battery chamber cover lock
release
Film rewind lever: Slide in
the direction of the arrow.
Tripod socket
CPU contacts: Do not touch.

Exposure mode (MODE) button/Automatic
Balanced Fill-Flash (£3) button
Film speed (ISO) button/Film speed setting
mode (DX/M) button
Film advance mode (DRIVE)/Auto Focus Lock
function (AF-L) button: For autofocus lock func
tion, see pages 32 to 34.
^SLWi
Metering system (:•:) button/Slow sync
button
Auto exposure bracketing (BKT) button
Self-timer (0) button/Rear-Curtain sync
button
These buttons are used with command dial or shift button.
For functions of each button, see next page.
O ffinp
Shift button: Press to set the functions
shown in matte gold ■ on the camera
body. For details, see next page.
Exposure compensation button
Command input control dial
(Command dial): Can be rotated
to set various functions.

Command dial/shift button functions
Combined with buttons listed below, the command dial and shift button provide various functions.
Button
With Command Dial
With Shift Button
Metering system (K)/Slow sync
button
To select metering system, rotate dial while
pressing this button. (See page 41)
With shift button pressed, this button is used to
set/cancel slow sync for flash photography.
Exposure mode (MODE)*/Automatic
Balanced Fill-Flash (B3) button
To select exposure mode, rotate dial while
pressing this button. (See page 47)
With shift button pressed, this button is used to
set/cancel automatic balanced Rll-Rash for
flash photography.
Film speed (ISO) button/Film speed
setting mode (DX/M) button
To manually set film speed, rotate dial while
pressing this button. (See pages 25 to 26)
With switch film speed setting mode (auto for DX-
coded film or manual), push it while pressing shift
button. (See page 24)
Film advance mode (DRIVE)/
AF-L function button*
To set film advance mode, rotate dial while
pressing this button. (See page 27)
With shift button pressed, this button is used to set/
cancel autofocus lock function. (See pages 32 to 34)
Exposure compensation (gj)
button
To make exposure compensation, rotate dial
while pressing this button. (See pages 66 to 67)
—
Auto exposure bracketing (BKT)
button
See pages 68 to 72.
Self-timer (0 )/Rear-curtain sync
button
Rotate it to set self-timer operation.
(See pages 73 to 74)
With shift button pressed, this button is used to
set/cancel rear-curtain sync lor (lash photography.
—
With shift button pressed, rotate command dial for flash output level compensation.
For details, see pages 35 to 37 in "FLASH PHOTOGRAPHY", a separate instruction book.
"Pushing any two of MODE, ISO, DRIVE and BKT buttons simultaneously lor more than one second sets N6006 for basic shooting.
In the following cases, command dial can be used by itself.
In Programmed auto exposure mode Turn command dial for flexible program
In Shutter-Priority auto or Manual exposure mode Turn command dial to set shutter speed

4 5 6 7
40
ït^ O COD L rO.O
wüûjüûrû:a
mQMiSËi
13 14 15 16 17
-10
-11
-12
LCD panel indications
1. Exposure mode
2. Film speed setting mode
3. Shutter speed/film speed (for
manual film speed setting)/AF-L
function/number of frames for auto
exposure bracketing
4. Metering system
5. Automatic Balanced Fill-Flash
6. Flash output compensation
7. Slow flash sync
8. Rear-curtain sync
9. Electronic analog display
10. Exposure compensation
11. Aperture/exposure compensation
value
12. Auto exposure bracketing
13. Rim advance mode
14. Film loading
15. Film advance and rewind
16. Self-timer
17. Frame counter/number of remain
ing frames for auto exposure
bracketing/self-timer duration
►•<3 sssbrasiiMM
Viewfinder indications
1.12mm-dia. reference circle
2. Focus brackets
3. 5mm-dia. reference circle
4. Clear matte field
5. Focus indicators: • indicates a
stationary subject is in focus while
► • ◄ shows focus tracking in
autofocus operation (see pages
28 to 31): either focus-to-right arrow
(►) or focus-to-left arrow (◄ )
appears for manual focus (see
pages 36 to 37)
6. Exposure mode
7. Shutter speed/film speed (for
manual film speed setting)/num-
ber of frames for auto exposure
bracketing
8. Aperture/exposure compensation
value
9. Electronic analog display
10. Exposure compensation
11. Ready-light LED

BASIC OPERATION
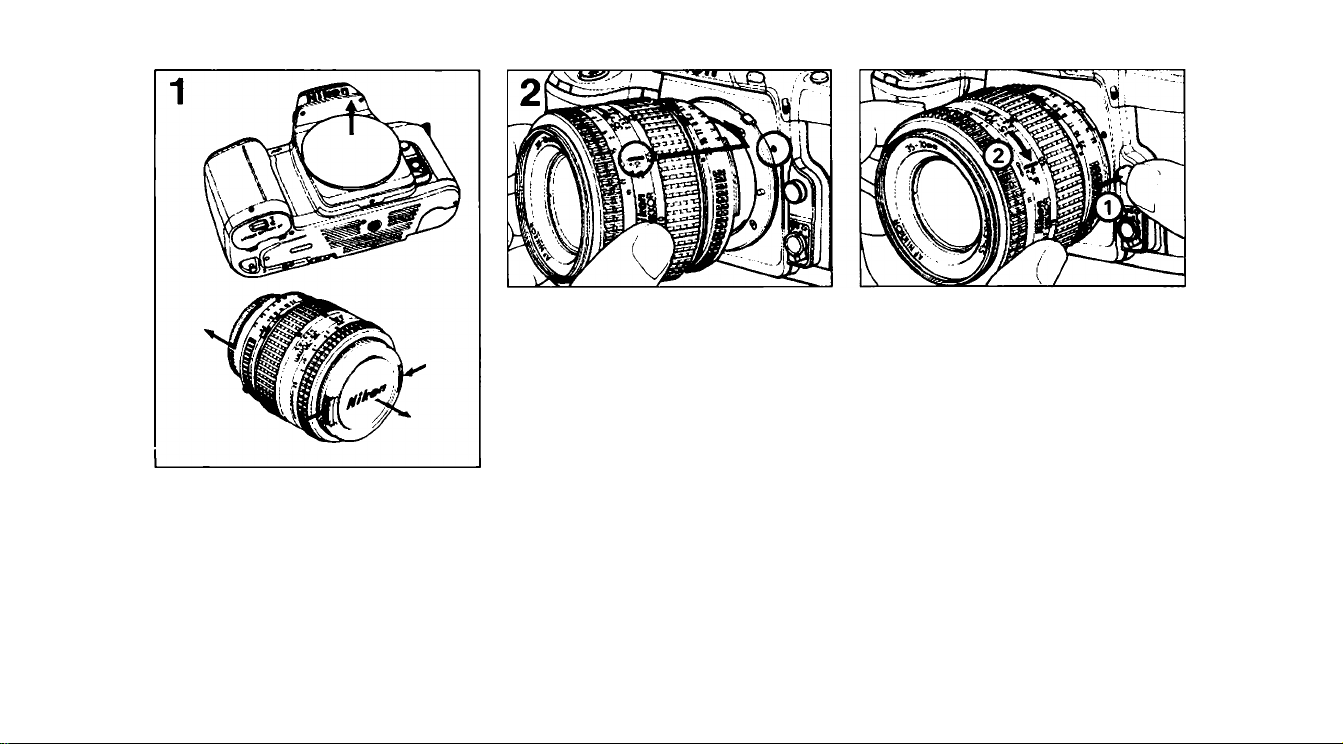
MOUNTING THE LENS
Remove camera body cap and front and
rear lens caps.
Aligning lens mounting index on the
camera body with lens’ aperture index,
twist lens counterclockwise until it locks
securely into place.
See page 82 for Nikon lens com
patibility chart.
To remove
Push lens release button and turn lens
clockwise.
10

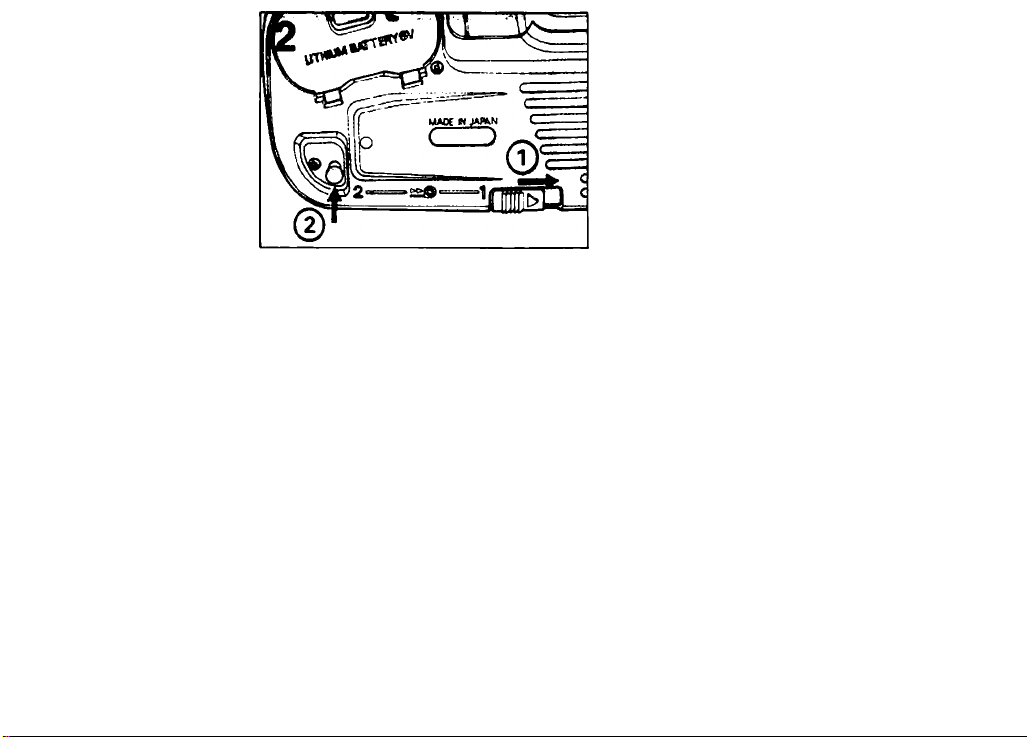
INSTALLING BATTERY
Open battery chamber ccrver by sliding
the lock release.
Insert 6V lithium battery pack (Duraceli
DL 223A, Panasonic CR-P2 or equiva
lent) with “-I-” and ” ends positioned
as shown on the inside cover. Then
push the battery pack down until it locks
into place.
Close the cover by pushing until it clicks.
The battery chamber cover may be detached if
pressure is applied. This prevents it from being
broken. If the cover is accidentally detached,
simply reattach it as illustrated, making sure to
push it until it clicks into place.
See page 94 for “NOTES ON
BATTERIES."
11
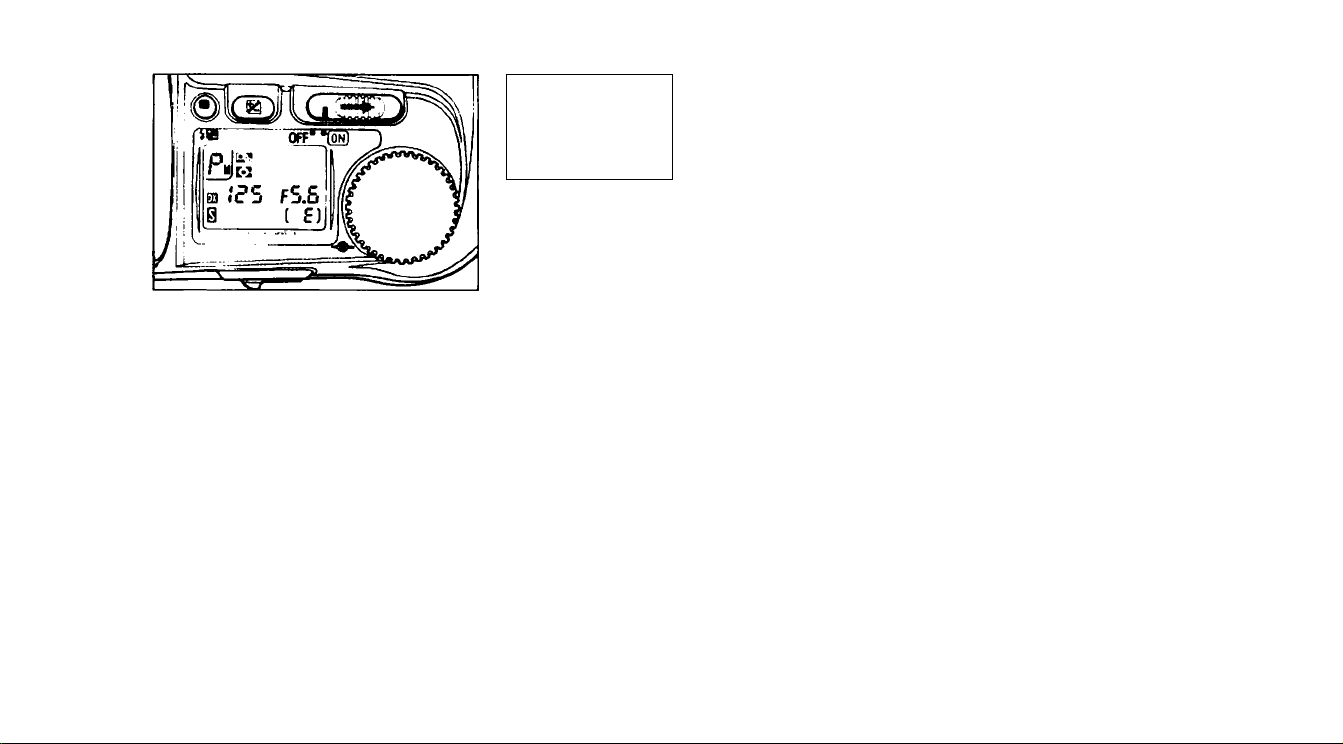
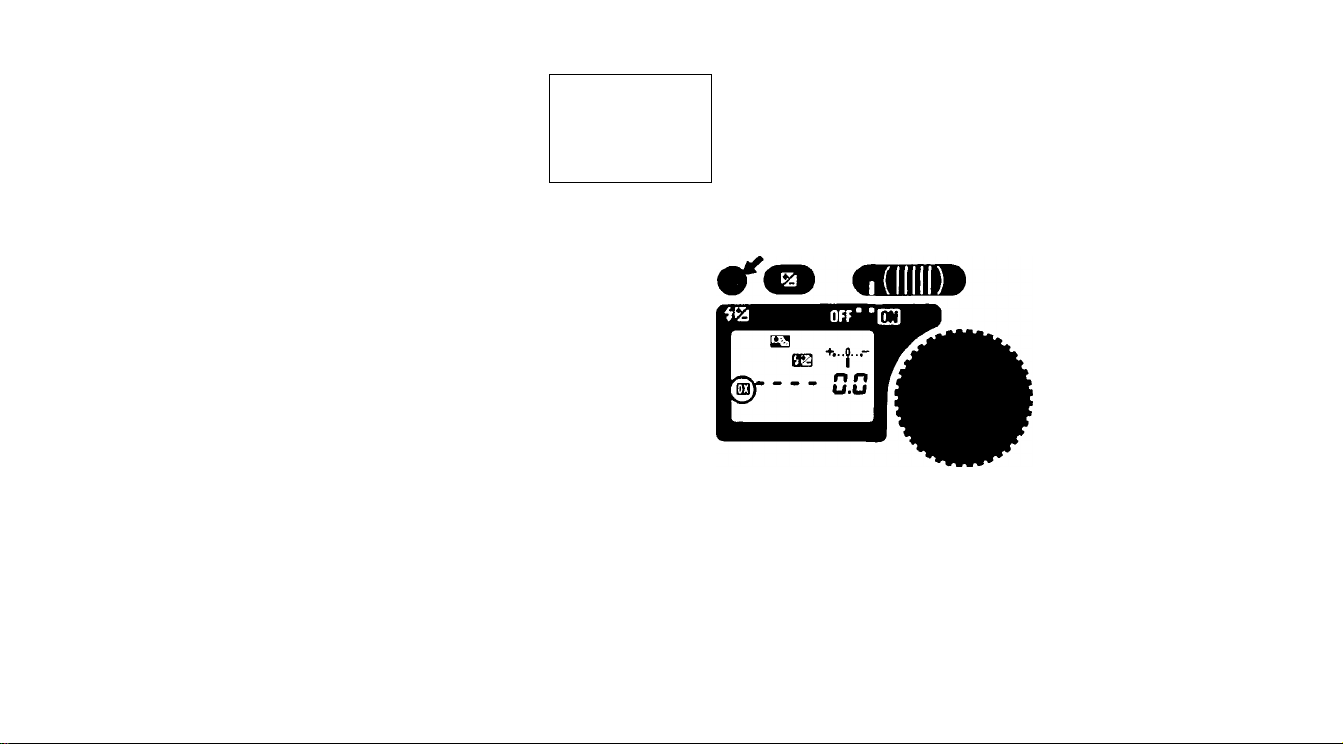
CHECKING BATTERY POWER
Slide power switch to ON and confirm
indications on LCD panel.
P-IS
Q] (C*5 f5.5
( 5)
After approx.
8 sec.
P.
_______________________________.
I'i)
With sufficient battery power, shutter speed and aperture indicators remain on for
approx. 8 sec., unless you release shutter.
If indicators turn off immediately, replace battery.
• Even with sufficient battery power, shutter speed and aperture indicators go off
approx. 2 sec. after you remove your finger from button, following shutter release.
• Lightly pressing the shutter release button, after exposure meter automatically
turns off, turns exposure meter on again. With sufficient battery power, meter stays
on for approx 8 sea after you remove your finger from the shutter release button.
With focus mode selector at S or CF, lightly pressing shutter release button also
starts autofocus operation.
•When not using the camera, be sure to turn power switch
off, to conserve battery power.
• The battery operates camera motor. When film-advance
speed becomes noticeably slower, replace battery with
fresh one.
• If all indicators on LCD panel blink when you lightly press
shutter release button, battery should be replaced.
12
• If shutter does not operate and data does not appear on
the LCD panel or viewfinder, the battery pack is exhaust
ed or improperly loaded.
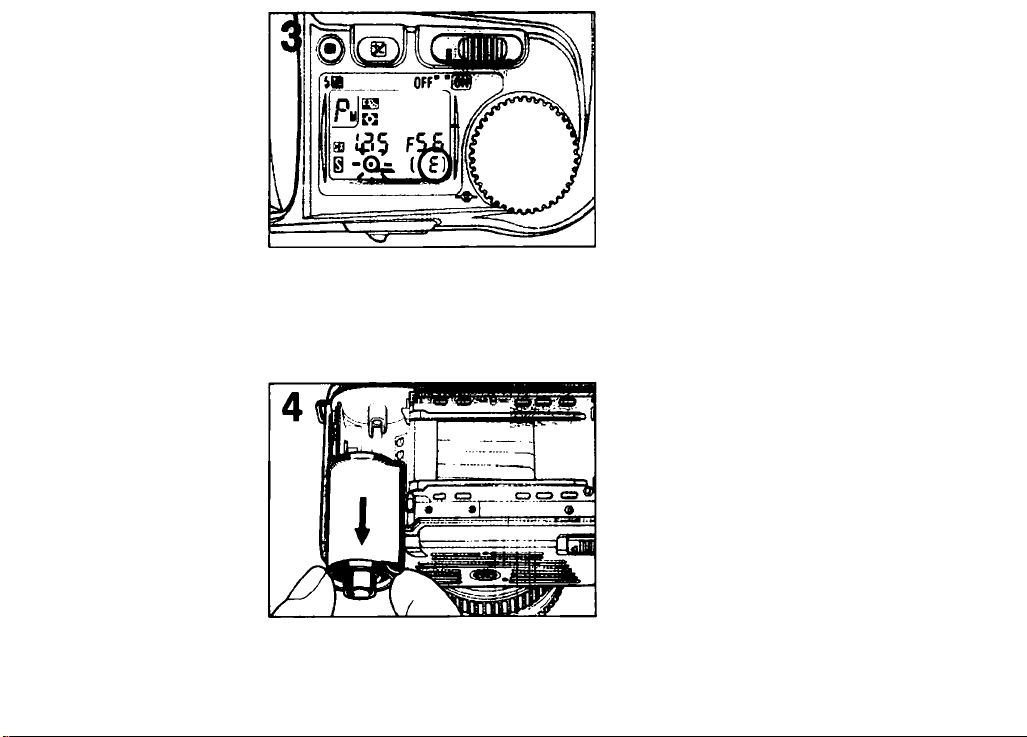
LOADING FILM
To avoid fogging film (especially
high-ISO film), do not load/unload
film in direct sunlight.
1
|)íг5
f5.5
(
E]
Confirm whether for auto setting is shown on the LCD panel.
o
©
If not, press and hold shift button, then press ISO button so OQ appears.
•
• Usable film speed range for DX-coded films is ISO 25 to 5000.
• For details about film-speed setting including manual film speed setting, see
pages 24 to 26.
13
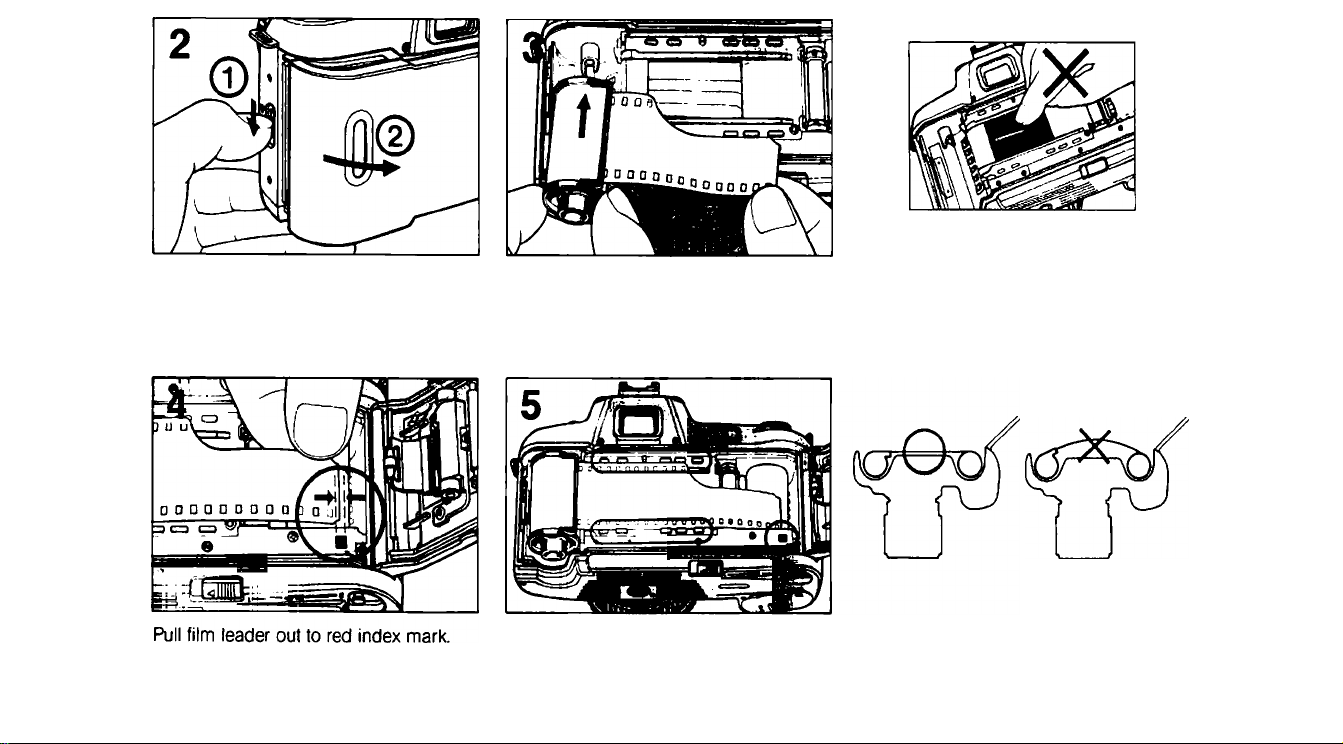
Slide camera back lock release to open Insert film cartridge,
camera back
Do not touch shutter curtains with
your finger a with film leader.
Check to ensure film is properly positioned with no slack. (See illustration)
14
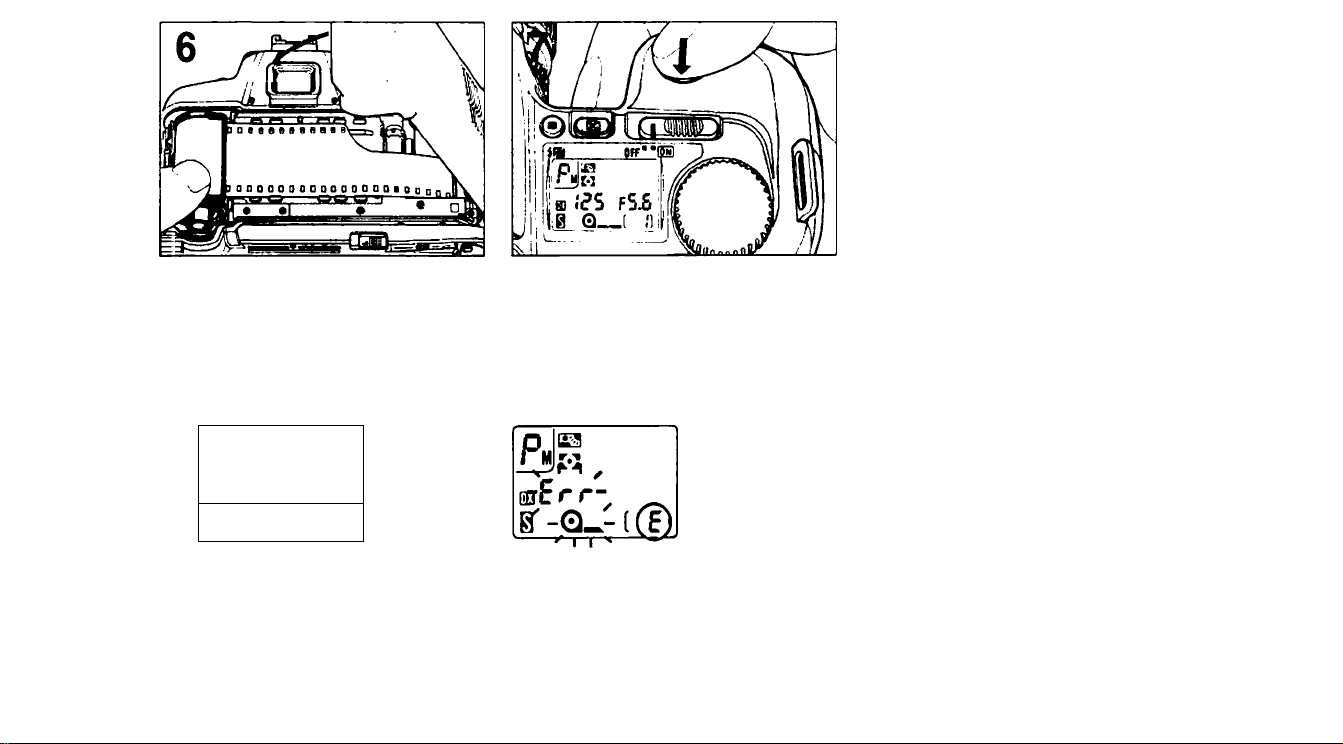
Close camera back until lock release
snaps closed.
Fully depress shutter release button to
automatically advance film to frame 1.
8
liD IP^.
IM
—( *'1
Confirm frame “1" and Q-
appear on LCD panel.
symbol
tif film is not correctly positioned, “E"
remains, Err and Q_ symtx>l blink
and shutter locks Open camera back
and reload film.
¡a
S3 too
To confirm ISO number of DX-
coded film, press ISO button.
15
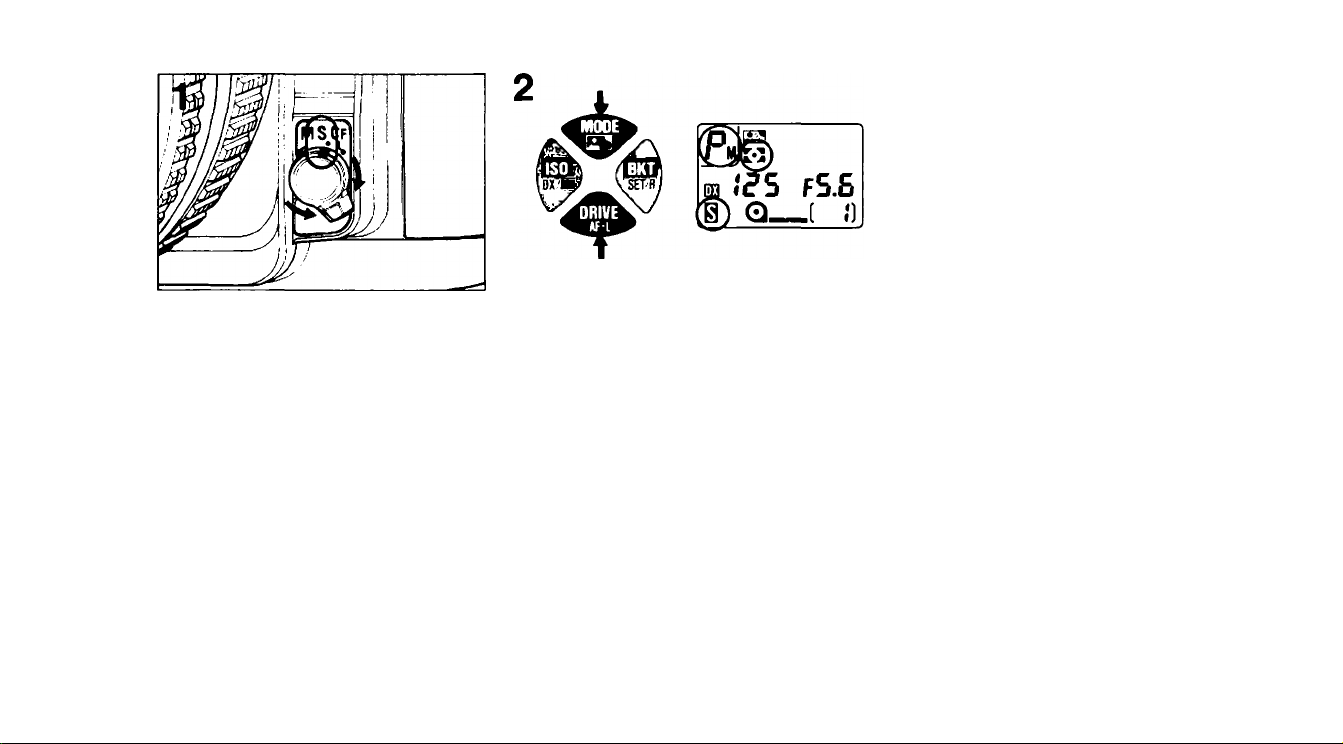
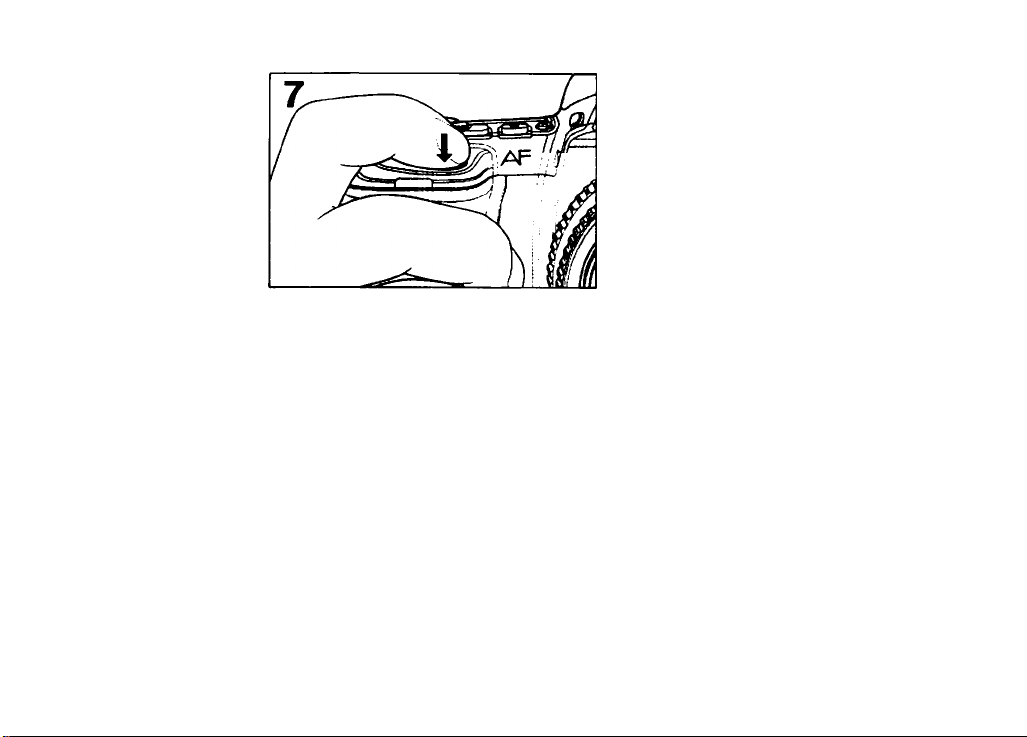
BASIC SHOOTING (Requires AF Nikkor lens)
Set focus mode selector to S for Focus-
Priority Single autofocus. If lens has an
A-M switch, set the switch to A.
Push any two buttons (MODE, ISO, DRIVE and BKT) simultaneously for more than
one second until K and 0 appear in the LCD panel (while viewfinder LCD shows
P), indicating that the camera settings are automatically reset for basic shooting as
shown below;
Film advance
Metering system
Exposure control
Flexible program setting
Exposure compensation on camera
Auto exposure bracketing
(For flash photography)
Flash sync
Automatic Balanced Fill-Flash
Manual flash light output compensation
Single frame (0)
Matrix (i*3)
Multi-program (^J)
Cancel
±0
Not set
Normal — Slow sync and Rear-curtain
sync cancelled
Set
±0
16

Shown here are basic settings for the easiest, most
common picture-taking situations using AF Nikkor
lenses with a CPU. With other than lenses Al-P Nikkor,
Center-Weighted metering and Aperture-Priority auto ex
posure mode are automatically selected, and autofocus
is not available (including Al-P Nikkor).
For film advance mode See page 27
For metering system See pages 39 to 45
For exposure control See pages 46 to 63
For flexible program See page 50
For exposure compensation
with button See pages 66 to 67
For auto exposure bracketing See pages 68 to 72
For flash photography See separate
instruction book
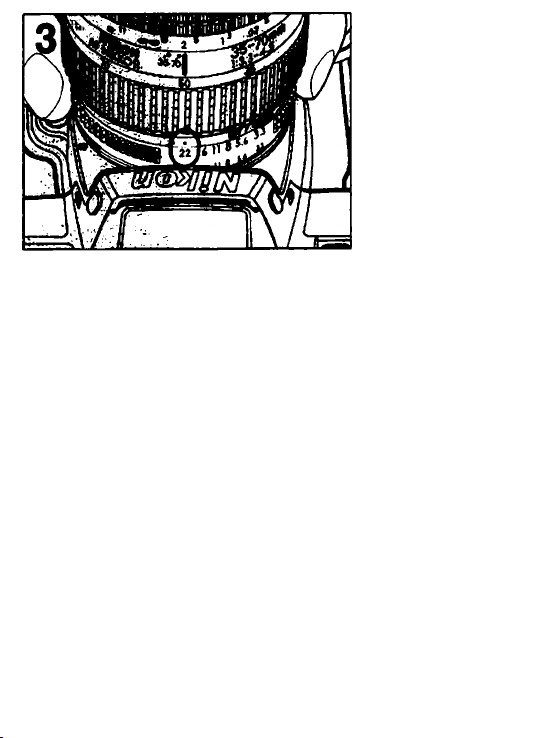
Set lens to its minimum aperture (highest f-number marked in
orange on AF Nikkor lenses).
Also lock lens aperture of AF Nikkor lens at its minimum set
ting (See lens instruction manual).
17
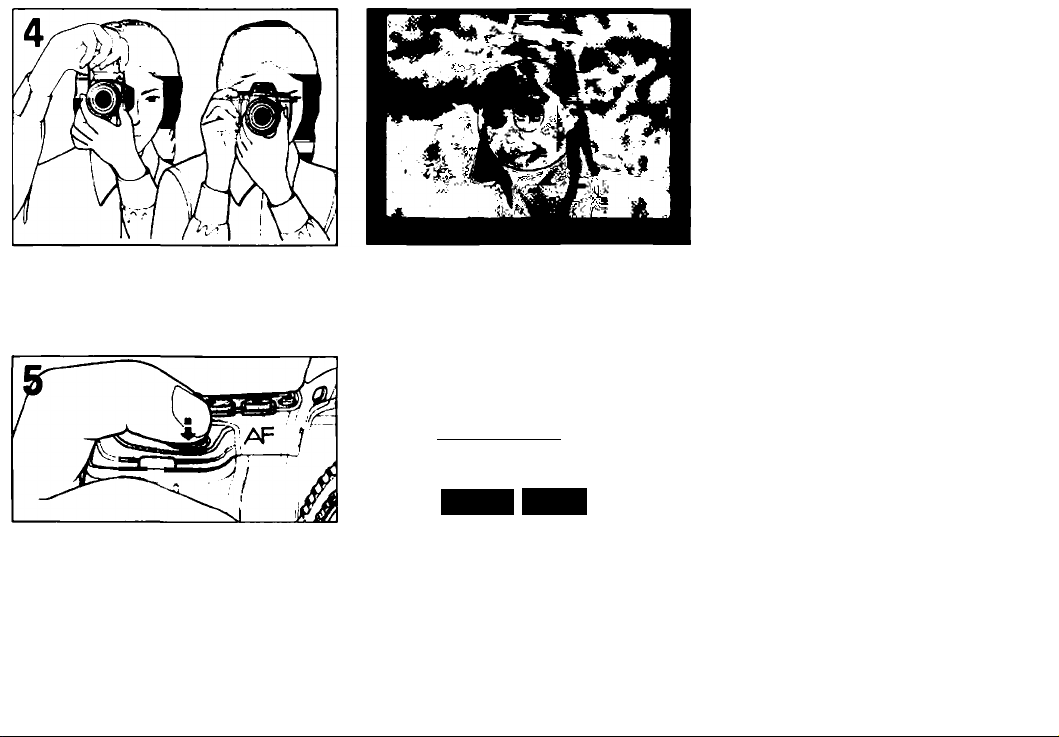
The N6006 viewfinder covers
approx. 92% of the image area
of the actual photograph so the
actual picture comes out larger
than the image in the viewfinder.
Note that the picture comes out
trimmed down in the case of
mounted slides or service-size
prints from negatives.
Look through the viewfinder and position focus brackets on the main subject.
Ughtly press shutter release button to
start autofocus operation and turn the
exposure meter on.
|£3
ijnCt^S fS.S..
0 Q_1 "ÏÏ
”i '( TC
“ IL J
rC c ■>
r J.Û
Confirm in-focus LCD indicator • or
► • ◄ is continuously visible in the
viewfinder. Also check exposure by con
firming shutter speed and aperture are
shown. Exposure indications are also
displayed in the LCD panel.
Shutter cannot be released until • or
► • ◄ appears Indicating that subject is
in focus.
• In-focus indication for a
stationary subject
► • ◄ Focus-tracking indication
18

P io F3.8
If shutter speed indicator biinks - Picture blur alert:
If a selected shutter speed is 1/(focal length) or slower, picture blur may occur due to camera shake
or subject movement. To avoid blur, hold camera very steady, use a tripod, or use accessory Nikon
Speedlight.
If “HI” blinks in the shutter speed position with
electronic analog display* - Overexposure alert:
Overexposure may occur. Use a filler such as the Nikon
ND filter.
If “Lo” blinks in the shutter speed position with or
without eiectronic analog display* - Underexposure
alert:
Underexposure may occur. Use built-in TTL flash or acces
sory Nikon Speedlight.
If ready-light LED (i ) biinks —
Flash-photography suggestion:
If the subject brightness is insuffic
ient, ready-light blinks. Use built-in
TTL flash or accessory Nikon
Speedlight.
If “fEE” blinks in the aperture position -
Lens setting error alert:
Lens is not set to smallest aperture setting and shutter
locks. Set lens to smallest aperture.
‘Shows value difference from correct
exposure.
19
Flash shooting with built-in TTL flash
First, make sure that subject is within flash shooting dis
tance range: With AF Zoom-Nikkor 35-70mm fl3.3-fl4.5
lens, the built-in TTL flash covers the following range:
Unit: m (ft)
Rim speed (ISO)
Zoom
setting
25 50 100 200
400 800
35mm
0.6~2
(2,0~
6.6)
0.7-2.8
(2.3-
9-2)
1-3.9
(3.3-
12.9)
1.3-5.5
(4.3-
18.2)
1.6-6.5
(5.3-
21.5)
1.9-7.7
(6.3-
25.4)
70mm
0.6-1.4
(2.0-
4.6)
0.6-2
(2.0-
6.6)
0.7-2.9
(2.3-
9.6)
1.0-4.1
(3.3-
13.5)
1.4-5.8
(4.6—
19.1)
1.9-7.7
(6.3- '
25.4)
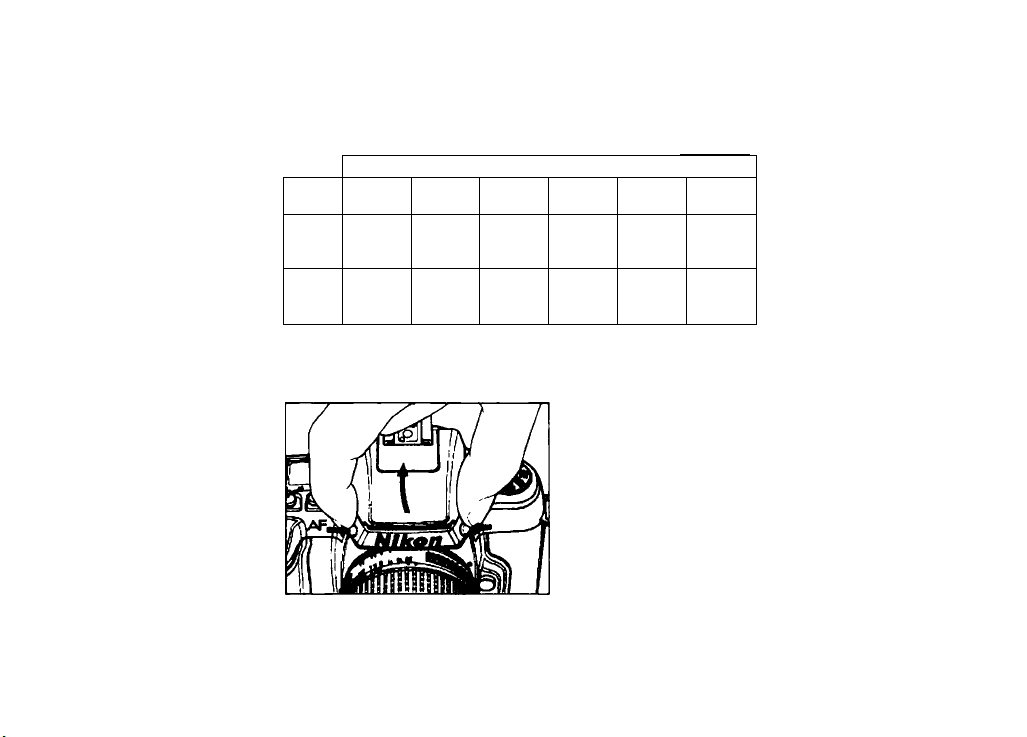
1. Push flash lock release buttons so that built-in TTL flash
pops up.
20
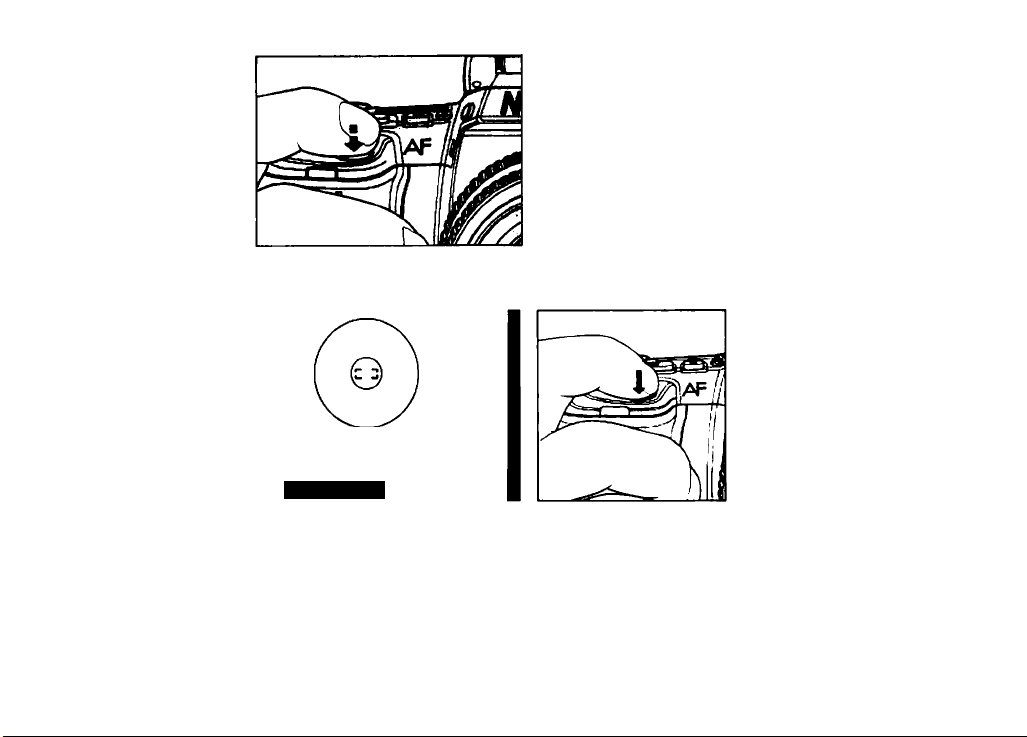
2. Lightly press the shutter release button.
• P US fS.S
3. Wait a few seconds for ready-light to come on, then
shoot. If subject is beyond flash's range, ready-light
blinks for approx. 3 sec. after shooting.
For details, see pages 75 to 79.
Fully depress shutter release button to take picture. Camera
automatically advances film by one frame. And LCD panel’s
frame counter increases by one.
Shutter speed aperture indicators in LCD panel and in
side viewfinder turn off approx. 2 sec. after you release
shutter and remove your finger from shutter release
button.
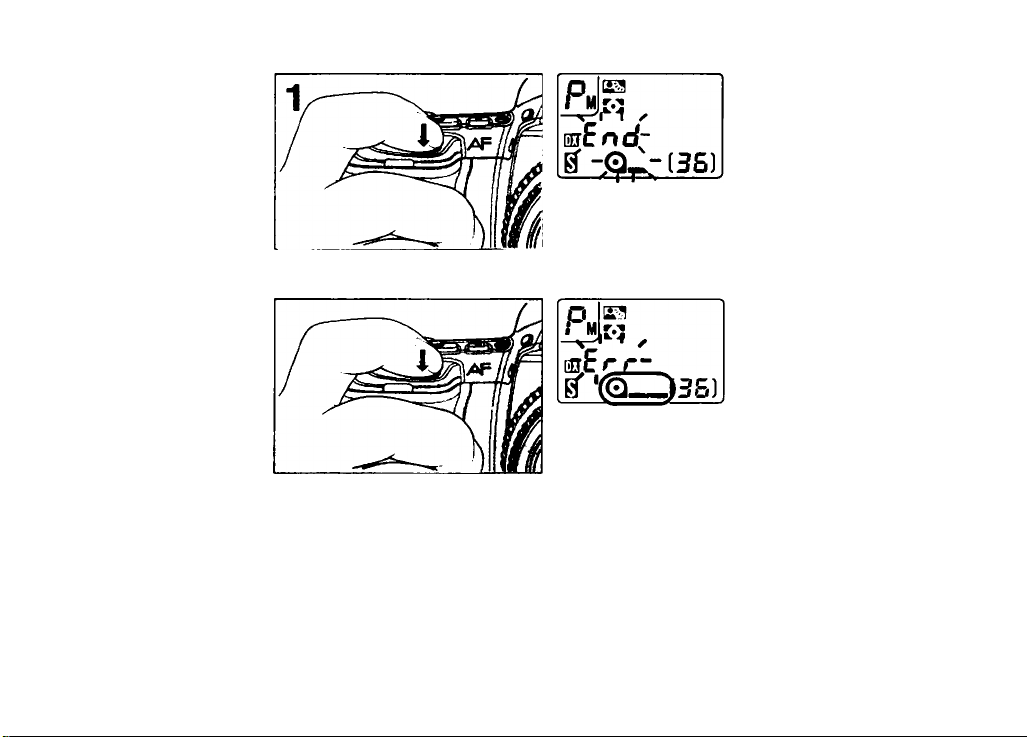
REWINDING FILM
O
Film advance stops automatically at end of roll with blinking
End and Q_ symbol on the LCD panel. After exposure meter
automatically turns off, each time you press shutter release
button, Err blinks and Q__ symbol appears instead, remind
ing you to rewind film.
21
Рм|к
ОБ
QjiLOS)
——
While sliding film rewind lever in the direction of arrow, press
film rewind button to start film rewinding. During film rewind,
Q_ and Q__ symbols alternately appear on the LCD panel,
and frame counter will count backwards until rewind is
complete.
• You can rewind film before it reaches end of roll in the same
manner.
• If camera stops during film rewind, replace battery without
opening camera back
After installing battery, turn power switch on, and restart film
rewind by the same method as before.
22
After rewind automatically stops, confirm frame counter shows
E, and film installation symbol (Q_) blinks fa a tew seconds.
Open camera back and remove film cartridge.

CONTROLS IN DETAIL/
PHOTOGRAPHIC TECHNIQUES
23

FILM SPEED SETTING
m)m
-Jiгs
f5.5
^ ( E)
The N6006 offers two ways to set film speed — automatic film
speed setting for DX-coded film and manual film speed setting.
Each time you press the ISO button, while depressing the shift
button, film speed setting changes from auto/DX to manual,
or vice versa. The LCD panel shows 03 for auto; there is no
indication for manual.
24
Loading...