


Nikon Motor Drive
MD-4
INSTRUCTION MANUAL
www.mynikon.com.pl 1
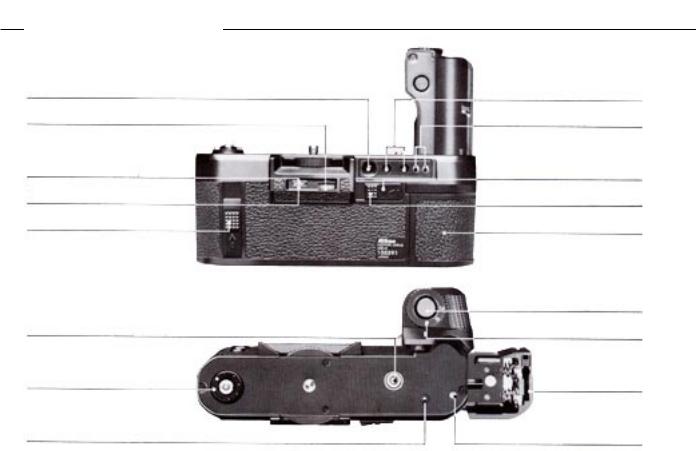
NOMENCLATURE
(1)Battery check button
(2)Counter setting dial
(3)Frame counter setting index
(4)Frame counter
(5)Rewind slide (R2)
(6)Motor drive coupling prong
(7)Electrical contacts
(8)Rewind button pin
LED indicators (9)
Auto rewind-stop terminals (10)
Rewind slide 1 lock button (11)
Rewind slide 1 (R1) (12)
Battery chamber with Battery clip (13)
Trigger button (14)
S-C mode selector (15)
Motor drive coupling cover storage
compartment (16)
Camera positioning pin (17)
www.mynikon.com.pl 2

(18) Anatomical
grip
(19) Maganize back terminal
Mounting screw (20)
Attachment wheel (21)
Automatic film rewind fork (22)
External power terminal (23)
Remote terminal (24)
Battery clip release
catch (25)
Tripod socket (26)
www.mynikon.com.pl 3

CONTENTS |
|
|
NOMENCLATURE . . . . . . . . . . . . . . . . . . |
. |
2-3 |
FOREWORD . . . . . . . . . . . . . . . . . . . . |
. |
. 4 |
BASIC OPERATION . . . . . . . . . . . . . . . . . |
. |
5-9 |
CONTROLS IN DETAIL . . . . . . . . . . . . . . . |
|
10-16 |
Anatomical Grip . . . . . . . . . . . . . . . |
. |
. 10 |
S-C Mode Selector . . . . . . . . . . . . . . |
|
10-11 |
(including Mulliple exposures) |
|
|
Trigger Button . . . . . . . . . . . . . . . . |
. |
. 12 |
Frame Counter . . . . . . . . . . . . . . . . |
|
12-13 |
Rewind Slides 1 (R1) and 2 (R2) . . . . . . . |
. |
. 14 |
Battery Chamber . . . . . . . . . . . . . . . |
. |
. 15 |
Battery Check Button and LED Indicators . . . . . 16 |
||
ElectricalTerminals . . . . . . . . . . . . . |
. |
. 16 |
(Magazine back terminal/External power |
|
|
terminal/Remote terminal) |
|
|
ACCESSORIES . . . . . . . . . . . . . . . . . . |
17 - 21 |
|
PowerAccessories . . . . . . . . . . . . . . . |
. |
. 17 |
(MN-2 NiCd Battery Unit and MH-2 Quick Charger/ |
|
|
MA-4 AC/DC Converter and MC-ll External |
|
|
Power Cord) |
|
|
ConvenientAccessories . . . . . . . . . . . . |
. |
. 18 |
(MF-6 Camera Back/Pistol Grip Model 2 and MC-3 |
|
|
Connecting Cord/AH-2 Tripod Adapter) |
|
|
Remote Control Accessories . . . . . . . . . . |
|
19-20 |
(MC12 Remote Cord with Button Release |
|
|
/MW-1 Radio Control Set and MC-S Connecting Cord/ |
||
ML-1 Modulite Remote Control Set and |
|
|
MC-8 Connecting Cord/ MR-2 Terminal Release) |
|
|
Simultaneous and Time Lag Shooting Accessories . |
. 21 |
|
(MC-4 Remote Cord/MT-1 Intervalometer and MC-S |
|
|
Connecting Cord/Time-lapse exposures) |
|
|
SPECIFICATIONS . . . . . . . . . . . . . . . . . |
. |
. 22 |
OPTIMUM BATTERY PERFORMANCE . . . . . . . . . . . |
. |
. 23 |
FOREWORD
Congratulations. You now own the MD4 Motor Drive, an accessory designed to advance the film automatically through the Ni*on F3 camera. The MD-4 offers either "Single" or "Continuous" operation. At "S," the film advances to the next frame as soon as the picture is taken. At "C, "it will be advanced at 4 frames per second with penlight batteries or at 6 fps when using the optional MN-2 NiCd Battery Unit. In addition, the MD-4 offers automatic film rewind. Even though the MD4 is extremely easy to use, you should still familiarize yourself with its basic operation as presented in the first section. For more detailed explanations and special picturetaking situations, refer to the sections CONTROLS IN DETAIL and ACCESSORIES. A few minutes wisely invested now will pay off in years of rewarding photographic experiences.
www.mynikon.com.pl 4
BASIC OPERATION
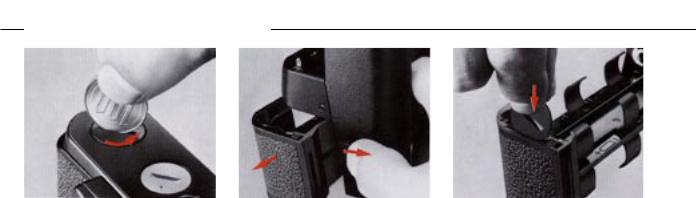
1.Unscrew the camera's motor drive coupling cover.
First make sure the camera's power switch is turned off. Then turn the camera upside down and use a coin to unscrew the cover.Remove the motor drive's battery clipG). Slide the release catch ~to the right and the battery clip will pop out.
2.Remove the motor drive's battery clip(13).
Slide the release catch (25)to the right and the battery clip will pop out.
3.Store the cover in the compartment (16) provided.
To prevent the cover from being misplaced, slip it into the storage compartment on the end of the battery clip. To remove the motor drive coupling cover, push the small catch to the outside as you turn the battery clip upside down. The cover will then fall out.
www.mynikon.com.pl 5

BASIC OPERATION continued
4.Load the batteries.
Install 8 AA-type penlight batteries into the clip following the " + " and "-" indications.
5.Install the battery clip.
Put the clip back in the battery chamber (13). Push it until it snaps into place.
6.Check the battery power.
Push the battery check button (1) If both LED's (9) light up, the batteries have been loaded properly and their power is sufficient. If one LED glows, the batteries should be replaced with a fresh set. If none go on, this indicates that the batteries have not been loaded correctly or are completely dead.
www.mynikon.com.pl 6
BASIC OPERATION continued
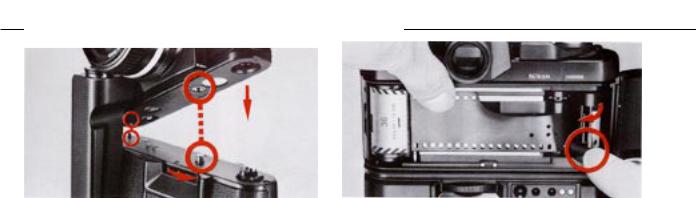
7.Attach the motor drive to the camera body.
Make sure the S-C mode selector (15) of the motor drive is set to L (Lock) before attaching the camera. Otherwise the motor might start operating. Place the camera body on top of the motor drive so that the motor drive's mounting screw (20) lines up with the camera's tripod socket and the camera positioning pin (17) is aligned with the motor drive coupling hole. Then turn the attachment wheel (21) counterclockwise until the two units are screwed tightly together.
8.Load the camera with film.
Load film into the camera in the normal way.
Note: Do not detach the motor drive from the camera while it's still loaded with film. Unless you are in o darkroom. the film might become exposed to liqht entering through the bottom of the camera.
www.mynikon.com.pl 7
 Loading...