


English

Thank you for choosing the H81M-P33/ H81M-E33/ H87M-P33/ H87M-E33/ B85MP33/ B85M-E33 Series (MS-7817 v1.X) Micro-ATX motherboard. The H81M-P33/ H81M-E33/ H87M-P33/ H87M-E33/ B85M-P33/ B85M-E33 Series motherboards are based on Intel H81/ H87/ B85 chipset for optimal system efficiency. Designed to fit the advanced Intel LGA1150 processor, the H81M-P33/ H81M-E33/ H87M-P33/ H87M-E33/ B85M-P33/ B85M-E33 Series motherboards deliver a high performance and professional desktop platform solution.
Layout
Top : mouse
Bottom: keyboard
USB2.0 ports |
JPWR2 |
|
|
USB3.0 ports |
|
DVI-D port
(for H81M-P33/
H87M-P33/ B85M-P33)
HDMI port
(for H81M-E33/
H87M-E33/ B85M-E33)
VGA port
JUSB_PW1
Top: LAN jack
Bottom: USB ports
SYSFAN1
T:Line-In
M:LineOut
B:MIC-Int
CPUFAN
|
SYSFAN2 |
|
JPWR1 |
DIMM1 |
DIMM2 |
PCI _E1
PCI _E2 |
JBAT1 |
|
|
|
JCI1 |
|
|
|
|
|
|
|
|
|
|
|
|
|
|
|
|
|
|
|
JFP2 |
|
|
|
|
JUSB_PW2 |
|
|
|
|
|||||||||
JAUD1 |
JTPM1 |
|
|
|
|
|
|
|
|
|
|
|
|
|
|
||||||||||||||||||||||
|
|
|
|
|
|
|
|
|
|
|
|
|
|
|
|
|
|
|
|
|
|
|
|
|
|
|
|
|
|
|
|
||||||
|
|
|
|
|
|
|
|
|
|
|
|
|
|
|
|
|
|
|
|
|
|
|
|
|
|
|
|
|
|
|
|
|
|
|
|
|
|
JCOM1 JFP1 JUSB2 JUSB1
SATA2
SATA4 SATA3 SATA1
English
11
English
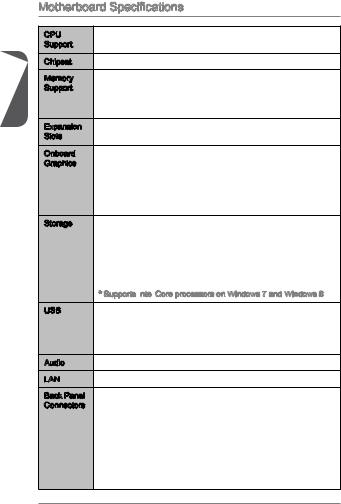
Motherboard Specifications
CPU |
■ |
4th Generation Intel® Core™ i7 / Core™ i5 / Core™ i3 / |
|
Support |
|
Pentium® / Celeron® processors for LGA 1150 socket |
|
Chipset |
■ |
Intel® H81/ H87/ B85 Express Chipset |
|
Memory |
■ 2x |
DDR3 memory slots supporting up to 16GB |
|
Support |
■ Supports DDR3 1600/ 1333/ 1066 MHz |
||
|
■ |
Dual channel memory architecture |
|
|
■ |
Supports non-ECC, un-buffered memory |
|
Expansion |
■ |
1x |
PCIe x16 slot (optional) |
Slots |
■ |
1x |
PCIe 2.0 x1 slot |
Onboard |
■ |
1x |
HDMI port (optional), supporting a maximum resolution of |
Graphics |
|
2560x1600@60Hz, 24bpp/ 1920x1080@60Hz, 36bpp |
|
■1x DVI-D port (optional), supporting a maximum resolution of 1920x1200 @ 60Hz, 24bpp
■1x VGA port, supporting a maximum resolution of 1920x1200 @ 60Hz, 24bpp
Storage |
■ Intel H81/ H87/ B85 Express Chipset |
-4x SATA ports (optional)
-Supports RAID 0, RAID1, RAID 5 and RAID 10 (optional)
-Supports Intel Smart Response Technology (optional)*
-Supports Intel Rapid Start Technology (optional)*
-Supports Intel Smart Connect Technology (optional)*
* Supports Intel
 Core processors on Windows 7 and Windows 8
USB |
■ Intel H81/ H87/ B85 Express Chipset |
-2x USB 3.0 ports on the back panel
-8x USB 2.0 ports (4 ports on the back panel, 4 ports available through the internal USB connectors*)
Audio |
■ Realtek® ALC887 Codec |
||
LAN |
■ |
Realtek® RTL8111G Gigabit LAN controller |
|
Back Panel |
■ |
1x |
PS/2 keyboard port |
Connectors |
■ |
1x |
PS/2 mouse port |
|
■ |
4x |
USB 2.0 ports |
|
■ |
2x |
USB 3.0 ports |
|
■ |
1x |
HDMI port (optional) |
|
■ |
1x |
DVI-D port (optional) |
|
■ 1x |
VGA port |
|
|
■ |
1x |
LAN (RJ45) port |
|
■ |
3x audio jacks |
|
12
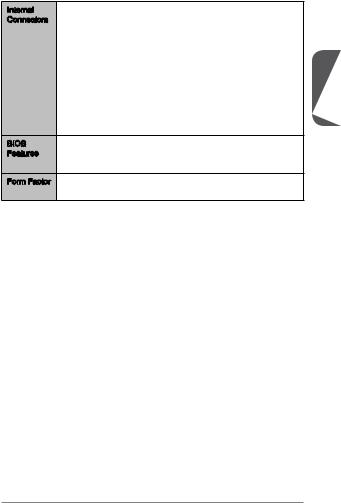
Internal |
■ |
1x |
24-pin ATX main power connector |
Connectors |
■ |
1x |
4-pin ATX 12V power connector |
■4x SATA connectors
■2x USB 2.0 connectors (supports additional 4 USB 2.0 ports)
■1x 4-pin CPU fan connector
■1x 4-pin system fan connector
■1x 3-pin system fan connector
■1x Front panel audio connector
■2x System panel connectors
■1x Chassis Intrusion connector
■1x Clear CMOS jumper
■2x USB power jumpers
BIOS |
■ UEFI AMI BIOS |
|
Features |
■ |
ACPI 5.0, PnP 1.0a, SM BIOS 2.7, DMI 2.0 |
|
■ |
Multi-language |
Form Factor |
■ |
Micro-ATX Form Factor |
|
■ |
8.9 in. x 6.8 in. (22.6 cm x 17.3 cm) |
English
13

English
Optional Specifications
Name |
H81M-P33 |
H81M-E33 |
H87M-P33 |
|
Specification |
||||
|
|
|
||
PCIe x16 slot |
Gen2 |
Gen2 |
Gen3 |
|
DVI-D/ HDMI |
DVI-D |
HDMI |
DVI-D |
|
SATA1, SATA2 |
SATA 6Gb/s |
SATA 6Gb/s |
SATA 6Gb/s |
|
SATA3, SATA4 |
SATA 3Gb/s |
SATA 3Gb/s |
SATA 6Gb/s |
|
BIOS ROM |
64Mb |
64Mb |
128Mb |
|
RAID |
Not supported |
Not supported |
Supported |
|
Small Business |
Not supported |
Not supported |
Supported |
|
Advantage |
||||
|
|
|
||
Intel Rapid Start |
Not supported |
Not supported |
Supported |
|
Intel Smart Response |
Not supported |
Not supported |
Supported |
|
Intel Smart Connect |
Not supported |
Not supported |
Supported |
|
Name |
H87M-E33 |
B85M-P33 |
B85M-E33 |
|
Specification |
||||
|
|
|
||
PCIe x16 slot |
Gen3 |
Gen3 |
Gen3 |
|
DVI-D/ HDMI |
HDMI |
DVI-D |
HDMI |
|
SATA1, SATA2 |
SATA 6Gb/s |
SATA 6Gb/s |
SATA 6Gb/s |
|
SATA3, SATA4 |
SATA 6Gb/s |
SATA 3Gb/s |
SATA 3Gb/s |
|
BIOS ROM |
128Mb |
128Mb |
128Mb |
|
RAID |
Supported |
Not supported |
Not supported |
|
Small Business |
Supported |
Supported |
Supported |
|
Advantage |
||||
|
|
|
||
Intel Rapid Start |
Supported |
Supported |
Supported |
|
Intel Smart Response |
Supported |
Not supported |
Not supported |
|
Intel Smart Connect |
Supported |
Supported |
Supported |
14
Back Panel
H81M -E33/
-E33/
 H87M
H87M -E33/
-E33/
 B85M-E33

PS/2 Mouse |
|
LAN |
|
USB 2.0 |
|
Line-In |
English |
|
|
||
|
VGA |
Line-Out |
|
HDMI |
|
||
|
|
||
|
|
Mic |
|
PS/2 Keyboard |
USB 3.0 |
USB 2.0 |
H81M -P33/ H87M
 -P33/ B85M-P33
PS/2 Mouse |
|
LAN |
USB 2.0 |
|
Line-In |
|
|
|
DVI-D |
VGA |
Line-Out |
|
||
|
|
Mic |
PS/2 Keyboard USB 3.0 USB 2.0
LAN
 LED
LED
 Indicator
LINK/ACT |
SPEED |
|
LED |
LED |
|
LED |
LED Status |
Description |
|
Off |
No link |
Link/ Activity LED |
Yellow |
Linked |
|
Blinking |
Data activity |
|
Off |
10 Mbps connection |
Speed LED |
Green |
100 Mbps connection |
|
Orange |
1 Gbps connection |
15
English
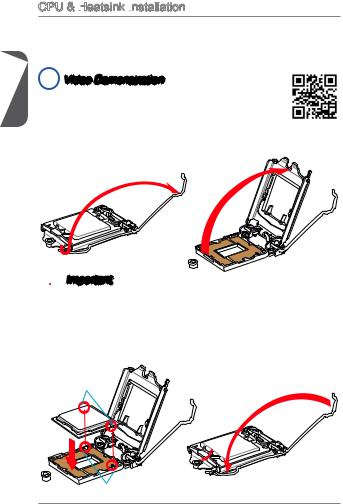
CPU & Heatsink Installation
When installing a CPU, always remember to install a CPU heatsink. A CPU heatsink is necessary to prevent overheating and maintain system stability. Follow the steps below to ensure correct CPU and heatsink installation. Wrong installation can damage both the CPU and the motherboard.
 Video Demonstration
Watch the video to learn how to install CPU & heatsink. at the address below.
http://youtu.be/bf5La099urI
1.Push the load lever down to unclip it and lift to the fully open position.
2.The load plate will automatically lift up as the load lever is pushed to the fully open position.
 Important
Do not touch the socket contacts or the bottom of the CPU.
3.Align the notches with the socket alignment keys. Lower the CPU straight down, without tilting or sliding the CPU in the socket. Inspect the CPU to check if it is properly seated in the socket.
4.Close and slide the load plate under the retention knob. Close and engage the load lever.
CPU notches
Alignment Key
16
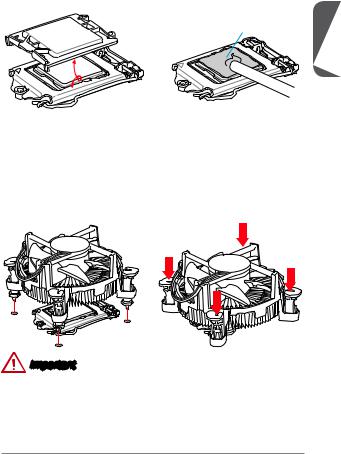
5.When you press down the load lever the PnP cap will automatically pop up from the CPU socket. Do not discard the PnP cap. Always replace the PnP cap if the CPU is removed from the socket.
6.Evenly spread a thin layer of thermal paste (or thermal tape) on the top of the CPU. This will help in heat dissipation and prevent CPU overheating.
Thermal paste
English
7.Locate the CPU fan connector on the motherboard.
8.Place the heatsink on the motherboard with the fan’s cable facing towards the fan connector and the fasteners matching the holes on the motherboard.
9.Push down the heatsink until the four fasteners get wedged into the holes on the motherboard. Press the four fasteners down to fasten the heatsink. As each fastener locks into position a click should be heard.
10.Inspect the motherboard to ensure that the fastener-ends have been properly locked in place.
11.Finally, attach the CPU fan cable to the CPU fan connector on the motherboard.
Important
•Confirm that the CPU heatsink has formed a tight seal with the CPU before booting your system.
•Whenever the CPU is not installed, always protect the CPU socket pins by covering the socket with the plastic cap.
•If you purchased a separate CPU and heatsink/ cooler, Please refer to the documentation in the heatsink/ cooler package for more details about installation.
17
 Loading...