


Mitsubishi I Miev 2012, Lancer SE Awc 2012, Lancer Sportback 2012, Lancer Ralliart 2011, Outlander 2010 Owner's Manual
...Introduction
Thank you for buying a Mitsubishi Motors product. This Owner’s Manual will add to your understanding and full enjoyment of the many fine features of the Mitsubishi Multi Communication System(MMCS).
Throughout this manual the words WARNING and CAUTION appear.
These are reminders to be especially careful. Failure to follow the instructions could result in personal injury or damage to your vehicle.
 WARNING
Indicates a strong possibility of severe personal injury or death if instructions are not followed.

 CAUTION
Points out hazards or unsafe practices that could cause minor personal injury or damage to your vehicle.
You will see another important symbol:
NOTE :Gives helpful information.
© 2011 Mitsubishi Motors Corporation Printed in Japan

Usage Precautions
 WARNING
•Do not operate the Mitsubishi Multi Communication System (MMCS) while driving.
•Always concentrate on your driving first. Keep your eyes and mind on the road. If distracted while driving, you could cause an accident.
•When operating the MMCS, do not park with the engine running in a closed or poorly ventilated area. Carbon monoxide gas, which is odorless and extremely poisonous, can build up and cause serious injury or death.

 CAUTION
•Drive according to the actual traffi c conditions. The MMCS gives guidance to arrive at the destination, but it cannot warn the driver of sudden dangers or potential damage.
•The route guidance of the MMCS may sometimes differ from the actual road conditions. Drive safely in accordance with the new road conditions or regulations.
•Do not look at the screen for a long time while driving, as it can cause an accident.
•Do not disassemble or modify, as it could cause malfunctions, smoke emissions or fi re.
NOTE
•For safety reasons, some functions are not possible to operate while driving.
•If an abnormality (e.g., water or foreign matter enters the MMCS or the MMCS emits smoke or an abnormal smell) occurs, do not use the MMCS. Have it inspected at an authorized Mitsubishi dealer. Do not continue to use the MMCS or try to repair it yourself.
•The following are characteristics of the LCD and are not malfunctions:
-Small black spots or bright spots (red, blue, or green) on the screen.
-When it is cold, the screen becomes darker or reddish or operations become slower.
-Color and brightness vary according to the viewing angle.
•Use a clean soft cloth to wipe off any dirt from the screen. Do not use any cleaners (such as benzene, thinners, antistatic agents or chemical cloths), as they may damage the screen.
•Do not use the MMCS for an extended time while the engine is off, as it will discharge the vehicle battery.

Introduction
Navigation System
Basic Operation Reference Guide
1 Storing the Home Location
>>> “When Storing Your Home” (page 5-2)
2 Searching for the Destination
Use one of the methods below to decide the destination
• Searching from the Map Screen
>>>“Destination Setting for Scrolled Position” (page 2-8)
>>>“Destination Setting” (page 3-12)
• Searching from the Address
>>> “From Address/Intersection” (page 3-2)
• Searching from the Points of Interest (POI) Name
>>> “Points of Interest (POI) Name” (page 3-5)
3Arriving at the Destination
4Going Home
Go back to the stored home location.
>>> “Go Home” (page 3-7)
5 Deleting the Route
>>> “Deleting the Route” (page 4-9)
Adding a Way Point
Add a way point to be visited on the way to the destination.
>>> “Adding a Way Point” (page 4-6)
Deciding Locations to Store
Destinations and way points can be easily selected if frequently visited locations are stored.
>>>“Storing a New Location” (page 5-1)
>>>“Editing a Location” (page 5-4)
Viewing the Route
The route to the destination can be viewed.
>>> “View Route” (page 4-1)
Deciding the Route Search Conditions
The route search for the destination can be changed.
>>> “Showing the Route (3 Routes)” (page 4-4)
Introduction
Navigation System Basic Operation Reference Guide 1-1

Table of contents
Introduction
Navigation System |
|
Basic Operation Reference Guide |
------1-1 |
Outline of the System-------------------------- |
1-6 |
Parts Name and Functions------------------- |
1-7 |
Roles of the Panel Operations Keys --------------- |
1-7 |
Role of the Steering Switch--------------------------- |
1-7 |
GPS Measurement ------------------------------ |
1-8 |
Error in the Current Location ------------- |
1-10 |
Route Calculation ----------------------------- |
1-12 |
Gracenote® music recognition service ------ |
1-13 |
EndUser License Agreement----------------------- |
1-13 |
Basic Operation
Starting the MMCS------------------------------ |
2-1 |
Operation Instructions---------------------------------- |
2-2 |
Lists--------------------------------------------------------- |
2-2 |
Menu Screens (Three Menus)--------------- |
2-3 |
Scroll Menu ----------------------------------------------- |
2-3 |
Navi Menu------------------------------------------------- |
2-3 |
Route Menu----------------------------------------------- |
2-4 |
Map Screen---------------------------------------- |
2-5 |
Current Location Screen ------------------------------ |
2-5 |
Changing the Map Display ------------------- |
2-6 |
Displaying the Current Location Screen----------- |
2-6 |
Changing the Scale------------------------------------- |
2-6 |
Changing Map Orientation ---------------------------- |
2-7 |
Scrolling the Map ------------------------------- |
2-8 |
Destination Setting for Scrolled Position ---------- |
2-8 |
Viewing the car location ------------------------------- |
2-8 |
Intersection Guidance ----------------------- |
2-10 |
Guidance Map ----------------------------------------- |
2-10 |
Turn List ------------------------------------------------- |
2-10 |
Arrow Guide -------------------------------------------- |
2-11 |
Listening to the Voice Guide -------------- |
2-12 |
How to Enter Text ----------------------------- |
2-13 |
Entering a letter---------------------------------------- |
2-13 |
Entering a Symbol ------------------------------------ |
2-13 |
Deleting Text-------------------------------------------- |
2-13 |
Switching between Upper Case and Lower Case --- |
2-14 |
Completing the input --------------------------------- |
2-14 |
Voice Operation-------------------------------- |
2-15 |
To use the voice operation -------------------------- |
2-15 |
Destination
Basic Method--------------------------------------------- |
3-1 |
Advanced Search --------------------------------------- |
3-1 |
Basic Method ------------------------------------- |
3-2 |
From Address/Intersection ---------------------------- |
3-2 |
Points of Interest (POI) Name------------------------ |
3-5 |
Previous 20 ----------------------------------------------- |
3-7 |
Address Book -------------------------------------------- |
3-7 |
Go Home -------------------------------------------------- |
3-7 |
Advanced Search ------------------------------- |
3-8 |
Nearby POI ----------------------------------------------- |
3-8 |
POI along Route----------------------------------------- |
3-9 |
POI by Dest./Way Point ------------------------------- |
3-9 |
POI along a Street ------------------------------------ |
3-10 |
POI by Freeway --------------------------------------- |
3-10 |
Map Point ----------------------------------------------- |
3-11 |
Return Trip ---------------------------------------------- |
3-11 |
Latitude/Longitude ------------------------------------ |
3-11 |
Destination Setting --------------------------- |
3-12 |
Setting as Destination-------------------------------- |
3-12 |
Setting as Way Point --------------------------------- |
3-12 |
Storing the Location ---------------------------------- |
3-13 |
|
Route |
View Route ---------------------------------------- |
4-1 |
Route Option Icon--------------------------------------- |
4-1 |
Remaining------------------------------------------------- |
4-2 |
Preview ---------------------------------------------------- |
4-2 |
Route Outline--------------------------------------------- |
4-2 |
Detour----------------------------------------------- |
4-3 |
Detour Distance ----------------------------------------- |
4-3 |
Avoid Street----------------------------------------------- |
4-3 |
Editing the Route (Itinerary) ----------------- |
4-4 |
Showing the Route (3 Routes)----------------------- |
4-4 |
Re-ordering ----------------------------------------------- |
4-5 |
Adding a Way Point------------------------------------- |
4-6 |
Deleting ---------------------------------------------------- |
4-6 |
Option ------------------------------------------------------ |
4-7 |
Start Demo ---------------------------------------- |
4-8 |
Deleting the Route ------------------------------ |
4-9 |
Table of Contents 1-2

Address Book
Storing a New Location ----------------------- |
5-1 |
From the Navi Menu------------------------------------ |
5-1 |
From the Scroll Menu ---------------------------------- |
5-1 |
To Customize/Modify Address ----------------------- |
5-2 |
When Storing Your Home ----------------------------- |
5-2 |
Icons-------------------------------------------------------- |
5-3 |
Editing a Location ------------------------------ |
5-4 |
Editing------------------------------------------------------ |
5-4 |
Deleting ---------------------------------------------------- |
5-5 |
|
|
RTT(Real Time Traffic) |
|
|
|
RTT(Real Time Traffic)------------------------- |
6-1 |
Viewing the Traffic Information----------------------- |
6-1 |
Dynamic Route Guidance----------------------------- |
6-2 |
Storing from the RTT Traffic Information Screen ------ |
6-2 |
Storing from the Map Scroll Screen ---------------- |
6-3 |
Recalling Stored Screens ----------------------------- |
6-3 |
RTT Options ---------------------------------------------- |
6-4 |
Audio
Audio Functions--------------------------------- |
7-1 |
Displaying during Navi Functions ------------------- |
7-1 |
Source Plate---------------------------------------------- |
7-1 |
A/V Icon---------------------------------------------------- |
7-2 |
Operation Limits while Driving ----------------------- |
7-2 |
Switching to Audio Screen ---------------------------- |
7-3 |
Ending Audio --------------------------------------------- |
7-3 |
Adjusting the Volume----------------------------------- |
7-3 |
Displaying the Navi Screen --------------------------- |
7-3 |
Disk Handling ------------------------------------ |
7-4 |
Inserting and Removing Disks ----------------------- |
7-4 |
Correct Disk Handling---------------------------------- |
7-5 |
Types of Playable Disks----------------------- |
7-6 |
Non-Standard CDs-------------------------------------- |
7-6 |
Meaning of the Logos on DVDs --------------------- |
7-6 |
MP3/WMA Files------------------------------------------ |
7-7 |
Folder Configurations ---------------------------------- |
7-7 |
MP3s ------------------------------------------------------- |
7-7 |
WMA-------------------------------------------------------- |
7-8 |
Listening to Radio ------------------------------ |
7-9 |
Selecting Stations --------------------------------------- |
7-9 |
Scanning Broadcasting Stations -------------------- |
7-9 |
Storing Broadcast Stations ------------------------- |
7-10 |
Recalling Stored Stations --------------------------- |
7-11 |
Listening to SIRIUS--------------------------- |
7-12 |
Display Contents -------------------------------------- |
7-12 |
Selecting Stations ------------------------------------- |
7-13 |
Selecting a Category to Be Received------------ |
7-13 |
Scanning ------------------------------------------------ |
7-13 |
Storing Channels -------------------------------------- |
7-15 |
Recalling Stored Channels ------------------------- |
7-15 |
Switching TEXT Display ----------------------------- |
7-16 |
Setting Channel Skipping --------------------------- |
7-16 |
Parental Lock Channel------------------------------- |
7-17 |
Displaying the SIRIUS ID --------------------------- |
7-18 |
Listening to Music CDs --------------------- |
7-19 |
Display Contents -------------------------------------- |
7-19 |
Basic Operations -------------------------------------- |
7-20 |
Changing the Playback Mode---------------------- |
7-20 |
Recording to the Music Server ----------- |
7-22 |
Displaying during Recording ----------------------- |
7-22 |
Recording ----------------------------------------------- |
7-22 |
Stopping Recording----------------------------------- |
7-24 |
Obtaining Title Information ---------------- |
7-25 |
Gracenote Service ------------------------------------ |
7-25 |
Obtaining Title Information -------------------------- |
7-25 |
Listening to MP3/WMA Disks ------------- |
7-27 |
Display Contents -------------------------------------- |
7-27 |
Basic Operations -------------------------------------- |
7-27 |
Changing the Playback Mode---------------------- |
7-28 |
To play tracks from iPod or USB device ---- |
7-31 |
To play from an iPod---------------------------------- |
7-31 |
To play from a USB memory device -------------- |
7-32 |
Setting up Bluetooth Connection-------- |
7-33 |
To pair a Bluetooth Audio---------------------------- |
7-33 |
To play from a Bluetooth AUDIO ------------------ |
7-34 |
To pair a Mobile Phone ------------------------------ |
7-34 |
Introduction
Table of Contents 1-3

Music Server
Music Server-------------------------------------- |
8-1 |
Display Contents ---------------------------------------- |
8-1 |
Configuration------------------------------------- |
8-2 |
Group------------------------------------------------------- |
8-2 |
Playlist ----------------------------------------------------- |
8-2 |
Listening to the Music Server--------------- |
8-3 |
Basic Operations ---------------------------------------- |
8-3 |
Changing the Playback Mode------------------------ |
8-4 |
Searching for Desired Tracks --------------- |
8-7 |
Selecting Tracks from the List Screen ------------- |
8-7 |
Searching Using the Search Function ------------- |
8-8 |
Editing User Groups ------------------------- |
8-11 |
Creating User Groups-------------------------------- |
8-11 |
Creating User Playlists------------------------------- |
8-11 |
Adding Tracks to Playlists--------------------------- |
8-14 |
Setting the “My Best” Group-------------- |
8-15 |
Setting the “My Frequency” Conditions---------- |
8-15 |
Adding to “My Favorites” ---------------------------- |
8-16 |
Editing Detailed Information -------------- |
8-17 |
Changing Titles ---------------------------------------- |
8-18 |
Changing Artist Names ------------------------------ |
8-18 |
Changing Group Names----------------------------- |
8-18 |
Changing Categories--------------------------------- |
8-19 |
Changing the Playback Order ------------ |
8-20 |
Changing the Group Playback Order ------------ |
8-20 |
Changing the Playlist Playback Order ----------- |
8-21 |
Changing the Track Playback Order ------------- |
8-22 |
Deleting------------------------------------------- |
8-23 |
Deleting One Item------------------------------------- |
8-23 |
Deleting All Items-------------------------------------- |
8-24 |
Visual
Watching DVDs ---------------------------------- |
9-1 |
Display Contents ---------------------------------------- |
9-1 |
Basic Operations ---------------------------------------- |
9-2 |
Operations Menu ---------------------------------------- |
9-3 |
Playing DVDs with Viewing Restrictions ---------- |
9-5 |
Displaying the Default Settings Menu-------------- |
9-6 |
Language Settings -------------------------------------- |
9-6 |
Displaying Angle Marks-------------------------------- |
9-7 |
Audio Compression------------------------------------- |
9-7 |
Viewing Restrictions ------------------------------------ |
9-8 |
Language Codes ------------------------------------- |
9-10 |
AUX / Video Entertainment System ----- |
9-11 |
AUX------------------------------------------------------- |
9-11 |
Video Entertainment System ----------------------- |
9-11 |
Information
Calendar------------------------------------------ |
10-1 |
Setting Special Days --------------------------------- |
10-1 |
Editing Special Days --------------------------------- |
10-2 |
Deleting Special Days-------------------------------- |
10-2 |
Setting Anniversaries--------------------------------- |
10-3 |
Editing Anniversaries --------------------------------- |
10-4 |
Deleting Anniversaries ------------------------------- |
10-4 |
Trip ------------------------------------------------- |
10-5 |
Reset Mode--------------------------------------------- |
10-5 |
Driving Distance and Time -------------------------- |
10-6 |
Lap Time------------------------------------------------- |
10-6 |
Environment ------------------------------------ |
10-8 |
Maintenance ------------------------------------ |
10-9 |
Setting the Maintenance Timing ------------------- |
10-9 |
Update ------------------------------------------------- |
10-10 |
Clear---------------------------------------------------- |
10-10 |
Air Conditioner-------------------------------- |
10-11 |
Mobile Phone ---------------------------------- |
10-12 |
Making Phone Calls -------------------------------- |
10-12 |
Importing Phonebook of Mobile Phone |
|
to Mobile Phonebook------------------------------- |
10-13 |
Importing Telephone Numbers |
|
to Vehicle Phonebook ------------------------------ |
10-13 |
Setting Passcode------------------------------------ |
10-14 |
Receiving Phone Calls----------------------------- |
10-14 |
Other Info --------------------------------------- |
10-15 |
Support Info------------------------------------------- |
10-15 |
Vehicle Position-------------------------------------- |
10-15 |
Setting
Adjusting the Screen ------------------------ |
11-1 |
Display Off ---------------------------------------------- |
11-1 |
Picture Control ----------------------------------------- |
11-1 |
Screen Size--------------------------------------------- |
11-1 |
Sound Control---------------------------------- |
11-2 |
If Premium Sound System is not connected ---- |
11-2 |
If Premium Sound System is connected -------- |
11-2 |
System Settings ------------------------------- |
11-4 |
Time ------------------------------------------------------ |
11-4 |
Language------------------------------------------------ |
11-4 |
Unit-------------------------------------------------------- |
11-5 |
Other Settings------------------------------------------ |
11-5 |
Equipment --------------------------------------- |
11-7 |
Equipment Items that Can Be Set ---------------- |
11-7 |
Returning the Equipment Settings to Default----- |
11-8 |
Navi Screen Options ------------------------- |
11-9 |
One/Two Maps----------------------------------------- |
11-9 |
Points of Interest (POI) Icons on Map----------- |
11-10 |
Map Color ---------------------------------------------- |
11-11 |
Current Street Name -------------------------------- |
11-11 |
Table of Contents 1-4

Address Book Name -------------------------------- |
11-11 |
Vehicle Tracking -------------------------------------- |
11-11 |
Route Options--------------------------------- |
11-12 |
Route Priority------------------------------------------ |
11-12 |
Minimize Freeways ---------------------------------- |
11-12 |
Minimize Toll Roads --------------------------------- |
11-12 |
Minimize Ferries -------------------------------------- |
11-13 |
Avoid Traffic Problems ------------------------------ |
11-13 |
Avoid Selected Areas ------------------------------- |
11-13 |
Avoid Time Restricted Roads --------------------- |
11-13 |
Guidance---------------------------------------- |
11-14 |
Guidance Mode--------------------------------------- |
11-14 |
Travel Time -------------------------------------------- |
11-15 |
Time/Distance remaining--------------------------- |
11-15 |
POI Icons on Guidance Map ---------------------- |
11-15 |
List Orientation---------------------------------------- |
11-15 |
Personal Settings ---------------------------- |
11-16 |
Address Book ----------------------------------------- |
11-16 |
Home Location---------------------------------------- |
11-16 |
Avoid Areas -------------------------------------------- |
11-16 |
My Categories----------------------------------------- |
11-18 |
Delete Previous 20----------------------------------- |
11-19 |
Navi Voice / Other ---------------------------- |
11-19 |
END-USER LICENSE AGREEMENT ---- |
11-20 |
Introduction
Table of Contents 1-5

Outline of the System
System
•Male or female voice guidance is available in 3 languages.
(English, French, Spanish)
•Trip information such as average speed, average fuel economy, and instant fuel economy can be viewed.
(page 10-5)
•Detailed settings can be made for vehicle equipment.
(page 11-7)
•The vehicle maintenance timing can be managed with the maintenance function. (page 10-9)
•Environmental information such as the outside air temperature, altitude, and air pressure can be viewed. (page 10-8)
•A special day or anniversary can be managed with the calendar function. (page 10-1)
•DVDs can be played. (page 9-1)
•Music CDs can be recorded and played using the Music Server. (page 8-1)
•iPod, USB device, and Bluetooth® audio device can be used (if so equipped). (page 7-31, 7-33)
Easy Operation Setting
• The touch panel enables easy operation.
Destination Setting
•Addresses and nearby POIs can be easily searched for and set as the destination. (page 3-2)
•A route can be set for returning home. (page 3-7)
•A new destination can be set from the 20 destinations that have been previously set.
(page 3-7)
Display Guidance
•POI icons can be displayed on the map. There are 43 POI icon types. (page 11-10)
•The menu and map colors can be changed.
(page 11-6),(page 11-11)
•Markings can be displayed on the road on which the vehicle is being driven. (page 11-11)
Routing
•Detour routes can be set with specifi ed distances or streets to avoid. (page 4-3)
•A route can be selected from 3 routes that have different calculation conditions. (page 4-4)
•Areas to avoid can be set. (page 11-16)
Voice Guidance
•Guidance is given for the required information at the optimum time. (page 2-12)
•A male or female voice can be selected. (page 11-5)
Vehicle information display (page 10-5)
•You can check or set driving information.
•You can check distance to empty, distance driven after refueling, and driving time.
NOTE
•Depending on the vehicle model, some new functions may have been added.
“iPod” is a registered trademark of Apple Inc. in the United States and other countries.
Bluetooth® is a registered trademark of BLUETOOTH SIG, INC.
Outline of the System 1-6
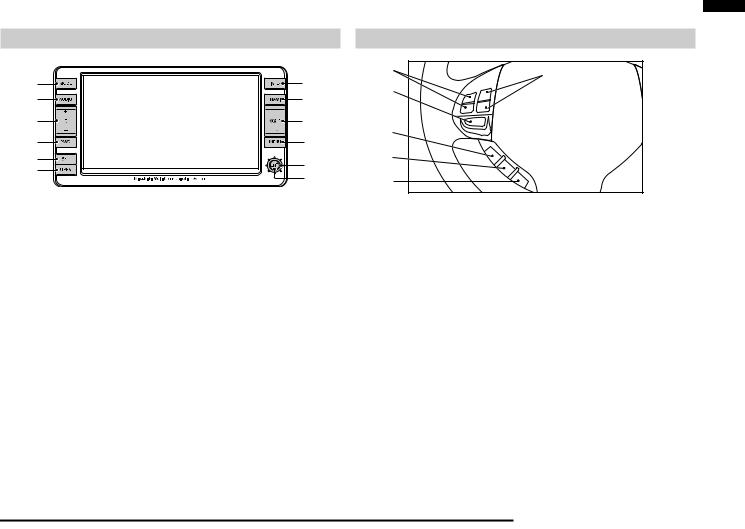
Parts Name and Functions
Roles of the Panel Operations Keys |
|
|
Role of the Steering Switch |
|
|
1) |
2) |
1) |
12) |
|
|
3) |
|
||
2) |
11) |
|
|
|
|
||
3) |
10) |
|
|
4) |
9) |
4) |
|
||
5) |
8) |
5) |
|
||
6) |
|
|
7) |
|
|
|
6) |
1)[MODE] Key
Displays the A/V mode selection screen.
2)[AUDIO] Key
Switches between the A/V screen and the NAVI screen.
3)[VOL] Key
Adjusts the A/V volume.
4)[PWR] Key
Turns ON and OFF the audio functions.
5)[SET] Key
Displays the Settings screen.
6)[OPEN] Key
Opens and closes the monitor panel.
7)[ENT] Key
Implements the selected item.
8)Joystick
Scrolls the maps and implements item selection.
9)[MENU] Key
Displays the Navi menu screen.
10)[  SCALE
SCALE  ] Key
] Key
Changes the map scale.
11)[NAVI] Key
Displays the current location screen.
12)[INFO] Key
Displays the Info screen.
1)Volume up / down button ( [ + ] and [ - ] button )
Adjust the volume during audio function playback.
2)CH up / down button
([ ] and [
 ] button)
Moves up and down radio stations, moves to the next or previous track during CD playback, and moves to the next or previous chapter during DVD playback.
3)[MODE] button
Toggles the A/V mode each time this key is pressed.
4)SPEECH button
Press this button to change to voice recognition mode. (page 2-15)
5)PICK-UP button
Press this button when an incoming call is received to answer the telephone.
6)HANG-UP button
Press this button during a call to end the current call.
*Refer to the vehicle owner's manual for further details.
Introduction
Parts Name and Functions 1-7
GPS Measurement
GPS
GPS is the acronym for Global Positioning System. The MMCS uses GPS satellites that orbit the Earth in space at an altitude of approximately 20,000km. Electromagnetic waves from at least three of these satellites are received on the Earth by the system, making it possible to learn the current position.
Map Matching
When traveling with just the GPS, there may be errors in the current position display. In such case, “map matching” is the function that compensates for this error by assuming that vehicles travel on roads and placing the current position on a nearby road.
GPS antenna position
The position of the vehicle is determined from the weak electromagnetic waves from GPS satellites received by the GPS antenna.
mngi263
NOTE
Since it may not be possible to accurately display the vehicle position if the electromagnetic waves from the GPS satellite are blocked, be sure to obey the following:
•Do not attach refl ective-type fi lms or fi lms containing carbon to the window glass.
•Do not place objects on top of or close to the GPS antenna.
•Do not use cellphones, computers, etc. near the GPS antenna.
Situations where accurate measurement is not possible
In situations such as the following, accurate measurement may not be possible.
• Inside a tunnel or indoor parking area
• Under a two-tier freeway
• Area with many high-rise buildings
• Between closely-spaced trees
The US Tracking and Control Center controls the satellites. Sometimes the electromagnetic waves are stopped during upgrades or repairs to the system.
NOTE
•Do not block the electromagnetic waves, from GPS satellites by placing objects on or around the GPS antenna.
•Avoid using a 1.5G digital mobile phone in the vicinity of the GPS antenna, as it could prevent accurate measurement.
GPS Measurement 1-8

Situations where errors occur in the current location and direction
•Errors sometimes occur when the accuracy of the GPS satellite unit is poor.
•The GPS satellites are controlled by the United States Department of Defense, so sometimes the satellite itself intentionally sends incorrect position data. The measurement error will increase in this kind of situation.
•Sometimes sufficient accuracy is not possible because the distribution of the GPS satellites is poor (when the satellites are aligned in approximately the same direction or height). (The best accuracy for GPS measurement is when signals are received from multiple satellites; a satellite directly over the vehicle and others just over the horizon to the north, south, east and west.)
•Regarding the height and directional accuracy of GPS measurement, errors are slightly more likely in the horizontal direction.
•Electromagnetic waves from satellites higher than the vehicle height can be received, but electromagnetic waves cannot physically be received from satellites positioned lower than the vehicle height (on the far side of the Earth). This means that an adequate height comparison is not possible.
3D Measurement
When valid electromagnetic waves can be received from at least four GPS satellites, the 3D positions of latitude, longitude and height are calculated.
2D Measurement
When valid electromagnetic waves can only be received from three or less GPS satellites, the height is assumed to be unchanged from the previous measurement and the 2D positions of latitude and longitude are calculated. If this happens, the accuracy of the position is less than with the 3D measurement.
No Measurement
If no valid electromagnetic waves can be received from the GPS satellites, there is no measurement.
Introduction
GPS Measurement 1-9
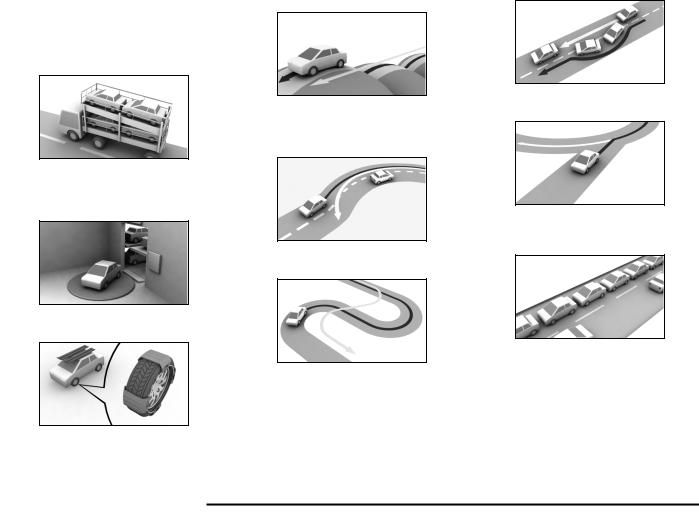
Error in the Current Location
In situations such as the following, the current location may not be correctly displayed.
•Vehicle was moved without it being driven (E.g., when transported on a ferry or trailer)
•Vehicle direction was changed without turning on the engine
(E.g., on a turntable in a parking area)
• After replacing the tires or chains
•When driving on roads with elevation differences, such as mountain roads with steep inclines
•When driving on roads that continue for a long time in a straight line or gentle curve
(E.g., freeways)
• When driving around tight hairpin corners
• When meandering on wide roads
• When driving on Y-shaped roads
•When starting and stopping frequently at low speed, such as in a traffi c jam
Error in the Current Location 1-10

• When driving on snowy or unpaved roads |
• When driving on a road that turns around in the |
|
|
|
same direction, such as a loop-shaped bridge or |
|
|
|
|
|
interchange |
|
|
|
• When driving on roads parallel to others
• When driving on roads where map data is not available
• When driving on grid-shaped roads
• When GPS measurements could not be made for an extended distance.
Introduction
Error in the Current Location 1-11

Route Calculation
•The most up-to-date road information and regulation data possible have been used for the maps and information used in this system. However, subsequent road changes may cause the information to differ from the actual conditions, and inappropriate guidance may be given. Be sure to drive according to the actual traffi c conditions.
•Not all roads are subject to the recommended route guidance.
•The calculated route is only one example of a road that reaches the destination, which the system calculated by taking into account road types and traffi c conditions. It is not necessarily always the best route.
•Not all ferry routes are necessarily stored in the data. Further, even if ferry routes are prioritized they are not necessarily used in the route.
•The route selection is a comprehensive judgement based on factors such as the road type, distance and road width, but this does not mean that the best route is always selected. Think of the route as only one example of many possible routes.
•The route guidance is performed for the roads subject to the route guidance that are the nearest to the destination or way point. For this reason, an inappropriate route may be displayed if the set route includes a location where many roads are concentrated together, such as at an interchange. Further, if the destination or way point becomes far away from the intersections of roads subject to the route guidance, a route may be displayed that passes the destination or way point.
•Traffic lanes in both directions are separately input for wide roads or roads with central dividers. If a destination (way point) is set in this kind of position, a route may be selected that passes and then returns to the destination (way point).
•The fi rst guidance location is the road nearest to the starting position (vehicle).
•The fi nal guidance location is the road nearest to the location set as the destination.
•If while driving along the route seems very indirect, it is possible that a route has been set in the direction opposite to the current vehicle direction.
•The guidance route may result in the vehicle being on the opposite side of a river or station from that which is desired. If this happens, move the destination near to the desired road.
•Sometimes it will not be possible to avoid toll roads or ferry routes, when there are no other suitable routes.
•If three recommended routes do not exist, the same route may be repeated.
•Sometimes the enlarged intersection map will not be displayed immediately after the route calculation, or due to other conditions.
Route Calculation 1-12

Gracenote® music recognition service
Music and video recognition technology and related data are provided by Gracenote®. Gracenote is the industry standard in music recognition technology and related content delivery. For more information, please visit www.gracenote.com.
CD, DVD, Blu-ray Disc, and music and video-related data from Gracenote, Inc., copyright © 2000 to present Gracenote. Gracenote Software, copyright © 2000 to present Gracenote. One or more patents owned by Gracenote apply to this product and service. See the Gracenote website for a non-exhaustive list of applicable Gracenote patents. Gracenote, CDDB, MusicID, MediaVOCS, the Gracenote logo and logotype, and the “Powered by Gracenote” logo are either registered trademarks or trademarks of Gracenote in the United States and/or other countries.
EndUser License Agreement
This application or device contains software from Gracenote, Inc. of Emeryville, California (“Gracenote”). The software from Gracenote (the “Gracenote Software”) enables this application to perform disc and/or file identification and obtain music-related information, including name, artist, track, and title information (“Gracenote Data”) from online servers or embedded databases (collectively, “Gracenote Servers”) and to perform other functions. You may use Gracenote Data only by means of the intended EndUser functions of this application or device.
You agree that you will use Gracenote Data, the Gracenote Software, and Gracenote Servers for your own personal non-commercial use only. You agree not to assign, copy, transfer or transmit the Gracenote Software or any Gracenote Data to any third party. YOU AGREE NOT TO USE OR EXPLOIT GRACENOTE DATA, THE GRACENOTE SOFTWARE, OR GRACENOTE SERVERS, EXCEPT AS EXPRESSLY PERMITTED HEREIN.
You agree that your non-exclusive license to use the Gracenote Data, the Gracenote Software, and Gracenote Servers will terminate if you violate these restrictions. If your license terminates, you agree to cease any and all use of the Gracenote Data, the Gracenote Software, and Gracenote Servers. Gracenote reserves all rights in Gracenote Data, the Gracenote Software, and the Gracenote Servers, including all ownership rights. Under no circumstances will Gracenote become liable for any payment to you for any information that you provide. You agree that Gracenote, Inc. may enforce its rights under this Agreement against you directly in its own name.
The Gracenote service uses a unique identifier to track queries for statistical purposes. The purpose of a randomly assigned numeric identifi er is to allow the Gracenote service to count queries without knowing anything about who you are. For more information, see the web page for the Gracenote Privacy Policy for the Gracenote service.
The Gracenote Software and each item of Gracenote Data are licensed to you “AS IS.” Gracenote makes no representations or warranties, express or implied, regarding the accuracy of any Gracenote Data from in the Gracenote Servers. Gracenote reserves the right to delete data from the Gracenote Servers or to change data categories for any cause that Gracenote deems sufficient. No warranty is made that the Gracenote Software or Gracenote Servers are errorfree or that functioning of Gracenote Software or Gracenote Servers will be uninterrupted. Gracenote is not obligated to provide you with new enhanced or additional data types or categories that Gracenote may provide in the future and is free to discontinue its services at any time.
GRACENOTE DISCLAIMS ALL WARRANTIES E X P R E S S O R I M P L I E D , I N C L U D I N G , B U T NOT LIMITED TO, IMPLIED WARRANTIES OF MERCHANTABILITY, FITNESS FOR A PARTICULAR PURPOSE, TITLE, AND NON-INFRINGEMENT. GRACENOTE DOES NOT WARRANT THE RESULTS THAT WILL BE OBTAINED BY YOUR USE OF THE GRACENOTE SOFTWARE OR ANY GRACENOTE SERVER. IN NO CASE WILL GRACENOTE BE LIABLE FOR ANY CONSEQUENTIAL OR INCIDENTAL DAMAGES OR FOR ANY LOST PROFITS OR LOST REVENUES.
© Gracenote 2011
Introduction
Gracenote® music recognition service 1-13

Gracenote® music recognition service 1-14
Basic Operation
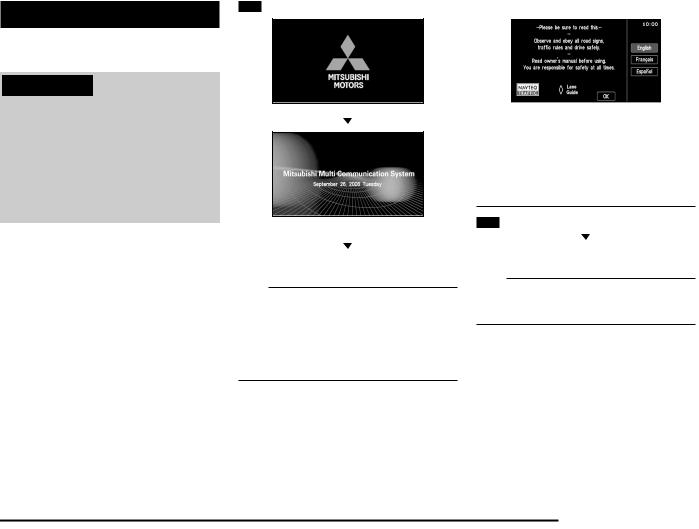
Starting the MMCS
 WARNING
•Do not operate the Mitsubishi Multi Communication System (MMCS) while driving.
•Always concentrate on your driving fi rst. Keep your eyes and mind on the road. If distracted while driving, you could cause an accident.
•When operating the MMCS, do not park with the engine running in a closed or poorly ventilated area. Carbon monoxide gas, which is odorless and extremely poisonous, can build up and cause serious injury or death.
1 Turn “ON” the ignition switch
eng_244
eng_a002
The opening screen is displayed.
If any function other than AUDIO was used last time, go to Step 2.
NOTE
•If special days and anniversaries (page 10-1) have been set, when the date matches the settings, the set icon is displayed on screen.
•If maintenance information (page 10-9) has been set, when the maintenance distance has been exceeded or the maintenance timing has been exceeded, a telop will be displayed in the opening screen.
2 |
Touch the desired language |
|
||||
|
|
|
|
|
|
|
|
|
|
|
|
|
|
|
|
|
|
|
|
|
|
|
|
|
|
|
Basic |
|
|
|
|
|
|
Operation |
|
|
|
eng_a600 |
|||
NOTE |
|
|
|
|
|
|
|
|
|
|
|||
•When the meter is set to Auto, the language of both sides can be changed by performing operations on either the MMCS side or the meter side.
•When the meter is set to Manual, the language of the meter side and the MMCS side can be set separately.
3 Touch [OK]
After a moment, the display is changed to the navigation screen.
NOTE
•If the battery voltage is low in cold regions, etc., the navigation screen is displayed rather than the screen last used.
Starting the MMCS 2-1
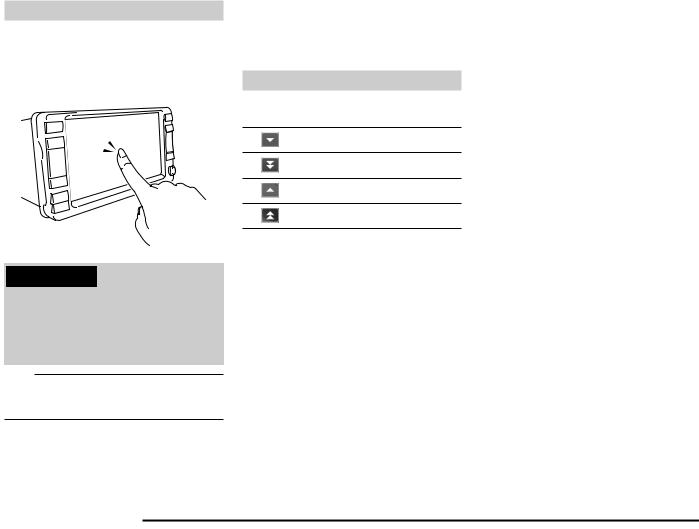
Operation Instructions
With this navigation system, operations can be performed by pressing the panel keys or touching the screen buttons.
Operate the screen by touching lightly with a fi ngertip.
mb447
 WARNING
•While driving, do not perform complicated operations or concentrate on the screen. Failure to pay attention to the road ahead may cause traffi c accidents. Have a front seat passenger perform the operations, or stop the car in a safe location before operating.
NOTE
•Do not touch the screen with wet hands or press it with hard, sharp objects, as this may cause malfunction.
The Screens in this Manual
The screens described in this manual are for explanation. They may be different from actual screens, and their operation may also be different.
Lists
This section explains the list operation buttons when a list has been displayed.
Scrolls forward through a list one line at a time.
Scrolls forward through a list one page at a time.
Scrolls back through a list one line at a time.
Scrolls back through a list one page at a time.
Starting the MMCS 2-2
Menu Screens (Three Menus)
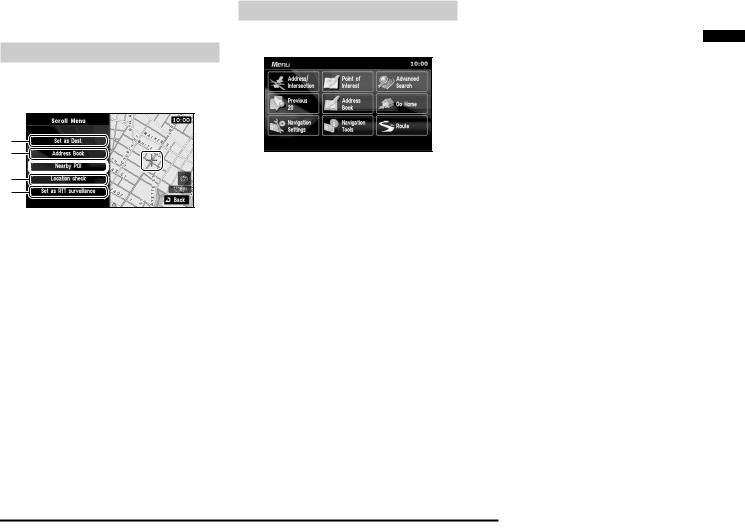
Scroll Menu
After scrolling the map, press the [ENT] key to display.
1)
2)
3) 
 6)
6)
4)
5)
eng_a601
1)[Set as Dest.]
Sets the cursor position as the destination.
>>>“Destination Setting for Scrolled Position” (page 2-8)
2)[Address Book]
The cursor position can be stored in the address book.
>>> “Storing a New Location” (page 5-1)
3)[Nearby POI ]
POI can be searched for in the vicinity of the cursor position. >>> “Nearby POI ” (page 3-8)
4)[Location check]
The positional relationship between the cursor position and the current location can be viewed.
>>>“Viewing the car location” (page 2-8)
5)[Set as RTT surveillance]
The surveillance map is stored
>>>“Storing from the Map Scroll Screen”
(page 6-3)
6) Cursor
Navi Menu
Press the [MENU] key to display.
eng_a004-2
1)[Address/Intersection]
The location can be searched for using the address or street name of the destination.
>>>“From Address/Intersection” (page 3-2)
2)[Point of Interest]
The location can be searched for using a POI name.
>>>“Points of Interest (POI) Name” (page 3-5)
3)[Advanced Search]
An advanced search is possible based on the POI search.
>>>“Advanced Search” (page 3-8)
4)[Previous 20]
A new destination can be set from the 20 destinations that have been previously set.
>>>“Previous 20” (page 3-7)
5)[Address Book]
A previously stored location can be called up and set as the destination.
>>>“Address Book” (page 5-1)
6)[Go Home]
A route can be set for returning home.
>>>“Go Home” (page 3-7)
7)[Navigation Settings]
Various functions related to the navigation can be set. >>> “Settings” (page 11-1)
8)[Navigation Tools]
The Demo of the set route and basic information related to the navigation can be viewed.
>>> “Start Demo” (page 4-8)
9)[Route]
The [Route] button is displayed when a destination has been set.
>>>“Route Menu” (page 2-4)
Operation Basic
Menu Screens (Three Menus) 2-3
Route Menu
Touch [Route] on the current location screen to display. The route can be viewed or edited.
NOTE
•The [Route] button is displayed when a destination has been set.
eng_a005-2
1)[Detour]
The route can be changed to one that detours a specifi ed area.
>>>“Detour” (page 4-3)
2)[Itinerary]
The destination position can be changed, a way point can be added, and the route calculation conditions can be changed.
>>>“Editing the Route (Itinerary)” (page 4-4)
3)[View Route]
The route can be viewed using various methods.
>>>“View Route” (page 4-1)
4)[Delete Route]
Deleting a created route.
>>>“Deleting the Route” (page 4-9)
5)[Nearby POI ]
POI can be searched for in the vicinity of the current location. >>> “Nearby POI ” (page 3-8)
Menu Screens (Three Menus) 2-4

Map Screen
The current position of your vehicle is displayed on the “Current Location Screen”.
Current Location Screen
1) |
|
2) |
|
3) |
10) |
|
|
4) |
9) |
|
|
5) |
8) |
|
6) 7) eng_a620
1)Maneuver Icon
When a route is set, displays whether to turn left or right at the next intersection of the guidance, and the distance to this intersection.
2)Direction Box
When a route is set, displays the route number or street name of the next street to turn onto.
3)Vehicle Mark
Shows the position of the vehicle being driven.
4)Guidance Route
When a route is set, shows the route to the destination.
5)[Route]
[Route] is displayed only while setting route. When touched, shows Route Menu (page 2-4).
6)Street Name
Displays the name of the street currently being traveled.
7)Destination/Way Point Information
When a route is set, shows the distance and time to the destination or way point.
8)Map Scale
Shows the scale of the displayed map.
9)Destination/Way Point Direction Icon
Shows the direction to the destination or way point. Only displayed when a route has been set.
10)Orientation Mark
Shows the orientation of the displayed map.
11)RTT (Real Time Traffic) Icon
Displays traffi c information such as traffi c jams, construction, etc. When icon is touched, detailed information for the RTT symbol displayed on the map can be checked.
Operation Basic
Map Screen 2-5
Changing the Map Display
Changing the display method of the map screen.
Displaying the Current Location Screen
Displays the current location.
1 Press the [NAVI] key
eng_a623
The current location screen is displayed.
Changing the Scale
The scale of the map display can be changed within a range of 1/32 miles (50m) to 60 miles (100km).
Two Maps Mode
When two maps are displayed, the left and right screens can be changed to different scales.
The scale of the right map is changed with the same operations as when there is only one map. This section explains how to change the scale of the left map.
NOTE
•The scale display unit can be changed from “mile” to “km”. >>> “Unit” (page 11-5)
One Map Mode
NOTE
•Switching between One Map and Two Map can be performed in “Screen Options”. >>> “One/Two Maps” (page 11-9)
1 Touch the map section of the left
1 To display a wider area, press the map [  SCALE] key
eng_a630
eng_a624
A wider area can be viewed each time the [  SCALE] key is pressed.
2 For a detailed display, press the [SCALE  ] key
] key
eng_a631
A scale bar is displayed.
eng_a627
A more detailed area can be viewed each time the [SCALE  ] key is pressed.
NOTE
•Press and hold the [  SCALE] key or the [SCALE
  ] key to change the scale using smooth zoom.
Changing the Map Display 2-6
2 Touch [  ] to display a wide area
eng_a632
A wider area can be viewed each time [  ] is touched.
3 Touch [  ] to display a detailed area
eng_a633
A more detailed area can be viewed each time [ ] is touched.
NOTE
•Perform these operations while the scale bar is being displayed.
•Touch and hold [ ] or [
 ] to change the scale using smooth zoom.
|
|
|
|
|
Map Orientation |
|
|
|
||
|
|
Changing Map Orientation |
|
|
|
|
||||
|
|
|
|
|
|
|
|
|
||
The map orientation can be changed |
Mark |
Name |
|
Display Contents |
|
|
||||
|
|
|
The vehicle mark is rotated so |
|
||||||
according to various conditions. |
(Red) |
North-Up |
|
that the north of the map is |
Basic |
|||||
|
|
|
|
|
|
|
|
always facing the front (up). |
|
|
|
Touch the orientation button |
|
|
|
The map is rotated so that |
|
||||
1 |
|
H e a d i n g - |
|
Operation |
||||||
|
|
Orientation Mark |
(Red) |
|
the vehicle is always facing |
|||||
|
|
|
Up |
|
the front (up). |
|
||||
|
|
|
|
|
|
|
|
|
||
|
|
|
|
|
|
|
|
“ H e a d i n g - U p ” o r “ N o r t h - |
|
|
|
|
|
|
|
|
|
|
Up” is selected automatically, |
|
|
|
|
|
|
|
(Blue) |
|
|
depending on the map scale. |
|
|
|
|
|
|
|
or |
Auto |
|
“Heading-Up” is selected for a |
|
|
|
|
|
|
|
|
scale of 1/16 miles (100m) or |
|
|||
|
|
|
|
|
(Blue) |
|
|
|||
|
|
|
|
|
|
|
|
|||
|
|
|
|
|
|
|
less, and “North-Up” is selected |
|
||
|
|
|
|
|
|
|
|
|
||
|
|
|
|
|
|
|
|
for a scale of 1/8 miles (250m) |
|
|
|
|
eng_a634 |
|
|
|
or more. |
|
|||
|
|
North-Up |
|
|
|
|
||||
|
|
In Two Maps Display |
|
|
|
|||||
|
|
|
|
|
|
|
|
|||
|
|
|
|
|
|
|
|
|||
|
|
|
|
|
When two maps are displayed, the left and right |
|
||||
|
|
|
|
|
maps are linked together, with either “Heading-Up” or |
|
||||
|
|
|
|
|
“North-Up” selected for both. However, when “Auto” |
|
||||
|
|
|
|
|
is set, different orientations can be selected for the left |
|
||||
|
|
|
|
|
and right maps, depending on the scale. |
|
||||
|
|
|
|
|
|
|
|
|
|
|
|
|
eng_a635 |
|
|
|
|
|
|
||
|
|
Heading-Up |
|
|
|
|
|
|
||
Each time the orientation mark is touched, the map |
|
|
|
|
|
|
||||
orientation is changed in the sequence “North-Up” |
|
|
|
|
|
|
||||
“Heading-Up” “Auto”. |
|
|
|
|
|
|
||||
Changing the Map Display 2-7
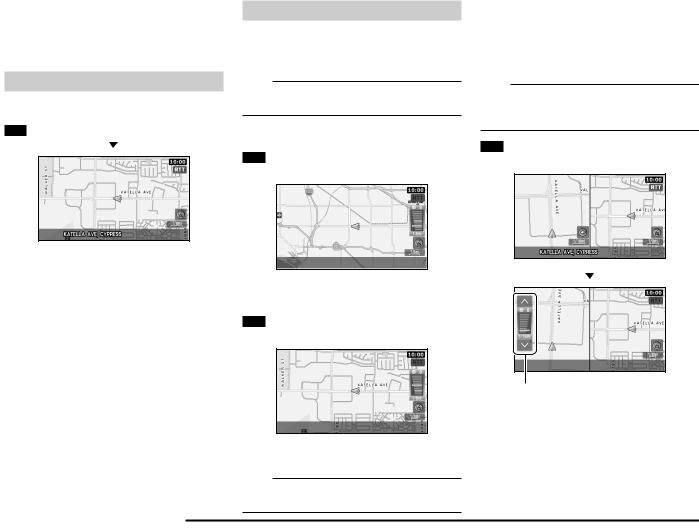
Scrolling the Map
The map can be scrolled to search for a location to view.
1 Move the joystick in the direction to be viewed
eng_a623
eng_a636
The map is scrolled.
NOTE
•When Two Map is set, during scrolling One Map display is shown at the scale selected for the rightside screen.
•During scrolling, the scale can be changed by pressing [SCALE] key.
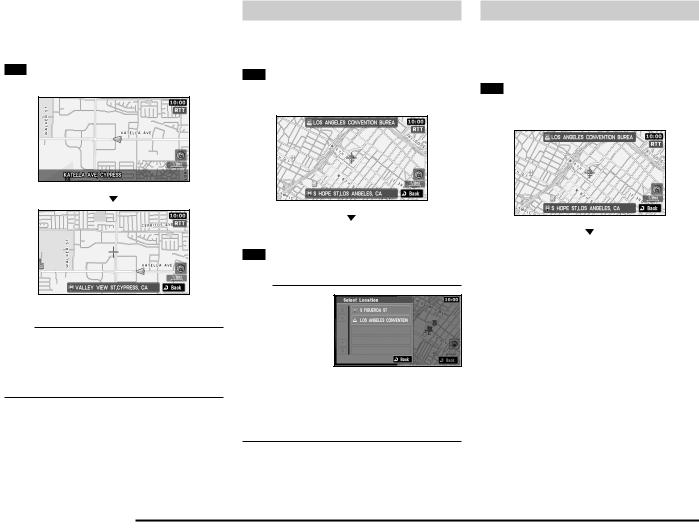
Destination Setting for Scrolled Position
The position reached with the map scroll can be set as the destination.
1 Scroll the map and place the cursor on the desired location, and press the [ENT] key
eng_a637
The scroll menu screen is displayed.
2 Touch [Set as Dest.]
>>> Continued at “Destination Setting” (page 3-12)
NOTE
•If there are several POIs in the scroll, a list is displayed, and the POIs to be registered can be selected.
eng_a127
•Touch [Address Book] to store the cursor position.
>>>“From the Scroll Menu” (page 5-1)
•Touch [Nearby POI ] to search for POI (Points of Interest) in the vicinity of the cursor position.
>>>“From the Scroll Menu” (page 3-9)
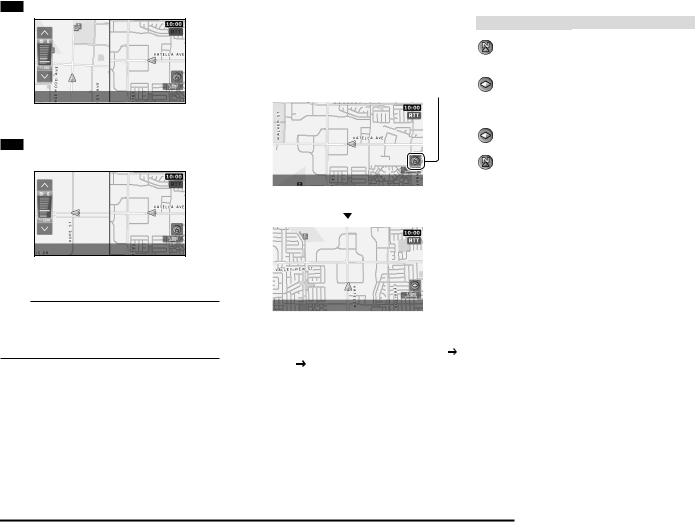
Viewing the car location
The positional relationship between the current location and the position reached with the map scroll can be viewed.
1 Scroll the map and place the cursor on the desired location, and press the [ENT] key
eng_a637
The scroll menu screen is displayed.
Scrolling the Map 2-8

2 Touch [Location check]
eng_a602
Cursor Position
eng_a201
The positional relationship between the current location and the cursor position can be viewed.
NOTE
•The location with the  (pin mark) mark is the cursor position.
Operation Basic
Scrolling the Map 2-9
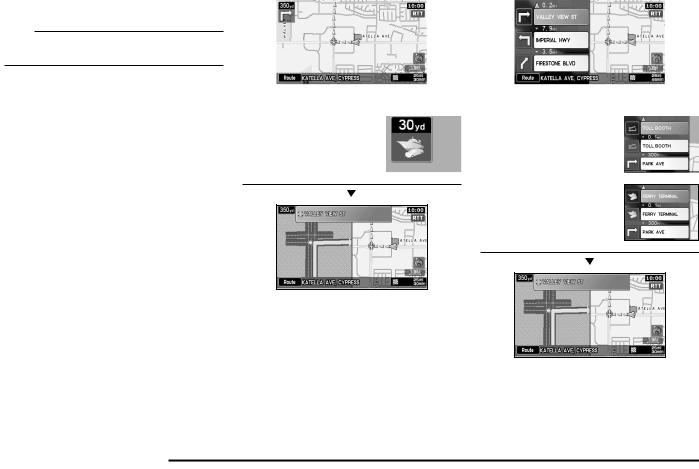
Intersection Guidance
An enlarged intersection map is displayed when an intersection is approached.
The guidance mode can be changed with the settings.
NOTE
•Refer to “Guidance Mode” (page 11-14) for details on how to change the guidance mode.
|
Guidance Map |
|
|
Turn List |
||
The screen changes from the normal map |
|
The screen changes from the turn list to |
||||
screen to the intersection guidance map. |
|
the intersection guidance map. |
||||
|
|
|
|
|
|
|
|
|
|
|
|
|
|
eng_a638 eng_a640
NOTE |
|
|
|
NOTE |
|
|
|
|
|
|
|
||
• The ferry mark is displayed when |
|
|
• The toll booth mark is displayed |
|
||
|
|
|
||||
there is a ferry terminal. |
|
|
when there is a toll booth. |
|
||
|
|
|
|
|
|
|
eng_a030 |
eng_a207 |
•The ferry mark is displayed when there is a ferry terminal.
eng_a029
eng_a639
eng_a639
Intersection Guidance 2-10
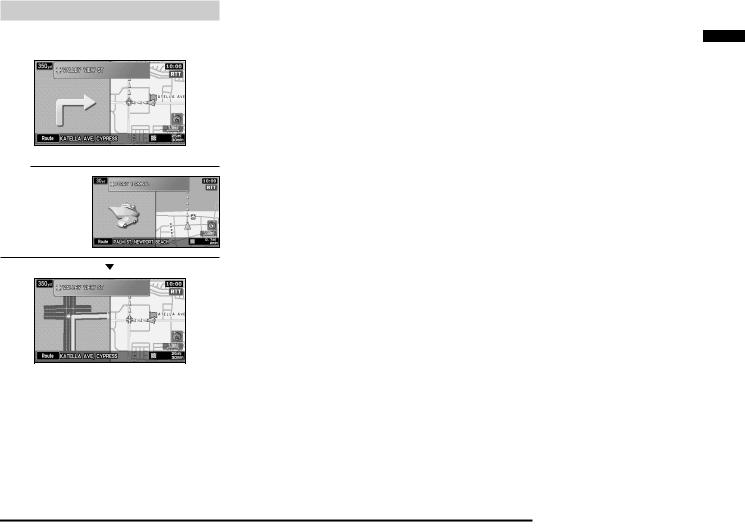
Arrow Guide
The screen changes from the arrow guide to the intersection guidance map.
eng_a641
NOTE
•The ferry illustration is displayed when
t h e r e i s a f e r r y terminal.
eng_a642
eng_a639
Operation Basic
Intersection Guidance 2-11
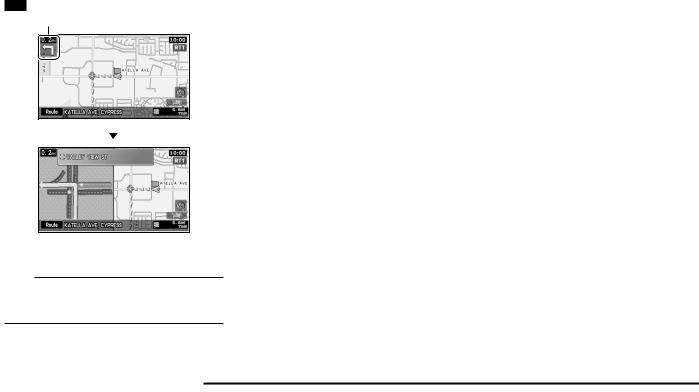
Listening to the Voice Guide
The voice guide provides information regarding the distance to the next intersection on the route and the direction you should turn. The voice guide comes on automatically when approaching in intersection, but can be activated at any time by the following operation:
1 Touch the [Maneuver icon]
Maneuver Icon
eng_a643
eng_a644
The intersection guidance map is displayed, and voice guidance is performed.
NOTE
•The voice guidance volume and male or female voice selection can be changed.
>>>“Other Settings” (page 11-5)
Listening to the Voice Guide 2-12

How to Enter Text
The text input keyboard is displayed when searching for a location or for the name of a stored location.
Capital letters, small letters, and symbols can be input depending on the function.
NOTE
•The examples in this section all show the screen for editing stored locations, but operations for other input keyboards are performed in the same way.
•The keyboard layout can be changed between [Alphabet] and [PC] using “Keyboard Layout” in “Other Settings” (page 11-6)
Entering a letter
1 Touch the letters
eng_a036
The touched letters are input.
Entering a Symbol
1Touch [More]
2Touch the symbols
eng_a036
eng_a038
eng_a039
The touched symbols are input.
Deleting Text
1 Touch [  ]
]
eng_a039
eng_a036
The letters are deleted one by one.
Operation Basic
How to Enter Text 2-13
 Loading...