


©Mitsubishi Wireless Communications, Inc.
G100 User Manual
Main Display Format
 Use LEFT on the Express Key to access the Memory menu and to scroll through menus and options.
 Use RIGHT on the Express Key to access the Main Menu and to scroll through menus and options.
  and
and  Use UP and Down on the Express Key to scroll through messages, menus or options.
LED Indicator
Flashing Green-there is an incoming call.
Constant Red-the battery is charging.
Constant Green-the battery is at full charge.
Tones
∙Power On/Off-high-pitched beep sounds when you turn your phone on or off.
∙Dial Tone-standard dial tone heard through the earpiece when you press  before dialing a number.
∙Ringing-choose from a variety of ring tones to sound when you receive a call.
∙Call Waiting-normal Call Waiting tone heard through the earpiece.
∙Key Tones-Dual Tone Multi-Frequency (DTMF) tones sound when you press Numeric Keys.
∙Low Battery Alert-tone sounds every 20 seconds. After 1 minute, the phone terminates the call and turns off.
∙Text Message Arrival Tone-beeps twice when you receive a text message.
∙Cell Message Tone-one beep tone sounds when you receive a Cell Broadcast message.
-1 -
©Mitsubishi Wireless Communications, Inc.
Backlight
Backlight is on when your phone is connected to an external power source. On battery power, the backlight duration is selectable. When your phone is not connected to an external power source and the backlight feature is engaged, the backlight comes on after a key press or during an incoming call.
Phone Features
Your phone allows you:
∙To place and receive calls
∙To send Dual Tone Multi-Frequency tones
∙To send and receive text messages*
∙To perform Hold and Call Waiting*
∙To have two lines [Alternating Line Service]*
∙To perform Call Forwarding *
∙To perform Call Barring*
∙To show the number of the person who calls you*
∙Not to show your number to the person you call*
∙To have conference calls*
∙To receive Cell Broadcast messages*
∙To access Closed User Group services*
∙To store and retrieve numbers
∙To retry calls
∙To call stored numbers (unanswered and last dialed numbers)
∙To display talk time
∙To set up passwords such as Personal Identity
∙Numbers
*These features depend on the network. Depending on your network subscription some network dependent options may be hidden.
Contact your Service Provider for more information.
Battery
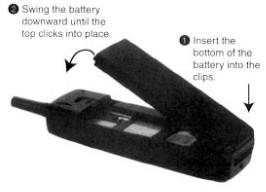
Attaching the Battery
Removing the Battery
1.Push up and hold the battery catch located on the back of the phone.
2.Lift the end of the battery up and away from the catch.
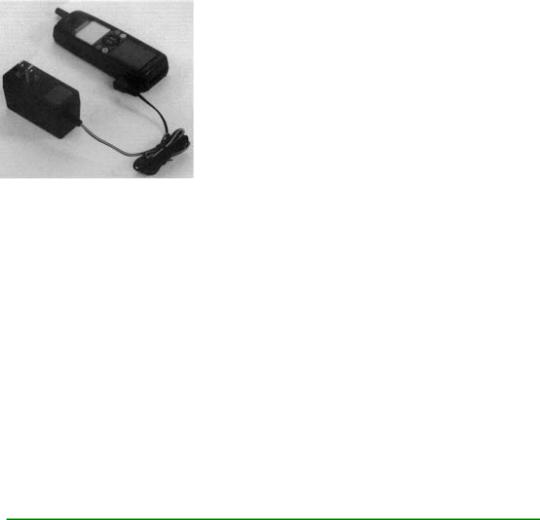
Charging the Battery
1.Connect the charger that came with your phone as shown in the diagram below.
2.Plug the charger into a standard wall outlet.
- 2 -
©Mitsubishi Wireless Communications, Inc.
NOTE: Your phone may be used during charging.
G100 phone being charged
Battery Charging Display
Power Off
∙No external power supply-the display is empty and top LED is off.
∙External power supply connected-top LED lights red and Charging displays.
∙At full charge-top LED lights green and Battery Full displays.
∙Problems charging-Check Battery displays.
Power On
∙No external power supply-Idle/Standby Mode display and top LED is off.
∙External power supply connected-Battery icon flashes from empty to full.
∙At full charge-Battery icon stops flashing and indicates full charge.
∙Problems charging-LED does not light and Battery Level icon does not display.
Low Battery
When the battery level falls to the lowest safe level, the Low Battery Alert Tone sounds and Low Battery! displays and flashes. The phone terminates any active calls after 1 minute.
The following is a chart containing the specifications for the 3 available battery packs:
|
NiMH-S |
NiMH-M |
NiMH-L |
|
(600mAh) |
(650mAh) |
(1150mAh) |
Weight (approx.) |
2.3 ounces |
2 ounces |
3 ounces |
Recharge Time With AC Adapter (approx.) |
1hr. 15min |
1hr. 25min |
2hr. 15min |
|
|
|
|
Basic Operation
SIM Card Installation
The Subscriber Identity Module (SIM) card helps your wireless network identify and communicate with your phone. It is also used for storing messages and phone numbers. You cannot use your phone without a SIM
card except to dial emergency calls.
If a SIM card is not installed, Check SIM! displays when you turn on the phone. To install your SIM card:
1.Turn off the phone's power by pressing  for 1 second.
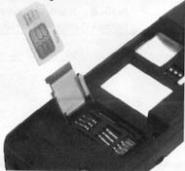
2.Remove the battery and insert the SIM card in its socket, making sure that it fits properly. The SIM card fits into its socket only one way, as shown below.
-3 -
©Mitsubishi Wireless Communications, Inc.
3. Close the hinge on the SIM lock and slide into place.
G100 phone w/ card being inserted
4.Reinsert the battery and turn the phone's power back on.
5.If necessary, enter your unlock code when Unlock Code? displays.
If Enter Pin and Press OK displays, enter your PIN (4-8 digits) and press  . For security, the digits display as asterisks. If you enter a digit incorrectly, press
  , and start over.
If you enter an incorrect PIN, Wrong PIN Enter Again! displays. You have 3 attempts to enter the PIN correctly. On the last attempt, Last Attempt flashes and the phone is locked. Contact your Service Provider Customer Care to unlock your phone.
NOTE: To disable the PIN, see Enabling and Disabling the SIM PIN in Security.
Turning the Phone On
Press  and hold for 1 second. The power-on tone sounds, and all icons display for a few seconds.
∙If Check SIM! displays, see SIM Card Installation.
∙If Auto Lock is enabled, Unlock Code? displays. Enter your Unlock Code. If you make a mistake,  and re-enter your Unlock Code.
∙If Enter PIN and Press OK displays, enter the PIN and press  .
.
Network Selection
We strongly recommend that you select automatic network selection although your phone can also select networks manually. See Network Selection Menu in Main Menu.
Automatic Network Search
When your phone is turned on, Searching displays. When your phone finds a network, the network name and Receiving Signal Strength Indicator icon  displays. Your phone is ready to use.
When you are outside of home network range, the  (Roaming Indicator) icon displays.
If you are outside of any PCS network, No Service Currently Available displays.
Manual Network Search
Contact your Service Provider or Carrier before selecting Manual network search.
Message Center
The phone checks for new messages. If you have any unretrieved messages, the Message Center screen displays.
Voice Mail
If you have new Voice Mail, the  icon appears and New Voice displays. Select New Voice. Your phone dials the Voice Mail Center and retrieves the voice mail.
- 4 -
©Mitsubishi Wireless Communications, Inc.
Text Messages (Short Message Service)
You can use your phone to send and receive text messages. If you have unretrieved messages, the Messages icon appears and the number of messages displays, followed by Text. If SIM memory for Text Messages is full, the  icon flashes.
See Messages Menu in the Main Menu chapter to read, write, and send messages.
Placing Calls
Domestic Calls
Either:
∙Press  , listen for a dial tone. When Enter Number displays, dial the number.
∙Dial the desired number first, then press  .
.
NOTE: The  button deletes any mis-dialed numbers.
1. After you dial the  icon, Dialing, and the number you dialed display.
∙If the called party is busy, a normal busy tone sounds and Busy displays.
∙If the call is restricted, Call Restricted displays.
∙If the call does not connect the first time, and Call Retry is on, the phone retries the call.
∙If the Call Retry function is not on, Call Failed! Try Again? displays. Select Yes to retry the call.
After a call connects, the Call Timer displays. After 1 hour, the Call Timer display format changes from minutes and seconds to hours and minutes.
2. When the call is complete, press  briefly to hang up.
Emergency Calls
You can place emergency calls at any time by dialing one of the emergency numbers (911, 999, or 112) and  .
.
International Calls
To place international calls, press  twice in quick succession (+, the international access code, displays) and dial the remaining digits.
Receiving Calls
When you receive a call, the phone rings, the top LED flashes green, the backlight illuminates, and CALL or Forwarded Call displays. Either:
∙To answer the call, press any key except  and 0.
∙To reject the call, press  , or press 0 followed by
  .
.
The caller's number (if available) displays. If you have this number in memory, the person's name displays.
If you do not answer a call, Unanswered Calls and the number of calls display. The phone stores up to 10 unanswered calls. View the phone numbers using Unanswered Calls in the Memory Menu.
Volume Controls
Adjusting Ringer Volume
During Incoming Calls and Idle/Standby Mode (phone on, no call placed), the volume control on the left side of the phone controls ringer volume.
During Idle/Standby Mode, you can also do the following:
1.Press Right on the Express Key, then use Down on the Express Key to select Settings and press  .
.
-5 -
©Mitsubishi Wireless Communications, Inc.
2.Use Down on the Express Key to select Volumes, and press  .
.
3.Select Ring Tones and press  .
.
4.Press  to validate (press
  to exit this menu).
If ramping is engaged, the volume increases by 1 volume level each successive ring until full volume is reached.
Adjusting Handset Speaker Volume
Use the volume control on the left side of the phone during conversation to adjust handset speaker volume.
Adjusting Keypad Tone Volume
1.Press Right on the Express Key to display the Main Menu.
2.Select the Setting menu and press  .
.
3.Select the Keys sub-menu and press  .
.
Adjust volume using Right and Left on the Express Key.
DTMF Tone Transmission
DTMF tones are the sounds your phone makes when you enter digits. You may need to send DTMF tones when you are communicating with computerized answering systems.
Sending DTMF Tones
1.Press Right on the Express Key, select Send DTMF, and press  .
.
2.Enter the desired DTMF string using the keypad, then press  .
.
Storing DTMF Strings
Store DTMF strings using the procedures in Storing and Retrieving Information or store the string with a phone number for automatic dialing and sending.
1.Enter the number into memory.
2.Insert a P (3 second pause) between the phone number and DTMF string by pressing  . You can insert as many Ps as necessary.
3.Press  to enter the number or string into memory.
4.Recall the number from memory and press  . The phone dials the number, pauses for 3 seconds for each P, and sends the DTMF string.
Call Waiting
If Call Waiting is active and you have a second call, a call waiting tone sounds, and the display changes as follows:
∙The first line displays 1-Actv followed by the name or the last five digits of the number for the person you are speaking with (if available).
∙The second line displays 2-Wait and that person's name or the last five digits of the phone number (if available).
∙The bottom right part of the screen displays the waiting caller's phone number (if available).
When a call is waiting, you have the following options:
∙Reject the call by pressing 0, then  .
.
∙Hang up the first call and accept the second by pressing 1, then  .
.
∙Put the first call on hold and accept the second by pressing 2 and  ,or simply press
  .
.
∙Hang up any of the calls by pressing 1 or 2 (the number of the call) and  .
.
∙Hang up all calls by pressing  briefly.
NOTE: You can also reject calls, put calls on hold, or take calls off hold using the Main Menu. See the Menus chapter for information on the Main Menu.
Hold/Retrieve
- 6 -
©Mitsubishi Wireless Communications, Inc.
To put a call on hold in order to place a second call, simply dial the desired phone number and press  or vice versa. You may also select Hold from the Main Menu, press
  , then dial the number.
When you put a call on hold the following happens:
∙While the phone is dialing, the first line of the screen displays 1-Hold and a caller identifier (if available).
∙The second line displays 2-Dial and a caller identifier (if available).
∙When the call connects, its status designation changes from 2-Dial to 2-Actv.
To retrieve the call (the active call is put on hold), either:
∙Press  .
.
∙Press 2, then  .
.
∙Select Swap from the Main Menu and press  .
.
If you have more than 2 calls, talk to one caller and hold the rest by pressing 2, the number of the call to talk to, and then  .
.
Multi-Party Conferencing
Adding Parties by Calling Them
1.Put the first call on hold by pressing  and dialing a number, or vise versa. The screen displays the first call with the status 1-Hold and the second with 2-Actv.
2.Add the original call back into the conference by selecting Join from the Main Menu and pressing  , or by pressing 3 and then
  . All parties are now active.
Adding Incoming Calls
1.Answer the call and put the first call on hold by pressing 2 and then  , or press
  only.
only.
2.Reconnect the first call by pressing 3 and  , or by selecting Join from the Main Menu and pressing
  .
.
You can perform these steps to include up to 5 callers.
Holding Private Conversations
Select Private from the Main Menu, then select a person from the list of calls. To return to the conference, press  (at least 3 times), or select Join from the Main Menu and press
  .
.
Removing Calls From the Conference
To remove a call from the conference, set up a private conversation, then select Reject in the Main Menu and  . Press
  or select Swap or Join in the Main Menu and
  to return to the conference.
Second Line Service
When you receive a call on a second line, the following happens:
∙LINE 2 indicator appears next to the  icon.
icon.
∙If you receive a call on one line while you are on the other, the second call displays as 2 Wait-Line 2.
Answer an incoming call on one line while you are on the other line as you would a waiting call.
Interrupted Calls
When a call is interrupted due to loss of the signal, the phone sounds a 3 beep tone, and may try to reconnect the call if the Call Retry function is enabled. When the phone tries to reconnect the call, Reconnecting displays.
Power Off
To turn off your phone, press  for 1 second. A power off tone sounds, and Power Off displays.
DO NOT disconnect the battery while this message displays. The phone saves information to the SIM card.
- 7 -
 Loading...