


Introduction
N09200100862
Thank you for buying a MITSUBISHI ECLIPSE/ECLIPSE SPYDER.
We are confident you will enjoy your vehicle. It has been engineered for optimum performance, durability and comfort. By thoroughly reading this Owner’s Manual, you will gain an understanding of the many features that are included in the ECLIPSE/ECLIPSE SPYDER. The Owner’s Manual contains descriptions and illustrations that will assist in the operation and maintenance of your vehicle.
Your Authorized Mitsubishi Motors Dealer will be happy to assist you with any further questions you may have regarding the operation of your vehicle.
Please note that this manual applies to all ECLIPSE/ECLIPSE SPYDER models and explains all features including options. Some features explained in this manual may not be installed on your vehicle.
Please leave this Owner’s Manual in the vehicle at the time of resale. The next owner will appreciate having access to the information contained here.
This manual includes instructions for standard and optional equipment available at the time of printing. Mitsubishi Motors Corporation reserves the right to make changes in design and specifications and to make additions or improvements in its product without assuming any obligation to install these on previously manufactured products.
Throughout this manual the words WARNING and CAUTION appear.
These are reminders to be especially careful. Failure to follow the instructions could result in personal injury or damage to your vehicle.
! WARNING
Indicates a strong possibility of severe personal injury or death if instructions are not followed.
! CAUTION
Points out hazards or unsafe practices that could cause minor personal injury or damage to your vehicle.
You will see another important symbol:
NOTE Gives helpful information.
! WARNING
●Engine exhaust, some of its constituents, and certain vehicle components contain or emit chemicals known to the State of California to cause cancer and birth defects and reproductive harm. In addition, certain fluids contained in vehicles and certain products of component wear contain or emit chemicals known to the State of California to cause cancer and birth defects or other reproductive harm.
©2011 Mitsubishi Motors Corporation |
Printed in U.S.A. |
This vehicle is manufactured by Mitsubishi Motors North America, Inc. in U.S.A. under license from Mitsubishi Motors Corporation.

Table of contents
Overview 

 Quick index


General information 
 1
1
Seat and restraint systems 
 2
2
Features and controls 
 3
3
Driving safety 
 4
4
Comfort controls 
 5
5
For emergencies 
 6
6
Vehicle care and maintenance 
 7
7
Customer assistance/Reporting Safety Defects 
 8
8
Specifications 
 9
9
Overview
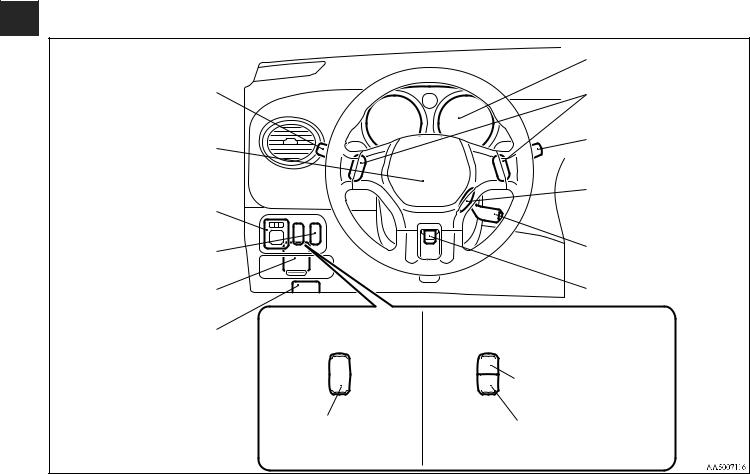
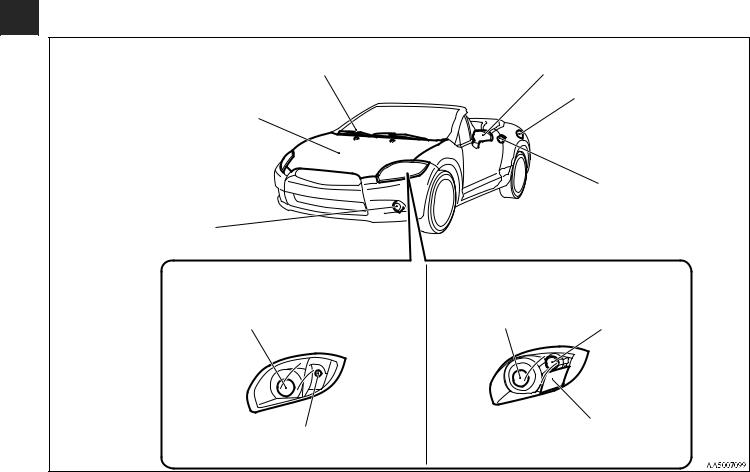
Instruments and controls (Driver’s area)
N00100201114
Combination headlights and dimmer switch P.3-125 Turn signal lever P.3-129
Supplemental restraint system - air bag (for driver’s seat) P.2-36
Horn switch P.3-136
Electric remote-controlled outside mirror switch P.3-58
Headlights leveling switch (if so equipped) P.3-128 ASC off switch
(if so equipped) P.3-85
Fuses P.7-38
Engine hood release lever
P.7-4
Front fog light switch (if so equipped) P.3-131
Instrument cluster P.3-104
Steering wheel audio remote control switch (if so equipped) P.5-65
Wiper and washer switch P.3-132
Ignition switch P.3-60
Cruise control lever P.3-89
Steering wheel tilt lock lever P.3-55
Front fog light switch (if so equipped) P.3-131
ASC off switch (if so equipped) P.3-85
Overview
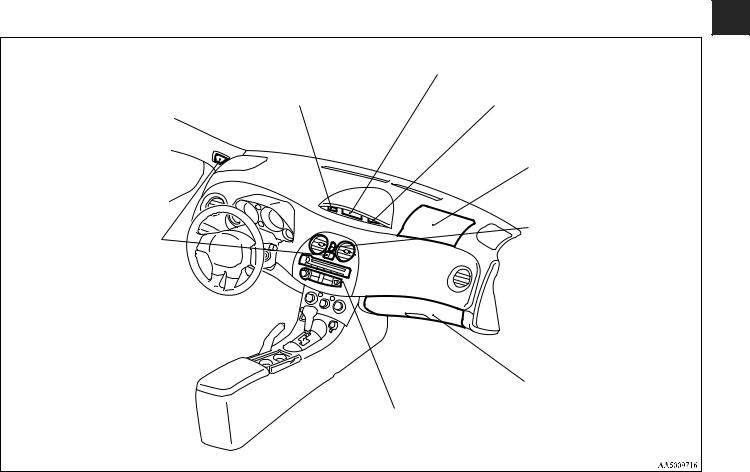
Instruments and controls (Instrument panel)
N00100201127
Multi center display P.3-114
Hands-free Bluetooth® cellular phone interface system with voice recognition (if so equipped) P.3-137
Passenger’s air bag off indicator |
Front passenger seat belt warning |
P.2-43 |
light P.2-19 |
|
Supplemental restraint system - air bag |
|
(for front passenger’s seat) P.2-36 |
Hazard warning flasher switch
P.3-130
 Vents P.5-2
Glove compartment
P.3-175
Audio system
P.5-24, 5-26, 5-39

Overview
Instruments and controls (Floor console)
N00100201273
Heated seat switch (if so equipped)
P.2-10
Gearshift or selector lever
P.3-66, 3-71
Parking brake lever P.3-54
Cup holder P.3-178
Floor console box P.3-176
Auxiliary Audio connector  (mini-jack) P.5-63
Power outlet
P.3-168
Electric rear window defogger switch P.3-135
Air conditioning
P.5-5, 5-14
Electric convertible top (ECLIPSE SPYDER) Operation indicator lamp
Top (OPEN) switch |
Top (CLOSE) switch |
P.3-33 |
P.3-33 |
Overview
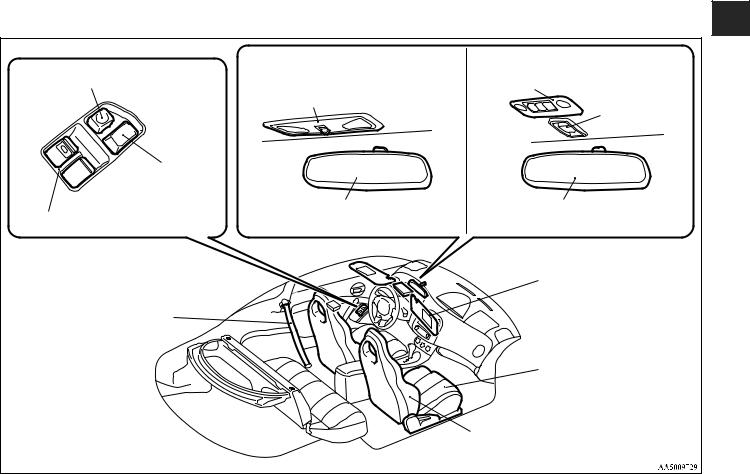
Interior
|
|
N00100301157 |
ECLIPSE |
Except for vehicles with sunroof |
Vehicles with sunroof |
Window lock switch P.3-28 |
|
Dome light (Front)/Reading lights (if so |
Dome light (Front)/Reading lights |
equipped) P.3-171, 3-172, 7-50 |
|
|
P.3-170, 3-171, 7-50, 7-68 |
Sunroof switch |
|
|
P.3-28 |
Power door lock |
|
|
switch P.3-15 |
|
|
Power window switch P.3-26 |
Inside rearview mirror P.3-56, 3-102 |
Inside rearview mirror P.3-56, 3-102 |
|
|
|
|
|
Sun visors P.3-166 |
|
|
Vanity mirror (if so |
Adjustable seat belt shoulder |
|
equipped) P.3-167 |
|
|
|
anchor (for front seats) P.2-19 |
|
|
Seat belts P.2-13 |
|
|
|
|
Front seats P.2-4 |
|
|
Head restraints P.2-12 |
|
Supplemental restraint system - side air bag |
|
|
(for front seats) P.2-51 |
|

Overview
Interior
N00100301069
ECLIPSE
Supplemental restraint system - curtain air bag P.2-52
Coat hooks (if so equipped)
P.3-180
Dome light (Rear)
P.3-174, 7-50, 7-68
Rear shelf panel
P.3-178
Rear seat P.2-11
Overview
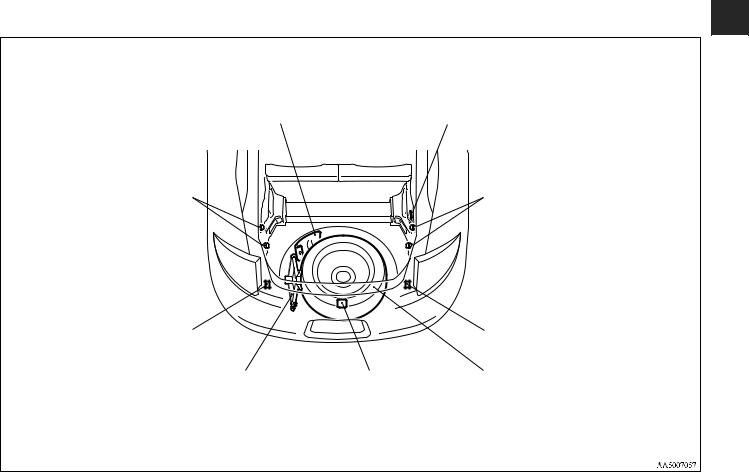
Cargo area
N00100500077
ECLIPSE
Tools P.6-8 |
Cargo area light P.3-174, 7-50, 7-69 |
Luggage hooks
P.3-180 Luggage hooks
P.3-180
Tether anchors for child restraint system P.2-28
|
Tether anchors for child restraint |
|
system P.2-28 |
Jack P.6-9 |
Inside rear hatch/trunk lid Spare tire P.6-11 |
|
release P.3-18 |
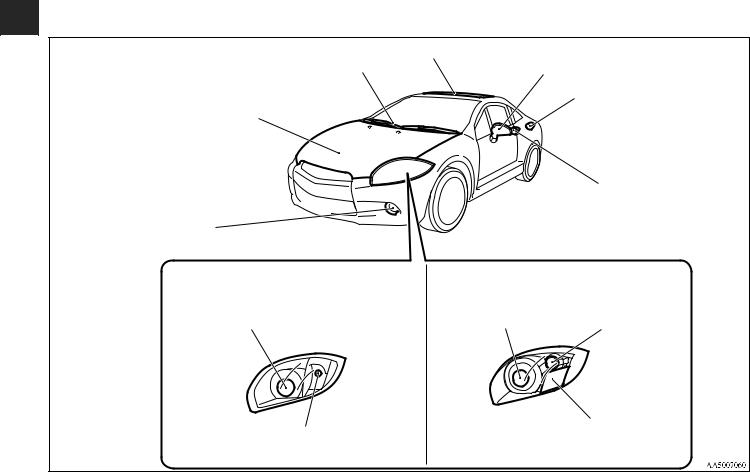
Overview
Outside (Front)
N00100601134
ECLIPSE |
Sunroof (if so equipped) |
Outside rearview mirrors |
Windshield wiper and washer P.3-132 |
P.3-28 |
P.3-58 |
Engine compartment P.7-6 |
|
Fuel tank filler door P.1-4 |
Engine hood P.7-4 |
|
|
|
Locking and unlocking |
|
|
P.3-13 |
|
Front fog lights |
Keyless entry system |
|
P.3-7 |
||
(if so equipped) |
||
|
||
P.3-131, 7-48, 7-57 |
|
Except for vehicles with high intensity discharge (HID) type headlights
Headlight P.3-125, 7-48, 7-52
Vehicles with high intensity discharge (HID) type headlights
Headlight |
Parking and side-marker |
|
light P.3-125, 7-48, 7-53 |
||
P.3-125, 7-48, 7-51 |
Front turn-signal, parking and side-marker lights |
Front turn signal light |
|
P.3-129, 7-48, 7-55 |
||
P.3-125,3-129, 7-48, 7-56 |
||
|
Overview
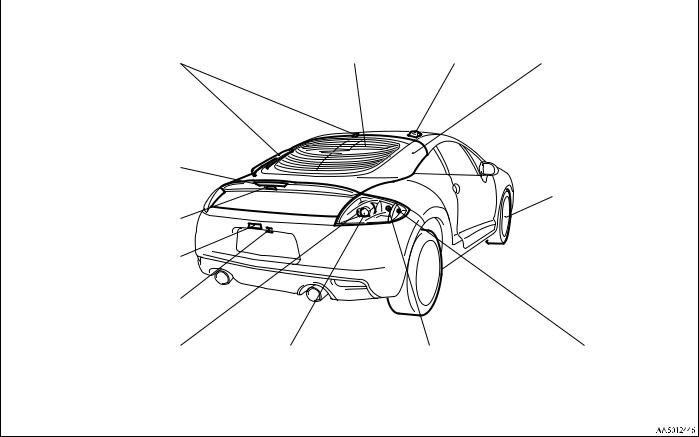
|
Outside (Rear) |
|
|
|
|
||
|
N00100601251 |
|
|
|
|
|
|
|
|
|
|
ECLIPSE |
|
|
|
|
Satellite radio antenna |
|
|
Rear window wiper and |
Antenna P.5-74 (if so equipped) P.5-75 Rear hatch P.3-16 |
|
|
washer |
|
|
|
P.3-134 |
|
|
|
High-mounted stop light
P.7-49
Rear hatch button |
P.3-16 |
Tire inflation pressure P.7-23 Changing tires P.6-9
Tire rotation P.7-26 Tire chains P.7-29
Tire pressure monitoring system P.3-96
License plate light |
|
|
|
P.7-49, 7-66 |
|
|
|
Rear-view camera |
|
|
|
(if so equipped) P.3-101 |
|
|
|
Stop and tail lights P.3-125 |
Back-up lights |
Rear turn signal lights |
Rear side-marker lights |
|
P.7-49, 7-59 |
P.3-129, 7-49, 7-59 |
P.3-125, 7-49, 7-59 |
Overview
Interior
N00100301144
ECLIPSE SPYDER |
|
Window lock switch P.3-28 |
Dome light (Front)/Reading lights |
|
|
|
(if so equipped) |
|
P.3-171, 3-172, 7-50 |
Power door lock switch P.3-15
Power window switch P.3-26
Seat belts P.2-13
Inside rearview mirror P.3-56, 3-102 Reading light (if so equipped) P.3-173, 7-50, 7-69
Sun visors P.3-166 Vanity mirror (if so equipped) P.3-167
Front seats P.2-4
Head restraints P.2-12
Supplemental restraint system - side air bag (for front seats) P.2-51
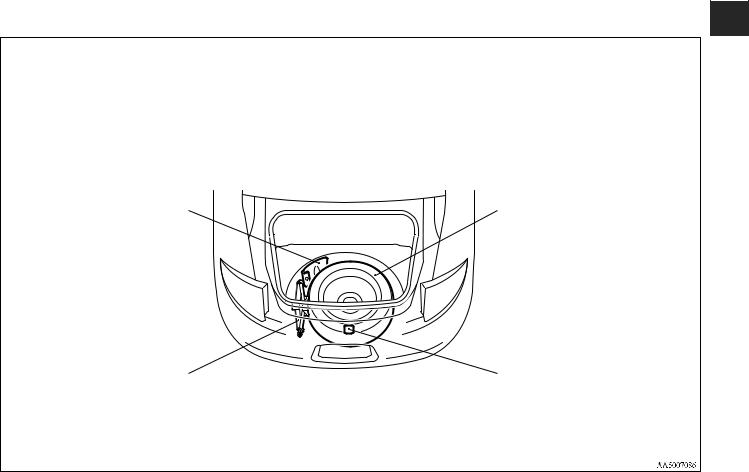
Overview
Trunk area
N00100400223
ECLIPSE SPYDER
Tools P.6-8 |
Spare tire P.6-11 |
|
Jack P.6-9 |
Inside emergency trunk lid release |
|
P.3-20 |
Overview
Outside (Front)
N00100601150
ECLIPSE SPYDER |
|
Windshield wiper and washer P.3-132 |
Outside rearview mirrors |
|
P.3-58 |
Engine compartment P.7-6
Engine hood P.7-4
Front fog lights
P.3-131, 7-48, 7-57
Except for vehicles with high intensity discharge (HID) type headlights
Headlight P.3-125, 7-48, 7-52
Fuel tank filler door P.1-4
Locking and unlocking
P.3-13
Keyless entry system
P.3-7
Vehicles with high intensity discharge (HID) type headlights
Headlight Parking and side-marker P.3-125, 7-48, 7-51 light P.3-125, 7-48, 7-53
Front turn-signal, parking and side-marker lights |
Front turn signal light |
|
P.3-129, 7-48, 7-55 |
||
P.3-125,3-129, 7-48, 7-56 |
||
|
Overview
Outside (Rear)
N00100601248
ECLIPSE SPYDER
Satellite radio antenna
High-mounted stop light (if so equipped) P.5-75
P.7-49
Trunk lid button
P.3-16
Trunk lid P.3-16
License plate light
P.7-49, 7-66
Rear-view camera (if so equipped) P.3-101
Antenna P.5-74
Tire inflation pressure P.7-23 Changing tires P.6-9
Tire rotation P.7-26 Tire chains P.7-29
 Tire pressure monitoring system P.3-96
Stop and tail lights P.3-125 |
Back-up lights |
Rear turn signal lights |
Rear side-marker lights |
|
P.7-49, 7-59 |
P.3-129, 7-49, 7-59 |
P.3-125, 7-49, 7-59 |


Quick index
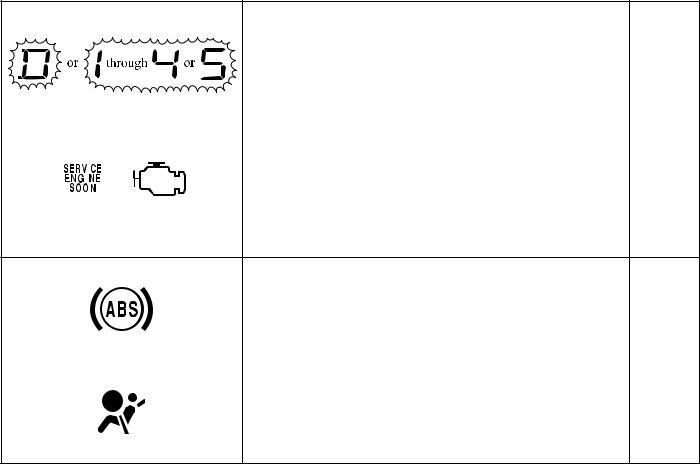
If this warning light comes on or flashes while you’re driving...
N00200701093
NOTE
● These warning lights will come on for a few seconds for a bulb check when the ignition key is first turned to “ON”.
Warning light |
Do this |
Ref. page |
|||||
|
|
|
|
|
|
● Park your vehicle in a safe place and stop the engine. |
|
|
|
|
|
|
|
|
|
|
|
|
|
|
|
|
|
|
|
|
|
|
|
Contact an authorized Mitsubishi Motors dealer or a repair facility of |
P.3-113 |
|
|
|
|
|
|
your choice for assistance. |
|
Charging system warning light |
|
||||||
|
|
||||||
|
|
|
|
|
|
|
|
|
|
|
|
|
|
● Park your vehicle in a safe place and stop the engine, then check the |
|
|
|
|
|
|
|
engine oil level. |
|
|
|
|
|
|
|
If the light comes on while the engine oil level is normal, have the |
P.3-113 |
|
|
|
|
|
|
system checked at an authorized Mitsubishi Motors dealer or a repair |
|
Oil pressure warning light |
facility of your choice as soon as possible. |
|
|||||
|
|
||||||
●If this light comes on while driving, check to see that the parking brake is fully released.
●If this light stays on after releasing the parking brake, stop and check
or |
the brake fluid level. |
P.3-111 |
|
● If the brake fluid level is correct, there may be a system malfunction. |
|
|
|
|
Brake warning light |
Avoid hard braking and high speeds, and contact an authorized |
|
Mitsubishi Motors dealer or a repair facility of your choice for assis- |
|
|
|
tance. |
|
1
Quick index
|
|
Warning light |
Do this |
Ref. page |
|
|
|
|
|
● Park your vehicle in a safe place. |
|
|
|
|
|
|
|
|
|
|
|
Idle the engine until the selector lever position indicator stops flash- |
|
|
|
|
|
ing. If the indicator does not go off, have the system checked at an |
P.3-74 |
|
|
|
|
||
|
|
Selector lever position indicator in the instru- |
authorized Mitsubishi Motors dealer or a repair facility of your choice |
|
|
|
|
as soon as possible. |
|
||
|
|
ment cluster flashes rapidly |
|
||
|
|
|
|
||
|
|
(twice per second) (if so equipped) |
|
|
|
|
|
|
|
|
|
|
|
|
|
● Although your vehicle will usually be drivable and not need towing, |
|
|
|
|
or |
have the engine system checked at an authorized Mitsubishi Motors |
|
|
|
|
|
||
|
|
|
dealer or a repair facility of your choice as soon as possible. If the |
|
|
|
|
|
|
||
|
|
|
|
|
|
|
|
|
|
vehicle is not drivable, contact emergency roadside assistance at 1- |
P.3-112 |
|
|
Engine malfunction indicator |
888-648-7820 (for vehicles sold in U.S.A.) or 1-888-576-4878 (for |
|
|
|
|
vehicles sold in Canada), an authorized Mitsubishi Motors dealer, or |
|
||
|
|
(“SERVICE ENGINE SOON” or “Check |
|
||
|
|
local towing company for assistance. |
|
||
|
|
|
engine light”) |
|
|
|
|
|
|
|
|
●When this light comes on, the anti-lock braking system is not functioning and only the ordinary braking system is functioning.
●Park your vehicle in a safe place and stop the engine.
|
Test the system as described on page 3-82. |
P.3-82 |
|
● If the light does not go out after the test, or if it comes on again, we |
|
|
|
|
Anti-lock braking system warning light |
recommend that you have the system checked at an authorized |
|
Mitsubishi Motors dealer or a repair facility of your choice as soon as |
|
|
|
possible. |
|
|
|
|
|
● It is not necessary to stop the vehicle immediately, but we recommend |
P.2-24, |
|
that you have the air bag and the pre-tensioner seat belt system |
|
|
checked at an authorized Mitsubishi Motors dealer as soon as possi- |
2-44 |
SRS warning light |
ble. |
|
|
|
2
|
|
Quick index |
|
|
|
|
|
|
|
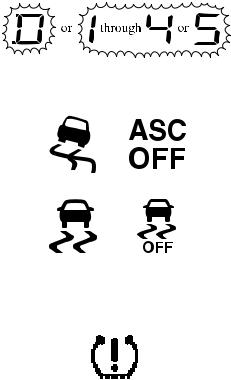
Warning light |
Do this |
Ref. page |
|
|
|
|
|
|
|
|
● Have the automatic transaxle checked at an authorized Mitsubishi |
P.3-74 |
|
|
|
|
|
||
Selector lever position indicator in the instru- |
Motors dealer or a repair facility of your choice as soon as possible. |
|
|
|
|
|
|
||
|
|
|
|
|
ment cluster flashes slowly |
|
|
|
|
(once per second) (if so equipped) |
|
|
|
|
|
|
|
|
|
and |
● Park your vehicle in a safe place and turn off the engine. |
|
|
|
|
|
|
|
|
|
Restart the engine and check to see if the indicator comes on again. |
|
|
|
or |
● If the indicator does not go out, or if it comes on again, have your |
|
|
|
|
vehicle inspected at an authorized Mitsubishi Motors dealer or a |
P.3-87 |
|
|
|
repair facility of your choice as soon as possible. |
|
|
|
and |
● When this indicator comes on, the active stability control is not func- |
|
|
|
|
tioning and normal operation of the vehicle will not be affected. |
|
|
|
ASC indicator and |
|
|
|
|
ASC OFF indicator |
|
|
|
|
|
|
|
|
|
|
● If the warning light comes on, you should stop and adjust the tires to |
|
|
|
|
the proper inflation pressure as soon as possible. |
|
|
|
|
(See “Tire inflation pressures” on page 7-23.) |
|
|
|
|
Once adjustments have been made, the warning light will go off after |
|
|
|
|
a few minutes of driving. |
P.3-97 |
|
|
|
● If the warning light blinks for approximately 1 minute and then |
|
|
|
|
|
|
|
|
Tire pressure monitoring system warning light |
remains continuously illuminated, the system is not operating prop- |
|
|
|
erly. If the system returns to normal, the warning light will go off. If |
|
|
|
|
|
the warning light does not go off, have the vehicle inspected at an |
|
|
|
|
authorized Mitsubishi Motors dealer. |
|
|
|
|
|
|
|
|
3
Quick index
If you hear this sound...
N00200800664
|
|
|
|
|
|
|
|
|
|
|
|
|
|
|
|
|
|
|
|
|
|
Sound |
Do this |
Ref. page |
|
|
|
|
|
|
|
|
“Key reminder buzzer” |
|
|
|
|
A tone will sound if the driver’s door is opened while the ignition key is in the |
P.3-14 |
|
|
|
“LOCK” or “ACC” position. |
|
|
|
|
Remove the key to stop the tone. |
|
|
|
Constant tone when the driver’s door is |
OR |
|
|
|
“Headlight reminder buzzer” |
|
|
|
|
opened. |
|
|
|
|
|
A tone will sound if the driver’s door is opened when the ignition key is in the |
|
|
|
|
“LOCK” or “ACC” position or removed from the ignition switch while the |
P.3-127 |
|
|
|
lights are on. Turn the lights off. |
|
|
|
|
|
|
|
|
|
The tone will stop automatically when the lights are automatically turned off. |
|
|
|
|
(See page 3-126 for auto-cutout function.) |
|
|
|
|
|
|
4
|
|
Quick index |
|
|
|
|
|
|
|
Sound |
Do this |
Ref. page |
|
|
|
|
|
|
|
Metallic squeal when you press the |
“Brake pad wear alarm” |
|
|
|
The brake pads are worn down to the serviceable limit. |
P.3-80 |
|
|
|
|
|
|||
brake pedal while driving. |
Have the brake pads replaced at an authorized Mitsubishi Motors dealer or a |
|
|
|
|
|
|
||
|
repair facility of your choice. |
|
|
|
|
|
|
|
|
|
|
|
|
|
|
“Seat belt reminder buzzer” |
|
|
|
|
When the ignition key is turned to the “ON” position, the tone will sound for |
|
|
|
Tone when the ignition key is turned to |
about 6 seconds. If the driver’s seat belt remains unfastened 1 minute later, the |
P.2-18 |
|
|
tone will sound intermittently (12 times) when the vehicle is driven. If the |
|
|
||
the “ON” position. |
|
|
||
driver’s seat belt subsequently remains unfastened while the vehicle is being |
|
|
|
|
|
|
|
|
|
|
driven, the tone will sound as a warning each time the vehicle stops and starts. |
|
|
|
|
When the driver’s seat belt is fastened, the tone will stop. |
|
|
|
|
|
|
|
|
Tone when the vehicle is moving at |
“Door-ajar warning buzzer” |
P.3-114 |
|
|
Door or rear hatch (ECLIPSE) is not properly shut. |
|
|
||
more than 5 mph (8 km/h). |
|
|
||
If you shut the door or rear hatch (ECLIPSE), the tone will stop. |
|
|
|
|
|
|
|
|
|
|
|
|
|
|
When the headlights have flashed for |
“Theft-alarm system” |
|
|
|
The theft-alarm system is operating. To stop the alarm, use the keyless-entry |
|
|
|
|
three minutes, the horn will sound inter- |
transmitter to lock or unlock the doors or rear hatch (ECLIPSE) or the trunk |
P.3-22 |
|
|
mittently for three minutes. |
lid (ECLIPSE SPYDER). |
|
|
|
|
Alternatively, turn the ignition key to the “ON” position. |
|
|
|
|
|
|
|
|
5
Quick index
If the indicator flashes and a tone sounds when the electric convertible top is operated (ECLIPSE SPYDER)
|
|
|
|
|
|
N00200100029 |
|
|
|
|
|
|
|
|
|
|
|
|
|
|
|
|
Indicator Lamp |
Tone |
Do this |
Ref. page |
|
|
|
|
|
|
|
|
|
|
|
|
|
● The requirements for operation of the electric convertible top |
|
|
|
|
|
|
are not all satisfied. Ensure satisfaction of all the require- |
P.3-32 |
|
|
|
|
|
ments. |
|
|
|
|
|
|
|
|
|
|
|
|
|
● The indicator and tone indicate that the electric convertible |
|
|
|
|
|
Sounds intermit- |
top is not going to operate. |
P.3-33, |
|
|
|
Flashes slowly |
• Check whether the OPEN switch and CLOSE switch are |
||
|
|
|
tently and rapidly |
both being pressed at the same time. |
3-36 |
|
|
|
|
(approx. one flash |
|||
|
|
|
per second). |
(approx. three |
• Check whether the OPEN (or CLOSE) switch is being |
|
|
|
|
times per second). |
pressed when the top is fully open (or closed). |
|
|
|
|
|
|
|
||
|
|
|
|
|
|
|
|
|
|
|
|
● The indicator and tone indicate that the electric convertible |
|
|
|
|
|
|
top has temporarily stopped working because continuous |
|
|
|
|
|
|
operation of one switch then the other has triggered a protec- |
P.3-33 |
|
|
|
|
|
tion circuit. Wait about seven minutes, then try operating the |
|
|
|
|
|
|
electric convertible top again. |
|
|
|
|
|
|
|
|
|
|
|
|
Sounds for |
● The top is partly open. Stop the vehicle and completely open |
|
|
|
|
|
approx. five sec- |
P.3-38 |
|
|
|
|
Flashes rapidly |
or close the top. The tone will then stop. |
||
|
|
|
onds. |
|
||
|
|
|
(approx. two |
|
|
|
|
|
|
Sounds intermit- |
|
|
|
|
|
|
flashes per sec- |
● The indicator and tone indicate a system fault. Have the vehi- |
P.3-38 |
|
|
|
|
ond). |
tently and slowly |
||
|
|
|
|
(approx. once per |
cle inspected by an authorized Mitsubishi Motors dealer. |
|
|
|
|
|
second). |
|
|
|
|
|
|
|
|
|
6
|
|
|
|
|
|
|
Quick index |
|
|
|
|
|
|
|
If this problem occurs... |
|
|
|
|
|
|
|
|
|
|
|
N00200900678 |
|
|
|
|
|
|
|
|
|
|
|
|
Problem |
Do this |
|
Ref. Page |
|
|
||||
|
|
|
|
|
|
|
|
|
|
Cannot turn the key. |
From “LOCK” to “ACC” |
|
|
|
|
||||
|
|
|
|
|
Turn the key while jogging the steering wheel in either direction. |
|
|
|
|
|
|
|
|
|
From “ACC” to “LOCK” |
|
P.3-61, |
|
|
|
|
|
|
|
Vehicles with automatic transaxle: |
|
|
||
|
|
|
|
|
Check the position of the selector lever. |
|
3-63 |
|
|
|
|
|
|
|
|
|
|
||
|
|
|
|
|
The key cannot be removed unless the selector lever is set to the “P” (PARK) position. |
|
|
|
|
|
|
|
|
|
Vehicles with manual transaxle: |
|
|
|
|
|
|
|
|
|
Place the key at the “ACC” position. Push the key in and turn it. |
|
|
|
|
|
|
|
|
|
|
|
|
|
|
Cannot shift the selector lever |
|
|
|
|
|
||||
from the “P” (PARK) position. |
Shift the selector lever while pressing the brake pedal. |
P.3-71 |
|
||||||
(for vehicles with automatic |
Check that the ignition key is in the “ON” position. |
|
|
||||||
|
|
|
|
||||||
transaxle) |
|
|
|
|
|
||||
|
|
|
|
|
|
|
|
|
|
The windows are fogged up. |
|
|
|
|
|
||||
|
|
|
|
|
1. Set the mode selection dial to the “ ” or “ |
” position. |
P.5-12, |
|
|
|
|
|
|
|
2. Turn on the blower. |
|
5-20 |
|
|
The engine does not start. |
|
|
|
The lights do not come on. |
|
P.6-2, |
|
The lights are dim. |
Have the battery checked. Recharge or replace as needed. |
||
7-16 |
|||
The horn does not honk. |
|
||
|
|
||
The horn sound is weak. |
|
|
7
Quick index
Problem |
Do this |
|
|
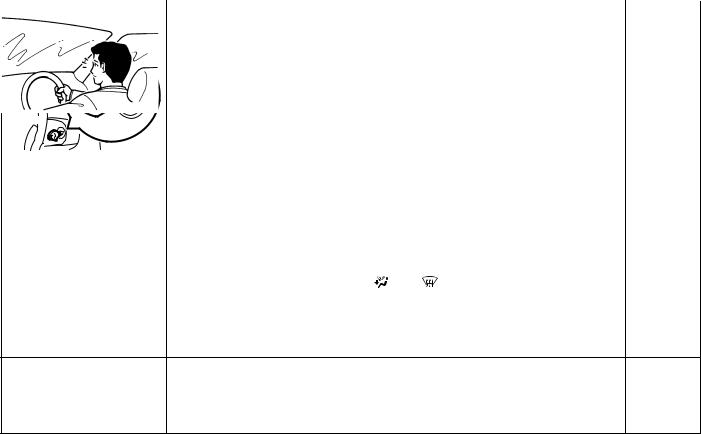
The engine coolant temperature gauge indicator is at the “H” (hot) position.
Steam comes out of the engine compartment.
The engine is overheated.
Carefully stop the vehicle in a safe place.
Ref. page
P.6-6
The vehicle is stuck in sand, mud, or snow.
Move the gearshift lever or selector lever rhythmically between 1st and Reverse gears
(for vehicles with manual transaxle) or “Sports mode” and “R” (REVERSE) positions P.6-22 (for vehicles with automatic transaxle), while pressing lightly on the accelerator pedal.
! WARNING
●When attempting to rock your vehicle out of a stuck position, be sure that no one is near the vehicle. The rocking motion may cause the vehicle to suddenly lurch forward or backward, possibly injuring bystanders.
●Avoid revving the engine or spinning the wheels. Prolonged efforts to free a stuck vehicle may result in overheating and transaxle failure.
If the vehicle remains stuck after several rocking attempts, have a towing service pull the vehicle out.
8
|
|
Quick index |
|
|
|
|
|
|
|
Problem |
Do this |
Ref. page |
|
|
|
|
|
|
|
The brakes are not functioning |
|
|
|
|
properly after driving through |
Dry out the brakes by driving slowly while lightly pressing the brake pedal. |
P.4-6 |
|
|
|
||||
water. |
|
|
|
|
|
|
|
|
|
|
There may be a problem in the automatic transaxle. |
|
|
|
The automatic transaxle does |
Have the vehicle inspected by an authorized Mitsubishi Motors dealer or a repair facility |
|
|
|
not shift when accelerating |
of your choice. |
P.3-79 |
|
|
and/or the vehicle does not |
Shift the lever into 2nd gear of the sports mode when starting the vehicle. If the vehicle is |
|
|
|
|
|
|
||
easily begin to move. |
on a level road, shift the lever back to “D” (DRIVE) position. |
|
|
|
|
(This method may or may not work depending on the type of malfunction.) |
|
|
|
|
|
|
|
|
A tire is punctured. |
|
|
|
|
|
1. Park the vehicle in a safe place where the surface is flat and level. |
P.6-9 |
|
|
|
2. Replace the flat tire with the spare tire. |
|
|
|
|
|
|
|
|
|
|
|
|
|
9

General information
Fuel selection |
1- |
2 |
|
|
|
|
|
|
|
||||
Filling the fuel tank . . . . . . . . . . . . . . . . . . . . . . . . |
1- |
4 |
|
|
|
|
1 |
||||||
Modifications to and racing of your vehicle . . . . . |
1- |
7 |
|
|
||
Mitsubishi Motors genuine parts . . . . . . . . . . . . . . |
1- |
9 |
|
|
|
|
|
||||||
California Perchlorate Materials Requirements. . . |
1- |
9 |
|
|
|
|
|
|
|
|
|
|
|
|
|
|
|
|
|
General information
Fuel selection
N00301000808
Your vehicle is designed to use unleaded gasoline only. It is equipped with a fuel filler tube especially designed to accept only a small diameter unleaded gasoline dispensing nozzle.
|
|
! |
WARNING |
1 |
|
||
|
|
|
|
|
|
● Gasoline is highly flammable and explosive. You |
|
|
|
|
could be burned, seriously injured or killed when |
|
|
|
handling it. Whenever you refuel your vehicle, stop |
|
|
|
the engine and keep flames, sparks, and smoking |
|
|
|
materials away from the vehicle. Always handle fuel |
|
|
|
in well-ventilated outdoor areas. |
! CAUTION
●Using leaded gasoline in your vehicle will damage the engine, catalytic converter, and the oxygen sensors. Also, using leaded gasoline is illegal, and will void your warranty coverage of the engine, catalytic converter, and oxygen sensors.
Gasoline detergent additives
In the United States, fuel suppliers are required by law to add detergents to their gasoline to minimize fuel-injector fouling and minimize intake-valve deposits. Detergent gasoline helps keep your engine in tune and your emission-control system working properly.
Octane requirement
2.4 liter engine model
Your vehicle is designed to operate on unleaded gasoline having a minimum octane number of 87 [(MON+RON)/2], or 91 RON.
3.8 liter engine model
Unleaded gasoline having an octane number of 87 [(MON+RON)/2] or 91 RON may be used, but Mitsubishi Motors Corporation recommends that your vehicle be operated on premium grade unleaded gasoline having a minimum octane number of 91 [(MON+RON)/2], or 95 RON. For maximum performance, premium gasoline is recommended.
MON: Motor Octane Number
RON: Research Octane Number
Oxygenated gasoline
Gasoline sold at some service stations contains oxygenates such as ethanol and MTBE, although the oxygenates may not be identified by those names. Oxygenates are required in some areas of the country. Such fuel can be used in your vehicle.
1-2
Ethanol (Gasohol)
A mixture of up to 10 % ethanol (grain alcohol) and 90 % unleaded gasoline may be used in your vehicle, provided the octane number is at least as high as that recommended for unleaded gasoline.
Methanol
Do not operate your vehicle on gasoline containing methanol (wood alcohol). Using this type of alcohol could adversely affect the vehicle’s performance and damage critical parts of the vehicle's fuel system.
Reformulated gasoline
Many areas of the country require the use of cleaner burning fuel referred to as “Reformulated Gasoline”.
Reformulated gasoline contains oxygenates and is specially blended to reduce vehicle emissions and improve air quality. Mitsubishi Motors Corporation strongly supports the use of reformulated gasoline. Properly blended reformulated gasoline has no adverse effect on vehicle performance or on the durability of the engine and fuel system.
MMT (methylcyclopentadienyl manganese tricarbonyl)
MMT is a manganese-containing metallic additive that is blended into some gasolines to increase the octane number. Mitsubishi Motors Corporation recommends using gasolines without MMT.
Use of gasolines blended with MMT may adversely affect performance, and cause the malfunction indicator on your instrument panel to come on. If this happens, contact an authorized Mitsubishi Motors dealer or a repair facility of your choice for assistance.
General information
Sulfur in gasoline
Your vehicle may have been designed to satisfy California’s |
|
low-emission regulations based on clean-burning low-sulfur |
|
gasoline. Gasoline sold in parts of the country other than Cali- |
|
fornia is allowed to have a higher sulfur content. Using such |
|
gasoline could adversely affect the vehicle's catalytic converter |
|
and cause the engine malfunction indicator (“SERVICE |
1 |
ENGINE SOON” or “CHECK ENGINE”) to come on. Illumi- |
|
nation of this indicator while you are using high-sulfur gaso- |
|
|
|
line does not necessarily mean the vehicle’s emission-control |
|
system is malfunctioning. Your authorized Mitsubishi Motors |
|
dealer may suggest you try using a different, lower-sulfur |
|
brand of unleaded gasoline to determine whether the problem |
|
is fuel-related. |
|
NOTE
●Poor-quality gasoline can cause problems such as poor starting, stalling during idling, abnormal engine noise, and poor acceleration. If you experience any of these problems, try using a different brand of gasoline. If the engine malfunction indicator (“SERVICE ENGINE SOON” or “CHECK ENGINE”) flashes, have the vehicle inspected as soon as possible by the nearest authorized Mitsubishi Motors dealer or a repair facility of your choice.
1-3
General information
●Repeatedly driving short distances at low speeds can cause deposits to form in the fuel system and engine, resulting in poor starting and poor acceleration. If these problems occur, you are advised to add a detergent additive to the gasoline when you refuel the vehicle. The additive will remove the deposits, thereby returning the engine to a normal condition. Be sure to use a genuine Mitsubishi
1detergent additive. Using an unsuitable additive could make the engine malfunction. For details, please contact the nearest authorized Mitsubishi Motors dealer.
Filling the fuel tank
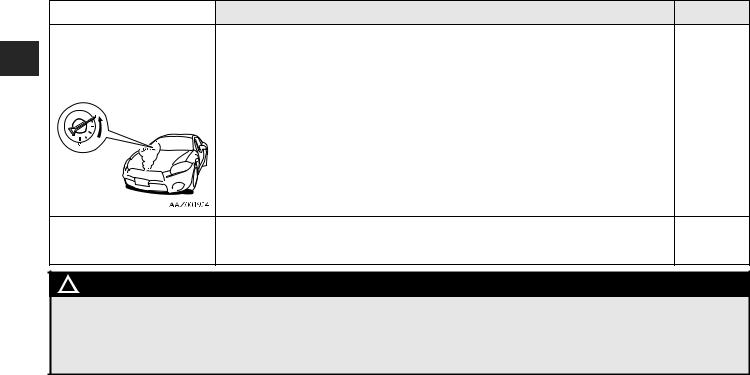
N00301100740
! WARNING
●Gasoline is highly flammable and explosive. You could be burned, seriously injured or killed when handling it. When refueling your vehicle, always turn the engine off and keep away from flames, sparks, and smoking materials. Always handle fuel in well-ventilated outdoor areas.
●Before removing the fuel cap, be sure to get rid of your body’s static electricity by touching a metal part of the car or fuel pump. Any static electricity on your body could create a spark that ignites fuel vapor.
●Perform the whole refueling process (opening the fuel tank filler door, removing the fuel cap, etc.) by yourself. Do not let any other person come near the fuel tank filler. If you allowed a person to help you and that person was carrying static electricity, fuel vapor could be ignited.
●Do not move away from the fuel tank filler until refueling is finished. If you moved away and did something else (for example, sitting on a seat) partway through the refueling process, you could pick up a fresh charge of static electricity.
●Be careful not to inhale fuel vapor. Fuel contains toxic substances.
●Keep the doors and windows closed while refueling the vehicle. If they were open, fuel vapor could get into the cabin.
1-4
Fuel tank capacity
17.7 gal (67 L)
Refueling
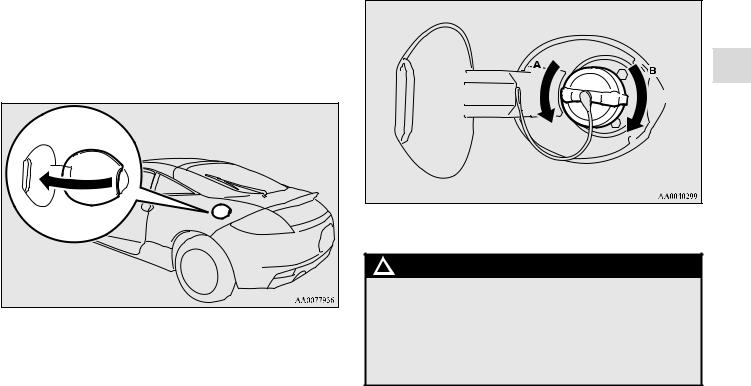
1.Before filling with fuel, stop the engine.
2.The fuel tank filler is located on the rear driver side of your vehicle.
To open the fuel tank filler door, hook a finger behind the door, and pull the door toward you.
General information
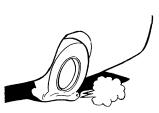
3.Open the fuel tank filler pipe by slowly turning the cap counterclockwise.
1
A- Remove
B- Close
! WARNING
●Since the fuel system may be under pressure, remove the fuel tank filler cap slowly. This relieves any pressure or vacuum that might have built up in the fuel tank. If the cap is venting vapor or if you hear a hissing sound, wait until it stops before removing the cap. Otherwise, fuel may spray out, injuring you or others.
1-5
 Loading...