


At a glance
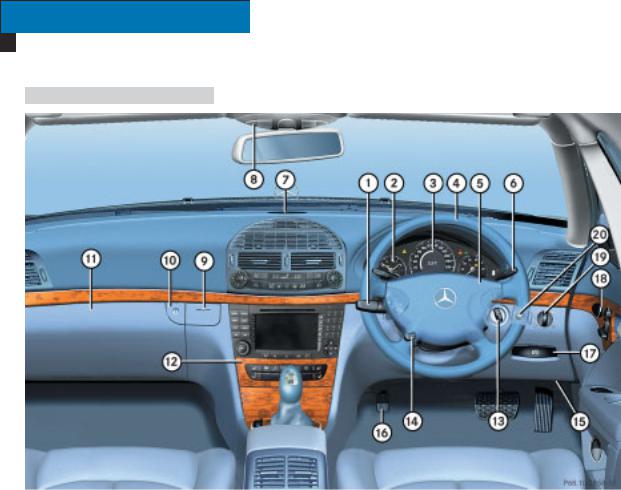
Cockpit
Left-hand-drive vehicles
16 |
Online Version (Edition F1, 06/03) |
|
|

At a glance
Cockpit
|
Function |
Page |
|
|
|
|
|
1 |
Combination switch |
|
|
|
|
Main-beam head- |
49 |
|
|
lamps |
|
|
|
Turn signals |
50 |
|
|
Windscreen wipers |
50 |
2 |
Cruise control lever |
|
|
|
|
Cruise control |
223 |
|
|
Distronic* |
227 |
|
|
Speedtronic |
237 |
|
|
SBC Stop* |
242 |
3 |
Instrument cluster |
22 |
|
4 |
Multi-function |
24 |
|
|
steering wheel |
|
|
5 |
Horn |
|
|
|
|
|
|
|
Function |
Page |
6 |
Linguatronic lever* – |
|
|
see the separate |
|
|
Operating Instructions |
|
7 |
Parktronic* warning |
253 |
|
display |
|
8 |
Overhead control panel |
27 |
9 |
Opens the spectacles/ |
282 |
|
mobile phone compart- |
|
|
ment |
|
a |
Opens the glove com- |
282 |
|
partment |
|
b |
Glove compartment |
282 |
c |
Centre console |
25 |
|
|
|
d |
Ignition lock |
31 |
|
|
|
|
Function |
Page |
e |
Adjusts the steering |
38 |
|
wheel |
|
|
Switches the steering |
289 |
|
wheel heating* on/off |
|
f |
Opens the bonnet |
306 |
|
|
|
g |
Parking brake |
53 |
h |
Releases the parking |
47 |
|
brake |
|
j |
Door control panel |
28 |
k |
Light switch |
121 |
l |
Cleans the headlamps* |
175 |
|
|
|
Online Version (Edition F1, 06/03) |
17 |
|
|
At a glance
Cockpit
Right-hand-drive vehicles
18 |
Online Version (Edition F1, 06/03) |
|
|

At a glance
Cockpit
|
Function |
Page |
|
|
|
|
|
1 |
Combination switch |
|
|
|
|
Main-beam head- |
49 |
|
|
lamps |
|
|
|
Turn signals |
50 |
|
|
Windscreen wipers |
50 |
2 |
Cruise control lever |
|
|
|
|
Cruise control |
223 |
|
|
Distronic* |
227 |
|
|
Speedtronic |
237 |
|
|
SBC Stop* |
242 |
3 |
Instrument cluster |
20 |
|
4 |
Multi-function |
24 |
|
|
steering wheel |
|
|
5 |
Horn |
|
|
|
|
|
|
|
Function |
Page |
6 |
Linguatronic lever* – |
|
|
see the separate |
|
|
Operating Instructions |
|
7 |
Parktronic* warning |
253 |
|
display |
|
8 |
Overhead control panel |
27 |
9 |
Opens the spectacles/ |
282 |
|
mobile phone compart- |
|
|
ment |
|
a |
Opens the glove com- |
282 |
|
partment |
|
b |
Glove compartment |
282 |
c |
Centre console |
25 |
|
|
|
d |
Ignition lock |
31 |
|
|
|
|
Function |
Page |
e |
Adjusts the steering |
38 |
|
wheel |
|
|
Switches the steering |
289 |
|
wheel heating* on/off |
|
f |
Opens the bonnet |
306 |
|
|
|
g |
Parking brake |
53 |
h |
Releases the parking |
47 |
|
brake |
|
j |
Door control panel |
28 |
k |
Light switch |
121 |
|
|
|
l |
Cleans the headlamps* |
175 |
|
|
|
Online Version (Edition F1, 06/03) |
19 |
|
|

At a glance
Instrument cluster
Kilometres
20 |
Online Version (Edition F1, 06/03) |
|
|

At a glance
Instrument cluster
|
Function |
Page |
|
1 |
Turn signal indicator |
50 |
|
|
lamp, left |
|
|
2 |
ABS/ESP warning |
395 |
|
|
lamp |
|
|
3 |
Speedometer |
129 |
|
4 |
Segments |
129 |
|
|
|
|
|
5 |
Multi-function |
130 |
|
|
display |
|
|
|
Depending on setting |
|
|
|
in the control system |
|
|
|
|
Outside |
|
|
|
temperature1 |
|
|
|
Digital speedome- |
|
|
|
ter |
|
|
Status line |
|
|
|
Trip meter |
|
|
6 |
Distance warning |
227 |
|
|
lamp*2 |
|
|
7 |
Turn signal indicator |
50 |
|
|
lamp, right |
|
|
|
|
|
|
|
Function |
Page |
8 Rev counter with |
|
|
|
1Restraint sys- |
397 |
|
tems warning lamp |
|
|
-ABS indicator |
396 |
|
lamp |
|
|
<Seat belt warning |
401 |
|
lamp |
|
|
AMain-beam indi- |
125 |
|
cator lamp |
|
9 Coolant temperature |
399 |
|
|
gauge with |
|
|
D Coolant warning |
|
|
lamp |
|
a Automatic transmis- |
165 |
|
|
sion*: |
|
|
gearshift program dis- |
|
|
play |
|
bTotal distance recorder
|
Function |
Page |
|
|
|
c |
Automatic transmis- |
165 |
|
sion* selector lever |
|
|
position display |
|
d |
Clock with |
146 |
|
qPreglow indica- |
45 |
|
tor lamp |
|
|
±Engine diagnos- |
400 |
|
tic indicator lamp |
|
|
— Brake indicator |
397 |
|
lamp |
|
e |
Fuel gauge with |
|
|
W Reserve fuel |
400 |
|
warning lamp |
|
f |
Rotary knob / |
128 |
|
reset button |
|
|
(R button) |
|
|
|
|
1 Except for the United Kingdom. The speed is always displayed in km/h.
2On vehicles without Distronic* the symbol lights up briefly, but has no function.
Online Version (Edition F1, 06/03) |
21 |
|
|

At a glance
Instrument cluster
Miles
22 |
Online Version (Edition F1, 06/03) |
|
|

At a glance
Instrument cluster
|
Function |
Page |
|
1 |
Turn signal indicator |
50 |
|
|
lamp, left |
|
|
2 |
ABS/ESP warning |
395 |
|
|
lamp |
|
|
3 |
Speedometer |
129 |
|
4 |
Segments |
129 |
|
|
|
|
|
5 |
Multi-function |
130 |
|
|
display |
|
|
|
Depending on setting |
|
|
|
in the control system |
|
|
|
|
Outside |
|
|
|
temperature1 |
|
|
|
Digital speedome- |
|
|
|
ter |
|
|
Status line |
|
|
|
Trip meter |
|
|
6 |
Distance warning |
227 |
|
|
lamp*2 |
|
|
7 |
Turn signal indicator |
50 |
|
|
lamp, right |
|
|
|
|
|
|
|
Function |
Page |
8 Rev counter with |
|
|
|
1Restraint sys- |
397 |
|
tems warning lamp |
|
|
-ABS indicator |
396 |
|
lamp |
|
|
<Seat belt warning |
401 |
|
lamp |
|
|
AMain-beam indi- |
125 |
|
cator lamp |
|
9 Coolant temperature |
399 |
|
|
gauge with |
|
|
D Coolant warning |
|
|
lamp |
|
a Automatic transmis- |
165 |
|
|
sion*: |
|
|
gearshift program dis- |
|
|
play |
|
bTotal distance recorder
|
Function |
Page |
|
|
|
c |
Automatic transmis- |
165 |
|
sion* selector lever |
|
|
position display |
|
d |
Clock with |
146 |
|
qPreglow indica- |
45 |
|
tor lamp |
|
|
±Engine diagnos- |
400 |
|
tic indicator lamp |
|
|
— Brake indicator |
397 |
|
lamp |
|
e |
Fuel gauge with |
|
|
W Reserve fuel |
400 |
|
warning lamp |
|
f |
Rotary knob / |
128 |
|
reset button |
|
|
(R button) |
|
|
|
|
1 Except for the United Kingdom. The speed is always displayed in km/h.
2On vehicles without Distronic* the symbol lights up briefly, but has no function.
Online Version (Edition F1, 06/03) |
23 |
|
|
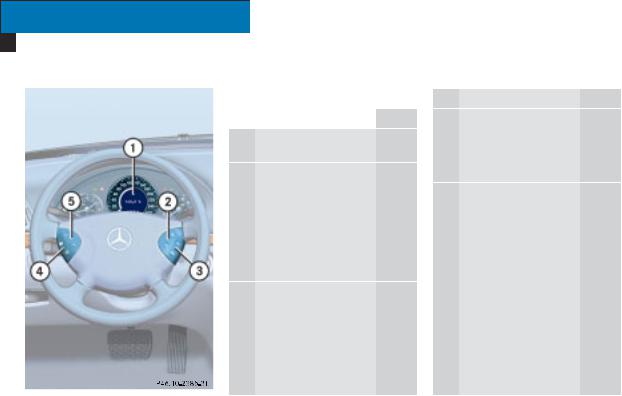
At a glance
Multi-function steering wheel
|
Function |
Page |
1 |
Multi-function display |
130 |
|
Controlling the oper- |
130 |
ating system
2 Selects a submenu or adjusts the volume
æ Up /increases
the volume
ç Down/ decreases the volume
3 Making a phone call s Accepts a call
Starts dialling t Hangs up
Rejects an incoming call
Function |
Page |
4Jumps from one menu to another
è Forwards
ÿBack
5Scrolls within a menu j Forwards k Back
24 |
Online Version (Edition F1, 06/03) |
|
|

Centre console
Upper section
At a glance
Centre console
|
Function |
Page |
1 |
Controls Thermatic |
181 |
|
Controls 4-zone- |
192 |
|
Thermotronic* |
|
|
Switches the rear win- |
180 |
|
dow heating on/off |
|
2 |
Controls COMAND |
|
|
APS* and Audio sys- |
|
|
tem* – see the sepa- |
|
|
rate Operating |
|
|
Instructions |
|
3 |
Switches the seat |
117 |
|
heating* on the right- |
|
|
hand side on/off |
|
4 |
Switches the seat ven- |
116 |
|
tilation* on the right- |
|
|
hand side on/off |
|
5 |
Unlocks the vehicle |
104 |
6 |
Opening button for |
282 |
|
stowage compartment |
|
or CD changer* – see the separate Operating Instructions
|
Function |
Page |
|
|
|
7 |
Switches the seat ven- |
116 |
|
tilation* on the left- |
|
|
hand side on/off |
|
8 |
Switches the seat |
117 |
|
heating* on the left- |
|
|
hand side on/off |
|
|
|
|
9 |
Saloon: |
|
|
Rolls the rear window |
179 |
|
blind* up/down |
|
|
Estate: |
|
|
Switches the rear |
52 |
|
windscreen wiper |
|
|
on/off |
|
a |
Folds back the rear |
110 |
|
seat head restraints |
|
b |
Switches the hazard |
125 |
|
warning lamps on/off |
|
c |
Passenger airbag |
70 |
|
warning lamp |
|
d |
Locks the vehicle |
104 |
e |
Activates/deactivates |
79 |
|
ESP |
|
|
|
|
Online Version (Edition F1, 06/03) |
25 |
|
|
At a glance
Centre console
Lower section
|
Function |
Page |
1 |
Opens/closes |
287 |
|
the ashtray |
|
2 |
KEYLESS GO* button |
32 |
|
|
|
3 |
Manual transmission: |
163 |
|
Gear lever |
|
|
Automatic transmis- |
165 |
|
sion*: |
|
|
Selector lever |
|
4 |
Switches auxiliary |
207 |
|
heating* /ventilation* |
|
|
on/off |
|
5 |
Deactivates |
255 |
|
Parktronic* |
|
|
|
|
|
Function |
Page |
|
|
|
6 |
Sets Airmatic DC* |
250 |
7 |
Sets the vehicle's |
248 |
|
level* |
|
|
|
|
8 |
Distronic*: |
234 |
|
Sets the specified |
|
|
minimum distance |
|
9 |
Distronic*: |
234 |
|
Switches the distance |
|
|
warning function* |
|
|
on/off |
|
a |
Automatic transmis- |
170 |
|
sion*: |
|
|
Selects the gearshift |
|
|
program |
|
|
|
|
26 |
Online Version (Edition F1, 06/03) |
|
|

Overhead control panel
|
Function |
Page |
1 |
Switches the rear inte- |
126 |
|
rior lights on/off |
|
|
|
|
2 |
Switches the interior |
126 |
|
lighting automatic |
|
|
function on/off |
|
3 |
Switches the front in- |
126 |
|
terior lighting on/off |
|
|
|
|
4 |
Switches the right- |
126 |
|
hand reading lamp |
|
|
on/off |
|
5 |
Opens/closes the |
213 |
|
sliding/tilting sun- |
|
|
roof* |
|
|
or |
|
|
Opens/closes the |
217 |
|
panorama sliding |
|
|
sunroof* |
|
6 |
Activates the TeleAid |
293 |
|
emergency call |
|
|
system* |
|
|
|
|
At a glance
Overhead control panel
|
Function |
Page |
|
|
|
7 |
Primes/deactivates |
85 |
|
the interior motion |
|
|
sensor* |
|
8 |
Rear-view mirror |
39 |
|
|
175 |
9 |
Reading lamps |
126 |
|
|
|
a |
Transmitter buttons |
297 |
|
for the garage door |
|
|
opener* |
|
b |
Primes/deactivates |
84 |
|
tow-away protection* |
|
|
|
|
c |
Ambient lighting* |
126 |
d |
Interior light |
126 |
e |
Switches the left-hand |
126 |
|
reading lamp on/off |
|
|
|
|
Online Version (Edition F1, 06/03) |
27 |
|
|

At a glance
Door control panel
|
Function |
Page |
|
|
|
1 |
Opens the door |
95 |
2 |
Adjusts the seat elec- |
34 |
|
trically* |
|
3 |
Stores settings for the |
119 |
|
seat, exterior mirrors |
|
|
and steering wheel* |
|
4 |
Adjusts the exterior |
40 |
|
mirrors |
|
5 |
Opens/closes the side |
211 |
|
windows |
|
|
|
|
|
Function |
Page |
6 |
Saloon: |
|
|
Boot lid remote un- |
99 |
|
locking feature |
|
|
Saloon: |
|
|
Boot lid remote open- |
99 |
|
ing switch* for |
|
|
opening/closing the |
|
|
boot lid automatically |
|
|
Estate: |
|
|
Tailgate remote open- |
100 |
|
ing switch* for opening |
|
|
the tailgate automati- |
|
|
cally |
|
|
|
|
28 |
Online Version (Edition F1, 06/03) |
|
|

Getting started
Opening
The "Getting started" section contains brief details of the basic functions of the vehicle. You should read this section particularly thoroughly if this is your first Mercedes-Benz vehicle.
If you are already familiar with the basic functions described here, the "Controls in detail" section will help you with more detailed information. You will find the reference to the appropriate page number at the end of each section.
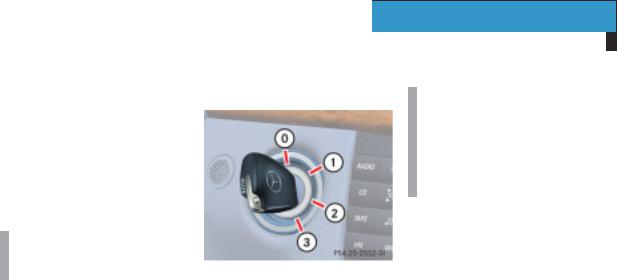
Unlocking with the remote control
Key with remote control
1 ‹ Locking button
2 Š Unlocking button for boot lid/tailgate*
3 ΠUnlocking button
Risk of accident |
G |
Your vehicle can be started with the key. This can also be used to activate other functions, e.g. opening the windows.
Do not leave children unsupervised in the vehicle as they could accidentally activate these functions.
Therefore, take the key with you when leaving the vehicle, even if you are only leaving it for a short while.
30 |
Online Version (Edition F1, 06/03) |
|
|
Press the Œunlocking button on the remote control.
The turn signals flash once. The vehicle unlocks. The locking knobs in the doors pop up. The anti-theft alarm system* is deactivated. The surround lighting also comes on when it is dark if this function is enabled in the control system.
i
The SBC brake system is activated ( page 80).
Get into the vehicle and insert the key in the ignition lock.
Key positions
Ignition lock
0 To remove the key
1Power supply for some consumers, such as the seat adjustment function
2Ignition (power supply for all consumers) and drive position
3 To start the engine ( page 45)
Getting started
Opening
i
The indicator and warning lamps light up when you switch on the ignition. They go out when the engine is running. This shows that the indicator and warning lamps for each system are operational.
You will find further information in the "Controls in detail" section
( page 88).
Online Version (Edition F1, 06/03) |
31 |
|
|

Getting started
Opening
Unlocking with KEYLESS GO*
You can unlock and start your vehicle without the remote control button using KEYLESS GO.
i
The KEYLESS GO key must be outside the vehicle to unlock it.
Pull the door handle.
The turn signals flash once. The vehicle unlocks. The locking knobs in the doors pop up. The anti-theft alarm system* is deactivated. The surround lighting also comes on when it is dark if this function is enabled in the control system.
.
Risk of accident |
G |
Your vehicle can be started using a valid KEYLESS GO key. This can also be used to activate other functions, e.g. adjusting the seats and opening the windows.
Do not leave children unsupervised in the vehicle as they could accidentally activate these functions.
Take the KEYLESS GO key with you when leaving the vehicle, even if you are only leaving it for a short while.
i
The SBC brake system is activated ( page 80).
Get into the vehicle.
KEYLESS GO positions
Pressing the KEYLESS GO button on the selector lever without depressing the brake pedal corresponds to the different key positions in the ignition lock ( page 31).
If you depress the brake pedal while pressing the KEYLESS GO button, the engine starts immediately.
i
If there is a key in the ignition lock, it has priority over the KEYLESS GO function.
32 |
Online Version (Edition F1, 06/03) |
|
|
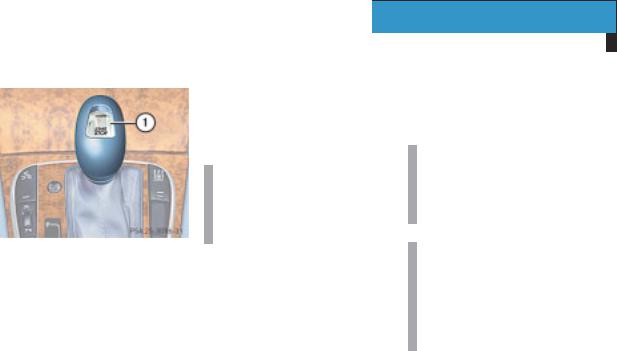
Getting started
Opening
1 KEYLESS GO button
Position 0
The on-board electronics have the status 0, the same as the key having been removed from the ignition, until you press KEYLESS GO button 1.
Position 1
Press KEYLESS GO button 1once.
You can now adjust the seats, for example.
i
The power supply will be disconnected again if you press the KEYLESS GO button twice while this position is selected.
Position 2 (ignition)
Press KEYLESS GO button 1 twice.
i
The power supply will be disconnected again if you press the KEYLESS GO button once while this position is selected.
i
The indicator and warning lamps light up when you switch on the ignition. They go out when the engine is running. This shows that the indicator and warning lamps for each system are operational.
You will find further information in the "Controls in detail" section
( page 91).
Online Version (Edition F1, 06/03) |
33 |
|
|

Getting started
Adjusting
Seats
You can adjust the seats either electrically or manually, depending on your vehicle's equipment.
Risk of accident |
G |
Only adjust the driver's seat when the vehicle is stationary. You will otherwise be distracted and could lose control of the vehicle and cause an accident as a result of the seat movement.
Risk of injury |
G |
Make sure that nobody can be trapped as you adjust the seat.
Your seat must be adjusted in such a way that you can wear the seat belt correctly ( page 43).
Position your seat in such a way that:
You are seated as far as possible from the front airbag.
Ensure the following:
The backrest is almost vertical.
Your arms are slightly bent when you are holding the steering wheel.
The distance to the pedals is such that you can depress them fully and your legs are not completely outstretched.
The head restraint supports the back of your head at about eye level.
You could otherwise receive severe or even fatal injuries in the event of sudden braking or an accident.
34 |
Online Version (Edition F1, 06/03) |
|
|
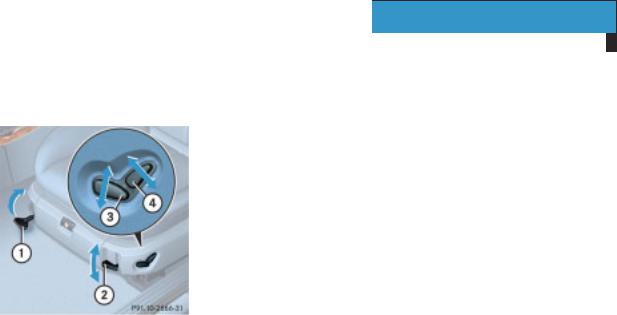
Adjusting the seat manually and electrically
1 Seat fore-and-aft adjustment
2 Seat cushion angle
3 Seat height
4 Backrest angle
Getting started
Adjusting
Seat fore-and-aft adjustment
Pull handle 1 up.
Push the seat forwards or backwards.
Release handle 1 again.
Make sure that you hear the seat click into position.
Seat cushion angle
Adjust the seat cushion angle so that your thighs are lightly supported.
Pull lever 2 upwards.
The seat cushion angle is tilted upwards by one detent.
or
Press the lever downwards.
The seat cushion angle is tilted downwards by one detent.
Seat height
Make sure that the key is in position 1 or 2 in the ignition lock.
Slide switch 3 up or down in the direction of the arrow.
Backrest angle
Make sure that the key is in position 1 or 2 in the ignition lock.
Slide switch 4 forwards or backwards in the direction of the arrow.
Online Version (Edition F1, 06/03) |
35 |
|
|
Getting started
Adjusting
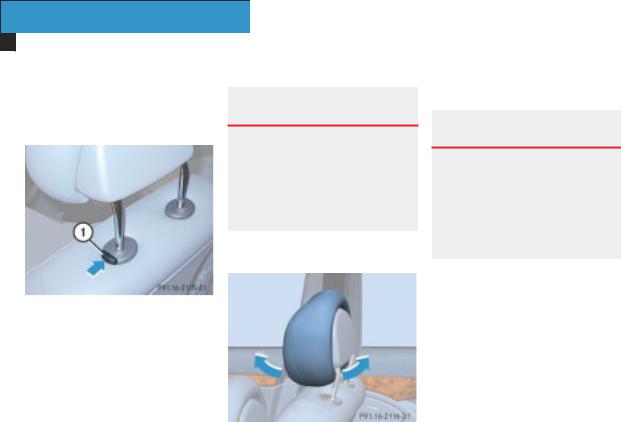
Head restraint height
The release catch is located on the top of the seat backrest.
1Release catch
Adjust the height of the head restraint manually. Press release catch 1 to lower the head restraint.
Risk of injury |
G |
Make sure that the back of your head is supported by the centre of the head restraint at about eye level. This reduces the risk of injury to the head and neck in the event of an accident or similar situations.
Head restraint angle
Adjust the angle of the head restraint manually. Pull or push on the bottom of the head restraint.
Adjusting the seat electrically*
Risk of injury |
G |
The seats can be adjusted when the key is removed from the ignition and the door is open.
For this reason, children should never be left unsupervised in the vehicle.
Make sure that:
the key is in position 1 or 2 in the ignition lock
or
the appropriate door is open
36 |
Online Version (Edition F1, 06/03) |
|
|
Getting started
Adjusting
The switches are located on the door control panel.
1 Seat fore-and-aft adjustment
2 Backrest angle
3 Head restraint height
4 Seat height
5 Seat cushion angle
Seat fore-and-aft adjustment
Slide switch 1 forwards or backwards in the direction of the arrow.
Seat height
Slide switch 4 up or down in the direction of the arrow.
Seat cushion angle
Slide switch 5 up or down in the direction of the arrow until your thighs are lightly supported.
Backrest angle
Slide switch 2 forwards or backwards in the direction of the arrow.
Head restraint height
Slide switch 3 up or down in the direction of the arrow.
Risk of injury |
G |
Make sure that the back of your head is supported by the centre of the head restraint at about eye level. This reduces the risk of injury to the head and neck in the event of an accident or similar situations.
Head restraint angle
-2116-31
Adjust the angle of the head restraint manually. Pull or push on the bottom of the head restraint.
Online Version (Edition F1, 06/03) |
37 |
|
|
Getting started
Adjusting
Steering wheel
Risk of accident G
Only adjust the steering wheel when the vehicle is stationary. Only drive with the steering wheel locked in position.
The electrically-adjustable steering wheel* can be adjusted when the key is removed from the ignition and the door is open.
Do not, therefore, leave children unsupervised in the vehicle as they could be trapped as the steering wheel is adjusted.
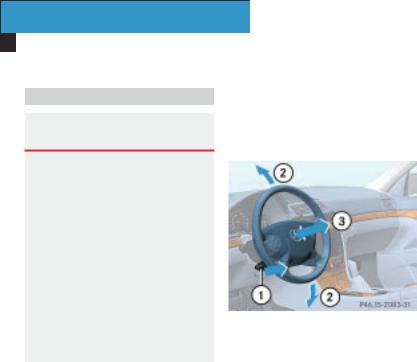
Adjusting the steering wheel manually
The handle is located under the steering column.
1 Release handle
2 Steering column height
3 Steering column fore-and-aft adjustment
Pull handle 1 out completely. The steering column is unlocked.
Adjust the steering wheel to the required position.
When doing this make sure that:
The steering wheel can be reached with your arms slightly bent
Your legs can move freely
All the displays in the instrument cluster can be clearly seen
Push handle 1 in fully until you hear it engage fully.
The steering wheel position is locked.
38 |
Online Version (Edition F1, 06/03) |
|
|

Getting started
Adjusting
Adjusting the steering wheel electrically*
The lever is located on the left under the steering wheel.
1Steering column fore-and-aft adjustment
2Steering column height
Make sure that:
the key is in position 1 or 2 in the ignition lock
or
the appropriate door is open
Steering column fore-and-aft adjustment
Push the lever forwards or backwards in the direction of arrow 1 until your arms are slightly bent when you are holding the steering wheel.
Steering column height
Push the lever up or down in the direction of arrow 2. When doing this make sure that:
You can move your legs freely
You can see all the displays in the instrument cluster clearly
You will find further information in the "Controls in detail" section:
Easy-entry system for the driver ( page 106)
Storing the steering wheel position ( page 119)
Mirrors
Before starting off, adjust the rear-view mirror and the exterior mirrors so that you get a good overview of road and traffic conditions.
Rear-view mirror
Adjust the rear-view mirror manually.
Online Version (Edition F1, 06/03) |
39 |
|
|

Getting started
Adjusting
Exterior mirrors |
The buttons are located on the door |
|
control panel. |
Risk of accident |
G |
The exterior mirrors reduce the size of the image. The objects are actually closer than they appear.
1 Right-hand exterior mirror
2 Left-hand exterior mirror
3 Adjustment button
Make sure that the ignition is switched on.
All the lights in the instrument cluster are lit.
Press button 1 for the right-hand mirror or button 2for the left-hand mirror.
Press adjustment button 3 at the top or bottom or to the right or to the left until you have adjusted the mirror to the correct position.
i
The convex exterior mirrors give a larger field of view.
Your exterior mirrors are automatically heated at low outside temperatures.
You will find further information in the "Controls in detail" section
( page 175).
40 |
Online Version (Edition F1, 06/03) |
|
|

Driving
Risk of accident |
G |
Do not keep any objects in the driver's footwell. Make sure that floormats or carpets in the driver's footwell
do not obstruct the pedals
are securely fastened
Objects could otherwise get caught between the pedals if you accelerate or brake suddenly. You will then not be able to brake, operate the clutch pedal, or accelerate as intended. This could lead to accidents and injury.
Wearing seat belts
Risk of injury G
A seat belt which is not worn correctly, or which has not been engaged in the seat belt buckle correctly, cannot perform its intended protective function. Under certain circumstances this could even cause severe or fatal injuries.
Make sure that all occupants – especially pregnant women – wear their seat belts correctly at all times:
Getting started
Driving
The seat belt must pass closely over your body and must not be twisted. You should therefore avoid wearing bulky clothing (e.g. winter coats). The shoulder belt section must be routed over the middle of your shoulder – never over your neck or under your arm – and pulled tight against your upper body. The lap belt must cross over your lap as low down as possible at all times, i.e. over your hip joints – not across your stomach or lower abdomen. If necessary, tighten the belt strap by pulling it down slightly and retighten in the direction of the inertia reel.
Do not route the belt strap over sharp-edged or easily broken objects, especially if these are located on or in your clothing, e.g. spectacles, pencils, keys, etc. The seat belt strap could be damaged and you could be injured.
Online Version (Edition F1, 06/03) |
41 |
|
|

Getting started
Driving
Only one person should use each seat belt at any one time. Never carry children on your lap, since the child will then no longer be secured in the event of an accident, braking or a sudden change in direction, which could result in severe or fatal injuries to the child and other occupants.
Persons less than 1.50 m tall (5 feet) cannot wear the seat belts correctly. For this reason, secure persons less than 1.50 m (5 feet) tall in specially designed, suitable restraint systems.
Children less than 1.50 m
(5 feet) tall or under 12 years of age cannot wear the seat belts properly. Always secure these children in suitable child re-
straint systems on suitable vehicle seats ( page 66).
Follow the manufacturer's installation instructions when fitting the child restraint system.
Do not secure any objects with a seat belt if it is also being used by one of the vehicle's occupants.
Risk of injury |
G |
A seat belt only offers its intended degree of protection if the backrest is positioned as close to the vertical as possible and the occupant is sitting upright. Avoid seat positions that do not allow the seat belt to be routed correctly ( page 34). Position the backrest as vertically as possible. Do not drive with the backrest reclined too far back.
Risk of injury |
G |
By design, airbags are not activated in all accident situations, since a correctly fastened seat belt will often be sufficient for providing an effective degree of protection. Airbags do not replace seat belts in any way. To reduce the risk of serious or fatal injuries, make sure that all occupants – especially pregnant women
– are strapped in correctly at all times, have adopted a normal sitting position, and that the seat is positioned as close to the vertical as possible ( page 34).
42 |
Online Version (Edition F1, 06/03) |
|
|

1 Belt reel
2 Belt tongue
3 Buckle
4 Release button
Pull the belt smoothly from belt reel 1.
Route the belt over your shoulder.
Click belt tongue 2into buckle 3.
If necessary, adjust the belt to the correct height ( page 44).
Pull the shoulder belt upwards to tighten the belt across your lap if necessary.
Risk of injury |
G |
You could be injured in an accident if you use seat belts which:
are damaged
have been subjected to a load in an accident
have been modified
Getting started
Driving
The seat belts can then neither function nor perform their protective function as intended.
Do not route the belt strap over sharp edges. It could tear.
Make sure that the seat belt is not caught in the door or in the seat adjustment mechanism. It could be damaged.
Check regularly that the seat belts are not damaged.
Never carry out any modifications to the seat belts yourself. They might not function properly any more.
Always have seat belts which have been damaged or subjected to a heavy load in an accident replaced at a qualified specialist workshop which has the necessary specialist knowledge and tools to carry out the work required.
Online Version (Edition F1, 06/03) |
43 |
|
|
Getting started
Driving
Mercedes-Benz recommends a Mercedes-Benz Service Centre for this purpose. In particular, work relevant to safety or on safety-related systems must be carried out at a qualified specialist workshop.
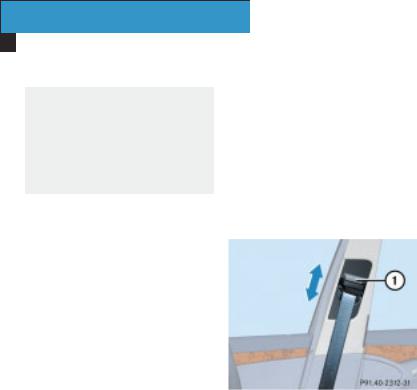
Belt height adjustment
You can adjust the seat belt height on the following seats:
Driver's seat
Front-passenger seat
Outer rear seats
Adjust the height so that the belt passes over the middle of your shoulder.
Raising the belt
Push the belt guide up.
The belt guide will engage in various positions.
Lowering the belt
Press and hold release button 1.
Move the belt guide to the required height.
Let go of release button 1 and ensure that the belt guide has engaged.
Please observe the information on wearing seat belts correctly
( page 41).
1 Release button
44 |
Online Version (Edition F1, 06/03) |
|
|

Starting the engine
Risk of poisoning G
Never leave the engine running in enclose spaces. The exhaust gases contain carbon monoxide. Inhaling exhaust fumes constitutes a health hazard and could lead to loss of consciousness or even death.
!
Do not depress the accelerator pedal when starting the engine.
i
If you depress the brake when starting the engine, the pedal travel is longer than usual and the pedal resistance is low.
If you depress the brake after starting the engine, the pedal travel and pedal resistance return to normal.
Automatic transmission*
Gearshift pattern
PPark position with selector lever
lock
R Reverse gear N Neutral
D Drive position
Before starting the engine, make sure that the selector lever is in position P.
You will find further information about automatic transmission in the "Controls in detail" section ( page 165).
Getting started
Driving
Starting the engine with the key
Vehicles with a petrol engine
Turn the key to position 3 in the ignition lock ( page 31) and release
it.
The engine starts automatically.
Vehicles with a diesel engine
Turn the key to position 2 in the ignition lock ( page 31).
The qpreglow indicator lamp in the instrument cluster lights up.
As soon as the qpreglow indicator lamp goes out, turn the key to position 3 in the ignition lock and release it.
The engine starts automatically.
i
You can start the engine without preglow if the engine is warm.
Online Version (Edition F1, 06/03) |
45 |
|
|

Getting started
Driving
Starting the engine with KEYLESS GO*
Risk of accident |
G |
Your vehicle can be started as long as the KEYLESS GO key is in the vehicle. For this reason, children should never be left unsupervised in the vehicle. They could unintentionally start the vehicle.
Take the KEYLESS GO key with you when leaving the vehicle, even if you are only leaving it for a short while.
You may start your vehicle with no key in the ignition lock using the KEYLESS GO button on the selector lever.
1 KEYLESS GO button
Vehicles with a petrol engine
Depress the brake pedal.
The selector lever lock will be released.
Press KEYLESS GO button 1once. The engine starts automatically.
Vehicles with a diesel engine
Depress the brake pedal.
The selector lever lock will be released.
Press KEYLESS GO button 1once.
Preglow is activated and the engine starts automatically.
You can start the engine without preglow if the engine is warm:
Press and hold KEYLESS GO button 1 until the engine is running.
46 |
Online Version (Edition F1, 06/03) |
|
|
 Loading...