


 Loading...
UNCONTROLLED IF PRINTED
9-1
CHAPTER 9
CLEANING INSTRUCTIONS – UNIMOG
9.1This chapter provides basic and specific cleaning requirements for selected vehicles. Where there is a specific requirement or need to highlight particular problem areas detailed cleaning guides are provided as tables and figures in this chapter.
9.2This Section deals with the cleaning of the basic Unimog vehicle. The section is structured as follows:
a.external areas;
b.underside;
c.cabin;
d.cabin holes
e.front areas;
f.under tray;
g.tray checker panel;
h.chassis;
i.chassis support tubes;
j.cross members;
k.chassis cross members;
l.chassis cavities;
m.sump;
n.torque tube wiring looms and air lines
o.chassis air lines and wiring looms;
p.suspension;
q.engine and transmission;
r.battery box;
s.winch, wire ropes and slings;
t.tarpaulins;
u.camouflage nets; and
v.tyres (new, old and spares).
ADF Force Extraction Cleaning Manual
UNCONTROLLED IF PRINTED
9-2
External Areas
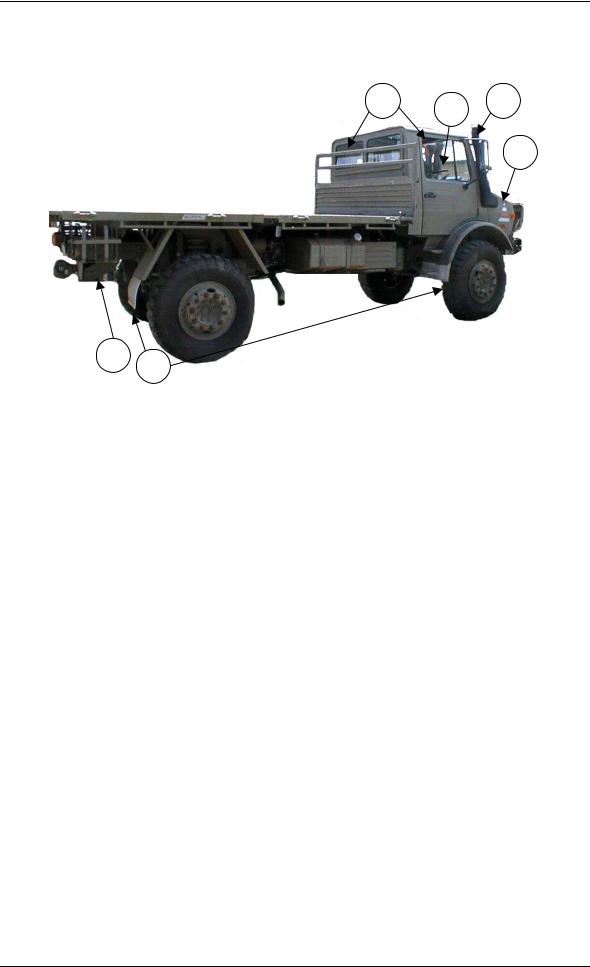
9.3The cleaning instructions for the Unimog’s external areas, as illustrated in Figure 9-1, include the points detailed in Table 9-1.
1 |
2 |
3 |
|
|
4
|
6 |
|
|
|
5 |
|
|
|
Figure 9-1: Unimog’s External Areas |
|
|
|
Table 9–1: Cleaning Instructions for the Unimog’s External Areas |
|
|
|
|
|
|
Serial |
Comments or Tasks |
|
Technical |
|
Time (hours) |
||
|
|
|
|
1 |
Clean all rubber seals around the windows and doors. |
|
|
|
|
|
|
2 |
Remove the cabin seats to facilitate cleaning. |
|
1.5 |
|
Remove the rubber floor matting to clean the cabin floor. |
|
|
3 |
Remove the snorkel to facilitate cleaning. |
|
0.5 |
4 |
Remove the bonnet to facilitate cleaning. |
|
|
5 |
Remove the mudflaps and pay attention to cleaning around the |
|
|
|
attachment points. |
|
|
6 |
Remove Cupola crash pad and any lining to facilitate cleaning and |
|
|
|
inspection. |
|
|
7 |
Loosen fuel and air tank retaining straps |
|
|
|
|
|
|
8 |
Remove light covers and flush housing |
|
|
|
|
|
|
9 |
Clean and inspect channel tubing at cargo tie down points on cargo |
|
|
|
tray |
|
|
ADF Force Extraction Cleaning Manual
UNCONTROLLED IF PRINTED
9-3
Underside
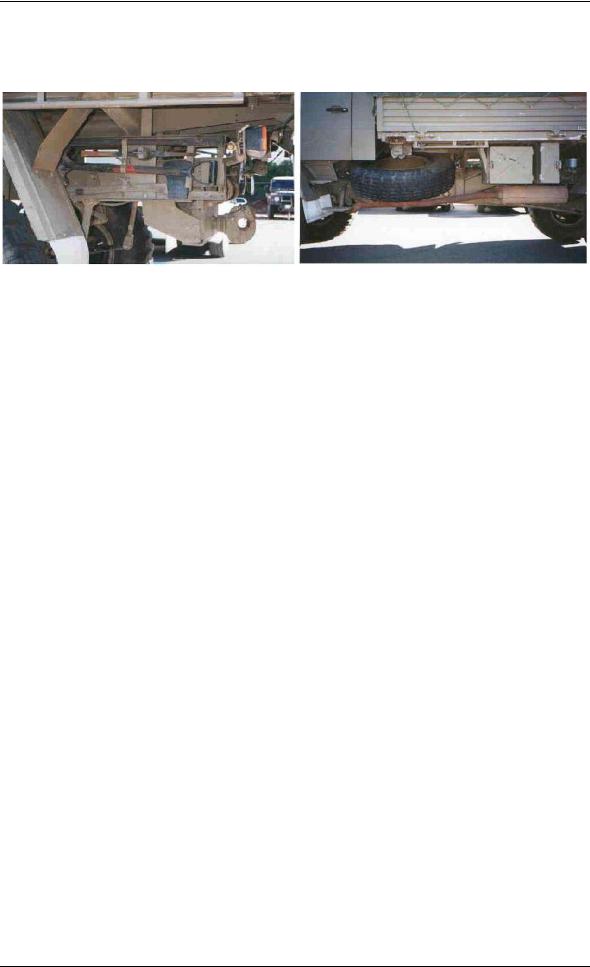
9.4The cleaning instructions for the Unimog’s external areas, as illustrated in Figure 9-2, include the points detailed in Table 9-2.
Figure 9-2: Unimog’s Underside Areas
Table 9–2: Cleaning Instructions for the Unimog’s Underside Areas
Serial |
Comments or Tasks |
Technical |
|
Time (hours) |
|||
|
|
||
1 |
All tools are to be fully removed and extended to facilitate cleaning. |
|
|
2 |
All externally fitted items of equipment to be removed and both the |
1.5 |
|
|
items and the mounting brackets to be cleaned of all QRM |
|
|
3 |
Jerry cans are to be removed to facilitate cleaning. |
0.5 |
|
|
|
|
|
4 |
All toolboxes are to be emptied to facilitate cleaning. |
|
|
|
If required, remove the toolboxes and Jerry can holders to facilitate |
|
|
|
cleaning of soil, plant and insect debris between the items and the |
|
|
|
chassis. |
|
|
5 |
Spare tyre to be fully removed and to be cleaned as per “tyres” |
|
|
|
para.10.9 below. |
|
|
6 |
Tyre cover (if fitted) to be fully removed and to be washed and |
|
|
|
scrubbed to remove all QRM (refer paragraph 9-23 below). |
|
|
7 |
Frame areas are to be washed with high-pressure water utilising a |
|
|
|
flexible nozzle. |
|
ADF Force Extraction Cleaning Manual
UNCONTROLLED IF PRINTED
9-4
Cabin
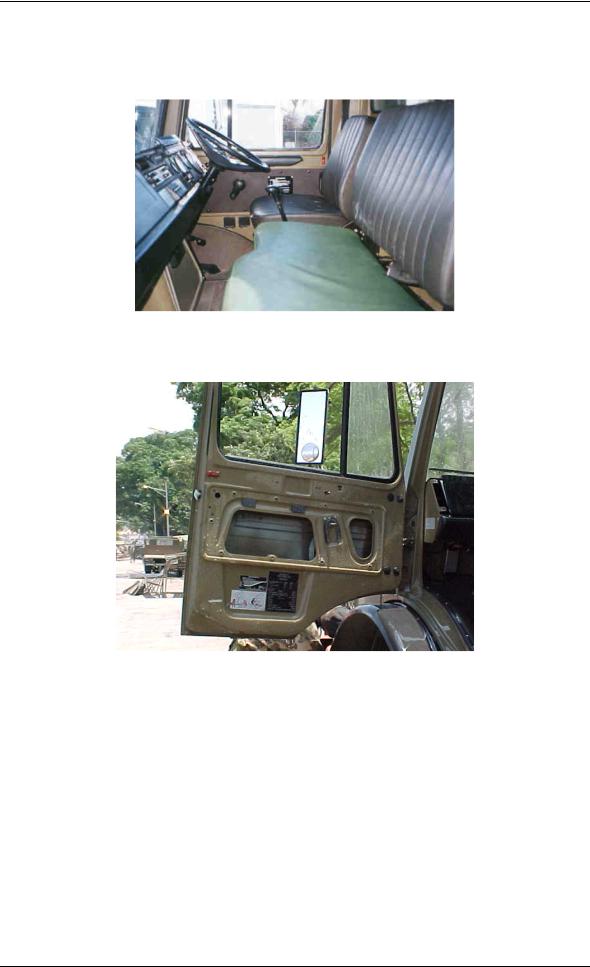
9.5The cleaning instructions for the Unimog’s cabin, as illustrated in Figures 9–3 and 9–4, include the point detailed in Table 9–3.
Figure 9–3: Unimog’s Cabin
Figure 9–4: Unimog’s Doors
ADF Force Extraction Cleaning Manual

UNCONTROLLED IF PRINTED
9-5
Table 9–3: Cleaning Instructions for the Unimog’s Doors
Serial |
Comments or Tasks |
Technical |
|
Time (hours) |
|||
|
|
||
1 |
Remove the cabin seats to facilitate cleaning. |
1.5 |
|
|
|
|
|
2 |
Remove the rubber floor matting to clean the cabin floor. |
|
|
|
|
|
|
3 |
Inspect mirror sills and mirrors. |
|
|
|
|
|
|
4 |
Door trims are to be removed and cleaned |
|
|
|
|
|
|
5 |
The window and door rubber seals are to be cleaned of all soil, plant |
|
|
|
and insect matter. Seals on the bonnet area are to be cleaned in a |
|
|
|
similar fashion. |
|
|
6 |
The seats and the floor mats are to be removed and the cabin floor |
1.0 |
|
|
cleaned. |
|
|
7 |
The cabin area is to be vacuumed and air-blown clean. |
|
|
|
|
|
|
8 |
Ventilation ducts are to be unscrewed and air-blown clean. |
|
|
|
|
|
|
9 |
Remove the front cover from the ventilation fan housing and clean the |
|
|
|
fan housing. All soil, plant and insect matter are to be removed. |
|
|
10 |
Critically inspect the gun mount and manhole (if fitted) to ensure they |
|
|
|
are free from dirt, dust, plant and insect material. |
|
ADF Force Extraction Cleaning Manual
UNCONTROLLED IF PRINTED
9-6
Cabin Holes
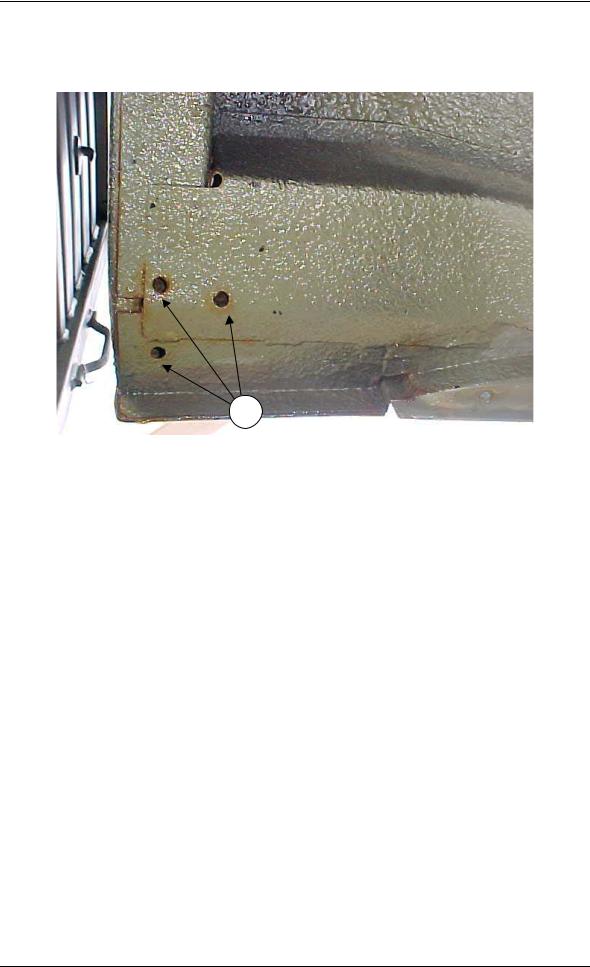
9.6The cleaning instructions for the Unimog’s cabin holes, as illustrated in Figure 9-5, include the point detailed in Table 9–4.
|
1 |
|
|
|
Figure 9-5: Unimog’s Cabin Holes |
|
|
|
Table 9–4: Cleaning Instructions for the Unimog’s Cabin Holes |
|
|
|
|
|
|
Serial |
Comments or Tasks |
Technical |
|
Time (hours) |
|||
|
|
||
1 |
The holes under the cab are to be flushed through to remove all debris. |
|
|
|
|
|
ADF Force Extraction Cleaning Manual
UNCONTROLLED IF PRINTED
9-7
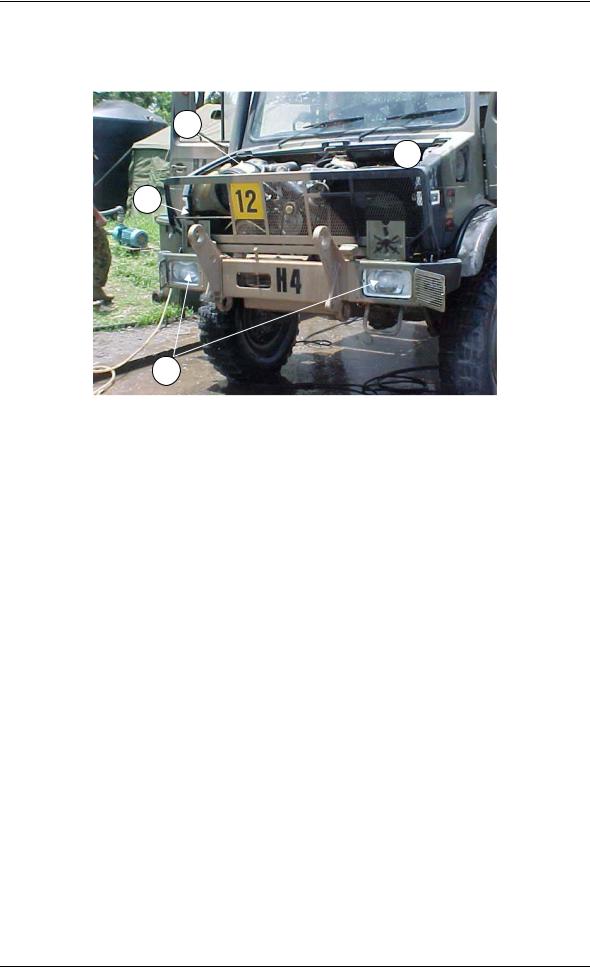
Front Areas
9.7The cleaning instructions for the Unimog’s front areas as illustrated in Figure 9-6 include the points detailed in Table 9–5.
3
4
2
|
1 |
|
|
|
Figure 9-6: Unimog’s Front Areas |
|
|
|
Table 9–5: Cleaning Instructions for the Unimog’s Front Areas |
|
|
|
|
|
|
Serial |
Comments or Tasks |
Technical |
|
Time (hours) |
|||
|
|
||
1 |
Headlights are to be removed to facilitate cleaning behind them. |
1.0 |
|
|
|
|
|
2 |
The brush guard is to be removed. |
0.25 |
|
|
|
|
|
3 |
The air cleaner element is to be removed and disposed of in |
|
|
|
accordance with AQIS directions. |
|
|
|
Clean the ventilation nozzles on the centre top of the dash using low |
|
|
|
pressure compressed air. |
|
|
|
Remove the ventilation blower assembly filter element, from the front |
|
|
|
left-hand side of the cabin, and dispose of in accordance with AQIS |
|
|
|
directions. Clean out the ventilation blower assembly housing and |
|
|
|
ensure no dirt, seed or plant material remains. |
|
|
|
Raise the heating/ventilation flap, on the selected gear indicator panel, |
|
|
|
and vacuum clean the discharge cavity to remove dust and other |
|
|
|
foreign material. |
|
|
4 |
The bonnet is to be removed. |
|
|
5 |
Remove the radiator to facilitate cleaning. |
|
|
|
The radiator is to be high-pressure air-cleaned to remove seed and |
|
|
|
then washed down by a low-pressure water high-volume wash; |
|
|
|
Bent radiator grills may require heat treatment to burn any embedded |
|
|
|
seed material (using heat shrink guns). |
|
|
|
It may be necessary to use brushes or pick insect and seed matter out |
|
|
|
from between the veins on the radiators. |
|
ADF Force Extraction Cleaning Manual
UNCONTROLLED IF PRINTED
9-8
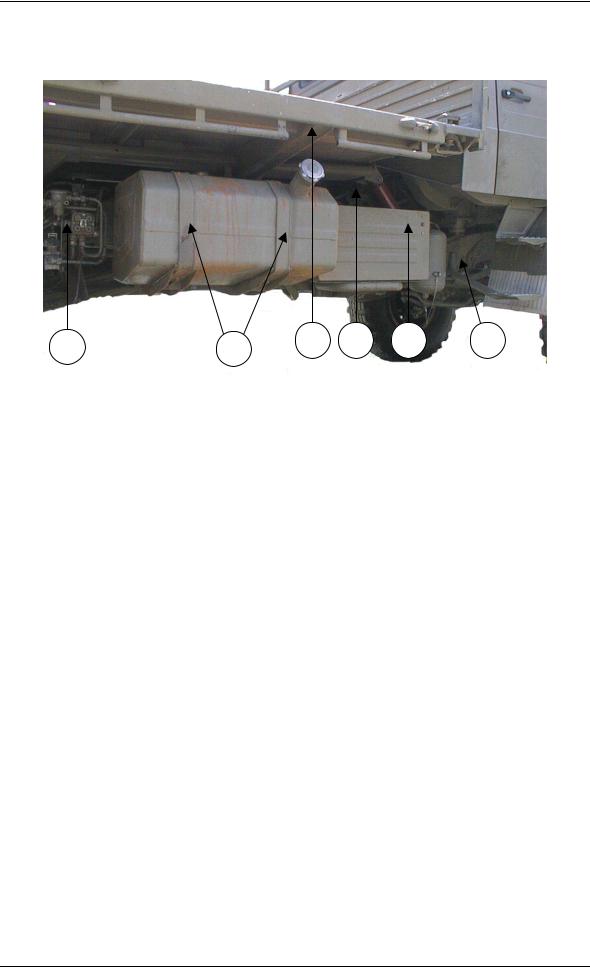
Under Tray
9.8The cleaning instructions for under the Unimog’s tray, as illustrated in Figure 9-7, include the points detailed in Table 9–6.
|
1 |
2 |
3 |
4 |
5 |
6 |
|
|
|
|
|
|
|
||
|
|
Figure 9-7: Under the Unimog’s Tray |
|
|
|
||
|
|
Table 9–6: Cleaning Instructions for Under the Unimog’s Tray |
|||||
|
|
|
|
|
|
|
|
Serial |
|
Comments or Tasks |
|
|
|
Technical |
|
|
|
|
|
Time (hours) |
|||
|
|
|
|
|
|
|
|
1 |
High-pressure water clean around the fittings using a flexible nozzle as |
|
|
||||
|
is necessary to get into all areas. |
|
|
|
|
|
|
2 |
Remove the tank straps to facilitate cleaning. |
|
|
|
1.0 |
||
3 |
Clean all the supporting members for the floor area. |
|
|
|
|||
|
The wooden floor is to be lifted to allow inspection and to facilitate |
|
2.0 |
||||
|
cleaning of the chassis cross members and underside of the floor. If |
|
|
||||
|
the wooden floor plates are cracked, gouged or damaged, they are to |
|
|
||||
|
be disposed of in accordance with AQIS directions. |
|
|
|
|||
4 |
The underside hollow cross members are to be subject to |
|
|
|
|||
|
high-pressure water using a flexible nozzle to remove all soil, plant and |
|
|
||||
|
insect matter. |
|
|
|
|
|
|
5 |
Remove the driver’s step to facilitate cleaning where the step attaches |
|
0.5 |
||||
|
to the vehicle. Additionally, the hollow tube is to be subject to a high- |
|
|
||||
|
pressure water clean and, if necessary, drill a hole near the step point |
|
|
||||
|
to provide an exit point for water and debris. |
|
|
|
|
||
ADF Force Extraction Cleaning Manual
UNCONTROLLED IF PRINTED
9-9
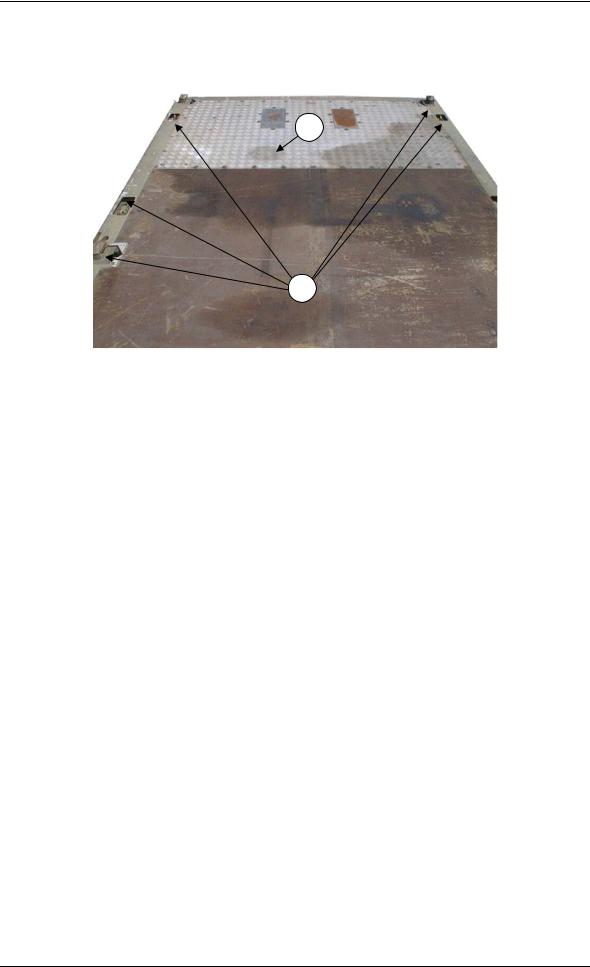
Tray Checker Panel
9.9The cleaning instructions for the Unimog’s tray checker panel, as illustrated in Figure 9-8, include the points detailed in Table 9–7.
1
2
Figure 9-8: Unimog’s Tray Checker Panel
Table 9–7: Cleaning Instructions for the Unimog’s Tray Checker Panel
Serial |
Comments or Tasks |
Technical |
|
Time (hours) |
|||
|
|
||
1 |
Where evidence of QRM has been found the checker plate is to be |
1.0 |
|
|
seperated from the Wooden floor to facilitate cleaning. Remove the |
|
|
|
checker plate to facilitate cleaning and an AQIS inspection underneath. |
|
|
|
Timber floor panels passed by AQIS inspectors will require fumigation |
|
|
|
action upon entry to Australia and will not be refitted to vehicle. |
|
|
2 |
Use a high-pressure water clean on the attachment points on the cargo |
|
|
|
tray. |
|
ADF Force Extraction Cleaning Manual
UNCONTROLLED IF PRINTED
9-10
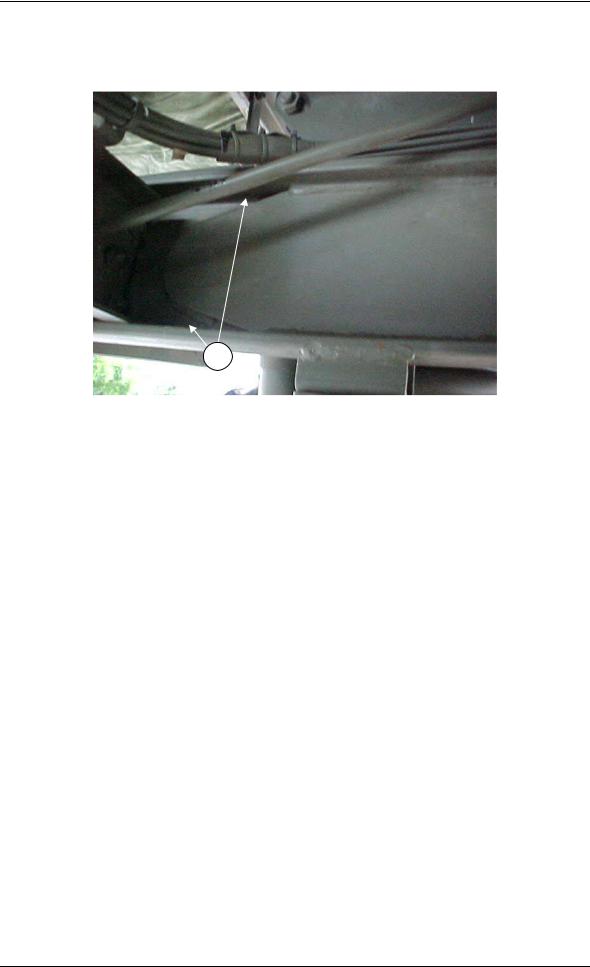
Chassis
9.10The cleaning instructions for the Unimog’s chassis, as illustrated in Figure 9-9, include the points detailed in Table 9–8.
|
1 |
|
|
|
Figure 9-9: Unimog Chassis |
|
|
|
Table 9–8: Cleaning Instructions for the Unimog’s Chassis |
|
|
|
|
|
|
Serial |
Comments or Tasks |
Technical |
|
Time (hours) |
|||
|
|
||
1 |
The chassis rail on the vehicle has open areas which collect debris. |
|
|
|
The area is to be flushed behind the plate using a flexible nozzle and |
|
|
|
moving around to ensure all areas behind the plate are cleaned until |
|
|
|
the water is observed to be clear on exit. |
|
|
2 |
Loosen and clean air line restraining straps. Foam covering may |
|
|
|
require to be disposed of if heavenly contaminated. |
|
ADF Force Extraction Cleaning Manual
UNCONTROLLED IF PRINTED
9-11
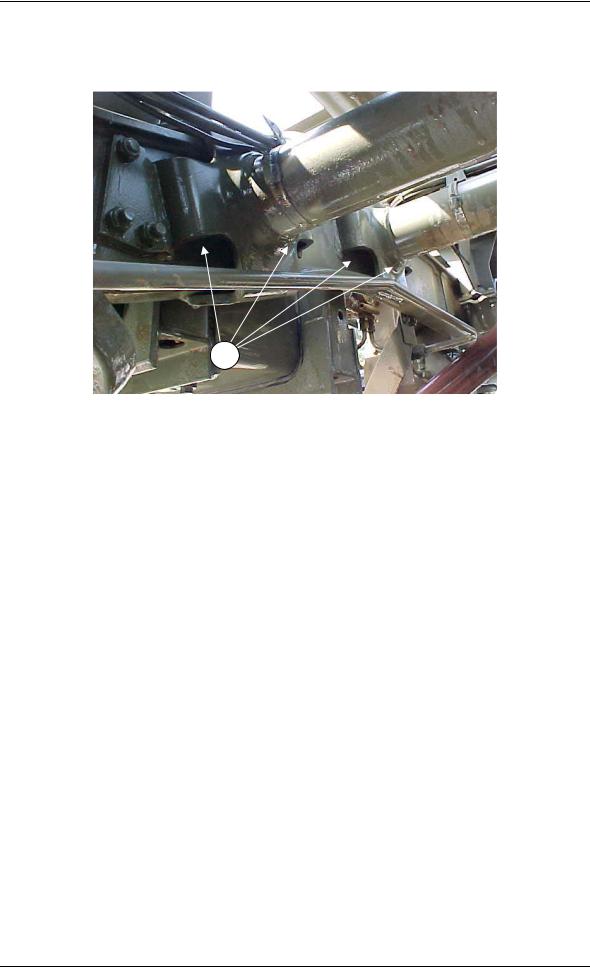
Chassis Support Tubes
9.11The cleaning instructions for the Unimog’s chassis support tubes, as illustrated in Figure 9-10, include the point detailed in Table 9–9.
1
1
Figure 9-10: Unimog’s Chassis Support Tubes
Table 9–9: Cleaning Instructions for the Unimog’s Chassis Support Tubes
Serial |
Comments or Tasks |
Technical |
|
Time (hours) |
|||
|
|
||
|
|
|
|
1 |
The rear view of the chassis support tubes are to be flushed out. The |
|
|
|
right-hand tube has a closed end and may require extensive flushing. |
|
|
|
Some vehicles have been modified and have drilled holes at the cabin |
|
|
|
end of the tube to allow water to drain out. |
|
ADF Force Extraction Cleaning Manual
UNCONTROLLED IF PRINTED
9-12
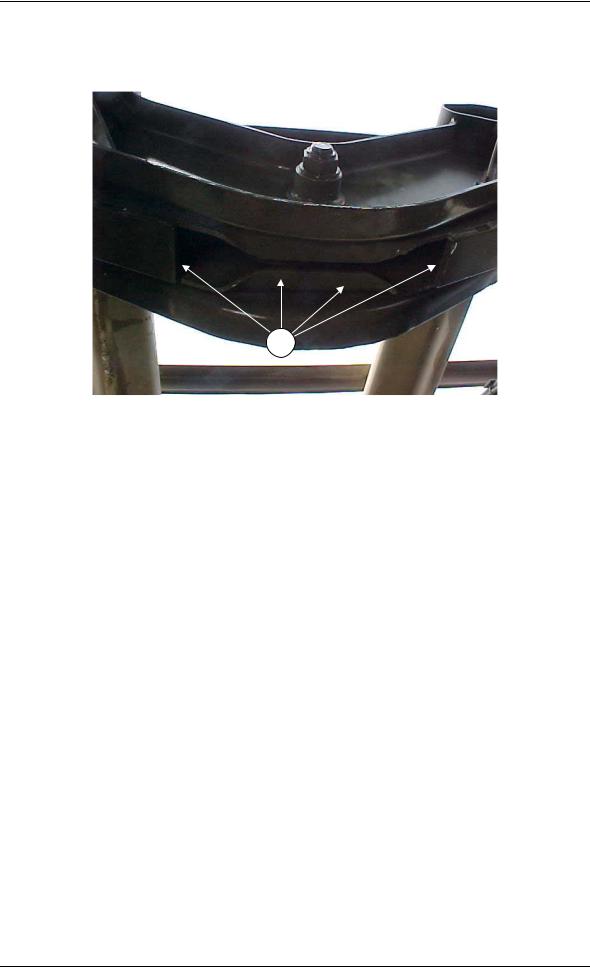
Cross Members
9.12The cleaning instructions for the Unimog’s cross members, as illustrated in Figure 9-11, include the point detailed in Table 9–10.
|
1 |
|
|
|
Figure 9-11: Unimog’s Cross Members |
|
|
|
Table 9–10: Cleaning Instructions for the Unimog’s Cross Members |
||
|
|
|
|
Serial |
Comments or Tasks |
Technical |
|
Time (hours) |
|||
|
|
||
1 |
The mounting brackets for the cross members collect debris that |
|
|
|
requires flushing using a flexible nozzle. |
|
|
ADF Force Extraction Cleaning Manual
UNCONTROLLED IF PRINTED
9-13
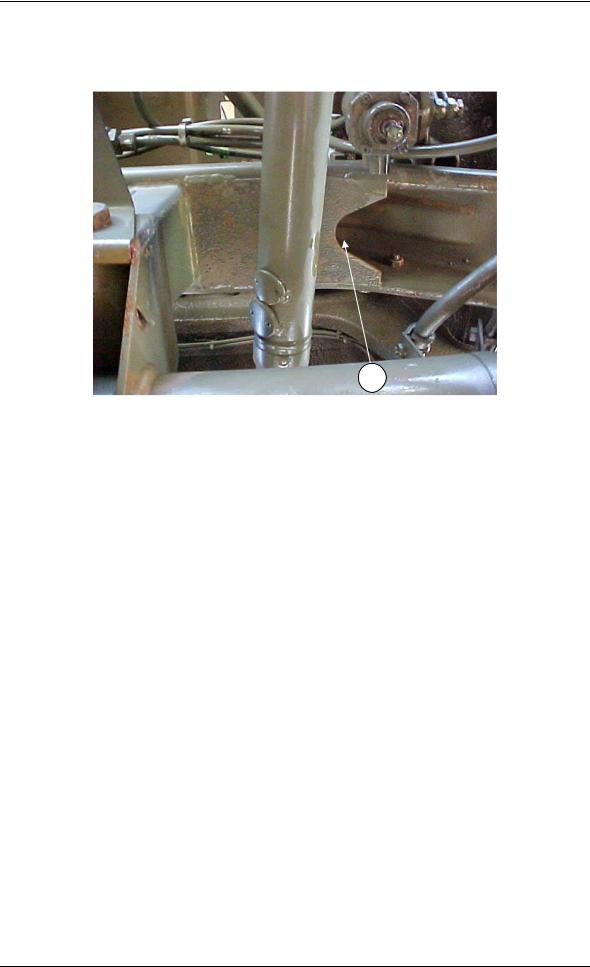
Chassis Cross Member
9.13 The cleaning instructions for the Unimog chassis cross member, as illustrated in Figure 9-12, include the point detailed in Table 9–11.
1 |
Figure 9-12: Unimog Chassis Cross Member
Table 9–11: Cleaning Instructions for the Unimog’s Chassis Cross Member
Serial |
Comments or Tasks |
Technical |
|
Time (hours) |
|||
|
|
||
|
|
|
|
1 |
The chassis cross member collects debris that requires flushing using |
|
|
|
a flexible nozzle. |
|
ADF Force Extraction Cleaning Manual
UNCONTROLLED IF PRINTED
9-14
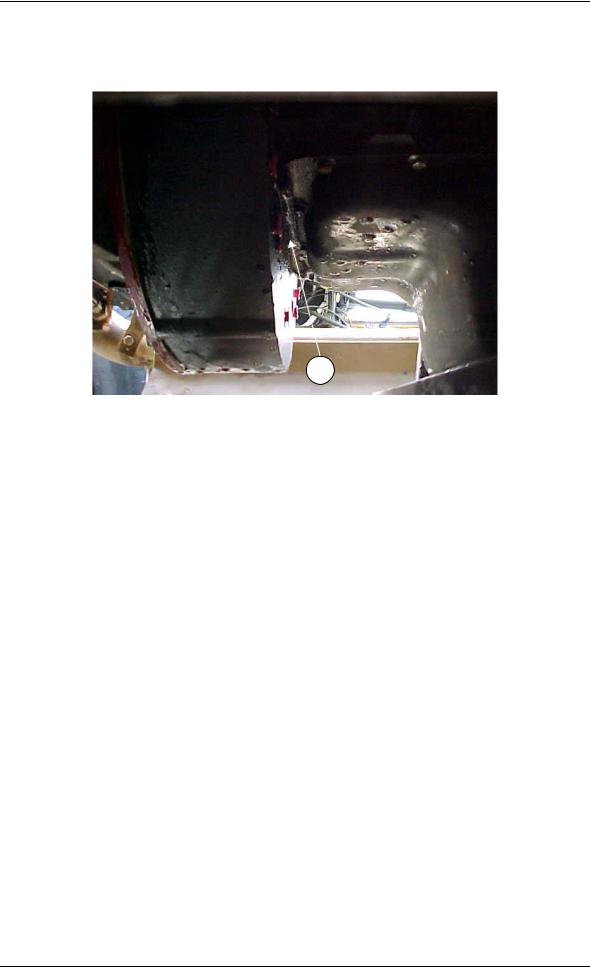
Chassis Cavities
9.14The cleaning instructions for the Unimog chassis cavities, as illustrated in Figure 9-13, include the point detailed in Table 9–12.
|
1 |
|
|
|
Figure 9-13: Unimog’s Chassis Cavities |
|
|
|
Table 9–12: Cleaning Instructions for the Unimog’s Chassis Cavities |
||
|
|
|
|
Serial |
Comments or Tasks |
Technical |
|
Time (hours) |
|||
|
|
||
1 |
All soil and debris is to be removed from the chassis cavities. |
|
|
|
|
|
|
2 |
Remove plastic ties to expose grouped cables and air lines for |
|
|
|
inspection |
|
|
ADF Force Extraction Cleaning Manual
UNCONTROLLED IF PRINTED
9-15
Sump
9.15The cleaning instructions for the Unimog sump, as illustrated in Figure 9-14, include the point detailed in Table 9–13.
|
1 |
|
|
|
Figure 9-14: Unimog Sump |
|
|
|
Table 9–13: Cleaning Instructions for the Unimog’s Sump |
|
|
|
|
|
|
Serial |
Comments or Tasks |
Technical |
|
Time (hours) |
|||
|
|
||
1 |
Grease and oil from the front of the sump and on the back of the |
|
|
|
flywheel housing is to be removed. |
|
ADF Force Extraction Cleaning Manual
UNCONTROLLED IF PRINTED
9-16
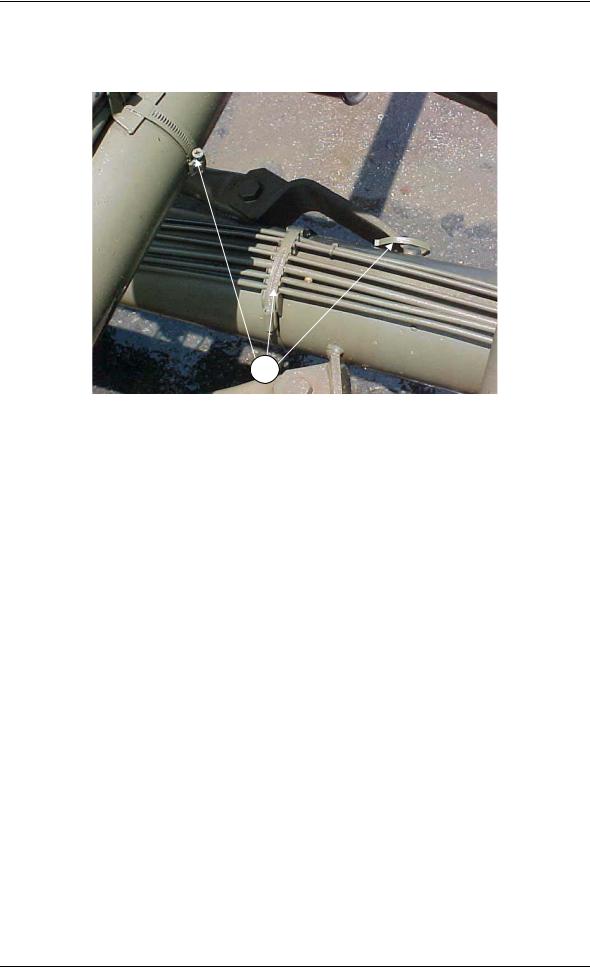
Torque Tube Wiring Looms and Air Lines
9.16The cleaning instructions for the Unimog’s wiring looms and air lines, as illustrated in Figure 9-15, include the point detailed in Table 9–14.
1
Figure 9-15: Unimog’s Wiring Looms and Air Lines
Table 9–14: Cleaning Instructions for the Unimog’s Wiring Looms and Air lines
Serial |
Comments or Tasks |
Technical |
|
Time (hours) |
|||
|
|
||
1 |
Loosen hose clamps and mounting channels and clean in between all |
|
|
|
air lines on the torque tube. |
|
ADF Force Extraction Cleaning Manual

UNCONTROLLED IF PRINTED
9-17
Chassis Air Lines and Wiring Looms
9.17The cleaning instructions for the Unimog’s cables, as illustrated in Figure 9-16, include the point detailed in Table 9–15.
1 |
|
Figure 9-16: Unimog’s Cables |
|
|
|
Table 9–15: Cleaning Instructions for the Unimog’s Cables |
|
|
|
|
|
|
Serial |
Comments or Tasks |
Technical |
|
Time (hours) |
|||
|
|
||
1 |
Clean in between all cables, paying attention to where the cable ties |
|
|
|
are located and between the cable and vehicle. |
|
ADF Force Extraction Cleaning Manual
UNCONTROLLED IF PRINTED
9-18
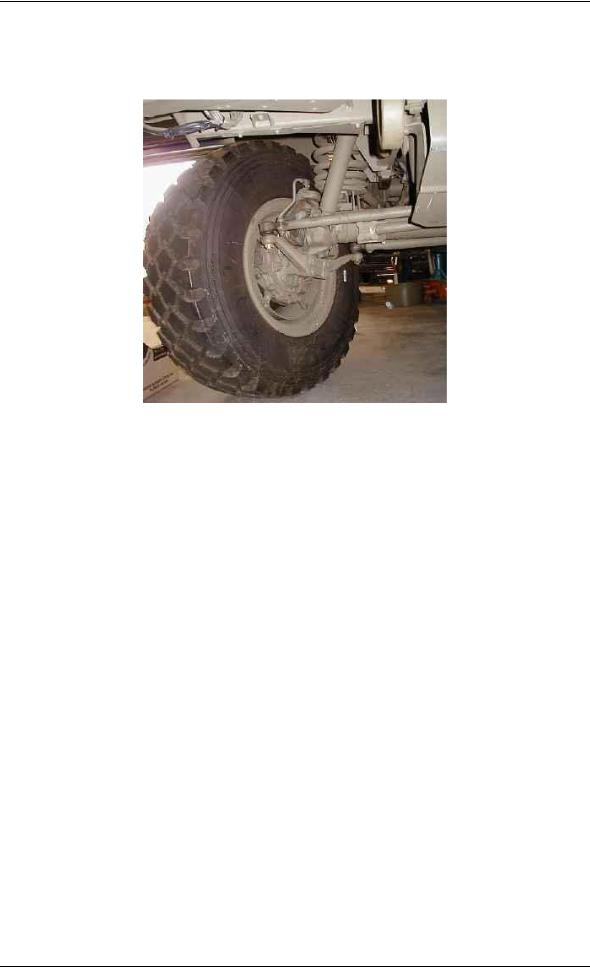
Suspension
9.18The specific cleaning instructions for Unimog’s suspension include those points detailed in Figure 9-17 and Table 9–16.
|
Figure 9-17: Unimog’s Suspension |
|
|
|
Table 9–16: Cleaning Instructions for the Unimog’s Suspension |
|
|
|
|
|
|
Serial |
Comments or Tasks |
|
Technical |
|
Time (hours) |
||
|
|
|
|
1 |
Ensure suspension rocker beam mounts on chassis are clean and free |
|
|
|
of soil, plant and insect material. |
|
|
2 |
Mud and other debris collect in the spring seat, where the spring is |
|
|
|
mounted to the axle assembly, and are difficult to remove from the |
|
|
|
base of the springs. |
|
|
|
Ensure that this area is cleaned well. |
|
|
3 |
Mud and other debris collect in the inside area on the inner side of the |
|
|
|
wheel. |
|
|
|
Ensure that this area is cleaned well. |
|
|
|
|
|
|
4 |
Ensure axles and mounts on chassis are clean and free of soil, plant |
|
|
|
and insect material. |
|
|
ADF Force Extraction Cleaning Manual
UNCONTROLLED IF PRINTED
9-19
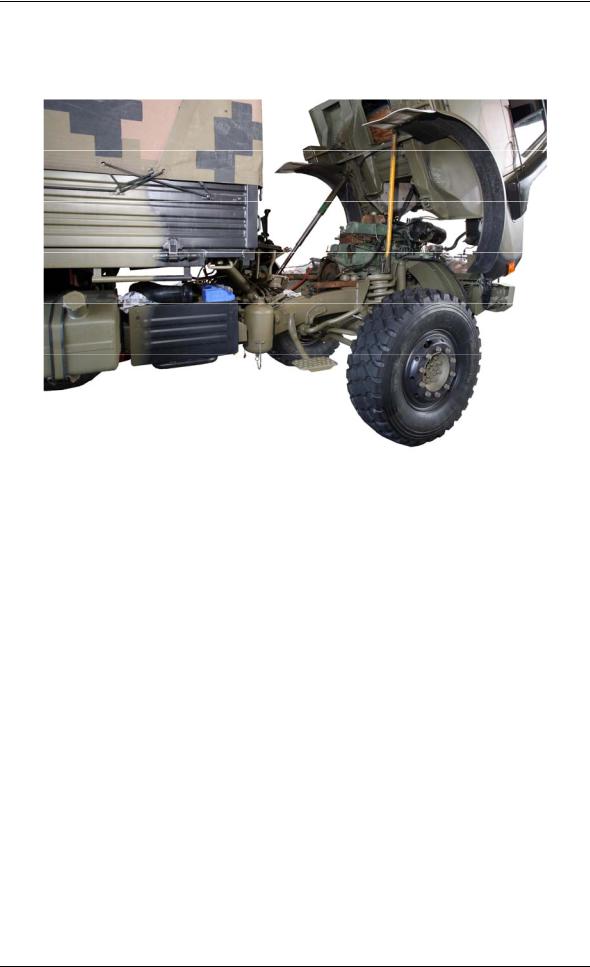
Engine and Transmission
9.19The specific cleaning instructions for Unimog’s engine and transmission include those points detailed in Figure 9-18 and Table 9–17.
Figure 9-18: Unimog’s Engine and Transmission
Table 9–17: Cleaning Instructions for the Unimog’s Engine and Transmission Compartment
Serial |
Comments or Tasks |
Technical |
|
Time (hours) |
|||
|
|
||
1 |
Clean the engine compartment and engine to ensure they are free of |
|
|
|
dust, built-up dirt and grease, insect and plant material.. |
|
|
2 |
Ensure any engine openings/breathers are taped or plugged to stop |
|
|
|
ingress of water. |
|
|
3 |
Ensure the starter motor and alternator are covered and taped to stop |
|
|
|
ingress of water. |
|
|
4 |
Do not direct high-pressure water jets at any of the engine |
|
|
|
openings/breathers, or at any of the electrical/electronic components |
|
ADF Force Extraction Cleaning Manual

UNCONTROLLED IF PRINTED
9-20
Battery Box
9.20The cleaning instructions for the Unimog’s battery box, as illustrated in Figure 9-19, include the point detailed in Table 9–18.
|
1 |
|
|
|
Figure 9-19: Unimog’s Battery Box |
|
|
|
Table 9–18: Cleaning Instructions for the Unimog’s Battery Box |
|
|
|
|
|
|
Serial |
Comments or Tasks |
|
Technical |
|
Time (hours) |
||
|
|
|
|
1 |
The battery box support member is to be flushed through using a |
|
|
|
flexible nozzle until clear water is seen to exit. |
|
|
2 |
Flush support bases and tubing underneath battery box. |
|
|
|
|
|
|
ADF Force Extraction Cleaning Manual

UNCONTROLLED IF PRINTED
9-21
Winches, Wire Ropes and Slings
9.21The cleaning instructions for Winches, Wire Ropes and Slings, as illustrated in Figures 9- 20 and 9-21, include the point detailed in Table 9–19.
Figure 9-20: Unimog’s Winch Assembly
|
Figure 9-21: Unimog’s Winch Assembly Underside |
|
|
|
Table 9–19: Cleaning Instructions for Winches, Wire Ropes and Slings |
||
|
|
|
|
Serial |
Comments or Tasks |
Technical |
|
Time (hours) |
|||
|
|
||
1 |
All items are to be extended to full length and subject to a high-pressure |
|
|
|
water clean using degreaser, if required, to remove all soil, plant and |
|
|
|
insect matter |
|
|
2 |
The winch drum is also to be degreased and subject to a high-pressure |
|
|
|
water clean |
|
|
3 |
All winch ropes, wire ropes and slings are to be re-oiled after inspection. |
|
|
|
An application of a protective covering (plastic bag) may be required to |
|
|
|
protect the refurbished ropes and cables |
|
|
ADF Force Extraction Cleaning Manual

UNCONTROLLED IF PRINTED
9-22
Tarpaulins
9.22The cleaning instructions for the tarpaulins include the points detailed in Table 9-20.
|
Table 9–20: Cleaning Instructions for the Tarpaulin Areas |
||||||
|
|
|
|
|
|
|
|
Serial |
|
|
Comments or Tasks |
|
Technical |
||
|
|
|
Time (hours) |
||||
|
|
|
|
|
|
|
|
1 |
All tarpaulins are to be given a brush down, brush scrubbing and hose |
|
|||||
|
cleaning, paying particular attention to the seam areas and then |
|
|||||
|
hung so as not to |
contact |
the ground for drying |
|
|
||
2 |
All ropes and universal |
dispatch straps are |
to be extended to |
|
|||
|
their full length and wiped or washed clean of all soil, plant and insect |
|
|||||
|
matter |
|
|
|
|
|
|
|
Attention to attachment points and fixtures and tension devices is |
|
|||||
|
required |
|
|
|
|
|
|
|
Personnel are to inspect and remove all twigs, foliage, and so on that |
|
|||||
|
has become embedded in the rope fibres |
|
|
|
|||
3 |
Velcro panels and seams (where fitted) are to be brushed and |
|
|||||
|
washed to ensure all seed, plant and soil material is removed |
|
|||||
4 |
Canvas bags are to be turned inside out and checked for burrs, seeds |
|
|||||
|
and insects; |
|
|
|
|
|
|
5 |
Where fitted, poles, |
knuckles and pegs are to |
be subject to a |
|
|||
|
high-pressure water clean to remove all soil, plant and insect matter |
|
|||||
|
(ants, spiders |
and |
mud wasps are of particular concern) |
|
|||
6 |
If tarpaulins |
have |
not been used during the |
entire deployment, |
|
||
|
then the requirement is for all tarpaulins |
to be unrolled, brushed and |
|
||||
|
swept clean to ensure no vermin or insect |
infestation and then |
|
||||
|
subject to an |
AQIS inspection |
|
|
|
||
ADF Force Extraction Cleaning Manual
Loading...