


McIntosh Laboratory, Inc. 2 Chambers Street Binghamton, New York 13903-2699 Phone: 607-723-3512 www.mcintoshlabs.com
RS200
Wireless Loudspeaker System
Owner’s Manual

Safety First
It is a smart idea to read all the enclosed RS200 SAFETY INFORMATION included in separate documents; even if you already know this stuff, you can’t be too safe.
Here is some compliance information:
FCC Information (For US Customers)
1. IMPORTANT NOTICE: DO NOT MODIFY THIS PRODUCT
This product, when installed as indicated in the instructions contained in this manual, meets FCC requirements.
Modification not expressly approved by McIntosh may void your authority, granted by the FCC, to use the product.
2.CAUTION:
•To comply with FCC RF exposure compliance requirement, separation distance of at least 20cm must be maintained between this product and all persons.
•This product and its antenna must not be co-located or operating in conjunction with any other antenna or transmitter.
3.COMPLIANCE INFORMATION:
•Product Name: RS200 Wireless Loudspeaker System
•Model Number: RS200
•This product contains FCC ID:2AAWQ-CAPRICA2XL and XCO-HSBT075
McIntosh Laboratory, Inc. 2 Chambers Street Binghamton, NY 13903 Tel. (607) 723-3512
IC Information (Canadian Customers)
1. PRODUCT:
This product contains IC: 11138A-CAPRICA2XL and
7756A-HSBT075.
This product complies with RSS-210 of Industry Canada. Operation is subject to the following two conditions: (1) this product may not cause harmful interference, and
(2) this product must accept any interference received, including interference that may cause undesired operation. This Class B digital Apparatus complies with Canadian ICES-003.
2. CAUTION:
To reduce potential radio interference to other users, the antenna type and its gain should be so chosen that the equivalent isotropically radiated power (e.i.r.p.) is not more than that permitted for successful communication.
Informations sur IC (pour les clients Canadiens)
1. APPAREIL:
Cet Appareil contiens IC: 11138A-CAPRICA2XL et 7756A-HSBT075.
Cet Appareil est conforme à la norme CNR-210 du Canada. L’utilisation de ce dispositif est autorisée seulement aux deux conditions suivantes : (1) il ne doit pas produire de brouillage, et (2) l’utilisateur du dispositif doit être prêt à accepter tout brouillage radioélectrique reçu, même si ce brouillage est susceptible de compromettre le fonctionnement du dispositif. Cet Appareil numérique de la classe B est conforme à la norme NMB-003 du Canada.
2. ATTENTION:
Afin de réduire le risque d’interférence aux autres
utilisateurs, il faut choisir le type d’antenne et son gain de façon à ce que la puissance isotrope rayonnée
équivalente (p.i.r.e.) ne soit pas supérieure au niveau requis pour l’obtention d’une communication satisfaisante.
Canadian Customers: CAN ICES-3 (B)/NMB-3 (B)
RF Exposure Information
This equipment complies with FCC/IC radiation exposure limits set forth for an uncontrolled environment and meets
the FCC radio frequency (RF) Exposure Guidelines in
Supplement C to OET65 and RSS-102 of the IC radio frequency (RF) Exposure rules. This equipment has very low levels of RF energy that are deemed to comply without testing of specific absorption ratio (SAR).
Cet équipement est conforme aux normes d’exposition aux radiations FCC/IC définies pour un environnement non contrôlé et satisfait les directives d’exposition à la radiofréquence (RF) dans le supplément C des OET65 et
RSS-102 des règles d’exposition à la fréquence radio (RF) IC. Cet équipement a de très faibles niveaux d’énergie RF qui sont jugés conformes sans test de taux d’absorption spécifique (SAR).
RED (EN) Information
1.DECLARATION OF CONFORMITY
Our products follow the provisions of EC/EU directives:
LVD: 2014/35/EC
EMC: 2014/30/EU
RED: 2014/53/EU
ErP: EC regulation 1275/2008 and its frame work directive 2009/125/EC
RoHS: 2011/65/EU
2. IMPORTANT NOTICE: DO NOT MODIFY THIS PRODUCT
This product, when installed as indicated in the instructions contained in this manual, meets RED directive requirements. Modification of the product could result in hazardous Radio and EMC radiation.
3. CAUTION:
Separation distance of at least 20cm must be maintained between this product and all persons.
This product and its antenna must not be co-located or operating in conjunction with any other antenna or transmitter.
2
Table of Contents |
|
Safety First |
2 |
FCC Information (For US Customers) |
2 |
IC Information (Canadian Customers) |
2 |
Thank you from all of us at McIntosh |
3 |
Make a Note |
3 |
Power Connection |
4 |
The Wi-Fi Connection |
4 |
Get the Play-Fi App.................................. |
4 |
Wi-Fi Setup.............................................. |
4 |
More about Play-Fi................................... |
4 |
Play-Fi Line In Broadcast......................... |
5 |
Surround Sound........................................ |
5 |
Works With Alexa™................................ |
5 |
AirPlay |
5 |
Multiroom Audio...................................... |
5 |
Siri Voice Control..................................... |
5 |
Other Wireless Connections |
5 |
Bluetooth®............................................... |
5 |
Qualcomm® aptX™ Audio..................... |
6 |
Buttons and the Switches on the Back |
6 |
Master Power Switch................................ |
6 |
EQThe WFT Switch ............................. |
6 |
CEC Button.............................................. |
6 |
Wi-Fi Reset............................................... |
6 |
Inputs and Outputs on the Back |
6 |
Optical...................................................... |
6 |
AUX......................................................... |
7 |
HDMI ARC (Connecting your TV)......... |
7 |
USB.......................................................... |
7 |
Trig Out (Power Control)......................... |
7 |
Service...................................................... |
7 |
Subwoofer Output..................................... |
7 |
The Knobs on the Front |
8 |
The Left Knob.......................................... |
8 |
Input.......................................................... |
8 |
Bluetooth Pairing ..................................... |
8 |
NET Wi-Fi Status LED............................ |
8 |
Meter Brightness...................................... |
8 |
The Right Knob........................................ |
8 |
Standby..................................................... |
8 |
Mute.......................................................... |
8 |
Volume..................................................... |
8 |
Both Knobs............................................... |
8 |
Resetting the Unit..................................... |
8 |
The Grilles |
8 |
Streaming Music |
9 |
Amazon Music......................................... |
9 |
Internet Radio........................................... |
9 |
Pandora..................................................... |
9 |
SiriusXM.................................................. |
9 |
iHeartRadio.............................................. |
9 |
KKbox...................................................... |
9 |
DLNA....................................................... |
9 |
Tidal.......................................................... |
9 |
Napster...................................................... |
9 |
QQ Music............................................... |
10 |
NPR........................................................ |
10 |
Using Presets |
10 |
Remote Learning |
10 |
Changing the Remote’s Battery |
10 |
Description of Remote Control Buttons |
11 |
Play-Fi Presets |
11 |
Trademark and License Information |
12 |
Technical Specifications |
13 |
Re-packing the RS200 |
13 |
List of Figures
Figure 1– AC Power Inlet 4 Figure 2– Wi-Fi Button 4 Figure 3– Rear Panel 6 Figure 4– 3.5mm Plug for AUX Input 7 Figure 5– USB Type B Connector 7 Figure 7– 3.5mm Plug for Power Control 7 Figure 6– 3.5mm Plug for Data Output 7 Figure 8– Knob Locations 8
Figure 9– Sliding open the remote 10 Figure 10– Remote control diagram 11 Figure 11– Packing Material 13
Thank you from all of us at McIntosh
Your new RS200 Wireless Loudspeaker System is a precision instrument that will provide many years of enjoyment. Please take a few moments to familiarize yourself with the features and instructions to get the maximum performance from your equipment.
If you need further technical assistance, please contact your dealer who may be more familiar with your particular setup including other brands. You can also contact McIntosh with additional questions or in the unlikely event of needing service.
McIntosh Laboratory, Inc.
2 Chambers Street Binghamton, New York 13903
Technical Assistance Phone: (607) 723-3512 Customer Service (for repairs)
Phone: (607) 723-3515 Fax: 607-724-1917 support@mcintoshlabs.com Website: mcintoshlabs.com
Make a Note
For future reference, you can jot down your serial number and purchase information here. We can identify your purchase from this information if the occasion should arise.
Serial Number:
Purchase Date:
Dealer Name:
3
Power Connection
Before the RS200 can stream wireless music, one cable must be connected– the AC power cord. The supplied AC power cord connects to the AC Power inlet in the top right corner of the rear of the RS200 (looking at the back).
Connect AC Power Cord to AC Power Inlet
Figure 1– AC Power Inlet
The Wi-Fi Connection
Get the Play-Fi App
The Play-Fi App allows you to stream music from your Apple and Android devices as well as any sound from your Windows PC to your RS200 (as well as any other Play-Fi speaker).
First, download the appropriate version of Play-Fi. For
Android, go to the Google Play Store; for Apple, go to the Apple App Store, and the Windows version can be downloaded from https://play-fi.com/apps/windows/.
The next step is for Play-Fi to connect the RS200 with your wireless network. After initial setup, the RS200 will automatically link with your network.
Wi-Fi Setup
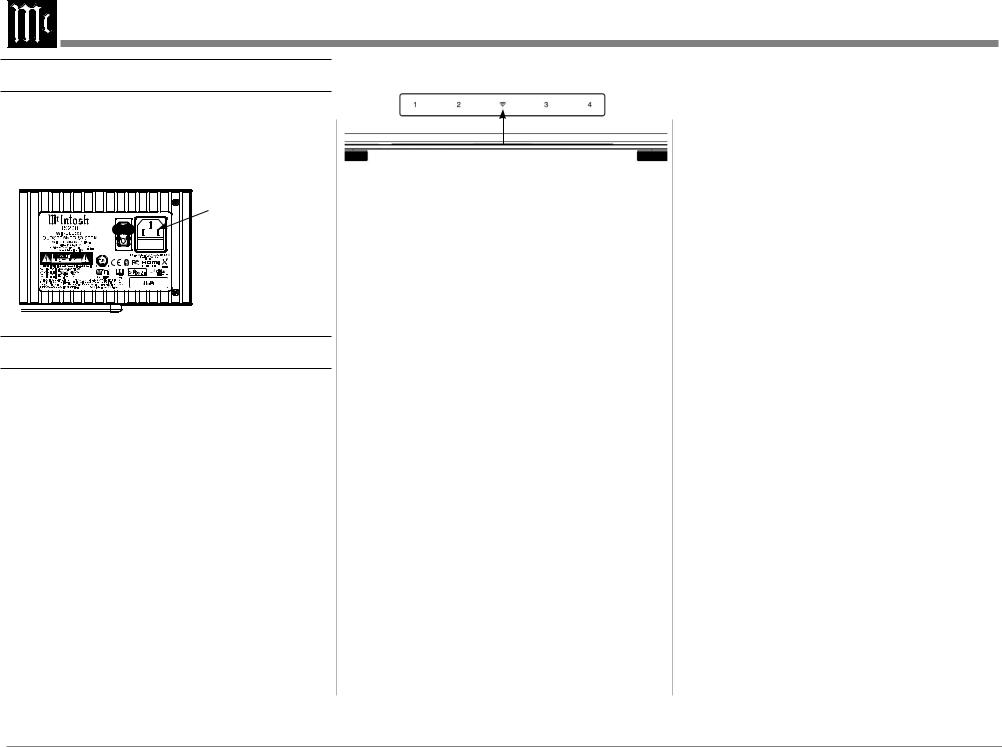
Place the RS200 in Setup Mode by pressing and
holding the Wi-Fi symbol  in the center of the LEDs on the top front of the RS200 for eight seconds. A tone will sound.
Figure 2– Wi-Fi Button
Install the Play-Fi App if you haven’t already. If only using AirPlay™, skip to the next section iOS
Connection Without Play-Fi.
For iOS users, open the Wi-Fi settings menu and select the available network option that contains “PlayFi2Device” in its name.
Run the Play-Fi App on your iOS, Windows or Android Device.
Play-Fi should search for Play-Fi devices that are in Setup mode (such as the RS200). If Play-Fi does not
automatically search, click on the settings icon  and then select “Set Up Play-Fi Device.” Then select Search.
After a minute or so, the RS200 should be found. Enter the Wi-Fi password for the network. The RS200 will now be connected to the wireless network. If there are software updates for the RS200 available, it may take a few minutes.
Next, choose a name from the list or choose to create a custom name to identify the RS200.
iOS Connection without Play-Fi
With the NET LED pulsing slowly, open the Wi-
Fi settings. Scroll to find Play-Fi device under “add
AirPlay Speaker below.”
Selecting the Play-Fi device will open a screen to add the RS200 to a selected Wi-Fi network.
After selecting the Wi-Fi network, it will take a moment
and then a message should display that the AirPlay Speaker was successfully connected to the network.
WPS Setup
If your router supports Wi-Fi Protected Setup (WPS), then you can use this method for connecting the RS200 to your network. WPS allows for a secure network connection without needing to enter a password.
Place the RS200 near the router. It can be moved after setup.
Place the RS200 in WPS mode by pressing and holding
the Wi-Fi symbol  in the center of the LEDs on the top front of the RS200 for 3 seconds. The symbol should begin to blink twice and then pause every second.
Now push the WPS button on your router. Once the automatic connection has completed, the Wi-Fi symbol should now be a solid, non-blinking, green.
Launch the Play-Fi App to complete the setup. The RS200 should be recognized and you will be able to name the unit.
More about Play-Fi
Play-Fi is a premium whole-home wireless audio system created by DTS and licensed by McIntosh. The goal of Play-Fi is to provide seamless interoperability between speakers in many locations with numerous streaming services. The streaming landscape is an everchanging ecosystem, and the folks at DTS are working hard to both maintain quality service as well as incorporate advances in streaming technology. Over time your Play-Fi App will change and improve. Play-Fi’s features and function are completely in the hands of our friends at DTS. You can find the latest information in the knowledge base at play-fi.com.
4

Play-Fi Line In Broadcast
The RS200 allows you to use Play-Fi to feed audio inputs from the RS200 to other Play-Fi speakers. To do this:
•Choose the Line In option from the Play-Fi menu.
•Select a source device such as the RS200.
•Select an Input (OPT, AUX, HDMI or USB).
•Select Type of Content (Music or TV Audio).
•Select one or more Output Speakers. Include the RS200 in your choice if you want to hear the music from the RS200.
•Select Start Line In Broadcast to play to all selected devices.
Surround Sound
The RS200 can be part of a Play-Fi 5.1 surround configuration.
To utilize the surround capability of Play-Fi, the RS200 should be set up as the Surround Master which will be the front position of the setup. Two additional Play-Fi surround capable speakers are needed for the right and left rear.
All the products should be updated with the latest firmware and software. Nothing less than a 5GHz capable router is recommended.
To set up surround:
Choose settings icon  in the Play-Fi App. Then choose Surround Sound from the menu.
Then choose the plus sign + and follow the guided instruction for the setup of wireless speakers.
After setup, a 5.1 audio signal sent to the RS200 will
be decoded and render discrete Surround Left and Surround Right channels to the rear speakers. Select signal input (HDMI, Optical or USB) using the RS200 Left Input Selector Knob.
To release the rear speakers from the surround setup:
•Go to Surround Sound under settings.
•Choose the three vertical dots to the right of the RS200 Surround Sound settings.
•Choose Delete. It will take a moment to reconfigure the rear speakers.
Works With Alexa™
Through the Play-Fi App and embedded hardware, the
RS200 can be voice controlled through Alexa enabled devices. An increasing list of music services can be streamed by the RS200 as commanded by an Alexa enabled device.
To enable these features, open the settings page in the
Play-FiApp and choose “AmazonAlexa.”Thenchoose the RS200. Default names work better with Alexa for controlling devices (like “Bedroom” or “Kitchen”). You will be prompted to sign in to your Amazon account. After registering, you will be prompted to launch the Alexa App. Choose “Smart Home” from the settings menu of the Alexa App, and then choose to setup a speaker. For speaker brand choose “Other.” Choose “Discover Devices.” After a minute or so of searching, your RS200 will be found and added to
Alexa’s devices.
AirPlay
AirPlay is an Apple Technology designed to control home audio systems and speakers in any room – with a tap or by simply asking Siri – right from iPhone, iPod, HomePod or Apple TV.
To control this AirPlay 2-enabled speaker, iOS 11.4 or later is required.
Multiroom Audio
AirPlay technology lets you play a song on every RS200 in your house at the same time or adjust the volume in any room – all in sync.
After installing your RS200, add it to the Apple Home App with a few simple steps using your iPhone or iPad.
Siri Voice Control
Use Siri on your iPhone, iPad, HomePod, or Apple TV to control your RS200 with just your voice.
Other Wireless Connections
Bluetooth®
With built-in Bluetooth capability, the RS200 can be connected to countless other devices such as phones.
To connect to a Bluetooth device:
Place the RS200 in pairing mode by pressing and holding in the Left Knob for two seconds. Release the Knob. The “BT” will blink green. You can now pair with a phone or other Bluetooth device by searching and selecting the RS200 (with additional characters in the name such as RS200-FF03). Follow your device’s instructions to complete the paring.
Note that your paired device will take control of the unit any time it is paired. If the RS200 is streaming via Play-Fi and a phone that is automatically set to pair with the RS200 via Bluetooth comes in range, the RS200 will switch to the Bluetooth input.
When playing music from a phone over a Bluetooth connection, the phones EQ can greatly affect the sound quality. Check the phone’s EQ if something sounds off.
5
 Loading...