


OWNER’S MANUAL
AIR CONDITIONER
Please read this manual carefully before operating your set and retain it for future reference.
TYPE : WALL MOUNTED
DELUXE LOW WATT
MODELS : S05DVX-3 S07DVX-3 S09DVX-3 S05DLX-3
S07DLX-3 S09DLX-3 S12DLX-3 S18DLX-3
MODELS : S05LPBX-R2 S09LPBX-R S12LPBX-R
ArtCool
MODELS : S05ACR S09ACR S12ACR
STANDARD INVERTER
MODELS : S10KMV S10SIV-2 S13SIV S18SIV-2
DELUXE INVERTER
MODELS : S18DLV-2
ArtCool Inverter
MODELS : S10ACNV S13ACNV
*MFL67658903*
P/NO : MFL67658903 www.lg.com

<![endif]>ENGLISH
2 |
TIPS FOR SAVING ENERGY |
|
|
|
|
TIPS FOR SAVING ENERGY
Here are some tips that will help you minimize the power consumption when you use the air conditioner. You can use your air conditioner more e ciently by referring to the instructions below:
•Do not cool excessively indoors. This may be harmful for your health and may consume more electricity.
•Block sunlight with blinds or curtains while you are operating the air conditioner.
•Keep doors or windows closed tightly while you are operating the air conditioner.
•Adjust the direction of the air flow vertically or horizontally to circulate indoor air.
•Speed up the fan to cool or warm indoor air quickly, in a short period of time.
•Open windows regularly for ventilation as the indoor air quality may deteriorate if the air conditioner is used for many hours.
•Clean the dual protection filter once every 2 weeks. Dust and impurities collected in the
dual protection filter may block the air flow or weaken the cooling / dehumidifying functions.
For your records
Staple your receipt to this page in case you need it to prove the date of purchase or for warranty purposes. Write the model number and the serial number here:
Model number :
Serial number :
You can find them on a label on the side of each unit.
Dealer’s name :
Date of purchase :
SAFETY PRECAUTIONS |
3 |
|
IMPORTANT SAFETY INSTRUCTIONS
READ ALL INSTRUCTIONS BEFORE USING THE APPLIANCE.
Always comply with the following precautions to avoid dangerous situations and ensure peak performance of your product
! WARNING
It can result in serious injury or death when the directions are ignored
! CAUTION
It can result in minor injury or product damage when the directions are ignored
! WARNING
in hazards to you and others.
•Installation MUST conform with local building codes.
•The information contained in the manual is intended for use b
familiar with safety procedures and equipped with the proper tools and test instruments.
•Failure to carefully read and follow all instructions in this manual can result in equipment malfunction, property damage, personal injury and/or death.
•This appliance is not intended for use by persons (including children) with reduced physical, sensory or mental capabilities, or lack of experience and knowledge, unless they have been given supervision or instruction concerning use of the appliance by a person responsible for their safety.
•Children should be supervised to ensure that they do not play with the appliance.
•When the power cord is to be replaced,replacement work shall be performed by authorized personnel only genuine replacement parts.
Installation
•Use a standard circuit breaker and fuse conforming with the rating of the air conditioner. Failure to do so may result in electric shock or product failure.
•Contact an authorized service center when you install or relocate the air conditioner. Failure to do so may result in serious injury or product failure.
•Always use a power plug and socket with a ground terminal.Failure to do so may result in electric shock or product failure
•Install the panel and the cover of the control box safely. Failure to do so may result in explo-
•Install a dedicated electric outlet and circuit breaker before you use the air conditioner. Failure to do so may result in electric shock or product failure.
•Use a standard circuit breaker and fuse conforming with the rating of the air conditioner. Failure to do so may result in electric shock or product failure.
•Do not modify or extend the power cable. If the power cable or cord has scratches or skin peeled o or deteriorated then it must be replaced. It may resu
•Be cautious when you unpack or install the air conditioner. Failure to do so may result in serious injury or product failure.
•Contact an authorized service center when you install or relocate the air conditioner. Failure to do so may result in serious injury or product failure.
•Do not install the air conditioner on an unstable surface or where there may be a danger of it falling. It may result in death, serious injury, or product failure.
<![endif]>ENGLISH
<![endif]>ENGLISH
4 |
SAFETY PRECAUTIONS |
|
|
|
|
Operation
•Do not let the air conditioner run for a long time when the humidity is very high or when a door or window has been left open. Failure to do so may result in product failure.
•Make sure that the power cord is not pulled or damaged while the air conditioner is operating. Fail-
ure.
•Do not place any objects on the power cord. It may result in electric shock or product failure.
•Do not turn on or o the air conditioner by plugging in or unplugging the power plug. It may result in
•Do not touch, operate or repair the air conditioner with wet hands. It may result in electric shock or product failure.
•Do not place a heater or other heating appliances near the po
shock, or product failure.
• Do not allow water to run into the air conditioner. It may re
d thinner near the air conditioner.
•Do not use the air conditioner for an extended period of time in a small place without ventilation. Ventilate the place regularly. Failure to do so may result in e
•When there is a gas leak, ventilate su ciently before using the air conditioner again. Failure to do so
•Unplug the power plug if there is a noise, smell or smoke coming from the air conditioner. Failure to
•Stop operating and close the window in strom or hurricane.If possible remove the product from the window before hurricane arrives
grille. Failure to do so may result in elec-
tric shock or product failure.
•Contact an authorized service center when the air conditioner 
•Be cautious water could not enter the product
•Make sure to ventilate su ciently when this air conditioner and a heating appliance such as a heater
rious injury, or product failure.
•Turn the main power o and unplug the power plug when you clean or repair the air conditioner. Failure to do so may result in death, serious injury, or product failure.
•Unplug the power plug when the air conditioner is not used for an extended period of time. Failure to do so may result in product failure.
•Do not place any objects on the air conditioner. It may result in product failure.
•For inner cleaning, contact an Authorized Service Center or a dealer. Do not use harsh detergent that causes corrosion or damange on the unit. Hash detergent may also cause failure of product, fire,or electronic shock.

SAFETY PRECAUTIONS 5
! CAUTION
Installation
•Make sure to check if there is a refrigerant leak after you install or repair the air conditioner. Failure to do so may result in product failure.
•Install the drain hose properly for smooth drainage of condensed water. Failure to do so may result in product failure.
•Keep level even when installing the product.
•Install the air conditioner where the noise from the outdoor unit or the exhaust gas will not inconvenience the neighbors. Failure to do so may result in conflict between neighbors.
•When transporting the equipment, there should be at least 2 or more people, or a forklift. It may result in serious injury.
•Do not install the air conditioner where it will be exposed to sea wind (salt spray) directly. It may result in product failure.
Operation
•Do not expose people, animals or plants to the cold or hot wind from the air conditioner. It may result in serious injury.
•Do not use the product for special purposes, such as preserving foods, works of art, etc. It is a consumer air conditioner, not a precision refrigeration system. It may result in death, fire or electric shock.
•Do not block the inlet or outlet of air flow. It may result in explosion or product failure.
•Do not use strong cleaning agents or solvents when you clean the air conditioner, or spray water. Use a smooth cloth. It may result in serious injury or product failure.
•Never touch the metal parts of the air conditioner when you remove the air filter. It may result in serious injury or product failure.
•Do not place any objects on the air conditioner. It may result in product failure.
•Always insert the filter securely after cleaning. Clean the filter every two weeks or more often if necessary.
•Do not insert hands or other objects through the air inlet or outlet while the air conditioner is operating. It may result in electric shock.
•Do not drink the water drained from the air conditioner. It may result in serious health complications.
•Use a sturdy stool or ladder when you clean, maintain or repair the air conditioner at a height. Failure to do so may result in serious injury or product failure.
•Do not mix the batteries for the remote control with other types of batteries or mix new batteries with used batteries. Failure to do so may result in product failure.
•Do not recharge or disassemble the batteries. Failure to do so may result in explosion, fire or serious injury.
•Stop using the remote control if there is a battery fluid leak. If your cloth or skin is exposed to the battery fluid from a leak, wash it off with clean water. Failure to do so may result in serious injury.
•If you swallow the battery fluid from a leak, wash out the inside of your mouth thoroughly and then consult a doctor. Failure to do so may result in serious health complications.
<![endif]>ENGLISH
<![endif]>ENGLISH
6 |
TABLE OF CONTENTS |
|
|
|
|
TABLE OF CONTENTS
2 |
TIPS FOR SAVING ENERGY |
15 |
ADVANCED FUNCTIONS |
||
|
|
|
|
|
|
3 |
|
15 |
Changing room temperature quickly |
||
IMPORTANT SAFETY |
15 |
Indoor air purification |
|||
|
INSTRUCTIONS |
15 |
- Auto Clean operation |
||
|
|
15 |
Skin Care Mode |
||
7 |
BEFORE USE |
16 |
Plasma Purification operation (Optional) |
||
16 |
Auto operation (Optional) |
||||
|
|
||||
7 |
Components |
||||
17 |
Auto Changeover operation (Optional) |
||||
9 |
Using the remote control |
17 |
°C/°F Conversion |
||
11 |
- Inserting batteries |
17 |
Energy saving cooling mode |
||
11 |
- Installing the remote control holder |
17 |
Display screen brightness |
||
12 |
|
18 |
Operating the air conditioner without the |
||
BASIC FUNCTIONS |
|
|
remote control |
||
18 |
Restarting the air conditioner |
||||
|
|
||||
|
|
||||
12 |
Cooling your room |
|
|
automatically |
|
12 |
Removing humidity |
19 |
MAINTENANCE |
||
13 |
Airing your room |
||||
|
|
|
|||
20 |
|
||||
13 |
Adjusting the fan speed |
|
|||
13 |
Adjusting the air flow direction |
20 |
Cleaning the anti-allergy filter and triple |
||
13 |
Setting the timer |
|
|
filter (Optional) |
|
20 |
Cleaning the plasma filter (Optional) |
||||
13 |
- Setting the current time |
||||
20 |
Cleaning the 3M multi protection lter& |
||||
14 |
- Turning on the air conditioner |
||||
|
|
3M micro protection lter(Optional) |
|||
|
automatically at a set time |
|
|
||
|
|
|
|
||
14 |
- T |
|
21 |
TROUBLESHOOTING |
|
|
automatically at a set time |
||||
14 |
- Canceling the timer setting |
21 |
Self-diagnosis function |
||
14 |
- Setting sleep mode |
21 |
Before requesting service |
||

BEFORE USE |
7 |
|
BEFORE USE
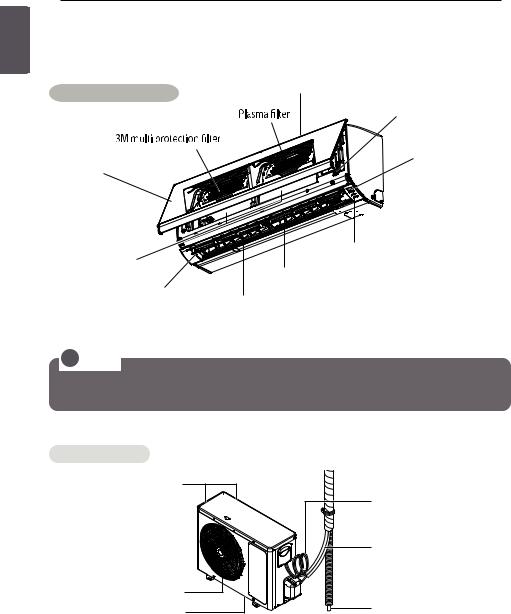
Components
Indoor unit
Front grille
3M micro-
(Optional)
Air outlet
|
(Optional) |
(Optional) |
Air inlet |
|
|
Dual Protection Filter |
ON/OFF button |
Plasmaster Ionizer(Optional)
 Operation lampSignal Receiver Horizontal vane
Vertical louver (Optional)
(Optional)
<![endif]>ENGLISH
*The feature can be changed according to type of model.
!NOTE
The number of operation lamps and their locations may vary, depending on the model of the air conditioner.
Outdoor unit
Air Inlet |
|
|
Connecting |
|
Wires |
|
Piping |
Air Outlet |
|
Base Plate |
Drain Hose |
|
* The feature can be changed according to type of model.
<![endif]>ENGLISH
8 BEFORE USE
BEFORE USE
Components
Indoor unit (Artcool) |
Air inlet |
|
(Optional) |
ON/OFF button |
|
|
(Optional) |
Signal Receiver |
|
Front grille


 Plasmaster Ionizer(Optional)
Operation lamp
Dual Protection Filter
Horizontal vane
Air outlet
Vertical louver (Optional)
*The feature can be changed according to type of model.
!NOTE
The number of operation lamps and their locations may vary, depending on the model of the air conditioner.
Outdoor unit
Air Inlet |
|
|
Connecting |
|
Wires |
|
Piping |
Air Outlet |
|
Base Plate |
Drain Hose |
|
* The feature can be changed according to type of model.

BEFORE USE 9
Using the remote control
You can operate the air conditioner more conveniently with the
buttons for the additional functions under the cover of the remote control.
Wireless remote control
Plasma Remote |
Non - Plasma Remote |
|
|
C |
|
|
C |
|
|
F |
|
Display |
F |
|
|
|
|
|
|
|
AM |
ON |
|
screen |
|
|
|
AM |
ON |
|
||
hr.PM |
OFF |
123 |
hr.PM |
OFF |
123 |
PLASMA |
E/SAVING |
A/CLEAN |
FAN |
E/SAVING |
A/CLEAN |
ON |
|
MODE |
|
ON |
|
MODE |
OFF |
|
|
OFF |
|
||
|
|
|
|
|
||
|
TEMP |
|
|
|
TEMP |
|
FAN |
|
JET |
|
FAN |
|
JET |
SPEED |
|
COOL |
Control |
SPEED |
|
COOL |
|
|
|
|
|
|
|
|
|
ROOM |
panel |
|
LIGHT |
ROOM |
SWING |
SWING |
TEMP |
|
SWING |
TEMP |
|
|
TIMER |
C/ F [5SEC] |
|
|
TIMER |
C/ F [5SEC] |
|
|
|
|
|
||
SLEEP |
ON |
OFF |
|
SLEEP |
ON |
OFF |
|
SET |
SET |
|
CLEAR |
CLEAR |
LIGHT |
TIME [3SEC] |
TIME [3SEC] |
|
|
Skin Care Remote
C
F
 Operation Mode
AM |
ON |
Cooling Operation |
hr.PM |
OFF 123 |
PLASMA |
SKIN |
A/CLEAN |
CARE |
||
|
|
MODE |
|
TEMP |
FAN |
JET |
SPEED |
COOL |
SWING |
SWING |
SAVING |
|
TIMER |
C/ F [5SEC] |
SLEEP |
ON |
OFF |
SET |
CLEAR |
LIGHT |
TIME [3SEC] ROOM TEMP |
Artificial Intelligence or Auto changeover
Healthy Dehumidification Operation
Air Circulation
•Plasma Remote, Skin Care Remote( ) Non - Plasma Remote(
 )
)
<![endif]>ENGLISH

<![endif]>HGLISHNE
10 BEFORE USE
Using the remote control
You can operate the air conditioner more conveniently with the  buttons for the additional functions under the cover of the remote control.
Control |
Display |
Description |
|
panel |
screen |
||
|
Plasma button* :
PLASMA moving particles that enter the indoor unit.
Air circulation button* : Used to circu- FAN late the room air without cooling or
heating.
SLEEP |
|
|
S leep mode auto button* : Sets the |
|
hr |
|
sleep mode auto operation. |
||
|
|
|||
|
|
|
Temperature adjustment buttons: Ad- |
|
|
|
C |
justs the room temperature when cool- |
|
|
|
|
|
|
|
|
|
ing and heating. |
|
OFF |
- |
|
On/Off button: |
|
ON |
|
|
|
|
FAN |
|
|
Indoor fan speed button: Adjusts the |
|
SPEED |
|
|
fan speed. |
|
|
|
|
Operation mode selection button* : Se- |
|
|
|
|
lects the operation mode. |
|
MODE |
|
|
Cooling operation ( |
) / Auto operation |
|
|
|
or auto changeover ( |
) / Dehumidify- |
|
|
|
ing operation ( ) /Air circulation( ) |
|
JET |
|
|
J et cooling/heating button* : Warms up |
|
|
|
or cools down the indoor temperature |
||
COOL |
|
|
||
|
|
|
within a short period of time. |
|
|
|
SKIN |
|
- |
Skin Care : keeps skin moisturized. |
|
|
|
CARE |
|
|||
SWING |
SWING |
|
|
Air flow direction button: Adjusts the air |
||
|
|
|
|
|||
|
|
|
|
|
Temperature display button: Displays |
|
|
ROOMTEMP |
|
|
the room temperature. |
||
|
|
|
|
|
||
|
ON |
OFF |
AM |
ON |
Timer button: Sets the current time and |
|
|
PM |
OFF |
the start / end time. |
|
||
|
|
|
|
|||
|
|
A/CLEAN |
|
|
Functions button* : Adjusts the time |
|
|
(Plasma & |
|
|
and sets the special functions. |
||
E/SAVING |
|
|
: Auto clean / |
: Operates energy |
||
Non plasma model) |
|
|
||||
SAVING |
(Skin care model) |
|
|
saving cooling / Adjusts the brightness |
||
|
(Plasma & |
|
|
of the indoor unit display |
||
|
Skin care model) |
|
- |
|
|
|
LIGHT |
|
|
|
|
|
|
LIGHT |
(Non plasma model) |
|
|
|
|
|
SET |
- |
S et/clear button: Sets or cancels func- |
CLEAR |
tions. |
|
|
|
-R eset button: Initialize the air conditioner settings.
* Some functions may not be supported, depending on the model.
BEFORE USE |
11 |
|
Inserting batteries
Insert batteries before using the remote control. The battery type used is AAA (1.5 V).
1 Remove the battery cover.
2Insert the new batteries and make sure that the + and - terminals of the batteries are installed correctly.
3Reattach the battery cover.
!NOTE
If the display screen of the remote control starts to fade, replace the batteries.
Installing the remote control holder
Install the holder where there is no direct sunlight to protect the remote control.
1 Choose a safe and easily-accessible place.
2 Fix the holder by fastening the 2 screws
3 Slide the remote control into the holder.
Operating method
Point the remote control towards the signal receiver at the bottom of the air conditioner to operate it.
!NOTE
•The remote control may operate other electronic devices if pointed towards them. Make sure to point the remote control towards the signal receiver of the air conditioner.
•For proper operation, use a soft cloth to clean the signal transmitter and receiver.
<![endif]>ENGLISH
<![endif]>ENGLISH
12 BASIC FUNCTIONS
BASIC FUNCTIONS
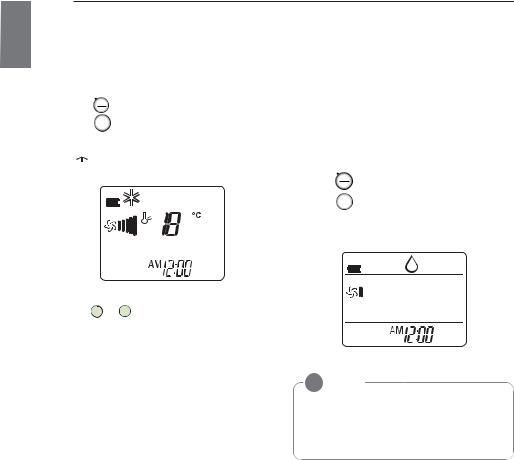
Cooling your room
(Cool ing operation)
1 |
Press |
ON |
to turn on the power. |
OFF |
2Press MODE repeatedly to select the cooling operation.
- 
 is displayed on the display screen.
3Press  or
or  to set the desired temperature.
-The temperature range is 18°C (64°F)- 30°C (86°F).
Removing humidity
(Dehumidifying operation)
This mode removes excess moisture from an environment with high humidity or in the rainy season, in order to prevent mold from setting in. This mode adjusts the room temperature and the fan speed automatically to maintain the optimal level of humidity.
1 |
Press |
ON |
to turn on the power. |
OFF |
2Press MODE repeatedly to select the dehumidifying operation.
-  is displayed on the display screen.
!NOTE
•In this mode you cannot adjust the room temperature, as it is adjusted automatically. Also, the room temperature is not displayed on the display screen.
BASIC FUNCTIONS |
13 |
|
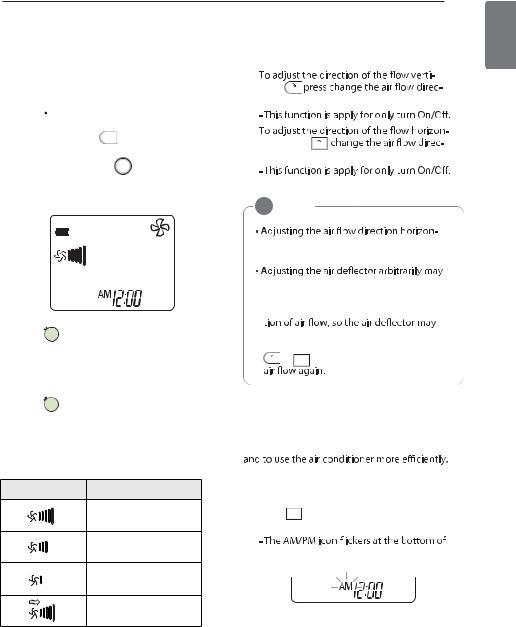
Airing your room
(Air Circulation operation)
This mode only circulates the indoor air without changing the room temperature. The cooling lamp lights up in air circulation mode. 1 Press to turn on the power.
2 Fan button : Press FAN |
turn on the air cuicu- |
lation operation. |
|
Mode button : Press |
MODE repeatedly to se- |
lect air circulation operation.
-  is displayed on the display screen.
3 Press |
SPEED |
to adjust the fan speed. |
|
FAN |
|
Adjusting the air flow direction
1
cally, SWING
tion automatically.
2
tally, press |
SWING |
tion automatically. |
|
! NOTE
tally may not be supported, depending on the model.
cause product failure.
•If you restart the air conditioner, it starts to operate with the previously set direc-
not match the icon displayed on the remote control. When this occurs, press SWING or SWING to adjust the direction of the
Adjusting the fan speed
1 Press |
SPEED |
repeatedly to adjust the fan |
|
FAN |
|
speed.
-Select  if you want natural air. The fan speed adjusts automatically.
Setting the timer
You can use the timer function to save energy
Remark |
Speed |
Setting the current time |
|||
|
High |
1 |
Press |
CLEAR |
and hold it for longer than 3 sec- |
|
|
|
|
SET |
|
|
|
|
onds. |
|
|
Medium |
the display screen. |
|
Low
Natural Wind
<![endif]>ENGLISH
14 BASIC FUNCTIONS
| <![if ! IE]> <![endif]>ENGLISH |
2 |
Press |
or |
to select the times. |
Canceling the timer setting |
|
|
3 |
Press |
SET |
|
SET |
|
|
|
CLEAR |
|
|
|
||||
|
|
|
|
|
Press CLEAR . |
|
|
|
|
|
|
|
- To cancel all timer settings, press |
CLEARSET |
. |
Turning on the air conditioner automatically at a set time
1 |
Press |
ON . |
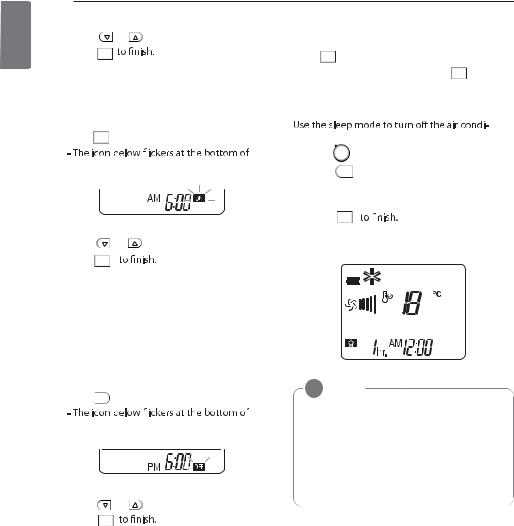
Setting sleep mode
tioner automatically when you go to sleep.
|
1 |
Press |
ON |
to turn on the power. |
the display screen. |
OFF |
|||
2 |
Press |
SLEEP |
||
3 Press  or
or 
 to select the hour (up to 7 hours).
4 |
Press |
SET |
CLEAR |
2 |
Press |
or |
to select the times. |
3 |
Press |
CLEARSET |
|
4 |
When setting the timer, current time and |
||
|
ON icon are displayed on the display |
||
|
screen indicating that the desired time is |
||
|
set. |
|
|
T tomatically at a set time
1 Press  OFF .
OFF .
-  is displayed on the display screen in sleep mode.
! NOTE
the display screen. |
|
|
|
|
In the Cooling and Dehumidifying modes, |
|
|
|
|
the temperature increases by 1°C(2°F) |
|
|
|
|
|
|
after 30 minutes and by a further |
|
|
|
|
|
1°C(2°F) after another 30 minutes for a |
|
|
|
|
|
more comfortable sleep. The temperature |
|
|
|
|||
|
|
|
|
|
increases with up to 2°C(4°F) from the |
|
|
|
|
|
preset temperature. |
2 |
Press |
or |
to select the times. |
3 |
Press |
SET |
|
CLEAR |
|
||
4 |
When setting the timer, current time and |
||
|
OFF icon are displayed on the display |
||
|
screen indicating that the desired time is |
||
|
set. |
|
|
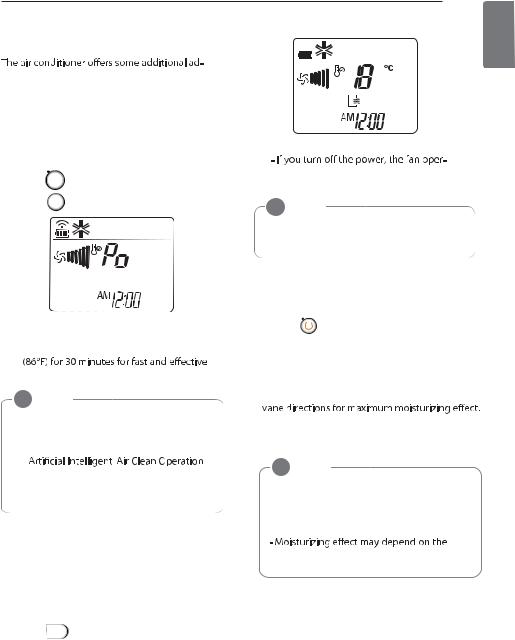
ADVANCED FUNCTIONS
vanced functions.
Changing room temperature quickly
(Jet Cool)
This mode allows you to cool indoor air quickly in summer or warm it quickly in winter.
1 |
Press |
OFF to turn on the power. |
|
|
|
ON |
|
2 |
Press |
COOL |
|
|
|
JET |
|
-In jet cooling mode, strong air blows out at a temperature of 18°C (64°F)- 30°C
cooling.
!NOTE
•Powerful Cooling
-C/O Model
Enable in Cooling/Dehumidifying/Fan/
•This function may not be supported, depending on the model.
Indoor air purification
Auto Clean operation
In the cooling and dehumidifying operations, moisture is generated inside the indoor unit. Use the auto cleaning function to remove such moisture.
1 Press  A/CLEAN .
ADVANCED FUNCTIONS |
15 |
|
<![endif]>ENGLISH
ates for 30 minutes and cleans the inside of the indoor unit.
! NOTE
Some buttons cannot be used while the auto cleaning function is in operation.
Skin Care Mode
Use the Skin Care mode to keeps skin moisturized.
1 |
Press |
|
|
to turn on the power. |
|
|
|
||||
|
|
||||
|
|
|
|
|
|
2 |
Press |
SKIN |
|
to enter the Skin Care mode |
|
CARE |
|
||||
|
|
|
|
|
|
-Nothing is going to change on the remote control display screen.
-This mode operates with high fan speed and setting However, temperature is not changed.
-In this mode, you can change the setting temperature, fan speed and vane directions.
!NOTE
-This function may not be supported, depending on the model.
-This function can be operated on Cooling mode, Fan Mode and Plasma mode
environment.
-  is displayed on the display screen.
 Loading...