


SN9YG

SIMPLE MANUAL
LG Wi-Fi
Sound Bar
Please read this manual carefully before operating your set and retain it for
future reference.
To view the instructions of advanced features, visit http://www.lg.com and
then download Owner’s Manual. Some of the content in this manual may differ
from your unit.
MODEL
SN9YG
www.lg.com
Copyright © 2020 LG Electronics Inc. All Rights Reserved.2001_Rev01
MFL71446098
ENGLISH
SN9YG.DCANLLK_SIMPLE_ENG_MFL71446098.indd 1 2020-02-27 8:24:27

Front Panel
Google Assistant LED
Microphone
1 (Standby) ············Switches the unit ON or OFF.
F (Function) ··························Selects function.
p/o (Volume)······················Adjusts volume.
N ········································ Play / pause
> (Mic mute)·········································
Enables and disables Voice recognition.
····················································
Standby and Stops feedback of Google Assistant.
Reset the Unit
Press and hold the > on the unit until you
hear the beep sound once.
Rear Panel
HDMI OUT (TV eARC/ARC) ······· Connect to a TV.
HDMI IN ··········Connect to device with HDMI OUT.
OPTICAL IN·············Connect to an optical device.
USB port ····················Connect to a USB device.
Make sure to properly align and connect
the optical cable; improper alignment may
cause damage to the jack.
Subwoofer Connection
Place the wireless subwoofer near the sound bar and
follow steps below.
a Connect the power cord of the sound bar and the
wireless subwoofer to the outlet.
b Turn on the sound bar.
• The sound bar and wireless subwoofer will be
automatically connected. The subwoofer's
green LED turns on.
Manually Subwoofer Connection
If the subwoofer does not make sound, try to
connect manually.
a Press Pairing on the rear of the wireless
subwoofer.
• The green LED on the rear of the wireless
subwoofer blinks quickly.
(If the green LED does not blink, press and
hold the Pairing.)
b Turn on the sound bar.
• Pairing is completed. The green LED on the
rear of the wireless subwoofer turns on.
Keep the sound bar and the subwoofer
away from the device (ex. wireless router,
microwave oven, etc.) over 1 m (3.3 ft) to
prevent wireless interference.
!
1 m
(3.3 ft)
SN9YG.DCANLLK_SIMPLE_ENG_MFL71446098.indd 2 2020-02-27 8:24:28
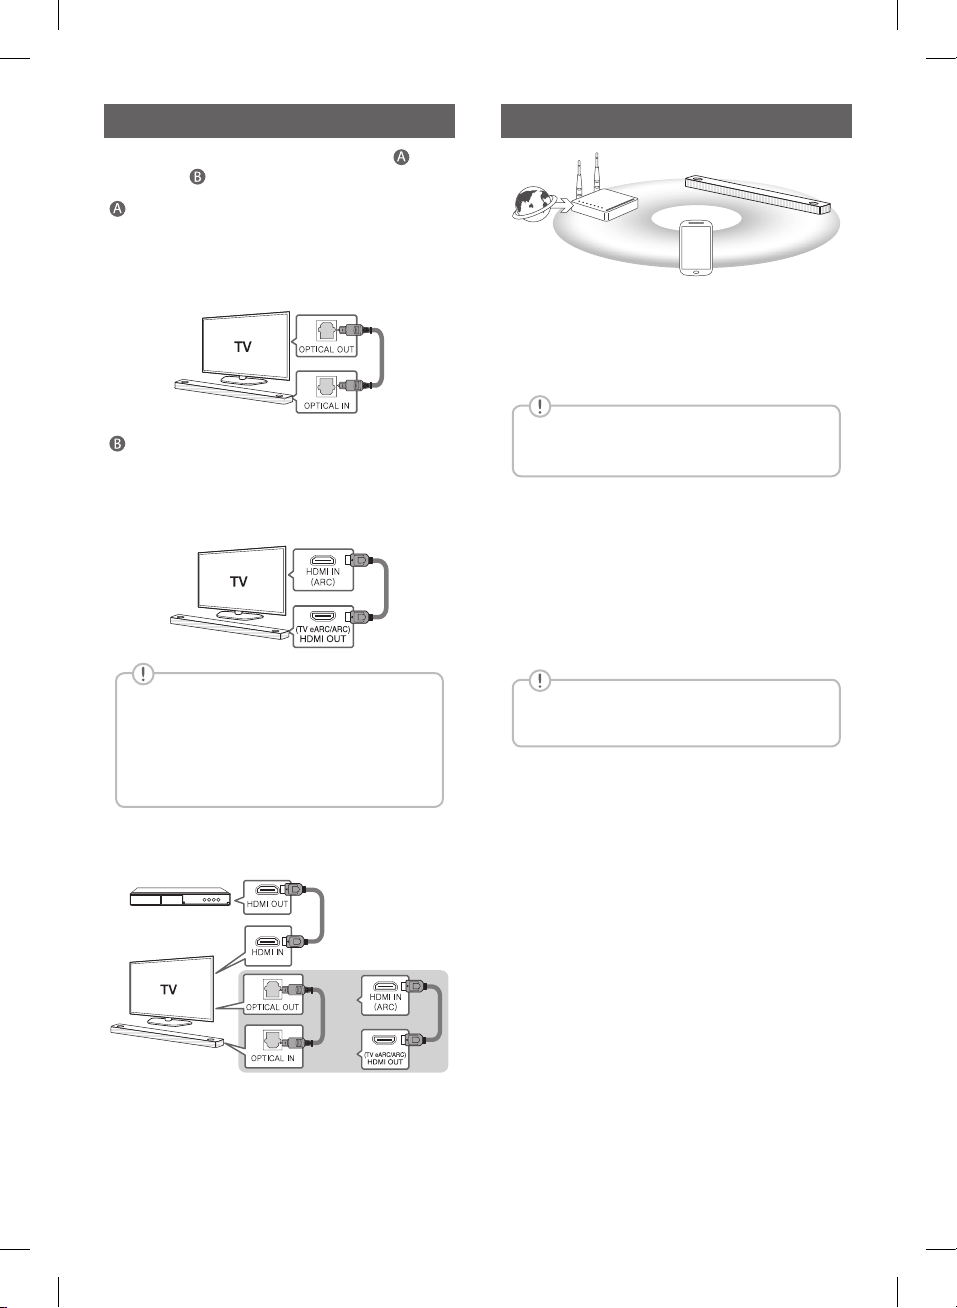
TV Connection
Connect the sound bar and TV using Optical ( ) or
HDMI ARC ( ).
Optical Connection
a Connect the sound bar to the TV using Optical
cable.
b Set up [External Speaker (Optical)] on your TV
setting menu.
HDMI (TV eARC/ARC) Connection
a Connect the sound bar to the TV using HDMI
cable.
b Set up [External Speaker (HDMI ARC)] on your
TV setting menu.
• HDMI connection is unavailable if your TV
does not support HDMI ARC.
• If this unit is connected by OPTICAL and
ARC at the same time, the ARC signal has
a higher priority.
Additional Device Connection
a Connect to the external device like as follow.
(Set-top Box,
Player etc.)
OR
b Set the input source by pressing F repeatedly.
Network Connection
a
b
c
a Check network condition. A router connected to
network should be installed.
b Connect your smart device to your home
network.
c Connect the sound bar to the power supply.
All devices should be connected to same
router.
Step.1 Install “Google Home” App
Download the Google Home App from the Google
Play or App Store.
Step.2 Set up the Wi-Fi connection with
app
a Connect your smart device to the Wi-Fi network
that you’ll use for your unit.
In case of iOS devices, it should be turned
on Bluetooth setting on your smart device.
b Launch the “Google Home” app.
c Follow the steps for Wi-Fi connection on the app.
• When the unit is properly connected to Wi-Fi,
“CONNECTED” will appear on the display
window with sound.
SN9YG.DCANLLK_SIMPLE_ENG_MFL71446098.indd 3 2020-02-27 8:24:29
 Loading...