Kyocera FS-C5030N, FS-C5025N, FS-C5015N, FS-C5020N Manual

FS-C5015N/FS-C5025N
FS-C5030N
Clearing Paper Jams
If the paper jammed in the paper transport system, or no paper sheets were fed at all, the Paper jam message appears and the location of the paper jam (the component where the paper jam has occurred) is also indicated. The printer automatically goes offline when this message is displayed. Remove jammed paper. After removing jammed paper, the printer will re-start printing.
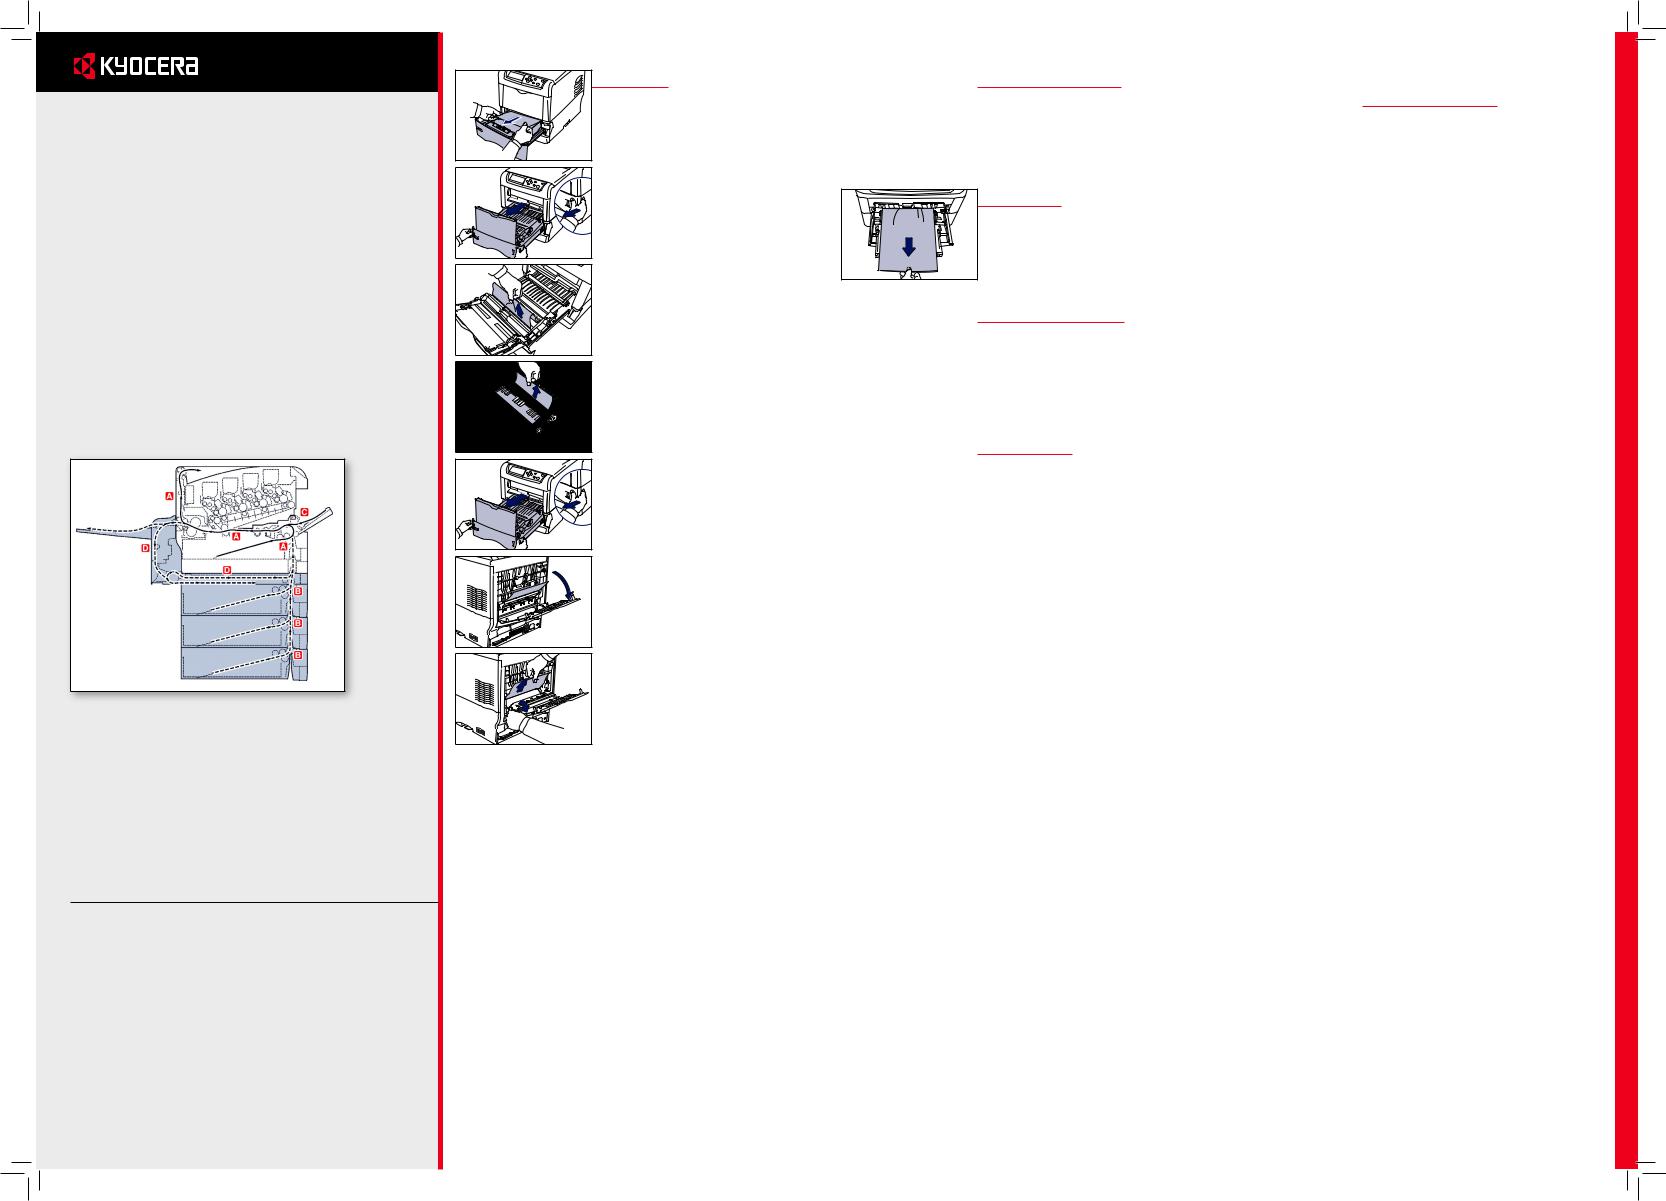
Possible Paper Jam Locations
The fi gure below explains the printer’s paper paths including the options. The locations where paper jams might occur are also shown here, with each location explained in the table below. Paper jams can occur in more than one component on the paper paths.
Face-up Tray
PT-300/PT-301
Duplex Unit
DU-301
Paper
Feeder
PF-60
Message |
Location |
Description |
|
|
|
Paper jam |
A |
Paper is jammed at paper cassette 1 |
Printer |
|
or inside the printer. |
|
|
|
Paper jam |
B |
Paper is jammed at the optional paper |
Cassette 2 (to 4) |
|
feeder’s cassette. |
|
|
|
Paper jam |
C |
Paper is jammed at the MP tray or |
MP Tray |
|
optional envelope feeder (if installed). |
EF |
|
|
|
|
|
Paper jam |
D |
Paper is jammed inside the rear cover |
Duplexer |
|
of the optional duplexer or at the |
|
|
duplexer drawer. |
Utilizing Online Help Messages
Online help messages are available in the printer’s message display to provide simple instructions for clearing jams. Press ( ) when the paper jam message has appeared. Then a help message will appear to facilitate jam clearing in the location.
A Printer
Pull out the paper cassette and remove the jammed paper.
While pulling the green paper transfer unit release lever, pull out the paper
transfer unit.
If paper is jammed as shown in A, remove the paper by pulling the center up.
If paper is jammed as shown in B, remove the paper by pulling the edge.
Open the rear cover and then the fuser cover, and remove the jammed paper.
Note If the optional face-up tray is installed on the printer, remove that tray first before attempting to remove the jammed paper.
CAUTION The fuser unit inside the printer is hot. Do not touch it with your hands as it may result in burn injury. Remove jammed paper carefully.
Push the paper transfer unit back in and close the fuser cover and rear cover.
B Cassette 2 (to 4)
Paper is jammed at optional paper cassette 2 (to 4). Refer to the Operation Guide for the optional paper cassette and remove the jammed paper.
C MP Tray
Remove the paper jammed at the MP tray.
Open and close the paper transfer unit (the paper jam error will be reset).
C Envelope Feeder
Paper is jammed at the optional envelope feeder. Remove the jammed paper using the same procedure as for a jam at the MP Tray. Then, open and close the paper transfer unit.
D Duplexer
Paper is jammed inside the rear cover of the optional duplexer or at the duplexer drawer. Refer to the Operation Guide for the duplexer and remove the jammed paper.
General considerations for clearing jams
CAUTION When pulling the paper, pull it gently so as not to tear it. Torn pieces of paper are difficult to remove and may be easily overlooked, deterring the jam recovery.
•If paper jams occur frequently, try using a different type of paper, replace the paper with paper from another ream, flip the paper stack over, or rotate the paper stack 180 degrees. The printer may have problems if paper jams recur after the paper was replaced.
•Whether or not the jammed pages are reproduced normally after printing is resumed depends on the location of the paper jam.
•CAUTION Never use sharp tools like knifes, screwdrivers or cutters to clear paperjams. Be aware of rings or watches as well.
•CAUTION Do no store paperclips or staples on any device.
 Loading...