


 Loading...
Kyocera FS-C5016N, KM-2560, KM-3530, KM-4230, FS-9530DN Manual
...
KX Driver
User Guide
Legal Notes
Unauthorized reproduction of all or part of this guide is prohibited.
The information in this guide is subject to change for improvement without notice.
We cannot be held liable for any problems arising from the use of this product, regardless of the information herein.
Regarding Trademarks
•PCL is a registered trademark of Hewlett-Packard Company.
•Microsoft Windows is a registered trademark of Microsoft Corporation in the U.S. and/or other countries.
•PostScript is either a registered trademark or trademark of Adobe Systems Incorporated in the U.S. and/or other countries.
•TrueType is a registered trademark of Apple Computer Inc.
•All other brand and product names herein are registered trademarks or trademarks of their respective companies.
Examples of the operations given in this guide support the Microsoft Windows XP printing environment. Essentially the same operations are used for Microsoft Windows 2000/Vista environments.
Models supported by the KX printer driver
FS-820 |
KM-C2520 |
FS-920 |
KM-C3225 |
FS-1118MFP |
KM-C3232 |
FS-1030D |
KM-C4008 |
FS-2000D |
KM-C4035E |
FS-3900DN |
KM-C3232E |
FS-4000DN |
KM-C3225E |
FS-6950DN |
KM-C2525E |
FS-9130DN |
FS-1010 |
FS-9530DN |
FS-1018MFP |
FS-C5015N |
FS-1020D |
FS-C5020N |
FS-1050 |
FS-C5025N |
FS-1100* |
FS-C5030N |
FS-1300D* |
FS-C8100DN |
FS-1800 |
KM-1820 |
FS-1800+ |
KM-2540* |
FS-1900 |
KM-2560* |
FS-1920 |
KM-3040* |
FS-3800 |
KM-3050* |
FS-3800KPDL3 |
KM-3060* |
FS-3820N |
KM-4050 * |
FS-3830N |
KM-5050 * |
FS-C5016N |
KM-6030 |
FS-6020 |
KM-8030 |
FS-6026 |
*Not supported in Windows 95/98/Me or Windows NT.
FS-C8008N |
CS-1820 |
FS-C8026N |
CS-2560 |
FS-9100DN |
CS-3050 |
FS-9120DN |
CS-3060 |
FS-9500DN |
CS-4050 |
FS-9520DN |
CS-5050 |
KM-1530 |
CS-6030 |
KM-1650 |
CS-8030 |
KM-1815 |
CS-C2520 |
KM-2030 |
CS-C3225 |
KM-2050 |
CS-C3232 |
KM-2530 |
CS-C4008 |
KM-2550 |
CS-C4035E |
KM-3035 |
CS-C3232E |
KM-3530 |
CS-C3225E |
KM-4030 |
CS-C2525E |
KM-4035 |
CS-1650 |
KM-4530 |
CS-2050 |
KM-5035 |
CS-2550 |
KM-5530 |
EP 370DN* |
KM-6330 |
EP 470DN* |
KM-7530 |
EP 510DN* |
KM-C830 |
EP C170N* |
KM-C850 |
EP C220N* |
KM-C2630 |
EP 270N* |
|
EP 320DN* |
The explanatory screens shown in this guide may differ from your printing system.
Copyright © 2007 KYOCERA Corporation
Copyright © 2007 Revised Edition KYOCERA MITA Corporation All rights reserved.
TC Rev. 5.9

Table of Contents
Chapter 1 Installation
Express Installation . . . . . . . . . . . . . . . . . . . . . . . . . . . . . . . . . . . . . . . . . . . . . . . . . . . . . 1-2
Windows XP and Vista - Express Installation . . . . . . . . . . . . . . . . . . . . . . . . . . . . . . .1-2
Custom Installation. . . . . . . . . . . . . . . . . . . . . . . . . . . . . . . . . . . . . . . . . . . . . . . . . . . . . . 1-2
Vista - Custom Installation . . . . . . . . . . . . . . . . . . . . . . . . . . . . . . . . . . . . . . . . . . . . .1-3
Windows XP - USB, Custom . . . . . . . . . . . . . . . . . . . . . . . . . . . . . . . . . . . . . . . . . . .1-3
Windows XP - Parallel Port (LPT) . . . . . . . . . . . . . . . . . . . . . . . . . . . . . . . . . . . . . . .1-4
Windows XP - Network Connection, Custom . . . . . . . . . . . . . . . . . . . . . . . . . . . . . . .1-4
Installing Optional Components . . . . . . . . . . . . . . . . . . . . . . . . . . . . . . . . . . . . . . . . . . . . 1-5
Product Library CD . . . . . . . . . . . . . . . . . . . . . . . . . . . . . . . . . . . . . . . . . . . . . . . . . . . . . |
1-6 |
Installing using the Add Printer Wizard . . . . . . . . . . . . . . . . . . . . . . . . . . . . . . . . . . . . . . 1-6
Chapter 2 Printer Properties
Accessing Printer Properties . . . . . . . . . . . . . . . . . . . . . . . . . . . . . . . . . . . . . . . . . . . . . . 2-1
Installing Optional Devices. . . . . . . . . . . . . . . . . . . . . . . . . . . . . . . . . . . . . . . . . . . . . . . . 2-1
Auto Configure . . . . . . . . . . . . . . . . . . . . . . . . . . . . . . . . . . . . . . . . . . . . . . . . . . . . . .2-1
Device Options . . . . . . . . . . . . . . . . . . . . . . . . . . . . . . . . . . . . . . . . . . . . . . . . . . . . . .2-2
Punch Unit Settings . . . . . . . . . . . . . . . . . . . . . . . . . . . . . . . . . . . . . . . . . . . . . . . . . .2-3
Assigning Custom Boxes . . . . . . . . . . . . . . . . . . . . . . . . . . . . . . . . . . . . . . . . . . . . . .2-4
User Settings . . . . . . . . . . . . . . . . . . . . . . . . . . . . . . . . . . . . . . . . . . . . . . . . . . . . . . . . . . 2-4
Identification . . . . . . . . . . . . . . . . . . . . . . . . . . . . . . . . . . . . . . . . . . . . . . . . . . . . . . . .2-4
Unit of Measurement . . . . . . . . . . . . . . . . . . . . . . . . . . . . . . . . . . . . . . . . . . . . . . . . .2-4
Language Preference Selection . . . . . . . . . . . . . . . . . . . . . . . . . . . . . . . . . . . . . . . . .2-5
Page Description Language (PDL) . . . . . . . . . . . . . . . . . . . . . . . . . . . . . . . . . . . . . . . . . 2-5
PDL Settings . . . . . . . . . . . . . . . . . . . . . . . . . . . . . . . . . . . . . . . . . . . . . . . . . . . . . . . .2-5
Administrator Settings . . . . . . . . . . . . . . . . . . . . . . . . . . . . . . . . . . . . . . . . . . . . . . . . . . . 2-9
User Login . . . . . . . . . . . . . . . . . . . . . . . . . . . . . . . . . . . . . . . . . . . . . . . . . . . . . . . . .2-9
Job Accounting . . . . . . . . . . . . . . . . . . . . . . . . . . . . . . . . . . . . . . . . . . . . . . . . . . . . . .2-11
Administrator Password . . . . . . . . . . . . . . . . . . . . . . . . . . . . . . . . . . . . . . . . . . . . . . .2-12
Compatibility Settings. . . . . . . . . . . . . . . . . . . . . . . . . . . . . . . . . . . . . . . . . . . . . . . . . . . . 2-12
Chapter 3 Printing Basics
Basic Printing Tasks. . . . . . . . . . . . . . . . . . . . . . . . . . . . . . . . . . . . . . . . . . . . . . . . . . . . . 3-1 Basic Printing . . . . . . . . . . . . . . . . . . . . . . . . . . . . . . . . . . . . . . . . . . . . . . . . . . . . . . .3-1 Printing on Paper of Non-Standard Sizes . . . . . . . . . . . . . . . . . . . . . . . . . . . . . . . . . . . . 3-4 Custom Paper Sizes . . . . . . . . . . . . . . . . . . . . . . . . . . . . . . . . . . . . . . . . . . . . . . . . . .3-5 Duplex Printing. . . . . . . . . . . . . . . . . . . . . . . . . . . . . . . . . . . . . . . . . . . . . . . . . . . . . . . . . 3-6 Print on Both Sides . . . . . . . . . . . . . . . . . . . . . . . . . . . . . . . . . . . . . . . . . . . . . . . . . . .3-6 Reverse Order Printing . . . . . . . . . . . . . . . . . . . . . . . . . . . . . . . . . . . . . . . . . . . . . . . . . . 3-7 Collating Modes . . . . . . . . . . . . . . . . . . . . . . . . . . . . . . . . . . . . . . . . . . . . . . . . . . . . . . . . 3-8 Sorter Modes . . . . . . . . . . . . . . . . . . . . . . . . . . . . . . . . . . . . . . . . . . . . . . . . . . . . . . .3-9
i

Chapter 4 Layout
Booklet . . . . . . . . . . . . . . . . . . . . . . . . . . . . . . . . . . . . . . . . . . . . . . . . . . . . . . . . . . . . . . . 4-1
Left Edge and Right Edge Binding . . . . . . . . . . . . . . . . . . . . . . . . . . . . . . . . . . . . . . .4-1
Booklet Printing . . . . . . . . . . . . . . . . . . . . . . . . . . . . . . . . . . . . . . . . . . . . . . . . . . . . .4-2
Multiple Pages Per Sheet. . . . . . . . . . . . . . . . . . . . . . . . . . . . . . . . . . . . . . . . . . . . . . . . . 4-3
Poster. . . . . . . . . . . . . . . . . . . . . . . . . . . . . . . . . . . . . . . . . . . . . . . . . . . . . . . . . . . . . . . . 4-3
Sheets Per Page . . . . . . . . . . . . . . . . . . . . . . . . . . . . . . . . . . . . . . . . . . . . . . . . . . . . .4-4
Available Poster Sizes . . . . . . . . . . . . . . . . . . . . . . . . . . . . . . . . . . . . . . . . . . . . . . . .4-4
Scaling . . . . . . . . . . . . . . . . . . . . . . . . . . . . . . . . . . . . . . . . . . . . . . . . . . . . . . . . . . . . . . . 4-6
Scaling . . . . . . . . . . . . . . . . . . . . . . . . . . . . . . . . . . . . . . . . . . . . . . . . . . . . . . . . . . . .4-6
Chapter 5 Finishing
Finishing Edge . . . . . . . . . . . . . . . . . . . . . . . . . . . . . . . . . . . . . . . . . . . . . . . . . . . . . . . . . 5-1
Gutter . . . . . . . . . . . . . . . . . . . . . . . . . . . . . . . . . . . . . . . . . . . . . . . . . . . . . . . . . . . . .5-4
Staple . . . . . . . . . . . . . . . . . . . . . . . . . . . . . . . . . . . . . . . . . . . . . . . . . . . . . . . . . . . . . . . . 5-4
Using the Stapler . . . . . . . . . . . . . . . . . . . . . . . . . . . . . . . . . . . . . . . . . . . . . . . . . . . .5-5
Punch . . . . . . . . . . . . . . . . . . . . . . . . . . . . . . . . . . . . . . . . . . . . . . . . . . . . . . . . . . . . . . . . 5-6
Using Hole Punch . . . . . . . . . . . . . . . . . . . . . . . . . . . . . . . . . . . . . . . . . . . . . . . . . . . .5-6
Separation . . . . . . . . . . . . . . . . . . . . . . . . . . . . . . . . . . . . . . . . . . . . . . . . . . . . . . . . . . . . 5-7
Rotate Copies . . . . . . . . . . . . . . . . . . . . . . . . . . . . . . . . . . . . . . . . . . . . . . . . . . . . . . .5-7
Offset Jobs . . . . . . . . . . . . . . . . . . . . . . . . . . . . . . . . . . . . . . . . . . . . . . . . . . . . . . . . .5-7
Chapter 6 Imaging
Print Quality . . . . . . . . . . . . . . . . . . . . . . . . . . . . . . . . . . . . . . . . . . . . . . . . . . . . . . . . . . . 6-1
Custom Print Quality Settings . . . . . . . . . . . . . . . . . . . . . . . . . . . . . . . . . . . . . . . . . . .6-2
EcoPrint . . . . . . . . . . . . . . . . . . . . . . . . . . . . . . . . . . . . . . . . . . . . . . . . . . . . . . . . . . . . . . 6-2
Fonts . . . . . . . . . . . . . . . . . . . . . . . . . . . . . . . . . . . . . . . . . . . . . . . . . . . . . . . . . . . . . . . . 6-2
Font Substitution . . . . . . . . . . . . . . . . . . . . . . . . . . . . . . . . . . . . . . . . . . . . . . . . . . . . .6-4
Disable Device Fonts . . . . . . . . . . . . . . . . . . . . . . . . . . . . . . . . . . . . . . . . . . . . . . . . .6-4
Graphics. . . . . . . . . . . . . . . . . . . . . . . . . . . . . . . . . . . . . . . . . . . . . . . . . . . . . . . . . . . . . . 6-4
Pattern Scaling . . . . . . . . . . . . . . . . . . . . . . . . . . . . . . . . . . . . . . . . . . . . . . . . . . . . . .6-5
Inversion Options . . . . . . . . . . . . . . . . . . . . . . . . . . . . . . . . . . . . . . . . . . . . . . . . . . . .6-5
Optimization . . . . . . . . . . . . . . . . . . . . . . . . . . . . . . . . . . . . . . . . . . . . . . . . . . . . . . . .6-5
Halftone Screen . . . . . . . . . . . . . . . . . . . . . . . . . . . . . . . . . . . . . . . . . . . . . . . . . . . . .6-6
Grayscale . . . . . . . . . . . . . . . . . . . . . . . . . . . . . . . . . . . . . . . . . . . . . . . . . . . . . . . . . .6-7
Chapter 7 Publishing
Printing with Covers . . . . . . . . . . . . . . . . . . . . . . . . . . . . . . . . . . . . . . . . . . . . . . . . . . . . . 7-1 Cover Printing Options . . . . . . . . . . . . . . . . . . . . . . . . . . . . . . . . . . . . . . . . . . . . . . . .7-2 Edit Cover Printing Options . . . . . . . . . . . . . . . . . . . . . . . . . . . . . . . . . . . . . . . . . . . .7-4 Page Insert. . . . . . . . . . . . . . . . . . . . . . . . . . . . . . . . . . . . . . . . . . . . . . . . . . . . . . . . . . . . 7-4 Insert Page Printing . . . . . . . . . . . . . . . . . . . . . . . . . . . . . . . . . . . . . . . . . . . . . . . . . .7-5 Combinations . . . . . . . . . . . . . . . . . . . . . . . . . . . . . . . . . . . . . . . . . . . . . . . . . . . . . . .7-6 Transparency Interleaving . . . . . . . . . . . . . . . . . . . . . . . . . . . . . . . . . . . . . . . . . . . . . . . . 7-6
Chapter 8 Job
Job Storage (e-MPS) . . . . . . . . . . . . . . . . . . . . . . . . . . . . . . . . . . . . . . . . . . . . . . . . . . . . 8-1
Custom Box . . . . . . . . . . . . . . . . . . . . . . . . . . . . . . . . . . . . . . . . . . . . . . . . . . . . . . . .8-2
Quick Copy . . . . . . . . . . . . . . . . . . . . . . . . . . . . . . . . . . . . . . . . . . . . . . . . . . . . . . . . .8-7
Proof and Hold . . . . . . . . . . . . . . . . . . . . . . . . . . . . . . . . . . . . . . . . . . . . . . . . . . . . . .8-8
ii

Private Print . . . . . . . . . . . . . . . . . . . . . . . . . . . . . . . . . . . . . . . . . . . . . . . . . . . . . . . .8-9
Job Storage . . . . . . . . . . . . . . . . . . . . . . . . . . . . . . . . . . . . . . . . . . . . . . . . . . . . . . . .8-10
Job Name. . . . . . . . . . . . . . . . . . . . . . . . . . . . . . . . . . . . . . . . . . . . . . . . . . . . . . . . . . . . . 8-11
Chapter 9 Advanced
Prologue/Epilogue . . . . . . . . . . . . . . . . . . . . . . . . . . . . . . . . . . . . . . . . . . . . . . . . . . . . . . |
9-1 |
Select Prologue/Epilogue File to Insert . . . . . . . . . . . . . . . . . . . . . . . . . . . . . . . . . . . |
9-2 |
Add . . . . . . . . . . . . . . . . . . . . . . . . . . . . . . . . . . . . . . . . . . . . . . . . . . . . . . . . . . . . . . . |
9-2 |
Edit . . . . . . . . . . . . . . . . . . . . . . . . . . . . . . . . . . . . . . . . . . . . . . . . . . . . . . . . . . . . . . . |
9-2 |
Delete . . . . . . . . . . . . . . . . . . . . . . . . . . . . . . . . . . . . . . . . . . . . . . . . . . . . . . . . . . . . . |
9-2 |
Insertion Point . . . . . . . . . . . . . . . . . . . . . . . . . . . . . . . . . . . . . . . . . . . . . . . . . . . . . . . |
9-3 |
Watermark . . . . . . . . . . . . . . . . . . . . . . . . . . . . . . . . . . . . . . . . . . . . . . . . . . . . . . . . . . . . |
9-4 |
Select Watermark . . . . . . . . . . . . . . . . . . . . . . . . . . . . . . . . . . . . . . . . . . . . . . . . . . . .9-4 Page selection . . . . . . . . . . . . . . . . . . . . . . . . . . . . . . . . . . . . . . . . . . . . . . . . . . . . . .9-4 Add Watermark . . . . . . . . . . . . . . . . . . . . . . . . . . . . . . . . . . . . . . . . . . . . . . . . . . . . . .9-5 Additional Text Options . . . . . . . . . . . . . . . . . . . . . . . . . . . . . . . . . . . . . . . . . . . . . . . .9-5 Edit Watermark . . . . . . . . . . . . . . . . . . . . . . . . . . . . . . . . . . . . . . . . . . . . . . . . . . . . . .9-7 Delete Watermark . . . . . . . . . . . . . . . . . . . . . . . . . . . . . . . . . . . . . . . . . . . . . . . . . . . .9-7
Security Watermark . . . . . . . . . . . . . . . . . . . . . . . . . . . . . . . . . . . . . . . . . . . . . . . . . . . . . 9-7 Select Security Watermark . . . . . . . . . . . . . . . . . . . . . . . . . . . . . . . . . . . . . . . . . . . . .9-9 Page Selection . . . . . . . . . . . . . . . . . . . . . . . . . . . . . . . . . . . . . . . . . . . . . . . . . . . . . .9-9 Add Security Watermark . . . . . . . . . . . . . . . . . . . . . . . . . . . . . . . . . . . . . . . . . . . . . . .9-10 Additional Options . . . . . . . . . . . . . . . . . . . . . . . . . . . . . . . . . . . . . . . . . . . . . . . . . . .9-11 Edit Security Watermark . . . . . . . . . . . . . . . . . . . . . . . . . . . . . . . . . . . . . . . . . . . . . . .9-13 Delete Security Watermark . . . . . . . . . . . . . . . . . . . . . . . . . . . . . . . . . . . . . . . . . . . . .9-14
Security Settings . . . . . . . . . . . . . . . . . . . . . . . . . . . . . . . . . . . . . . . . . . . . . . . . . . . . . . . |
9-14 |
Security Watermark in Security Settings . . . . . . . . . . . . . . . . . . . . . . . . . . . . . . . . . . |
9-14 |
PrintID Tracker . . . . . . . . . . . . . . . . . . . . . . . . . . . . . . . . . . . . . . . . . . . . . . . . . . . . . . |
9-14 |
Lock PrintID Tracker . . . . . . . . . . . . . . . . . . . . . . . . . . . . . . . . . . . . . . . . . . . . . . . . . . |
9-16 |
Enable Client Profile. . . . . . . . . . . . . . . . . . . . . . . . . . . . . . . . . . . . . . . . . . . . . . . . . . . . . |
9-17 |
EMF Spooling. . . . . . . . . . . . . . . . . . . . . . . . . . . . . . . . . . . . . . . . . . . . . . . . . . . . . . . . . . |
9-18 |
Chapter 10 Profile
Add Profile . . . . . . . . . . . . . . . . . . . . . . . . . . . . . . . . . . . . . . . . . . . . . . . . . . . . . . . .10-1
Edit Profile . . . . . . . . . . . . . . . . . . . . . . . . . . . . . . . . . . . . . . . . . . . . . . . . . . . . . . . .10-2
Delete Profile . . . . . . . . . . . . . . . . . . . . . . . . . . . . . . . . . . . . . . . . . . . . . . . . . . . . . .10-3
Import and Export Profile . . . . . . . . . . . . . . . . . . . . . . . . . . . . . . . . . . . . . . . . . . . . .10-3
Glossary
Index
iii

Installation
1 Installation
1
2
A printer driver is an application that sends documents to a printer and manages communication between a printer and your computer. Install the printer driver from the supplied Product Library CD-ROM. Once installed, a variety of printer settings can be configured.
Note: In Windows XP, Windows Vista, and Windows 2000, you must be logged in with administrator rights to install the KX Driver. If you connect the Universal Serial Bus (USB) cable before CD installation, it is strongly recommended that you cancel the Found New Hardware Wizard and install the software through the CD menu. Browsing the CD and installing each driver separately is not recommended.
Turn off the power for the computer and printer.
Ensure that the printer is ready to print (remove packing materials, insert paper and any toner or ink cartridges), then connect the computer and printer using either USB, a parallel cable, or a network cable. For further details on connecting the printer to the computer, refer to the printer’s Operation Guide.
3 Once connected, power on both devices.
If the Windows Found New Hardware Wizard appears, click Cancel.
4 Insert the Product Library CD-ROM into the CD drive. After the installation program starts the Main Menu appears.
Note: If the Product Library Software Installation Wizard fails to start after inserting the CD-ROM into the CD drive, explore the CD drive, and double-click
Setup.exe.
5
6
7
8
Click View License Agreement to read the License Agreement.
Click Accept to proceed.
To begin installation, click Install Software.
The Software Installation Wizard appears. Click Next.
The installation differs depending on your operating system and connection method. Select your operating system and connection method from the list below and proceed to the referenced page to continue the installation.
Windows XP and Vista - Express Installation on page 1-2 Vista - Custom Installation on page 1-3
Windows XP - USB, Custom on page 1-3 Windows XP - Parallel Port (LPT) on page 1-4
Windows XP - Network Connection, Custom on page 1-4
1-1 |
KX Driver |

Windows XP and Vista - Express Installation |
Installation |
Note: KPrint installs a client port monitor that enables Windows TCP/IP printing to any network card connected to Kyocera printing systems. KPrint supports LPR and IPP printing. For the KPrint Installation instructions, refer to your CD. KPrint is now a standalone installer.
Express Installation
Express mode is for a Universal Serial Bus (USB) or network connection only. The installer can find the printer if it is turned on and connected by USB or network cable. For the simple, default installation, select Express Mode Installation. In the Custom method you are able to choose which software packages to install and specify the port. To use the Custom method, see Custom Installation on page 1-2.
Windows XP and Vista - Express Installation
|
In Windows Vista the installation dialog boxes have a slightly different appearance, |
|
but the steps are the same. |
1 |
For the simple, default connection select Express Mode and then click Next. |
|
After you select Express Mode and click Next, Discover Printing System opens |
|
and looks for your printer. If Discovery does not find your printing system, ensure that |
|
it is properly connected by USB or network cable and that it is turned on, and then |
|
retry Discovery. |
2 |
At the Discover Printing System page, select the printing system you would like to |
|
install and click Next. |
|
|
|
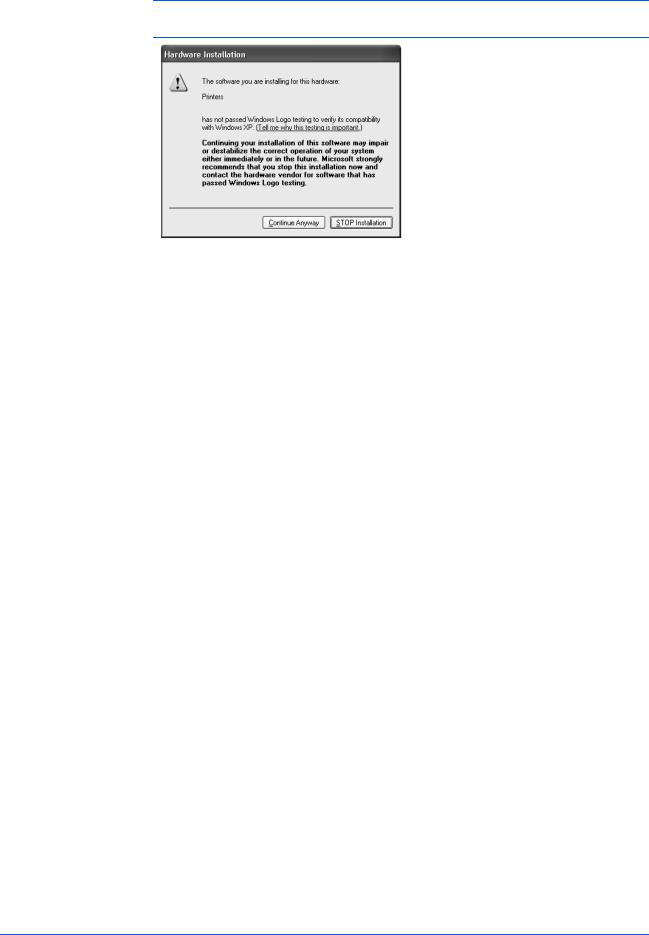
Note: If the Found New Hardware Wizard appears, click Cancel. If the Hardware |
|
Installation warning dialog box appears, click Continue Anyway. |
3 |
In Printer Settings you can assign a name to the printing system. This is the name |
that appears in Windows Printers and Faxes and in the printer lists in applications. You can also choose to share this printer with others or set this printer as the default printer. Make your selection from the following choices, and then click Next.
4
5
•Share your printers with others
•Set the printer system as the default
In the Confirm Settings page, click Install if the settings are correct. Click Cancel to correct the settings.
The Printer Installed Successfully screen appears. Click Finish to exit the Printer Installation Wizard and return to the CD-ROM main menu.
The installation of the printer is now complete. If prompted, restart your system.
Custom Installation
When using the Custom method you can specify the printer port and choose which software packages to install. For example, if you do not want to overwrite your existing fonts, choose the Custom mode and then clear Fonts in the Custom Installation page (shown in step 2 on page 1-4).
User Guide |
1-2 |

Installation |
Vista - Custom Installation |
Vista - Custom Installation
1
2
3
In the Installation Method page, select a custom installation then click Next.
In the Custom Installation page, ensure that the KX Driver is selected as the product and then click Next.
The Discover Printing System page appears.
To find a printing system already turned on and connected to the network, click Discover. and go to step 4 on page 1-3.
-OR-
To manually select your printing system and port select Custom select and then click Next.
4 |
The Printer Port page appears. If the port you want to use appears in the Port name |
|
list, select it and click Next, then go to step 4 on page 1-3. |
|
To create a new port, click Add Port and then click Next. The Add Port Wizard page |
|
appears. |
Add Port Wizard in Vista |
|
1 |
At the Welcome page, ensure that the printing device is on and connected to the |
|
network, then click Next. |
2 |
Type the printer name or IP address and then click Next. |
3 |
After the port has been created, the Completing the Add Standard TCP/P Printer |
|
Port Wizard page shown below appears. Click Finish to close the Add Port Wizard |
page and return to the installation wizard.
Vista Custom Installation, continued from page 1-3
4
5
The Printing System page appears. From the list, select the Printing System to install, and click Next.
In Printer Settings you can create a custom name to the printing system. This name appears in Windows Printers and Faxes and in the printer lists in applications. You can also choose to share this printer with others or set this printer as the default printer. Make your selections and then click Next.
6
7
In the Confirm Settings page, click Install if the settings are correct. Click Cancel to correct the settings.
The Printer Installed Successfully page appears. Click Finish to exit the Printer Installation Wizard and return to the CD-ROM main menu.
The installation of the printer is now complete. If prompted, restart your system.
Windows XP - USB, Custom
1 |
Ensure that your printer and computer are connected using the Universal Serial Bus |
|
(USB) cable. |
1-3 |
KX Driver |

Windows XP - Parallel Port (LPT) |
Installation |
2
3
4
In the Installation Method page, select Custom Mode > Driver. If you want to install the fonts, also select Utilities.
In the Connection Type page, select Universal Serial Bus (USB), and then click Next.
The Printing System appears in certain conditions, for example, when the installer cannot detect the USB connection. From the list, select the printing system to install, and click Next.
5
6
In the Custom Installation page, ensure that the KX Driver is selected as the product and then click Next.
In the Confirm Settings page, click Install if the settings are correct. Click Cancel to correct the settings.
Note: If the Found New Hardware Wizard appears, click Cancel. If the Hardware Installation warning dialog box appears, click Continue Anyway.
The installation of the printer is now complete. If prompted, restart your system.
Windows XP - Parallel Port (LPT)
1 |
In the Installation Method page, select Custom Mode > Driver. If you want to |
|
install the fonts, also select Utilities. |
2
3
In the Connection Type page, select Parallel Port (LPT), then click Next.
The Printing System appears. From the list, select the printing system to install, and click Next.
4 |
In the Custom Installation page, ensure that the KX Driver is selected as the |
|
product and then click Next. |
5 |
In Printer Settings you can assign a name to the printing system. This is the name |
that appears in Windows Printers and Faxes and in the printer lists in applications. Here you can also choose to share this printer with others or set this printer as the default printer. Make your selections and then click Next.
6
7
8
In the Printer Port page, select a port, and then click Next.
In the Confirm Settings page, click Install if the settings are correct. Click Cancel to correct the settings.
In the Printer Installed Successfully dialog box. Click Finish.
The installation of the printer is now complete. If prompted, restart your system.
Windows XP - Network Connection, Custom
1 |
In the Installation Method page, select Custom Mode for Driver or Utilities. Later, |
|
you can choose to install a KX Driver or mini-driver and fonts, a scanner driver, |
and KMnet for clients.
User Guide |
1-4 |

Installation |
Windows XP - Network Connection, Custom |
2
3
4
5
In the Connection Type page, select Network connection and then click Next.
In the Network Port Type page select a port type. If you select Standard TCP/IP port, the installer automatically creates a new port if needed.
In the Printing System page, select the model to install, and click Next.
In Custom Installation select the software packages you want to install, and clear those not intended for installation. Click Next.
6 |
In Printer Settings, you can assign a name for the printing system. This name |
|
appears in Windows Printers and Faxes and in the printer lists in applications. You |
|
can also choose to share this printer with others or set this printer as the default |
|
printer. Make your selections and then click Next. |
7 |
In the Standard TCP/IP Port dialog box, you can select Discover Printing System |
|
or Host name or IP address. |
|
The Discover Printing System searches the network for the printer. After it is found |
|
select the printer and then click Next. To use Host name or IP address, type the IP |
|
address or host name and then click Next. |
8 |
In the Confirm Settings page, click Install if the settings are correct. Click Cancel |
|
to correct the settings. |
9 |
After the installation is complete, the Printer Installed Successfully page appears. |
|
The installation of the printer is now complete. If prompted, restart your system. |
Installing Optional Components
1
2
3
You can expand the functions of your printer driver by installing optional components that compliment the ways in which you use your printer. Available components may include Common Profiles and Plug-ins.
A plug-in is a small computer program that interacts with a larger program to provide additional functionality. An example is Security Watermark, which is available for Kyocera printer drivers. Installing the plug-in adds Security Watermark functionality to the printer driver, adds a Security Watermark icon to the Advanced tab, and adds the dialog boxes that are used to set up a Security Watermark.
In the CD Main Menu select Advanced Tools.
On the Advanced Tools page, select Optional Printer Components.
The Optional Components Wizard dialog box appears. Click Next to install optional components or Cancel to close the wizard.
4 |
The Select Printer page appears. From the list, select the optional components you |
|
want to install and click Next. |
5 |
The Select Components page appears. Select the components to install, and click |
|
Next. |
Other pages, such as Select Common Profiles and Select Plug-In Modules may appear, depending on what selections are made here.
1-5 |
KX Driver |
Windows XP - Network Connection, Custom |
Installation |
|
6 |
In any Select pages that appear make your selections and click Next. |
|
7 |
In the Confirm Settings page, click Install if the settings are correct. Click Cancel |
|
|
to correct the settings. |
|
8 |
The Printer Components Installation Completed page appears. Click Finish. |
|
|
When you have completed installing printers and optional components, if prompted, |
|
|
restart your system. |
|
Product Library CD
Selections in the Product Library include Install Software, Remove Software,
Advanced Tools, Documentation, Software Release Notes and Select Language. Remove software provides a tool to eliminate the KX driver from your computer. The software release notes provide information about the contents of the CD-ROM, and known driver and hardware issues.
Click Documentation to view a list of available manuals.
You can select your interface language from the language menu. The Product
Library menus use the selected language.
Installing using the Add Printer Wizard
1
2
This section describes how to install a printer driver using the Add Printer Wizard.
Click Start in the Windows taskbar, and click Printers and Faxes to open the
Printers and Faxes window.
Click Add a printer in the Printer Tasks group box on the left.
Note: The Add Printer Wizard can also be launched by clicking Add printer in the
File menu of the Printers and Faxes window.
3
4
The Add Printer Wizard page appears. In the Welcome page, click Next and follow the instructions.
When the Completing the Add Printer Wizard page appears, click Finish.
User Guide |
1-6 |
Installation |
Windows XP - Network Connection, Custom |
Note: If the Found New Hardware Wizard page appears, click Cancel. If the
Hardware Installation warning dialog box appears, click Continue Anyway.
Installation of the printer driver is now complete. If prompted, restart your system.
1-7 |
KX Driver |

Printer Properties
2 Printer Properties
This chapter explains how to customize the following printer driver settings:
•Accessing Printer Properties
•Installing Optional Devices
•User Settings
•Page Description Language (PDL)
•Administrator Settings
•Compatibility Settings
Follow the steps below to set your preferred options as the default settings. These default settings can be changed temporarily when printing from Windows-based applications.
Accessing Printer Properties
1 |
Click Start in the Quick Launch toolbar and click Printers and Faxes. The Printers |
|
and Faxes window appears. |
2
3
Right-click the printer icon in the Printers and Faxes window.
Click Properties in the list. The Properties dialog box appears.
Installing Optional Devices
In the Printer Properties dialog box, go to the Device Settings tab. For each optional device installed in your printing system, select the equivalent setting under the Device Options list. Available devices include finishers, paper feeders, large capacity feeder, hard disk, mailbox, and folding unit.
For models connected to a network, the Auto Configure button can be used to detect all available devices. See Auto Configure for more information. You can also specify the memory setting, PDL (Page Description Language), settings for the user, and more.
Auto Configure
Auto Configure detects the installed device options on the printing system if it is connected over a network. This button appears in the Device Settings tab.
Auto Configure can detect printing system devices such as input devices, output devices, and hard disk size. Then it updates the Device options list in the Device Settings tab. Auto Configure keeps the printer driver’s Device Settings consistent with the actual printing system devices.
Note: Not all installed devices are detected by using Auto Configure. Before selecting OK in the Device Settings tab, check the settings to make sure they are correct.
User Guide |
2-1 |

Printer Properties
To use this feature, click Auto Configure. An "in progress" message appears, saying "Communicating with the printer to obtain setting information. Please wait a moment."
The check box settings in the Device options list change and the Preview image is updated according to the device options installed. Memory information also changes based on the setting information returned.
Under the following conditions the Auto Configure tool cannot communicate with the printing system:
•The printing system is powered off or is in the middle of the startup process. In such cases, Auto Configure displays the following message after the time out: "Please verify that the printer is powered on and ready to print."
•The Windows XP firewall prevents the communication. It opens a Windows Security Alert dialog box with this message: "Do you want to keep blocking this program? (Keep Blocking, Unblock, Ask me Later)."
The Microsoft Windows XP Firewall settings can be changed to allow communication between the printing system and your computer. The default setting for Windows XP Service Pack 2 is for the Windows Firewall to be set to On.
When the Windows Security Alert dialog box appears, click Unblock to allow communication between the printing system and your computer.
When you click Unblock, Auto Configure is added to the Windows Firewall > Exceptions > Programs and Services list. The Windows Firewall is accessed through the Control Panel.
Auto Configure currently supports only TCP/IP ports for Microsoft Windows 2000, XP and Vista operating systems.
A TCP/IP port can be either an IP address or the printing system name (Host name).
Device Options
1 Click the Device Settings tab.
2-2 |
KX Driver |
|
Printer Properties |
2 |
Under Device options in the Device Settings tab, select the check boxes for |
|
devices installed in your printing system. |
|
Note: Some devices cannot be installed simultaneously. For example, an internal |
|
finisher and a 1000-sheet finisher cannot be used at the same time. After you have |
|
selected a device, other devices are marked with a red X, preventing the selection of |
|
conflicting devices. |
|
When you select the check box of an optional device shown in blue, a sub-dialog box |
|
appears with additional setting details. If a device option check box is already |
|
selected, double-click the device option to open the sub-dialog box. |
|
The Hard Disk Settings dialog box appears if you select the Hard disk option, |
|
enabling the configuration of Custom boxes. For further details, see Custom Box on |
|
page 8-2. |
3 |
In the Memory box, select the memory capacity of your printing system. This setting |
|
is required to optimize the downloading of printing system fonts. |
Punch Unit Settings
When you select the check box for a finishing device shown in blue in the Device options list, such as Finisher or Multi Finisher, the Punch Unit Settings dialog box appears. If the device listing is already selected, double-click the option to open the
Punch Unit Settings dialog box.
Select 2 Hole, 2 & 3 Hole (for inches), or 2 & 4 Hole (for millimeters) punch option depending on the optional Punch Unit attached to your finisher.
User Guide |
2-3 |
Printer Properties
Assigning Custom Boxes
If you select the Hard disk check box, the Hard Disk Settings dialog box appears and virtual mail boxes can be created. For further details, see Custom Box on page 8-2. If the device listing is already selected, double-click the option to open the
Hard Disk Settings dialog box.
Note: An installed hard disk supports the following options: Custom box, Quick
Copy, Proof and Hold, Private Print, and Job Storage.
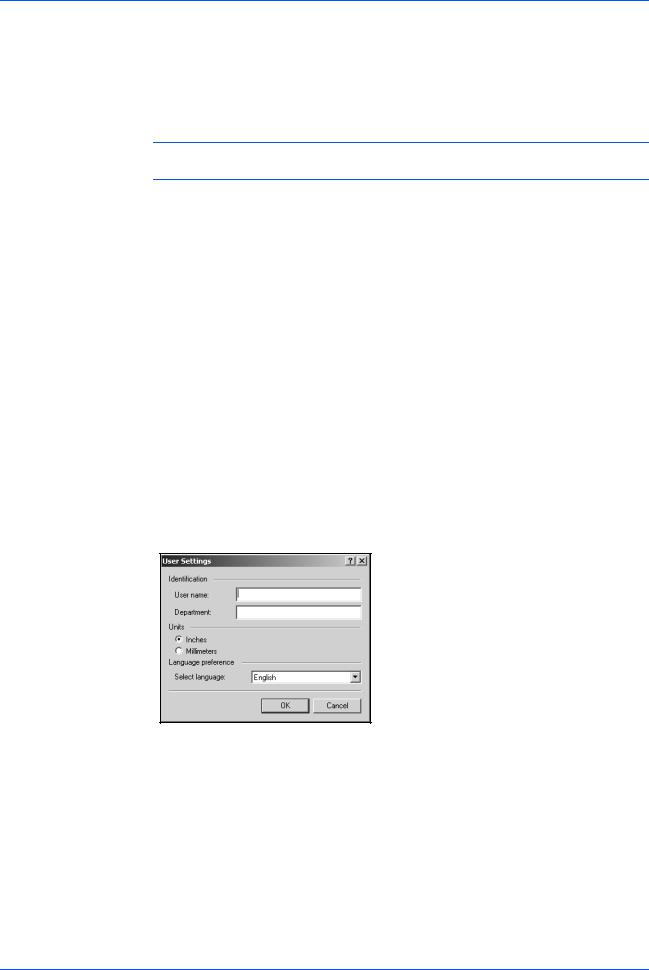
User Settings
The following user information can be configured by selecting User in the Device
Settings tab.
•Identification
•Unit of Measurement
•Language Preference Selection
Identification
|
In this dialog box, type user name and department information to be used with the |
|
Job Storage feature. For further details, see Job Storage (e-MPS) on page 8-1. |
1 |
In the Device Settings tab, click User. |
2 |
The User Settings dialog box appears. In the User name and Department text |
|
boxes, type up to 31 characters. |
• Type the preferred name in User name text box.
• Type the user's department or group name in the Department text box.
3 Click OK.
Unit of Measurement
The unit of measurement is used for the following settings:
•Custom Page Sizes setting in the Page Sizes section in the Basic tab
•Spacing setting in the Watermark Add and Edit dialog boxes
•Poster settings in the Layout tab.
In the User Settings dialog box, select either inches or millimeters.
2-4 |
KX Driver |
Printer Properties
Language Preference Selection
The Language preference option specifies the user interface language of the Device Settings tab of Printer Properties and all tabs of Printing Preferences. Available languages vary depending on your locale and your computer settings.
Select the preferred language from the Language preferences list. To activate the new language, click OK in User Settings and then in the Properties dialog box.
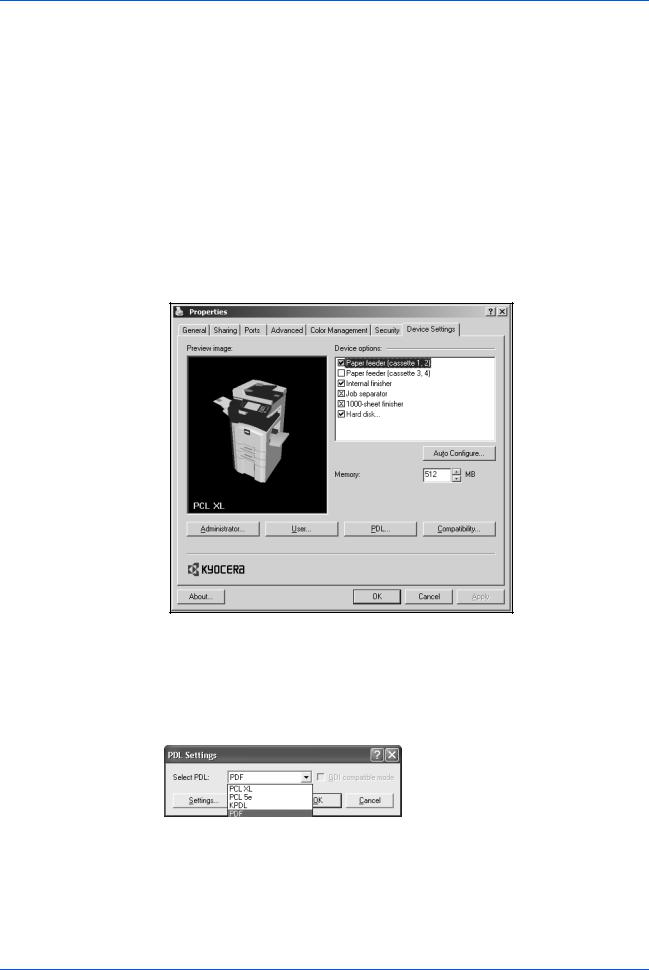
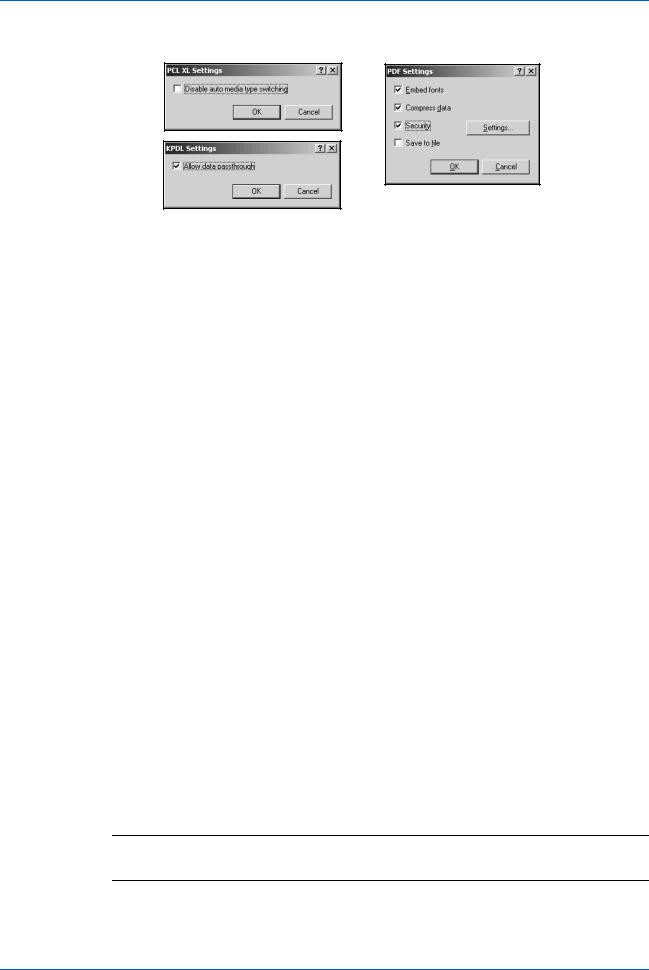
Page Description Language (PDL)
You have the option to change the Page Description Language (PDL) by selecting
PDL in the Device Settings tab. You can choose from PCL XL, PCL 5e, KPDL
(Kyocera Page Description Language), or PDF. The default is PCL XL, which is suitable for most printing purposes. After you select a PDL, the selection appears in the lower corner of the Preview image.
PDL Settings
1 |
In the Device Settings tab, click PDL. |
2 |
The PDL Settings dialog box appears. Select the desired language from the Select |
|
PDL list. See the table below for options and descriptions. |
User Guide |
2-5 |

Printer Properties
Option
PCL XL
(color and monochrome printing systems)
Description
The most recent version of HP PCL and PCL 6. This PDL includes PCL 5e features.
Enhanced over PCL 5e in these areas:
•Reduced file size
•Better print speed
•Faster return to application
•Lacks backward compatibility with earlier PCL versions
PCL 5e
(monochrome printing systems)
Specifies PCL 5e as the PDL.
•Fully compatible with earlier PCL versions
•Bidirectional communication support
•Wide selection of fonts for use with Microsoft Windows applications
•Allows more options for utilizing PRESCRIBE commands within applications
•Quality when printing complex graphics may be lower
KPDL
(color and monochrome printing systems)
Specifies KPDL as the PDL. KPDL is used when printing from applications that support PostScript 2 or 3.
•An optional KPDL upgrade kit may be required for some models.
•Kyocera’s emulation of PostScript printing
•Strong graphics reproduction
•Print speeds may be slower than PCL 5e.
•Requires more printing system memory than PCL 5e.
•Enables native TrueType font downloading
•Supports most Graphics settings options
(Portable Document Format)
Lets you print or save documents from multiple sources to Adobe PDF format. The PDF format is independent of the operating system and application software used to create documents.
Output to PDF is a plug-in that lets you print or save documents from multiple sources to Adobe PDF format. For information about installing the Output to PDF plug-in, see Installing Optional Components on page 1-5.
•Use as an alternative to existing commercial applications for creating PDF documents.
•Documents saved as PDF retain their original appearance, and can be viewed and printed with the free Adobe Reader on Windows, Mac OS, and UNIX platforms.
Note: With PDF selected as the Page description language, only a limited set of driver options are available.
In GDI compatible mode, vector graphics are rasterized for printing as bitmap images. Use the GDI compatible mode option to improve the graphic output quality created by the application. Due to memory restrictions, this feature is not available in certain printing environments.
2-6 |
KX Driver |
Printer Properties
3 Settings is available when the PDL is set to PCL XL, KPDL, or PDF.
PCL XL
|
Option |
Description |
|
Disable auto media type |
A check box control for disabling automatic switching of |
|
switching |
the paper source. |
|
|
If the selected cassette runs out of paper: |
|
|
Cleared: The printing system automatically switches to |
|
|
another cassette loaded with the same page size and |
|
|
media type. |
|
|
Selected: Printing stops until you load more paper into |
|
|
the cassette. |
KPDL |
|
|
|
|
|
|
Option |
Description |
|
Allow data passthrough |
Data passthrough reduces errors when printing complex |
|
|
jobs from applications that use PostScript formatting. |
|
||
|
|
|
|
Options |
Description |
|
Embed fonts |
Select to ensure document fonts appear accurately in the |
|
|
PDF file on screen. This option significantly increases the |
|
|
file size and ensures accurate reproduction. |
|
|
|
|
Compress data |
Select to enable Flat compression for the generated PDF |
|
|
document. It significantly reduces the file size. Additional |
|
|
compression options are available within Adobe Acrobat. |
|
|
|
|
Security |
Select 40-bit or 128-bit encryption for the print job and set |
|
|
passwords for opening a document and/or access to |
|
|
changing the document restrictions within Adobe Acrobat. |
|
|
Save to file must be checked for security to create secure |
|
|
PDF documents. Click Settings for additional security |
|
|
settings. |
|
Save to file |
Select to save the document as a PDF file. Password |
|
|
settings are available in the Security Settings dialog box. |
Note: If Save to file is selected, the document is not printed when you click OK in the Print dialog box.
User Guide |
2-7 |

Printer Properties
Options |
Description |
Security Settings |
Lets you select an encryption level and create passwords |
|
for the generated PDF file. To access the Security |
|
Settings dialog, follow these steps: |
|
1. Open Printer Properties/Device Settings |
|
2. Click on the PDL. button |
|
3. For Select PDL:, choose PDF then click on the |
|
Settings. |
|
4. Place a checkmark next to Security then click on |
|
Settings. |
|
The following security options are available: |
|
• Encryption: Encryption provides password protection |
|
so that a document cannot be easily opened or altered |
|
by unauthorized users. |
|
• 40-bit: Provides low level security for a document. |
|
Supported for earlier versions of Adobe Acrobat and |
|
Adobe Reader 3.0 - 4.x. |
|
• 128-bit: Provides high level security for Adobe Acrobat |
|
and Adobe Reader 5.0 or later. |
|
Note: Adobe Acrobat 3 and 4 cannot open 128 bit |
|
encrypted PDF documents. |
|
• Passwords: Select passwords for changing security |
|
settings and for opening a document. Passwords are |
|
supported up to 16 characters in length. |
|
• Requires a password to change security settings: |
|
Type an Owner password. Within Adobe Acrobat, this |
|
password is be required to change the document |
|
restrictions in the Files/Properties/Security section. |
|
• Requires a password to open document: Type a |
|
User password. The user password must be entered at |
|
the time the PDF document is opened. This password |
|
must be different from the owner password used to |
|
control document restrictions. |
|
|
2-8 |
KX Driver |
Printer Properties
Administrator Settings
The following settings can be specified by selecting Administrator in the Device
Settings tab.
•User Login
•Job Accounting
•Administrator Password
Note: The Administrator Settings dialog box appearance and options may vary depending on your printing system.
User Login
Use User Login to add users with a user name and password. Use this feature to limit printing privileges to specified users, for secure printing and job accounting. The number of pages/job printed by each user can be tracked by the printer. See your printing system’s Operation Manual for information about tracking usage at the printer.
User login provides job restriction by user, in contrast to the Job accounting feature, which assigns privileges by division or department. A maximum of 1000 login user names and passwords can be registered at the printing system. One hundred user names and passwords can be stored in the printer driver.
Note: Job accounting and User login cannot be used at the same time.
Users added in the printer driver should also be manually registered at the printing system’s operation panel.
The settings selected here are applied to every print job sent from this computer. The available options are as follows:
•Use specific login user name
Select this option and type a user name and password to use the same user login for every print job. If this option is selected, the user does not have to type the name and password for each print job.
•Prompt for login user name
User Guide |
2-9 |

Printer Properties
When a user prints a document, the driver prompts you for a user name and password. You can use a Login User Name that is not on the list, and it is not added to the list. When sending a print job, type a Login User Name and password when prompted, then click OK to print.
•Prompt for login user name and validate
Whenever a user sends a job to print, the driver prompts for user name and password. For the job to print, the user name and password entered must be on the Login User Name List (see Add Login User Names on page 2-10).
You can use the Login User Names entered in the Login User Name List of the driver. When sending a print job, type a Login User Name and password when prompted, then click OK to print. This option ensures that the job prints only when the selected Login User Name is saved in the driver.
•Verify the printing system’s login user for each user (PC)
When this option is selected, the driver asks for a Login User Name and password the first time the a job is sent to the printer. The Login User Name must be one that is not yet registered on the Login User Name List.
The name entered is added to the list, and thereafter the printer driver does not prompt for a user name and password.
Add Login User Names
1 In the Administrator Settings dialog box, select User login.
2
3
Click Login User Name List.
Click Add.
The name and password are case-sensitive. The name and password can each be up to 64 alphanumeric characters. The user name is automatically filled in with the Login User Name by default, but can be changed. The user name can be up to 20 characters.
Import and Export the Login User Name List
This section explains how to import and export your Login User Name lists. You can save the list of Login User Names created in the previous section to your personal computer or network. After saved, the list can be imported into other printer drivers.
Import
1 In Administrator Settings, click Login User Name List, then click Import.
2-10 |
KX Driver |
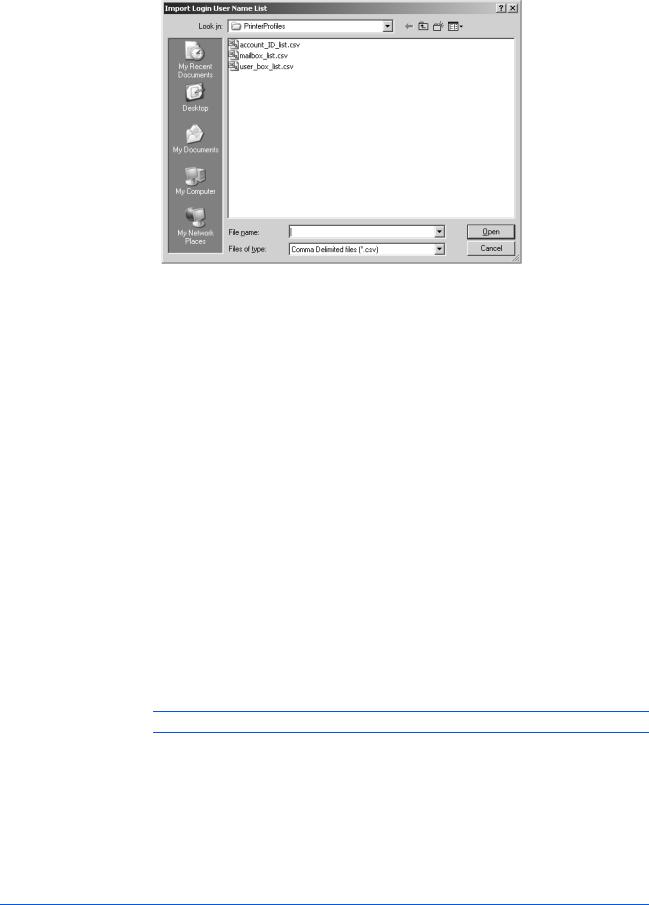
|
|
|
Printer Properties |
2 |
Use Look in at the top of the window to find for the file to import, or type the file name, |
||
|
and click Open. |
||
|
|
|
|
3 |
You can then select the imported file from the list of Login User Names. |
Export |
|
1 |
In the Administrator Settings dialog box, click Login User Name List, then click |
|
Export. |
2 |
In Login User Names select a file to export, and click Export. |
3 |
Use Save in to browse to a location to save the file, type the file name, and click |
|
Save. |
Job Accounting
With Job accounting, you can assign account IDs to print jobs, or work with IDs already created at the printing system. Job accounting features help you manage and control the number of copies in a printing system. After IDs are created, from the printing system operation panel you can view the number of copies attached to a specific ID or limit the number of copies for individual IDs. IDs for newer models must be 8 digits or less.
Copy management must be set to ON at the printing system to use this feature. Depending on the printing system model, a maximum of 500 account IDs can be assigned at the printing system and stored in the printer driver. For complete information about the job accounting features of the printing system, please see the Operation Guide for your particular model.
Note: User login and job accounting cannot be used at the same time in the driver.
Job accounting includes the following options:
Use specific account ID: This option can be used to specify a single account ID to manage the print jobs of a specific user. When the user prints, your jobs are sent with the account ID. You can use Password protect administrator settings to protect access to the Administrator Settings dialog box, so that the user cannot see or change this setting.
User Guide |
2-11 |

Printer Properties
Note: Some versions say Password protect instead of Password protect administrator settings. Both open the same dialog box.
Prompt for account ID: This option can be used to prompt the user for an account ID when printing. When sending a print job, type an account ID when prompted, then click OK to print. The account ID must be one that has been registered at the printing system, or the job does not print.
Prompt for account ID and validate: This option can be used to prompt the user to specify an account ID that is saved in the driver. When sending a print job, type an account ID when prompted, then click OK to print. The account ID is validated against the account ID list, so you must type an ID from the list, or you cannot print.
Display account ID list: This option can be used to display the list of IDs entered in the account ID list of the driver when sending a print job. This gives the user a selection of account IDs to choose from.
Account ID List: This option can be use to add, edit, or delete account IDs from the account ID list of the driver. You can also give the IDs text descriptions to help manage and track them. After an account ID list is created, the list can be exported as a group by saving it as a text file (.CSV). To import an account ID list, browse for an existing list and save it in your printer driver.
Administrator Password
You can set a password for the Administrator Settings dialog box. After a password is typed in, the administrator settings dialog box cannot be opened until the password is typed in the Enter Password dialog box. This prevents unauthorized personnel from changing the administrator settings.
Set the Password
1 |
In the Administrator Settings dialog box, select the Password protect check box to |
|
open the Password dialog box. |
2 |
In the Password dialog box, enter the new password using between 4 and 16 |
|
characters in the Password text box. Re-enter the password in Confirm password |
and click OK.
Change the Password
1
2
3
4
In the Device Settings tab, click Administrator.
The Enter Password dialog box appears. Type the password and click OK.
The Administrator Settings dialog box appears. Clear the Password protect check box. A Password message appears.
Click OK.
Compatibility Settings
This feature supports compatibility for media source values unique to the printer driver, such as those for cassettes or feeders, so your newly installed KX Driver maintains identical media source support with the driver it replaces, whether for this
2-12 |
KX Driver |

Printer Properties
|
driver or one from another manufacturer. If media source macros exist for the older |
|
driver, then the alignment of media source values maintain support without the need |
|
to change the macros. |
|
Use the Driver Info utility, available on the Product Library CD, to compare the source |
|
values for all installed drivers. |
|
If the values for a given media source differ between the old and new printer drivers, |
|
reassign the value in the new driver to match the value in the previous driver. |
|
Compatibility settings can be adjusted by selecting Compatibility in the Device |
|
Settings tab. |
1 |
In the Device Settings tab, click Compatibility. |
2 |
The Compatibility Settings dialog box appears. From the Media source |
|
enumeration list, select the paper supply method. The current value is listed in the |
Enumerated value box.
3 |
Type a new Enumerated value for the media source and click OK. You can also |
|
restore all the parameters to the default by clicking Reset. |
The other options in the Compatibility Settings dialog box include:
• Disable face-up reverse page order
This option prevents reverse order printing if face-up output is selected.
• Ignore application collation
Use this option to bypass the Collate setting in the application, and give priority to the printer driver setting.
• Combine source and media type lists
This option changes the Basic tab of Printer Properties so that Media type and Source are combined into one box, labelled Source.
User Guide |
2-13 |
Printing Basics
3 Printing Basics
This chapter describes the following printing tasks when printing from Microsoft
Windows applications.
•Basic Printing Tasks
•Printing on Paper of Non-Standard Sizes
•Duplex Printing
•Reverse Order Printing
•Collating Modes
Basic Printing Tasks
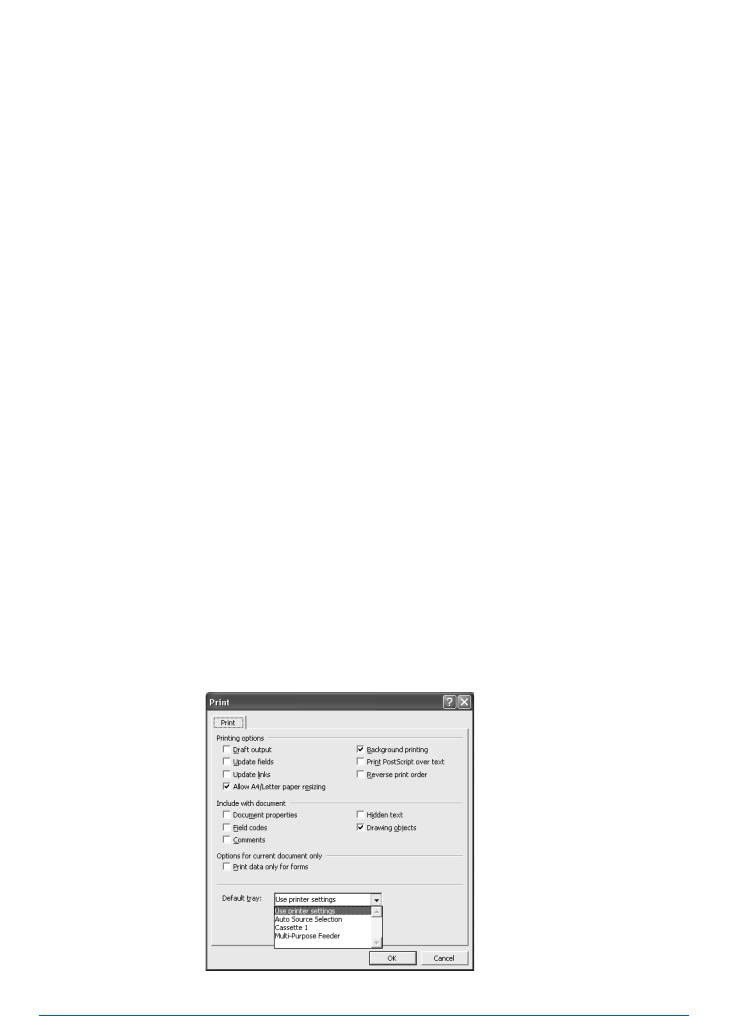
The steps required to print a document created with an application are explained below. You can select the printing paper size and output destination.
Basic Printing
1 |
Insert the proper paper size (such as A4) into the printing system's paper cassette or |
|
MP tray. |
2 |
From the application’s File menu, select Print. The Print dialog box appears. |
|
Select the desired printing system from the list of available printing systems. |
3 |
Specify the number of copies to print in the Number of copies box. You can print up |
to 999 copies. When printing two or more copies, enable the Collate check box for collation. Number of copies and Collate can also be specified in the Basic tab. See page 3-10 for further information.
If Ignore application collation is selected in the Compatibility Settings dialog box, the Print Collate setting is not applied.
When using Microsoft Word, we recommend that you click Options, and for default tray select Use printer settings.
3-1 |
KX Driver |
Printing Basics
4
5
6
7
8
9
10
Click Properties to open the Properties dialog box.
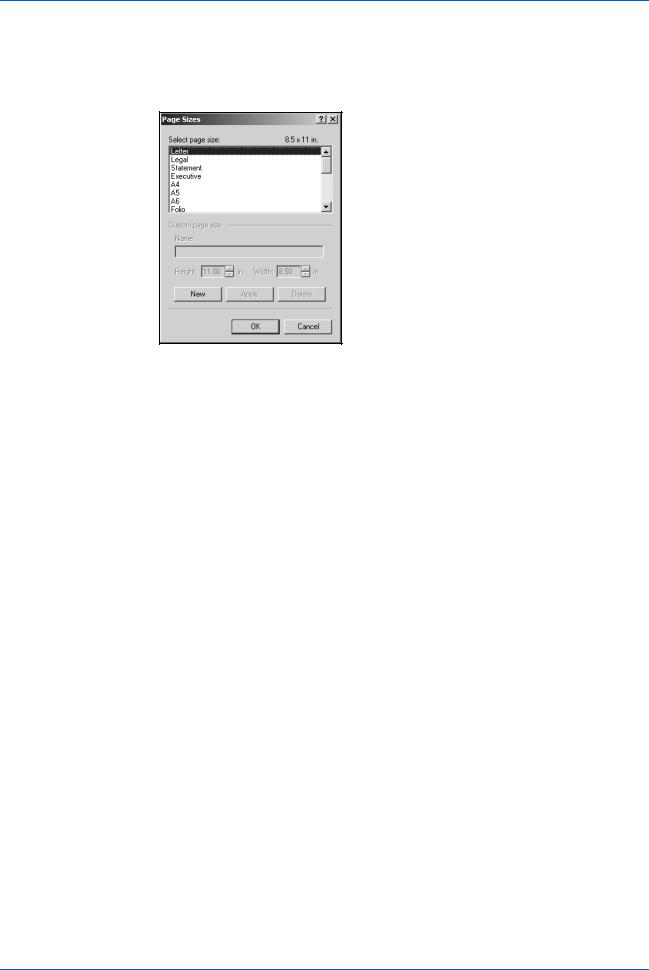
In the Basic tab, click Page Sizes to open the Page Sizes dialog box. In the Select page size list, select a page size for the print job.
Click OK to return to the Basic tab. Click OK to return to the Properties dialog box.
For best results when printing on transparencies or recycled paper (the back side of paper which has already been printed on), from the Media type list select the media type. For further details, see Media Types on page 3-3.
The printing system automatically selects the paper size that matches the size specified above. A message appears requesting you to load paper into the MP tray if the proper paper size is not available.
Click the Source list to specify the paper cassette for printing.
Choose either Portrait or Landscape to match the document page orientation. You can rotate the document 180 degrees by selecting the Rotated check box.
Click OK to return to the Print dialog box.
Click OK to start printing.
Print Sizes
1
2
This section describes how to print documents of different sizes than the original document. The document image is adjusted to match the size you select. If you would like to manually input the Scaling percentage, see Scaling on page 4-6.
In the Properties dialog box, from the Basic tab click Page Sizes.
In the Page Sizes list, select the document’s paper size and click OK.
User Guide |
3-2 |

Printing Basics
3 In the Basic tab, click the Print Size list and select the preferred output paper size.
4
5
Confirm the proper paper size is loaded. Click OK to return to the Print dialog box.
Click OK to start printing.
The source document is automatically scaled to fit the output paper size.
Media Types
The printing system automatically selects the paper size specified in the Page Sizes setting in the Basic tab by default when you are printing on regular paper. However, the printing system supports a wide variety of printing media depending on your printing system model.
You can specify the media type in the Media type setting for auto media selection when using non-standard types of printing media, such as recycled paper, labels, or transparencies. You can also specify the finishing settings for best results. Automatic selection of media types can be disabled in the PCL XL settings dialog box. For further details, refer to Page Description Language (PDL) on page 2-5.
Labels, transparencies, and envelopes must be printed using the MP tray. Ensure the paper is properly loaded by following the instructions outlined in the printing system's Operation Guide.
Note: The default setting is for Source and Media type to be separate items in the dialog box, but it is possible to combine them using a setting in Compatibility Settings. If they are combined, the Media type list is not available. To change this setting, open Printer Properties from the Microsoft Windows Printer and Faxes window, go to Device settings and then Compatibility Settings, and then clear the Combine source and media type lists selection.
When paper is properly loaded in the paper cassette, the printing system can automatically detect the paper size. However, it is necessary to use the operation panel on the printing system to assign the media type of the paper cassette so that the printing system can recognize it. The steps to specify the media settings are listed below.
3-3 |
KX Driver |

Printing Basics
1 Load the paper in a paper cassette or the MP tray.
2
3
4
5
Note: Use the MP tray in cassette mode (the default). For further details on MP tray modes, refer to the printing system's Operation Guide.
Specify the media type at the operation panel on the printing system.
Open the Properties dialog box.
Select the document paper size from the Print Size list.
From the Media type list, select the type of media for printing, then click OK.
Options Available in the Media Type List
Media Type |
Usable Paper Cassettes |
Plain 64 to 90 g/m2 |
All |
Preprinted |
All |
|
|
Bond (securities) |
All |
|
|
Coated |
All |
|
|
Recycled |
All |
|
|
Vellum Less than 64 g/m2 |
All |
Letterhead |
All |
|
|
Color 64 to 90 g/m2 |
All |
Prepunched |
All |
|
|
High quality |
All |
|
|
Cardstock |
MP Tray |
|
|
Envelopes |
MP Tray |
|
|
Thick |
MP Tray or paper cassette |
|
|
Rough 90 to 200 g/m2 |
MP Tray or paper cassette |
Labels |
MP Tray |
|
|
Transparency |
MP Tray |
|
|
Custom (1-8) |
Refer to Operation Guide |
|
|
After printing begins, the printing system automatically selects the paper to match the paper size and specified media type.
If the paper loaded does not match the size, type, or both, a message appears asking you to load paper in the MP tray.
Printing on Paper of Non-Standard Sizes
To use custom sizes of paper in your printing system, you must first define the custom paper sizes in the Properties dialog box.
User Guide |
3-4 |
Printing Basics
Note: For custom paper, supply the paper using the universal (adjustable) paper cassette or the MP tray.
Custom Paper Sizes
1 |
Load the custom paper into the printing system. For further details, refer to the |
|
printing system's Operation Guide. |
2 |
Click Start in the Windows taskbar and then select Printers and Faxes. The |
|
Printers and Faxes window appears. |
3 |
Right-click the printer icon and select Properties to open the Properties dialog |
|
box. |
4
5
6
Click Printing Preferences to open the Printing Preferences dialog box.
Click Page Sizes. The Page Sizes dialog box appears.
Click New to display Custom_01 in the Name box. You can replace Custom_01 with the name for your new custom paper size. The name can be up to 31 characters.
7 Type the measurements in the Height and Width boxes in millimeters or inches. The unit (inches or millimeters) is selected in the User Settings dialog box, accessed from the Device Settings tab. For further details on changing the unit, refer to User Settings on page 2-4.
Size limits for custom paper are listed in the table below.
Size |
Cassette |
MP tray |
Duplex unit |
|
Minimum (A4 |
148 × 210 mm |
70 × 148 mm |
148 |
× 216 mm |
printing systems) |
(5.8 x 8.3 inches) |
(Portrait) |
|
|
|
|
|
|
|
Maximum (A4 |
216 × 356 mm |
216 × 356 mm |
216 |
× 356 mm |
printing systems) |
(8.5 x 14 inches) |
(Portrait) |
|
|
Minimum (A3 |
148 × 210 mm |
70 × 148 mm |
148 |
× 210 mm |
printing systems) |
(5.8 x 8.3 inches) |
|
|
|
|
|
|
|
|
Maximum (A3 |
297 × 450 mm |
310 × 458 mm |
297 |
× 431.8 mm |
printing systems) |
(11.7 x 17.7 inches) |
|
|
|
|
|
|
|
|
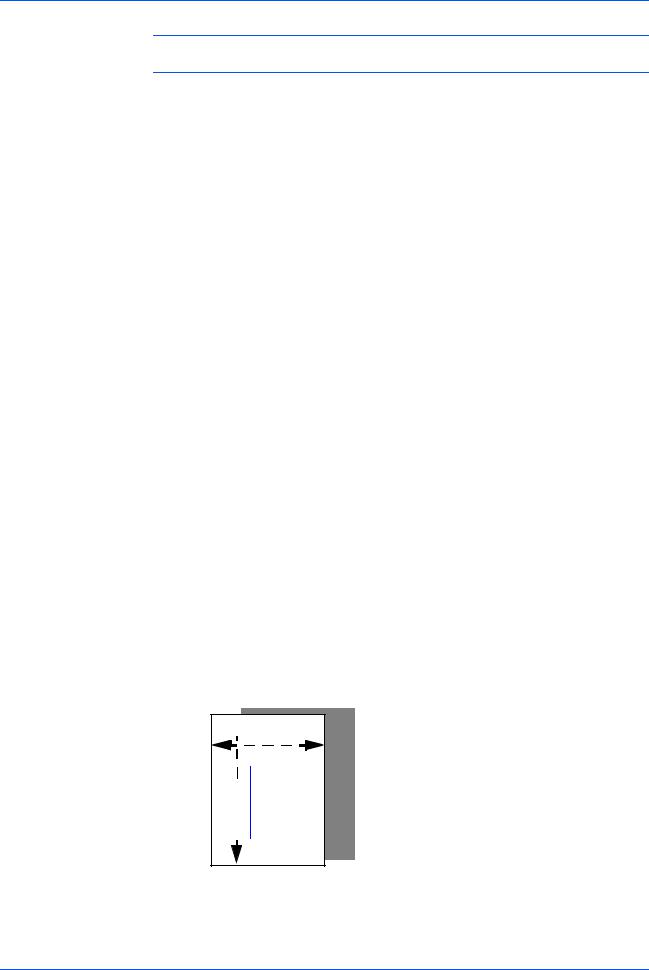
 Width = 150 mm
 Height = 200 mm
Sample Paper Measurements (150 mm x 200 mm)
8 Click OK.
3-5 |
KX Driver |
Loading...