

Page 1
Operation and Safety Manual
®
Original Instructions - Keep this manual with the machine at all times.
Models
12SP
15SP
ANSI
P/N - 3120774
May 4, 2012
Page 2

NOTES:
Page 3

SECTION - FOREWORD
FOREWORD
This manual is a very important tool! Keep it with the machine at all times.
The purpose of this manual is to provide owners, users, operators, lessors, and lessees with the precautions and
operating procedures essential for the safe and proper machine operation for its intended purpose.
Due to continuous product improvements, JLG Industries, Inc. reserves the right to make specification changes
without prior notification. Contact JLG Industries, Inc. for updated information.
3120774 – JLG Lift – a
Page 4
SECTION - SAFETY ALERT SYMBOLS AND SAFETY SIGNAL WORDS
DANGER
CAUTION
NOTICE
SAFETY ALERT SYMBOLS AND SAFETY SIGNAL WORDS
This is the Safety Alert Symbol. It is used to alert you to the potential personal
injury hazards. Obey all safety messages that follow this symbol to avoid possible
injury or death
INDICATES AN IMMINENTLY HAZARDOUS SITUATION. IF NOT
AVOIDED, WILL RESULT IN SERIOUS INJURY OR DEATH. THIS DECAL
WILL HAVE A RED BACKGROUND.
INDICATES A POTENTIALITY HAZARDOUS SITUATION. IF NOT
AVOIDED, COULD
DECAL WILL HAVE AN ORANGE BACKGROUND.
RESULT IN SERIOUS INJURY OR DEATH. THIS
INDICATES A POTENTIALITY HAZARDOUS SITUATION. IF NOT
AVOIDED, MAY RESULT IN MINOR OR MODERATE INJURY. IT MAY
ALSO ALERT AGAINST UNSAFE PRACTICES. THIS DECAL WILL HAVE
A YELLOW BACKGROUND.
INDICATES INFORMATION OR A COMPANY POLICY THAT RELATES
DIRECTLY OR INDIRECTLY TO THE SAFETY OF PERSONNEL OR PROTECTION OF PROPERTY.
b – JLG Lift – 3120774
Page 5

SECTION - SAFETY ALERT SYMBOLS AND SAFETY SIGNAL WORDS
NOTICE
NOTICE
THIS PRODUCT MUST COMPLY WITH ALL SAFETY RELATED BULLETINS. CONTACT JLG INDUSTRIES, INC. OR THE LOCAL AUTHORIZED
JLG REPRESENTATIVE FOR INFORMATION REGARDING SAFETY
RELATED BULLETINS WHICH MAY HAVE BEEN ISSUED FOR THIS
PRODUCT.
For :
• Accident Reporting
• Product Safety Publications
• Current Owner Updates
• Questions Regarding
Product Safety
• Standards and Regulations
Compliance Information
• Questions Regarding Special Product Applications
• Questions Regarding Product Modifications
JLG INDUSTRIES, INC. SENDS SAFETY RELATED BULLETINS TO THE
OWNER OF RECORD OF THIS MACHINE. CONTACT JLG INDUSTRIES,
INC. TO ENSURE THAT THE CURRENT OWNER RECORDS ARE
UPDATED AND ACCURATE.
JLG INDUSTRIES, INC. MUST BE NOTIFIED IMMEDIATELY IN ALL
INSTANCES WHERE JLG PRODUCTS HAVE BEEN INVOLVED IN AN
ACCIDENT INVOLVING BODILY INJURY OR DEATH OF PERSONNEL OR
WHEN SUBSTANTIAL DAMAGE HAS OCCURRED TO PERSONAL
PROPERTY OR THE JLG PRODUCT.
Contact :
Product Safety and Reliability Department
JLG Industries, Inc.
13224 Fountainhead Plaza
Hagerstown, MD 21742
or Your Local JLG Office
(See addresses on manual rear cover)
In USA:
Toll Free: 877-JLG-SAFE (877-554-7233)
Outside USA:
3120774 – JLG Lift – c
Phone: 240-420-2661
E-mail: ProductSafety@JLG.com
Page 6

SECTION - REVISION LOG
REVISION LOG
Original Issue of Manual . . . . . . . . . . . . . . . . . . . April 4, 1999
Manual Revised . . . . . . . . . . . . . . . . . . . . . . . . . . March 7, 2000
Manual Revised . . . . . . . . . . . . . . . . . . . . . . . . . . April 13, 2000
Manual Revised . . . . . . . . . . . . . . . . . . . . . . . . . . April 20, 2000
Manual Revised . . . . . . . . . . . . . . . . . . . . . . . .January 16, 2002
Manual Revised . . . . . . . . . . . . . . . . . . . . . . . .January 20, 2006
Manual Revised . . . . . . . . . . . . . . . . . . . . . . . . . . . July 12, 2006
Manual Revised . . . . . . . . . . . . . . . . . . . . . . . . . . . July 23, 2008
Manual Revised . . . . . . . . . . . . . . . . . . . . . .November 26, 2008
Manual Revised . . . . . . . . . . . . . . . . . . . . . . .December 7, 2010
Manual Revised . . . . . . . . . . . . . . . . . . . . . . . . . . . .May 3, 2011
Manual Revised . . . . . . . . . . . . . . . . . . . . . . . . . . . .May 4, 2012
d – JLG Lift – 3120774
Page 7

TABLE OF CONTENTS
SECTION - PARAGRAPH, SUBJECT PAGE SECTION - PARAGRAPH, SUBJECT PAGE
FOREWORD . . . . . . . . . . . . . . . . . . . . . . . . . . . . . . . . . . . . . . . A
SAFETY ALERT SYMBOLS AND SAFETY SIGNAL WORDS . .B
Contact:. . . . . . . . . . . . . . . . . . . . . . . . . . . . . . . . . . . . . C
In USA: . . . . . . . . . . . . . . . . . . . . . . . . . . . . . . . . . . . . .C
Outside USA: . . . . . . . . . . . . . . . . . . . . . . . . . . . . . . . .C
REVISION LOG
SECTION - 1 - SAFETY PRECAUTIONS
1.1 GENERAL. . . . . . . . . . . . . . . . . . . . . . . . . . . . . . . . . . . 1-1
1.2 PRE-OPERATIONAL SAFETY . . . . . . . . . . . . . . . . . . . 1-2
1.3 OPERATING SAFETY . . . . . . . . . . . . . . . . . . . . . . . . . 1-3
1.4 ELECTROCUTION HAZARD . . . . . . . . . . . . . . . . . . . . 1-7
1.5 TRANSPORTING . . . . . . . . . . . . . . . . . . . . . . . . . . . . . 1-8
1.6 TRANSPORT SAFETY . . . . . . . . . . . . . . . . . . . . . . . . . 1-8
SECTION - 2 - USER RESPONSIBILITIES, MACHINE
PREPARATION, AND INSPECTION
2.1 PERSONNEL TRAINING . . . . . . . . . . . . . . . . . . . . . . . 2-1
Operator Training . . . . . . . . . . . . . . . . . . . . . . . . . . . 2-1
Training Supervision . . . . . . . . . . . . . . . . . . . . . . . . . 2-1
Operator Responsibility . . . . . . . . . . . . . . . . . . . . . . 2-1
2.2 PREPARATION, INSPECTION, AND MAINTENANCE. 2-2
Pre-Start Inspection . . . . . . . . . . . . . . . . . . . . . . . . . 2-4
2.3 FUNCTION CHECK . . . . . . . . . . . . . . . . . . . . . . . . . . . 2-4
2.4 DAILY WALK-AROUND INSPECTION . . . . . . . . . . . . . 2-5
General . . . . . . . . . . . . . . . . . . . . . . . . . . . . . . . . . . . 2-5
Batteries Charged . . . . . . . . . . . . . . . . . . . . . . . . . . . 2-7
Overall Cleanliness . . . . . . . . . . . . . . . . . . . . . . . . . . 2-7
Placards . . . . . . . . . . . . . . . . . . . . . . . . . . . . . . . . . . . 2-7
Lubrication . . . . . . . . . . . . . . . . . . . . . . . . . . . . . . . . . 2-7
SECTION - 3 - MACHINE CONTROLS AND INDICATORS
3.1 OPERATING CHARACTERISTICS AND LIMITATIONS 3-1
General . . . . . . . . . . . . . . . . . . . . . . . . . . . . . . . . . . . 3-1
Placards . . . . . . . . . . . . . . . . . . . . . . . . . . . . . . . . . . . 3-1
Capacities . . . . . . . . . . . . . . . . . . . . . . . . . . . . . . . . . 3-1
Stability . . . . . . . . . . . . . . . . . . . . . . . . . . . . . . . . . . . 3-1
3.2 CONTROLS AND INDICATORS . . . . . . . . . . . . . . . . . . 3-2
Ground Control Station . . . . . . . . . . . . . . . . . . . . . . . 3-2
Platform Control Station . . . . . . . . . . . . . . . . . . . . . . 3-4
Decal Installation . . . . . . . . . . . . . . . . . . . . . . . . . . . 3-5
SECTION - 4 - MACHINE OPERATION
4.1 MACHINE DESCRIPTION. . . . . . . . . . . . . . . . . . . . . . . 4-1
4.2 GENERAL . . . . . . . . . . . . . . . . . . . . . . . . . . . . . . . . . . . 4-2
4.3 BATTERY CHARGING . . . . . . . . . . . . . . . . . . . . . . . . . 4-2
3120774 – JLG Lift – i
Page 8

TABLE OF CONTENTS
SECTION - PARAGRAPH, SUBJECT PAGE SECTION - PARAGRAPH, SUBJECT PAGE
Battery Charger Operation . . . . . . . . . . . . . . . . . . . . 4-2
Abnormal Cycle Indicator LED . . . . . . . . . . . . . . . . . 4-4
4.4 MACHINE SET-UP AND OPERATION . . . . . . . . . . . . . 4-7
Floor Stop Operation. . . . . . . . . . . . . . . . . . . . . . . . . 4-7
Raising and Lowering the Platform . . . . . . . . . . . . . . 4-8
4.5 PLATFORM CONFIGURATIONS . . . . . . . . . . . . . . . . . 4-9
Platform Loading . . . . . . . . . . . . . . . . . . . . . . . . . . . . 4-9
StockPicking Platform Operation . . . . . . . . . . . . . . 4-10
Extendible Platform Operation - OPTION . . . . . . . 4-11
Extendible Platform - Lanyard Attachment . . . . . . . 4-12
Side Entry Platform with Material Tray - OPTION . . 4-13
Platform Gate Alarm - OPTION . . . . . . . . . . . . . . . . 4-13
4.6 QUICK-CHANGE PLATFORM MOUNTING . . . . . . . . 4-14
Platform Removal . . . . . . . . . . . . . . . . . . . . . . . . . . 4-14
Platform Installation . . . . . . . . . . . . . . . . . . . . . . . . . 4-14
4.7 STOWING MACHINE . . . . . . . . . . . . . . . . . . . . . . . . . 4-15
4.8 TRANSPORTING, LIFTING AND TIE DOWN . . . . . . . 4-15
General . . . . . . . . . . . . . . . . . . . . . . . . . . . . . . . . . . 4-15
Transporting by Pushing . . . . . . . . . . . . . . . . . . . . . 4-15
Lifting . . . . . . . . . . . . . . . . . . . . . . . . . . . . . . . . . . . . 4-16
Transport Vehicle Tie Down . . . . . . . . . . . . . . . . . . 4-16
4.9 RUG CARRIER ACCESSORY (OPTION) . . . . . . . . . . 4-17
General . . . . . . . . . . . . . . . . . . . . . . . . . . . . . . . . . . 4-17
Pre-Start Inspection. . . . . . . . . . . . . . . . . . . . . . . . . 4-17
SECTION - 5 - OPTIONAL EQUIPMENT
SECTION - 6 - EMERGENCY PROCEDURES
Hanging a Rug using the Rug Carrier
Accessory Arms . . . . . . . . . . . . . . . . . . . . . . . . . . . .4-18
Removing a Rug using Rug Carrier
Accessory Arms . . . . . . . . . . . . . . . . . . . . . . . . . . . .4-19
5.1 OPTIONAL EQUIPMENT. . . . . . . . . . . . . . . . . . . . . . . . 5-1
Extra Power Pack (DC Battery, Charger & Case) . . . 5-1
Lifting Hook . . . . . . . . . . . . . . . . . . . . . . . . . . . . . . . .5-1
Platform Auxiliary Power Lowering Device . . . . . . . .5-1
Amber Beacon Light . . . . . . . . . . . . . . . . . . . . . . . . . 5-1
Platform Motion Alarm . . . . . . . . . . . . . . . . . . . . . . . . 5-1
Foot-Operated Platform Controller . . . . . . . . . . . . . .5-1
Rug Carrier Accessory . . . . . . . . . . . . . . . . . . . . . . . . 5-1
Machine Cycle Counter Meter . . . . . . . . . . . . . . . . . .5-2
Platform Gate Alarm . . . . . . . . . . . . . . . . . . . . . . . . . . 5-2
6.1 GENERAL INFORMATION . . . . . . . . . . . . . . . . . . . . . . 6-1
6.2 EMERGENCY OPERATION . . . . . . . . . . . . . . . . . . . . .6-1
Operator Unable to Control Machine. . . . . . . . . . . . . 6-1
Platform Caught Overhead . . . . . . . . . . . . . . . . . . . .6-1
6.3 INCIDENT NOTIFICATION . . . . . . . . . . . . . . . . . . . . . . 6-1
ii – JLG Lift – 3120774
Page 9

TABLE OF CONTENTS
SECTION - PARAGRAPH, SUBJECT PAGE SECTION - PARAGRAPH, SUBJECT PAGE
SECTION - 7 - GENERAL SPECIFICATIONS AND OPERATOR
MAINTENANCE
7.1 INTRODUCTION . . . . . . . . . . . . . . . . . . . . . . . . . . . . . 7-1
7.2 GENERAL SPECIFICATIONS . . . . . . . . . . . . . . . . . . . 7-2
Machine Specifications . . . . . . . . . . . . . . . . . . . . 7-2
Electrical Specifications . . . . . . . . . . . . . . . . . . . . 7-3
Machine Component Weights . . . . . . . . . . . . . . . 7-5
Serial Number Locations . . . . . . . . . . . . . . . . . . . . . 7-5
7.3 OPERATOR MAINTENANCE . . . . . . . . . . . . . . . . . . . . 7-6
Battery . . . . . . . . . . . . . . . . . . . . . . . . . . . . . . . . . . . . 7-6
Lubrication . . . . . . . . . . . . . . . . . . . . . . . . . . . . . . . . 7-7
Lubrication Points . . . . . . . . . . . . . . . . . . . . . . . . . . . 7-8
7.4 SUPPLEMENTAL INFORMATION . . . . . . . . . . . . . . . 7-10
SECTION - 8 - INSPECTION AND REPAIR LOG
1-1. Read Your Manual. . . . . . . . . . . . . . . . . . . . . . . . . 1-2
1-2. Always Look in the Direction of Movement.
Watch for Overhead and Other Obstructions. . . . 1-4
1-3. Death or Serious Injury Could Occur from
a Tip Over . . . . . . . . . . . . . . . . . . . . . . . . . . . . . . . 1-4
1-4. All Personnel Must Stand Clear When
Platform Is Being Raised Or Lowered. . . . . . . . . . 1-5
1-5. Falling from Platform could cause
Death or Serious Injury . . . . . . . . . . . . . . . . . . . . . 1-6
1-6. Use Handles Provided On Mast Crossbar To
Move Machine . . . . . . . . . . . . . . . . . . . . . . . . . . . . 1-9
1-7. Do Not Move Unit on Soft or Uneven Surfaces or
Over Obstructions, Bumps, Debris, Etc.. . . . . . . . 1-9
1-8. Two People May Be Required on Slopes Up To
Five Degrees. Also Always Travel With Platform
End On The Low Side of Slope. . . . . . . . . . . . . . 1-10
2-1. Daily Walk-Around Inspection. . . . . . . . . . . . . . . . 2-6
3-1. Ground Control Station . . . . . . . . . . . . . . . . . . . . . 3-2
3-2. Manual Descent Valve Location . . . . . . . . . . . . . . 3-3
3-3. Platform Control Station . . . . . . . . . . . . . . . . . . . . 3-4
3-4. SP Machine - Decal Installation . . . . . . . . . . . . . . 3-5
4-1. Battery Box and Charger Assembly -
(Original Design) . . . . . . . . . . . . . . . . . . . . . . . . . . 4-3
LIST OF FIGURES
3120774 – JLG Lift – iii
Page 10

TABLE OF CONTENTS
SECTION - PARAGRAPH, SUBJECT PAGE SECTION - PARAGRAPH, SUBJECT PAGE
4-2. Battery Box and Charger Assembly -
(Compact Design). . . . . . . . . . . . . . . . . . . . . . . . . 4-3
4-3. Battery Charger - Front Panel - 120V-AC Input. . . 4-5
4-4. Battery Charger - Front Panel -
120 - 240V-AC Input . . . . . . . . . . . . . . . . . . . . . . . 4-6
4-5. Engaging & Releasing Floor Stop. . . . . . . . . . . . . 4-8
4-6. Platform Operating Configurations. . . . . . . . . . . 4-10
4-7. Platform Operating Configurations. . . . . . . . . . . 4-11
4-8. SP Tie Down Pockets.. . . . . . . . . . . . . . . . . . . . . 4-17
1-1 Minimum Approach Distance (M.A.D.) . . . . . . . . . .1-7
2-1 Inspection and Maintenance Table . . . . . . . . . . . . .2-3
3-1 SP Series Decal Installation Chart. . . . . . . . . . . . . .3-6
4-1 Maximum Platform Capacity.. . . . . . . . . . . . . . . . . .4-9
7-1 Lubrication Specifications . . . . . . . . . . . . . . . . . . . .7-7
7-2. Lubrication Intervals for Various Components . . . .7-9
8-1 Inspection and Repair Log. . . . . . . . . . . . . . . . . . . .8-1
LIST OF TABLES
iv – JLG Lift – 3120774
Page 11

1.1 GENERAL
SECTION 1 - SAFETY PRECAUTIONS
SECTION 1. SAFETY PRECAUTIONS
This section prescribes the proper and safe practices for major
areas of machine usage which have been divided into three basic
categories: Transporting, Pre-Operation and Operation. In order to
promote proper usage of the machine, it is mandatory that a daily
routine be established based on instruction given in this section. A
maintenance program must also be established by a qualified person and must be followed to ensure that the machine is safe to
operate.
The user/operator of the machine should not accept operating
responsibility until this manual has been READ and UNDERSTOOD, and operating instructions of the machine under the
supervision of an experienced and qualified operator, has been
completed. If there is a question on application and/or operation,
JLG Industries Product Safety and Reliability Department should
be consulted.
MODIFICATION OF THE MACHINE WITHOUT APPROVAL OF JLG INDUSTRIES INC., OR CERTIFICATION BY A NATIONALLY RECOGNIZED TESTING LAB TO BE IN CONFORMITY WITH APPLICABLE OSHA
REGULATIONS, AND TO BE AT LEAST AS SAFE AS BEFORE MODIFICATION, IS PROHIBITED AND IS A VIOLATION OF OSHA RULES.
3120774 – JLG Lift – 1-1
Page 12

SECTION 1 - SAFETY PRECAUTIONS
1.2 PRE-OPERATIONAL SAFETY
Figure 1-1. Read Your Manual.
• Read your manual. understand what you’ve read - then
begin operations.
• Allow only those authorized and qualified personnel to
operate machine who have demonstrated that they understand safe and proper operation and maintenance of the
unit.
• An operator must not accept operating responsibilities
until adequate training has been given by competent and
authorized persons.
• Before operation check work area for overhead electric
lines. (see electrocution hazard, section 1-2.)
• Before operation check work area for machine traffic such
as forklifts, cranes, and other construction equipment.
• Set-up machine for operation only on a smooth, firm level
surface.
• Ensure that operators of other overhead and floor level
machines are aware of the aerial platforms presence. Disconnect power to overhead cranes, barricade floor area if
necessary.
• Precautions to avoid all known hazards in the work area
must be taken by the operator and his supervisor before
starting the work.
• Do not operate this machine unless it has been serviced
and maintained according to the manufacturers specifications and schedule.
• Ensure daily inspection and function check is performed
prior to placing machine into operation. Have authorized
personnel take any necessary corrective action before
placing machine into operation.
• Never disable or modify any safety device. Any modification of the machine is a safety violation and is a violation of
osha and ansi rules.
• Do not operate machine when exposed to high wind, rain
or snow.
• Never operate or raise platform when machine is on a
truck or other vehicle.
1-2 – JLG Lift – 3120774
Page 13

SECTION 1 - SAFETY PRECAUTIONS
• Approved head gear (i.e. hard hat, etc.) must be worn
when required by all operating and ground personnel.
• Read and obey all danger, warnings, cautions and operating instructions on machine and in this manual.
• Be familiar with location and operation of ground station
and emergency controls.
1.3 OPERATING SAFETY
• Do not operate any machine on which danger, warning,
caution or instruction placards or decals are missing or
illegible.
• Never exceed manufacturers rated platform capacity refer to capacity decal on machine.
• Do not enter platform until the floor brake has been properly adjusted and the unit’s base frame is level according
to the bubble level indicator on base frame.
• Do not operate machine on soft footing that will allow the
floor brake to settle into or break through surface.
• Never operate a malfunctioning machine. If a malfunction
occurs, shut down the machine, remove it from service,
and notify proper authorities.
• While operating the machine, personnel in the platform
shall at all times wear approved fall protection equipment
and other safety gear as required. A lanyard attachment is
supplied on the top rail at the rear of the platform. Failure
to follow these instructions could result in death or serious
injury.
• Check clearances above, on sides and bottom of platform
when raising and lowering platform.
• Never use the mast to gain access to or leave platform.
3120774 – JLG Lift – 1-3
Page 14
SECTION 1 - SAFETY PRECAUTIONS
Figure 1-2. Always Look in the Direction of Movement.
Watch for Overhead and Other Obstructions.
• Do not attach overhanging loads to the platform or
increase the platform size with unauthorized deck extensions or attachments.
• Do not tie off machine to any adjacent structure. never
attach wire, cable or any similar items to platform.
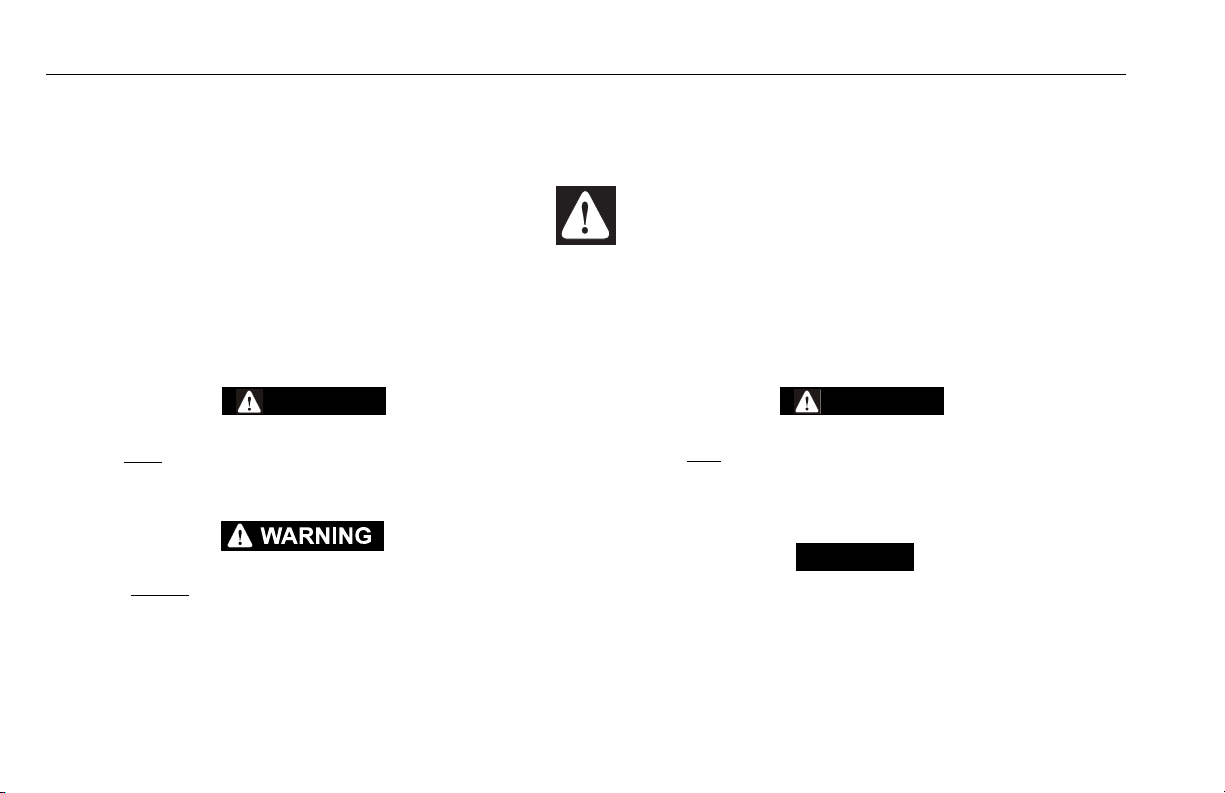
Figure 1-3. Death or Serious Injury Could Occur from a
Tip Over
1-4 – JLG Lift – 3120774
Page 15
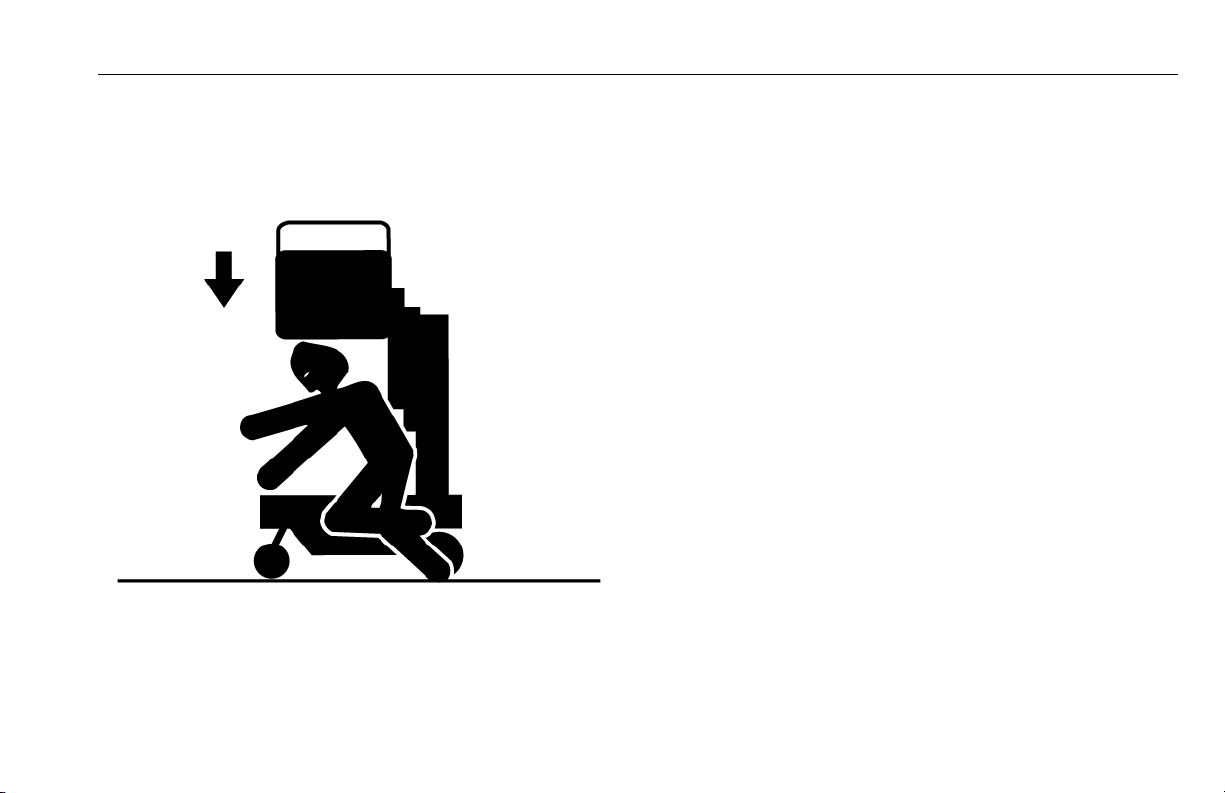
Figure 1-4. All Personnel Must Stand Clear When
Platform Is Being Raised Or Lowered.
SECTION 1 - SAFETY PRECAUTIONS
• Transfers between a structure and the platform expose
operators to fall potentials. this practice should be discouraged wherever possible. Where transfer must be
accomplished to perform the job, two lanyards will be
used and the platform must be within 1 foot (0.3 m) of the
adjacent - safe and secure - structure. one lanyard should
be attached to the platform, the other to the structure. The
safety lanyard that is attached to the platform should not
be disconnected until such time as the transfer to the
structure is complete.
• No horseplay is permitted in platform.
• Do not allow personnel to tamper with, service, or operate
this machine from the ground with personnel in platform
except in an emergency.
• During platform operation keep all body parts inside platform railings.
• Never position ladders, steps, or similar items on unit to
provide additional reach for any purpose.
• When working from platform both feet must be firmly positioned on deck.
• Do not extend reach limits of this machine with additional
equipment such as planks, boxes, etc.
3120774 – JLG Lift – 1-5
Page 16

SECTION 1 - SAFETY PRECAUTIONS
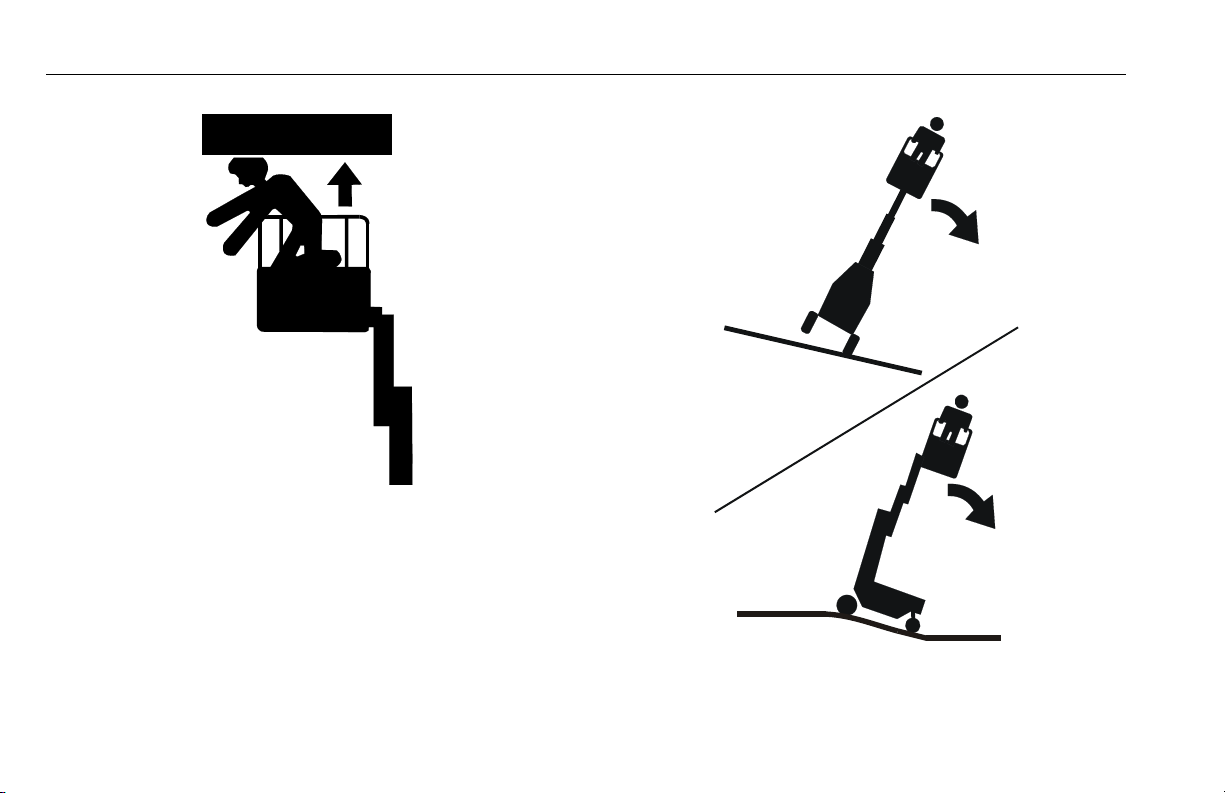
Figure 1-5. Falling from Platform could cause
Death or Serious Injury.
• Do not use ladders on or against machine. do not perform
work that will subject unit to a horizontal force or create a
rocking motion of the platform.
• Do not operate machine without the platform gates
securely latched.
• Always ensure that power tools are properly stowed and
never left hanging by their cord from the platform work
area.
• Avoid accumulation of debris on platform work area. keep
mud, oil, grease and other slippery substances from footwear and platform deck.
1-6 – JLG Lift – 3120774
Page 17

SECTION 1 - SAFETY PRECAUTIONS
1.4 Electrocution Hazard
Table 1-1. Minimum Approach Distance (M.A.D.)
VOLTAGE RANGE
(PHASE TO PHASE)
0-50KV 10 (3)
Over 50KV to 200KV 15 (5)
Over 200KV to 350KV 20 (6)
Over 350KV to 500KV 25 (8)
Over 500KV to 750KV 35 (11)
Over 750KV to 1000KV 45 (14)
NOTE: This Minimum Approach Distance shall apply except where
employer, local, or governmental regulations are more stringent.
MINIMUM APPROACH DISTANCE -
Feet (m)
Maintain a clearance of at least 10 ft (3m) between any part of the
machine and its occupants, their tools, and their equipment from
any electrical line or apparatus carrying up to 50,000 volts. One
foot (0.3m) additional clearance is required for every additional
30,000 volts or less.
The minimum approach distance may be reduced if insulating barriers are installed to prevent contact, and if the barriers are rated
for the voltage of the line being guarded. These barriers shall not
be part of (or attached to) the machine. The minimum approach
distance shall be reduced to a distance within the designed working dimensions of the insulating barrier. This determination shall
be made by a qualified person in accordance with employer, local,
or governmental requirements for work practices near energized
equipment.
3120774 – JLG Lift – 1-7
Page 18
SECTION 1 - SAFETY PRECAUTIONS
1.5 TRANSPORTING
Before transporting the machine the user/operator must be familiar with the proper procedures for transporting the machine, as
well as the weight and size of the machine.
The user/operator should be familiar with the surrounding work
area and surface before transporting the machine. The work area
must be a smooth, firm surface on which machine is capable of
being leveled.
NOTE: Remember that the key to safe and proper usage is com-
mon sense and its careful application.
FAILURE TO COMPLY WITH SAFETY PRECAUTIONS LISTED IN THIS
SECTION AND ON MACHINE MAY RESULT IN MACHINE DAMAGE, PERSONNEL INJURY OR DEATH AND IS A SAFETY VIOLATION.
1.6 TRANSPORT SAFETY
• Fully lower and completely empty platform of tools and
debris before moving machine.
• Never allow personnel in platform while moving machine.
FAILURE TO OBSERVE THE FOLLOWING TIPPING HAZARD INSTRUCTIONS COULD CAUSE THE UNIT TO TIP OVER OR BE HARD TO CONTROL WHEN BEING MOVED, WHICH COULD RESULT IN SERIOUS
INJURY OR DEATH DUE TO BEING PINNED OR CRUSHED BY THE UNIT.
• On a level surface, always travel with the platform end
leading the way.
• Watch for obstructions around machine and overhead
when moving.
• Check travel path for persons, holes, bumps, drop-offs,
obstructions, debris, and coverings which may conceal
holes and other hazards, as tipping could occur.
• Before moving machine on floors, trucks and other surfaces, check allowable capacity of surfaces.
• Two people are required on slopes up to 5 degrees. a
forklift must be used when moving units on slopes greater
than 5 degrees.
1-8 – JLG Lift – 3120774
Page 19
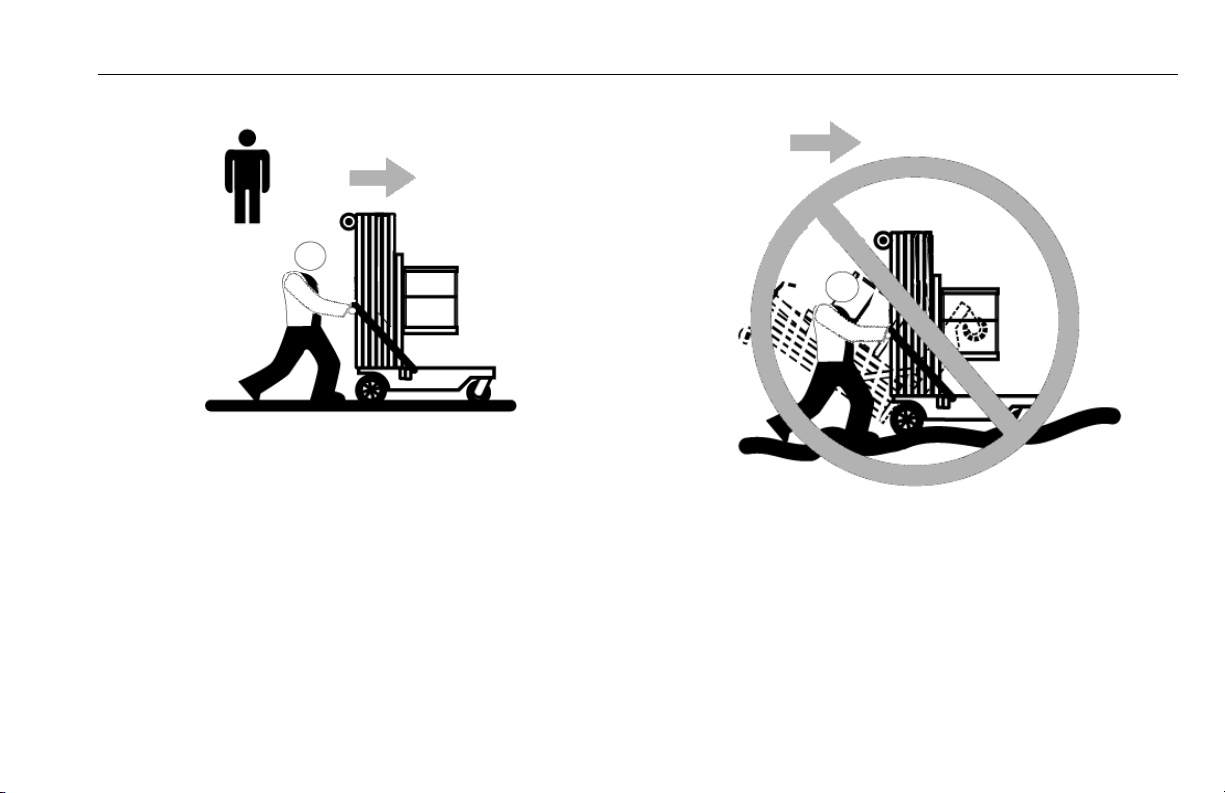
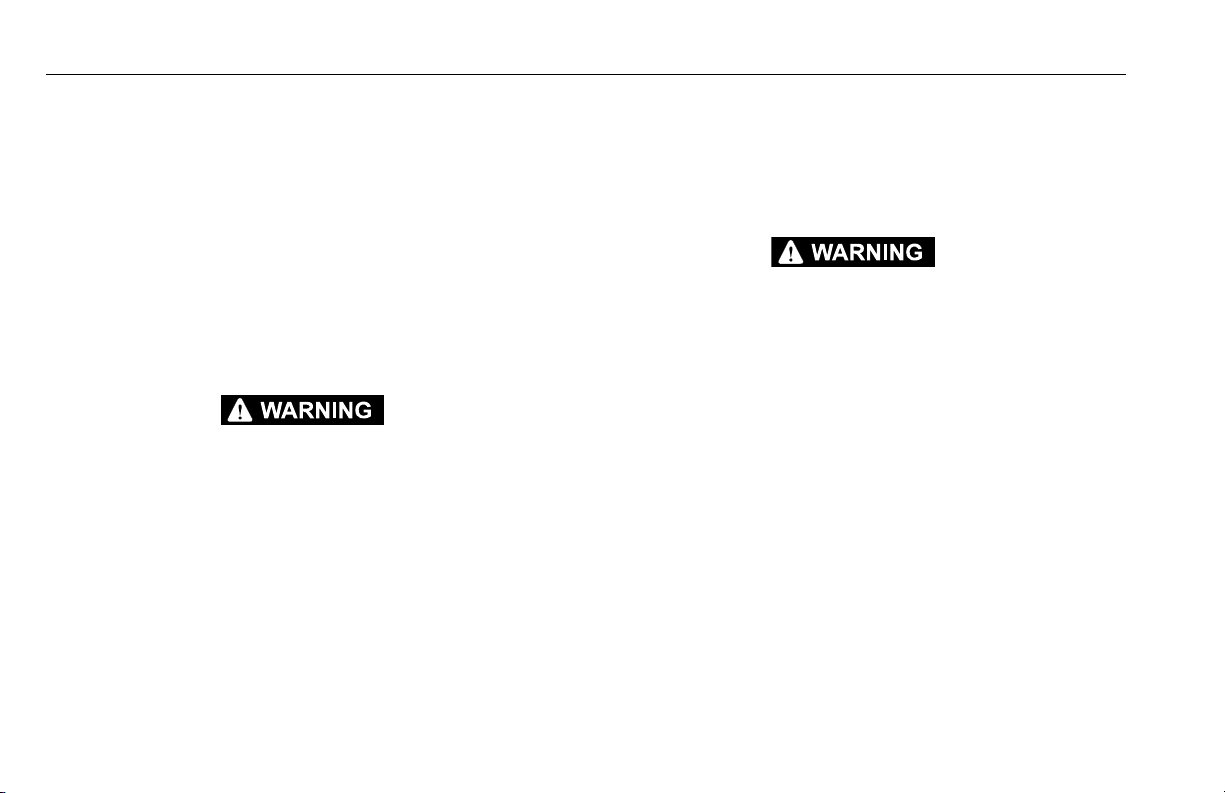
Figure 1-6. Use Handles Provided On Mast Crossbar
To Move Machine.
SECTION 1 - SAFETY PRECAUTIONS
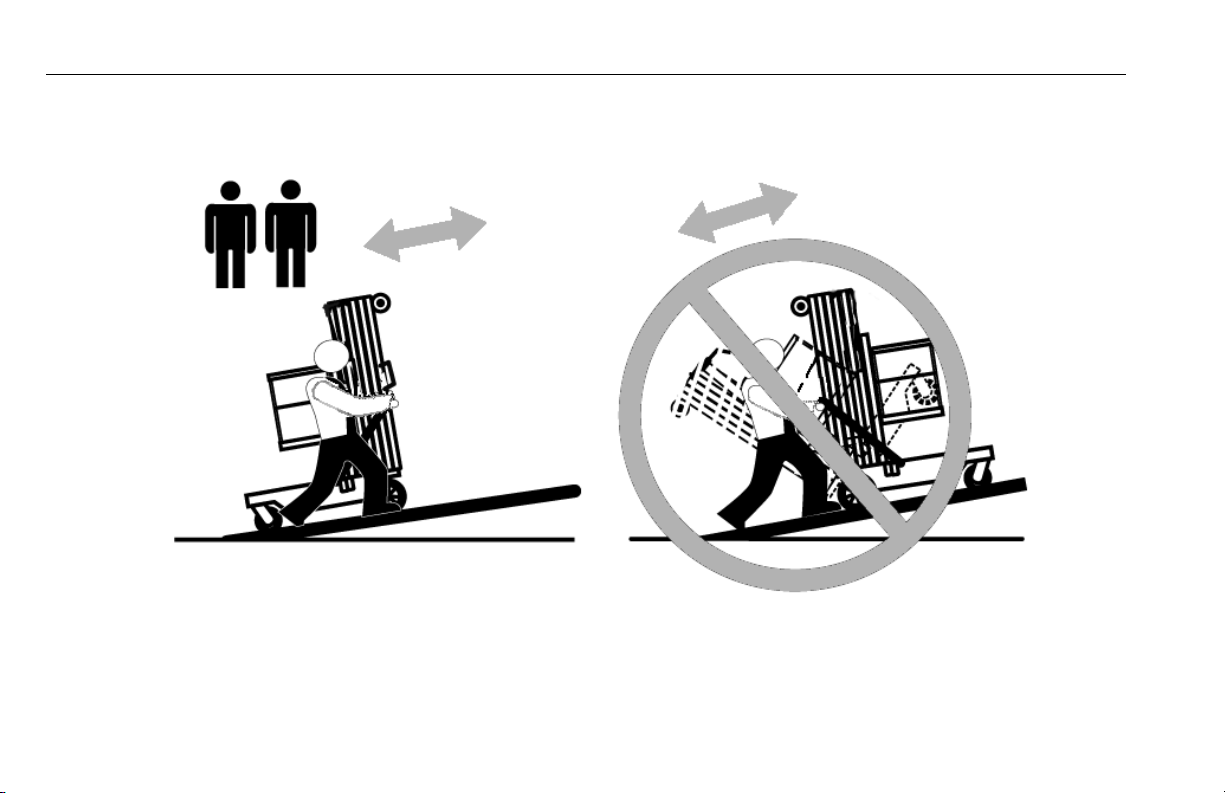
• Always travel up or down a slope with the platform end of
the machine positioned towards the low side of the slope.
the operator and assistant must walk beside and guide
the machine with the handles on the mast crossbar.
• Never position the unit sideways on a slope.
• Use caution and check clearances when moving machine
in restricted or close quarters.
Figure 1-7. Do Not Move Unit on Soft or Uneven
Surfaces or Over Obstructions, Bumps, Debris, Etc.
• Always use an assistant when moving machine in areas
where vision is obstructed.
• Keep non-operating personnel at least 6 feet (1.8 m)
away from machine during transporting operations.
3120774 – JLG Lift – 1-9
Page 20
SECTION 1 - SAFETY PRECAUTIONS
Figure 1-8. Two People May Be Required on Slopes Up To Five Degrees.
Also Always Travel With Platform End On The Low Side of Slope.
1-10 – JLG Lift – 3120774
Page 21

SECTION 2 - USER RESPONSIBILITIES, MACHINE PREPARATION, AND INSPECTION
SECTION 2. USER RESPONSIBILITIES, MACHINE PREPARATION, AND
INSPECTION
2.1 Personnel Training
The aerial platform is a personnel handling device; so it is necessary that it be operated and maintained only by trained personnel.
Persons under the influence of drugs or alcohol or who are subject
to seizures, dizziness or loss of physical control must not operate
this machine.
Operator Training
Operator training must cover:
1. Use and limitations of the controls in the platform and at
the ground, emergency controls and safety systems.
2. Control labels, instructions, and warnings on the
machine.
3. Rules of the employer and government regulations.
4. Use of approved fall protection device.
5. Enough knowledge of the mechanical operation of the
machine to recognize a malfunction or potential malfunction.
6. The safest means to operate the machine where overhead obstructions, other moving equipment, obstacles,
depressions, holes, and drop-offs exist.
7. Means to avoid the hazards of unprotected electrical
conductors.
8. Specific job requirements or machine application.
Training Supervision
Training must be done under the supervision of a qualified person
in an open area free of obstructions until the trainee has developed the ability to safely control and operate the machine.
Operator Responsibility
The operator must be instructed that he/she has the responsibility
and authority to shut down the machine in case of a malfunction or
other unsafe condition of either the machine or the job site.
3120774 – JLG Lift – 2-1
Page 22

SECTION 2 - USER RESPONSIBILITIES, MACHINE PREPARATION, AND INSPECTION
NOTICE
2.2 Preparation, Inspection, and Maintenance
The following table covers the periodic machine inspections and
maintenance recommended by JLG Industries, Inc. Consult local
regulations for further requirements for aerial work platforms. The
frequency of inspections and maintenance must be increased as
necessary when the machine is used in a harsh or hostile environment, if the machine is used with increased frequency, or if the
machine is used in a severe manner.
JLG INDUSTRIES, INC. RECOGNIZES A FACTORY-TRAINED SERVICE
TECHNICIAN AS A PERSON WHO HAS SUCCESSFULLY COMPLETED
THE JLG SERVICE TRAINING SCHOOL FOR THE SPECIFIC JLG PRODUCT MODEL.
2-2 – JLG Lift – 3120774
Page 23

SECTION 2 - USER RESPONSIBILITIES, MACHINE PREPARATION, AND INSPECTION
Table 2-1. Inspection and Maintenance Table
TYPE FREQUENCY
Pre-Start Inspection
Pre-Delivery
Inspection
(See Note)
Frequent
Inspection
Annual Machine
Inspection
Preventative
Maintenance
NOTE: Inspection forms are available from JLG. Use the Service and Maintenance Manual to perform inspections.
B ef o re u s in g ea c h d a y ; o r whenever there’s an Operator change.
Before each sale, lease, or rental delivery. Owner, Dealer, or User Qualified JLG
In service for 3 months or 150 hours, whichever
comes first; or Out of ser vice for a period of more
than 3 months; or Purchased used.
Annually, no later than 13 months from the date of
prior inspection.
At intervals as specified in the Ser vice and Maintenance Manual.
PRIMARY
RESPONSIBILITY
User or Operator User or Operator Operator and Safety Manual
Owner, Dealer, or User Qualified JLG
Owner, Dealer, or User Factory-Trained
Owner, Dealer, or User Qualified JLG
SERVICE
QUALIFICATION
Mechanic
Mechanic
Service Technician
(Recommended)
Mechanic
Service and Maintenance Manual and applicable JLG inspection form
Service and Maintenance Manual and applicable JLG inspection form
Service and Maintenance Manual and applicable JLG inspection form
Service and Maintenance Manual
REFERENCE
3120774 – JLG Lift – 2-3
Page 24

SECTION 2 - USER RESPONSIBILITIES, MACHINE PREPARATION, AND INSPECTION
Pre-Start Inspection
The Pre-Start Inspection should include each of the following:
1. Cleanliness – Check all surfaces for leakage (oil, fuel,
or battery fluid) or foreign objects. Report any leakage to
the proper maintenance personnel.
2. Decals and Placards – Check all for cleanliness and
legibility check and that none of the decals and placards
are missing. Check that all illegible decals and placards
are cleaned or replaced.
3. Operators and Safety Manuals – Make sure a copy of
the Operator and Safety Manual, EMI Safety Manual
(Domestic only), and ANSI Manual of Responsibilities
(Domestic only) is enclosed in the weather resistant
storage container.
4. Walk-Around Inspection – Refer to Figure 2-1. on page
2-6.
5. Battery – Charge as required.
6. Fuel (Combustion Engine Powered Machines Only) –
Add the proper fuel as necessary.
7. Hydraulic Oil – Check the hydraulic oil level. Ensure
hydraulic oil is added as required.
8. Function Check – Once the “Walk-Around” Inspection
is complete, perform a function check of all systems in
an area free of overhead and ground level obstructions.
Refer to Section 3 for more specific instructions.
IF THE MACHINE DOES NOT OPERATE PROPERLY, TURN OFF THE
MACHINE IMMEDIATELY! REPORT THE PROBLEM TO THE PROPER MAINTENANCE PERSONNEL. DO NOT OPERATE THE MACHINE UNTIL IT IS
DECLARED SAFE FOR OPERATION.
2.3 FUNCTION CHECK
The function check of all systems should be performed in an area
free of overhead and ground level obstructions. Perform a function
check as follows:
1. Set-up machine for operation, according to instructions
in Section 4, set floor stop, etc.
2. Enter platform, raise and lower platform 2 ft. to 3 ft.
(.61m to .92 m) several times. Check for smooth elevation and lowering of platform.
3. (If Equipped - Machines with side entry-material tray platform and optional platform gate alarm). Raise the plat-
form approximately 2 in. or more, check the gate alarm
will sound when either platform gate is opened.
4. With platform completely lowered, check hydraulic oil
level in reservoir at ground control station. Maintain an
oil level to the "Fill to Line" indicator on the side of the
reservoir. NEVER USE HYDRAULIC BRAKE FLUID.
2-4 – JLG Lift – 3120774
Page 25

SECTION 2 - USER RESPONSIBILITIES, MACHINE PREPARATION, AND INSPECTION
2.4 DAILY WALK-AROUND INSPECTION
It is the user/operator’s responsibility to inspect the machine
before the start of each workday. It is recommended that each
user/operator inspect the machine before operation, even if the
machine has already been put into service under another user/
operator. This Daily Walk-Around Inspection is the preferred
method of inspection.
General
Begin the “Walk-Around Inspection” at item 1 listed following.
Continue around machine checking each item in sequence for the
conditions listed in the “Walk-Around Inspection Check list”.
TO AVOID INJURY DO NOT OPERATE MACHINE UNTIL ALL MALFUNCTIONS
HAVE BEEN CORRECTED. USE OF A MALFUNCTIONING MACHINE IS A
SAFETY VIOLATION.
TO AVOID POSSIBLE INJURY, BE SURE MACHINE POWER IS “OFF”
DURING “WALK-AROUND INSPECTION”.
NOTE: Do not overlook visual inspection of chassis underside.
Checking this area often results in discovery of conditions
which could cause extensive machine damage.
1. Wheels and Casters - Properly secured, wheels and
casters turn freely and are properly lubricated. Check for
any visible damage.
2. Floor Stop(s) - Properly secured to frame, no visible
damage (cracks, distortion, etc.) and is functioning
properly.
3. Base Frame - No visible damage; components properly
secured, no loose wires dangling below base; bubble
level in place and functioning properly.
4. Battery/Battery Charger Installation -
(DC Machines)
optional sealed AGM battery), cables secure, no dam-
age or corrosion.
5. Motor/Pump/Reservoir Unit - All properly secured, no
visible damage, no evidence of hydraulic leaks. Check
that hydraulic reservoir fluid level is filled to the "Fill to
Line" mark on the side of the reservoir.
6. Manual Descent Valve - (Located under the base frame
at the rear of the machine), properly secured, no loose
or missing parts, no visible damage.
7. Ground Controls - Key switch operable, no visible damage; placards secure and legible; emergency stop
switch, no visible damage and properly set for operation.
Proper battery electrolyte level (except
3120774 – JLG Lift – 2-5
Page 26

SECTION 2 - USER RESPONSIBILITIES, MACHINE PREPARATION, AND INSPECTION
1
2
2
3
4
5
6
7
8
9
1
0
11
Daily Walk-Around
Inspection Items
1. Wheels & Casters
2. Floor Stop(s)
3. Base Frame
4. Battery Box/Charger
5. Motor/Pump/Reservoir Unit
6. Manual Descent Valve
7. Ground Controls
8. Mast Installation
9. Platform Controls
10. Guard Rail Installation
11. Platform Assembly
Figure 2-1. Daily Walk-Around Inspection.
2-6 – JLG Lift – 3120774
Page 27

SECTION 2 - USER RESPONSIBILITIES, MACHINE PREPARATION, AND INSPECTION
8. Mast Installation - Mast sections properly secured, no
visible damage to mast sections, no loose or missing
parts, slide pads properly secured. Mast chains and
cables properly secured, lubricated and undamaged.
Sequencing cables properly secured and undamaged.
Sheaves and pins are properly secured, have no visible
damage, no loose or missing parts and are lubricated.
9. Platform Controls - Up/Down and Function Enable buttons properly secured, no loose or missing parts, no visible damage. Placards secure and legible, emergency
shut-off button set for operation. Control markings legible; Operators manual enclosed in manual storage tube.
10. Guard Rail Installation - All railings securely attached,
no visible damage, no missing parts; sliding entry bar in
proper working order. Platform gate working properly,
no visible sign of damage.
11. Platform Assembly - Secure to mast; no loose or missing parts, no visible damage. Control and power cables,
no visible damage; cables properly tensioned and
seated in control cable sheaves; control cable sheaves
not damaged and rotate freely.
If equipped with side-entry platform with material tray
(OPTION), check material tray is secure to the platform
railing, no loose or missing parts, and tray locks
securely in place when raised into position.
In addition to the Daily Walk-Around Inspection, be sure to include
the following as part of the daily inspection:
Batteries Charged
Start each day with fully charged batteries. (See “BATTERY
CHARGING” on page 4-2.)
Overall Cleanliness
Keep oil, grease, water, etc. wiped from standing surfaces and
hand holds.
Placards
Keep all information and operating placards clean and unobstructed. Cover areas where placards are present when using the
machine for spraying paint or any material which could cover
these surfaces and reduce legibility.
Lubrication
For those parts pointed out in the Walk-Around Inspection requiring lubrication, (See “Lubrication Points (See Table 7-2. on page 7-
9)” on page 7-8.) for specific time interval requirements.
3120774 – JLG Lift – 2-7
Page 28

SECTION 2 - USER RESPONSIBILITIES, MACHINE PREPARATION, AND INSPECTION
NOTES:
2-8 – JLG Lift – 3120774
Page 29

SECTION 3 - MACHINE CONTROLS AND INDICATORS
SECTION 3. MACHINE CONTROLS AND INDICATORS
3.1 OPERATING CHARACTERISTICS AND LIMITATIONS
General
A thorough knowledge of the operating characteristics and limitations of the machine is always the first requirement for any user,
regardless of user’s experience with similar types of equipment.
Placards
(See Figure 3-4.)
Important points to remember during operation are provided at
the control stations by DANGER, WARNING, CAUTION, IMPORTANT, NOTICE and INSTRUCTION placards. This information is
placed at various locations on the machine for the express purpose of alerting personnel of potential hazards constituted by the
operating characteristics and load limitations of the machine. See
Foreword at the start of this manual for a definition of the seriousness of each of the above placard types. See Decal Location
Figure 3-4. on page 3-5 in this section for decals which apply to
this machine.
Capacities
Raising the platform above the stowed position is based on the following criteria:
• The machine is positioned on a smooth, firm level surface.
• The load is within manufacturer’s rated capacity.
• All machine systems are functioning properly.
• The machine floor brake on the base frame is properly set
and locked in place.
Stability
This machine, as originally manufactured by JLG and operated
within its rated capacity on a smooth, firm and level supporting
surface, provides a stable aerial platform for all platform positions.
3120774 – JLG Lift – 3-1
Page 30

SECTION 3 - MACHINE CONTROLS AND INDICATORS
EMERGENCY
STOP BUTTON
POWER ON/OFF
KEY SWITCH
HYDRAULIC
OIL
RESERVOIR
3.2 CONTROLS AND INDICATORS
Ground Control Station (See Figure 3-1.)
NOTE: When the machine is shut down for overnight parking or
battery charging, be sure the POWER ON/OFF KEY
SWITCH is positioned to OFF to prevent draining the batteries.
1. POWER ON/OFF Key Switch
A key operated power on/off switch located on the ground
control station panel controls power to all functions on the
unit. The machine will not operate without the key inserted
and turned to the ON position. When left unattended
removing key will prevent unauthorized machine use.
2. EMERGENCY STOP Button
An emergency stop (RED button) is mounted on both the
ground control station and the platform control panel.
When the button is depressed, all machine functions will
stop. To re-activate power to the machine, turn emergency
stop button clockwise until button is reset.
Figure 3-1. Ground Control Station.
3-2 – JLG Lift – 3120774
Page 31

SECTION 3 - MACHINE CONTROLS AND INDICATORS
MANUAL DESCENT
VALVE KNOB
LOCAT IO N
PULL TO LOWER PLATFORM -
RELEASE TO STOP LOWERING
3. HYDRAULIC RESERVOIR/CIRCUIT BREAKER/FUSE
(located inside ground control station housing)
The hydraulic reservoir is housed inside the ground control station, the hydraulic oil level can be checked through
an access hole in the side of the cover. Maintain an oil
level to the "Fill to Line" indicator on the side of the reservoir.
NOTE: Check hydraulic oil only when platform is completely low-
ered and after cycling platform up/down a few times.
A 5 Amp fuse is located inside the ground control station.
4. MANUAL DESCENT VALVE Knob
This (RED) knob, located under the base frame at the rear
of the machine, (See Figure 3-2.), provides for lowering of
the platform in the event of an emergency or power failure.
To operate PULL knob to LOWER platform, RELEASE
knob to STOP lowering.
Figure 3-2. Manual Descent Valve Location.
3120774 – JLG Lift – 3-3
Page 32

SECTION 3 - MACHINE CONTROLS AND INDICATORS
EMERGENCY STOP BUTTON
PLATFORM UP BUTTON
FUNCTION ENABLE BUTTON
PLATFORM DOWN BUTTON
Platform Control Station
(See Figure 3-3.)
1. EMERGENCY STOP/SHUT-OFF Button.
An EMERGENCY STOP (RED) button is provided in order
to turn machine power on and off in the platform and also
to turn off machine power in the event of an emergency.
Power is on when the switch is in the reset position (turned
completely clockwise - out). Power is off and all machine
functions will stop, when button is depressed.
2. FUNCTION ENABLE Button.
This (GREEN) button must be depressed simultaneously
with either the UP or DOWN platform function buttons in
order to operate the platform.
3. PLATFORM UP Button.
When depressed simultaneously with ENABLE button
raises the platform to a higher level.
4. PLATFORM DOWN Button.
When depressed simultaneously with ENABLE button lowers the platform to a lower level.
5. AUXILILARY LOWERING DEVICE Button (OPTION)
This button located on the mast behind the platform control station, will in the event of a loss of power from the
machines main power source, lower the platform from a
raised position.
Figure 3-3. Platform Control Station.
3-4 – JLG Lift – 3120774
Page 33

Decal Installation
SECTION 3 - MACHINE CONTROLS AND INDICATORS
Figure 3-4. SP Machine - Decal Installation. (See Table 3-1.)
3120774 – JLG Lift – 3-5
Page 34

SECTION 3 - MACHINE CONTROLS AND INDICATORS
Table 3-1. SP Series Decal Installation Chart.
Location ANSI
1
2
3
4
5
6
7
8
9
10
11
12
13
14
15
1704366 1704594 1704777 1704970 1704366
1704212 1704213 1704215 1704076 1704212
1706343 1706343 1704775 1704969 1706341
1703781 1704029 1704086 1704077 1703781
1704221 1704222 1704224 1704964 1704221
1701509 1701509 1701509 1701509 1701509
1704424 1704593 1704776 1704968 1704424
1703817 1704029 1703817 1703817 1703817
1703785 1704031 1704031 1704079 1703785
1703784 1704030 1704030 1704078 1703784
1706953 1706953 1706953 1706953 1706953
1703814 1703814 1703814 1703814 1703814
1703789 1704034 1704092 1704083 1703789
1703786 1704032 1704032 1704081 1703786
1704277 1704277 1704277 1704277 1704277
ANSI
(LAT)
ANSI
(JPN)
ANSI
(CHI)
CSA
(FRE)
3-6 – JLG Lift – 3120774
Page 35

SECTION 4 - MACHINE OPERATION
SECTION 4. MACHINE OPERATION
4.1 MACHINE DESCRIPTION
SP machines are manually propelled machines, with a platform
mounted to an elevating aluminum mast mechanism. The mast is
raised and lowered by a hydraulic cylinder extending between
mast section-1 and -2, the remaining mast sections are proportionally extended and retracted using steel chains and cables.
Hydraulic pressure is supplied to the lift cylinder by an electrically
powered hydraulic pump. The platform may be raised only when
lift is positioned on smooth, firm, level surface with the floor stop
set. The SP personnel lift’s intended purpose is to provide personnel access to areas above ground level.
The SP personnel lift has a primary operator control station in the
platform. From this control station the operator can raise and
lower the platform. A ground control station is also provided. This
station contains a keyed power on/off switch, an emergency stop
button and an emergency/manual decent valve which enables the
platform to be lowered to the ground in an emergency, if the operator in the platform is unable to do so, or if a power failure should
occur.
Instructions and warnings are posted adjacent to both operator
control stations and at other places on the machine. It is extremely
important that the user/operator know what instructions and warnings are placed on the machine and in the manual. And that these
instructions and warning’s be reviewed periodically. The JLG personnel lift is designed to provide efficient and safe operation when
maintained and operated in accordance with instructions and
warnings on the machine, in the Operating, Safety and Maintenance Manual and all job-site and government rules and regulations.
As with any type of machinery, the operator is very important to
efficient and safe operation. It is absolutely necessary that the JLG
lift be regularly maintained in accordance with this manual.
Any evidence of lack of maintenance, malfunction, excessive wear,
damage or modification to the machine must be reported immediately to the machine owner, the job-site supervisor or safety manager and the machine must be taken out of service until all
discrepancies are corrected.
The JLG SP personnel lift is not intended to be used to lift material
other than hand-picked stock or supplies. Supplies or tools which
extend outside the platform are prohibited except for JLG
approved receptacles. The personnel lift must not be used as a
forklift, crane, or support for overhead structure.
The total platform capacity is to be uniformly distributed in the
center of the platform. This means that the total combined weight
of personnel, tools and supplies loaded into the platform must not
exceed the total platform capacity.
3120774 – JLG Lift – 4-1
Page 36

SECTION 4 - MACHINE OPERATION
4.2 GENERAL
This section provides the necessary information needed to operate the machine. Included in this section are the procedures for
set-up, raising, lowering, platform loading and transporting. It is
important that the user read and understand the proper procedures before operating the machine. Although some of the more
important operating safety precautions will be listed in the following paragraph sections, it is extremely important all safety precautions in Section 1 - Safety Precautions be read and understood
before operating machine. If a "Daily Walk-Around Inspection",
(see Section 2) has not been completed, perform this inspection
before starting set-up and operation. The operator must also be
familiar with all machine controls as described in Section 3 - "User/
Operator Responsibilities and Machine Controls".
4.3 BATTERY CHARGING
These machines are equipped standard with 12 volt, 10 amp
output battery chargers (120V-AC/60Hz or 100-240V-AC/50/60Hz
input). The battery charger has a microprocessor controlled
automatic charge sensing circuit which can determine cell voltage and regulates charger output as required. The charger
automatically terminates charging when a full battery charge is
achieved.
NOTE: Wet cell battery maintenance information can be found in
Section 7 of this Operation Manual.
NOTE: If machine is equipped with the AGM (Absorption Gas
Mat) battery option, this battery is a VRLA (valve regulated
lead acid) type and is a sealed maintenance free battery.
The charger supplied with this battery is of higher output
(20 amp), resulting in a quicker charge cycle. This charger operates similarly to the standard charger as outlined
in the following, except there is only a charge complete
(100%) LED.
Battery Charger Operation
1. Position machine in well ventilated area near an AC electrical outlet and set the Ground Control-PLAT/OFF/
GRND key switch to the OFF position.
4-2 – JLG Lift – 3120774
Page 37

SECTION 4 - MACHINE OPERATION
100%
80%
25%
100%
80%
25%
100-120
VAC
200-240
VAC
Figure 4-1. Battery Box and Charger Assembly -
(Original Design)
Figure 4-2. Battery Box and Charger Assembly -
(Compact Design)
3120774 – JLG Lift – 4-3
Page 38

SECTION 4 - MACHINE OPERATION
2. Connect the battery charger AC power cord receptacle
to a properly grounded AC electrical outlet, use a suitable extension cord.
3. When plugged in, the charger runs through a self-diagnostic check. The LED’s on the front panel of the battery
charger flash in the sequence.
4. When ready to charge, the CHARGER ON LED and the
INCOMPLETE CHARGE (25%) LED on the front panel of
the charger will light up, the charger will then begin to
charge the batteries.
NOTE: If the ABNORMAL CYCLE LED comes on and stays on at
any time during the charge cycle, see sub-section following about the ABNORMAL CYCLE indicator LED.
5. When the battery cell voltage reaches 2.37 V/cell the
80% CHARGE LED on the front panel of the charger will
light up. The charger then continues to monitor the
increase in charge until it sees no increase, and then terminates the charging process.
6. The CHARGE COMPLETE (100%) LED will come on
when the charging process is finished.
7. Remove the power cord from the AC power cord receptacle on the face of the charger.
Abnormal Cycle Indicator LED
If the ABNORMAL CYCLE indicator LED should come on during
the normal charging cycle of the batteries, it could indicate any of
the following conditions;
• The AC input to the charger was interrupted, i.e. local
power failure or charger cable was unplugged or bumped
and power was interrupted intermittently.
• A dead cell or cells in the battery would prevent the charger
from sensing enough voltage to complete the battery
charge.
• One or more of the battery terminal connections loose or
corroded resulting in an intermittent incomplete circuit.
4-4 – JLG Lift – 3120774
Page 39

ABNORMAL CYCLE
(YELLOW LED)
A/C POWER
CORD RECEPTACLE
CIRCUIT
BREAKER
RESET
% OF CHARGE
IN PROGRESS
CHARGER ON
(GREEN LED'S)
(GREEN LED)
100%
80%
25%
SECTION 4 - MACHINE OPERATION
Figure 4-3. Battery Charger - Front Panel - 120V-AC Input.
3120774 – JLG Lift – 4-5
Page 40

SECTION 4 - MACHINE OPERATION
100-120
VAC
100%
80%
25%
200-240
VAC
Figure 4-4. Battery Charger - Front Panel - 120 - 240V-AC Input.
4-6 – JLG Lift – 3120774
Page 41

SECTION 4 - MACHINE OPERATION
4.4 MACHINE SET-UP AND OPERATION
The following sequence of set-up procedures must be followed to
safely operate this machine.
1. Position machine in work area. Work area must be a
smooth, firm, level surface.
NOTE: Check that battery box assembly is installed, battery is
charged and connected to the machine’s DC receptacle.
2. Set Power On/Off Key switch to the ON position at the
ground control station.
3. Check both Emergency Stop switches, one on platform
control station and one on ground control station, they
must be in the reset position for operation.
4. Set Floor Stop, see steps following.
Floor Stop Operation
(See Figure 4-5.)
1. Located on both sides of the machine under the base
frame, behind either of the front caster wheels, are the
floor stop assemblies. Engage and lock one or both of
the floor stop assemblies down into position
THE FRONT CASTER WHEELS SHOULD BE RELIEVED OF THE MACHINES
WEIGHT ENOUGH SO THE MACHINE DOES NOT ROLL IN ANY DIRECTION.
IF THIS IS NOT THE CASE DO NOT ATTEMPT TO ELEVATE THE PLATFORM
UNTIL THE FLOOR STOP IS OPERATING PROPERLY.
2. To disengage the floor stop, apply pressure to the
release rod or lift up on the floor stop pedal.
3120774 – JLG Lift – 4-7
Page 42

SECTION 4 - MACHINE OPERATION
ENGAGING FLOOR STOP
RELEASING FLOOR STOP
Raising and Lowering the Platform
1. Enter platform and close the entry gate, see Section 4.5,
PLATFORM CONFIGURATIONS.
2. Attach your fall protection harness to the applicable lanyard attachment on the machine.
NOTE: On the platform control panel the FUNCTION ENABLE
(green button) must be depressed simultaneously with
either the UP or DOWN button in order for these functions
to work.
DO NOT ATTEMPT TO RAISE THE PLATFORM UNLESS EITHER OF THE
FLOOR STOP ASSEMBLIES IS PROPERLY SET AND MACHINE IS ON A
SMOOTH, FIRM, LEVEL SURFACE.
BEFORE AND WHILE RAISING THE PLATFORM, CHECK CLEARANCES
ABOVE AND AROUND PLATFORM AND MAST TO ENSURE ADEQUATE
CLEARANCE OF SURROUNDING OBJECTS AND PERSONNEL.
NOTE: Machines equipped with the platform gate alarm (option),
when the platform is raised approximately 2 in. or more,
the platform gate alarm will sound if either of the platform
gates are opened.
Figure 4-5. Engaging & Releasing Floor Stop.
3. To RAISE platform up, depress the FUNCTION ENABLE
BUTTON (green) and PLATFORM UP BUTTON (top,
4-8 – JLG Lift – 3120774
Page 43

SECTION 4 - MACHINE OPERATION
white button) on the platform control panel simultaneously. Upon reaching desired elevation level release UP
and FUNCTION ENABLE buttons.
ENSURE AREA BENEATH PLATFORM IS FREE OF PERSONNEL AND
OBSTRUCTIONS PRIOR TO LOWERING PLATFORM.
4. To LOWER platform, depress FUNCTION ENABLE BUTTON (green) and PLATFORM DOWN BUTTON (bottom,
white button) on control panel simultaneously. Upon
reaching desired elevation level release DOWN and
FUNCTION ENABLE buttons.
Auxiliary Lowering Switch (Option): To lower the platform using
the auxiliary lowering switch, be certain the emergency stop switch
on the platform control panel is set to the reset (on) position. Press
and hold both the (green) function enable button on the control
panel and the auxiliary lowering switch, on the side of the mast
behind the control panel, until platform is lowered.
NOTE: Machines equipped with platform gate alarm (option), the
platform must be completely lowered when exiting the
platform or the platform gate alarm will sound.
4.5 PLATFORM CONFIGURATIONS
Platform Loading
The platform maximum rated load capacity is shown on a placard
located on the platform control panel and is based upon the following criteria.
Maximum capacity for the SP model is as follows:
Table 4-1. Maximum Platform Capacity.
PLATFORM TYPE PLATFORM CAPACITY
12/15SP
StockPicker
(28 in. X 48 in.)
Extendible
26 in. X 49 in.
Side Entry with Tray
23 in. X 27 in.
ANSI
USA/Latin America
500 lb. (227 kg)
* 250 lb. (113kg) Front -
* 250 lb. (113kg) Rear
500 lb. (227 kg)
* 250 lb. (113kg) Front * 250 lb. (113kg) Rear *
500 lb. (227 kg)
250 lb. (113kg) Tray -
250 lb. (113kg) Platform
* 200 lb. (91kg) Front -
* 200 lb. (91kg) Front -
200 lb. (91kg) Platform
CSA
(Canada)
400 lb. (182 kg)
* 200 lb. (91kg) Rear
400 lb. (182 kg)
* 200 lb. (91kg) Rear
400 lb. (182 kg)
200 lb. (91kg) Tray -
* Distribute weight evenly over the platform base.
3120774 – JLG Lift – 4-9
Page 44

SECTION 4 - MACHINE OPERATION
CAUTION
StockPicking Platform Operation
(See Figure 4-6. and Figure 4-7.)
The stockpicking platform is available in two (2) versions.
• Fixed side-rail version
• Folding side-rail version
THE STOCKPICKER PLATFORM ALLOWS THE MACHINE TO BE OPERATED IN AN OPEN RAIL CONFIGURATION (SEE ILLUSTRATION).
THE OPERATOR MUST WEAR A FULL BODY HARNESS WITH A LANYARD (MAX. 6 FT. (1M) ATTACHED TO THE AUTHORIZED LANYARD
POINT OR A BODY BELT EQUIPPED WITH A LANYARD SHORT ENOUGH
TO PREVENT A FALL FROM THE PLATFORM.
Figure 4-6. Platform Operating Configurations.
4-10 – JLG Lift – 3120774
Page 45

Figure 4-7. Platform Operating Configurations.
SECTION 4 - MACHINE OPERATION
Extendible Platform Operation - OPTION
EXTENDIBLE PLATFORM - OPTION (GULL-WING ENTRY )
1. Gullwing Entry Gate 4. Extension Slide/Lock Handle
2. Entry Gate Latch 5. Sliding Extendible Section
3. Lanyard Attach Point (on side of mast)
3120774 – JLG Lift – 4-11
Page 46

SECTION 4 - MACHINE OPERATION
CAUTION
CAUTION
Extendible Platform - Lanyard Attachment
JLG INDUSTRIES, INC. RECOMMENDS THE OPERATOR IN THE PLATFORM
WEAR A FULL BODY HARNESS WITH A LANYARD ATTACHED TO AN
AUTHORIZED LANYARD ANCHORAGE POINT.
The main lanyard attach point for 12/15SP machines equipped
with the extendible platform option is located on the lower left side
of the mast platform header, just behind the operators platform.
AFTER ENTERING THE PLATFORM, BEFORE BEGINNING OPERATION
ALWAYS CLOSE THE PLATFORM ENTRY GATE(S).
4-12 – JLG Lift – 3120774
Page 47

SECTION 4 - MACHINE OPERATION
1
4
3
2
Side Entry Platform with Material Tray - OPTION Platform Gate Alarm - OPTION
To determine if your machine is equipped with the platform gate
alarm, look for a wire harness exiting the lower platform rail, near
the center at the rear of the platform. The gate alarm harness
plugs into the control station box behind the decal board. See
item 4 of illustration - SIDE ENTRY PLATFORM w/MATERIAL TRAY.
SIDE ENTRY PLATFORM w/FOLDING MATERIAL TRAY
1. Swing Side Entry Gates
2. Folding Material Tray
3. Lanyard Attach Point - (on mast)
4. Gate Alarm Harness (OPTION)
3120774 – JLG Lift – 4-13
Page 48

SECTION 4 - MACHINE OPERATION
1
3
2
4
4.6 QUICK-CHANGE PLATFORM MOUNTING
Quick-Change platform mounts which allow quick removal and
installation of currently available quick-change platforms.
NOTE: 12/15SP Models require the installation of the Quick-
Change mount kit to use Quick-Change Platforms.
Platform Removal
5. Remove the platform control console from the platform and
lay aside.
6. Remove both upper and lower mount attach pins securing
the platform support rails to the mast mounting channels.
7. Swing and lift the platform out of the mounts and lay aside.
Platform Installation
1. Set platform in upper and lower mounts.
2. Install attach pins in upper and lower mounts.
3. Attach platform control console to platform rail.
ENSURE ALL PINS AND FASTENERS ARE INSTALLED AND SECURE
PRIOR TO OPERATION.
4-14 – JLG Lift – 3120774
1. Upper Platform Mount
2. Upper Mount Attach Pins
3. Lower Platform Mount
4. Lower Mount Pins
Page 49

SECTION 4 - MACHINE OPERATION
NOTICE
NOTICE
4.7 STOWING MACHINE
1. Ensure that platform is fully lowered, turn POWER ON/
OFF key switch (on the Ground Control Station) to the
OFF position.
WHEN MOVING MACHINE PLEASE FOLLOW ALL SAFETY PRECAUTIONS DESCRIBED IN SECTION 1, “TRANSPORT SAFETY” OF THIS
MANUAL. ALSO SEE SECTION 4, “TRANSPORTING AND LIFTING” FOR
PROPER PROCEDURES FOR TRANSPORTING.
2. Move machine to a well-protected and well-ventilated
area. If necessary, cover the machine so it will be protected if in a hostile environment.
3. Set the floor stop when parking machine for an
extended period of time.
4. If necessary remove key from Ground Control Panel
POWER ON/OFF key switch to disable machine from
unauthorized use.
NOTE: If required, machine batteries should be charged in prep-
aration for next work day.
4.8 TRANSPORTING, LIFTING AND TIE DOWN
General
The machine may be transported from work-site to work-site using
any of the following methods:
• Pushing the machine around on its base wheels.
• Transport with a forklift truck using the forklift pockets in the
base-frame or to lift onto a transport vehicle.
Transporting by Pushing
CAREFULLY REVIEW ALL SAFETY PRECAUTIONS NOTED IN SECTION
1, “TRANSPORT SAFETY”, BEFORE ATTEMPTING TO MOVE MACHINE.
The machine’s base frame is equipped with load bearing wheels
mounted on a straight axle at the mast end of the machine; and a
pair of heavy duty swivel caster wheels mounted on the frame at
the platform end of the machine. It is important to closely follow
the instructions mentioned in the following WARNING note to
ensure safe transport of unit when pushing.
3120774 – JLG Lift – 4-15
Page 50

SECTION 4 - MACHINE OPERATION
NOTICE
FAILURE TO HEED THE FOLLOWING INSTRUCTIONS COULD CAUSE THE
UNIT TO TIP OVER OR BE HARD TO CONTROL WHEN BEING MOVED
WHICH COULD RESULT IN SERIOUS INJURY OR DEATH DUE TO BEING
PINNED OR CRUSHED BY UNIT.
• Walk behind the unit to push and steer using the handles
on the mast crossbar.
• On a level surface, always travel with the platform end leading the way.
• On a slope, always travel with the platform end on the low
side of the slope.
• Two people are required on slopes up to 5 degrees, a forklift must be used when moving units on slopes greater than
5 degrees.
• Never position the unit sideways on a slope.
• Do not move unit on soft or uneven surfaces, or over
obstructions, bumps, debris, etc.
BEFORE MOVING A MACHINE BY PUSHING, SECURE ANY TOOLS OR
OBJECTS WHICH MAY OTHERWISE FALL OFF AND CAUSE INJURY OR
BE DAMAGED DURING TRANSPORT.
Lifting
If it becomes necessary to lift the machine, use suitable lifting
equipment capable of handling the weight of the machine
NOTE: Fork lifts, cranes, chains, slings, etc. must be capable of
handling the weight of the machine - See Section 7, GENERAL SPECIFICATIONS AND OPERATOR MAINTENANCE
for machine gross weight specifications.
NOTE: All SP models are equipped with forklift pockets at the
mast end of frame for transporting the unit. An optional
crane hook is available. Do not attempt to lift the machine
with a crane, without the optional crane hook.
Transport Vehicle Tie Down
(See Figure 4-8.)
When placing the machine onto a transport vehicle for transport to
another work-site, always tie the machine securely to the transport
vehicle using the tie down pockets provided on the machine.
There are four tie down pockets, one on each corner of the
machine. Use corner tie down pockets as needed. Tie down
method shown is for illustrative purposes only.
4-16 – JLG Lift – 3120774
Page 51

SECTION 4 - MACHINE OPERATION
CORNER
TIE DOWN
POCKETS
CORNER
TIE DOWN
POCKETS
4.9 RUG CARRIER ACCESSORY (OPTION)
NOTE: The Rug Carrier Accessory is intended for use in hanging
and removal of rugs in hanging display racks only. Use
for any other purpose is not authorized by JLG.
General
The Rug Carrier Accessory consists of two pivoting arms mounted
to the platform left side rails. The pivoting arms are locked in the
plane of the platform side rail when not in use (the stowed posi-
tion). The arms are locked into position at approximately 90
degrees to the left side platform side rails when in use (the carry
position). The pivoting arms’ position can be changed by lifting
each arm to release the lock, rotating the arm, and lowering each
Figure 4-8. SP Tie Down Pockets.
arm back into a locked position.
Pre-Start Inspection
Prior to use of the Rug Carrier accessory, check the following;
• Carrier arm mounting is secure to the platform railing, no
missing or damaged fasteners.
• The arm lock pins are in place and working properly.
3120774 – JLG Lift – 4-17
Page 52

SECTION 4 - MACHINE OPERATION
3
2
1
Hanging a Rug using the Rug Carrier Accessory Arms
The following is a description for use of the Rug Carrier accessory
in hanging rugs on horizontal pivoting arm display racks.
1. Select the intended location in the display for mounting the
rug. Open the display rack to provide adequate space for the
lift and rug.
2. With the Rug Carrier Accessory arms stowed, drive the lift
into position prior to loading the rug.
3. Swing and lock Rug Carrier Accessory arms into the carry
position.
4. Load the rolled rug with the finished side facing the platform.
As required, use an assistant to load the rug onto the Rug
Carrier Accessory arms.
5. Make sure that the rug is centered over its length on the Rug
Carrier Accessory.
6. Elevate the platform to the required height for mounting the
rug onto the display arm.
7. Properly attach the rug to the display arm. Never climb onto
the platform rails for any reason.
8. After adequately attaching the rug to the display arm, lower
the platform, stow the Rug Carrier Accessory arms.
9. As required reposition and elevate the lift to completely
attach the rug.
Positioning Rug Carrier Arms
1. Carry Position
2. Stowed Position and Lock
into Position
3. Lift Arm Up, Swing
4-18 – JLG Lift – 3120774
Page 53

2
1
3
Positioning Carpet Roll On Rug Carrier
1. Center Carpet on Arms 3. Platform Front
2. Rest on Arms Here (a)
Note: (a) Maximum Capacity of Arms - 150 lb. (68kg)
SECTION 4 - MACHINE OPERATION
Removing a Rug using Rug Carrier Accessory Arms
This section describes the use of the Rug Carrier accessory in
removing a rug from a horizontal pivoting arm display rack.
1. Select the intended location in the display for removal of the
rug. Open the display rack to provide adequate space for
the lift and rug.
2. With the Rug Carrier Accessory arms stowed, drive the lift
into position prior to loading the rug.
3. Swing and lock the Rug Carrier Accessory arms into the
carry position.
4. Elevate the platform a few feet. Start to roll the rug onto the
Rug Carrier Accessory arms.
5. Be certain the rug is centered over its length on the Rug Carrier Accessory.
6. While elevating to the required height for removing the rug
from the display arm, continue to roll the rug until it is completely rolled up on the carrier arms.
7. Properly remove the rug from the display arm. Never climb
onto the platform rails for any reason.
8. After adequately removing the rug from the display arm,
lower the platform.
3120774 – JLG Lift – 4-19
Page 54

SECTION 4 - MACHINE OPERATION
CAUTION
1
2
Removing Rug From Display Arm.
1. Roll Rug onto Rug Carrier while Elevating Platform
2. Rug Carrier in Carry Position
9. Remove the rug from the Rug Carrier Accessory. If required,
use an assistant to unload the rug from the Rug Carrier
Accessory Arms.
10. Replace the Rug Hanger Accessory arms to the stowed position for normal operation.
THE RUG CARRIER ACCESSORY ARMS MUST BE LOCKED IN THE STOWED
POSITION WHEN NOT IN USE.
EXTREME CAUTION MUST BE EXERCISED AT ALL TIMES WHILE THE RUG
CARRIER ACCESSORY IS IN USE (DRIVING, RAISING AND LOWERING) TO
PREVENT OBSTACLES AND PERSONNEL FROM STRIKING THE LOAD.
WHEN DRIVING WITH A RUG WITHIN THE RUG CARRIER ACCESSORY, THE
RUG MUST BE PROPERLY SECURED TO PREVENT INADVERTENT MOTION
OR MOVEMENT OF THE RUG AND MUST NOT EXCEED THE RATED CAPACITY OF THE RUG CARRIER ACCESSORY.
NEVER OVERLOAD THE RUG CARRIER ACCESSORY. MAXIMUM CAPACITY
OF THE RUG CARRIER ACCESSORY IS 150 LBS.
THE COMBINED WEIGHT OF PERSONNEL, MATERIALS, EQUIPMENT PLUS
ANY LOAD ON THE RUG CARRIER ACCESSORY MUST NOT EXCEED THE
MAXIMUM CAPACITY OF THE PLATFORM.
NEVER USE A RUG CARRIER ACCESSORY THAT HAS DAMAGE OR LOOSE
MOUNTINGS. IMMEDIATELY REPORT ANY DAMAGE TO APPROPRIATE
PERSONNEL. DISCONTINUE USE OF THE RUG CARRIER ACCESSORY
UNTIL ALL DISCREPANCIES HAVE BEEN CORRECTED.
4-20 – JLG Lift – 3120774
Page 55

SECTION 5 - OPTIONAL EQUIPMENT
SECTION 5. OPTIONAL EQUIPMENT
5.1 OPTIONAL EQUIPMENT
The following optional equipment is available for SP machines:
Extra Power Pack (DC Battery, Charger & Case)
An extra power pack which includes the battery, charger and
molded case allows for extended use of an AM machine under
high cycle conditions. One power pack can be charging while
the other is in use.
Lifting Hook
The optional lifting hook is mounted at the top rear of the first
mast section. The hook is used to lift the machine up or down to
another level.
Platform Auxiliary Power Lowering Device
The Platform Auxiliary Power Lowering device is a switch activated, battery backed electrical circuit, designed to provide
power to lower the platform in the event of loss of machine main
power. This can be useful to the operator if the main battery
becomes depleted while the platform is raised. Also if the on/off
key switch on the ground control station is turned to the off position while the platform is still raised.
Amber Beacon Light
The revolving amber beacon flashes any time the machine power
is turned on, this helps alert others of the presence and operation
of the machine.
Platform Motion Alarm
The motion alarm emits a very audible beeping sound which is
activated anytime the platform is in motion (ascending or
descending).
Foot-Operated Platform Controller
This device is mounted on the platform floor at the rear of the platform. It contains two separate petal switches mounted in a protective housing. The switches labeled UP and DOWN allow the
operator to operate the lift up and lift down functions with either
foot, while pressing the function enable button on the platform
control panel.
Rug Carrier Accessory
The rug carrier accessory is intended for use in hanging and
removal of rugs in hanging display racks. The rug carrier accessory consists of two pivoting arms mounted to the platform left
side rails.
3120774 – JLG Lift – 5-1
Page 56

SECTION 5 - OPTIONAL EQUIPMENT
Machine Cycle Counter Meter
The Cycle Counter Meter is located on the Ground Control Station. This meter tracks the number of cycles the mast travels up
and down during macheine operation. This information can be
used to determine maintenance intervals and other for other informational purposes when recorded over a specific period of time.
Platform Gate Alarm
The platform gate alarm is available for machines equipped with
the side-entry/material-tray platform with swinging gates. The gate
alarm sounds if either or both gates are opened once the platform
is raised approximately 2 in. from the fully lowered position.
5-2 – JLG Lift – 3120774
Page 57

SECTION 6 - EMERGENCY PROCEDURES
NOTICE
SECTION 6. EMERGENCY PROCEDURES
6.1 GENERAL INFORMATION
This section explains the steps to be taken in case of an emergency situation during operation.
6.2 EMERGENCY OPERATION
Operator Unable to Control Machine
IF THE PLATFORM OPERATOR IS PINNED, TRAPPED OR
UNABLE TO OPERATE OR CONTROL THE MACHINE:
1. Other personnel should operate the machine from
ground controls only as required.
2. Only qualified personnel in the platform may use the
platform controls. DO NOT CONTINUE OPERATION IF
CONTROLS DO NOT FUNCTION PROPERLY.
3. Rescue equipment can be used to remove the platform
occupant. Cranes and forklifts can be used to stabilize
motion of the machine.
Platform Caught Overhead
If the platform becomes jammed or snagged in overhead structures or equipment, rescue the platform occupant prior to freeing
the machine.
6.3 INCIDENT NOTIFICATION
JLG Industries, Inc. must be notified immediately of any incident
involving a JLG product. Even if no injury or property damage is
evident, the factory should be contacted by telephone and provided with all necessary details.
USA: 877-JLG-SAFE (554-7233)
Outside USA: 717-485-5161
E-mail: productsafety@jlg.com
Failure to notify the manufacturer of an incident involving a JLG
Industries product within 48 hours of such an occurrence may
void any warranty consideration on that particular machine.
FOLLOWING ANY ACCIDENT, THOROUGHLY INSPECT THE MACHINE
AND TEST ALL FUNCTIONS FIRST FROM THE GROUND CONTROL STATION, THEN FROM THE PLATFORM CONTROL CONSOLE. DO NOT ELEVATE PLATFORM UNTIL YOU ARE SURE THAT ALL DAMAGE HAS BEEN
REPAIRED, IF REQUIRED, AND THAT ALL CONTROLS ARE OPERATING
CORRECTLY.
3120774 – JLG Lift – 6-1
Page 58

SECTION 6 - EMERGENCY PROCEDURES
NOTES:
6-2 – JLG Lift – 3120774
Page 59

SECTION 7 - GENERAL SPECIFICATIONS AND OPERATOR MAINTENANCE
SECTION 7. GENERAL SPECIFICATIONS AND OPERATOR MAINTENANCE
7.1 Introduction
This section of the manual provides additional necessary information to the operator for proper operation and maintenance of this
machine.
The maintenance portion of this section is intended as information
to assist the machine operator to perform daily maintenance tasks
only, and does not replace the more thorough Preventive Maintenance and Inspection Schedule included in the Service and Maintenance Manual.
Other Publications Available Specific to this Machine:
Service and Maintenance Manual:
ANSI. . . . . . . . . . . . . . . . . . . . . . . . . . . . . . . . 3120775
Illustrated Parts Manual
ANSI. . . . . . . . . . . . . . . . . . . . . . . . . . . . . . . . 3120776
3120774 – JLG Lift – 7-1
Page 60

SECTION 7 - GENERAL SPECIFICATIONS AND OPERATOR MAINTENANCE
7.2 General Specifications
Machine Specifications
SPECIFICATION 12SP 15SP
Gross Machine Weight: (Platform Empty) 1,155 lb. (525kg) 1,240 lb. (564kg)
Machine Height: (Platform Stowed) 7 8 i n. ( 1. 9 m)
Machine Base - Overall : ( Width x Length) 33 in. (W) x 47.5 in. (L)
(83.8 cm (W) x 120.6 cm (L))
Maximum Wind Speed: 0 mph (0kph) - Machine rated for indoor use only
Maximum Horizontal Manual Side Force:
(Platform fully extended with Maximum load)
Maximum Hydraulic System Pressure: Pressure Relief Set to Approximately 2800 PSI (193 bar) at Factory
45 Pound Force (200 Newtons)
7-2 – JLG Lift – 3120774
Page 61

SECTION 7 - GENERAL SPECIFICATIONS AND OPERATOR MAINTENANCE
Electrical Specifications
SPECIFICATION 12SP AND 15SP
S y s te m V o lt a g e : DC M o d e l s : 12 Volts DC
Battery Specifications: Battery Type WET/DRY COMBO
Battery Charger (DC Models) Input: 120/240 Volts AC - 50/60 Hz - Voltage Selectable
AGM (VRLA)
(Standard)
Voltage 12 Volts DC
Amp Hour (AH) Rating 105 AmpHr. @ 20 Hr. 100 AmpHr. @ 20 Hr.
Reserve Capacity 165 Min. N/A
Cold Cranking Amps 625 Amps @ 0° F N/A
Weight 54 lb. (24kg) 78 lb. (35kg)
Output: 12 Volt - 10 Amps DC - w/Auto Charge Sensing Circuit
(Optional)
3120774 – JLG Lift – 7-3
Page 62

SECTION 7 - GENERAL SPECIFICATIONS AND OPERATOR MAINTENANCE
Platform Data
12/15SP - PLATFORM CAPACITY
PLATFORM TYPE ANSI
USA/Latin America/Japan/China
StockPicker
(28 in. X 48 in.)
Extendible
26 in. X 49 in.
Side Entry with Tray
23 in. X 27 in.
* Distribute weight evenly throughout the platform.
Occupants: (Persons allowed in Platform) 1
* 250 lb. (113kg) Front - * 250 lb. (113kg) Rear
* 250 lb. (113kg) Front - 250 lb. (113kg) Rear
250 lb. (113kg) Tray - 250 lb. (113kg) Platform
500 lb. (227 kg)
* 200 lb. (91kg) Front - * 200 lb. (91kg) Rear
500 lb. (227 kg)
* 200 lb. (91kg) Front - 200 lb. (91kg) Rear
500 lb. (227 kg)
200 lb. (91kg) Tray - 200 lb. (91kg) Platform
SPECIFICATION 12SP 15SP
400 lb. (182 kg)
400 lb. (182 kg)
400 lb. (182 kg)
CSA
(Canada)
Platform Height - Mast Fully Extended -
(Ground to Platform Floor):
Platform Working Height: (Average Size Person) 18 ft. (5.4 m) 21 ft. (6 .4 m)
P la t f or m Cy c le P er f o rm a nc e : L i ft U p : 25 30
(in seconds) (w/max. rated load) L i f t D o wn : 13-20 18-25
12 ft.
(3.6 m)
15 ft.
(4.5 m)
7-4 – JLG Lift – 3120774
Page 63

SECTION 7 - GENERAL SPECIFICATIONS AND OPERATOR MAINTENANCE
Machine Component Weights
SPECIFICATION 12SP AND 15SP
P la t f or m We i gh t : S to c kP i c ke r Pl a tf o r m: 65 lb. (30 kg)
DC Voltage Battery Pack: (Wet Cell) 70 lb. (32 kg)
Serial Number Locations
For machine identification, a serial number plate is affixed to the
machine. The plate is located on the back of the mast, just above
the mast support bracket.
3120774 – JLG Lift – 7-5
Page 64

SECTION 7 - GENERAL SPECIFICATIONS AND OPERATOR MAINTENANCE
CAUTION
7.3 Operator Maintenance
Battery
NOTE: This information applies to wet cell batteries only. Do not
attempt to open a maintenance-free sealed battery.
The battery fluid level should be approximately 1/8" (3mm) below
vent tubes. (See Illustration)
Keep cable connections clean and free of corrosion.
BATTERY ACID IS HIGHLY CORROSIVE. AVOID CONTACT WITH SKIN
AND CLOTHING AT ALL TIMES.
BATTERY ACID RELEASES AN EXPLOSIVE GAS WHILE CHARGING,
ALLOW NO OPEN FLAMES, SPARKS OR LIGHTED TOBACCO PRODUCTS IN THE AREA WHILE CHARGING BATTERIES. CHARGE BATTERIES ONLY IN A WELL VENTILATED AREA.
ADD ONLY DISTILLED WATER TO BATTERIES. WHEN ADDING DISTILLED WATER TO THE BATTERIES, A NON-METALLIC CONTAINER
AND/OR FUNNEL MUST BE USED.
Battery Fluid Level
1. Battery Filler Cap 3. Fluid Level
2. Vent Tube 4. Cell Plates
7-6 – JLG Lift – 3120774
Page 65

SECTION 7 - GENERAL SPECIFICATIONS AND OPERATOR MAINTENANCE
Lubrication
Hydraulic Oil (HO)
HYDRAULIC SYSTEM OPERATING
TEMPERATURE RANGE
+ 0° F to + 1 80 ° F ( - 1 8° C to - 83 ° C ) 10 W
+0° F to +210° F (-18° C to +99° C) 10W-20, 10W-30
+50° F to +210° F (+10° C to +99° C) 20W-20
Hydraulic oils must have anti-wear qualities at least to API Service
Classification GL-3, and sufficient chemical stability for mobile
hydraulic system service. JLG Industries, recommends Mobilfluid
424 hydraulic oil, which has an SAE viscosity of 10W-30 and a viscosity index of 152.
For cold weather applications, i.e. when temperatures remain consistently below +20°F (–7°C) JLG recommends using Mobil DTE
13 hydraulic oil.
Aside from JLG recommendations, it is not advisable to mix oils of
different brands or types, as they may not contain the same
required additives or be of comparable viscosities. If use of
hydraulic oil other than Mobilfluid 424 is desired, contact JLG
Industries for proper recommendations.
SAE VISCOSITYGRADE
Table 7-1. - Lubrication Specifications
KEY SPECIFICATIONS
MPG - Multipurpose Grease having a minimum dripping point of 350° F.
Excellent water resistance and adhesive qualities, and being of
extreme pressure type. (Timken OK 40 pounds minimum.)
EPGL - Extreme Pressure Gear Lube (oil) meeting API service classification
G L-5 or MI L- Sp ec MI L-L- 2 10 5.
HO - Hydraulic Oil. ISO-Vg grade 32, 46.
CL - Chain Lube. Use a good quality chain lubricant
NOTE: Refer to Lubrication Chart, Table 7-2. on page 7-9 for spe-
cific lubrication locations on machine.
3120774 – JLG Lift – 7-7
Page 66

SECTION 7 - GENERAL SPECIFICATIONS AND OPERATOR MAINTENANCE
1
3
Lubrication Points (See Table 7-2. on page 7-9)
7-8 – JLG Lift – 3120774
Page 67

SECTION 7 - GENERAL SPECIFICATIONS AND OPERATOR MAINTENANCE
Table 7-2. Lubrication Intervals for Various Components
INTERVAL HOURS
ITEM COMPONENT
1Hydraulic Oil
NO/TYPE
LUBE POINTS
Fill To Line
on Reservoir
5 Qt. (4.3 L)
LUBE/METHOD
HO - Check Hyd. Oil
Level
HO - Change Hyd. Oil
Reservoir
2 Swivel Raceways 2 - Front Casters MPG - Pressure Gun
3 Mast Chains * 2 - Per Section CL - Brush or Spray
* Ap p l ie s On l y t o Ma s t Se c ti o n s w i th C ha i ns .
Key to Lu bricants: MPG - Multipurpose Grease
HO - Hydraulic Oil - ISO-Vg grade 32, 46
CL - Chain Lube. Use a good quality chain lubricant
Notes: 1. Be cer tain to lubricate like items on each side of the machine.
2. Recommended lubricating intervals are based on nor mal use. If machine is subjected to severe operating conditions,
s uc h as a h ig h nu m be r of c y cl e s, l oc a t ion, corrosive/dir ty environment, etc., user must adjust lubricating requirements accordingly.
3. Lubricating inter vals are calculated on 50 hours of machine operation a week.
4. Prior to checking hydraulic oil level, operate machine through one complete cycle of lift function (full up and down). Failure to do so will
result in incorrect oil level reading on the hydraulic reservoir.
3 MOS.
or
150 Hrs.
✔
6 MOS.
or
300 Hrs.
✔
1 YR.
or
600 Hrs.
2 YRS.
or
1200 Hrs.
✔
COMMENTS
Check Hyd. Oil after every 10 hrs. of operation.
Change Hyd. Oil after every 1200 hrs. of operation.
Inspect, lubricate if dry or r usting.
3120774 – JLG Lift – 7-9
Page 68

SECTION 7 - GENERAL SPECIFICATIONS AND OPERATOR MAINTENANCE
7.4 SUPPLEMENTAL INFORMATION
The following information is provided in accordance with the
requirements of the European Machinery Directive 2006/42/EC
and is only applicable to CE machines.
For electric powered machines, the equivalent continuous AWeighted sound pressure level at the work platform is less than
70dB(A).
For combustion engine powered machines, guaranteed Sound
Power Level (LWA) per European Directive 2000/ 14/EC (Noise
Emission in the Environment by Equipment for Use Outdoors)
based on test methods in accordance with Annex III, Part B,
Method 1 and 0 of the directive, is 109 dB.
The vibration total value to which the hand-arm system is subjected does not exceed 2,5 m/s2. The highest root mean square
value of weighted acceleration to which the whole body is subjected does not exceed 0,5 m/s2.
7-10 – JLG Lift – 3120774
Page 69

SECTION 8 - INSPECTION AND REPAIR LOG
SECTION 8. INSPECTION AND REPAIR LOG
Table 8-1. Inspection and Repair Log
Date Comments
Machine Serial Number: _________________________
3120774 – JLG Lift – 8-1
Page 70

SECTION 8 - INSPECTION AND REPAIR LOG
Table 8-1. Inspection and Repair Log
Date Comments
Machine Serial Number: _________________________
8-2 – JLG Lift – 3120774
Page 71

TRANSFER OF OWNERSHIP
To Product Owner:
If you now own but ARE NOT the original purchaser of the product covered by this
manual, we would like to know who you are. For the purpose of receiving safety-related
bulletins, it is very important to keep JLG Industries, Inc. updated with the current
ownership of all JLG products. JLG maintains owner information for each JLG product
and uses this information in cases where owner notification is necessary.
Please use this form to provide JLG with updated information with regard to the
current ownership of JLG products. Please return completed form to the JLG Product
Safety & Reliability Department via facsimile or mail to address as specified below.
Thank You,
Product Safety & Reliability Department
JLG Industries, Inc.
13224 Fountainhead Plaza
Hagerstown, MD 21742
USA
Telephone: +1-717-485-6591
Fax: +1-301-745-3713
NOTE: Leased or rented units should not be included on this form.
Mfg. Model: _____________
__________________________________________________
Serial Number: ____________________________________________________________
Previous Owner: ___________________________________________________________
Address: _________________________________________________________________
_________________________________________________________________________
Country: _________________________ Telephone: (_______
) ____________________
Date of Transfer: _________________________________
Current Owner: ____________________________________________________________
Address: _______________
__________________________________________________
_________________________________________________________________________
Country: _________________________ Telephone: (_______
) ____________________
Who in your organization should we notify?
Name: ___________________________________________________________________
Title:____________________________________________________________________
An Oshkosh Corporation Company
Page 72

Page 73

Page 74

JLG Industries, Inc.
1 JLG Drive
McConnellsburg PA. 17233-9533
USA
(717) 485-5161
(717) 485-6417
JLG Worldwide Locations
JLG Industries (Australia)
P.O. Box 5119
11 Bolwarra Road
Port Macquarie
N.S.W. 2444
Australia
+61 2 65 811111
+61 2 65 810122
JLG Deutschland GmbH
Max-Planck-Str. 21
D - 27721 Ritterhude - Ihlpohl
Germany
+49 (0)421 69 350 20
+49 (0)421 69 350 45
Plataformas Elevadoras
JLG Iberica, S.L.
Trapadella, 2
P.I. Castellbisbal Sur
08755 Castellbisbal, Barcelona
Spain
+34 93 772 4700
+34 93 771 1762
JLG Latino Americana Ltda.
Rua Eng. Carlos Stevenson,
80-Suite 71
13092-310 Campinas-SP
Brazil
+55 19 3295 0407
+55 19 3295 1025
JLG Equipment Services Ltd.
Rm 1107 Landmark North
39 Lung Sum Avenue
Sheung Shui N. T.
Hong Kong
(852) 2639 5783
(852) 2639 5797
JLG Sverige AB
Enkopingsvagen 150
Box 704
SE - 176 27 Jarfalla
Sweden
+46 (0)850 659 500
+46 (0)850 659 534
JLG Industries (UK) Ltd
Bentley House
Bentley Avenue
Middleton
Greater Manchester
M24 2GP - England
+44 (0)161 654 1000
+44 (0)161 654 1001
JLG Industries (Italia) s.r.l.
Via Po. 22
20010 Pregnana Milanese - MI
Italy
+39 029 359 5210
+39 029 359 5845
JLG France SAS
Z.I. de Baulieu
47400 Fauillet
France
+33 (0)5 53 88 31 70
+33 (0)5 53 88 31 79
Oshkosh - JLG Singapore T. E. P. Ltd.
29 Tuas Ave 4
Jurong Industrial Estate
639379
Singapore
+65-6591-9030
+65-6591-9031
www.jlg.com
 Loading...