HP PageWriter 200, PageWriter 300pi User manual
M1771A
M1770A
PageWriter 200/300pi
User’s Guide

3DJH:ULWHU SL 0 $ $ &DUGLRJUDSK
PageWriter 200/300pi M1771A/1770A Cardiograph

About This Edition
Edition 2
Printed in the USA
Publication number M1770-91930
The information in this guide applies to the M1771/M1770 PageWriter 200/ 300pi Cardiograph. This information is subject to change without notice. Agilent Technologies shall not be liable for errors contained herein or for incidental or consequential damages in connection with the furnishing, performance, or use of this material.
Edition History
Edition 1, August 1998
Edition 2, November 1999
Copyright
Copyright © 1999
Agilent Technologies, Inc. 3000 Minuteman Road Andover, MA 01810-1099 USA
(978) 687-1501
This document may not be photocopied, reproduced, or translated to another language without prior written consent of Agilent Technologies, Inc.
WARNING
As with electronic equipment, Radio Frequency (RF) interference between the cardiograph and any existing RF transmitting or receiving equipment at the installation site, including electrosurgical equipment, should be evaluated carefully and any limitations noted before the equipment is placed in service.
Radio frequency generation from electrosurgical equipment and close proximity transmitters may seriously degrade performance.
Like all electronic devices, this cardiograph is susceptible to electrostatic discharge (ESD). Electrostatic discharge typically occurs when electrostatic energy is transferred to the patient, the electrodes, or the cardiograph. ESD may result in ECG artifact that may appear as narrow spikes on the cardiograph display or on the printed report. When ESD occurs, the cardiograph’s ECG interpretation may be inconsistent with the physician’s interpretation.
Agilent Technologies assumes no liability for failures resulting from RF interference between Agilent medical electronics and any radio frequency generating equipment at levels exceeding those established by applicable standards.
CAUTION
Use of accessories other than those recommended by Agilent Technologies may compromise product performance.
THIS PRODUCT IS NOT INTENDED FOR HOME USE.
IN THE U.S., FEDERAL LAW RESTRICTS THIS DEVICE TO SALE ON OR BY THE ORDER OF A PHYSICIAN.
Medical Device Directive
The M1771A/M1770A PageWriter 200/ 300pi Cardiograph complies with the requirements of the Medical Device Directive 93/42/EEC and carries the

 0123 mark accordingly.
Authorized EU-representative:
Agilent Technologies Deutschland
GmbH
Herrenbergerstrasse 130
D-71034 Boeblingen
Germany
Fax: +49-7031-14-2346
ii
&RQYHQWLRQV
|
|
Conventions Used in This Manual |
|
|
|
WARNING |
|
Warning statements describe conditions or actions that can result in |
|
|
personal injury or loss of life. |
|
||
|
|
|
|
|
|
|
|
|
|
|
|
CAUTION |
|
Caution statements describe conditions or actions that can result in |
|
|
damage to the equipment or software. |
|
|
|
|
|
|
|
|
|
|
|
|
|
|
|
|
|
|
NOTE |
|
Notes contain additional information on cardiograph usage. |
|
|
|
|
|
.H\ Represents keys on the key panel. |
|
|
Safety Summary
Safety Symbols Marked on the Cardiograph
The following safety symbols are used on the cardiograph.
Caution - See operating instructions.
Meets IEC type CF leakage current requirements and is defibrillator protected (Isolated ECG input).
Alternating current.
Equipotential (identifies independent protective earth conductor to the cardiograph).
PageWriter 200/300pi M1771A/1770A Cardiograph |
iii |
&RQYHQWLRQV
|
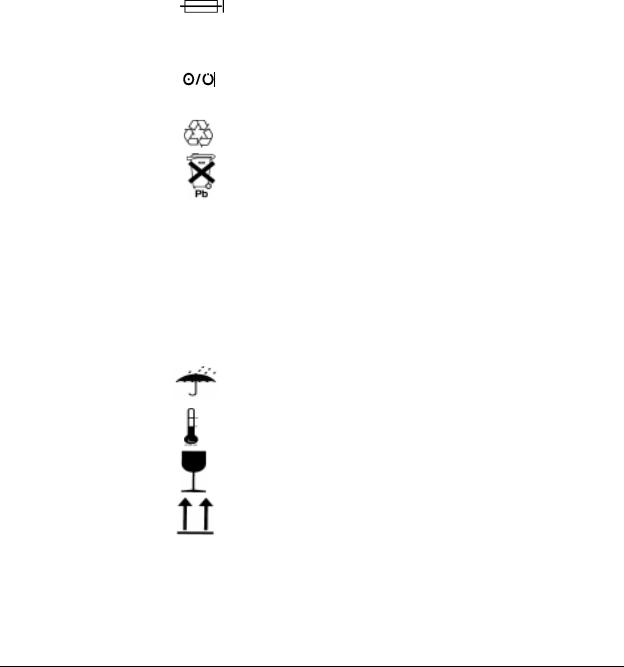
Fuse. |
|
Indicates power control for cardiograph. |
|
Recycle. |
|
Sealed Lead Acid Battery - Recycle or dispose of prop- |
|
erly. |
Hz |
Indicates operating frequency in cycles per second. |
Please see "Maintaining the Cardiograph", for further information about operating your cardiograph safely.
Cardiograph Packaging Symbols
The following symbols appear on the packagin for the cardiograph:
Keep dry.
Temperature and relativey humidity ranges.
Fragile.
Keep upright.
iv

Contents
6DIHW\ 6\PEROV 0DUNHG RQ WKH &DUGLRJUDSK LLL
*HWWLQJ $FTXDLQWHG
7KH .H\ERDUG DQG )URQW 3DQHO
$ERXW <RXU &DUGLRJUDSK
2SWLRQV
3DWLHQW DQG 2SHUDWLRQDO 6DIHW\ 1RWHV
(OHFWURPDJQHWLF &RPSDWLELOLW\
5HGXFLQJ (OHFWURPDJQHWLF ,QWHUIHUHQFH
5HVWULFWLRQV IRU 8VH $& DQG %DWWHU\ 2SHUDWLRQ
5HFRUGLQJ DQ (&*
3UHSDULQJ WKH 3DWLHQW
1RWHV IRU &XVWRPHUV 8VLQJ 5HXVDEOH (OHFWURGHV
1RWHV IRU &XVWRPHU 8VLQJ 'LVSRVDEOH 7DE (OHFWURGHV
8QGHUVWDQGLQJ :KHQ D 6LJQDO LV$FTXLUHG
3HUIRUPLQJ D 6WDW (&* %\SDVVLQJ 3DWLHQW ,' (QWU\
&KHFNLQJ 6LJQDO 4XDOLW\ (QWHULQJ 3DWLHQW ,'
5HYLHZLQJ DQG &KDQJLQJ 3DWLHQW ,'
5HFRUGLQJ D 0DQXDO (&*
5HVWRULQJ WKH (&* 7UDFH$IWHU 'HILEULOODWLRQ RU 5HFRQQHFWLQJ /HDGV
5HFRUGLQJ DQ$XWR (&*
0DNLQJ &RSLHV RI$XWR (&*V
8QGHUVWDQGLQJ WKH 3ULQWHG 5HSRUW
&KRRVLQJ D 5HSRUW )RUPDW
&KDQJLQJ WKH 5HSRUW )RUPDW
$XWR 5HSRUW )RUPDWV
0DQXDO 5HSRUW )RUPDWV
7KH$XWR (&* 5HSRUW
$XWR 5HSRUW ([DPSOHV
i

Contents
0DQXDO 5HSRUW ([DPSOHV
8QGHUVWDQGLQJ (&* $QDO\VLV DQG WKH 3UHGLFWLYH ,QVWUXPHQWV $SSOLFDWLRQV
8QGHUVWDQGLQJ WKH (&*$QDO\VLV 3URJUDP
+RZ WKH 3DJH:ULWHU SL 0HDVXUHV (&*V
:DYHIRUP 5HFRJQLWLRQ
&RPSUHKHQVLYH 0HDVXUHPHQWV
*URXS 0HDVXUHPHQWV
/HDG 0HDVXUHPHQWV
$WULDO 5K\WKP$QDO\VLV
*OREDO 0HDVXUHPHQWV
$[LV 0HDVXUHPHQWV
$XWRPDWLFDOO\ 0HDVXULQJ DQG ,QWHUSUHWLQJ (&*V
8QGHUVWDQGLQJ WKH ([WHQGHG 0HDVXUHPHQWV 5HSRUW
7KH ([WHQGHG 0HDVXUHPHQWV 5HSRUW
0RUSKRORJ\$QDO\VLV
5K\WKP$QDO\VLV
8QGHUVWDQGLQJ WKH 3DJH:ULWHU SL 3UHGLFWLYH ,QVWUXPHQW$SSOLFDWLRQV
,QGLFDWLRQV IRU 8VH
8QGHUVWDQGLQJ 73, 9DULDEOHV
8QGHUVWDQGLQJ$&, 7,3, 9DULDEOHV
8VLQJ WKH 73, DQG$&, 7,3,$SSOLFDWLRQV
$QDO\]LQJ DQ (&* ZLWK WKH 3UHGLFWLYH ,QVWUXPHQWV
2EWDLQLQJ$OWHUQDWH 5HSRUWV
(&* 6WRUDJH 2SWLRQV $ RU 6WUHVV:ULWHU
$GYDQWDJHV RI 6WRUDJH
6WRULQJ (&*V
0DQDJLQJ 6WRUHG (&*V
6HOHFWLQJ 6WRUHG (&*V
3ULQWLQJ 6WRUHG (&*V
'HOHWLQJ 6WRUHG (&*V
(GLWLQJ 3DWLHQW ,' IRU 6WRUHG (&*V
3ULQWLQJ WKH /RJ RI (&*V 7DNHQ RU WKH /RJ RI (&*V 6WRUHG
ii

Contents
7UDQVPLWWLQJ )D[LQJ DQG 5HFHLYLQJ $XWR (&*V 2SWLRQV $ RU 6WUHVV:ULWHU RQO\
7UDQVPLWWLQJ (&*V
&KDQJLQJ D 7HOHSKRQH 'LUHFWRU\ (QWU\
5HFHLYLQJ (&*V
5HFHLYLQJ (&*V VHQW E\ D 5HPRWH 'HYLFH
5HTXHVWLQJ (&*V IURP D 5HPRWH 'HYLFH
7URXEOHVKRRWLQJ
&KHFNLQJ (&* 7HFKQLTXH
,GHQWLI\LQJ (&* 3UREOHPV
,I WKH 5HFRUGLQJ :RQªW 6WDUW
,I WKH &DUGLRJUDSK :RQªW 3ULQW D 0DQXDO 5HSRUW
(UURU 0HVVDJHV
,GHQWLI\LQJ 6WRUDJH 3UREOHPV 2SWLRQV$RU 6WUHVV:ULWHU RQO\
,GHQWLI\LQJ 7UDQVPLVVLRQ 3UREOHPV 2SWLRQV$RU 6WUHVV:ULWHU RQO\
0DLQWDLQLQJ WKH &DUGLRJUDSK
&DUH DQG &OHDQLQJ
&OHDQLQJ WKH &DUGLRJUDSK
&OHDQLQJ WKH (OHFWURGHV DQG &DEOHV
&OHDQLQJ WKH 'LJLWDO$UUD\ 3ULQWKHDG DQG 3DSHU 6HQVRU
/RDGLQJ WKH 3DSHU
6WRULQJ WKH 3DSHU DQG 3DWLHQW (&* 5HFRUGV
&DULQJ IRU WKH %DWWHU\
6WRULQJ WKH %DWWHU\
5HSODFLQJ WKH )XVHV
7R UHSODFH WKH$& IXVHV
6XSSOLHV
&DOOLQJ IRU 6HUYLFH
8QLWHG 6WDWHV RI$PHULFD
&DQDGD
2WKHU ,QWHUQDWLRQDO$UHDV
iii

Contents
6HWWLQJ 8S <RXU &DUGLRJUDSK
&KHFNLQJ WKH 9ROWDJH 6HWWLQJ $ 7KH %DWWHU\ $
,QVWDOOLQJ WKH %DWWHU\$ &RQQHFWLQJ WKH &DEOHV $ /RDGLQJ 3DSHU $ 6HWWLQJ WKH .H\ERDUG 0RGH $ 6HWWLQJ WKH &DUGLRJUDSK /RFDWLRQ DQG ,' &RGHV 2SWLRQV$RU 6WUHVV:ULWHU RQO\$
&RQQHFWLQJ WKH 'LUHFW 7UDQVPLVVLRQ &DEOH 2SWLRQV$RU 6WUHVV:ULWHU RQO\$
7UDQVPLWWLQJ RU )D[LQJ (&*V E\ 0RGHP 2SWLRQV$RU 6WUHVV:ULWHU RQO\$
6HWWLQJ 8S WKH 7HOHSKRQH 'LUHFWRU\ 2SWLRQV$RU 6WUHVV:ULWHU RQO\$
6HWWLQJ 8S 3UHGLFWLYH ,QVWUXPHQWV $
&RQILJXULQJ <RXU &DUGLRJUDSK
7KH &RQILJXUDWLRQ 0HQX % 1DYLJDWLQJ WKH &RQILJXUDWLRQ 0HQXV %
3DWLHQW ,' (QWULHV % 3RZHU 2Q 5HSRUW )LHOGV %
)LOWHUV %
0LVFHOODQHRXV 5HSRUW )LHOGV%
6HWWLQJ 'DWH DQG 7LPH %
3ULQWLQJ WKH &RQILJXUDWLRQ % $GMXVWLQJ 'LVSOD\ 6FUHHQ &RQWUDVW % 6HW XS 7UDQVPLVVLRQ 2SWLRQV$RU 6WUHVV:ULWHU RQO\ %
6SHFLILFDWLRQV
%DVLF &RQWUROV &
)UHTXHQF\ DQG ,PSXOVH 5HVSRQVH &
,QVWUXPHQW 7HVW & 3DWLHQW 6DIHW\ &
iv

Contents
3RZHU DQG (QYLURQPHQW &
v

Contents
vi

1 Getting Acquainted
1
|
|
This chapter describes to the new user the many features of the PageWriter |
|
|
200/300pi cardiograph, patient and operational safety, A/C, and battery |
|
|
operation. The user should become familiar with this material, especially the |
|
|
safety information, prior to using the cardiograph. |
|
|
|
|
|
|
|
|
|
NOTE |
|
See Setting Up Your Cardiograph, for information on checking the voltage |
|
|
switch setting, installing the battery, connecting the cables, and loading paper. |
|
||
|
||
|
|
Each of these tasks must be done prior to operating the cardiograph for the |
|
|
first time. |
|
|
If accurate ST segment contours are required for ECGs recorded in Manual |
|
|
mode, do not use the 0.5 Hz baseline wander filter. This filter suppresses |
|
|
baseline wander to the extent that it may alter the ST segment. Instead, |
|
|
configure your cardiograph to use the 0.15 Hz or 0.05 Hz baseline wander |
|
|
filter. Regardless of the filter used, the rhythm characteristics of the ECG are |
|
|
accurately recorded. |
|
|
|
PageWriter 200/300pi M1771A/1770A Cardiograph |
1-1 |

Figure 1-1: The PageWriter 200/300pi Cardiograph
A.Patient Cable
B.Cardiograph
1-2 |
Getting Acquainted |

1
Figure 1-2: Bottom View of Cardiograph
A.AC Fuse Holders with fuse replacement information
B.Mounting Point for Optional M1705B Cart (Mounting screw included with cart)
C.Battery Door with battery replacement information
PageWriter 200/300pi M1771A/1770A Cardiograph |
1-3 |
The Keyboard and Front Panel
The Keyboard and Front Panel
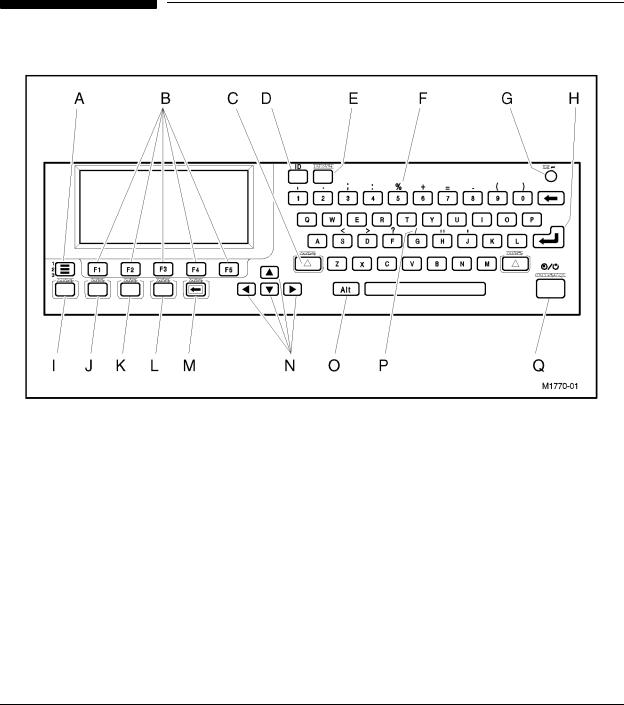
Figure 1-3: The Keyboard and Front Panel of the Cardiograph
1-4 |
Getting Acquainted |
The Keyboard and Front Panel
$ |
|
|
|
|
|
Displays the configuration menu, unless an ECG report is in-process. Use |
|
, |
|
|||
|
|
|
|
Exit |
1 |
|||||||
|
|
|
|
|
|
|||||||
|
|
|
|
|
|
|
|
, or |
to return to the normal ECG display. |
|||
|
|
|
|
|
|
|
Stop |
|||||
% |
|
|
|
|
|
These five keys (F1 – F5), located directly beneath the display window, perform different |
|
|||||
softkey |
|
|||||||||||
|
|
functions at different times. They are called “softkeys.” When a softkey is active, a label |
|
|||||||||
|
|
|
|
|
|
|
||||||
|
|
|
|
|
|
|
||||||
|
|
|
|
|
|
describing its function is displayed above it on the screen. Press the key to perform the |
|
|||||
|
|
|
|
|
|
function displayed on the screen. |
|
|||||
& |
|
|
|
|
|
Used to enter shifted characters. |
|
|||||
Shift |
|
|
|
|||||||||
|
|
|
|
|
|
|
|
|
|
|
||
' |
|
|
|
|
|
Allows patient identification entry, review, and edit. |
|
|||||
|
ID |
|
|
|
|
|||||||
|
|
|
|
|
|
|
|
|
|
|
||
( |
|
|
|
Turns filters on and off. The filter or filters controlled by this key are selected during car- |
|
|||||||
|
Filter |
|
|
|||||||||
|
|
|
|
|
|
diograph configuration. |
|
|||||
)Shift ²&KDU Enters the upper case letters and punctuation marks shown above the number keys when
you press the corresponding letter or number key while pressing the Shift key.
* |
$& |
This indicator is lighted when the power cord is plugged into an active wall outlet. This |
|
|
also indicates that the battery is charging. |
+
,Auto
-Manual
.Stop
/Copy
0Page
1


2Alt
3Alt –&KDU
4
On/Standby
The Enter key.
This key starts an Auto ECG recording.
Starts a Manual ECG recording. Also restores the ECG trace during a Manual report after defibrillation.
Halts any cardiograph activity and restores the normal ECG display.
Prints a copy of the last Auto ECG.
Advances the paper to the beginning of the next page.
To view lead groups, use the |
or |
keys to move to the next lead group, and the |
||||
or |
keys to move to the previous lead group. The |
or |
keys move the cursor |
|||
down on configuration displays and patient ID information screens. The |
and |
|||||
keys move the cursor up. |
|
|
|
|
|
|
Used to enter alternate characters. (See item P.)
To enter the characters shown above the letter keys (see Table 1-1 for language-specific keys), press the Alt key with the desired letter.
Switches the cardiograph between On and Standby. Standby means the cardiograph is off, but charging the battery, when it is plugged in to AC power.
PageWriter 200/300pi M1771A/1770A Cardiograph |
1-5 |

The Keyboard and Front Panel
Table 1-1: Characters by Language
Key |
English |
|
French |
|
German |
|
Dutch |
|
Italian |
|
Spanish |
||||||||
|
|
|
|
|
|
|
|
|
|
|
|
|
|
|
|
|
|
|
|
|
DOW |
$/7 |
|
DOW |
$/7 |
|
DOW |
|
$/7 |
|
DOW |
$/7 |
|
DOW |
$/7 |
|
DOW |
|
$/7 |
|
|
|
|
|
|
|
|
|
|
|
|
|
|
|
|
|
|
|
|
D |
|
|
|
j |
j |
|
l |
|
b |
|
l |
b |
|
j |
j |
|
i |
|
$ |
|
|
|
|
|
|
|
|
|
|
|
|
|
|
|
|
|
|
|
|
E |
|
` |
|
|
` |
|
|
|
` |
|
|
` |
|
|
` |
|
|
|
` |
|
|
|
|
|
|
|
|
|
|
|
|
|
|||||||
F |
# |
_ |
# |
_ |
# |
_ |
# |
_ |
# |
_ |
# |
_ |
|||||||
|
|
|
|
|
|
|
|
|
|
|
|
|
|||||||
G |
! |
! |
! |
! |
! |
! |
! |
! |
! |
! |
! |
! |
|||||||
|
|
|
|
|
|
|
|
|
|
|
|
|
|
|
|
|
|
|
|
H |
|
|
|
r |
r |
|
|
|
|
|
s |
s |
|
|
|
|
p |
|
e |
|
|
|
|
|
|
|
|
|
|
|
|
|
|
|
|
|
|
|
|
I |
" |
" |
|
" |
" |
|
" |
|
" |
|
" |
" |
|
" |
" |
|
" |
|
" |
|
|
|
|
|
|
|
|
|
|
|
|
|
|
|
|
|
|
|
|
J |
|
? |
|
|
? |
|
|
|
? |
|
|
? |
|
|
? |
|
|
|
? |
|
|
|
|
|
|
|
|
|
|
|
|
|
|
|
|
|
|
|
|
K |
“ |
“ |
“ |
“ |
“ |
|
“ |
“ |
|
“ |
“ |
|
“ |
“ |
|
“ |
|
|
|
|
|
|
|
|
|
|
|
|
|
|
|
|
|
|
|
|
|
|
|
L |
|
|
|
v |
v |
|
|
|
|
|
|
|
|
u |
u |
|
t |
|
t |
|
|
|
|
|
|
|
|
|
|
|
|
|
|
|
|
|
|
|
|
M |
’ |
’ |
|
’ |
’ |
|
’ |
|
’ |
|
’ |
’ |
’ |
|
’ |
’ |
|
’ |
|
|
|
|
|
|
|
|
|
|
|
|
|
|
|
|
|
|
|
|
|
N |
|
|
|
|
|
|
|
|
|
|
|
|
|
q |
q |
|
|
|
|
|
|
|
|
|
|
|
|
|
|
|
|
|
|
|
|
|
|
|
|
O |
|
|
|
• |
• |
|
|
|
|
|
|
|
|
p |
e |
|
x |
|
f |
|
|
|
|
|
|
|
|
|
|
|
|
|
|||||||
P |
a |
@ a |
@ |
a |
|
@ |
a |
@ |
a |
@ |
a |
@ |
|||||||
|
|
|
|
|
|
|
|
|
|
|
|
|
|
|
|
|
|
|
|
Q |
|
> |
|
|
> |
|
|
|
> |
|
|
> |
|
|
> |
|
|
|
> |
|
|
|
|
|
|
|
|
|
|
|
|
|
|
|
|
|
|
|
|
R |
|
|
{ |
{ |
|
| |
|
g |
|
| |
g |
|
z |
z |
|
y |
|
y |
|
|
|
|
|
|
|
|
|
|
|
|
|
|
|
|
|
|
|
|
|
S |
|
|
|
o |
d |
|
ß |
|
ß |
ƒ |
|
|
|
|
|
|
|
|
|
|
|
|
|
|
|
|
|
|
|
|
|
|
|
|
|
|
|
|
|
T |
|
|
|
k |
k |
|
|
|
|
|
|
|
|
|
|
|
|
|
|
|
|
|
|
|
|
|
|
|
|
|
|
|
|
|
|||||
V |
|
|
|
|
|
|
|
|
|
|
|
|
|
|
|||||
|
|
|
|
|
|
|
|
|
|
|
|
|
|
|
|
|
|
|
|
X |
|
|
|
€ |
€ |
|
• |
|
h |
|
• |
h |
|
• |
• |
|
~ |
|
|
|
|
|
|
|
|
|
|
|
|
|
|
|
|
|
|
|
|
|
|
Y |
A |
^ |
|
A |
^ |
|
A |
|
^ |
|
A |
^ |
|
A |
^ |
|
|
|
|
|
|
|
|
|
|
|
|
|
|
|
|
|
|
|
|
|
|
|
|
Z |
|
|
|
p |
e |
|
|
|
|
|
|
|
|
|
|
|
º |
|
º |
|
|
|
|
|
|
|
|
|
|
|
|
|
|
|
|
|
|
|
|
[ |
|
|
|
|
|
|
|
|
|
|
|
|
|
|
|
|
|
|
|
|
|
|
|
|
|
|
|
|
|
|
|
|
|
|
|
|
|
|
|
\ |
|
|
|
q |
q |
|
|
|
|
º |
º |
|
|
|
|
• |
|
h |
|
|
|
|
|
|
|
|
|
|
|
|
|
|
|
|
|
||||
] |
|
|
|
|
|
|
|
|
|
|
|
|
|
|
|
||||
|
|
|
|
|
|
|
|
|
|
|
|
|
|
|
|
|
|
|
|
1-6 |
Getting Acquainted |

The Keyboard and Front Panel
|
|
|
|
|
|
|
|
|
|
|
|
|
|
|
|
|
|
|
Key |
Norwegian |
Swedish |
|
Finnish |
Polish |
|
Portuguese |
Key |
Russian |
|
1 |
|||||||
|
|
|
|
|
|
|
|
|
|
|
|
|
|
|
|
|
|
|
|
DOW |
$/7 |
DOW |
$/7 |
|
DOW |
$/7 |
DOW |
$/7 |
|
DOW |
|
$/7 |
|
DOW |
$/7 |
|
|
|
|
|
|
|
|
|
||||||||||||
|
|
|
|
|
|
|
|
|
|
|
|
|
|
|
|
|
|
|
D |
n |
c |
l |
b |
|
|
|
|
|
|
j |
|
- |
|
|
|
|
|
|
|
|
|
|
|
|
|
|
|
|
|
|
|
|
|
|
|
|
E |
|
` |
|
` |
|
|
` |
` |
` |
|
|
|
|
|
|
|
|
|
|
|
|
|
|
|
|
|
|
|
|
|
|
|
|
|
|
|
|
F |
# |
_ |
# |
_ |
|
# |
_ |
|
|
|
|
|
|
|
|
|
|
|
|
|
|
|
|
|
|
|
|
|
|
|
|
|
|
|
|
|
|
G |
! |
! |
! |
! |
|
! |
! |
|
|
|
! |
|
! |
|
|
|
|
|
|
|
|
|
|
|
|
|
|
|
|
|
|
|
|
|
|
|
|
H |
|
• |
|
|
|
|
|
|
|
|
k |
|
Ç |
|
|
|
|
|
|
|
|
|
|
|
|
|
|
|
|
|
|
|
|
|
|
|
|
I |
" |
" |
" |
" |
|
" |
" |
" |
" |
|
" |
|
" |
|
|
|
|
|
|
|
|
|
|
|
|
|
|
|
|
|
|
|
|
|
|
|
|
J |
|
|
|
|
|
|
|
|
|
|
|
|
|
|
|
|
|
|
|
|
|
|
|
|
|
|
|
|
|
|
|
|
|
|
|
|
|
K |
“ |
“ |
“ |
“ |
“ |
“ |
|
|
|
“ |
|
“ |
|
|
|
|
|
|
|
|
|
|
|
|
|
|
|
|
|
|
|
|
|
|
|
|
|
L |
|
|
|
|
|
|
|
|
|
|
|
|
|
|
|
|
|
|
|
|
|
|
|
|
|
|
|
|
|
|
|
|
|
|
|
|
|
M |
’ |
’ |
’ |
’ |
|
’ |
’ |
|
|
|
‘ |
|
‘ |
|
|
|
|
|
|
|
|
|
|
|
|
|
|
|
|
|
|
|
|
|
|
|
|
N |
|
|
|
|
|
|
|
|
|
|
|
|
|
|
|
|
|
|
|
|
|
|
|
|
|
|
|
|
|
|
|
|
|
|
|
|
|
O |
|
|
|
|
|
|
|
|
|
|
|
|
|
|
|
|
|
|
|
|
|
|
|
|
|
|
|
|
|
|
|
|
|
|
|
|
|
P |
a |
@ |
a |
@ |
|
a |
@ |
|
|
|
|
|
|
|
|
|
|
|
|
|
|
|
|
|
|
|
|
|
|
|
|
|
|
|
|
|
|
Q |
|
> |
|
> |
|
|
> |
|
|
|
|
|
|
|
|
|
|
|
|
|
|
|
|
|
|
|
|
|
|
|
|
|
|
|
|
|
|
R |
¡ |
‘ |
| |
g |
|
| |
g |
|
|
|
|
|
|
|
|
|
|
|
|
|
|
|
|
|
|
|
|
|
|
|
|
|
|
|
|
|
|
S |
|
|
|
|
|
|
|
“ |
“ |
|
~ |
|
Ô |
|
|
|
|
|
|
|
|
|
|
|
|
|
|
|
|
|
|
|
|
|
|
|
|
T |
|
|
n |
c |
|
n |
c |
|
|
|
m |
|
® |
|
|
|
|
|
|
|
|
|
|
|
|
|
|
|
|
|
|
|
|
|
|
|
|
U |
|
|
|
|
|
|
|
|
|
|
r |
|
È |
|
|
|
|
|
|
|
|
|
|
|
|
|
|
|
|
|
|
|
|
|
|
|
|
V |
|
|
|
|
|
|
|
|
|
|
|
|
|
|
|
|
|
|
|
|
|
|
|
|
|
|
|
|
|
|
|
|
|
|
|
|
|
W |
|
|
|
|
|
|
|
|
|
|
{ |
|
Ñ |
|
|
|
|
|
|
|
|
|
|
|
|
|
|
|
|
|
|
|
|
|
|
|
|
X |
|
|
• |
h |
|
• |
h |
! |
! |
|
r |
|
È |
|
|
|
|
|
|
|
|
|
|
|
|
|
|
|
|
|
|
|
|
|
|
|
|
Y |
A |
^ |
A |
^ |
|
A |
^ |
^ |
^ |
|
|
|
|
|
|
|
|
|
|
|
|
|
|
|
|
|
|
|
|
|
|
|
|
|
|
|
|
Z |
|
|
|
|
|
å |
ä |
|
|
|
} |
|
¯ |
|
|
|
|
|
|
|
|
|
|
|
|
|
|
|
|
|
|
|
|
|
|
|
|
[ |
|
|
|
|
|
|
|
|
|
|
|
|
|
|
|
|
|
|
|
|
|
|
|
|
|
|
|
|
|
|
|
|
|
|
|
|
|
\ |
|
|
|
|
|
|
|
|
|
|
i |
|
É |
|
|
|
|
|
|
|
|
|
|
|
|
|
|
|
|
|
|
|
|
|
|
|
|
] |
|
|
|
|
|
|
|
|
|
|
|
|
|
|
|
|
|
|
|
|
|
|
|
|
|
|
|
|
|
|
|
|
|
|
|
|
|
PageWriter 200/300pi M1771A/1770A Cardiograph |
1-7 |

About Your Cardiograph
About Your Cardiograph
Your PageWriter 200/300pi cardiograph:
λAcquires 12 leads simultaneously.
λAllows you to check lead quality on the preview screen before printing the ECG.
λProvides selectable formats (Auto and Manual).
λReports measurements of the ECG.
λOperates on a rechargeable battery. AC power charges the battery.
λHas a digital array printer with continuous-feed paper.
λHas a 200 sheet Z-fold paper capacity.
In addition to the features listed above, the PageWriter 300pi cardiograph can analyze and interpret the ECG. The PageWriter 300pi also includes Predictive Instrument applications that detect Acute Myocardial Infarction and Acute Cardiac Ischemia, as well as calculate predicted outcome with and without thrombolytic therapy.
Accessories
Your cardiograph was shipped with one of the following three accessory sets, according to your geographic option:
No Electrodes Accessory Set — Options: ABB, ABD, ABE, ABF, ABH,
ABS, ABU, ABX, ABZ, AKD, ACB, AC4, AB9, ABN
λBattery assembly
λPower cord
λPatient Cable
λ1 package of paper
λPageWriter 200/300pi User’s Guide
λUsing the HP PageWriter 200/200i Cardiograph operator training video (also applicable to the PageWriter 300pi)
λHewlett-Packard Interpretive Cardiograph Physician’s Guide
For electrodes, contact your local Agilent Technologies Sales Office or your authorized Agilent Technologies Dealer or Distributor.
1-8 |
Getting Acquainted |

About Your Cardiograph
Reusable Electrodes Accessory Set — Options: ABG, ABK, ABM, AB2, AB4, AKV, ABK, AKM, ACQ, AC6, ACJ
λ |
Battery assembly |
1 |
λ |
Power cord |
λPatient Cable
λ1 package of paper
λ6 Welsh bulb electrodes
λ4 limb plate electrodes and straps
λPageWriter 200/300pi User’s Guide
λUsing the HP PageWriter 200/200i Cardiograph operator training video (also applicable to the PageWriter 300pi)
λHewlett-Packard Interpretive Cardiograph Physician’s Guide
Disposable Electrodes Accessory Set — Options: ABA, ABC
λBattery assembly
λPower cord
λPatient Cable
λ1 package of paper
λDisposable electrode starter set
λTab electrode adapters
λPageWriter 200/300pi User’s Guide
λUsing the HP PageWriter 200/200i Cardiograph operator training video (also applicable to the PageWriter 300pi)
λHewlett-Packard Interpretive Cardiograph Physician’s Guide
Options
Your PageWriter 200/300pi cardiograph can store and transmit ECGs if you purchased Options #A05 or StressWriter. See ECG Storage (Options #A05 or StressWriter), for information about storing, retrieving and editing ECGs. See Transmitting, Faxing, and Receiving Auto ECGs (Options #A05 or StressWriter only), for information about sending ECGs to other PageWriter cardiographs or the TraceMaster ECG Management system.
PageWriter 200/300pi M1771A/1770A Cardiograph |
1-9 |

Patient and Operational Safety Notes
WARNING
WARNING
Patient and Operational Safety Notes
Your cardiograph isolates all connections to the patient from electrical ground and all other conductive circuits in the cardiograph. This reduces the possibility of hazardous currents passing from the cardiograph through the patient’s heart to ground. To ensure the patient’s safety and your own, observe the following reminders:
λWhen operating your cardiograph from AC power, be sure it and all other electrical equipment connected to or near the patient are effectively grounded.
λUse only grounded power cords (three-wire power cords with grounded plugs). Also make sure the outlet accepts the plug and is grounded. Never adapt a grounded plug to fit an ungrounded outlet by removing the ground prong or ground clip. Should an ungrounded plug adapter be necessary, use a ground strap to connect the equipotential connector at the rear of the instrument to the power source ground.
λThe patient cable should be routed away from power cords and any other electrical equipment. Failure to do so can result in AC power line frequency interference on the ECG trace.
The patient cable supplied with this cardiograph, or an Agilent Technologies approved substitute patient cable, is an integral part of the cardiograph's safety features. Using any other patient cable may compromise defibrillation protection as well as cardiograph performance.
Only qualified personnel may service the cardiograph.
Do not use this cardiograph near flammable anesthetics. It is not intended for use in explosive environments.
Do not touch the patient, patient cable or cardiograph during defibrillation. Death or injury may occur from the electrical shock delivered by the defibrillator.
Be sure that the electrodes or lead wire tips do not come in contact with any other conductive materials, including earth-grounded materials, especially when
1-10 |
Getting Acquainted |
WARNING
CAUTION
NOTE
Electromagnetic Compatibility
connecting or disconnecting electrodes to/from a patient.
The use of multiple instruments connected to the same patient may pose a safety
hazard due to the summation of leakage currents from each instrument. Any 1 combination of instruments should be evaluated by local safety personnel before
being put into service.
Do not pull on the paper while a report is being printed. This can cause distortion of the waveform and can lead to potential misdiagnosis.
(#A05 or StressWriter Options only) Equipment connected to the cardiograph’s RS232 connector can cause ground leakage currents exceeding the maximum specified in IEC601-1 safety standards.
Do not connect any equipment to the RS-232 connector during cardiograph operation unless you can verify that the leakage current is within the specified limits.
Do not block the ventilation slots. Lack of ventilation may cause the cardiograph to overheat, resulting in failure of internal electronic components.
The Agilent Technologies warranty is only assured if you use Agilent Technologies approved accessories and replacement parts. See Maintaining the Cardiograph for more information.
Electromagnetic Compatibility
When using the PageWriter 200/300pi, electromagnetic compatibility with surrounding devices should be assessed.
A medical device can either generate or receive electromagnetic interference. Testing for electromagnetic compatibility (EMC) of the PageWriter 200/300pi cardiograph has been performed according to IEC 601-1-2. This IEC standard has been adopted in Europe as the European Norm (EN 60601-1-2).
This EMC standard describes tests for both emitted and received interference. Emission tests deal with interference generated by the device being tested.
PageWriter 200/300pi M1771A/1770A Cardiograph |
1-11 |
Reducing Electromagnetic Interference
Tests for the 200/300pi cardiographs show they do not emit interference that exceeds the IEC 601-1-2 limits.
Reducing Electromagnetic Interference
The M1770/M1771 PageWriter 200/300pi cardiographs are susceptible to interference from other RF energy sources and continuous, repetitive, power line bursts. Examples of other sources of RF interference are medical devices, cellular products, information technology equipment and radio/television transmission. Should interference be encountered, as demonstrated by artifact on the ECG, attempt to locate the source. Assess:
λIs the interference intermittent or constant?
λDoes the interference occur only in certain locations?
λDoes the interference occur only when in close proximity to certain medical devices?
Once the source is located, attempt to attenuate the EMC coupling path by distancing the cardiograph from the source as much as possible. If assistance is needed, call your local Agilent Technologies service representative.
Restrictions for Use
Artifact on the ECG caused by electromagnetic interference should be evaluated by a physician or physician authorized personnel to determine if it will negatively impact patient diagnosis or treatment.
AC and Battery Operation
The battery must be installed for proper operation of the cardiograph—even if the cardiograph is plugged into AC power, it cannot print an ECG report without the battery. For information about replacing or installing the battery, refer to Setting Up Your Cardiograph.
The following is a list of AC and battery operating information:
λA fully charged battery (without AC power) will print approximately 40 Auto ECGs, or approximately 40 minutes of continuous Manual ECG information.
1-12 |
Getting Acquainted |

NOTE
NOTE
AC and Battery Operation
λThe Low Battery message on the display indicates the battery needs to be charged.
λFrom the time the Low Battery message is first displayed to when
the cardiograph automatically is turned to Standby (off), there is |
1 |
typically enough reserve battery capacity to record two Auto ECGs or |
|
2-minutes of Manual ECG data. A weak or faulty battery will reduce |
|
this time. |
|
λThe flashing Low Battery message indicates that the cardiograph will turn itself off in one minute unless it is plugged into AC power.
λA discharged battery requires at least 5 minutes charging time, with the cardiograph in Standby (off), before printing an Auto ECG.
λA discharged battery requires at least 10 minutes charging time, with the cardiograph in Standby (off), before printing a 1-minute Manual ECG.
If the cardiograph is turned on while the battery is being charged, these charging times are doubled (10 minutes for an Auto ECG and 20 minutes for a 1-minute Manual ECG).
λThe PageWriter 200/300pi cardiograph has a battery-saving feature: it will turn itself to Standby (off) after 30 minutes of instrument inactivity. This prevents the cardiograph from being accidentally left on for extended periods of time.
This feature is not active if all the limb electrodes are connected to a patient or if the cardiograph is plugged into AC power.
λA new battery or a battery that has been stored for an extended period of time requires charging (with the cardiograph in Standby (off)) for 16 hours in order to guarantee a full charge.
λThe battery, if installed, is being charged any time the AC light is on.
λA fully depleted battery will charge to 90% of full capacity in 7 hours, and 100% capacity in 16 hours, as long as the cardiograph is in Standby (off) for the entire time.
λWhen the cardiograph is not in use, it should be connected to AC power and left in Standby (off). This will maintain a full battery charge and prolong battery life.
PageWriter 200/300pi M1771A/1770A Cardiograph |
1-13 |

AC and Battery Operation
|
|
|
|
|
|
NOTE |
|
The cardiograph’s battery charging circuit delivers less power than the |
|
|
cardiograph uses while printing an ECG. It is possible to run down the battery, |
|
||
|
||
|
|
even when the cardiograph is plugged into AC power, if the printer is being |
|
|
heavily used. |
|
|
|
1-14 |
Getting Acquainted |

2 Recording an ECG
|
|
This chapter describes how to: |
|
|||
|
|
λ prepare the patient for an ECG |
2 |
|||
|
|
λ |
check the signal quality of the patient leads |
|||
|
|
|
||||
|
|
λ enter patient ID and printed report information |
|
|||
|
|
λ |
record an ECG |
|
||
|
|
|||||
|
|
λ change the report format |
|
|||
|
|
λ understand the printed report |
|
|||
|
|
Samples of the different Manual and Auto ECG formats are also shown. |
|
|||
|
|
|
|
|
||
|
|
|
|
|
|
|
|
|
|
|
|
|
|
NOTE |
|
If the cardiograph has not been setup, refer to Setting Up Your Cardiograph, |
|
|||
|
|
for instructions. |
|
|||
|
|
|||||
|
|
|||||
|
|
|
|
|
|
|
If your cardiograph is already configured, you can record an ECG by performing the following steps and procedures. (If you need to configure your cardiograph or check settings, refer to Configuring Your Cardiograph.)
1.If the cardiograph is not On, press 2Q 6WDQGE\ .
2.Prepare the patient and apply the electrodes, as described in the next section, “Preparing the Patient”.
3.Check the signal quality on all leads, as described in “Checking Signal Quality” , later in this chapter.
4.Enter patient ID information, if necessary. This is described in “Entering Patient ID” , later in this chapter.
5.Press $XWR to record a 12-lead ECG, or press 0DQXDO to record a rhythm report.
The rest of this chapter discusses the details of setting up and recording ECGs.
PageWriter 200/300pi M1771A/1770A Cardiograph |
2-1 |

Preparing the Patient
NOTE
NOTE
Preparing the Patient
For electrode placement information, refer to the diagram on the top of your cardiograph.
Proper patient preparation and electrode placement are the most important elements in producing a high quality ECG trace.
Prepare the patient by performing the following steps.
1.Reassure and relax the patient. A calm and quiet patient produces the best ECGs.
2.Make sure the electrode site is not covered by hair or clothing.
3.Gently clean and abrade the surface of the skin with dry gauze.
4.Place electrodes on patient. See the following notes regarding your type of electrodes.
5.Attach each lead wire to the correct electrode.
6.The upper-left corner of the screen displays the electrodes that are not placed firmly on the patient and/or the lead wires that are not attached securely to the electrodes. (See Table 2-1.) This is an indication of “ leads off”. Correct the attachment of any lead/electrode pair that appears on the screen.
The patient cable should be routed away from power cords and any other electrical equipment. Failure to do so can result in AC line frequency interference on the ECG trace.
2-2 |
Recording an ECG |

Preparing the Patient
Table 2-1: Leads Off Labels |
|
||
|
|
|
|
Designator |
Meaning |
|
|
(AHA/IEC) |
|
|
|
|
|
|
|
|
|
|
|
RL/N |
Right leg electrode not connected or only right leg electrode is |
|
|
|
connected and all other limb electrodes are not connected. |
|
|
|
|
|
|
RA/R |
Right arm electrode is not connected. |
|
|
|
|
|
2 |
LA/L |
Left arm electrode is not connected. |
|
|
|
|
|
|
LL/F |
Left leg electrode is not connected. |
|
|
|
|
|
|
V1...V6/ |
One or more chest electrodes are not connected. For example, |
|
|
|
|||
C1...C6 |
V2 means the V2 electrode is not connected. |
|
|
|
|
|
|
Notes for Customers Using Reusable Electrodes
Each electrode must be attached securely. Straps must neither slide nor be so tight as to cause discomfort.
The electrode paste, gel, or creme must cover an area the size of the electrode, but must not extend beyond it, especially on the chest.
Notes for Customer Using Disposable Tab Electrodes
Disposable electrodes have conductive material on the adhesive side only. The electrode tab must be placed between the jaws of the electrode adapter clip, and remain flat. Do not attempt to place the jaws of the electrode adapter so close to the circular part of the electrode that the tab of the electrode is bent, or contact is made with the conductive gel. Gently tug on the electrode adapter to ensure that the electrode adapter is properly placed on the electrode.
Good and accurate placement on the first attempt should be your goal for each electrode. Each time an electrode is lifted off the skin and attached again, the adhesive gel becomes weaker and less effective.
|
|
|
|
|
|
NOTE |
|
Never mix reusable and disposable electrodes on the same patient. |
|
|
|
|
|
|
PageWriter 200/300pi M1771A/1770A Cardiograph |
2-3 |
Understanding When a Signal is Acquired
|
|
|
Understanding When a Signal is Acquired |
||
|
|
|
|||
|
|
|
Your PageWriter 200/300pi cardiograph attempts to acquire a good signal for |
||
|
|
|
|
|
|
|
|
|
an Auto report before you press the |
$XWR |
key. This is called pre-acquisition. |
|
|
|
Pre-acquisition is activated when the cardiograph is turned on and remains |
||
|
|
|
active until an Auto report begins to print. Pre-acquisition is also suspended |
||
|
|
|
whenever an electrode is disconnected. |
||
|
|
|
Pre-acquisition is reactivated when a patient ID is entered or edited, or when a |
||
|
|
|
Manual report is finished printing. |
||
|
|
|
When Pre-acquisition is active, it is important for the patient to stay still and |
||
|
|
|
relaxed. This will help ensure a good signal is captured prior to printing an |
||
|
|
|
Auto report. |
||
|
|
|
|
|
|
|
|
|
|
|
|
|
|
|
|
|
|
NOTE |
|
|
Pre-acquisition is not used for Manual ECG reports. |
||
|
|
|
|
|
|
|
|
|
|
|
|
|
|
|
|
|
|
|
|
|
|
|
|
|
|
|
|
|
|
NOTE
NOTE
Performing a Stat ECG (Bypassing Patient ID
Entry)
Perform the following step when an ECG is needed quickly.
1.If the cardiograph is not On, press 2Q 6WDQGE\ .
2.Prepare the patient and apply the electrodes.
3.Do one of the following:
A.Press 0DQXDO twice for a Manual ECG report.
B.Press $XWR twice for an Auto ECG report.
Reports printed by following the above steps will use the last patient identification information even if powered off in between. Be sure the patient ID data on the report matches the patient.
Signals seen on the screen can only be captured for an Auto report when Preacquisition is active. See “Understanding When a Signal is Acquired” for more information on Pre-acquisition.
2-4 |
Recording an ECG |

Checking Signal Quality
Checking Signal Quality
You can produce better ECGs by previewing the lead traces on the screen before you record and print the ECG. By observing the traces and adjusting the leads accordingly, you can make the best possible ECG recording.
The screen displays the output from the selected three leads whenever the cardiograph is on.
The leads are displayed in five groups of three leads each. The groups are
listed below:
2
Table 2-2: Lead Groups
Group |
Leads Displayed |
|
|
Group 1 |
I, II, III |
|
|
Group 2 |
aVR, aVL, aVF |
|
|
Group 3 |
V1, V2, V3 |
|
|
Group 4 |
V4, V5, V6 |
|
|
Group 5 |
Custom 3 |
|
|
λTo select which three leads to display on the screen, press the  or
or


 key, or the 6SDFH bar, to display the next lead group, or press the

 or
or 

 key to display the previous lead group.
λBefore you connect the electrodes, each lead displays on the screen as a dotted line, indicating that at least one of the electrodes associated with the lead is not connected. The dotted line is known as a “leads off” trace . Use the leads off labels (see Table 2-1) to determine which leads are off.
λAs you connect the electrodes to the patient, the lead waveforms are displayed on the screen.
PageWriter 200/300pi M1771A/1770A Cardiograph |
2-5 |
 Loading...