


LASERJET1150

service
hp LaserJet
1150 1300 1300n


hp LaserJet 1150 and
hp LaserJet 1300 series
service manual

Hewlett-Packard Company
11311 Chinden Boulevard
Boise, Idaho 83714 U.S.A.
Copyright Information
© 2003 Hewlett-Packard
Company
All Rights Reserved.
Reproduction, adaptations, or
translation without prior written
permission is prohibited except
as allowed under copyright
laws.
Part number Q1334-90928
Edition 1, 4/2003
Printed in USA
Warranty
The information contained in
this document is subject to
change without notice.
Hewlett-Packard makes no
warranty of any kind with
respect to this information.
HEWLETT-PACKARD
SPECIFICALLY DISCLAIMS
THE IMPLIED WARRANTY OF
MERCHANTABILITY AND
FITNESS FOR A PARTICULAR
PURPOSE.
Hewlett-Packard shall not be
liable for any direct, indirect,
incidental, consequential, or
other damage alleged in
connection with the furnishing or
use of this information.
NOTICE TO U.S.
GOVERNMENT USERS:
RESTRICTED RIGHTS
COMMERCIAL COMPUTER
SOFTWARE: “Use, duplication,
or disclosure by the
Government is subject to
restrictions as set forth in
subparagraph (c) (1)(ii) of the
Rights in Technical Data Clause
at DFARS 52.227-7013.”
Trademark Credits
Microsoft, Windows, and MS-
DOS are U.S. registered
trademarks of Microsoft
Corporation.
TrueType is a U.S. trademark of
Apple Computer, Inc.
All other products mentioned
herein may be trademarks of
their respective companies.
Safety Information
WARNING!
Potential Shock Hazard
Always follow basic safety
precautions when using this
product to reduce risk of injury
from fire or electric shock.
1 Read and understand all
instructions in the user
guide.
2 Observe all warnings and
instructions marked on the
product.
3 Use only a grounded
electrical outlet when
connecting the printer to a
power source. If you do not
know whether the outlet is
grounded, check with a
qualified electrician.
4 Do not touch the contacts
on the end of any of the
sockets on the printer.
Replace damaged cords
immediately.
5 Unplug this product from
wall outlets before
cleaning.
6 Do not install or use this
product near water or
when you are wet.
7 Install the product securely
on a stable surface.
8 Install the product in a
protected location where
no one can step on or trip
over the power cord and
the power cord will not be
damaged.
9 If the product does not
operate normally, see the
online user guide.
10 Refer all servicing
questions to qualified
personnel.
Information regarding FCC
Class B, Parts 15 and 68
requirements can be found in
the user guide.

ENWW Contents iii
Contents
Figures
Tables
1 Product information
Introduction . . . . . . . . . . . . . . . . . . . . . . . . . . . . . . . . . . . . . . . . . . . . . . . . . . . . . . 2
Hardware description . . . . . . . . . . . . . . . . . . . . . . . . . . . . . . . . . . . . . . . . . . . 2
Firmware description . . . . . . . . . . . . . . . . . . . . . . . . . . . . . . . . . . . . . . . . . . . 3
Product specifications . . . . . . . . . . . . . . . . . . . . . . . . . . . . . . . . . . . . . . . . . . . 4
Model and serial numbers . . . . . . . . . . . . . . . . . . . . . . . . . . . . . . . . . . . . . . . . . . . 7
Overview of printer . . . . . . . . . . . . . . . . . . . . . . . . . . . . . . . . . . . . . . . . . . . . . . . . 8
Front and side view. . . . . . . . . . . . . . . . . . . . . . . . . . . . . . . . . . . . . . . . . . . . . 8
Back and side view . . . . . . . . . . . . . . . . . . . . . . . . . . . . . . . . . . . . . . . . . . . . . 9
Warranty statement . . . . . . . . . . . . . . . . . . . . . . . . . . . . . . . . . . . . . . . . . . . . . . . 10
Extended warranty . . . . . . . . . . . . . . . . . . . . . . . . . . . . . . . . . . . . . . . . . . . . 11
Limited warranty for print cartridge life . . . . . . . . . . . . . . . . . . . . . . . . . . . . . . . . 12
Print cartridge information . . . . . . . . . . . . . . . . . . . . . . . . . . . . . . . . . . . . . . . . . 12
Print cartridge date stamp. . . . . . . . . . . . . . . . . . . . . . . . . . . . . . . . . . . . . . . 12
Refilled print cartridges . . . . . . . . . . . . . . . . . . . . . . . . . . . . . . . . . . . . . . . . 13
HP LaserJet printing supplies . . . . . . . . . . . . . . . . . . . . . . . . . . . . . . . . . . . . 13
HP printing supplies returns and recycling program information . . . . . . . . . 13
Material safety data sheet. . . . . . . . . . . . . . . . . . . . . . . . . . . . . . . . . . . . . . . 14
2 Installation and operation
Operating environment . . . . . . . . . . . . . . . . . . . . . . . . . . . . . . . . . . . . . . . . . . . . 16
Identifying printer components . . . . . . . . . . . . . . . . . . . . . . . . . . . . . . . . . . . . . . 17
Printer control panel . . . . . . . . . . . . . . . . . . . . . . . . . . . . . . . . . . . . . . . . . . . 17
Control panel light patterns . . . . . . . . . . . . . . . . . . . . . . . . . . . . . . . . . . . . . . 18
Selecting media. . . . . . . . . . . . . . . . . . . . . . . . . . . . . . . . . . . . . . . . . . . . . . . . . . 21
Loading media . . . . . . . . . . . . . . . . . . . . . . . . . . . . . . . . . . . . . . . . . . . . . . . . . . 23
Printer output paths . . . . . . . . . . . . . . . . . . . . . . . . . . . . . . . . . . . . . . . . . . . . . . . 24

iv Contents ENWW
3 Maintenance
Life expectancies of components . . . . . . . . . . . . . . . . . . . . . . . . . . . . . . . . . . . . 26
User-replaceable parts . . . . . . . . . . . . . . . . . . . . . . . . . . . . . . . . . . . . . . . . . . . . 26
Replacing the printer pickup roller . . . . . . . . . . . . . . . . . . . . . . . . . . . . . . . . 27
Replacing the printer separation pad . . . . . . . . . . . . . . . . . . . . . . . . . . . . . . 30
Cleaning the equipment . . . . . . . . . . . . . . . . . . . . . . . . . . . . . . . . . . . . 33
Cleaning the print path . . . . . . . . . . . . . . . . . . . . . . . . . . . . . . . . . . . . . . . . . 34
Cleaning the print cartridge area . . . . . . . . . . . . . . . . . . . . . . . . . . . . . . . . . 35
Cleaning the printer pickup roller . . . . . . . . . . . . . . . . . . . . . . . . . . . . . . . . . 37
Cleaning the printer separation pad . . . . . . . . . . . . . . . . . . . . . . . . . . . . . . . 38
4 Operational overview
Basic functions . . . . . . . . . . . . . . . . . . . . . . . . . . . . . . . . . . . . . . . . . . . . . . . . . . 42
Formatter system . . . . . . . . . . . . . . . . . . . . . . . . . . . . . . . . . . . . . . . . . . . . . . . . 43
Control panel . . . . . . . . . . . . . . . . . . . . . . . . . . . . . . . . . . . . . . . . . . . . . . . . 44
EconoMode. . . . . . . . . . . . . . . . . . . . . . . . . . . . . . . . . . . . . . . . . . . . . . . . . . 44
MEt . . . . . . . . . . . . . . . . . . . . . . . . . . . . . . . . . . . . . . . . . . . . . . . . . . . . . . . . 44
Enhanced I/O . . . . . . . . . . . . . . . . . . . . . . . . . . . . . . . . . . . . . . . . . . . . . . . . 44
PJL overview . . . . . . . . . . . . . . . . . . . . . . . . . . . . . . . . . . . . . . . . . . . . . . . . 45
Printer functions . . . . . . . . . . . . . . . . . . . . . . . . . . . . . . . . . . . . . . . . . . . . . . . . . 46
Engine control unit/power system . . . . . . . . . . . . . . . . . . . . . . . . . . . . . . . . . 47
Image formation system . . . . . . . . . . . . . . . . . . . . . . . . . . . . . . . . . . . . . . . . 52
Printer paper-feed system . . . . . . . . . . . . . . . . . . . . . . . . . . . . . . . . . . . . . . 55
Jam detection . . . . . . . . . . . . . . . . . . . . . . . . . . . . . . . . . . . . . . . . . . . . . . . . 57
Basic sequence of operation (formatter-to-printer) . . . . . . . . . . . . . . . . . . . . 59
5 Removal and replacement
Removal and replacement strategy. . . . . . . . . . . . . . . . . . . . . . . . . . . . . . . . . . . 63
Required tools. . . . . . . . . . . . . . . . . . . . . . . . . . . . . . . . . . . . . . . . . . . . . . . . 63
Before performing service. . . . . . . . . . . . . . . . . . . . . . . . . . . . . . . . . . . . . . . 64
Print cartridge . . . . . . . . . . . . . . . . . . . . . . . . . . . . . . . . . . . . . . . . . . . . . . . . 64
Parts removal order . . . . . . . . . . . . . . . . . . . . . . . . . . . . . . . . . . . . . . . . . . . 65
Differences between the printers. . . . . . . . . . . . . . . . . . . . . . . . . . . . . . . . . . . . . 66
Locating the printer differences . . . . . . . . . . . . . . . . . . . . . . . . . . . . . . . . . . 66
Covers . . . . . . . . . . . . . . . . . . . . . . . . . . . . . . . . . . . . . . . . . . . . . . . . . . . . . . . . . 69
Left side cover . . . . . . . . . . . . . . . . . . . . . . . . . . . . . . . . . . . . . . . . . . . . . . . 69
Back cover . . . . . . . . . . . . . . . . . . . . . . . . . . . . . . . . . . . . . . . . . . . . . . . . . . 70
Right side cover . . . . . . . . . . . . . . . . . . . . . . . . . . . . . . . . . . . . . . . . . . . . . . 72
Top cover . . . . . . . . . . . . . . . . . . . . . . . . . . . . . . . . . . . . . . . . . . . . . . . . . . . 75
Control panel assembly . . . . . . . . . . . . . . . . . . . . . . . . . . . . . . . . . . . . . . . . 76
Front cover assembly . . . . . . . . . . . . . . . . . . . . . . . . . . . . . . . . . . . . . . . . . . 77
Internal assemblies . . . . . . . . . . . . . . . . . . . . . . . . . . . . . . . . . . . . . . . . . . . . . . . 84
Transfer roller . . . . . . . . . . . . . . . . . . . . . . . . . . . . . . . . . . . . . . . . . . . . . . . . 84
Formatter (hp LaserJet 1300 series) . . . . . . . . . . . . . . . . . . . . . . . . . . . . . . 85
Formatter (hp LaserJet 1150 printer) . . . . . . . . . . . . . . . . . . . . . . . . . . . . . . 87

ENWW v
Laser/scanner assembly . . . . . . . . . . . . . . . . . . . . . . . . . . . . . . . . . . . . . . . 89
Fuser assembly . . . . . . . . . . . . . . . . . . . . . . . . . . . . . . . . . . . . . . . . . . . . . . 91
Output rollers . . . . . . . . . . . . . . . . . . . . . . . . . . . . . . . . . . . . . . . . . . . . . . . . 95
E-label assembly (hp LaserJet 1300 only) . . . . . . . . . . . . . . . . . . . . . . . . . . 97
Motor. . . . . . . . . . . . . . . . . . . . . . . . . . . . . . . . . . . . . . . . . . . . . . . . . . . . . . . 98
Solenoid . . . . . . . . . . . . . . . . . . . . . . . . . . . . . . . . . . . . . . . . . . . . . . . . . . . . 99
Fan assembly . . . . . . . . . . . . . . . . . . . . . . . . . . . . . . . . . . . . . . . . . . . . . . . 101
Right plate assembly . . . . . . . . . . . . . . . . . . . . . . . . . . . . . . . . . . . . . . . . . 103
Pickup assembly . . . . . . . . . . . . . . . . . . . . . . . . . . . . . . . . . . . . . . . . . . . . . 106
Pickup roller shaft . . . . . . . . . . . . . . . . . . . . . . . . . . . . . . . . . . . . . . . . . . . . 109
Paper lift plate assembly. . . . . . . . . . . . . . . . . . . . . . . . . . . . . . . . . . . . . . . 111
Left plate assembly . . . . . . . . . . . . . . . . . . . . . . . . . . . . . . . . . . . . . . . . . . . 113
Bottom assemblies . . . . . . . . . . . . . . . . . . . . . . . . . . . . . . . . . . . . . . . . . . . . . . 115
ECU . . . . . . . . . . . . . . . . . . . . . . . . . . . . . . . . . . . . . . . . . . . . . . . . . . . . . . 115
Paper feed assembly . . . . . . . . . . . . . . . . . . . . . . . . . . . . . . . . . . . . . . . . . 120
Paper-feed roller . . . . . . . . . . . . . . . . . . . . . . . . . . . . . . . . . . . . . . . . . . . . . 121
6 Troubleshooting
Basic troubleshooting . . . . . . . . . . . . . . . . . . . . . . . . . . . . . . . . . . . . . . . . . . . . 128
Errors. . . . . . . . . . . . . . . . . . . . . . . . . . . . . . . . . . . . . . . . . . . . . . . . . . . . . . . . . 130
Control panel light messages . . . . . . . . . . . . . . . . . . . . . . . . . . . . . . . . . . 130
Fatal error secondary messages . . . . . . . . . . . . . . . . . . . . . . . . . . . . . . . . 133
Accessory error secondary messages . . . . . . . . . . . . . . . . . . . . . . . . . . . . 135
Checking the print cartridge . . . . . . . . . . . . . . . . . . . . . . . . . . . . . . . . . . . . 136
Solving image-quality problems . . . . . . . . . . . . . . . . . . . . . . . . . . . . . . . . . 137
Solving paper-feed problems . . . . . . . . . . . . . . . . . . . . . . . . . . . . . . . . . . . . . . 142
Functional checks . . . . . . . . . . . . . . . . . . . . . . . . . . . . . . . . . . . . . . . . . . . . . . . 144
Engine test . . . . . . . . . . . . . . . . . . . . . . . . . . . . . . . . . . . . . . . . . . . . . . . . . 144
Half self-test functional check . . . . . . . . . . . . . . . . . . . . . . . . . . . . . . . . . . 145
Drum rotation functional check . . . . . . . . . . . . . . . . . . . . . . . . . . . . . . . . . 146
Heating element check . . . . . . . . . . . . . . . . . . . . . . . . . . . . . . . . . . . . . . . 147
High-voltage power supply check . . . . . . . . . . . . . . . . . . . . . . . . . . . . . . . . 148
Paper path check . . . . . . . . . . . . . . . . . . . . . . . . . . . . . . . . . . . . . . . . . . . . 150
Service mode functions . . . . . . . . . . . . . . . . . . . . . . . . . . . . . . . . . . . . . . . . . . . 151
NVRAM initialization . . . . . . . . . . . . . . . . . . . . . . . . . . . . . . . . . . . . . . . . . 151
Cold reset . . . . . . . . . . . . . . . . . . . . . . . . . . . . . . . . . . . . . . . . . . . . . . . . . . 152
PJL software commands . . . . . . . . . . . . . . . . . . . . . . . . . . . . . . . . . . . . . . 153
Troubleshooting tools . . . . . . . . . . . . . . . . . . . . . . . . . . . . . . . . . . . . . . . . . . . . 155
Internal reports . . . . . . . . . . . . . . . . . . . . . . . . . . . . . . . . . . . . . . . . . . . . . . 155
Repetitive image defect ruler . . . . . . . . . . . . . . . . . . . . . . . . . . . . . . . . . . . 158
Main wiring . . . . . . . . . . . . . . . . . . . . . . . . . . . . . . . . . . . . . . . . . . . . . . . . . 159
Locations of connectors . . . . . . . . . . . . . . . . . . . . . . . . . . . . . . . . . . . . . . . 162
Locations of LEDs, jumpers, and switches . . . . . . . . . . . . . . . . . . . . . . . . . 163
Contents

vi Contents ENWW
7 Parts and diagrams
Ordering parts and supplies . . . . . . . . . . . . . . . . . . . . . . . . . . . . . . . . . . . . . . . 166
Parts . . . . . . . . . . . . . . . . . . . . . . . . . . . . . . . . . . . . . . . . . . . . . . . . . . . . . 166
Related documentation and software . . . . . . . . . . . . . . . . . . . . . . . . . . . . . 166
Consumables . . . . . . . . . . . . . . . . . . . . . . . . . . . . . . . . . . . . . . . . . . . . . . . 166
Accessories . . . . . . . . . . . . . . . . . . . . . . . . . . . . . . . . . . . . . . . . . . . . . . . . 167
How to use the parts lists and diagrams . . . . . . . . . . . . . . . . . . . . . . . . . . . . . . 169
Common hardware . . . . . . . . . . . . . . . . . . . . . . . . . . . . . . . . . . . . . . . . . . . . . . 169
Assembly locations . . . . . . . . . . . . . . . . . . . . . . . . . . . . . . . . . . . . . . . . . . . . . . 170
Covers . . . . . . . . . . . . . . . . . . . . . . . . . . . . . . . . . . . . . . . . . . . . . . . . . . . . . . . 172
Internal assemblies . . . . . . . . . . . . . . . . . . . . . . . . . . . . . . . . . . . . . . . . . . . . . . 174
Internal components (1 of 2). . . . . . . . . . . . . . . . . . . . . . . . . . . . . . . . . . . . 174
Internal components (2 of 2). . . . . . . . . . . . . . . . . . . . . . . . . . . . . . . . . . . . 176
Left side plate assembly . . . . . . . . . . . . . . . . . . . . . . . . . . . . . . . . . . . . . . . 178
Right side plate assembly . . . . . . . . . . . . . . . . . . . . . . . . . . . . . . . . . . . . . . 180
Electrical components. . . . . . . . . . . . . . . . . . . . . . . . . . . . . . . . . . . . . . . . . 182
Paper pickup assembly . . . . . . . . . . . . . . . . . . . . . . . . . . . . . . . . . . . . . . . 184
Paper feed guide assembly . . . . . . . . . . . . . . . . . . . . . . . . . . . . . . . . . . . . 186
Fuser assembly . . . . . . . . . . . . . . . . . . . . . . . . . . . . . . . . . . . . . . . . . . . . . 188
Alphabetical parts list . . . . . . . . . . . . . . . . . . . . . . . . . . . . . . . . . . . . . . . . . . . . 190
Numerical parts list . . . . . . . . . . . . . . . . . . . . . . . . . . . . . . . . . . . . . . . . . . . . . . 194
Index

ENWW Figures vii
Figures
Figure 1. HP LaserJet 1150 printer label (220 volt) . . . . . . . . . . . . . . . . . . . . . . . . 7
Figure 2. HP LaserJet 1300 printer label (110 volt) . . . . . . . . . . . . . . . . . . . . . . . . 7
Figure 3. HP LaserJet 1300 printer label (220 volt) . . . . . . . . . . . . . . . . . . . . . . . . 7
Figure 4. Front and side view . . . . . . . . . . . . . . . . . . . . . . . . . . . . . . . . . . . . . . . . 8
Figure 5. Back and side view. . . . . . . . . . . . . . . . . . . . . . . . . . . . . . . . . . . . . . . . . 9
Figure 6. Dimensions of printer . . . . . . . . . . . . . . . . . . . . . . . . . . . . . . . . . . . . . . 16
Figure 7. Printer control panel . . . . . . . . . . . . . . . . . . . . . . . . . . . . . . . . . . . . . . . 17
Figure 8. Light status legend . . . . . . . . . . . . . . . . . . . . . . . . . . . . . . . . . . . . . . . . 18
Figure 9. Output bin . . . . . . . . . . . . . . . . . . . . . . . . . . . . . . . . . . . . . . . . . . . . . . . 24
Figure 10. Straight-through output door. . . . . . . . . . . . . . . . . . . . . . . . . . . . . . . . . 24
Figure 11. Basic configuration . . . . . . . . . . . . . . . . . . . . . . . . . . . . . . . . . . . . . . . . 42
Figure 12. Printer unit functional block diagram . . . . . . . . . . . . . . . . . . . . . . . . . . 46
Figure 13. ECU loads . . . . . . . . . . . . . . . . . . . . . . . . . . . . . . . . . . . . . . . . . . . . . . 48
Figure 14. Overview of laser/scanner operation . . . . . . . . . . . . . . . . . . . . . . . . . . 49
Figure 15. High-voltage power supply circuit. . . . . . . . . . . . . . . . . . . . . . . . . . . . . 51
Figure 16. Image formation block diagram . . . . . . . . . . . . . . . . . . . . . . . . . . . . . . 52
Figure 17. Printer path . . . . . . . . . . . . . . . . . . . . . . . . . . . . . . . . . . . . . . . . . . . . . . 56
Figure 18. Solenoid, photosensors, and switches . . . . . . . . . . . . . . . . . . . . . . . . . 58
Figure 19. General timing diagram . . . . . . . . . . . . . . . . . . . . . . . . . . . . . . . . . . . 60
Figure 20. Removing the print cartridge . . . . . . . . . . . . . . . . . . . . . . . . . . . . . . . . 64
Figure 21. Printer differences (front) . . . . . . . . . . . . . . . . . . . . . . . . . . . . . . . . . . . 67
Figure 22. Printer differences (left side). . . . . . . . . . . . . . . . . . . . . . . . . . . . . . . . . 67
Figure 23. Printer differences (right side) . . . . . . . . . . . . . . . . . . . . . . . . . . . . . . . 68
Figure 24. Removing the left side cover . . . . . . . . . . . . . . . . . . . . . . . . . . . . . . . . 69
Figure 25. Removing the back cover (1 of 2). . . . . . . . . . . . . . . . . . . . . . . . . . . . . 70
Figure 26. Removing the back cover (2 of 2). . . . . . . . . . . . . . . . . . . . . . . . . . . . . 71
Figure 27. Removing the right side cover (1 of 3) . . . . . . . . . . . . . . . . . . . . . . . . . 72
Figure 28. Removing the right side cover (2 of 3) . . . . . . . . . . . . . . . . . . . . . . . . . 73
Figure 29. Removing the right side cover (3 of 3) . . . . . . . . . . . . . . . . . . . . . . . . . 74
Figure 30. Removing the top cover . . . . . . . . . . . . . . . . . . . . . . . . . . . . . . . . . . . . 75
Figure 31. Removing the control panel . . . . . . . . . . . . . . . . . . . . . . . . . . . . . . . . . 76
Figure 32. Removing the front cover (1 of 2) . . . . . . . . . . . . . . . . . . . . . . . . . . . . . 77
Figure 33. Removing the front cover (2 of 2) . . . . . . . . . . . . . . . . . . . . . . . . . . . . . 78
Figure 34. Removing the print cartridge door (1 of 2) . . . . . . . . . . . . . . . . . . . . . . 79
Figure 35. Removing the print cartridge door (2 of 2) . . . . . . . . . . . . . . . . . . . . . . 80
Figure 36. Removing the front guide assembly (1 of 3). . . . . . . . . . . . . . . . . . . . . 81
Figure 37. Removing the front guide assembly (2 of 3). . . . . . . . . . . . . . . . . . . . . 82
Figure 38. Removing the front guide assembly (3 of 3). . . . . . . . . . . . . . . . . . . . . 83
Figure 39. Removing the transfer roller . . . . . . . . . . . . . . . . . . . . . . . . . . . . . . . . . 84
Figure 40. Removing the HP LaserJet 1300 series formatter (1 of 2) . . . . . . . . . . 85
Figure 41. Removing the HP LaserJet 1300 series formatter (2 of 2) . . . . . . . . . . 86

viii Figures ENWW
Figure 42. Removing the HP LaserJet 1150 printer formatter (1 of 2). . . . . . . . . . 87
Figure 43. Removing the HP LaserJet 1150 printer formatter (2 of 2). . . . . . . . . . 88
Figure 44. Removing the laser/scanner (1 of 2) . . . . . . . . . . . . . . . . . . . . . . . . . . 89
Figure 45. Removing the laser/scanner (2 of 2) . . . . . . . . . . . . . . . . . . . . . . . . . . 90
Figure 46. Removing the fuser assembly (1 of 4) . . . . . . . . . . . . . . . . . . . . . . . . . 91
Figure 47. Removing the fuser assembly (2 of 4) . . . . . . . . . . . . . . . . . . . . . . . . . 92
Figure 48. Removing the fuser assembly (3 of 4) . . . . . . . . . . . . . . . . . . . . . . . . . 93
Figure 49. Removing the fuser assembly (4 of 4) . . . . . . . . . . . . . . . . . . . . . . . . . 94
Figure 50. Removing the output rollers (1 of 2) . . . . . . . . . . . . . . . . . . . . . . . . . . . 95
Figure 51. Removing the output rollers (2 of 2) . . . . . . . . . . . . . . . . . . . . . . . . . . . 96
Figure 52. Removing the e-label assembly . . . . . . . . . . . . . . . . . . . . . . . . . . . . . . 97
Figure 53. Removing the motor . . . . . . . . . . . . . . . . . . . . . . . . . . . . . . . . . . . . . . . 98
Figure 54. Removing the solenoid (1 of 2). . . . . . . . . . . . . . . . . . . . . . . . . . . . . . . 99
Figure 55. Removing the solenoid (2 of 2). . . . . . . . . . . . . . . . . . . . . . . . . . . . . . 100
Figure 56. Removing the fan (1 of 2) . . . . . . . . . . . . . . . . . . . . . . . . . . . . . . . . . . 101
Figure 57. Removing the fan (2 of 2) . . . . . . . . . . . . . . . . . . . . . . . . . . . . . . . . . . 102
Figure 58. Removing the right plate assembly (1 of 3) . . . . . . . . . . . . . . . . . . . . 103
Figure 59. Removing the right plate assembly (2 of 3) . . . . . . . . . . . . . . . . . . . . 104
Figure 60. Removing the right plate assembly (3 of 3) . . . . . . . . . . . . . . . . . . . . 105
Figure 61. Removing the pickup assembly (1 of 3) . . . . . . . . . . . . . . . . . . . . . . . 106
Figure 62. Removing the pickup assembly (2 of 3) . . . . . . . . . . . . . . . . . . . . . . . 107
Figure 63. Removing the pickup assembly (3 of 3) . . . . . . . . . . . . . . . . . . . . . . . 108
Figure 64. Removing the pickup roller shaft (1 of 2) . . . . . . . . . . . . . . . . . . . . . . 109
Figure 65. Removing the pickup roller shaft (2 of 2) . . . . . . . . . . . . . . . . . . . . . . 110
Figure 66. Removing the paper lift plate assembly . . . . . . . . . . . . . . . . . . . . . . . 112
Figure 67. Removing the left plate assembly. . . . . . . . . . . . . . . . . . . . . . . . . . . . 114
Figure 68. Removing the ECU (1 of 5) . . . . . . . . . . . . . . . . . . . . . . . . . . . . . . . . 115
Figure 69. Removing the ECU (2 of 5) . . . . . . . . . . . . . . . . . . . . . . . . . . . . . . . . 116
Figure 70. Removing the ECU (3 of 5) . . . . . . . . . . . . . . . . . . . . . . . . . . . . . . . . 117
Figure 71. Removing the ECU (4 of 5) . . . . . . . . . . . . . . . . . . . . . . . . . . . . . . . . 118
Figure 72. Removing the ECU (5 of 5) . . . . . . . . . . . . . . . . . . . . . . . . . . . . . . . . 119
Figure 73. Removing the paper feed assembly . . . . . . . . . . . . . . . . . . . . . . . . . . 120
Figure 74. Removing the paper-feed roller (1 of 5) . . . . . . . . . . . . . . . . . . . . . . . 121
Figure 75. Removing the paper-feed roller (2 of 5) . . . . . . . . . . . . . . . . . . . . . . . 122
Figure 76. Removing the paper-feed roller (3 of 5) . . . . . . . . . . . . . . . . . . . . . . . 123
Figure 77. Removing the paper-feed roller (4 of 5) . . . . . . . . . . . . . . . . . . . . . . . 123
Figure 78. Removing the paper-feed roller (5 of 5) . . . . . . . . . . . . . . . . . . . . . . . 124
Figure 79. Reinstalling the paper-feed roller . . . . . . . . . . . . . . . . . . . . . . . . . . . . 125
Figure 80. Control panel location . . . . . . . . . . . . . . . . . . . . . . . . . . . . . . . . . . . . . 130
Figure 81. Engine test switch. . . . . . . . . . . . . . . . . . . . . . . . . . . . . . . . . . . . . . . . 144
Figure 82. Locating connectors for the heating element check . . . . . . . . . . . . . . 147
Figure 83. Print cartridge high-voltage connection points (right side) . . . . . . . . . 148
Figure 84. Print cartridge high-voltage connection points (left side) . . . . . . . . . . 148
Figure 85. High-voltage connector assembly (right side) . . . . . . . . . . . . . . . . . . 149
Figure 86. High-voltage connector assembly (left side). . . . . . . . . . . . . . . . . . . . 149
Figure 87. Overriding SW301 . . . . . . . . . . . . . . . . . . . . . . . . . . . . . . . . . . . . . . . 150
Figure 88. Self-test page . . . . . . . . . . . . . . . . . . . . . . . . . . . . . . . . . . . . . . . . . . . 157

ENWW Figures ix
Figure 89. Repetitive image defect ruler . . . . . . . . . . . . . . . . . . . . . . . . . . . . . . . 158
Figure 90. Main wiring (1 of 2) . . . . . . . . . . . . . . . . . . . . . . . . . . . . . . . . . . . . . . . 159
Figure 91. Main wiring (2 of 2) . . . . . . . . . . . . . . . . . . . . . . . . . . . . . . . . . . . . . . . 160
Figure 92. Optional paper feeder wiring . . . . . . . . . . . . . . . . . . . . . . . . . . . . . . . 161
Figure 93. Locations of printer connectors . . . . . . . . . . . . . . . . . . . . . . . . . . . . . 162
Figure 94. Locations of LEDs, jumpers, and switches . . . . . . . . . . . . . . . . . . . . . 163
Figure 95. Assembly locations . . . . . . . . . . . . . . . . . . . . . . . . . . . . . . . . . . . . . . . 170
Figure 96. Covers . . . . . . . . . . . . . . . . . . . . . . . . . . . . . . . . . . . . . . . . . . . . . . . . 172
Figure 97. Internal components (1 of 2). . . . . . . . . . . . . . . . . . . . . . . . . . . . . . . . 174
Figure 98. Internal components (2 of 2). . . . . . . . . . . . . . . . . . . . . . . . . . . . . . . . 176
Figure 99. Left side plate assembly . . . . . . . . . . . . . . . . . . . . . . . . . . . . . . . . . . . 178
Figure 100. Right side plate assembly. . . . . . . . . . . . . . . . . . . . . . . . . . . . . . . . . . 180
Figure 101. Electrical components . . . . . . . . . . . . . . . . . . . . . . . . . . . . . . . . . . . . 182
Figure 102. Paper pickup assembly . . . . . . . . . . . . . . . . . . . . . . . . . . . . . . . . . . . 184
Figure 103. Paper feed guide assembly . . . . . . . . . . . . . . . . . . . . . . . . . . . . . . . . 186
Figure 104. Fuser assembly . . . . . . . . . . . . . . . . . . . . . . . . . . . . . . . . . . . . . . . . . 188

x Figures ENWW

ENWW Tables xi
Tables
Table 1. Physical specifications . . . . . . . . . . . . . . . . . . . . . . . . . . . . . . . . . . . . . . 4
Table 2. Environmental specifications . . . . . . . . . . . . . . . . . . . . . . . . . . . . . . . . 4
Table 3. Power specifications . . . . . . . . . . . . . . . . . . . . . . . . . . . . . . . . . . . . . . . 5
Table 4. Performance of HP LaserJet 1150 printer . . . . . . . . . . . . . . . . . . . . . . . 5
Table 5. Performance of HP LaserJet 1300 series printer . . . . . . . . . . . . . . . . . . 5
Table 6. Print operating acoustical emissions specifications . . . . . . . . . . . . . . . . 6
Table 7. Skew specifications . . . . . . . . . . . . . . . . . . . . . . . . . . . . . . . . . . . . . . . . 6
Table 8. HP hardware product numbers. . . . . . . . . . . . . . . . . . . . . . . . . . . . . . . 11
Table 9. Control panel light messages . . . . . . . . . . . . . . . . . . . . . . . . . . . . . . . . 18
Table 10. Media types . . . . . . . . . . . . . . . . . . . . . . . . . . . . . . . . . . . . . . . . . . . . . 21
Table 11. Life expectancies of components . . . . . . . . . . . . . . . . . . . . . . . . . . . . . 26
Table 12. Basic sequence of operation . . . . . . . . . . . . . . . . . . . . . . . . . . . . . . . . 59
Table 13. Basic troubleshooting . . . . . . . . . . . . . . . . . . . . . . . . . . . . . . . . . . . . 128
Table 14. Control panel lights legend . . . . . . . . . . . . . . . . . . . . . . . . . . . . . . . . . 130
Table 15. Control panel light messages . . . . . . . . . . . . . . . . . . . . . . . . . . . . . . . 131
Table 16. Fatal error secondary messages . . . . . . . . . . . . . . . . . . . . . . . . . . . . 133
Table 17. Accessory error secondary messages . . . . . . . . . . . . . . . . . . . . . . . . 135
Table 18. Solving print image-quality problems . . . . . . . . . . . . . . . . . . . . . . . . . 137
Table 19. Solving paper-feed problems . . . . . . . . . . . . . . . . . . . . . . . . . . . . . . . 142
Table 20. NVRAM PJL factory variables . . . . . . . . . . . . . . . . . . . . . . . . . . . . . . 153
Table 21. Switch functions . . . . . . . . . . . . . . . . . . . . . . . . . . . . . . . . . . . . . . . . . 163
Table 22. Technical support websites . . . . . . . . . . . . . . . . . . . . . . . . . . . . . . . . 166
Table 23. Accessories . . . . . . . . . . . . . . . . . . . . . . . . . . . . . . . . . . . . . . . . . . . . 167
Table 24. Common fasteners . . . . . . . . . . . . . . . . . . . . . . . . . . . . . . . . . . . . . . . 169
Table 25. Printer assemblies . . . . . . . . . . . . . . . . . . . . . . . . . . . . . . . . . . . . . . . 171
Table 26. Covers . . . . . . . . . . . . . . . . . . . . . . . . . . . . . . . . . . . . . . . . . . . . . . . . 173
Table 27. Internal components (1 of 2). . . . . . . . . . . . . . . . . . . . . . . . . . . . . . . . 175
Table 28. Internal components (2 of 2). . . . . . . . . . . . . . . . . . . . . . . . . . . . . . . . 177
Table 29. Electrical components . . . . . . . . . . . . . . . . . . . . . . . . . . . . . . . . . . . . 183
Table 30. Paper pickup assembly . . . . . . . . . . . . . . . . . . . . . . . . . . . . . . . . . . . 185
Table 31. Fuser assembly . . . . . . . . . . . . . . . . . . . . . . . . . . . . . . . . . . . . . . . . . 189
Table 32. Alphabetical parts list . . . . . . . . . . . . . . . . . . . . . . . . . . . . . . . . . . . . . 190
Table 33. Numerical parts list . . . . . . . . . . . . . . . . . . . . . . . . . . . . . . . . . . . . . . . 194

xii Tables ENWW

ENWW Chapter contents 1
1
Product information
Chapter contents
Introduction . . . . . . . . . . . . . . . . . . . . . . . . . . . . . . . . . . . . . . . 2
Hardware description . . . . . . . . . . . . . . . . . . . . . . . . . . . 2
Firmware description . . . . . . . . . . . . . . . . . . . . . . . . . . . 3
Product specifications. . . . . . . . . . . . . . . . . . . . . . . . . . . 4
Model and serial numbers . . . . . . . . . . . . . . . . . . . . . . . . . . . . 7
Overview of printer . . . . . . . . . . . . . . . . . . . . . . . . . . . . . . . . . . 8
Front and side view . . . . . . . . . . . . . . . . . . . . . . . . . . . . 8
Back and side view . . . . . . . . . . . . . . . . . . . . . . . . . . . . . 9
Warranty statement . . . . . . . . . . . . . . . . . . . . . . . . . . . . . . . . 10
Extended warranty . . . . . . . . . . . . . . . . . . . . . . . . . . . . 11
Limited warranty for print cartridge life . . . . . . . . . . . . . . . . . . 12
Print cartridge information . . . . . . . . . . . . . . . . . . . . . . . . . . . 12
Print cartridge date stamp . . . . . . . . . . . . . . . . . . . . . . 12
Refilled print cartridges . . . . . . . . . . . . . . . . . . . . . . . . . 13
HP LaserJet printing supplies. . . . . . . . . . . . . . . . . . . . 13

2 Chapter 1 - Product information ENWW
Introduction
The HP LaserJet 1150 and 1300 series printers are designed to print
documents easily with the laser-quality you have come to expect from
an HP LaserJet printer.
Hardware description
The printer provides 1200 dot-per-inch (dpi) printing.
The HP LaserJet 1150 prints 18 pages per minute (ppm) on letter-
size paper or 17 ppm on A4. The HP LaserJet 1300 prints 20 ppm on
letter-size paper or 19 ppm on A4. With 600 x 2 (Fast Res 1200)
printing resolution, these printers have exceptional text and graphics
print quality. The simple control panel and improved paper handling
make this product very easy to use.
The printer’s main input tray has a 250-sheet capacity for continuous,
multiple-page printing. Manual, single-sheet printing is possible
through the priority input tray. Both trays are center-justified for all
supported paper sizes. The printer output bin holds up to 125 sheets.
The printer has a very fast first-page-out, at less than 10 seconds.
The formatter board contains 8 MB of ROM, 8 MB of RAM, and an
embedded 32-bit Coldfire V3 processor. The HP LaserJet 1300 has
one DIMM slot available for DIMM expansion (supporting an 8 MB,
16 MB, 32 MB, or 64 MB DIMM).
The printer engine has a 1,000 average (10,000 peak) page-per-
month duty cycle. The standard print cartridge life is 2,500 pages,
and, for the HP LaserJet 1300 series, the high capacity print cartridge
life is 4,000 pages.
The HP LaserJet 1300n printer is network ready with an HP Jetdirect
200m print server included.

ENWW Introduction 3
Firmware description
The firmware in the printer includes:
z Host-based and PCL 5e printing
z Enhanced PCL 6 with status readback (HP LaserJet 1300 only)
z 80 TrueType™ fonts, plus Cyrillic, Greek, Hebrew, and Arabic
z Pixel placement, mosaic characters
z Memory Enhancement technology (MEt) with hardware
compression and decompression
The printer firmware also has Resolution Enhancement
technology (REt) and EconoMode functionality.

4 Chapter 1 - Product information ENWW
Product specifications
Table 1. Physical specifications
Category Specification
Height 253 mm (10 inches)
Depth 486 mm (19.1 inches)
Width 415 mm (16.3 inches)
Weight (cartridge
installed)
8.5 kg (18.6 lb)
Table 2. Environmental specifications
Category Specification
Operating
environment (printer
plugged into an AC
outlet)
z Temperature: 10° to 32.5° C (50° to 90.5° F)
z Humidity: 20% to 80% relative humidity
(no condensation)
Storage environment
(printer not plugged
into an AC outlet)
z Temperature: 0° to 40° C (32° to 104° F)
z Humidity: 10% to 80% relative humidity
(no condensation)

ENWW Introduction 5
Table 3. Power specifications
Category Specification
Power
requirements
z 110 Vac (± 10%), 60 (± 3) Hz; 127 Vac
(± 10%), 60 (± 2) Hz
-Or-
z 220 Vac (± 10%), 50/60 (± 2) Hz
z 240 Vac (± 10%), 50 (± 2) Hz
Note Power sources are not
interchangeable.
Power consumption
(during printing)
320 W
Power consumption
(idle)
7 W
Power consumption
(off)
0 W
Minimum
recommende d circuit
capacity
4.5 A at 115 V
2.4 A at 230 V
Table 4. Performance of HP LaserJet 1150 printer
Category Specification
Print resolution 1200 dpi
Print speed 18 ppm (Letter)
17 ppm (A4)
Table 5. Performance of HP LaserJet 1300 series printer
Category Specification
Print resolution 1200 dpi
Print speed 20 ppm (Letter)
19 ppm (A4)

6 Chapter 1 - Product information ENWW
Table 6. Print operating acoustical emissions specifications
Category Specification
Sound Power Level,
L
WAd
(1 bel = 10 decibels)
6.3 Bels(A)
Sound Pressure Level,
L
pAm
(operator position)
63 dB(A)
Sound Pressure Level,
L
pAm
(bystander position)
63 dB(A)
Table 7. Skew specifications
Category Specification
Print skew—left 0.8% (2 mm over 250 mm in length) for
cut-sheet media)
1.5% (3.3 mm over 220 mm in length) for
cut-sheet media
0.87 (1.65 mm over 190 mm in width) for
cut-sheet media
Print skew—right 1.5% (3.3 mm over 220 mm in width) for
envelopes, postcards, A5, and cut-sheet media
Cut-sheet leading
edge skew
0.87% (1.6 mm over 190 mm in width)

ENWW Model and serial numbers 7
Model and serial numbers
The model number and serial number are listed on an identification
label located on the inside of the print cartridge door. The serial
number contains information about the country/region of origin,
revision level, production code, and production number of the printer.
The label also contains power rating and regulatory information.
Figure 1. HP LaserJet 1150 printer label (220 volt)
Figure 2. HP LaserJet 1300 printer label (110 volt)
Figure 3. HP LaserJet 1300 printer label (220 volt)
8 Chapter 1 - Product information ENWW
Overview of printer
Front and side view
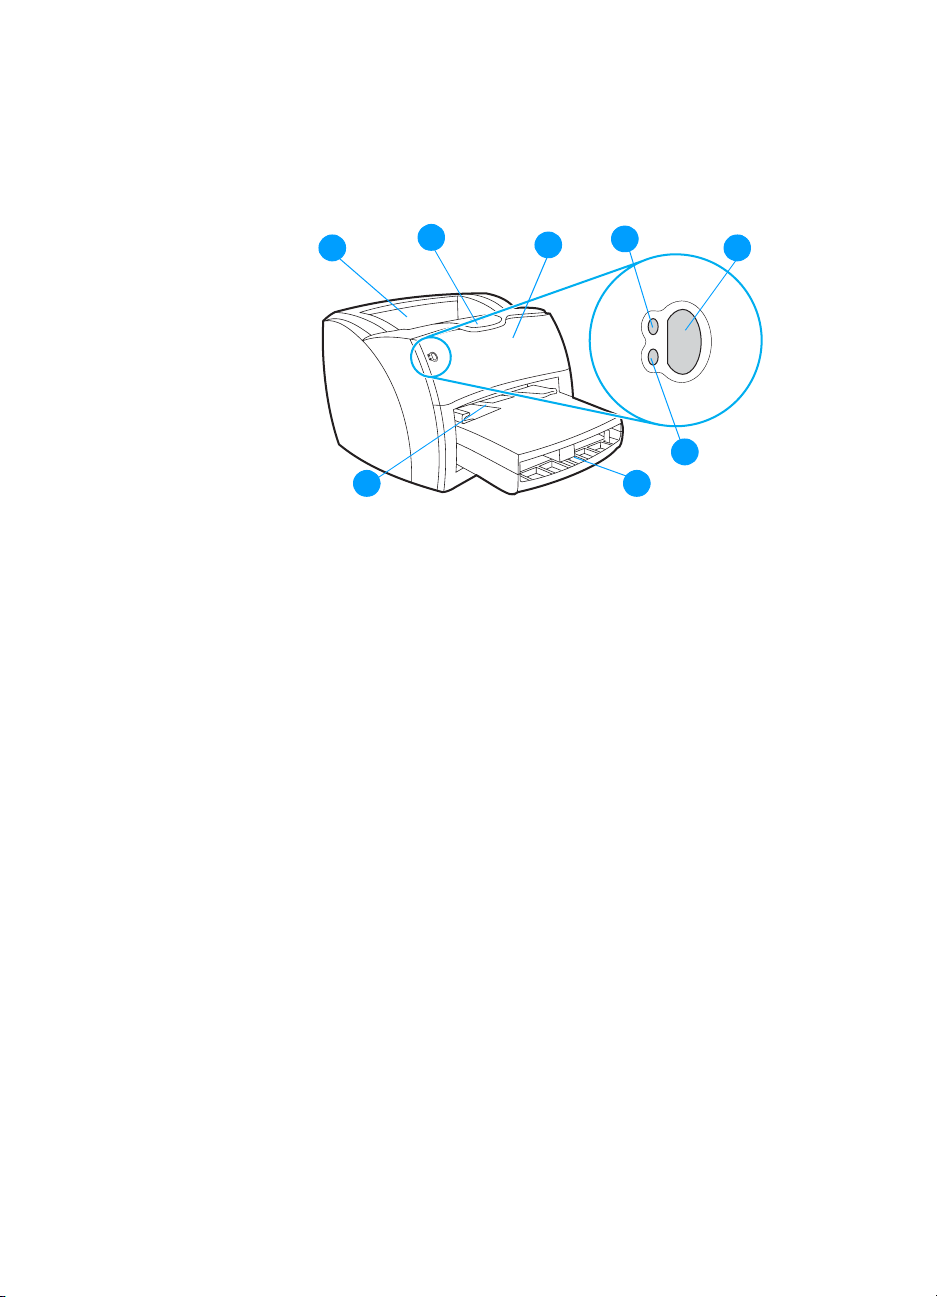
Figure 4. Front and side view
1 Printer output bin
2 Long media extension
3 Print cartridge door
4 Ready light
5 Go button and light
6 Attention light
7 Main input tray
8 Priority input tray
1
2
3
4
5
6
78
ENWW Overview of printer 9
Back and side view
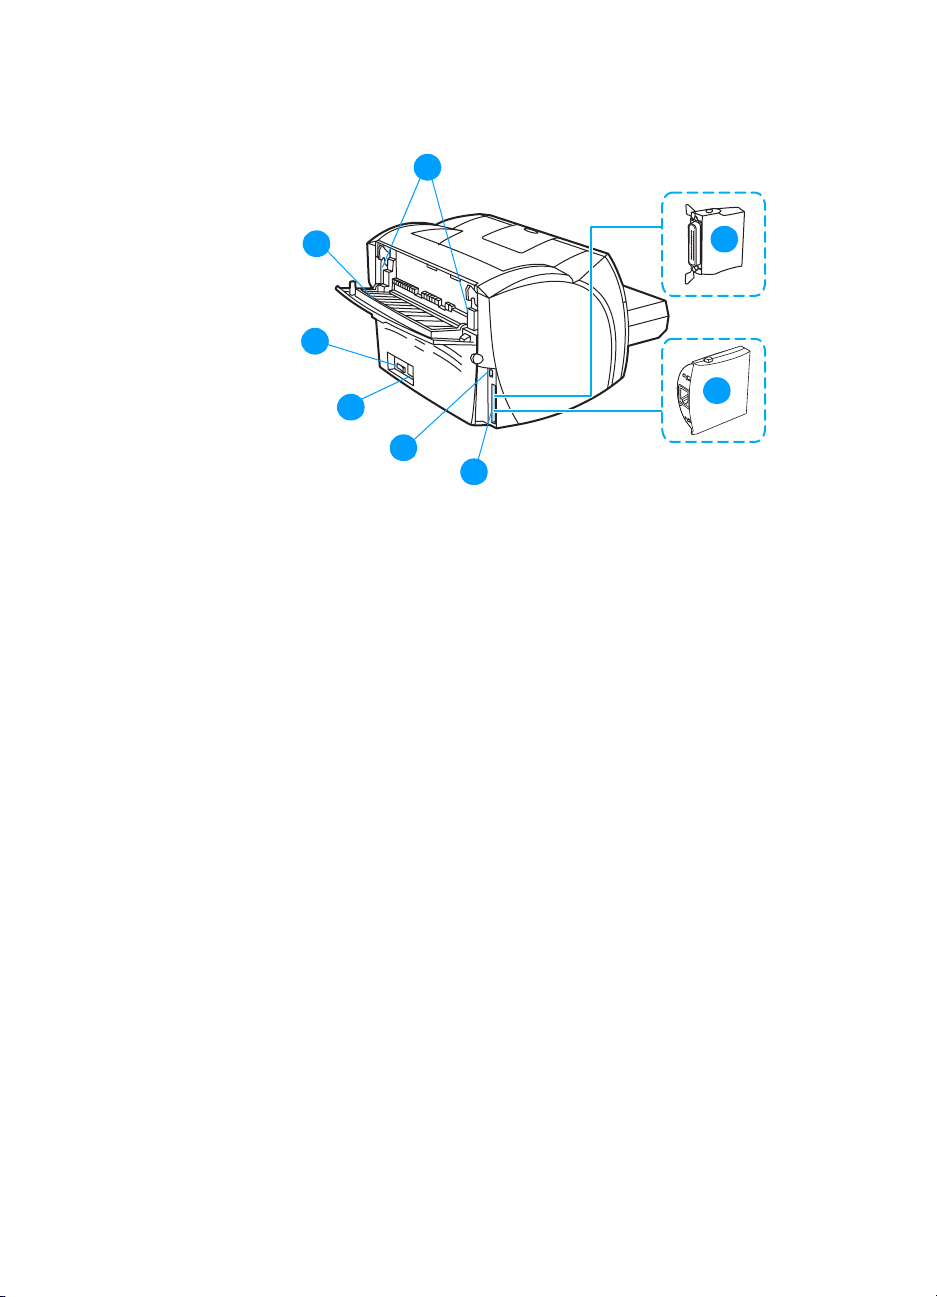
Figure 5. Back and side view
9 Fuser pressure release levers
10 Straight-through output door
11 On/off switch
12 Power receptacle
13 USB port
14 Parallel port (HP LaserJet 1150 printer)
LIO connectivity slot (HP LaserJet 1300 series)
15 HP Jetdirect print server (HP LaserJet 1300n printer only)
16 Parallel LIO adaptor (HP LaserJet 1300 series)
9
10
11
12
13
14
15
16

10 Chapter 1 - Product information ENWW
Warranty statement
1 HP warrants to you, the end-user customer, that HP hardware, accessories, and
supplies, will be free from defects in materials and workmanship after the date of
purchase, for the period specified above. If HP receives notice of such defects
during the warranty period, HP will, at its option, either repair or replace products
which prove to be defective. Replacement products may be either new or
like-new.
2 HP warrants to you that HP software will not fail to execute its programming
instructions after the date of purchase, for the period specified above, due to
defects in material and workmanship when properly installed and used. If
HP receives notice of such defects during the warranty period, HP will replace
software media which does not execute its programming instructions due to such
defects.
3 HP does not warrant that the operation of HP products will be uninterrupted or
error free. If HP is unable, within a reasonable time, to repair or replace any
product to a condition as warranted, you will be entitled to a refund of the
purchase price upon prompt return of the product.
4 HP products may contain remanufactured parts equivalent to new in performance
or may have been subject to incidental use.
5 Warranty does not apply to defects resulting from (a) improper or inadequate
maintenance or calibration, (b) software, interfacing, parts, or supplies not
supplied by HP, (c) unauthorized modification or misuse, (d) operation outside of
the published environmental specifications for the product, or (d) improper site
preparation or maintenance.
6 HP MAKES NO OTHER EXPRESS WARRANTY OR CONDITION WHETHER
WRITTEN OR ORAL. TO THE EXTENT ALLOWED BY LOCAL LAW, ANY
IMPLIED WARRANTY OR CONDITION OR MERCHANTABILITY,
SATISFACTORY QUALITY, OR FITNESS FOR A PARTICULAR PURPOSE IS
LIMITED TO THE DURATION OF THE EXPRESS WARRANTY SET FORTH
ABOVE. Some countries/regions, states, or provinces do not allow limitations on
the duration of an implied warranty, so the above limitation or exclusion might not
apply to you. This warranty gives you specific legal rights and you might also have
other rights that vary from country/region to country/region, state to state, or
province to province.
DURATION OF WARRANTY: One year from date of purchase.

ENWW Warranty statement 11
7 TO THE EXTENT ALLOWED BY LOCAL LAW, THE REMEDIES IN THIS
WARRANTY STATEMENT ARE YOUR SOLE AND EXCLUSIVE REMEDIES.
EXCEPT AS INDICATED ABOVE, IN NO EVENT WILL HP OR ITS SUPPLIERS
BE LIABLE FOR LOSS OF DATA OR FOR DIRECT, SPECIAL, INCIDENTAL,
CONSEQUENTIAL (INCLUDING LOST PROFIT OR DATA), OR OTHER
DAMAGE, WHETHER BASED IN CONTRACT, TORT, OR OTHERWISE. Some
countries/regions, states, or provinces do not allow the exclusion or limitation of
incidental or consequential damages, so the above limitation or exclusion may not
apply to you.
FOR CONSUMER TRANSACTIONS IN AUSTRALIA AND NEW ZEALAND, THE
WARRANTY TERMS CONTAINED IN THIS STATEMENT, EXCEPT TO THE
EXTENT LAWFULLY PERMITTED, DO NOT EXCLUDE, RESTRICT OR
MODIFY AND ARE IN ADDITION TO THE MANDATORY STATUTORY RIGHTS
APPLICABLE TO THE SALE OF THIS PRODUCT TO YOU.
Extended warranty
For the latest information on HP SupportPack options available for
the HP LaserJet 1150 and 1300 series printers,
see http://lookup.supportpack.hp.com
. You will need the
HP hardware product number for the product. See table 8 for these
product numbers.
Table 8. HP hardware product numbers
Product Product number
HP LaserJet 1150 Q1336A
HP LaserJet 1300 Q1334A
HP LaserJet 1300n Q1335A
Optional 250-sheet paper
feeder for the
HP LaserJet 1300 series
Q2485A

12 Chapter 1 - Product information ENWW
Limited warranty for print cartridge life
This HP print cartridge is warranted to be free from defects in
materials and workmanship for cartridge life (until the HP toner is
depleted).
Your HP toner is depleted when you begin to see faded or light type
on your printed page. HP will, at HP’s option, either replace products
which prove to be defective or refund your purchase price.
The warranty does not cover cartridges which have been refilled, are
emptied, abused, misused, or tampered with in any way.
This limited warranty gives you specific legal rights. You may have
other rights which vary from state to state, province to province, and
country/region to country/region.
To the extent allowed by applicable law, in no event shall Hewlett-
Packard Company be liable for any incidental, consequential, special,
indirect, punitive, or exemplary damages or lost profits from any
breach of this warranty or otherwise.
In the event that your product proves to be defective, please return it
to place of purchase with a written description of the problem.
Print cartridge information
The print cartridge is designed to simplify replacement of the major
consumable parts. The print cartridge contains the printing
mechanism and a supply of toner.
At five percent page coverage, the standard print cartridge for the
HP LaserJet 1150 and 1300 printers will print approximately
2,500 pages. The actual page yield obtained by a customer depends
upon factors such as the percentage of coverage on the pages
printed, toner density setting, EconoMode, and environmental
conditions (temperature and humidity).
Print cartridge date stamp
Some HP LaserJet print cartridge packages are stamped with an
alphanumeric date code. This code represents a 30-month period
beyond the date of production in order to facilitate efficient inventory

ENWW Print cartridge information 13
management processes between HP and its resellers. It does not
serve as an indication of toner life or relate in any way to warranty
terms and conditions.
Refilled print cartridges
While Hewlett-Packard does not prohibit the use of refilled print
cartridges during the warranty period or while the printer is under a
maintenance contract, it is not recommended for the following
reasons:
z Repairs resulting from the use of refilled print cartridges are not
covered under Hewlett-Packard warranty or maintenance
contracts.
z Hewlett-Packard has no control or process to ensure that a
refilled print cartridge functions at the high level of reliability of a
new HP LaserJet print cartridge. Hewlett-Packard also cannot
predict the long term reliability effect on the printer from using
different toner formulations found in refilled cartridges.
z The print quality of HP LaserJet print cartridges influences the
customer’s perception of the printer. Hewlett-Packard has no
control over the actual print quality of a refilled print cartridge.
HP LaserJet printing supplies
In many countries/regions, this product’s printing supplies (such as
print cartridge, drum, and fuser) can be returned to Hewlett-Packard
through the HP printing supplies returns and recycling program. This
easy-to-use, free takeback program is available in over 48
countries/regions. Multilingual program information and instructions
are included in every new HP print cartridge and consumables
package.
HP printing supplies returns and recycling
program information
Since 1990, the HP printing supplies returns and recycling program
has collected millions of used print cartridges that otherwise might
have been discarded in the world’s landfills. The HP LaserJet print
cartridges and consumables are collected and bulk-shipped to our
resource and recovery partners who disassemble the print cartridge.
After a thorough quality inspection, selected parts are reclaimed for
use in new print cartridges. Remaining materials are separated and
converted into raw materials for use by other industries to make a
variety of useful products.

14 Chapter 1 - Product information ENWW
U.S. recycling returns
For a more environmentally responsible return of used print
cartridges and consumables, Hewlett-Packard encourages you to use
bulk returns. Simply bundle two or more print cartridges together and
use the single, prepaid, pre-addressed label that is supplied in the
package. For more information in the U.S., call (800) 340-2445 or visit
the HP LaserJet supplies Web site at http://www.hp.com/recycle
.
Non-U.S. recycling returns
Non-U.S. customers should call the local HP sales and service office
or visit the http://www.hp.com/recycle
website more information
regarding availability of the HP printing supplies returns and recycle
program.
For more information
For more information on the following HP environmental programs,
see http://www.hp.com/go/environment
.
z Product environmental profile sheet for this and many related HP
products
z HP's commitment to the environment
z HP's environmental management system
z HP's end-of-life product return and recycling program
z Material safety data sheets
Material safety data sheet
Material safety data sheets (MSDS) can be obtained by contacting
the HP LaserJet supplies website at http://www.hp.com/go/msds
.

ENWW Chapter contents 15
2
Installation and
operation
Chapter contents
Operating environment. . . . . . . . . . . . . . . . . . . . . . . . . . . . . . 16
Identifying printer components . . . . . . . . . . . . . . . . . . . . . . . . 17
Printer control panel . . . . . . . . . . . . . . . . . . . . . . . . . . . 17
Control panel light patterns. . . . . . . . . . . . . . . . . . . . . . 18
Selecting media . . . . . . . . . . . . . . . . . . . . . . . . . . . . . . . . . . . 21
Loading media . . . . . . . . . . . . . . . . . . . . . . . . . . . . . . . . . . . . 23
Printer output paths . . . . . . . . . . . . . . . . . . . . . . . . . . . . . . . . 24
16 Chapter 2 - Installation and operation ENWW
Operating environment
Place the printer on a sturdy, level surface in a well-ventilated, dust-
free area that meets the following environmental requirements:
z temperature: 10° to 32.5° C (50° to 90.5° F)
z humidity: 20% to 80% relative humidity (no condensation)
z away from direct sunlight, open flames, and ammonia fumes
z sufficient space around the printer to allow for proper access and
ventilation
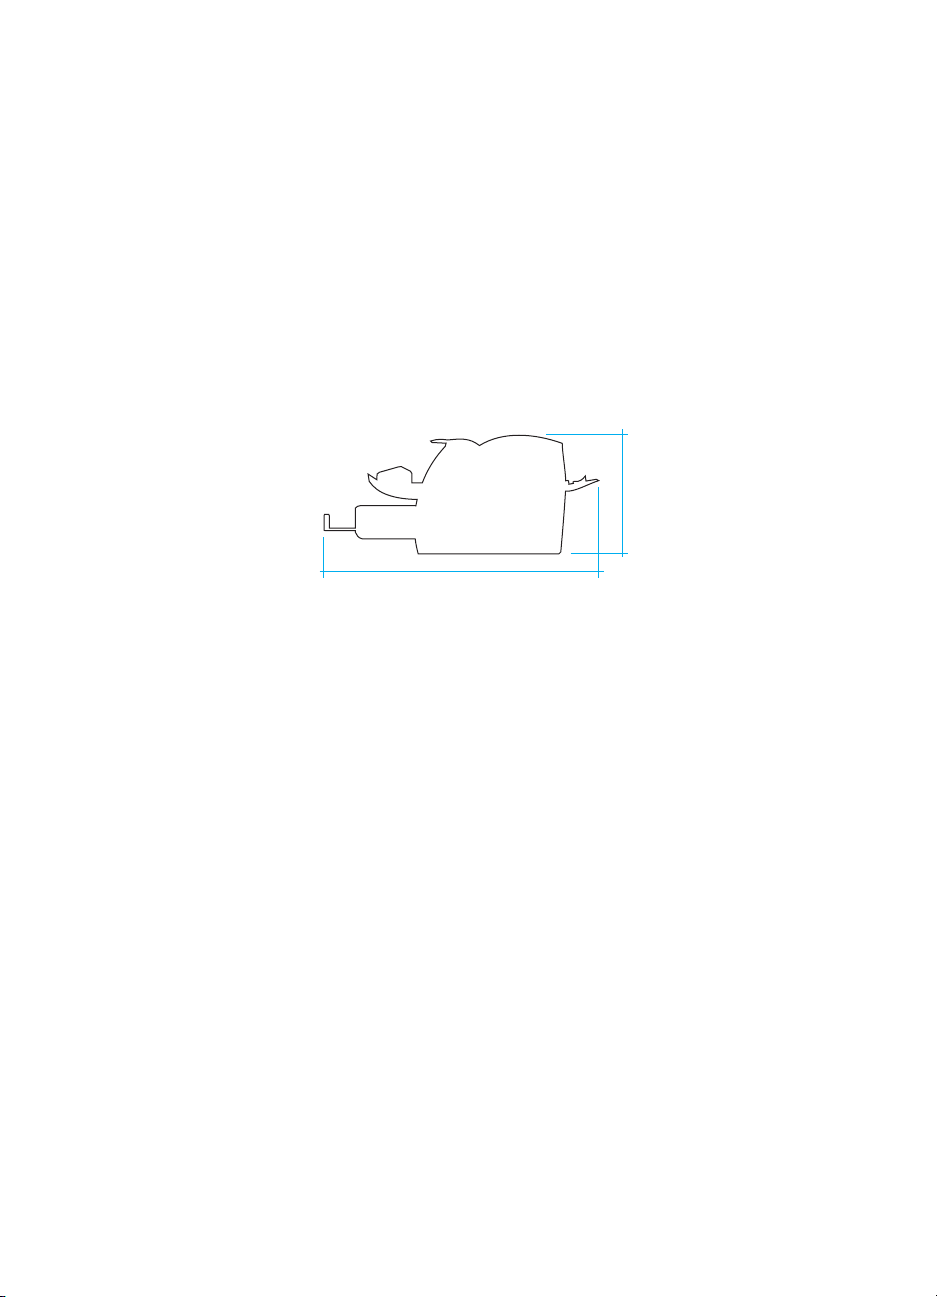
Figure 6. Dimensions of printer
253 mm (10.0 inches)
643 mm (25.3 inches)
 Loading...