


Designjet 110 Plus

DO NOT PRINT THIS PAGE!
Part number: C7796-90245
Languages: ET
Size: A5
Paper: 80 g. recycling paper recommended, but we leave it up to each DC to use
the most cost efficient paper according to their Paper strategy.
Color: B+W
Binding: Saddle stitch
Pages: 52 + cover front and back.
Covers: 200 gr. recycling paper recommended, but we leave it up to ech DC to use
the most cost efficient paper according to their Paper strategy.
File: pdf format.
HP Designjet 110plus series
Quick reference guide
DO NOT PRINT THIS PAGE. THIS PAGE IS FOR REFERENCE ONLY!
HP Designjet 110plus/110plus nr
Panduan Referensi Singkat

1
How do I…?
How do I load sheets of paper? (general guidance).................................2
How do I load paper using the front path? .............................................3
How do I unload paper from the front path? ...........................................3
How do I load paper into the input tray? ................................................4
How do I print on large sheets?.............................................................6
How do I load a roll of paper? .............................................................8
How do I unload a roll of paper? ........................................................10
How do I replace ink cartridges?.........................................................11
The problem is…
The problem is a paper jam................................................................12
The problem is a roll of paper is jammed..............................................13
The problem is that the printer has stopped...........................................14
The problem is that the printer has not received the job ..........................15
The problem is… something else .........................................................16
Tell me about…
Tell me about the front panel...............................................................17
Tell me about the icons on the front panel .............................................18
Tell me about combinations of flashing icons.........................................19
Legal information
HP limited warranty statement .............................................................21
Regulatory notices .............................................................................24
More information
For more details of how to use your printer,
additional information about your printer (including
drivers and networking), and troubleshooting printer
problems, see the Using Your Printer CD or the on-
line help for the printer driver.
HP Designjet 110 plus/110plus nr—Quick Reference Guide
HP Designjet 110plus/110 plus nr printer—
Quick Reference Guide
2
There are three ways of loading sheets of paper into the printer:
•The input tray at the front of the printer for multiple sheets of paper between
76×142mm (3×5.6inches) and 457×610 mm (18×24inches) (C+).
You can load up to 50 sheets of paper of 0.2 mm thickness (or 150 g/m²) in
the unextended tray, or 25 sheets of the same thickness in the extended tray.
Envelopes can also be loaded in the input tray.
•The front path for single sheets of paper between 110 × 205 mm
(4.3×8.1inches) and 625×1625mm (24.6×63.9inches) (A1 oversize).
•The rear path (upper slot) for single sheets of thick paper or other media
between 110×205 mm (4.3×8.1inches) and 625×1625mm
(24.6×63.9inches) (A1 oversize). The rear path (lower slot) is used for roll
input.
• The automatic roll feed enables you to load roll paper into the rear path. When
roll paper is loaded into the printer, it obstructs the paper path; therefore roll
paper must always be unloaded before printing on sheet paper (see page 8).
However the paper is loaded, it should always be loaded in portrait mode: the
leading edge of the paper should be the shorter edge.
The output tray extensions may be used to support sheets of paper up to 19 inches
in length. For sheets longer than 19 inches, close the output tray extensions and use
the extended input tray to support the paper as it emerges from the printer.
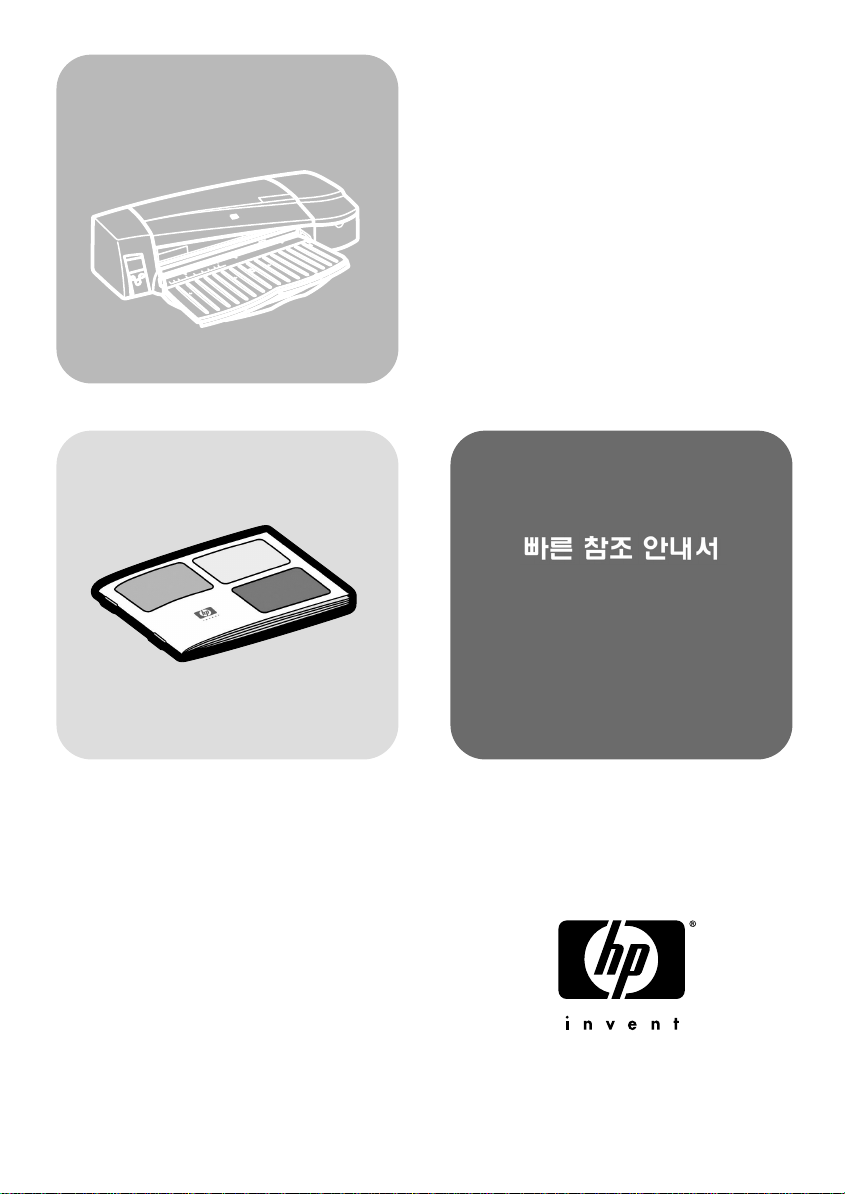
How do I load sheets of paper? (general guidance)
extensions
to support
paper
input tray
front path
rear
path
output tray
HP Designjet 110plus/110 plus nr printer—
Quick Reference Guide
3
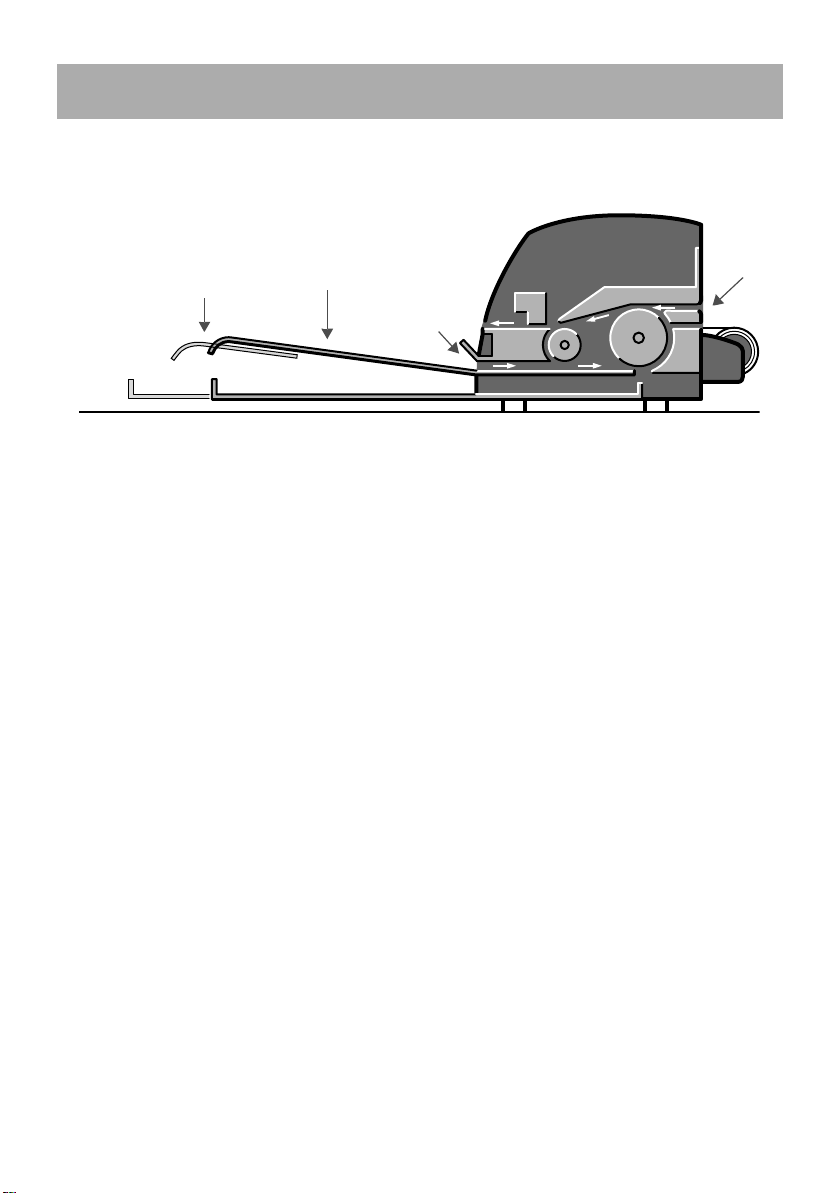
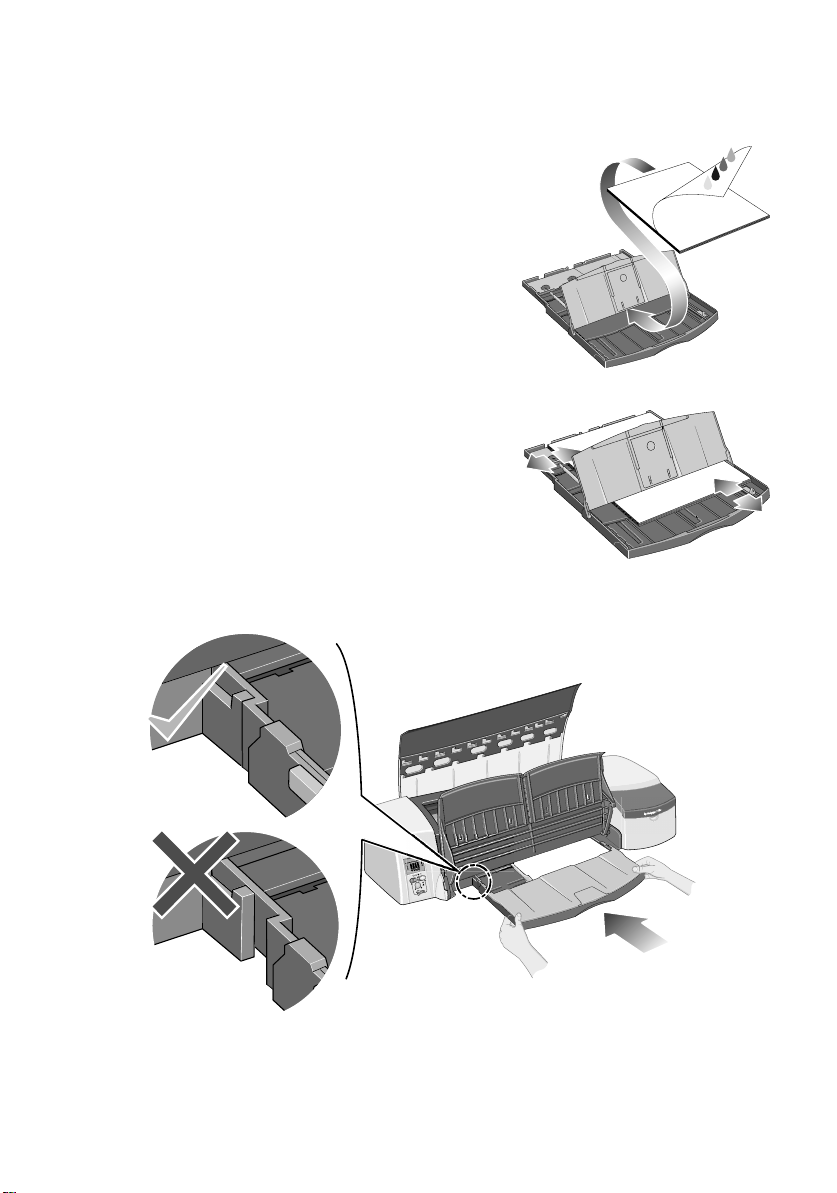
1. Place a single sheet of paper in the output tray, aligning it on the right of the
output tray, with the side that is to be printed on facing down. Do not stack
multiple sheets here.
2. Push the paper as far as it will go into the printer, maintaining its alignment to
the right.
3. Press the OK key (the upper right key) on the front panel.
The printer will check the alignment of the paper, and if it is misaligned, it will eject
the paper; in that case you will have to reload the paper.
How do I unload paper from the front path?
In case you want to change or remove the paper that you have loaded before
printing, for example to change the type of paper or to use a different input path:
• Press the Cancel and OK keys at the same time, to eject the paper.
How do I load paper using the front path?
HP Designjet 110plus/110 plus nr printer—
Quick Reference Guide
4
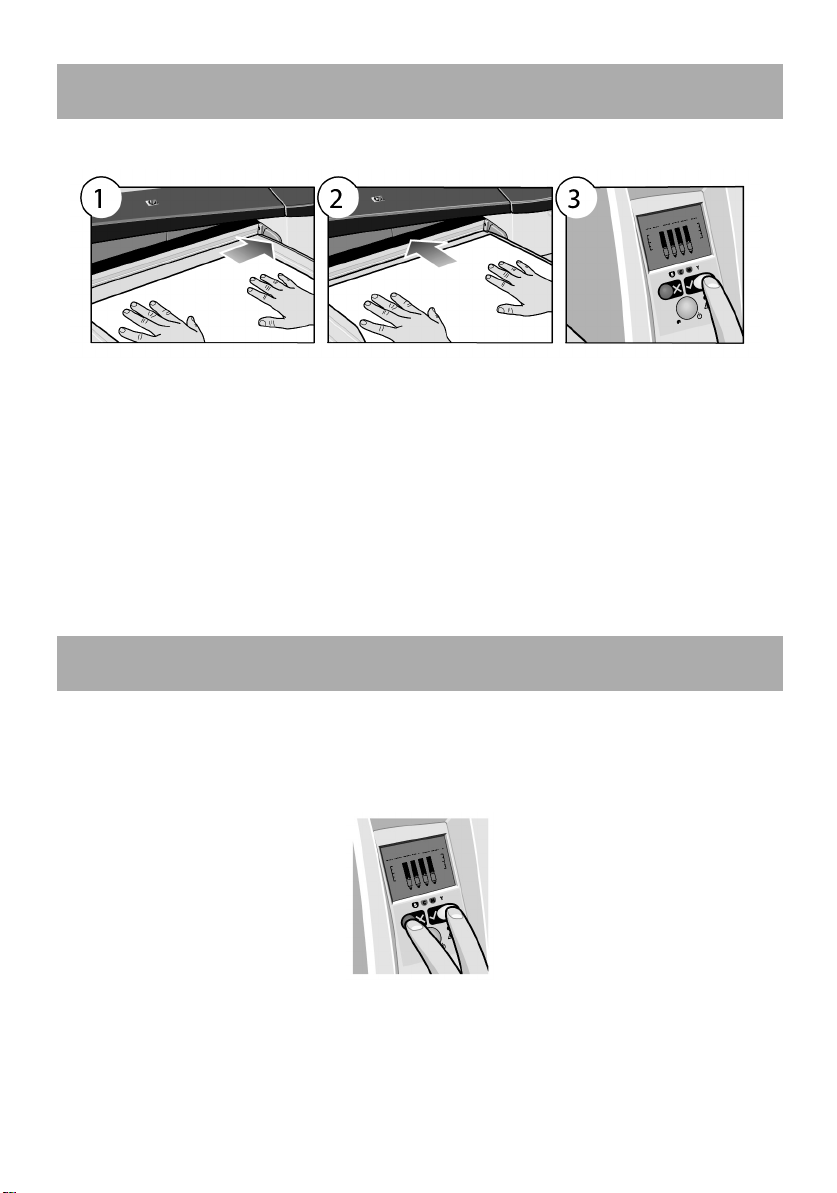
How do I load paper into the input tray?
Note that the input tray should be extended only when necessary: when using
paper larger than Legal- or A4-size.
1. Remove the input tray.
2. Lift up the tray cover.
3. If the paper you are using is larger than Legal- or A4-size, move the small tab
in the centre towards the left so that you can lengthen the tray. Then let go of
the tab and pull the tray extension out as far as it will go.
4. Riffle the paper. This helps to prevent adjacent sheets of paper from sticking to
each other.
HP Designjet 110plus/110 plus nr printer—
Quick Reference Guide
5
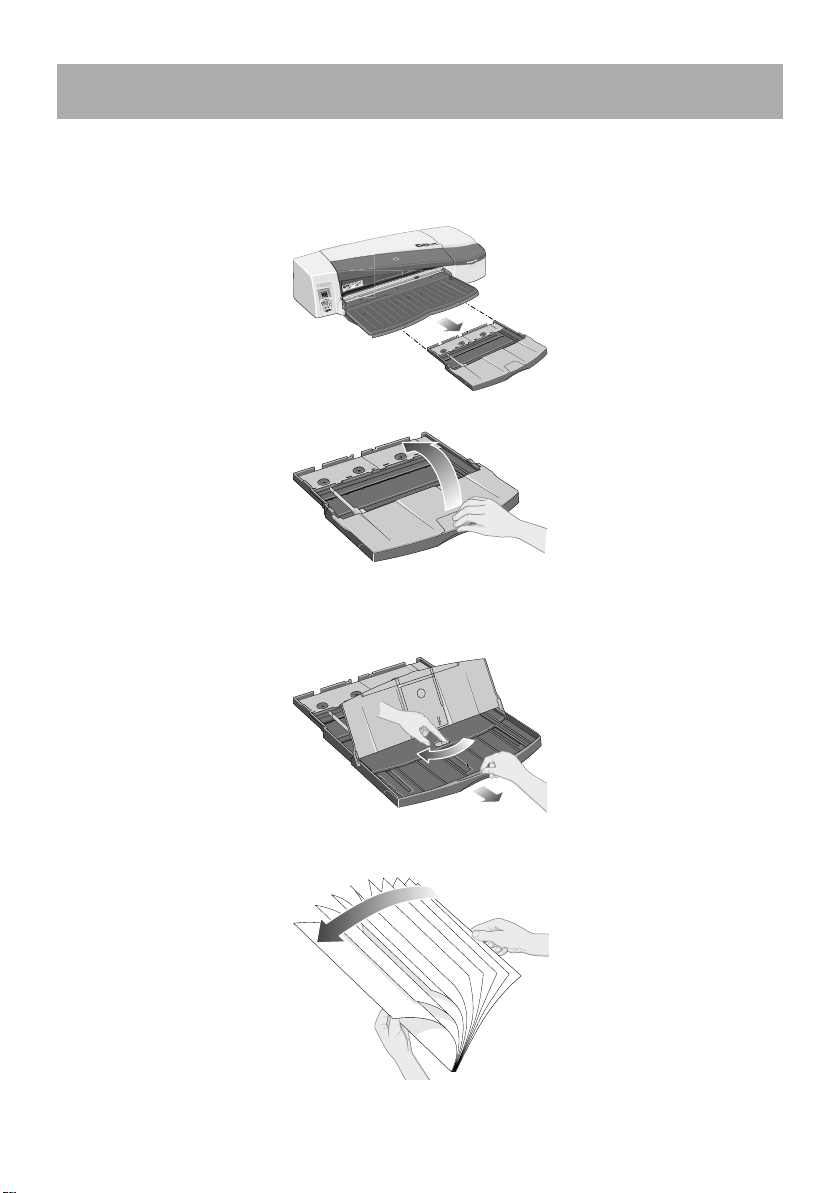
5. Slide the paper into the tray under the tray
cover, ensuring that it touches the sides of the
tray on the right and on the printer side.
6. Push in the small tab on the right of the tray so
that it fits snugly against the paper. Move the
larger tab on the left of the tray to the right so
that it too fits snugly against the paper.
7. Close the tray cover.
8. Lift up the output tray and insert the input tray
into the printer, keeping it straight and pushing it in as far as it will go. The left
inside corner must be aligned with the plastic paper tray guide.
9. Lower the output tray. Note that if the input tray is extended, it will extend out
beyond the output tray.
HP Designjet 110plus/110 plus nr printer—
Quick Reference Guide
6
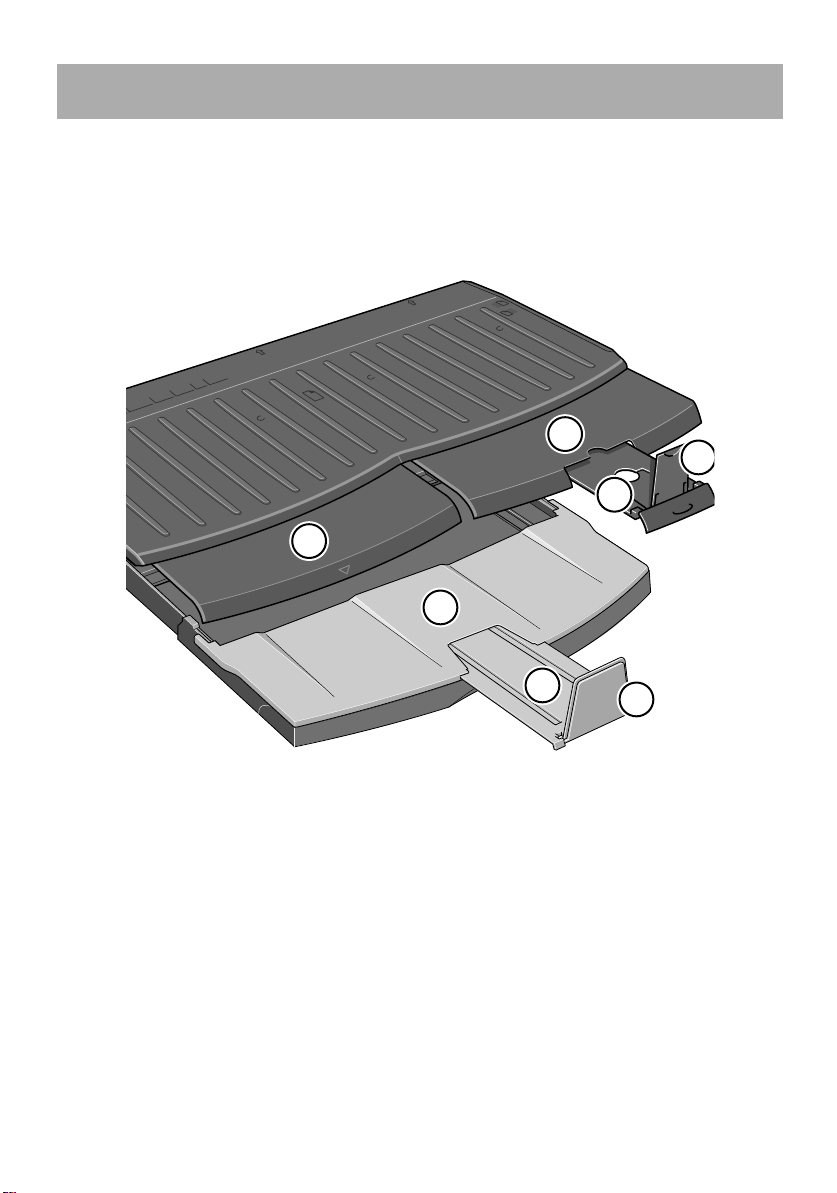
How do I print on large sheets?
The printer output system has several adjustable components. When printing on
large sheets of paper, it is important that you use the correct printer output
configuration. The following diagram shows adjustable parts of the printer output
system:
.
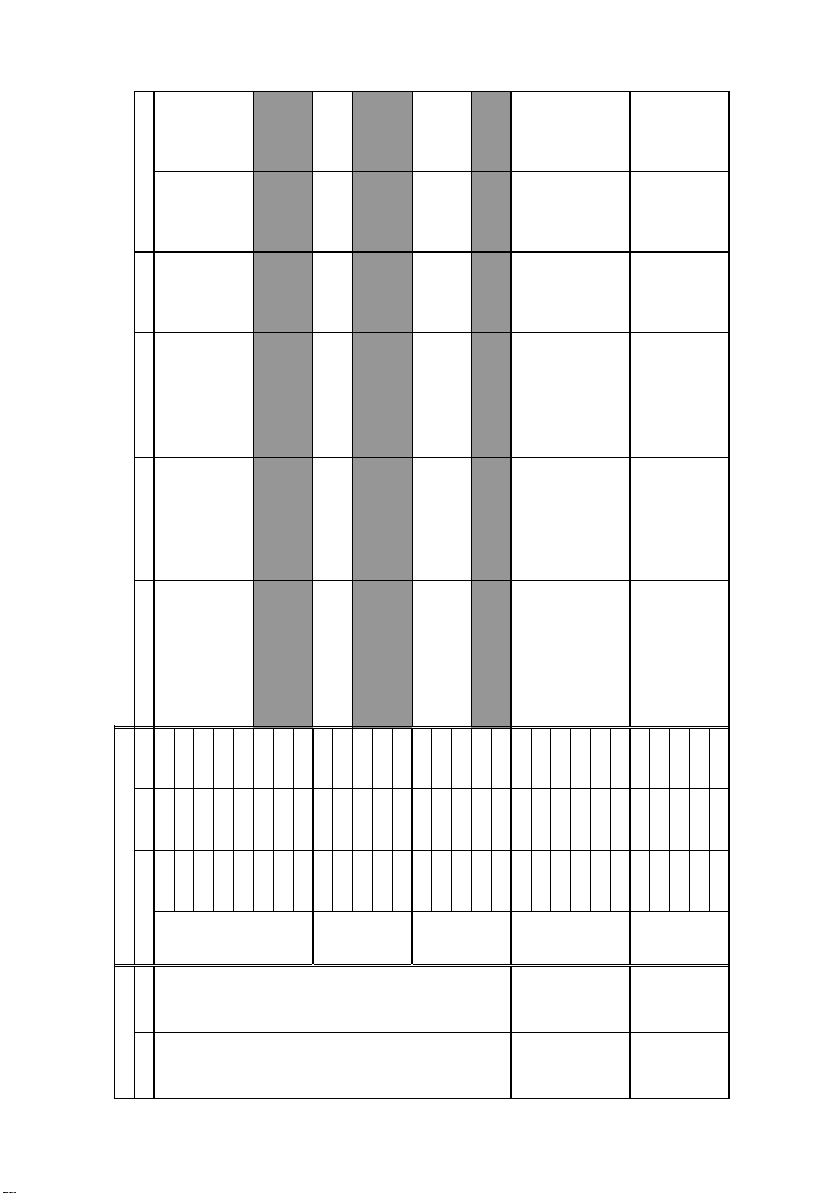
The table on the next page gives the output system configuration required for
various paper sizes.
Note:
• When using the main tray or roll feedback as source, make the necessary
adjustments to the output system to enable output to be stacked.
• If the output tray has prints stacked in it and you want to print from the roll feed,
empty the output tray and adjust it as necessary before printing.
...continued on next page...
4
5
6
1
2
3
3
HP Designjet 110plus/110 plus nr printer—
Quick Reference Guide
7
Source Destination Width Length
1
23456
JIS B5 182mm 257mm
ANSI A 8.5" 11"
ISO A4 210mm 297mm
ARCH A 9" 12"
DIN C4 229mm 324mm
ISO B4 250mm 353mm
LEGAL 8.5" 14"
JIS B4 257mm 364mm
ISO A3 297mm 420mm
ANSI B 11" 17"
ARCH B 12" 18"
DIN C3 324mm 458mm
ANSI B+ 13" 19"
ISO B3 353mm 500mm
JIS B3 264mm 515mm
ANSI C 17" 22"
ISO A2 420mm 594mm
ARCH C 18" 24"
DIN C2 458mm 648mm
ISO B2 500mm 707mm
JIS B2 515mm 728mm
ISO A1 594mm 841mm
ANSI D 22" 34"
ARCH D 24" 36"
Custom Up to 24" Up to 12"
Custom Up to 24" Up to 18"
Custom Up to 24" Up to 24"
Custom Up to 24" Up to 36"
Custom Up to 24" > 36"
Media
Size
Position A3,... Closed DOWN
C-Size Tray Output Tray
A-Size
B-Size
C-Size
Closed N/A
UP
Position B4,... Closed DOWN Closed N/A
UP
N/A
UP
Position B4,... Position A3,... DOWN Closed N/A
UP
Position A3,...
Closed Closed UP
ClosedPosition A3,... DOWN
Position 17x22 Open
DOWN
Closed Closed UP Position A2,... Open
DOWN
Manual feed,
front or rear
Output Bin D-Size
DOWN
Closed Position Roll icon DOWN
DOWN
Closed Position Roll icon DOWN
Roll
accessory
Output Bin Custom Closed N/A
Closed N/A
HP Designjet 110plus/110 plus nr printer—
Quick Reference Guide
8
Only one source of paper can be used by the printer at any one time, so if a roll
of paper is loaded in the printer and you want to print to a sheet of paper, you
must first unload the roll. The roll is automatically reloaded the next time printing
to the roll is requested.
You can cut a roll without unloading it by pressing the OK key (top right key on
the front panel); the paper first advances about 1 cm or 0.4 inch.
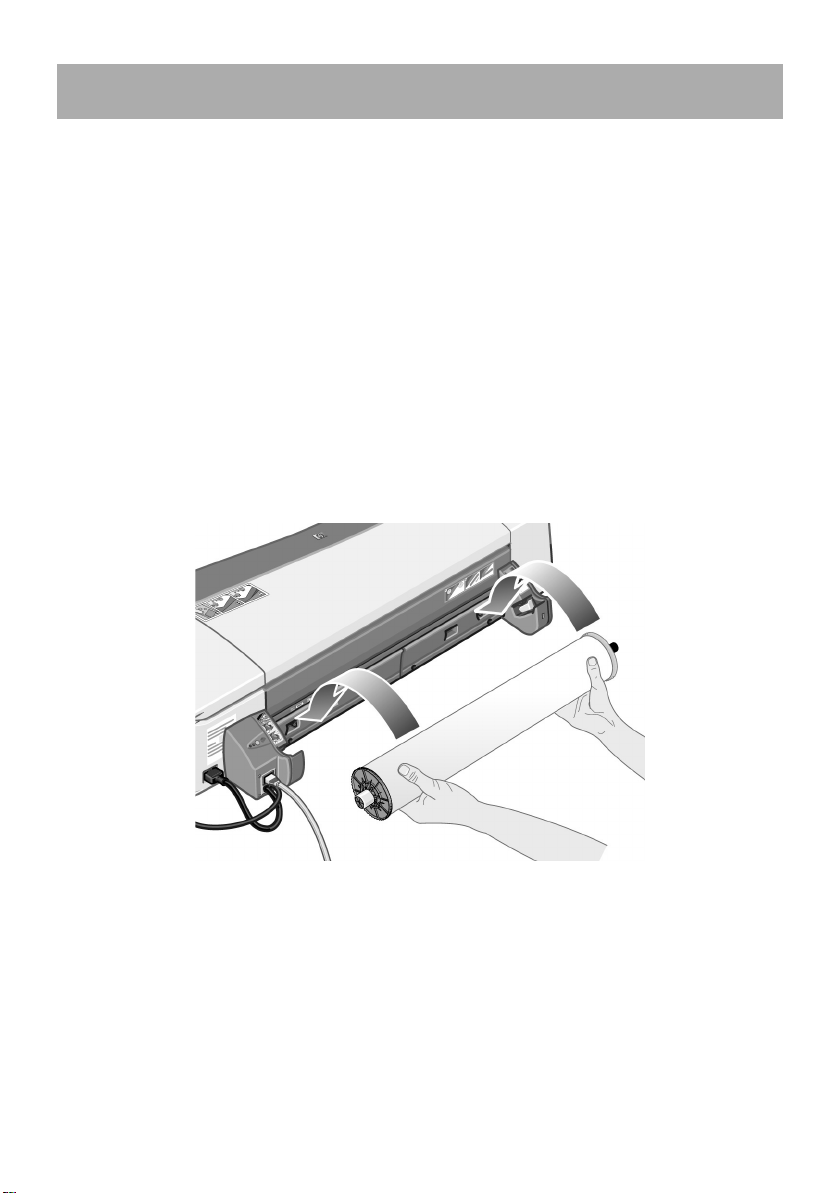
1. Set your application to pick paper from the roll feed.
2. Select Print from your application.
3. Load a roll of the required paper onto the spindle. Ensure that the roll is the
right way round and that the blue stop on the spindle is pushed in against the
paper.
4. Insert the spindle into its retaining slots, with the blue stop on the right and the
black stop on the left as seen from the rear of the printer.
If the paper is glossy, we recommend that you wear gloves to avoid smearing
the surface of the paper.
5. Make sure that the leading edge of the roll is straight and perpendicular to its
side edges and has no irregularities.
...continued on next page...
How do I load a roll of paper?
HP Designjet 110plus/110 plus nr printer—
Quick Reference Guide
9
...continued from previous page...
6. Rewind any excess paper so that the paper is rolled tightly onto the spindle.
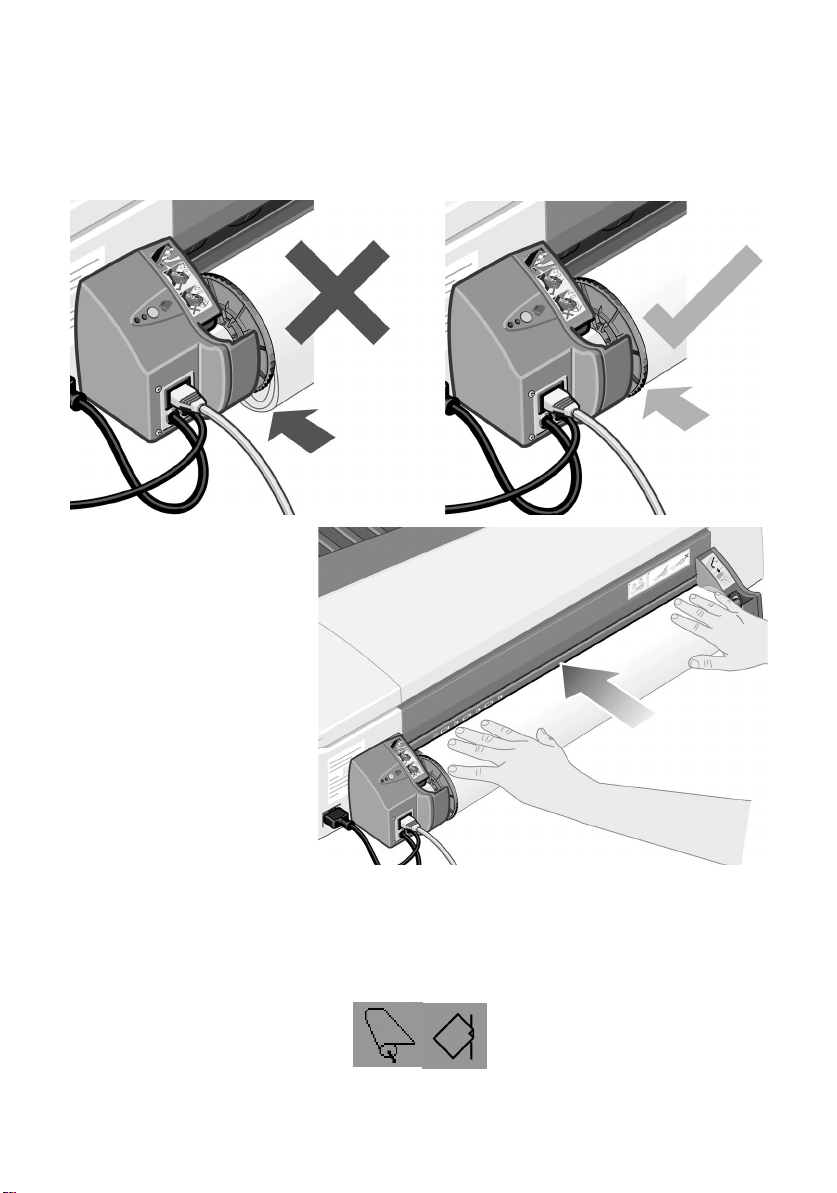
7. Insert the leading
edge of the paper into
the lower slot in the
rear of the printer.
Push the paper in until
it encounters
resistance, keeping
the sides of the paper
rolled tightly so that
the paper is not
skewed.
8. After emitting a
‘beep’, the printer will
take up the paper.
9. The printer will check
the alignment of the paper. If the paper is properly aligned, the roll icon will
appear on the display, indicating that the printer is ready to print.
If the paper is misaligned, the printer will eject the paper and the display will
show the misaligned and roll icons; you will have to reload the paper.
Repeat Step 6, so that the paper is tightly rolled onto the spindle.
How do I print on large sheets?
HP Designjet 110plus/110 plus nr printer—
Quick Reference Guide
10
Important: Do not pull on the roll of paper once it is taken up by the printer,
that is, if there is any resistance.
There are two ways of unloading a roll of paper:
• If you want to unload the roll in order to feed a single sheet through the
printer, press the Cancel and OK keys on the front panel at the same time (see
below). If you later request printing to the roll, the Automatic Roll Feed will
then automatically reload the roll.
• If you want to unload the roll in order to completely remove it (for example,
you no longer wish to use this roll of paper):
1. Push the Eject button on the left roll feed support at the rear of the printer.
Avoid pressing the Eject button several times, as this can damage the paper.
2. Pull the roll towards you and remove the paper completely from the rear
paper path of the printer. The icons shown below will flash until the paper is
completely out, because if the paper is only partially removed, paper jams
may subsequently occur. Sometimes the paper may fall away from the rear
path by itself.
You do not need to remove the spindle from its supports in the printer.
How do I unload a roll of paper?
HP Designjet 110plus/110 plus nr printer—
Quick Reference Guide
11
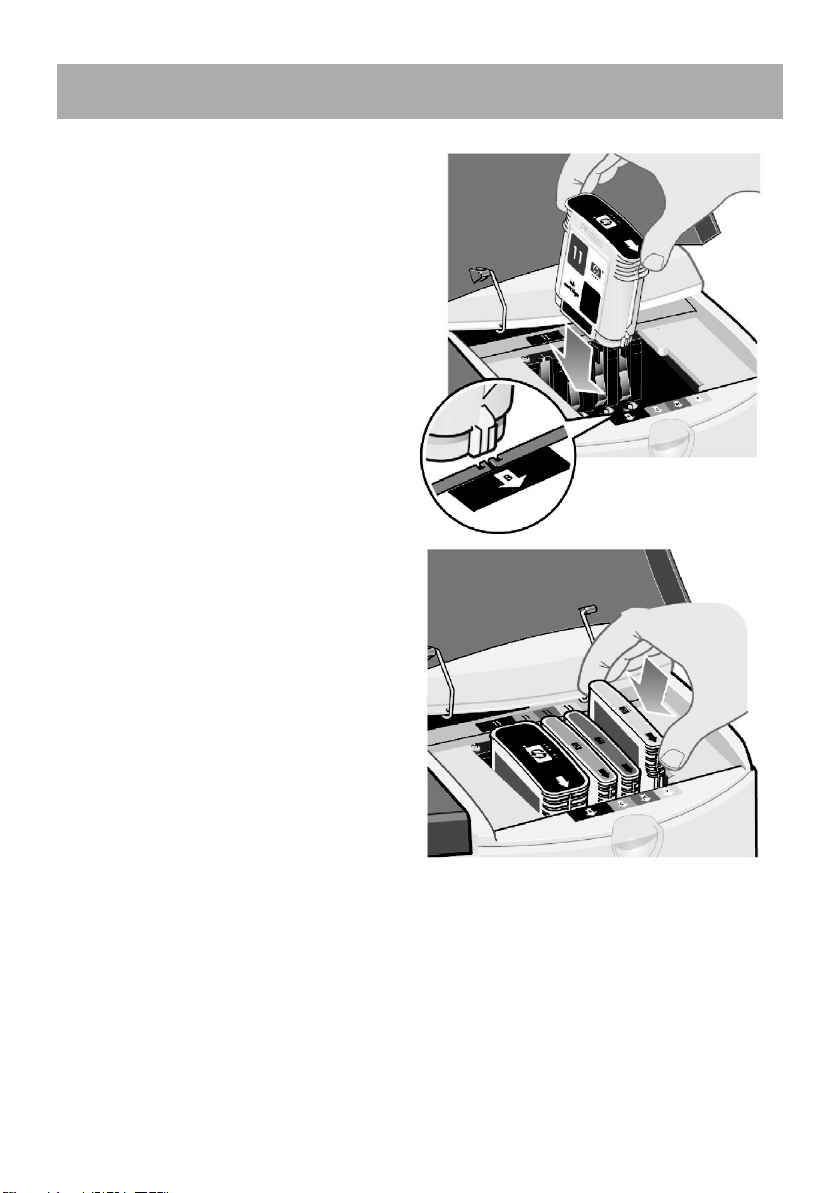
How do I replace ink cartridges?
1. Open the front hinged flap at the
right of the printer.
2. For each ink cartridge that needs to
be replaced:
• Gripping it by its shorter top
edges, lift the ink cartridge
vertically up and out of the
printer.
• Lower the new ink cartridge into
its slot until it clicks into place
and is quite secure.
3. Finally close the outer flap.

HP Designjet 110plus/110 plus nr printer—
Quick Reference Guide
12
1. Try pressing the OK key (the upper right key) on the printer’s front panel.
If this doesn't solve the problem…
2. Turn off the printer.
3. Remove all media from the tray. Pull out any paper that is visibly stuck.
4. Lift the top cover and pull out any paper that may be stuck.
Be careful when you lift the cover not to damage or disturb any of the tubes or
other internal parts of the printer.
5. Remove the rear path carefully by pressing the buttons on each of its sides and
pulling it straight out. If you don’t pull it straight out, you may damage the
paper sensor.
Removing the rear path gives access to the inside of the printer from the rear.
Pull out any paper that may be stuck inside or is accessible from the rear.
Replace the rear path and make sure it fits securely.
6. Turn on the printer.
7. We recommend that after clearing a paper jam you align the printheads to
avoid problems of poor print quality. To align printheads, start HP Designjet
System Maintenance (see page 16) and select Align printhead.
Rear path
The problem is a paper jam

HP Designjet 110plus/110 plus nr printer—
Quick Reference Guide
13
If paper from the roll is jammed:
1. Turn off the printer.
2. Check in all places where the roll could be trapped:
• Remove the front paper tray. This will allow you to see inside the printer
through a slot in the front. Release and remove any trapped paper that is
accessible.
• Lift the top cover, being careful not to damage or disturb any of the tubes or
other internal parts of the printer. If there is any paper trapped in the wheels
inside the printer, release and remove the paper.
• Remove the rear path by pressing the buttons on each of its sides and pulling
it straight out. If you don't pull it straight out, you may damage the paper
sensor. If there is any paper trapped in the rollers inside the printer, release
and remove the paper.
3. Once the paper jam has been cleared, replace any parts of the printer
(paper tray, top cover, rear path) that you have removed/opened, making
sure they fit securely.
4. Turn on the printer.
5. Before reloading the paper roll, you must trim the leading edge of the roll
such that this edge is perfectly straight and at right-angles to the sides of the
roll.
The problem is a roll of paper is jammed

HP Designjet 110plus/110 plus nr printer—
Quick Reference Guide
14
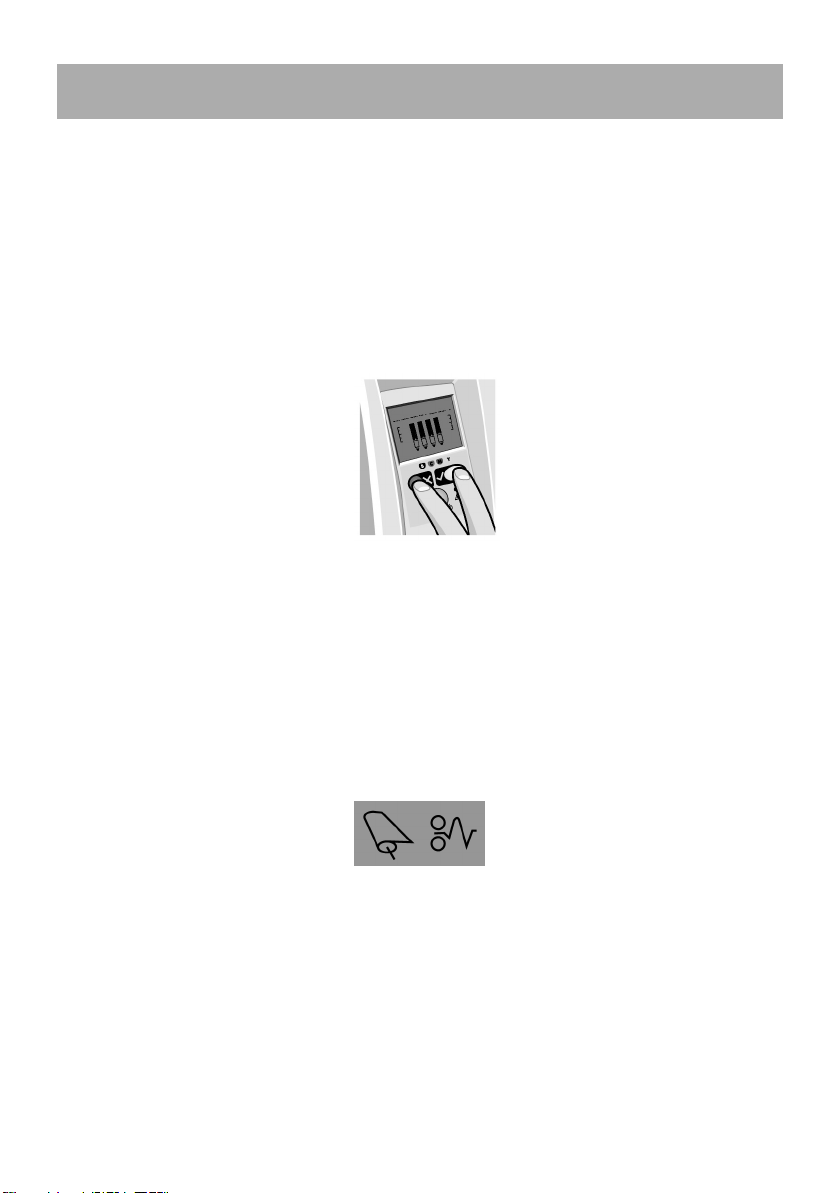
The problem is that the printer has stopped
If the front panel looks like this and the yellow light
is flashing:
1. Open both parts of the hinged flap at the right
of the printer, lifting it right back so that you can
see the print carriage. Check that all packaging
material has been removed from around the
print carriage.
The carriage may move at this point. Wait until
it has stopped moving.
2. Check that the printhead cover is latched down.
The printer will not work if the latch is not
properly engaged.
3. Close the rear part and then the front part of the
hinged flap. The printer will not work if it is not
properly closed.
4. If the yellow light has not turned off, see the
Using Your Printer CD.

HP Designjet 110plus/110 plus nr printer—
Quick Reference Guide
15
The problem is that the printer has not received the job
If your printer seems to be ignoring the printing job you have sent to it:
1. Check that the printer is correctly connected to the computer.
If the connection is through a network, print the printer’s configuration pages
(hold down the Power key while pressing the OK key four times), and check in
the TCP/IP section that the Status is shown as Ready. Make a note of the
printer’s IP address and subnet mask, which are in the same section.
• If the IP address is 0.0.0.0 or 192.0.0.192, refer to your printer’s setup
poster.
• If the Status is Ready, you can use a Web browser to check the network
connection between printer and computer. Simply type your printer’s IP
address into your browser, where you would normally type a URL. If you get
a reply from the printer, then the network connection between the printer
and the computer is working.
• If the Status is Not Ready, or if the printer does not reply to the Web
browser, check that the printer’s IP address and subnet mask belong to your
network.
• If necessary, consult your network administrator.
2. Check that the printer queue is not paused.
3. If you are using Mac OS X, make sure you selected “HP IP Printing” when you
created your printer, and not “IP Printing”.
 Loading...