


Fridge/freezer combined
Installation and use
Комбинированный холодильник-морозильник
Установка и использование

BCS 313 V
GB |
Fridge/freezer combined |
1 |
|
Instructions for installation and use |
|
CSI |
Комбинированный холодильник-морозильник |
11 |
|
Инструкции по установке и использованию |
|
To maintain the EFFICIENCY and SAFETY of this appliance, we recommend:
-call only the Service Centers authorized by the manufacturer
-always use original Spare Parts
Производитель оставляет за собой право без предупрежден ия вносить изменения в конструкцию, не ухудшающие эффективность раб оты оборудования.
-Некоторые параметры, приведенные в этой инструкции, явля ются приблизительными.
-Производитель не несет ответственности за незначительн ые отклонения от указанных величин.

Safety - a good habit to get into.
ATTENTION
Read your manual carefully since it contains instructions which will ensure safe installation, use and maintenance of your appliance.
Your Refrigerator is built to International safety standards (EN60) and has been awarded the European approval mark (IMQ) for compliance with UK electrical safety requirements. It also meets the EC standards on the prevention and elimination of radio interference (EC directive 87/308 - 02.06.89).
1.This appliance must not be installed outdoors - not even in an area protected by a roof. It is extremely dangerous to leave it exposed to rain or storms.
2.It must only be used by adults and exclusively to refrigerate and freeze foodstuffs, following the instructions for use contained in this manual.
3.Do not ever touch or handle the appliance with bare feet or with wet hands or feet.
4.It is highly recommended that you do not use extension cords or multiple socket adapters. If the refrigerator is installed between cabinets, make sure that the cord is not bent or dangerously pinched or compressed.
5.Never pull on the cord or the refrigerator to remove the plug from the wall socket - this is very dangerous.
6.Never touch the cooling components within the appliance, especially with wet hands because this could result in injury. Never put ice cubes just removed from the freezer into your mouth because they could stick to your mouth and cause burns.
7.Never clean or perform maintenance on the appliance without first removing the plug from the socket; in fact, turning the knob for adjusting the temperature to the "0"· setting is not sufficient to eliminate all electrical contact with the mains.
8.Before having your old refrigerator picked up for disposal, remove or make inoperable any locking devices to prevent children who might play in or around the appliance from being locked inside.
9.Before calling for service/assistance in the case of malfunction, consult the chapter entitled “Is There a Problem? to determine whether it is possible to eliminate the problem. do not try to repair the problem by trying to access the internal components of the appliance.
10.If damaged, the power supply cord on this appliance must necessarily be replaced by our service centre because special tools are required for replacement.
11.Do not use electric appliances inside the compartment for food storage, if these are not those recommended by the manufacturer.
12.At the end of the functional life of your appliance – containing cyclopentane gas in the insulation foam and perhaps gas R600a (isobutane) in the refrigeration circuit – the latter should made safe before being sent to the dump.
For this operation, please contact your dealer or the Local Organisation in charge of waste disposal.
Installation
To ensure that the appliance operates properly and to reduce energy consumption, it is important that the appliance is installed correctly.
Ventilation
The compressor and condenser generate heat and, therefore, need to be ventilated properly. Rooms with less than perfect ventilation are not very suited for installation of the appliance. Therefore, it should be installed in a room with an opening (window or French window) that provide the appropriate amount of air re-circulation. It is also important that the room not be too humid.
Away from Heat
This appliance should not be positioned in a place where it is directly exposed to sunlight or directly next to an iven/hob.
Electrical Connection and Earthing
Before proceeding with the electrical connection, make sure that the voltage indicated on the rating plate, located at the bottom left near the vegetable crisper, corresponds to the mains voltage in your home and that the socket is fitted with a standard earthing wire in accordance with safety standards for 46/90 systems. If the socket is not fitted with
an earthing wire, the manufacturer will not be held liability for any damages and or injuries arising out of the use of the appliance. Do not use multiple sockets or adapters.
Position the appliance in such a way that you can access the socket where it is plugged in.
Insufficient power?
The electrical socket must be able to handle the maximum power load of the appliance, which is indicated on the rating plate located at the bottom left next to the vegetable crisper.
Before making the electrical connection ...
After the appliance has been delivered, place it in the vertical upright position and wait at least 3 hours before inserting the plug into the socket in order to ensure that it functions properly.
1 |
GB |

Close-up view
A Removable door shelves with lid, with egg tray and lidded butter dish
B Removable miscellaneous shelf
C Hinged shelf
D Compartment for a 2 litre bottle
E Removable door shelf for bottles
K
L
M
N
O
Fruit and Vegetable Crispers
Meat/cheese storage box
Removable/Adjustable Shelves
Hinged bottle rack
"A.I.R. System"
(Ariston Integrated Refrigeration)
F Drain system for drawing off |
|
|
|||
|
defrost water from freezer |
O |
A |
||
|
compartment |
||||
G Compartment for storing |
M |
B |
|||
|
frozen foods |
|
|
||
H Ice tray "ESY ICE" |
N |
B |
|||
M |
|||||
|
|
|
|
||
I |
Compartment for freezing |
L |
C |
||
|
|||||
|
fresh foods and storing frozen |
|
D |
||
|
foods |
|
|||
|
|
|
|||
J |
|
|
K |
E |
|
Compartment for freezing |
|
||||
J |
|
||||
|
fresh foods and storing frozen |
|
|||
|
|
|
|||
|
foods |
I |
|
||
|
|
|
|
||
|
This knob is used to regulate the |
H |
|
||
|
temperature in the two compart- |
|
|||
|
ments with the following settings: |
G |
|
||
|
0 The refrigerator is off; |
|
|||
|
H |
|
|||
|
1 |
less cold; |
|
||
|
5 |
colder |
|
|
|
|
|
|
G |
|
|
F
GB |
2 |
How to Start the Appliance
NOTICE
After the appliance has been delivered, stand it in the upright position and wait approximately 3 hours before connecting it to the electrical outlet to guarantee that it operates properly.
Before placing foodstuffs in the refrigerator or freezer, clean the interior well with warm water and baking soda.
After having plugged the appliance into the socket, make sure that the refrigerator light has turned on. Then turn the thermostat knob “J” to setting “3”. After a few hours have passed, you can place fresh food in the refrigerator compartment and frozen foods into the freezer.
How to use the refrigerator compartment...
The thermostat automatically regulates the temperature inside the appliance
1 = less cold 5 = colder
It is recommended that a medium setting be used.
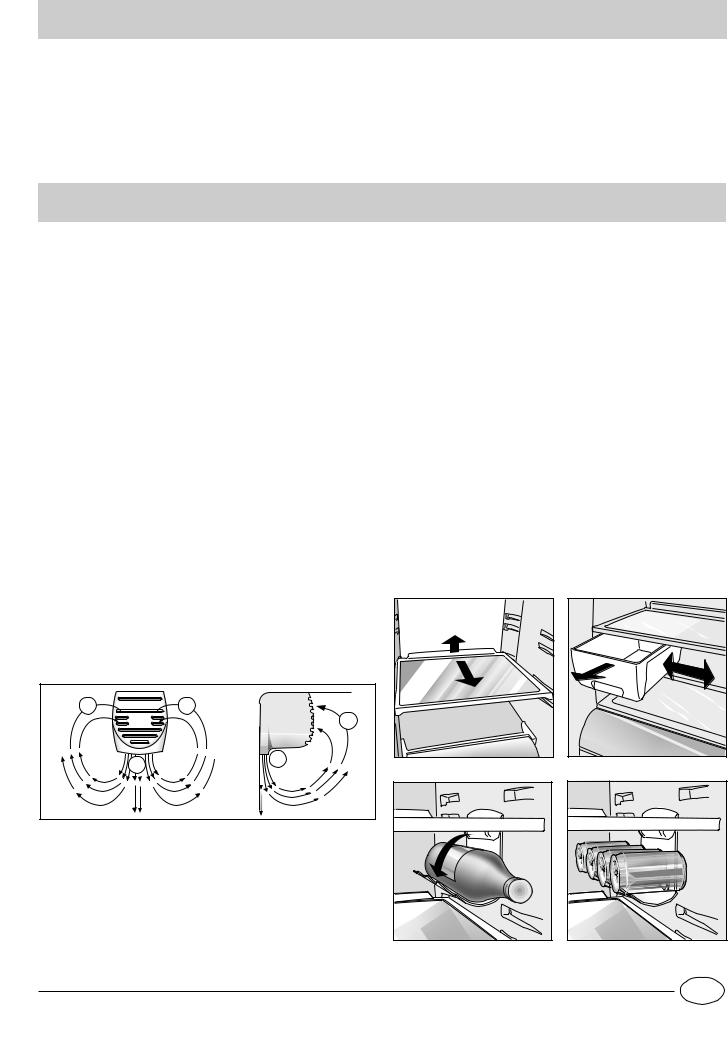
To increase the amount of space, optimize arrangement and improve appearance, this appliance has a “cooling area” located within the back panel of the refrigerator compartment. When the appliance is operating, this panel may be covered with frost or droplets of water depending on whether the compressor is operating or not at a given time. Do not be concerned about this! The refrigerator is operating normally.
If the thermostat knob is positioned on higher settings while the refrigerator is heavily filled and the ambient temperature high, the appliance may run continuously, resulting in the formation of frost on the back cooling area. This will lead to an increase in energy consumption.
To avoid this situation, just turn the thermostat knob to a lower setting so that the appliance defrosts automatically.
The refrigerator compartment of your appliance is equipped with
A.I.R. System (Ariston Integrated Refrigeration) which allows an optimal food storage while simplifying the use of the refrigerator thanks to the following features:
-Fast temperature reset: after the doors heve been opened, the internal temperatures return to optimal values faster, improving food storage.
-More uniform temperature distribution: this makes it possible to place any type of food on any shelf.
-Higher humidity level: this allows you to store food longer.
B 
 B
B
B
A


 A
A
The refrigerator compartment is equipped with practical slideout shelves (Fig. 1) which can be adjusted for height using the appropriate guides. This feature allows you to store large containers and food products.
Remember to cool hot food before storing otherwise the temperature inside the appliance will increase, causing the compressor to work harder and use more energy.
Do not store liquids in unsealed containers since this will increase the humidity and lead to the formation of frost in the refrigerator.
Be careful not to place containers (plastic or glass), food or other objects in direct contact with the cooling area of the back wall of the refrigerator. This could harm the food, increase energy consumption and facilitate the formation of condensate (on food, containers, etc.).
To use the meat/cheese box, unhook it and remove it from the shelf. To optimise space according to your needs, the same can be moved laterally (Fig. 2).
The side bottle rack can be used either for storing bottles (Fig. 3) as well as several cans (2-4) placed horizontally (Fig. 4). If not in use, the bottle/can rack can be tipped up and away to make more room inside the refrigerator.
1 |
2 |
Fig. 1 |
Fig. 2 |
A - Blown air which is cooled when it comes into contact with |
|
|
the refrigeration panel |
|
|
B - Hotter air is drawn in |
|
|
Remember to follow our instructions on the storage life of |
|
|
foods: If not stored properly, even the freshest food will dete- |
|
|
riorate quite quickly. |
|
|
Contrary to popular belief, cooked foods do not keep longer |
|
|
than fresh food. |
Fig. 3 |
Fig. 4 |
3 |
GB |
How to use the freezer compartment...
-For the preparation of food to be frozen, please consult a specialized manual.
-Food that has been thawed, even partially, must not be refrozen: you must cook it in order to consume it (within 24 hours) or to freeze it once again.
-Fresh foods that you intend to freeze must not be placed in contact with those that are already frozen or those that have been fast-frozen. Rather, they must be placed on the grid in the freezer compartment, in contact with the walls of the compartment (back or side) if possible. Please keep in mind that proper conservation of frozen foods depends on the speed with which they are frozen.
-During the freezing process, avoid opening the door of the freezer.
-The maximum daily quantity of food that can be frozen is indicated on the rating plate located to the left of the vegetable crisper.
-In order to freeze and then thaw foods optimally, it is recommended that you divide food into small portions so that they freeze quickly and uniformly. The packages should be clearly marked with the content and the date they were frozen.
-Do not open the freezer door in the event of a power failure or malfunction. This precaution will slow the rise in temperature within the compartment. If the door is not opened, frozen and fast-frozen foods will remain in their current state for approximately 9-14 hours.
-Do not place full bottles in the freezer: they could easily burst because all liquids increase in volume when they freeze.
-If the ambient temperature remains below 14°C for an extended period of time, the temperature needed for extended storage of food in the freezer will not be reached, resulting in reduced storage life of the food.
Ice trays
This new concept of ice trays is an exclusive Merloni patent. The fact that they are situated on the top part of the freezer drawers ensures greater ergonomics and cleanliness and leaves more room free inside the drawers : the ice no longer comes into contact with the food placed inside the freezer compartment; furthermore, the dripping of the water during filling is avoided (a lid to cover up the hole after filling with water is also provided).
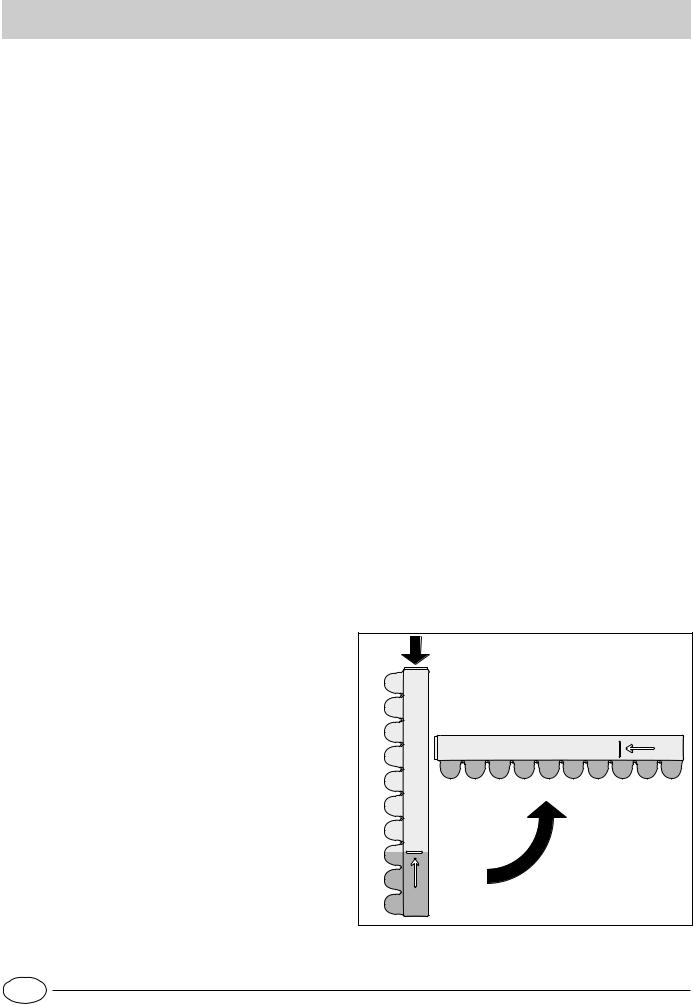
Instructions for use (Fig. 5)
Fill up the tray with water via the special hole up to the level indicated (MAX WATER LEVEL), taking care not to exceed it: inserting more water than is necessary will lead to the formation of ice which could obstruct the exit of the ice cubes.
If you have used an excessive amount of water, you will have to wait until the ice has melted, empty out the tray and re-fill it with water.
Once you have filled the ice tray up with water through the hole indicated, turn it by 90 °. Thanks to the connected compartments, the water fills up the special shapes, after which you can cover the hole up with the special cap and place the ice tray in the inner door of the freezer compartment.
Once the ice has formed, all you need to do is to knock the tray against a hard surface so that the ice cubes come away from their housing and come out of the same hole used to fill the tray with water. To make it easier for the ice cubes to come out, wet the outside of the tray.
WARNING: every time you fill up the ice tray with water , make sure that the same is completely empty and that there are no traces of ice left inside it.
The minimum time required for ice to form well is approximately 8 hours.
|
MAX |
|
WATER LEVEL |
WATER |
MAX |
LEVEL |
|
Fig. 5
GB |
4 |

Guide to Using the Freezer
Meat and Fish
Food |
Wrapping |
Tenderising |
Storage |
Thawing Time |
|
(days) |
(months) |
||||
|
|
|
|||
|
|
|
|
|
|
Beef Roast |
Tinfoil |
2 / 3 |
9 / 10 |
Not required. |
|
|
|
|
|
|
|
Lamb |
Tinfoil |
1 / 2 |
6 |
Not required. |
|
|
|
|
|
|
|
Pork Roast |
Tinfoil |
1 |
6 |
Not required. |
|
|
|
|
|
|
|
Veal Roast |
Tinfoil |
1 |
8 |
Not required. |
|
|
|
|
|
|
|
Veal/Pork Chops |
Each piece wrapped in cling wrap and |
|
6 |
Not required. |
|
then in tinfoil (4 to 6 slices) |
|
||||
|
|
|
|
||
|
|
|
|
|
|
Veal/Lamb Cutlets |
Each piece wrapped in cling wrap and |
|
6 |
Not required. |
|
then in tinfoil (4 to 6 slices) |
|
||||
|
|
|
|
||
|
|
|
|
|
|
Minced Meat |
In aluminium containers covered with cling |
Freshly |
2 |
Slowly in refrigerator. |
|
wrap. |
minced |
||||
|
|
|
|||
|
|
|
|
|
|
Heart and Liver |
Plastic Baggies |
|
3 |
Not required. |
|
|
|
|
|
|
|
Sausages |
Cling Wrap or Tinfoil |
|
2 |
As necessary. |
|
|
|
|
|
|
|
Chicken and Turkey |
Tinfoil |
1 / 3 |
9 |
Very slowly in refrigerator. |
|
|
|
|
|
|
|
Duck and Goose |
Tinfoil |
1 / 4 |
6 |
Very slowly in refrigerator. |
|
|
|
|
|
|
|
Pheasant, Partrige and |
Tinfoil |
1 / 3 |
9 |
Very slowly in refrigerator. |
|
Wild Duck |
|||||
|
|
|
|
||
|
|
|
|
|
|
Hare and Rabbit |
Tinfoil |
3 / 4 |
6 |
Very slowly in refrigerator. |
|
|
|
|
|
|
|
Venison |
Tinfoil or Cling Wrap |
5 / 6 |
9 |
Very slowly in refrigerator. |
|
|
|
|
|
|
|
Large Fish |
Tinfoil or Cling Wrap |
|
4 / 6 |
Very slowly in refrigerator. |
|
|
|
|
|
|
|
Small Fish |
Plastic Baggies |
|
2 / 3 |
Not required. |
|
|
|
|
|
|
|
Crustaceans |
Plastic Baggies |
|
3 / 6 |
Not required. |
|
|
|
|
|
|
|
Shellfish |
Store in salted water in aluminium |
|
3 |
Very slowly in refrigerator. |
|
containers or plastic containers. |
|
||||
|
|
|
|
||
|
|
|
|
|
|
Boiled Fish |
Tinfoil or Cling Wrap |
|
12 |
In hot water. |
|
|
|
|
|
|
|
Fried Fish |
Plastic Baggies |
|
4 / 6 |
Directly in pan. |
|
|
|
|
|
|
5 |
GB |

Fruits and Vegetables
Food |
Preparation |
Blanching |
Wrapping |
Storage |
Thawing Time |
|
Tim e |
(months) |
|||||
|
|
|
|
|||
|
|
|
|
|
|
|
Apples and Pears |
Peel and cut into slices. |
2’ |
In Containers (cover |
12 |
In refrigerator very |
|
with syrup) |
slowly. |
|||||
|
|
|
|
|||
|
|
|
|
|
|
|
Apricots, Peaches, |
Peel and pit. |
1’ / 2’ |
In Containers (cover |
12 |
In refrigerator very |
|
Cherries and Plums |
with syrup) |
slowly. |
||||
|
|
|
||||
|
|
|
|
|
|
|
Strawberries |
|
|
In Containers (cover |
|
In refrigerator very |
|
Blackberries and |
Rinse and fry. |
|
10 / 12 |
|||
|
with sugar) |
slowly. |
||||
Raspberries |
|
|
|
|||
|
|
|
|
|
||
|
|
|
|
|
|
|
Cooked Fruit |
Cut, cook and strain. |
|
In Containers (add |
12 |
In refrigerator very |
|
|
10% sugar) |
slowly. |
||||
|
|
|
|
|||
|
|
|
|
|
|
|
Fruit Juice |
Wash, cut and crush. |
|
In Containers (sugar |
10 / 12 |
In refrigerator very |
|
|
to taste) |
slowly. |
||||
|
|
|
|
|||
|
|
|
|
|
|
|
|
Remove leaves, cut head |
|
|
|
|
|
Cauliflower |
into small pieces and blanch |
2’ |
Plastic Baggies |
12 |
Not required. |
|
in water and a little lemon |
||||||
|
|
|
|
|
||
|
juice. |
|
|
|
|
|
|
|
|
|
|
|
|
Cabbage and |
Wash and cut into small |
1’ / 2’ |
Plastic Baggies |
10 / 12 |
At room temperature. |
|
Brussel Sprouts |
pieces. |
|||||
|
|
|
|
|||
|
|
|
|
|
|
|
Peas |
Shell and wash. |
2’ |
Plastic Baggies |
12 |
Not required. |
|
|
|
|
|
|
|
|
French Beans |
Wash and slice if required. |
2 |
Plastic Baggies |
10 / 12 |
Not required. |
|
|
|
|
|
|
|
|
Carrots, Peppers |
Peel, wash and slice if |
3’ / 4’ |
Plastic Baggies |
12 |
Not required. |
|
and Turnips |
necessary. |
|||||
|
|
|
|
|||
|
|
|
|
|
|
|
Mushrooms and |
Wash, peel and cut up. |
3’ / 4’ |
Plastic Baggies or |
6 |
At room temperature. |
|
Asparagus |
Containers |
|||||
|
|
|
|
|||
|
|
|
|
|
|
|
Spinach |
Wash and mince. |
2’ |
Plastic Baggies |
12 |
At room temperature. |
|
|
|
|
|
|
|
|
Vegetable for Soups |
Wash and cut up in small |
3’ |
Plastic Baggies or |
6 / 7 |
Not required. |
|
pieces. |
Containers |
|||||
|
|
|
|
|||
|
|
|
|
|
|
|
Various Foods |
Preparation |
Blanching |
Wrapping |
Storage |
Thawing time |
|
Time |
(months) |
|||||
|
|
|
|
|||
|
|
|
|
|
|
|
Bread |
|
|
Plastic Baggies |
4 |
At room temperature |
|
|
|
and in the oven. |
||||
|
|
|
|
|
||
|
|
|
|
|
|
|
|
|
|
|
|
About 10 minutes at |
|
Cakes |
|
|
Plastic Baggies |
6 |
room temperature, |
|
|
|
|
|
|
cook at 100/200°C. |
|
|
|
|
|
|
|
|
Cream |
|
|
Plastic Containers |
6 |
At room temperature or |
|
|
|
in refrigerator. |
||||
|
|
|
|
|
||
|
|
|
|
|
|
|
Butter |
|
|
In original wrapping |
6 |
In refrigerator. |
|
|
|
or tinfoil |
||||
|
|
|
|
|
||
|
|
|
|
|
|
|
Boiled Food or |
|
|
Plastic or Glass |
3 / 6 |
At room temperature or |
|
Vegetable Soup |
|
|
Containers |
in hot water. |
||
|
|
|
||||
|
|
|
|
|
|
|
Eggs |
|
|
Freeze without shells |
10 |
At room temperature or |
|
|
|
in small containers |
in refrigerator. |
|||
|
|
|
|
|||
|
|
|
|
|
|
GB |
6 |
 Loading...