


Lyric™ C2 Wi-Fi Security Camera
USER MANUAL
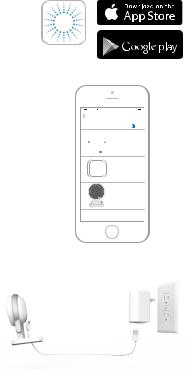
Download the Lyric app
To setup and use your new security camera, search for Honeywell Lyric in the App Store or Google Play.
GET IT ON
Lyric
Before you begin
Read these instructions carefully. Failure to follow these instructions may damage the product or cause it to not function as intended.
Need help?
If you need help at any point during the installation and setup of the Wi-Fi Security Camera, please contact Honeywell Lyric Support:
Web: YourHome.Honeywell.com
Email: MyLyric@honeywell.com
Phone: 1-800-633-3991
ii
Contents
Welcome • 1 Camera overview • 2
Placement • 3
With stand • 3 Without stand • 3
Installation • 4
Download the Honeywell Lyric app • 4 Launch the Lyric app • 4
Connect the power cord • 4
Connect • 5
Connect to mobile device • 5
Connect to Wi-Fi • 5
Status LEDs • 6
Operation • 7
Remove/replace the stand • 7
Lyric app experience • 7
Reset • 7
SD card • 7
iii
App overview • 8
Livestreaming • 9
Configure alerts • 10
Select alert notification type • 10
Select alert recipients • 11
Review clips • 11
Camera settings • 12
Turn the LED on and off • 14
Turn the microphone on and off • 14 Motion detection • 15
Sound detection • 16
Smoke or carbon monoxide alarm detection • 17 Baby cry detection • 17
Delete a camera • 18
iv
Set up detection zones • 20 Geofencing setup • 19
App settings and account info • 22 Manage messages • 23
Firmware update • 24 Frequently Asked Questions • 25 Specifications • 33
FCC Regulations • 34 Warranty • 36
v
vi

Welcome
Congratulations on your purchase of Honeywell’s Lyric™ C2 Wi-Fi Security Camera. You can monitor visitors, pets, and family yourself—anytime, anywhere.
What’s in the box?
You should find:
•Honeywell Lyric C2 Wi-Fi Security Camera
•Optional mounting screws
•Power cord and adapter
•8 GB microSD Card
Download the app
You need the Lyric app and an |
|
account to set up and use your new |
|
camera. |
|
Search for Honeywell Lyric in the |
Lyric |
App Store or Google Play. |
|
GET IT ON
After downloading, follow the instructions in the app.
See “Frequently Asked Questions” on page 25 for any questions regarding installation and operation of your Lyric camera.
1

Camera overview
LED indicator
Camera
lens
Power |
|
cord |
|
Stand/wall |
|
mount |
|
Backplate |
|
and rubber |
Reset hole |
feet |
SD card and slot
2
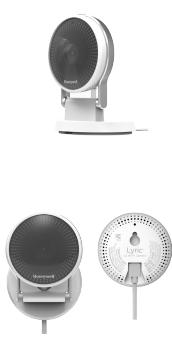
Placement
With stand
Place the camera in a desired location for viewing and recording.
Without stand
You can also mount the camera directly to the wall without the stand.
3
Installation
Download the Honeywell Lyric app
Note: Have your Wi-Fi password available and confirm your |
|
|
|
router is dual-band and communicates at 2.4/5 GHz before |
|
|
|
installation. |
Lyric |
|
|
1 |
Make sure Bluetooth is enabled on your mobile device. |
|
|
2 |
Search for Honeywell Lyric in the App Store or Google |
|
|
|
Play. |
|
|
3 |
Download the Honeywell Lyric app. |
|
|
Launch the Lyric app |
|
|
|
|
|
||
4 |
Launch the Lyric app. |
|
|
|
|
||
|
|
||
5 |
Select the Security Camera to install, then create an |
|
|
|
|
||
6 |
account (if necessary), or sign in to your Lyric account. |
|
|
Follow the instructions in the Lyric app to name the |
|
|
|
|
camera and its location. |
|
|
Connect the power cord |
|
|
|
7 |
Plug the power cord’s micro USB end into the camera. |
|
|
8 |
Plug the power cord’s USB end into the wall |
|
|
|
outlet adapter, and plug your camera into a |
|
|
|
power outlet. |
|
|
9 |
Wait until the LED on the camera blinks blue |
|
|
|
(about 1 minute), then press NEXT. |
|
|
Note: If the LED turns solid red, it means the connection mode timed out. Unplug the camera
and plug it back in, and wait for the LED to blink blue.
GET IT ON
4
Connect
Connect to mobile device
1
2
3
Enable Bluetooth on your mobile device.
The app will look for the camera.
•For one camera, it will connect automatically.
•For more than one camera, the
app will prompt you to select one camera at a time. Each camera has a unique Media Access Control (MAC)
ID printed on the back. The MAC ID is a unique identifier assigned to the
camera. Use that ID to select the camera you want to connect.
A QR code will display in the app as shown in the image above. To connect your camera to the app, hold your mobile device to display the QR code approximately 3-6 inches (7-15 cm) from the camera lens.
4 The camera LED turns purple and the camera beeps when the mobile connection is complete.
Connect to Wi-Fi
Be sure you are on the same Wi-Fi network you wish to connect your camera to.
1
2
Choose your Wi-Fi network from the list. Press NEXT.
Enter your Wi-Fi password, if necessary. Press DONE.
Note: The camera will beep during some steps in this process, which is normal.
5

Status LEDs
During Wi-Fi connection and camera operation, the LED shows the status of the camera.
LED |
Camera state |
During installation |
|
Blinking Blue |
Powered up. Ready to begin setup. |
Solid Blue |
Connected to App. Ready to complete setup. |
Solid Red (for |
Setup timed out, or connection failed. The LED will |
2 seconds) |
then turn solid purple. Unplug camera, plug it back |
|
in, and restart the process. |
Solid Purple |
QR Code scan complete. |
|
See “Connect to Wi-Fi” on page 5. |
Blinking Green |
Connecting to Wi-Fi network. |
Solid Green |
Connected to Wi-Fi network. |
During operation |
|
Blinking Green |
Connecting to Wi-Fi network. |
Solid Green |
Connected to Wi-Fi and operating. |
Blinking Red |
Not connected to Wi-Fi. |
6

Operation
Remove/replace the stand
The C2 Camera snaps in and out of its stand. When replacing the camera, be sure to thread the power cord through the hole in the base of the stand.
Lyric app experience
When you launch the application, live video from your camera is displayed.
If you have multiple cameras, a list of them is displayed. Select a camera from the list to view live video from that camera.
Reset
If your Wi-Fi connection fails or you need to connect to a different Wi-Fi network, insert one end of a paperclip into the reset hole. Press and hold it for 10 seconds until you hear a chirp. Then re-start the connection process. This erases the SD card, but clips remain in the cloud unless you delete them during your subscription period.
SD card
The camera comes with an encrypted 8GB SD card installed. It stores images if the camera’s connection to the cloud is lost. You can replace it with any compatible SD card, up to 64GB.
7

App overview
These are the controls available during livestream.
Camera on/off |
|
Press to turn the |
|
camera on or off. |
Motion/sound detector |
|
Press to turn the motion or |
|
sound detection alerts on or |
|
off during livestream. |
Push to Talk |
Snapshot control |
Press and hold |
Press to take pictures during |
to speak out of |
livestream. Images are saved |
the camera. |
to mobile device’s photos. |
Release to stop. |
|
Video clips
When the camera detects motion or sound, it records a clip. Those clips are listed in chronological order here. Swipe up to see the list of clips, then swipe up or down to see the full list. Press a clip to watch it.
Clips are saved to the cloud and are available for the length of time determined by your subscription level.
8
 Loading...