


Performance Series
Embedded DVR
HRG4
HRG8
HRG16
User Guide
Document 800-12005 – Rev A – 06/2012
User Guide

Revisions
Issue |
Date |
Revisions |
|
|
|
A |
06/2012 |
New document. |
|
|
|
|
|
|
|
|
|
|
|
|
|
|
|
|
|
|

Contents | 5
Contents
1 |
Introduction . . . . . . . . . . . . . . . . . . . . . . . . . . . . . . . . . . . . . . |
. . . . . . . . . |
13 |
|
Overview . . . . . . . . . . . . . . . . . . . . . . . . . . . . . . . . . . . . . . . . . |
. . . . . . . . . . |
13 |
|
Product Features . . . . . . . . . . . . . . . . . . . . . . . . . . . . . . . . . . . |
. . . . . . . . . |
13 |
|
System Diagram . . . . . . . . . . . . . . . . . . . . . . . . . . . . . . . . . . . . |
. . . . . . . . . |
15 |
|
Operating the HRG DVR . . . . . . . . . . . . . . . . . . . . . . . . . . . . . . . . . . |
. . . . . . . . . |
16 |
|
Front Panel. . . . . . . . . . . . . . . . . . . . . . . . . . . . . . . . . . . . . . . |
. . . . . . . . . |
16 |
|
Using the IR Remote Control . . . . . . . . . . . . . . . . . . . . . . . . . . . . . |
. . . . . . . . . |
19 |
|
Using a USB Mouse . . . . . . . . . . . . . . . . . . . . . . . . . . . . . . . . . . |
. . . . . . . . . |
20 |
|
Using the Virtual Keyboard . . . . . . . . . . . . . . . . . . . . . . . . . . . . . . |
. . . . . . . . . |
21 |
|
Rear Panel . . . . . . . . . . . . . . . . . . . . . . . . . . . . . . . . . . . . . . . |
. . . . . . . . . |
21 |
2 |
Getting Started . . . . . . . . . . . . . . . . . . . . . . . . . . . . . . . . . . . . . . . . . . . . . |
25 |
|
Starting and Shutting Down the HRG DVR. . . . . . . . . . . . . . . . . . . . . . . . . . . . . . . . . . |
25 |
|
Starting the HRG DVR . . . . . . . . . . . . . . . . . . . . . . . . . . . . . . . . . . . . . . . . . . |
25 |
|
Shutting Down the HRG DVR . . . . . . . . . . . . . . . . . . . . . . . . . . . . . . . . . . . . . . |
25 |
|
Rebooting and Locking the HRG DVR . . . . . . . . . . . . . . . . . . . . . . . . . . . . . . . . . . . . |
26 |
|
Using the Setup Wizard . . . . . . . . . . . . . . . . . . . . . . . . . . . . . . . . . . . . . . . . . . . |
26 |
|
Setting the Date and Time . . . . . . . . . . . . . . . . . . . . . . . . . . . . . . . . . . . . . . . . . . |
32 |
3 |
Live View . . . . . . . . . . . . . . . . . . . . . . . . . . . . . . . . . . . . . . . |
. . . . . . . . . |
33 |
|
On-screen Display in Live View . . . . . . . . . . . . . . . . . . . . . . . . . . . . . |
. . . . . . . . . . |
33 |
|
Live View Icons . . . . . . . . . . . . . . . . . . . . . . . . . . . . . . . . . . . |
. . . . . . . . . . |
33 |
|
Operating Live View . . . . . . . . . . . . . . . . . . . . . . . . . . . . . . . . . . . . |
. . . . . . . . . |
34 |
|
Using the Mouse in Live View . . . . . . . . . . . . . . . . . . . . . . . . . . . . . |
. . . . . . . . . |
34 |
|
Using the Digital Zoom . . . . . . . . . . . . . . . . . . . . . . . . . . . . . . . . |
. . . . . . . . . |
35 |
|
Configuring the Live View Display . . . . . . . . . . . . . . . . . . . . . . . . . . . . . |
. . . . . . . . . |
36 |
|
Setting the Camera Order . . . . . . . . . . . . . . . . . . . . . . . . . . . . . . . |
. . . . . . . . . |
37 |
4 |
Recording Settings . . . . . . . . . . . . . . . . . . . . . . . . . . . . . . . . . . . . |
. . . . . . . |
39 |
|
Configuring Recording Settings . . . . . . . . . . . . . . . . . . . . . . . . . . . . . . . |
. . . . . . . . |
39 |
|
Initializing Recording Settings . . . . . . . . . . . . . . . . . . . . . . . . . . . . . . |
. . . . . . . . |
39 |
|
Scheduling Recording . . . . . . . . . . . . . . . . . . . . . . . . . . . . . . . . . . . |
. . . . . . . |
41 |
|
Starting a Manual Recording . . . . . . . . . . . . . . . . . . . . . . . . . . . . . . . |
. . . . . . . |
42 |
|
Protecting Recorded Files . . . . . . . . . . . . . . . . . . . . . . . . . . . . . . . . . . . |
. . . . . . . |
43 |
|
Locking and Unlocking Recorded Files . . . . . . . . . . . . . . . . . . . . . . . . . . |
. . . . . . . |
43 |
|
Setting the Hard Drive to Read-Only . . . . . . . . . . . . . . . . . . . . . . . . . . . |
. . . . . . . |
44 |
5 |
Playback . . . . . . . . . . . . . . . . . . . . . . |
. . . . . . . . . . . . . . . . . . . . . . . . . . . |
47 |
|
Video Playback . . . . . . . . . . . . . . . . . . . . |
. . . . . . . . . . . . . . . . . . . . . . . . . . . . |
47 |
|
Playback Interface . . . . . . . . . . . . . . . . |
. . . . . . . . . . . . . . . . . . . . . . . . . . . . |
47 |
|
Playback by Search . . . . . . . . . . . . . . . |
. . . . . . . . . . . . . . . . . . . . . . . . . . . . |
48 |
|
Playback in Live View Mode . . . . . . . . . . . |
. . . . . . . . . . . . . . . . . . . . . . . . . . . . |
49 |
|
Playback by System Log . . . . . . . . . . . . |
. . . . . . . . . . . . . . . . . . . . . . . . . . . . |
50 |
|
Playback Frame-by-Frame . . . . . . . . . . . |
. . . . . . . . . . . . . . . . . . . . . . . . . . . . |
51 |
|
Digital Zoom . . . . . . . . . . . . . . . . . . . |
. . . . . . . . . . . . . . . . . . . . . . . . . . . . |
51 |
6 |
Backup. . . . . . . . . . . . . . . . . . . . . . . . . . . . . . . . . . . . . . . . |
. . . . . . . . . . |
53 |
|
Backing Up Recorded Files . . . . . . . . . . . . . . . . . . . . . . . . . . . . . . |
. . . . . . . . . . . |
53 |
|
Exporting Files . . . . . . . . . . . . . . . . . . . . . . . . . . . . . . . . . . . |
. . . . . . . . . . . |
53 |
|
Exporting Video Clips . . . . . . . . . . . . . . . . . . . . . . . . . . . . . . . . |
. . . . . . . . . . |
55 |
|
Managing Backup Devices . . . . . . . . . . . . . . . . . . . . . . . . . . . . . |
. . . . . . . . . . |
56 |
800-12005 - A - 06/2012

6 | Performance Series DVR User Guide
7 |
Alarm Settings. . . . . . . . . . . . . . . . . . . . . . . . . . . . . . . . . . . . . . . . . . . . . . |
59 |
|
Configuring Alarms . . . . . . . . . . . . . . . . . . . . . . . . . . . . . . . . . . . . . . . . . . . . . . |
59 |
|
Motion Detection Alarm . . . . . . . . . . . . . . . . . . . . . . . . . . . . . . . . . . . . . . . . . |
59 |
|
Sensor Alarm Settings . . . . . . . . . . . . . . . . . . . . . . . . . . . . . . . . . . . . . . . . . . |
62 |
|
Manual Alarm Triggering . . . . . . . . . . . . . . . . . . . . . . . . . . . . . . . . . . . . . . . . |
65 |
|
Video Loss Detection . . . . . . . . . . . . . . . . . . . . . . . . . . . . . . . . . . . . . . . . . . |
66 |
|
Video Tampering Detection . . . . . . . . . . . . . . . . . . . . . . . . . . . . . . . . . . . . . . . |
68 |
|
Exception Settings . . . . . . . . . . . . . . . . . . . . . . . . . . . . . . . . . . . . . . . . . . . . . . |
70 |
|
Understanding Exception Trigger Options . . . . . . . . . . . . . . . . . . . . . . . . . . . . . . . |
71 |
8 |
Network Settings . . . . . . . . . . . . . . . . . . . . . . . . . . . . . . . . . . . . . . . . . . . . |
73 |
|
Configuring Network Settings . . . . . . . . . . . . . . . . . . . . . . . . . . . . . . . . . . . . . . . . |
73 |
|
Configuring General System Settings. . . . . . . . . . . . . . . . . . . . . . . . . . . . . . . . . . |
73 |
|
Configuring PPPoE Settings. . . . . . . . . . . . . . . . . . . . . . . . . . . . . . . . . . . . . . . |
74 |
|
Configuring DDNS . . . . . . . . . . . . . . . . . . . . . . . . . . . . . . . . . . . . . . . . . . . . |
75 |
|
Configuring NTP Server Settings . . . . . . . . . . . . . . . . . . . . . . . . . . . . . . . . . . . . |
76 |
|
Configuring Remote Alarm Host Settings . . . . . . . . . . . . . . . . . . . . . . . . . . . . . . . . |
77 |
|
Configuring Multicast . . . . . . . . . . . . . . . . . . . . . . . . . . . . . . . . . . . . . . . . . . |
78 |
|
Configuring Server and HTTP Ports. . . . . . . . . . . . . . . . . . . . . . . . . . . . . . . . . . . |
79 |
9 |
PTZ Control . . . . . . . . . . . . . . . . . . . . . . . . . . . . . . . . . . . . . . |
. . . . . . . . . |
81 |
|
Navigating the PTZ Menu . . . . . . . . . . . . . . . . . . . . . . . . . . . . . . . . |
. . . . . . . . . . |
81 |
|
Configuring PTZ Settings. . . . . . . . . . . . . . . . . . . . . . . . . . . . . . . . . . |
. . . . . . . . . |
82 |
|
Setting PTZ Presets, Patrols and Patterns . . . . . . . . . . . . . . . . . . . . . . . . . |
. . . . . . . . . |
83 |
|
Understanding PTZ Controls . . . . . . . . . . . . . . . . . . . . . . . . . . . . . |
. . . . . . . . . |
83 |
|
Customizing Presets. . . . . . . . . . . . . . . . . . . . . . . . . . . . . . . . . . |
. . . . . . . . . |
83 |
|
Customizing Patrols . . . . . . . . . . . . . . . . . . . . . . . . . . . . . . . . . . |
. . . . . . . . . |
84 |
|
Customizing Patterns . . . . . . . . . . . . . . . . . . . . . . . . . . . . . . . . . |
. . . . . . . . . |
86 |
10 Camera Management . . . . . . . . . . . . . . . . . . . . . . . . . . . . . . . . . . . |
. . . . . . . |
87 |
OSD Settings . . . . . . . . . . . . . . . . . . . . . . . . . . . . . . . . . . . . . . . . . |
. . . . . . . . |
87 |
Image Settings . . . . . . . . . . . . . . . . . . . . . . . . . . . . . . . . . . . . . . . . |
. . . . . . . . |
88 |
Privacy Mask Settings . . . . . . . . . . . . . . . . . . . . . . . . . . . . . . . . . . . . |
. . . . . . . . |
89 |
11 Hard Drive Management . . . . . . . . . . . . . . . . . . . . . . . . . . . . . . . . . . . . . . . . |
91 |
Managing Hard Drives . . . . . . . . . . . . . . . . . . . . . . . . . . . . . . . . . . . . . . . . . . . . |
91 |
Initializing Hard Drives . . . . . . . . . . . . . . . . . . . . . . . . . . . . . . . . . . . . . . . . . . |
91 |
Setting HDD Groups. . . . . . . . . . . . . . . . . . . . . . . . . . . . . . . . . . . . . . . . . . . |
92 |
Setting HDD Status . . . . . . . . . . . . . . . . . . . . . . . . . . . . . . . . . . . . . . . . . . . |
92 |
Checking HDD Status . . . . . . . . . . . . . . . . . . . . . . . . . . . . . . . . . . . . . . . . . . |
93 |
Configuring HDD Alarms . . . . . . . . . . . . . . . . . . . . . . . . . . . . . . . . . . . . . . . . |
95 |
12 HRG DVR Management . . . . . . . . . . . . . . . . . . . . . . . . . . . . . . . . . . . . . . . . . |
97 |
Configuring System Settings . . . . . . . . . . . . . . . . . . . . . . . . . . . . . . . . . . . . . . . . . |
97 |
Configuring General Settings . . . . . . . . . . . . . . . . . . . . . . . . . . . . . . . . . . . . . . |
97 |
Configuring Advanced Settings . . . . . . . . . . . . . . . . . . . . . . . . . . . . . . . . . . . . . |
98 |
Setting the RS-232 Port . . . . . . . . . . . . . . . . . . . . . . . . . . . . . . . . . . . . . . . . . . . |
99 |
Managing User Accounts . . . . . . . . . . . . . . . . . . . . . . . . . . . . . . . . . . . . . . . . . . |
100 |
Adding a New User . . . . . . . . . . . . . . . . . . . . . . . . . . . . . . . . . . . . . . . . . . . |
100 |
Deleting a User . . . . . . . . . . . . . . . . . . . . . . . . . . . . . . . . . . . . . . . . . . . . . |
103 |
Modifying a User. . . . . . . . . . . . . . . . . . . . . . . . . . . . . . . . . . . . . . . . . . . . . |
104 |
Managing the System . . . . . . . . . . . . . . . . . . . . . . . . . . . . . . . . . . . . . . . . . . . . |
104 |
Importing and Exporting the Configuration File. . . . . . . . . . . . . . . . . . . . . . . . . . . . . |
105 |
Updating the System Firmware . . . . . . . . . . . . . . . . . . . . . . . . . . . . . . . . . . . . . . . |
105 |
Restoring the Default Settings . . . . . . . . . . . . . . . . . . . . . . . . . . . . . . . . . . . . . . . . |
107 |
Viewing the System Information . . . . . . . . . . . . . . . . . . . . . . . . . . . . . . . . . . . . . . . |
108 |
Viewing the System Log . . . . . . . . . . . . . . . . . . . . . . . . . . . . . . . . . . . . . . . . . . . |
108 |
Appendix A Glossary . . . . . . . . . . . . . . . . . . . . . . . . . . . . . . . . . . . . . . . . . |
111 |
Appendix B Solutions . . . . . . . . . . . . . . . . . . . . . . . . . . . . . . . . . . . . . . . . . |
113 |
Troubleshooting the HRG DVR. . . . . . . . . . . . . . . . . . . . . . . . . . . . . . . . . . . . . . . . |
113 |
Troubleshooting the IR Remote Control . . . . . . . . . . . . . . . . . . . . . . . . . . . . . . . . . . . |
115 |
Index . . . . . . . . . . . . . . . . . . . . . . . . . . . . . . . . . . . . . . . . . . . . . . . . . . . . . . |
117 |
www.honeywellvideo.com

Figures | 7
Figures
Figure 1-1 |
System Diagram (HRG4 DVR shown) . . . . . . . . . . . . . . . . . . . . . . . . . . |
. . . . . |
16 |
Figure 1-2 |
HRG4 Front Panel . . . . . . . . . . . . . . . . . . . . . . . . . . . . . . . . . . . . |
. . . . . |
17 |
Figure 1-3 |
HRG8 and HRG16 Front Panel . . . . . . . . . . . . . . . . . . . . . . . . . . . . . |
. . . . . |
18 |
Figure 1-4 |
IR Remote Control . . . . . . . . . . . . . . . . . . . . . . . . . . . . . . . . . . . . |
. . . . . |
19 |
Figure 1-5 |
Virtual Keyboard . . . . . . . . . . . . . . . . . . . . . . . . . . . . . . . . . . . . . |
. . . . . |
21 |
Figure 1-6 |
HRG4 Rear Panel Connections and Switches . . . . . . . . . . . . . . . . . . . . . |
. . . . . |
21 |
Figure 2-1 |
.Shutdown Menu. . . . . . . . . . . . . . . . . . . . . . . . . . . . . . . . . . . . . |
. . . . . |
26 |
Figure 2-2 |
Setup Wizard. . . . . . . . . . . . . . . . . . . . . . . . . . . . . . . . . . . . . . . |
. . . . . |
27 |
Figure 2-3 |
User Permission Window . . . . . . . . . . . . . . . . . . . . . . . . . . . . . . . . |
. . . . . |
27 |
Figure 2-4 |
Entering the HDD Management Window . . . . . . . . . . . . . . . . . . . . . . . . . |
. . . . |
28 |
Figure 2-5 |
HDD Management Window . . . . . . . . . . . . . . . . . . . . . . . . . . . . . . . . |
. . . . |
28 |
Figure 2-6 |
Entering the Record Settings Window. . . . . . . . . . . . . . . . . . . . . . . . . . . |
. . . . |
29 |
Figure 2-7 |
Schedule Tab . . . . . . . . . . . . . . . . . . . . . . . . . . . . . . . . . . . . . . . |
. . . . |
29 |
Figure 2-8 |
Entering a New Recording Schedule . . . . . . . . . . . . . . . . . . . . . . . . . . . |
. . . . |
30 |
Figure 2-9 |
Copying a Schedule . . . . . . . . . . . . . . . . . . . . . . . . . . . . . . . . . . . . |
. . . . |
30 |
Figure 2-10 |
Entering the Network Settings Window . . . . . . . . . . . . . . . . . . . . . . . . . . |
. . . . |
31 |
Figure 2-11 |
Network Settings Window . . . . . . . . . . . . . . . . . . . . . . . . . . . . . . . . . |
. . . . |
31 |
Figure 2-12 |
Setting the Date and Time . . . . . . . . . . . . . . . . . . . . . . . . . . . . . . . . . |
. . . . |
32 |
Figure 3-1 |
Live View Shortcut Menu . . . . . . . . . . . . . . . . . . . . . . . . . . . . . . . . . |
. . . . |
34 |
Figure 3-2 |
Digital Zoom . . . . . . . . . . . . . . . . . . . . . . . . . . . . . . . . . . . . . . . . |
. . . . |
35 |
Figure 3-3 |
Display Settings Menu . . . . . . . . . . . . . . . . . . . . . . . . . . . . . . . . . . . |
. . . . |
36 |
Figure 3-4 |
Camera Order Settings . . . . . . . . . . . . . . . . . . . . . . . . . . . . . . . . . . |
. . . . |
37 |
Figure 4-1 |
General Record Settings Menu . . . . . . . . . . . . . . . . . . . . . . . . . . . . . . |
. . . . |
39 |
Figure 4-2 |
More Record Settings . . . . . . . . . . . . . . . . . . . . . . . . . . . . . . . . . . . |
. . . . |
40 |
Figure 4-3 |
Advanced Record Settings . . . . . . . . . . . . . . . . . . . . . . . . . . . . . . . |
. . . . . |
41 |
Figure 4-4 |
Schedule Record Settings Menu . . . . . . . . . . . . . . . . . . . . . . . . . . . . . |
. . . . |
41 |
Figure 4-5 |
Manual Record Menu . . . . . . . . . . . . . . . . . . . . . . . . . . . . . . . . . . . |
. . . . |
42 |
Figure 4-6 |
Video Search Menu . . . . . . . . . . . . . . . . . . . . . . . . . . . . . . . . . . . . |
. . . . |
43 |
Figure 4-7 |
Video Search Result List . . . . . . . . . . . . . . . . . . . . . . . . . . . . . . . . . . |
. . . . |
44 |
Figure 4-8 |
HDD Management Menu . . . . . . . . . . . . . . . . . . . . . . . . . . . . . . . . . |
. . . . |
44 |
Figure 4-9 |
HDD Property Settings Menu . . . . . . . . . . . . . . . . . . . . . . . . . . . . . . . |
. . . . |
45 |
Figure 5-1 |
Playback Interface . . . . . . . . . . . . . . . . . . . . . . . . . . . . . . . . . . . . . |
. . . . |
47 |
Figure 5-2 |
Playback Control Panel . . . . . . . . . . . . . . . . . . . . . . . . . . . . . . . . . . |
. . . . |
48 |
Figure 5-3 |
Video Search Menu . . . . . . . . . . . . . . . . . . . . . . . . . . . . . . . . . . . . |
. . . . |
48 |
Figure 5-4 |
Playback Interface . . . . . . . . . . . . . . . . . . . . . . . . . . . . . . . . . . . . . |
. . . . |
49 |
Figure 5-5 |
Playback Interface . . . . . . . . . . . . . . . . . . . . . . . . . . . . . . . . . . . . . |
. . . . |
49 |
Figure 5-6 |
Log Search Menu . . . . . . . . . . . . . . . . . . . . . . . . . . . . . . . . . . . . . |
. . . . |
50 |
Figure 5-7 |
Digital Zoom in Playback Mode . . . . . . . . . . . . . . . . . . . . . . . . . . . . . |
. . . . . |
51 |
800-12005 - A - 06/2012

8 | Performance Series DVR User Guide
Figure 6-1 |
Record Backup Menu . . . . . . . . . . . . . . . . . . . . . . . . . . . . . . . . . |
. . . . . . |
53 |
Figure 6-2 |
Video Search Results . . . . . . . . . . . . . . . . . . . . . . . . . . . . . . . . . . |
. . . . . |
54 |
Figure 6-3 |
Export Menu . . . . . . . . . . . . . . . . . . . . . . . . . . . . . . . . . . . . . . . |
. . . . . |
54 |
Figure 6-4 |
Backup Progress Screen . . . . . . . . . . . . . . . . . . . . . . . . . . . . . . . . |
. . . . . |
55 |
Figure 6-5 |
Export Successful Screen . . . . . . . . . . . . . . . . . . . . . . . . . . . . . . . . |
. . . . . |
55 |
Figure 6-6 |
Save Video Clips Prompt . . . . . . . . . . . . . . . . . . . . . . . . . . . . . . . . |
. . . . . |
56 |
Figure 6-7 |
Export Menu . . . . . . . . . . . . . . . . . . . . . . . . . . . . . . . . . . . . . . . |
. . . . . |
57 |
Figure 7-1 |
Camera Settings Menu . . . . . . . . . . . . . . . . . . . . . . . . . . . . . . . . . |
. . . . . |
59 |
Figure 7-2 |
Advanced Camera Settings - Motion Detection . . . . . . . . . . . . . . . . . . . . . |
. . . . . |
60 |
Figure 7-3 |
Motion Detection Area Settings Interface . . . . . . . . . . . . . . . . . . . . . . . . |
. . . . . |
60 |
Figure 7-4 |
Motion Detection Sensitivity Settings . . . . . . . . . . . . . . . . . . . . . . . . . . |
. . . . . |
61 |
Figure 7-5 |
Exception Handle Menu . . . . . . . . . . . . . . . . . . . . . . . . . . . . . . . . . |
. . . . . |
61 |
Figure 7-6 |
Schedule Settings . . . . . . . . . . . . . . . . . . . . . . . . . . . . . . . . . . . . |
. . . . . |
62 |
Figure 7-7 |
Handle Settings . . . . . . . . . . . . . . . . . . . . . . . . . . . . . . . . . . . . . |
. . . . . |
62 |
Figure 7-8 |
Alarm Settings Menu. . . . . . . . . . . . . . . . . . . . . . . . . . . . . . . . . . . |
. . . . . |
63 |
Figure 7-9 |
Alarm Input Settings Menu . . . . . . . . . . . . . . . . . . . . . . . . . . . . . . . |
. . . . . |
63 |
Figure 7-10 |
Alarm Input Handle Menu . . . . . . . . . . . . . . . . . . . . . . . . . . . . . . . . |
. . . . . |
64 |
Figure 7-11 |
Alarm Output Interface. . . . . . . . . . . . . . . . . . . . . . . . . . . . . . . . . . |
. . . . . |
64 |
Figure 7-12 |
Alarm Output Settings . . . . . . . . . . . . . . . . . . . . . . . . . . . . . . . . . . |
. . . . . |
65 |
Figure 7-13 |
Manual Alarm Menu . . . . . . . . . . . . . . . . . . . . . . . . . . . . . . . . . . . |
. . . . . |
65 |
Figure 7-14 |
Camera Settings Menu . . . . . . . . . . . . . . . . . . . . . . . . . . . . . . . . |
. . . . . . |
66 |
Figure 7-15 |
Advanced Camera Settings - Video Loss Detection . . . . . . . . . . . . . . . . . . |
. . . . . |
67 |
Figure 7-16 |
Schedule Settings . . . . . . . . . . . . . . . . . . . . . . . . . . . . . . . . . . . . |
. . . . . |
67 |
Figure 7-17 |
Handle Settings . . . . . . . . . . . . . . . . . . . . . . . . . . . . . . . . . . . . . |
. . . . . |
68 |
Figure 7-18 |
Camera Settings Menu . . . . . . . . . . . . . . . . . . . . . . . . . . . . . . . . |
. . . . . . |
68 |
Figure 7-19 |
Advanced Camera Settings - Tamper Detection . . . . . . . . . . . . . . . . . . . . |
. . . . . |
69 |
Figure 7-20 |
Schedule Settings . . . . . . . . . . . . . . . . . . . . . . . . . . . . . . . . . . . . |
. . . . . |
69 |
Figure 7-21 |
Handle Settings . . . . . . . . . . . . . . . . . . . . . . . . . . . . . . . . . . . . . |
. . . . . |
70 |
Figure 7-22 |
Exception Menu . . . . . . . . . . . . . . . . . . . . . . . . . . . . . . . . . . . . . |
. . . . . |
71 |
Figure 8-1 |
Network Settings Menu . . . . . . . . . . . . . . . . . . . . . . . . . . . . . . . . . |
. . . . . |
73 |
Figure 8-2 |
Network Status. . . . . . . . . . . . . . . . . . . . . . . . . . . . . . . . . . . . . . |
. . . . . |
74 |
Figure 8-3 |
Advanced Network Settings Menu . . . . . . . . . . . . . . . . . . . . . . . . . . . |
. . . . . |
75 |
Figure 8-4 |
PPPoE Settings . . . . . . . . . . . . . . . . . . . . . . . . . . . . . . . . . . . . . |
. . . . . |
75 |
Figure 8-5 |
DDNS Settings Menu . . . . . . . . . . . . . . . . . . . . . . . . . . . . . . . . . . |
. . . . . |
76 |
Figure 8-6 |
DynDNS Settings . . . . . . . . . . . . . . . . . . . . . . . . . . . . . . . . . . . . |
. . . . . |
76 |
Figure 8-7 |
NTP Settings Menu . . . . . . . . . . . . . . . . . . . . . . . . . . . . . . . . . . . |
. . . . . |
77 |
Figure 8-8 |
Host/Others Menu . . . . . . . . . . . . . . . . . . . . . . . . . . . . . . . . . . . . |
. . . . . |
78 |
Figure 8-9 |
Host/Others Menu . . . . . . . . . . . . . . . . . . . . . . . . . . . . . . . . . . . . |
. . . . . |
78 |
Figure 8-10 |
Host/Others Menu . . . . . . . . . . . . . . . . . . . . . . . . . . . . . . . . . . . . |
. . . . . |
79 |
Figure 9-1 |
PTZ Menu . . . . . . . . . . . . . . . . . . . . . . . . . . . . . . . . . . . . . . . . |
. . . . . |
81 |
Figure 9-2 |
PTZ Settings Menu. . . . . . . . . . . . . . . . . . . . . . . . . . . . . . . . . . . . |
. . . . . |
82 |
Figure 9-3 |
PTZ Control Panel . . . . . . . . . . . . . . . . . . . . . . . . . . . . . . . . . . . . |
. . . . . |
83 |
Figure 9-4 |
Preset Management Menu. . . . . . . . . . . . . . . . . . . . . . . . . . . . . . . . |
. . . . . |
84 |
Figure 9-5 |
Patrol Management Menu . . . . . . . . . . . . . . . . . . . . . . . . . . . . . . . . |
. . . . . |
84 |
Figure 9-6 |
Patrol Configuration Menu. . . . . . . . . . . . . . . . . . . . . . . . . . . . . . . . |
. . . . . |
85 |
Figure 9-7 |
Patrol Management Menu . . . . . . . . . . . . . . . . . . . . . . . . . . . . . . . . |
. . . . . |
86 |
Figure 9-8 |
Pattern Management Menu . . . . . . . . . . . . . . . . . . . . . . . . . . . . . . . |
. . . . . |
86 |
Figure 10-1 |
Camera Settings Menu . . . . . . . . . . . . . . . . . . . . . . . . . . . . . . . . . |
. . . . . |
87 |
Figure 10-2 |
Advanced Camera Settings Menu. . . . . . . . . . . . . . . . . . . . . . . . . . . . |
. . . . . |
88 |
www.honeywellvideo.com

Figures | 9
Figure 10-3 |
Image Settings . . . . . . . . . . . . . . . . . . . . . . . . . . . . . . . . . . . . . . . |
. . . . 88 |
Figure 10-4 |
Advanced Camera Settings Menu. . . . . . . . . . . . . . . . . . . . . . . . . . . . . |
. . . . 89 |
Figure 10-5 |
Setting Mask Area . . . . . . . . . . . . . . . . . . . . . . . . . . . . . . . . . . . . . |
. . . . 89 |
Figure 11-1 |
HDD Management Menu . . . . . . . . . . . . . . . . . . . . . . . . . . . . . . . . . |
. . . . 91 |
Figure 11-2 |
HDD Group Settings Menu . . . . . . . . . . . . . . . . . . . . . . . . . . . . . . . . |
. . . . 92 |
Figure 11-3 |
HDD Property Settings Menu . . . . . . . . . . . . . . . . . . . . . . . . . . . . . . . |
. . . . 93 |
Figure 11-4 |
Log Search Menu . . . . . . . . . . . . . . . . . . . . . . . . . . . . . . . . . . . . . |
. . . . 94 |
Figure 11-5 |
Log Search Results . . . . . . . . . . . . . . . . . . . . . . . . . . . . . . . . . . . . |
. . . . 94 |
Figure 11-6 |
HDD SMART Information . . . . . . . . . . . . . . . . . . . . . . . . . . . . . . . . . |
. . . . 95 |
Figure 11-7 |
HDD SMART Menu . . . . . . . . . . . . . . . . . . . . . . . . . . . . . . . . . . . . |
. . . . 95 |
Figure 11-8 |
Exception Menu, HDD Error . . . . . . . . . . . . . . . . . . . . . . . . . . . . . . . . |
. . . . 96 |
Figure 12-1 |
General Settings Menu . . . . . . . . . . . . . . . . . . . . . . . . . . . . . . . . . . |
. . . . 97 |
Figure 12-2 |
More Settings Menu . . . . . . . . . . . . . . . . . . . . . . . . . . . . . . . . . . . . |
. . . . 98 |
Figure 12-3 |
RS-232 Settings Menu . . . . . . . . . . . . . . . . . . . . . . . . . . . . . . . . . . . |
. . . . 99 |
Figure 12-4 |
User Settings Menu . . . . . . . . . . . . . . . . . . . . . . . . . . . . . . . . . . . . |
. . . . 100 |
Figure 12-5 |
Add User Menu . . . . . . . . . . . . . . . . . . . . . . . . . . . . . . . . . . . . . . |
. . . . 101 |
Figure 12-6 |
Permission Settings Menu . . . . . . . . . . . . . . . . . . . . . . . . . . . . . . . . . |
. . . . 101 |
Figure 12-7 |
Network Permission Settings Menu . . . . . . . . . . . . . . . . . . . . . . . . . . . . . |
. . . 102 |
Figure 12-8 |
Camera Permission Settings Menu . . . . . . . . . . . . . . . . . . . . . . . . . . . . . |
. . . 103 |
Figure 12-9 |
Modify User Menu . . . . . . . . . . . . . . . . . . . . . . . . . . . . . . . . . . . . . . |
. . . 104 |
Figure 12-10 |
Import/Export Configuration Menu . . . . . . . . . . . . . . . . . . . . . . . . . . . . . |
. . . 105 |
Figure 12-11 |
Firmware Update Menu . . . . . . . . . . . . . . . . . . . . . . . . . . . . . . . . . . . |
. . . 106 |
Figure 12-12 |
FTP Firmware Update . . . . . . . . . . . . . . . . . . . . . . . . . . . . . . . . . . . . |
. . . 106 |
Figure 12-13 |
Default Settings Menu . . . . . . . . . . . . . . . . . . . . . . . . . . . . . . . . . . . . |
. . . 107 |
Figure 12-14 |
System Information . . . . . . . . . . . . . . . . . . . . . . . . . . . . . . . . . . . . . |
. . . 108 |
Figure 12-15 |
Log Search Menu . . . . . . . . . . . . . . . . . . . . . . . . . . . . . . . . . . . . . . |
. . . 109 |
Figure 12-16 |
Log Search Results . . . . . . . . . . . . . . . . . . . . . . . . . . . . . . . . . . . . . |
. . . 109 |
Figure 12-17 |
Log Search Export Menu . . . . . . . . . . . . . . . . . . . . . . . . . . . . . . . . . . |
. . . 110 |
800-12005 - A - 06/2012

10 | Performance Series DVR User Guide
www.honeywellvideo.com
Tables | 11
Tables
Table 1-1 |
HRG4 Front Panel Controls and Indicators . . . . . . . . . . . . . . . . . . . . |
. . . . . . . . |
17 |
Table 1-2 |
IR Remote Control . . . . . . . . . . . . . . . . . . . . . . . . . . . . . . . . . |
. . . . . . . . |
19 |
Table 1-3 |
Mouse Controls . . . . . . . . . . . . . . . . . . . . . . . . . . . . . . . . . . . |
. . . . . . . . |
20 |
Table 1-4 |
Virtual Keyboard Controls . . . . . . . . . . . . . . . . . . . . . . . . . . . . . |
. . . . . . . . |
21 |
Table 1-5 |
HRG4 Rear Panel Connections and Switches . . . . . . . . . . . . . . . . . . . . |
. . . . . . . |
22 |
Table 1-6 |
HRG8 and HRG16 Rear Panel Connections and Switches . . . . . . . . . . . . . |
. . . . . . . |
23 |
800-12005 - A - 06/2012

12 | Performance Series DVR User Guide
www.honeywellvideo.com

1
Introduction
This chapter introduces the Honeywell HRG 4-Channel, 8-Channel, and 16-Channel Performance Series DVRs and provides an overview of how to operate the HRG DVR using various methods.
Overview
Developed using the latest technology, the Honeywell HRG Performance Series DVRs (HRG DVRs) combine the latest in advanced H.264 video encoding and decoding technologies to deliver high performance, rock-solid reliability, and longer recording times.
The Honeywell HRG DVRs can be used either as standalone video surveillance products or used to build a powerful surveillance network. This flexibility makes them perfect for small business applications.
Product Features
Feature Overview
•4, 8, or 16 video inputs (model dependent).
•H.264 video compression with excellent reliability and superior definition.
•4 audio inputs, 1 audio output.
•IR remote controller and mouse included
•Independent video encoding parameters, including frame rate, resolution, bit rate, and video quality.
•Remote access from iPhone and Android devices.
•Multi-site software.
•Recording rates up to 120 (4-channel), 240 (8-channel) and 480 (16-channel) ips @ 4CIF resolution.
•PTZ dome control.
800-12005 - A - 06/2012

14 | Performance Series DVR User Guide
Local Monitoring Features
•Up to 1280 × 1024 resolution for VGA output display.
•Simultaneous VGA and CVBS output.
•Multi-camera video live view, with an adjustable camera order.
•Group switch, manual switch, and automatic cycles modes that are selectable for video live view, with a configurable auto-cycle period.
•Digital zoom in live mode.
•Shield of assigned channels for live view.
•Privacy masking support.
•Multiple PTZ protocols support, including the setting and call up of presets, patrols, and patterns.
•Video image zoom-in by clicking the mouse and tracing by dragging the mouse in PTZ control mode.
Hard Disk Drive Management Features
•S.M.A.R.T. technology.
•HDD standby function.
Recording Features
•Cycle and non-cycle recording mode.
•Normal and event video encoding parameters.
•Multiple recording types, including manual, normal, alarm, motion, motion/alarm, and motion + alarm recording.
•Eight recording time periods, with separate recording types.
•Pre-record and post-record time intervals for alarm and motion detection, and pre-record time intervals for scheduled and manual recording.
•Lock and unlock video files.
•HDD can be set to read-only.
•Video data search and playback by channel number, recording type, and time.
•Digital zoom function in playback mode.
•Pause, fast forward play, slow play, skip forward, and skip backward available during playback.
•Up to 4/8/16-channel synchronous playback.
Backup Features
•Back up recorded files to a USB or SATA device.
•Bunch backup by file or by time.
•Recorded files edited for backup in playback.
•Management and maintenance for backup devices.
www.honeywellvideo.com

Introduction | 15
Alarm and Exception Features
•Configurable arming time for alarm in/out.
•Support of various exception alarm types, including: alarms for video loss, motion detection, video tampering, unmatched video in/out format, illegal access, network disconnection, IP conflict, hard disk error, and hard disk full.
•Support of various exception alarm handling methods, including: pop-up alarm image on the monitor, audible warnings, surveillance center notifications, alarm output triggers, and send emails.
•Auto recovery from exceptions.
Other Features
•Use a mouse or the IR remote control to control the HRG DVR.
•Three-level user management. Each user has individual operating permission for the HRG DVR and cameras.
•Powerful recording and searching of operation, alarm, and exception logs.
•Import/export of device configuration files.
Network Features
•10M/100M adaptive network interface.
•TCP/IP protocol suites, PPPoE, DHCP, DNS, DDNS, NTP, SADP protocols.
•Unicast and multicast supported; TCP and UDP protocols applicable in unicast transmission.
•Remote search, playback and download, lock/unlock of video files.
•Breakpoint resume support.
•Remote access and configuration of parameters; remote import/export of device configuration parameters.
•Remote access of device running status, system log, and alarm status.
•Remote formatting of hard disk, upgrade, reboot/shutdown, and other system maintenance operations.
•Event alarm and exceptions upload to a remote management host.
•Remote video image capture in JPEG format.
•Remote PTZ control.
•Voice talk and broadcast.
•Built-in WEB Server.
System Diagram
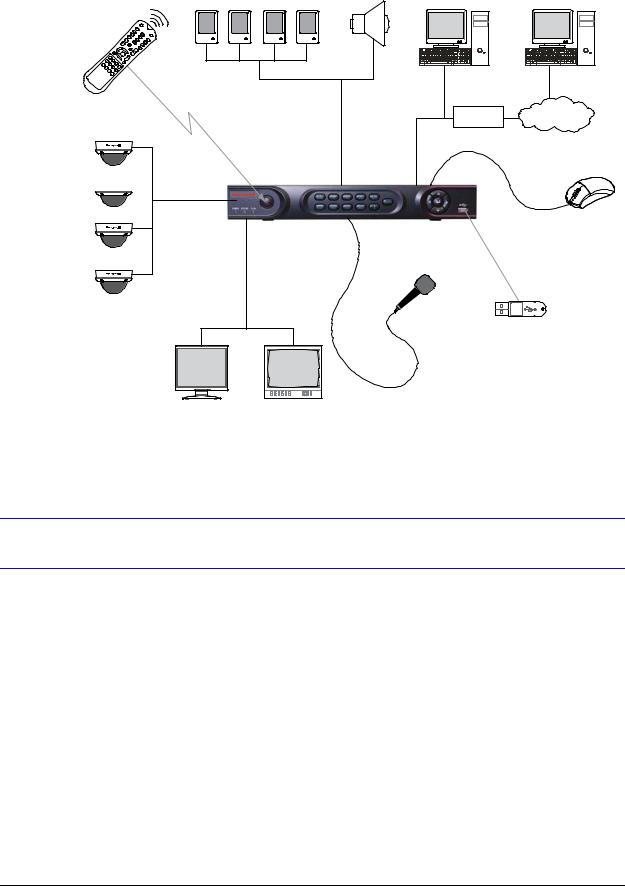
Connect your HRG DVR as shown in Figure 1-1.
800-12005 - A - 06/2012
16 | Performance Series DVR User Guide
Figure 1-1 System Diagram (HRG4 DVR shown)
Alarm Out
Alarm Sensors
IR Remote
Control
|
Alarm Input/Output |
Web Browser |
Multi-site |
|
|
||
|
|
|
Software |
Analog |
|
Router |
Internet |
Cameras |
|
|
|
HRG4 DVR


 Video In
USB Mouse
Support
Video Out
Microphone
USB Flash Drive to back up video clips
Main Monitor |
Spot Monitor |
VGA |
(BNC) |
Operating the HRG DVR
You can use the following tools to navigate and operate your HRG DVR.
•the front panel controls (see Front Panel on page 16)
•the IR (Infrared) remote (see Using the IR Remote Control on page 19)
•a mouse (see Using a USB Mouse on page 20)
•the virtual keyboard (see Using the Virtual Keyboard on page 21)
Front Panel
Familiarize yourself with the front panel controls for your HRG DVR.
www.honeywellvideo.com

Introduction | 17
HRG4 Front Panel
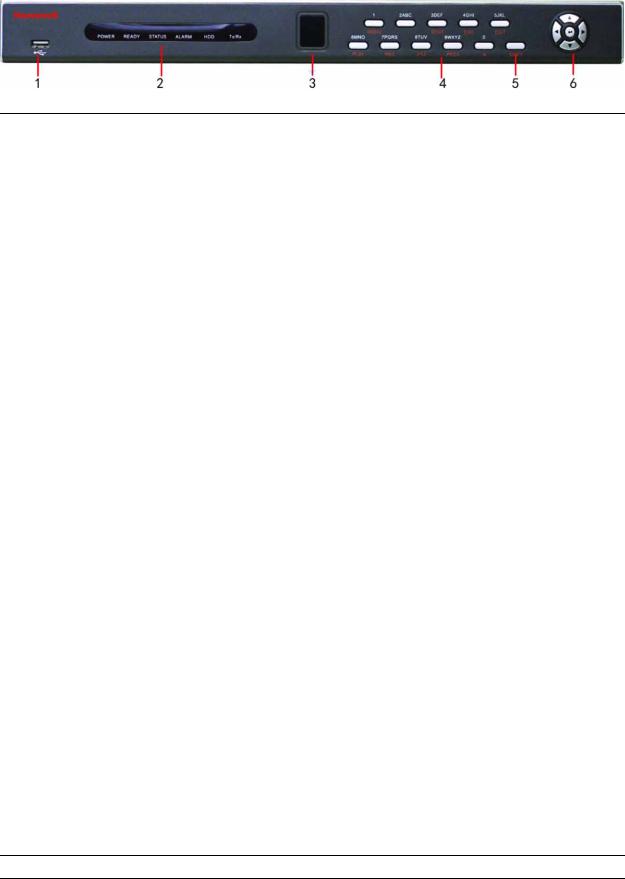
Figure 1-2 HRG4 Front Panel
1 2 3 4 5 6
|
Table 1-1 |
HRG4 Front Panel Controls and Indicators |
|
|
|
Position |
Control/Indicator |
Function |
|
|
|
1 |
Status Indicators |
|
|
|
|
|
POWER |
Turns green when the HRG DVR is on. |
|
|
|
|
STATUS |
Illuminates when the compound key switches to numeric/letter input mode. |
|
|
|
|
Tx/Rx |
Flickers green when the network connection is functioning normally. |
|
|
|
2 |
IR Receiver |
Sensor for IR Remote Controller. |
|
|
|
3 |
Compound Buttons |
|
|
|
|
|
1/MENU |
Enter number “1”; Access the main menu. |
|
|
|
|
2/ABC/F1 |
Enter number “2” or letters “A”, “B”, “C”; The F1 button when used in a list field will |
|
|
select all items on the list. In PTZ Control mode, it will turn on/off PTZ light. |
|
|
|
|
3/DEF/F2 |
Enter number “3” or letters “D”, “E”, “F”; The F2 button is used to cycle through tab |
|
|
pages. It will also bring up the Channel and OSD Position settings. |
|
|
|
|
4/GHI/ESC |
Enter number “4” or letters “G”, “H”, “I”; Exit and back to the previous menu. |
|
|
|
|
5/JKL/EDIT |
Enter number “5” or letters “J”, “K”, “L”; Delete characters before cursor; Select the |
|
|
check box and ON/OFF switch; Start/stop record clipping in playback. |
|
|
|
|
6/MNO/PLAY |
Enter number “6” or letters “M”, “N”, “O”; Playback, for direct access to playback |
|
|
interface. |
|
|
|
|
7/PQRS/REC |
Enter number “7” or letters “P”, “Q”, “R”, “S”; Manual record, for direct access to |
|
|
manual record interface; manually enable/disable record. |
|
|
|
|
8/TUV/PTZ |
Enter number “8” or letters “T”, “U”, “V”; Access to PTZ control interface. |
|
|
|
|
9/WXYZ/PREV |
Enter number “9” or letters “W”, “X”, “Y”, “Z”; Multi-camera display in live view. |
|
|
|
|
0/A |
Enter number “0”; Switch between input methods (upper and lowercase alphabet, |
|
|
symbols and numeric input). |
|
|
|
4 |
SHIFT |
Switches the compound keys functions from inputting the numeric/letter values to |
|
|
the functional controls. |
|
|
|
5 |
Control Buttons |
Directional buttons: In menu mode, the direction buttons are used to navigate |
|
|
between different fields and items and select setting parameters. In playback mode, |
|
|
the Up and Down buttons are used to speed up and slow down record play, and the |
|
|
Left and Right buttons are used to select the recording 30s forwards or backwards. |
|
|
In Live View mode, these buttons can be used to cycle through channels. |
|
|
Enter: The Enter button is used to confirm selection in the Menu mode; or used to |
|
|
select check box fields and ON/OFF switch. In playback mode, it can be used to |
|
|
play or pause the video. In single-frame play mode, pressing the Enter button |
|
|
advances the video by a single frame. And in auto sequence live view mode, the |
|
|
buttons can be used to pause / resume auto sequence. |
|
|
|
6 |
USB Port |
Connection for a USB mouse or USB flash memory device. |
|
|
|
800-12005 - A - 06/2012
18 | Performance Series DVR User Guide
HRG8 and HRG16 Front Panel
Figure 1-3 HRG8 and HRG16 Front Panel
Position |
Button/Indicator |
Function |
|
|
|
1 |
USB Port |
Connection for a USB mouse or USB flash memory device. |
|
|
|
2 |
Status Indicators |
|
|
|
|
|
POWER |
Turns green when the HRG DVR is on. |
|
|
|
|
READY |
Turns green when the device is running normally. |
|
|
|
|
STATUS |
Illuminates when the compound key switches to numeric/letter input mode. |
|
|
|
|
ALARM |
Turns red when there is a sensor alarm occurring. |
|
|
|
|
HDD |
Flickers red when the HDD is reading or writing. |
|
|
|
|
Tx/Rx |
Flickers green when the network connection is functioning normally. |
|
|
|
3 |
IR Receiver |
Sensor for IR Remote Controller. |
|
|
|
4 |
Compound Buttons |
|
|
|
|
|
1/MENU |
Enter number “1”; Access the main menu. |
|
|
|
|
2/ABC/F1 |
Enter number “2” or letters “A”, “B”, “C”; The F1 button when used in a list field will |
|
|
select all items on the list. In PTZ Control mode, it will turn on/off PTZ light. |
|
|
|
|
3/DEF/F2 |
Enter number “3” or letters “D”, “E”, “F”; The F2 button is used to cycle through tab |
|
|
pages. It will also bring up the Channel & OSD Position settings. |
|
|
|
|
4/GHI/ESC |
Enter number “4” or letters “G”, “H”, “I”; Exit and back to the previous menu. |
|
|
|
|
5/JKL/EDIT |
Enter number “5” or letters “J”, “K”, “L”; Delete characters before cursor; Select the |
|
|
check box and ON/OFF switch; Start/stop record clipping in playback. |
|
|
|
|
6/MNO/PLAY |
Enter number “6” or letters “M”, “N”, “O”; Playback, for direct access to playback |
|
|
interface. |
|
|
|
|
7/PQRS/REC |
Enter number “7” or letters “P”, “Q”, “R”, “S”; Manual record, for direct access to |
|
|
manual record interface; manually enable/disable record. |
|
|
|
|
8/TUV/PTZ |
Enter number “8” or letters “T”, “U”, “V”; Access to PTZ control interface. |
|
|
|
|
9/WXYZ/PREV |
Enter number “9” or letters “W”, “X”, “Y”, “Z”; Multi-camera display in live view. |
|
|
|
|
0/A |
Enter number “0”; Switch between input methods (upper and lowercase alphabet, |
|
|
symbols and numeric input). |
|
|
|
5 |
SHIFT |
Switches the compound keys functions from inputting the numeric/letter values to |
|
|
the functional controls. |
|
|
|
6 |
Control Buttons |
Directional buttons: In menu mode, the direction buttons are used to navigate |
|
|
between different fields and items and select setting parameters. In playback mode, |
|
|
the Up and Down buttons are used to speed up and slow down record play, and the |
Left and Right buttons are used to select the recording 30s forwards or backwards.
In Live View mode, these buttons can be used to cycle through channels.
Enter: The Enter button is used to confirm a selection in the Menu mode; or used to select check box fields and the ON/OFF switch. In playback mode, it can be used to play or pause the video. In single-frame play mode, pressing the Enter button advances the video by a single frame. And in auto sequence live view mode, the buttons can be used to pause / resume auto sequence.
www.honeywellvideo.com

Introduction | 19
Using the IR Remote Control
Your HRG DVR may also be controlled with the IR remote control. Batteries (2 x AAA) must be installed before operation.
Figure 1-4 IR Remote Control |
|
|
||
|
|
Table 1-2 |
IR Remote Control |
|
|
|
|
|
|
|
# |
Button |
|
Function |
|
|
|
|
|
1 |
POWER |
|
Turn On/Off the HRG DVR. |
|
|
|
|
|
|
2 |
DEV |
|
Enable/Disable Remote Control |
|
|
|
|
|
|
3 |
Alphanumerics |
Same as front panel |
||
|
|
|
|
|
4 |
EDIT |
|
Same as JKL/EDIT on front panel. |
|
|
|
|
|
|
5 |
A |
|
Same as 0/A on front panel. |
|
|
|
|
|
|
6 |
REC |
|
Same as 7/PQRS/REC on front panel. |
|
|
|
|
|
|
7 |
PLAY |
|
Same as 6/MNO/PLAY on front panel. |
|
|
|
|
|
|
8 |
INFO |
|
Reserved. |
|
|
|
|
|
|
9 |
VOIP |
|
Same as 2/ABC/F1 on front panel. |
|
|
|
|
|
|
10 |
MENU |
|
Same as 1/MENU on front panel. |
|
|
|
|
|
|
11 |
PREV |
|
Same as 9/WXYZ/PREV on front panel. |
|
|
|
|
|
|
12 |
DIRECTION/ENTER |
Same as on front panel. |
||
|
|
|
|
|
13 |
PTZ |
|
Same as 8/TUV/PTZ on front panel. |
|
|
|
|
|
|
14 |
ESC |
|
Same as ESC on front panel. |
|
|
|
|
|
|
15 |
RESERVED |
|
Reserved. |
|
|
|
|
|
|
16 |
F1 |
|
Same as 2/ABC on front panel. |
|
|
|
|
|
|
17 |
PTZ CONTROL Buttons |
Use to adjust the iris, focus, and zoom. |
||
|
|
|
|
|
18 |
F2 |
|
The F2 button is used to cycle through tab |
|
|
|
|
|
pages. It can also be used to enter the |
|
|
|
|
Channel and OSD Position settings. |
|
|
|
|
|
See HRG4 Front Panel on page 17 and HRG8 and HRG16 Front Panel on page 18 for more about front panel controls.
Configuring the IR Remote Control
Aim the remote control at the IR receiver located at the front of the unit to test operation. If there is no response, try the following steps:
1.Use the front control panel or the mouse to navigate to Menu Settings General More Settings.
2.Check and remember the HRG DVR ID number. The default ID number is 255. This ID number is valid for all IR remote controls.
3.Press DEV on the remote.
4.Enter the DVR ID number from step 2.
5.Press ENTER on the IR remote control.
The Status indicator on the front panel should turn green to indicate that the remote control is operating properly.
800-12005 - A - 06/2012

20 | Performance Series DVR User Guide
Using a USB Mouse
A regular 3-button (Left/Right/Scroll-wheel) USB mouse can also be used with this HRG DVR.
Connecting a USB Mouse
•Plug the USB mouse into one of the USB ports on the front panel of the HRG DVR.
The mouse should automatically be detected. If, in a rare case, that the mouse is not detected, pleased refer to the recommended device list from your provider.
USB Mouse Controls
Table 1-3 |
Mouse Controls |
|
|
|
|
|
|
Control |
|
Action |
Result |
|
|
|
|
|
|
Single click |
Select a menu component, such as a button or an |
|
|
|
input field. This is similar to pressing the ENTER |
|
|
|
button on the remote/front panel controls. |
|
|
|
|
|
|
Double click |
Switch between single screen and multi-screen |
|
|
|
mode in Live View/ Playback mode. |
Left button |
|
|
|
|
Click and drag |
Click and drag the Left mouse button to control the |
|
|
|
||
|
|
|
pan/tilt of a PTZ camera as well as to vary the |
|
|
|
position of the digital zoom area and the camera |
|
|
|
OSD. It can also be used to setup the alarm areas. |
|
|
|
|
Right button |
|
Single click |
Shows pop-up menu. |
|
|
|
|
|
|
Scroll up |
In Live View mode, scrolling up will switch to the |
|
|
|
previous screen. In Menu mode, it will move the |
Scroll wheel |
|
|
selection to the previous item. |
|
|
|
|
|
Scroll down |
In Live View mode, scrolling down will switch to the |
|
|
|
||
|
|
|
next screen. In Menu mode, it will move the |
|
|
|
selection to the next item. |
|
|
|
|
www.honeywellvideo.com
Introduction | 21
Using the Virtual Keyboard
When a mouse is used to perform a task on the HRG DVR, clicking on a text input field brings up the Virtual Keyboard.
Figure 1-5 Virtual Keyboard
Table 1-4 |
Virtual Keyboard Controls |
|
|
|
|
Virtual key |
Name |
Function |
|
|
|
|
Lowercase |
Indicates that lowercase |
|
|
input is being used. |
|
|
|
|
Uppercase |
Indicates that uppercase |
|
|
input is being used. |
|
|
|
|
Switch to lowercase |
Switch to lowercase input. |
|
|
|
|
Switch to uppercase |
Switch to uppercase input. |
|
|
|
|
Number |
Indicates that number input is |
|
|
being used. |
|
|
|
|
Symbols |
Switch to symbols input. |
|
|
|
|
Backspace |
Delete a character in front of |
|
|
the cursor. |
|
|
|
|
Enter |
Confirm selection. |
|
|
|
|
ESC |
Exit out of the virtual |
|
|
keyboard. |
|
|
|
Rear Panel
Use these diagrams to make the rear panel connections.
HRG4 Rear Panel Connections and Switches
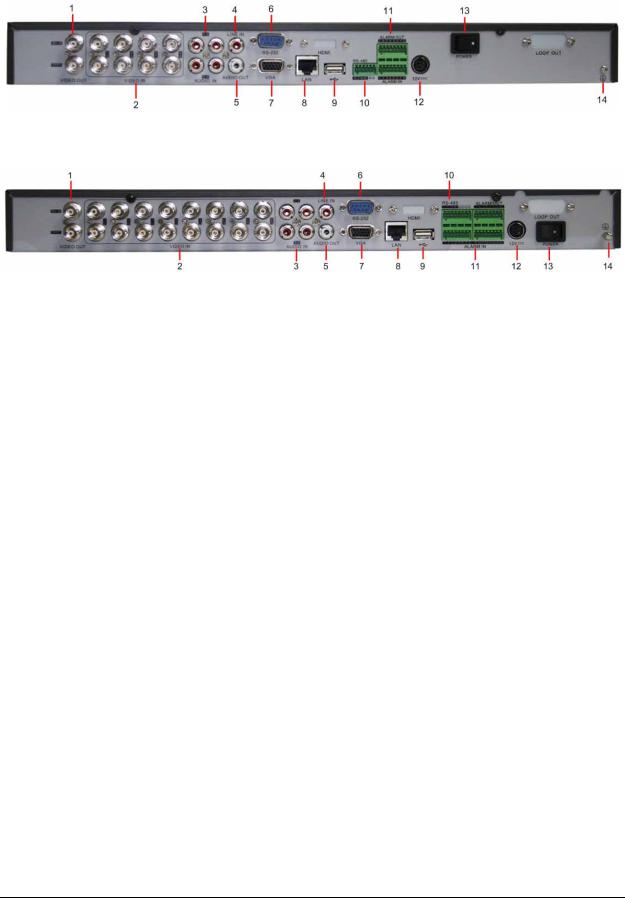
Figure 1-6 HRG4 Rear Panel Connections and Switches
800-12005 - A - 06/2012

22 | Performance Series DVR User Guide
|
Table 1-5 |
HRG4 Rear Panel Connections and Switches |
|
|
|
|
|
Position |
Connection/Switch |
Function |
|
|
|
|
|
1 |
Video In |
BNC connectors for analog video input. |
|
|
|
|
|
2 |
Video Out |
BNC connectors for video output. |
|
|
|
|
|
3 |
Audio In |
RCA connectors for analog audio input. |
|
|
|
|
|
4 |
Line In |
RCA connector for audio input. |
|
|
|
|
|
5 |
Audio Out |
RCA connector for audio output. |
|
|
|
|
|
6 |
LAN |
Connector for LAN (Local Area Network). |
|
|
|
|
|
7 |
VGA |
DB15 connector for VGA output. Display local video output and menu. |
|
|
|
|
|
8 |
USB |
Connector for USB devices. |
|
|
|
|
|
9 |
RS-232 Port |
DB9 connector for RS-232 devices. |
|
|
|
|
|
|
Alarm In |
Connector for alarm input. |
|
10 |
|
|
|
Alarm Out |
Connector for alarm output. |
||
|
|||
|
|
|
|
|
RS-485 Port |
Connector for RS-485 devices. T+, T- pins connect to PTZ. |
|
|
|
|
|
11 |
Power |
Switch for turning On/Off the device. |
|
|
|
|
|
12 |
12 V |
12 V DC power supply. |
|
|
|
|
|
13 |
GND |
Ground (needs to be connected when HRG DVR starts up). |
|
|
|
|
www.honeywellvideo.com
Introduction | 23
HRG8 Rear Panel Connections and Switches
HRG16 Rear Panel Connections and Switches
|
Table 1-6 |
HRG8 and HRG16 Rear Panel Connections and Switches |
|
|
|
|
|
Position |
Connection/Switch |
Function |
|
|
|
|
|
|
Main Video Out |
BNC connectors for analog video input. |
|
1 |
|
|
|
Spot Video Out |
BNC connectors for spot video out |
||
|
|||
|
|
|
|
2 |
Video In |
BNC connectors for analog video input. |
|
|
|
|
|
3 |
Audio In |
RCA connectors for analog audio input. |
|
|
|
|
|
4 |
Line In |
RCA connector for audio input. |
|
|
|
|
|
5 |
Audio Out |
RCA connector for audio output. |
|
|
|
|
|
6 |
RS-232 Port |
DB9 connector for RS232 devices. |
|
|
|
|
|
7 |
VGA |
DB15 connector for VGA output. Display local video output and menu. |
|
|
|
|
|
8 |
LAN |
Connector for LAN (Local Area Network). |
|
|
|
|
|
9 |
USB |
Connector for USB devices. |
|
|
|
|
|
10 |
RS-485 Port |
Connector for RS-485 devices. T+, T- pins connect to PTZ. |
|
|
|
|
|
|
Alarm In |
Connector for alarm input. |
|
11 |
|
|
|
Alarm Out |
Connector for alarm output. |
||
|
|||
|
|
|
|
12 |
12 V |
12 V DC power supply. |
|
|
|
|
|
13 |
Power |
Switch for turning On/Off the device. |
|
|
|
|
|
14 |
GND |
Ground (needs to be connected when HRG DVR starts up). |
|
|
|
|
800-12005 - A - 06/2012

24 | Performance Series DVR User Guide
www.honeywellvideo.com

2
Getting Started
This chapter covers:
•Starting and shutting down the HRG DVR
•Rebooting and locking the HRG DVR
•Using the Setup Wizard
•Setting the date and time
Starting and Shutting Down the HRG DVR
Proper startup and shutdown procedures are crucial to maintaining the life of your HRG DVR.
Starting the HRG DVR
Note Ensure that the input voltage meets the requirements of the HRG DVR, and that the GND is grounded.
Note Ensure that the VGA on the HRG DVR rear panel is connected to a display device, or that the VIDEO OUT port is connected to a monitor. You cannot view and navigate the menu without being connected to a monitor.
1.Ensure the power supply is plugged into an electrical outlet. It is HIGHLY recommended that you use an Uninterruptible Power Supply (UPS) in conjunction with the unit.
2.Press the POWER switch on the rear panel. After the power has been started up, the POWER indicator on the HRG DVR will light green.
Shutting Down the HRG DVR
1.Click Menu ShutDown to enter the Shutdown menu (see Figure 2-1).
800-12005 - A - 06/2012
26 | Performance Series DVR User Guide
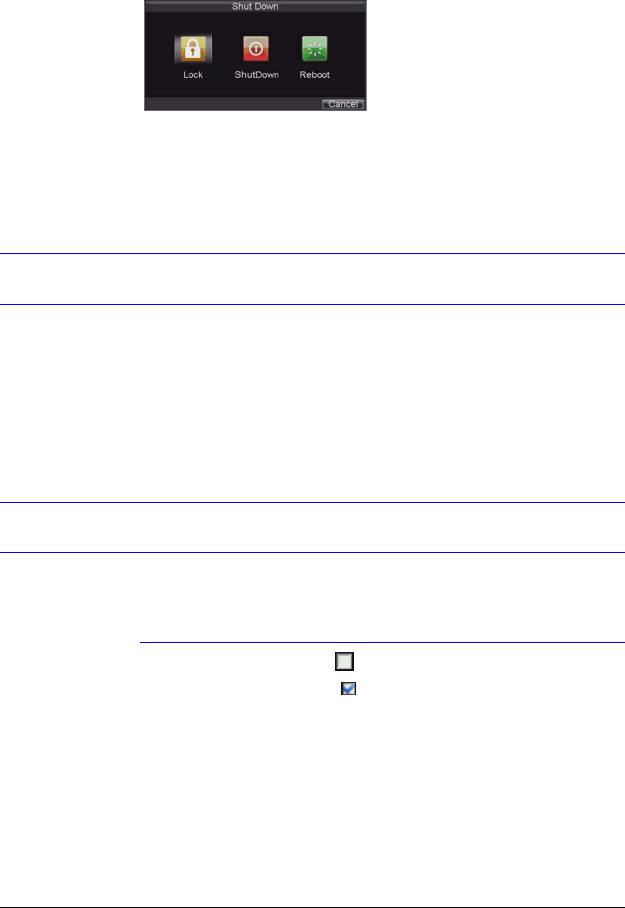
Figure 2-1 .Shutdown Menu
2.Click ShutDown.
3.Click Yes in the pop-up window to confirm that you want to shut down the HRG DVR.
Rebooting and Locking the HRG DVR
While in the Shutdown menu, you can also reboot or lock your HRG DVR. Locking your HRG DVR will return you to the Live View mode, which requires a user name and password to exit out of it. The Reboot button reboots your HRG DVR.
1.Click Menu ShutDown to enter the Shutdown menu (see Figure 2-1).
2.Click Lock or Reboot.
Using the Setup Wizard
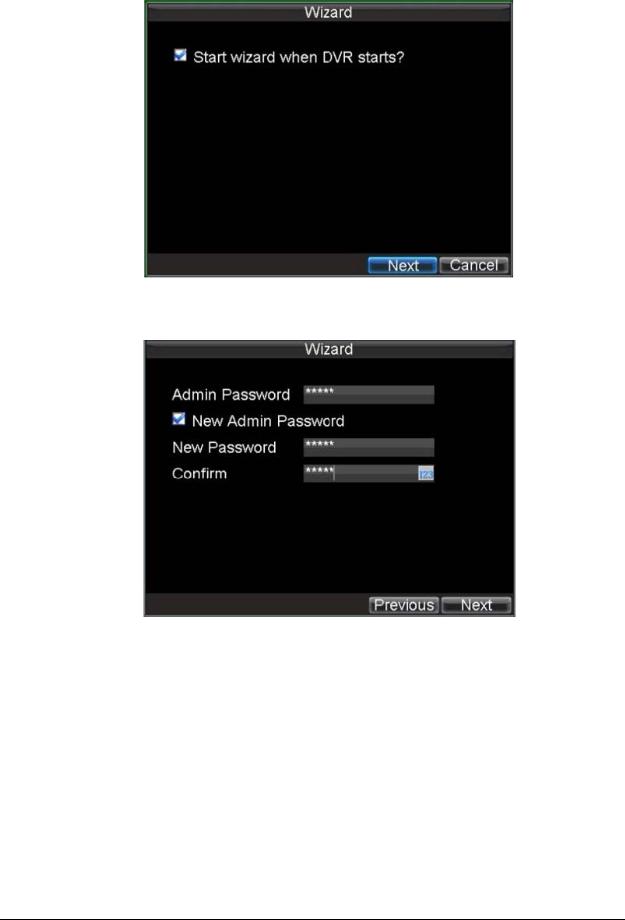
By default, the Setup Wizard prompt appears when you turn on the HRG DVR (see Figure 2-2). The Setup Wizard guides you to configure some of the important settings for your HRG DVR.
Note |
If the check box is cleared |
, then the Setup Wizard will not run again until the |
|
factory default settings are resumed. |
|
|
If the check box is selected |
, then the Setup Wizard will start the next time the |
|
HRG DVR is turned on. |
|
|
|
|
www.honeywellvideo.com
Getting Started | 27
Figure 2-2 Setup Wizard
1.Click Next to open the User Permission window (see Figure 2-3).
Figure 2-3 User Permission Window
2.Navigate to the Admin Password input field. Enter the admin password into the Admin Password input field. By default, the password is 12345.
3.Select the New Admin Password check box to change the admin password. Enter the new password and confirm.
4.Click Next to continue to the HDD Management window.
800-12005 - A - 06/2012
28 | Performance Series DVR User Guide
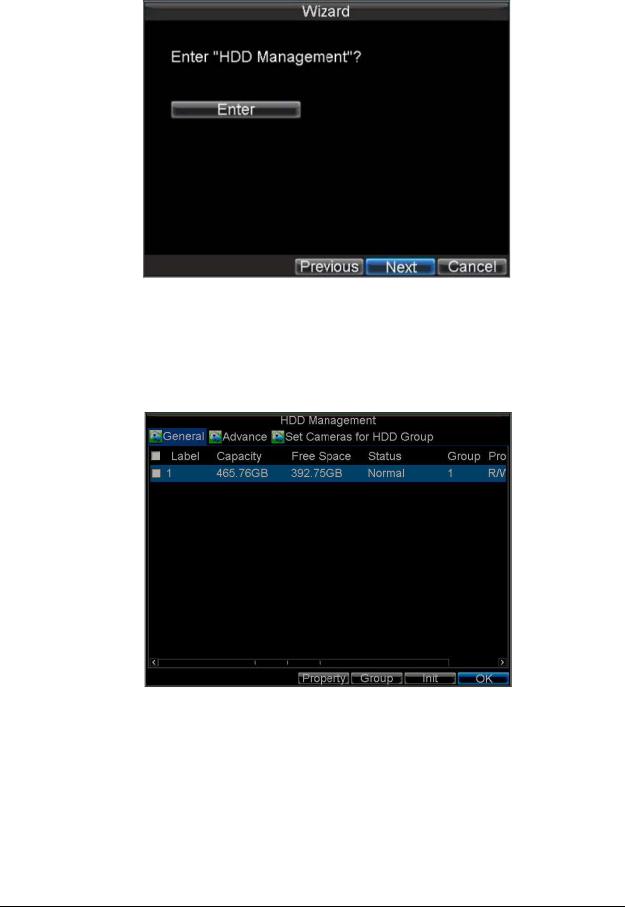
Figure 2-4 Entering the HDD Management Window
5.At the prompt, click Enter to open the HDD Management window (see Figure 2-5).
6.If a new hard drive was recently installed, select the HDD from the list, and then click Init to initialize it.
Initializing the HDD will format it and remove all data from it.
Figure 2-5 HDD Management Window
7.After the HDD has been initialized, click OK to return to the Setup Wizard.
8.Click Next to continue to the Record Settings window.
www.honeywellvideo.com
Getting Started | 29
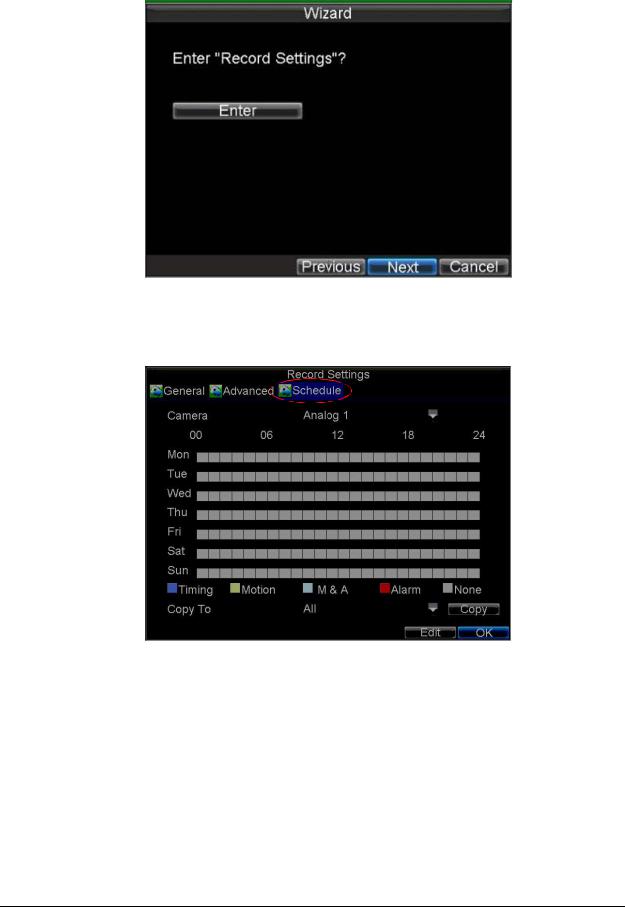
Figure 2-6 Entering the Record Settings Window
9.At the prompt, click Enter to open the Record Settings window (see Figure 2-7).
10.Select the Schedule tab.
Figure 2-7 Schedule Tab
11.Click Edit.
A new recording schedule opens (see Figure 2-8).
800-12005 - A - 06/2012

30 | Performance Series DVR User Guide
Figure 2-8 Entering a New Recording Schedule
12.Select both the Enable Schedule and All Day check boxes to enable the recording schedule and allow it to record continuously all day.
13.Click OK to return to the Schedule tab.
Note To copy the schedule to a different channel, select the channel or all under
Copy To, and then click Copy (see Figure 2-9).
Figure 2-9 Copying a Schedule
14. Click Next to continue to the Network Settings window.
www.honeywellvideo.com
 Loading...