


This owner’s manual should be considered a permanent part of the vehicle and should remain with the vehicle when it is sold.
This publication includes the latest production information available before printing. Honda Motor Co., Ltd. reserves the right to make changes at any time without notice and without incurring any obligation.
No part of this publication may be reproduced without written permission.
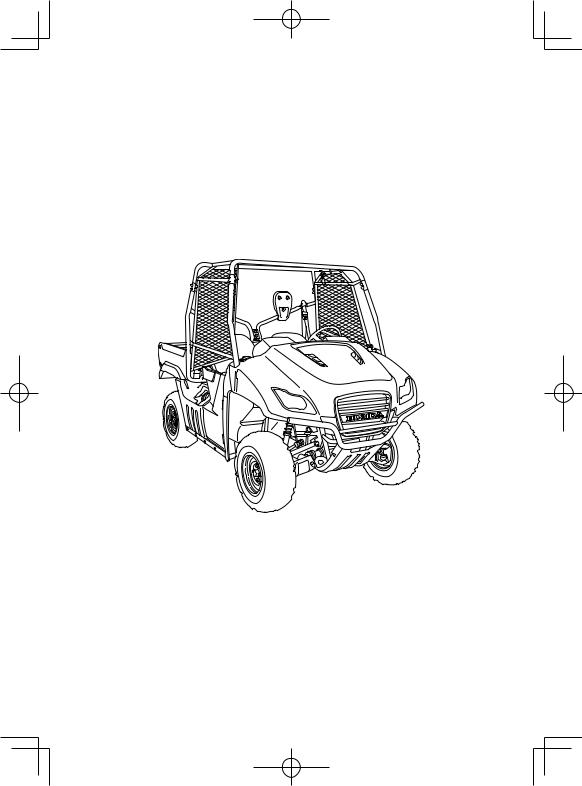
The vehicle pictured on the front cover may not match your vehicle.
California Proposition 65 Warning
WARNING: This product contains or emits chemicals known to the State of California to cause cancer and birth defects or other reproductive harm.
© Honda Motor Co., Ltd. 2008
2009
Honda BIG RED OWNER’S MANUAL

Introduction
Congratulations on choosing your Honda Big Red. When you own a Honda, you’re part of a worldwide family of satisfied customers–people who appreciate Honda’s reputation for building quality into every product.
Before you begin driving your vehicle, we recommend that you read this owner’s manual. It’s full of facts, instructions, safety information, and helpful tips. To help you find what you are looking for, the manual contains a detailed list of contents at the beginning of each section and an alphabetical index at the back of the book.
To protect your investment, we urge you to keep your vehicle well maintained. Scheduled service is a must, of course, but it’s also important to observe the break-in guidelines and perform all pre-drive and other periodic checks detailed in this manual.
As you read this manual, you will find information that is preceded by a  symbol. This information is intended to help you avoid damage to your Honda, to other property, or to the environment.
Be sure to read the Warranties Booklet (page 203) so you understand the coverages that protect your new Honda and are aware of your rights and responsibilities.
If you have any questions, or if you ever need special service or repairs, remember that your Honda dealer knows your Honda MUV best and is dedicated to your complete satisfaction.
Please report any change of address or ownership to your dealer so we will be able to contact you concerning important product information. You may also want to visit our website at www.honda.com.
Introduction
A Few Words About Safety
Your safety, and the safety of others, is very important. And operating your Honda safely is an important responsibility.
To help you make informed decisions about safety, we have provided operating procedures and other information on labels and in this manual. This information alerts you to potential hazards that could hurt you or others.
Of course, it is not possible to warn you about all hazards associated with operating or maintaining this vehicle. You must use your own good judgment.
You will find important safety information in a variety of forms, including:
Safety Labels –– on the vehicle.
Safety Messages –– boxed messages preceded by a safety alert symbol  and one of three signal words: DANGER, WARNING, or
CAUTION.
These signal words mean:
You WILL be KILLED or SERIOUSLY HURT if you don’t follow instructions.
You CAN be KILLED or SERIOUSLY HURT if you don’t follow instructions.
You CAN be HURT if you don’t follow instructions.
A Few Words About Safety

A Few Words about Safety
Safety Headings –– such as “Important Safety Reminders” or “Important Safety Precautions.”
Safety Section –– “Driver & Passenger Safety,” beginning on page 1.
Instructions –– how to operate this vehicle correctly and safely.
In addition to the above, your owner’s manual is full of information that can help you safely operate and maintain your vehicle. So please read it carefully.
A Few Words About Safety


Contents
These pages give an overview of the contents of your owner’s manual. The first page of each section lists the topics discussed in that section.
Driver & Passenger Safety ............................................................... |
1 |
The most important safety guidelines, how accessories and |
|
modifications can affect your safety, and the location of safety- |
|
related labels on your vehicle. |
|
Instruments & Controls.................................................................... |
9 |
The location, function and operation of the indicators, driver |
|
controls, and other operational components. |
|
Before Driving ................................................................................... |
39 |
The importance of wearing a seat belt, helmet and protective |
|
eyewear, how to make sure you and your Honda are ready to drive, |
|
plus load limits and guidelines on carrying cargo and towing a trailer. |
|
Basic Operation & Driving Guidelines ........................................... |
51 |
How to start and stop the engine, select a driving mode and gear, plus |
|
guidelines for driving on hills and other off-road situations. |
|
Servicing Your Honda....................................................................... |
65 |
Why your vehicle needs regular maintenance, what you need to |
|
know before servicing your vehicle, a maintenance schedule, and |
|
instructions for specific maintenance and adjustment items. |
|
Tips ..................................................................................................... |
153 |
How to store and transport your Honda, and how to be an |
|
environmentally responsible driver. |
|
Taking Care of the Unexpected........................................................ |
163 |
What to do if you have a flat tire, your engine won’t start, etc. |
|
Contents

Contents |
|
Technical Information ...................................................................... |
185 |
ID numbers, technical specifications, and other technical facts. |
|
Consumer Information..................................................................... |
199 |
Information on warranties, emissions controls, how to get a service |
|
manual, and how to contact Honda. |
|
Index................................................................................................... |
208 |
Alphabetical listing of topics in the manual. |
|
Quick Reference |
|
Handy facts about fuel, engine oil, tire sizes, and tire pressure. |
|
Contents

Driver & Passenger Safety
This section presents some of the most important information and recommendations to help you drive your Honda safely. Please take a few moments to read these pages. This section also shows you the location of safety labels on your vehicle.
Important Safety Information ................................................................. |
2 |
Accessories & Modifications .................................................................. |
4 |
Safety Labels........................................................................................... |
6 |
Driver & Passenger Safety |
1 |
Important Safety Information
There is much that you can do to protect yourself and a passenger. You’ll find many helpful recommendations throughout this manual. The following are those we consider to be most important.
Follow Age and Size Recommendations
The driver should be at least 16 years old and tall enough to wear the seat belt properly and reach all the controls. A passenger should also be tall enough for the seat belt to fit properly and brace themselves, if needed, placing both feet firmly on the floor.
Always Wear a Seat Belt
Wearing a seat belt and positioning it properly is your best protection against injury in a crash or rollover.
Protect Your Head and Eyes
We recommend that occupants always wear a helmet with a chin strap, impact resistant goggles or eyeglasses, and clothing appropriate to the driving situation.
Keep Doors and Side Nets Closed
Making sure the doors are closed and the side nets are secure will help keep the driver’s and passenger’s arms and legs inside the occupant protective structure (OPS) should the vehicle tip or turn over.
2 |
Driver & Passenger Safety |
Important Safety Information
Never Carry a Passenger in the Cargo Bed
This vehicle is designed for a driver and one passenger only. Do not let anyone ride in the cargo bed, as they could be thrown against or out of the vehicle and be seriously hurt or killed.
Obey Loading Limits & Guidelines
Do not carry more than 500 lbs (227 kg) in the cargo bed, and make sure all cargo is properly loaded and secured to prevent shifting.
Keep Your Vehicle in Safe Condition
It’s important to keep your vehicle properly maintained and in safe operating condition. Having a breakdown can be difficult, especially if you are stranded far from your base. To help avoid problems, inspect your Honda before each use and perform all recommended maintenance.
Don’t Drink and Drive
Alcohol and driving don’t mix. Even one drink can affect your judgment and your ability to respond to changing conditions. Drugs can also impair your abilities. So don’t drive if you are under the influence of alcohol or drugs.
Stay Off Public Roads
Your vehicle has been designed for use on private property and designated off-highway areas. It does not have turn signals or many other items required for use on either paved or unpaved public roads.
Driver & Passenger Safety |
3 |
Accessories & Modifications
Modifying your vehicle or using non-Honda accessories can make it unsafe. Before you consider making any modifications or adding an accessory, be sure to read the following information.
Accessories
We strongly recommend that you use only Honda Genuine Accessories that have been specifically designed and tested for your vehicle. Because Honda cannot test all other accessories, you must be personally responsible for the proper selection, installation, and use of non-Honda accessories.
Check with your Honda dealer for assistance, and always follow these guidelines:
•Make sure the accessory does not obscure any lights, reduce ground clearance, limit suspension travel or steering travel, or interfere with operating any controls.
•Do not add any electrical equipment that will exceed the vehicle’s electrical system capacity (pages 190, 191). A blown fuse can cause a loss of lights or engine power (page 176).
Improper accessories or modifications can cause a crash in which you can be seriously hurt or killed.
Follow all instructions in this owner’s manual regarding accessories and modifications.
4 |
Driver & Passenger Safety |

Accessories & Modifications
Modifications
We strongly advise you not to remove any original equipment or modify your Honda in any way that would change its design or operation. Such changes could seriously impair your vehicle’s handling, stability, and braking and make it unsafe to drive.
We also advise you not to make any modifications or remove any equipment (such as the spark arrester, muffler, or emissions control system components) that would make your vehicle illegal in your area.
Driver & Passenger Safety |
5 |
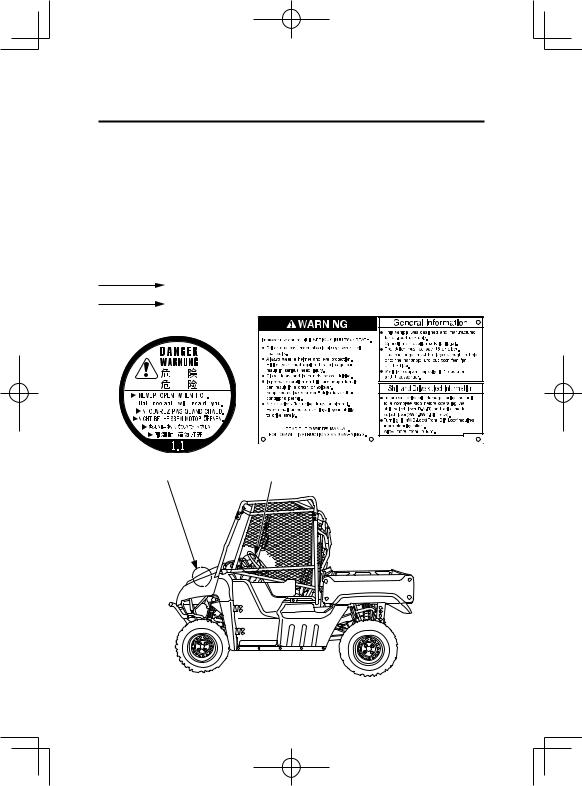
Safety Labels
Your Honda comes with several labels that contain important information.
You, and anyone else who operates or rides in the vehicle, should read and understand this information before driving.
The labels should be considered permanent parts of the vehicle. If a label comes off or becomes hard to read, contact your Honda dealer for a replacement.
Indicates something apparent. Indicates something concealed.
|
|
|
|
|
|
|
|
|
|
|
|
|
|
|
|
|
|
|
|
|
|
|
|
|
|
|
|
|
|
|
|
|
|
|
|
|
|
|
|
|
|
|
|
|
|
|
|
|
|
|
|
|
|
|
|
|
|
|
|
|
|
|
|
|
|
|
|
|
|
radiator cap danger |
general warning & |
||||||||
general information |
|||||||||
|
|
|
|
|
|
||||
6 |
Driver & Passenger Safety |

Safety Labels
tire warning & tire information
loading warning
towing capacity
towing warning
|
|
|
|
|
|
|
|
|
7 |
|
|
|
|
|
|
Driver & Passenger Safety |
|||
|
|
|
|
|
|
||||
|
|
|
|
|
|
||||
|
|
|
|
|
|
||||
|
|
|
|
|
|
||||
|
|
|
|
|
|
||||
|
|
|
|
|
|
||||
|
|
|
|
|
|
||||
|
|
|
|
|
|
||||
|
|
|
|
|
|
||||

8 |
Driver & Passenger Safety |

Instruments & Controls
The items listed below are described in this section. |
|
Operation Component Locations .......................................................... |
10 |
Fuel Gauge ........................................................................................... |
13 |
Indicators .............................................................................................. |
14 |
Neutral Indicator ............................................................................. |
14 |
Reverse Indicator ............................................................................ |
14 |
Parking Brake Indicator .................................................................. |
14 |
4WD Indicator ................................................................................ |
15 |
Front Differential Lock Indicator ................................................... |
15 |
High Coolant/Oil Temperature Indicator ........................................ |
15 |
PGM-FI Malfunction Indicator Lamp (MIL) .................................. |
16 |
Low Fuel Indicator .......................................................................... |
16 |
Driver Controls .................................................................................... |
17 |
Ignition Switch ................................................................................ |
17 |
Headlight Switch ............................................................................. |
18 |
Shift Lever ...................................................................................... |
19 |
Drive Mode Lever ........................................................................... |
20 |
Parking Brake Lever ....................................................................... |
22 |
Doors .................................................................................................... |
23 |
Side Nets .............................................................................................. |
25 |
Seats ..................................................................................................... |
27 |
Seats ................................................................................................ |
27 |
Adjustable Seat-Backs .................................................................... |
27 |
Seat Belts .............................................................................................. |
29 |
Passenger Handhold ............................................................................. |
32 |
Storage Compartments ......................................................................... |
33 |
Accessory Power Socket ...................................................................... |
34 |
Cargo Bed Controls .............................................................................. |
35 |
Tailgate Levers ................................................................................ |
35 |
Tie-Down Hooks ............................................................................. |
35 |
Tilt Bed Levers ................................................................................ |
36 |
Trailer Hitch ......................................................................................... |
38 |
Instruments & Controls |
9 |
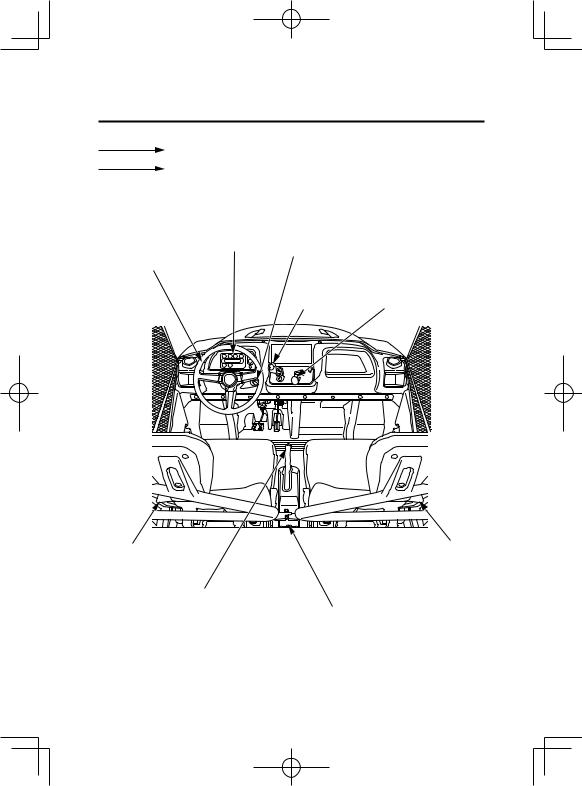
Operation Component Locations
Indicates something apparent.
Indicates something concealed.
indicators
headlight switch (page 14) ignition switch (page 17) (page 18)
shift lever
(page 19) drive mode lever (page 20)
seat-back |
seat-back |
(page 27) |
(page 27) |
parking brake lever (page 22) |
|
|
accessory power socket (page 34) |
10 Instruments & Controls
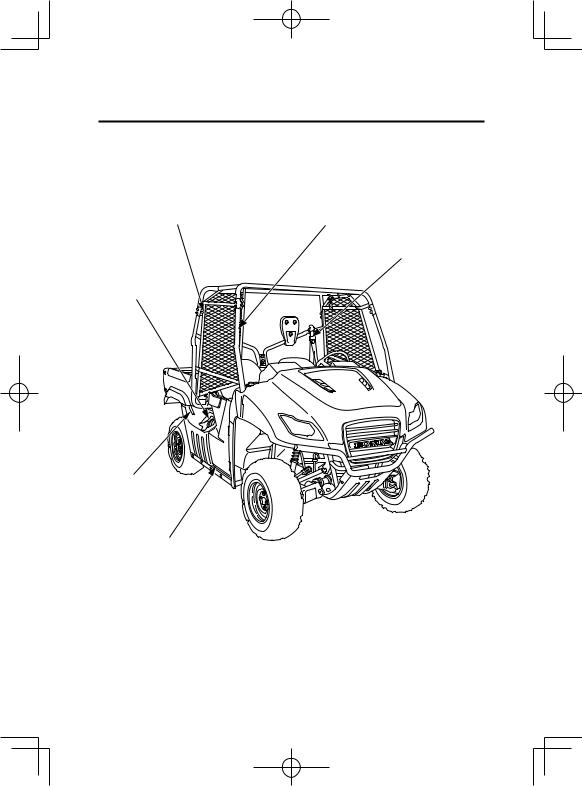
Operation Component Locations
side net (page 25) passenger handhold (page 32)
seat belt (page 29)
fuel gauge (page 13)
tilt bed lever (page 36)
door (page 23)
Instruments & Controls 11
Operation Component Locations
Indicates something apparent.
Indicates something concealed.
side net (page 25) |
seat belt (page 29) |
cargo bed (page 35)
|
tailgate levers |
door (page 23) |
(page 35) |
|
tilt bed lever (page 36) |
|
trailer hitch receiver (page 38) |
12 Instruments & Controls
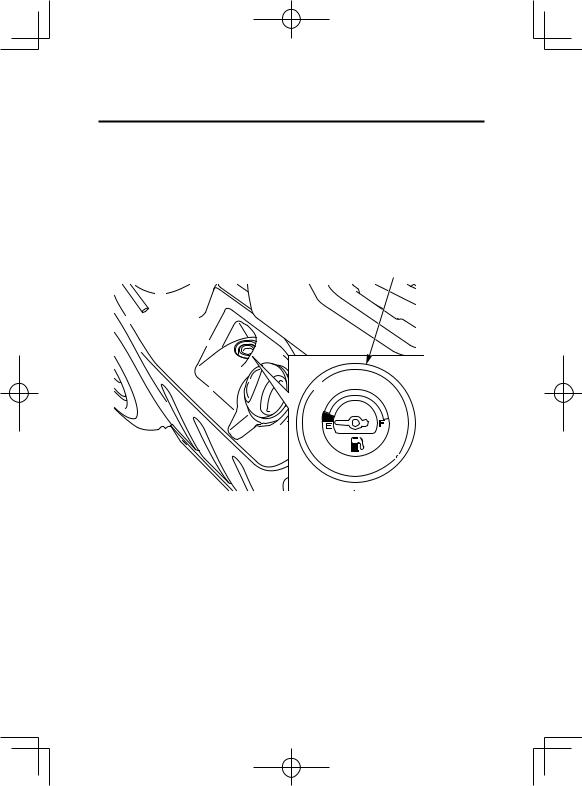
Fuel Gauge
The fuel gauge is located on top of the fuel tank next to the fuel filler cap. The gauge indicates approximately how much fuel remains in the tank.
The fuel tank capacity is:
7.93 US gal (30.0ℓ)
RIGHT SIDE |
fuel gauge |
Instruments & Controls 13
Indicators
Your Honda MUV’s instrument panel has a number of indicators to keep you informed and alert you to possible problems. Each is described in the following pages.
reverse indicator
4WD indicator
high coolant/oil temperature indicator
PGM-FI malfunction indicator lamp (MIL)
parking brake 
 indicator

 low fuel indicator
neutral indicator |
front differential lock indicator |
Neutral Indicator
This indicator comes on and stays on when the transmission is in neutral.
Reverse Indicator
This indicator comes on and stays on when the transmission is in reverse.
Parking Brake Indicator
This indicator comes on and stays on when the parking brake is on.
14 Instruments & Controls
Indicators
 4WD Indicator
This indicator comes on and stays on when the drive mode is in the 4WD rear diff lock mode.
 Front Differential Lock Indicator
When the drive mode is 4WD all diff lock mode, this indicator comes on and stays on along with the 4WD indicator.
 High Coolant/Oil Temperature Indicator
This indicator comes on and stays on when either the coolant temperature or the engine oil temperature is high enough to adversely affect the service life of the engine. If this indicator comes on while you are driving, stop as soon as possible, turn the engine off, and let it cool. The indicator also comes on for a few seconds when you turn the ignition switch to the ON ( ) position.
(cont’d)
Instruments & Controls 15
Indicators
 PGM-FI Malfunction Indicator Lamp (MIL)
This indicator comes on and stays on when there a problem with your vehicle’s engine system. If this happens, reduce speed and take your vehicle to a Honda dealer as soon as possible. The light should also come on for a few seconds when the ignition switch is turned to the ON ( ) position.
 Low Fuel Indicator
This indicator comes on and stays on when the remaining fuel is low. When the indicator comes on, the amount of fuel in the tank is approximately 1.5 US gal (5.7ℓ). The light should also come on for a few seconds when the ignition switch is turned to the ON ( ) position.
16 Instruments & Controls
Driver Controls
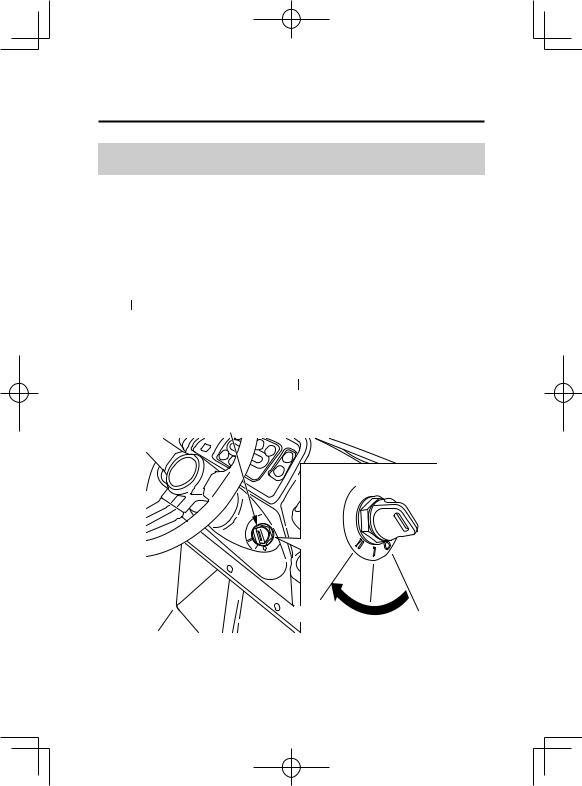
Ignition Switch
The ignition switch is a three-position, key-operated switch used to start and stop the engine.
OFF ( ) ̶ The engine and all electrical circuits are off. The key can be inserted and removed only when it is in this position.
ON ( ) ̶ The electrical circuits are on. You can use the accessory power socket in this position.
START ( 
 ) ̶ This position is used only to start the engine. The key will automatically return to the ON ( ) position when you let go of the key.
ignition switch
ON 
START OFF
Instruments & Controls 17
Driver Controls
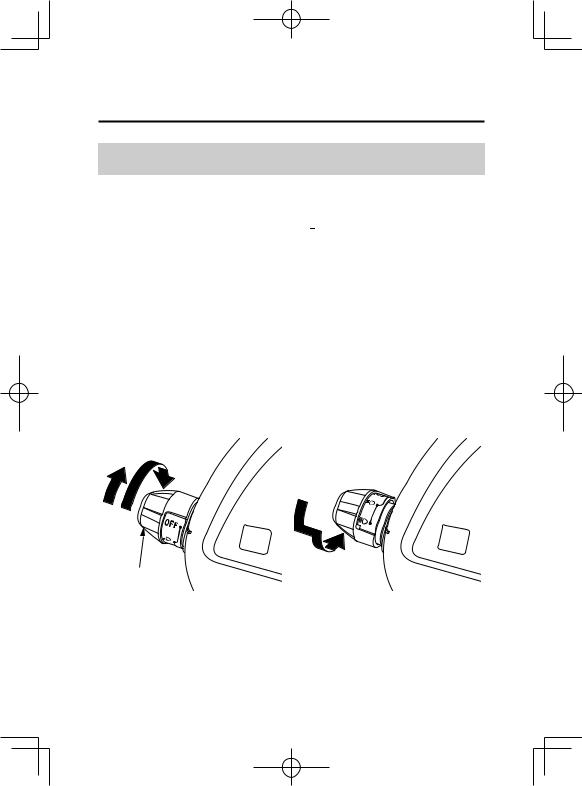
Headlight Switch
The headlight switch is located on the front console, to the left of the steering wheel. This switch turns the headlights and tail lights on and off. It is also used to select high beam (  ) or low beam (
  ) for the headlights.
To turn the lights on, rotate the switch away from you, stopping at the desired beam level. To change beam levels, rotate to the desired level. To turn the lights off, press in and rotate the switch toward you to the OFF position.
ON (LO) ON (HI)
OFF
headlight |
|
|
switch |
TO TURN ON |
TO TURN OFF |
|
18 Instruments & Controls
Driver Controls
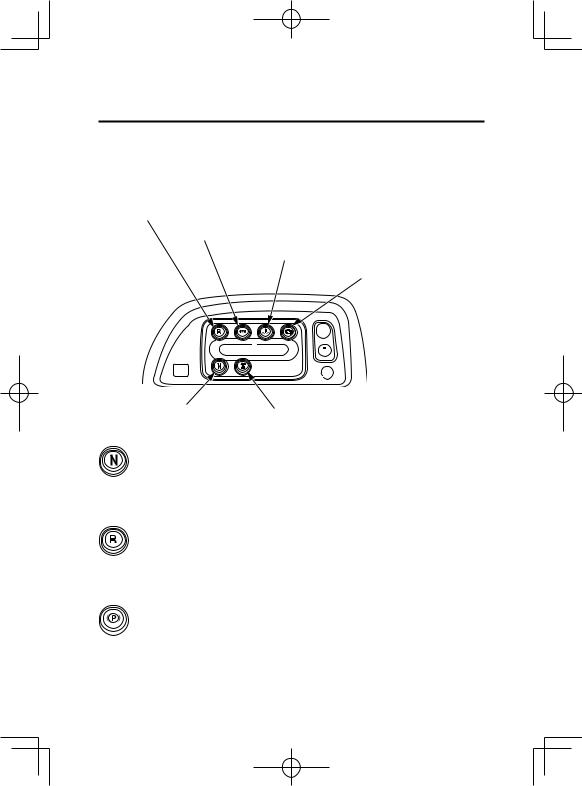
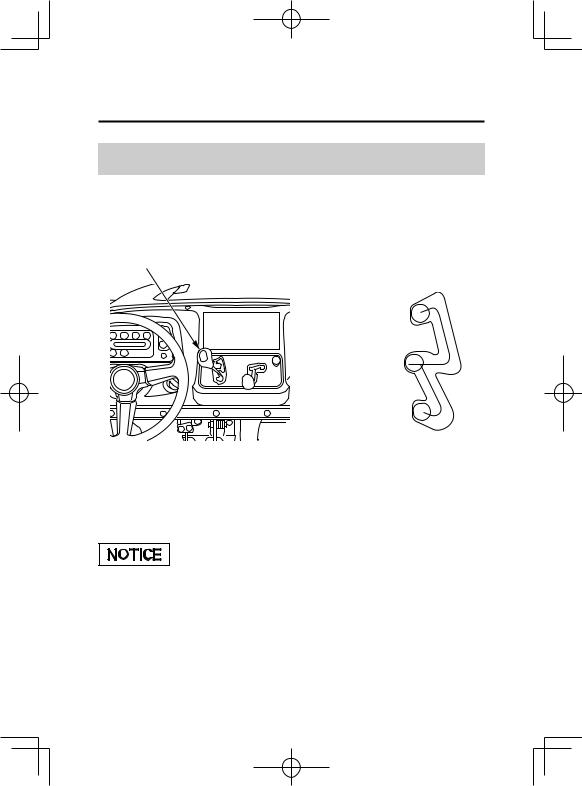
Shift Lever
Your vehicle is equipped with an automatic transmission. The shift lever, located to the right of the steering wheel, has three positions: drive (D), neutral (N), and reverse (R).
shift lever |
shift positions |
reverse R
neutral N
drive D
You should move the shift lever only when the vehicle is stopped with your foot on the brake pedal and with the engine idling. Have your vehicle checked by a dealer if you experience any shifting problems.
Do not attempt to shift the shift lever with engine speed above idle or while the vehicle is moving, as you may damage the transmission.
Instruments & Controls 19
Driver Controls
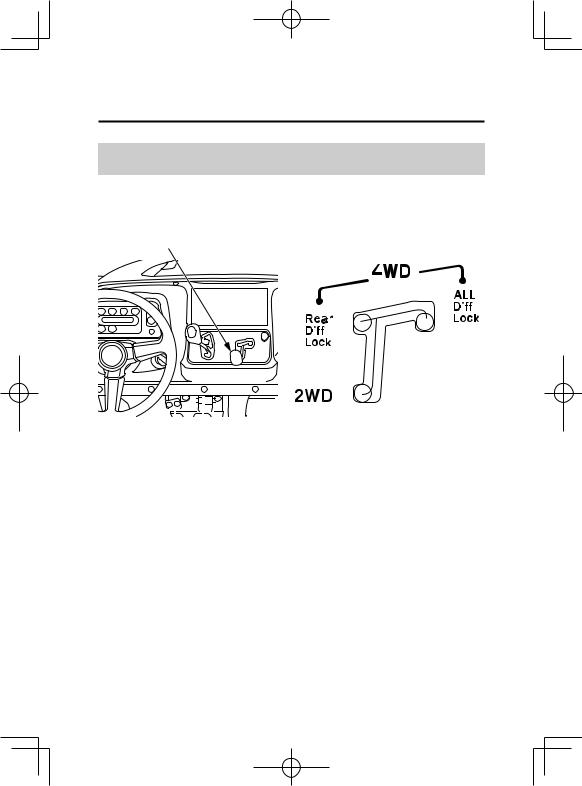
Drive Mode Lever
The drive mode lever, located to the right of the shift lever, has three drive mode positions: 2WD, 4WD rear diff lock and 4WD all diff lock.
drive mode lever |
drive mode positions |
||||||||||||||||
|
|
|
|
|
|
|
|
|
|
|
|
|
|
|
|
|
|
|
|
|
|
|
|
|
|
|
|
|
|
|
|
|
|
|
|
|
|
|
|
|
|
|
|
|
|
|
|
|
|
|
|
|
|
|
|
|
|
|
|
|
|
|
|
|
|
|
|
|
|
|
|
|
|
|
|
|
|
|
|
|
|
|
|
|
|
|
|
|
|
|
|
|
|
|
|
|
|
|
|
|
|
|
|
|
|
|
|
|
|
|
|
|
|
|
|
|
|
|
|
|
|
|
|
|
|
|
|
|
|
|
|
|
|
|
|
|
|
|
|
|
|
|
|
|
|
|
|
|
|
|
|
|
|
|
|
|
|
|
|
|
|
|
|
|
|
|
|
|
|
|
|
|
|
|
|
|
|
|
|
|
|
|
|
|
|
|
|
|
|
|
|
|
|
|
|
|
|
|
|
|
|
|
|
|
|
|
|
|
|
|
|
|
|
|
|
|
|
|
|
|
|
|
|
|
|
|
|
|
|
|
|
|
|
|
|
|
|
|
|
|
|
|
|
|
|
|
|
|
|
|
|
To check your present drive mode, look at the 4WD indicator and front differential lock indicator.
2WD mode:
Both indicators go off when the 2WD mode engages.
4WD Rear Diff Lock mode:
The 4WD indicator comes on when the 4WD rear diff lock mode engages.
4WD All Diff Lock mode:
The 4WD indicator and front differential lock indicator go on when the 4WD all diff lock mode engages.
20 Instruments & Controls
Driver Controls
You should change drive modes only when the vehicle is stopped and the engine is idling.
Changing drive modes while the vehicle is moving could damage the drivetrain.
After changing the drive mode, drive several yards, making right and left turns, and make sure that indicators work properly. If the indicators do not go out or come on according to the drive mode position, see your Honda dealer.
Instruments & Controls 21
 Loading...