Hitachi IC35L018UWDY10, IC35L073UWDY10, IC35L018UCDY10, IC35L073UCDY10, IC35L036UWDY10 Quick Installation Guide
...
Quick installation guide
Hitachi Ultrastar 146Z10
Ultra 160 and 320 SCSI
Models: IC35L018UWDY10 IC35L073UWDY10
IC35L018UCDY10 IC35L073UCDY10
IC35L036UWDY10 IC35L146UWDY10
IC35L036UCDY10 IC35L146UCDY10
Handling precautions |
|
Address jumper and drive option blocks |
ŸDo not open the electrostatic discharge (ESD) bag containing the drive until required.
ŸDo not apply pressure on the drive during handling or installation.
ŸTo prevent damage from impact or vibration always set the drive down gently.
ŸHandle the drive carefully by the edges. Do not touch the exposed printed circuit board or any electronic components.
ŸDo not cover the breather hole! Covering the breather hole may result in loss of data.
ŸSave the packaging materials including the ESD bag in the event that the drive must be returned.
Installing the drive
1.Backup all data.
2.Record the serial number and part number of your hard drive for future reference.
3.Turn off the computer and remove the computer system cover.
4.Before handling the hard disk drive, discharge any static electricity from yourself and your clothing. With one hand touch an unpainted metal surface on the computer chassis, then touch the ESD bag with the other hand for a minimum of two seconds.
5.Remove the hard drive from the ESD bag.
6.Unplug the computer.
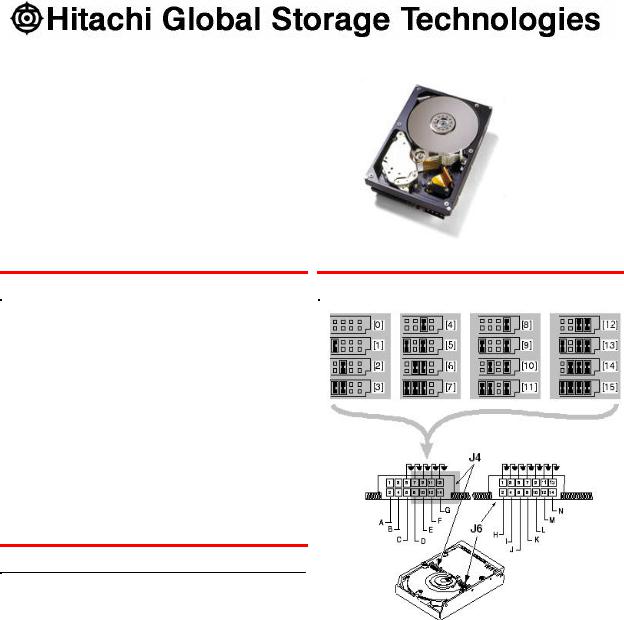
7.Assign a SCSI address (0 through 15) to the drive by installing a jumper on the appropriate ID bits (pin pairs D, E, F, and G) on jumper block J4 as shown on the shaded area in the illustration below.
Address 6 is the shipping default for 68-pin models Address 7 is normally reserved for the host adapter
8.Select the desired options by placing a jumper on the pin pair for that option. The options are listed below cross-referenced by a letter to the two jumper blocks in the above illustration. Refer to the Ultrastar 146Z10 product summary for a description of the options.
APin pair for LED connection
BTermination Power (68-pin model only)
CForce Single-ended Mode
HEnable Auto Spin (68-pin model) Disable Auto Spin (80-pin model
I Auto Start Delay
JDelay Start 6/12
KDisable Parity
LTarget Initiated Sync Negotiation M Disable Unit Attention
N Reserved
Page 1 |
version 1.0 |
 Loading...