


LE48W806
Models
LE55W806
55” Class (54.64” Diagonal)
LE48W806
48” Class (47.61” Diagonal)
Owner’s Guide
Image may differ from actual product.
Thank you for purchasing this Hitachi product. Please read these instructions carefully.
For additional assistance please call 1-888-333-1899(U.S.A. or Puerto Rico), or 01-800-700-4321(Mexico) or visit our
website at www.hitachi.us/tv.
Keep this owner's guide for future reference.
Record the model number and serial number of your LCD Television for future reference.
This information is located on the back of the television.
MODEL NUMBER SERIAL NUMBER
Simulated image.
TABLE OF CONTENTS
IMPORTANT SAFETY INSTRUCTIONS ....................................................................... 2-6
INSTALLING THE TABLETOP STAND 7
FIRST TIME USE
TV OPERATION ........................................................................................................13-19
CONNECTIONS
NETWORK SETTINGS
TROUBLESHOOTING ......................................
SPECIFICATIONS .......................................................................................................... 38
LIMITED WARRANTY ...............................................................................................
APPENDIXES................................................................................................................. 43
.......................................................................................................
TO OTHER EQUIPMENT .............................................................. 20-22
.....................................
.............................................................
10-12
.............................................................
.............................................................
23-35
36-37
39-40
ES-G122201

TO PREVENT ELECTRIC SHOCK, THIS APPLIANCE MUST BE CONNECTED TO AN OUTLET WITH A
PROTECTIVE EARTHING CONNECTION.
This TV has an Auto Shut Off feature that will automatically turn off the TV if there is no video signal detected within 15minutes.
Additionally this TV has LED backlighting which has greater energy saving benefits versus conventional CCFL type TV.
2

3
This apparatus shall be connected to a mains socket outlet with a protective earthing connection.
This product contains lead. Dispose of this product in accordance with applicable environmental laws .For product recycling and
disposal information,contact your local government agency or www.eRecycle.org (in California),the Electronic Industries Alliance at
www.eiae.org(in the US) or the Electronic Product Stewardship Canada at www.epsc.ca (In Canada).For more information,call
"1-888-333-1899."
(1) This device may not cause harmful interference and (2) This device must accept any interference received, including interference
that may cause undesired operation.
4

5
SAFETY PRECAUTIONS
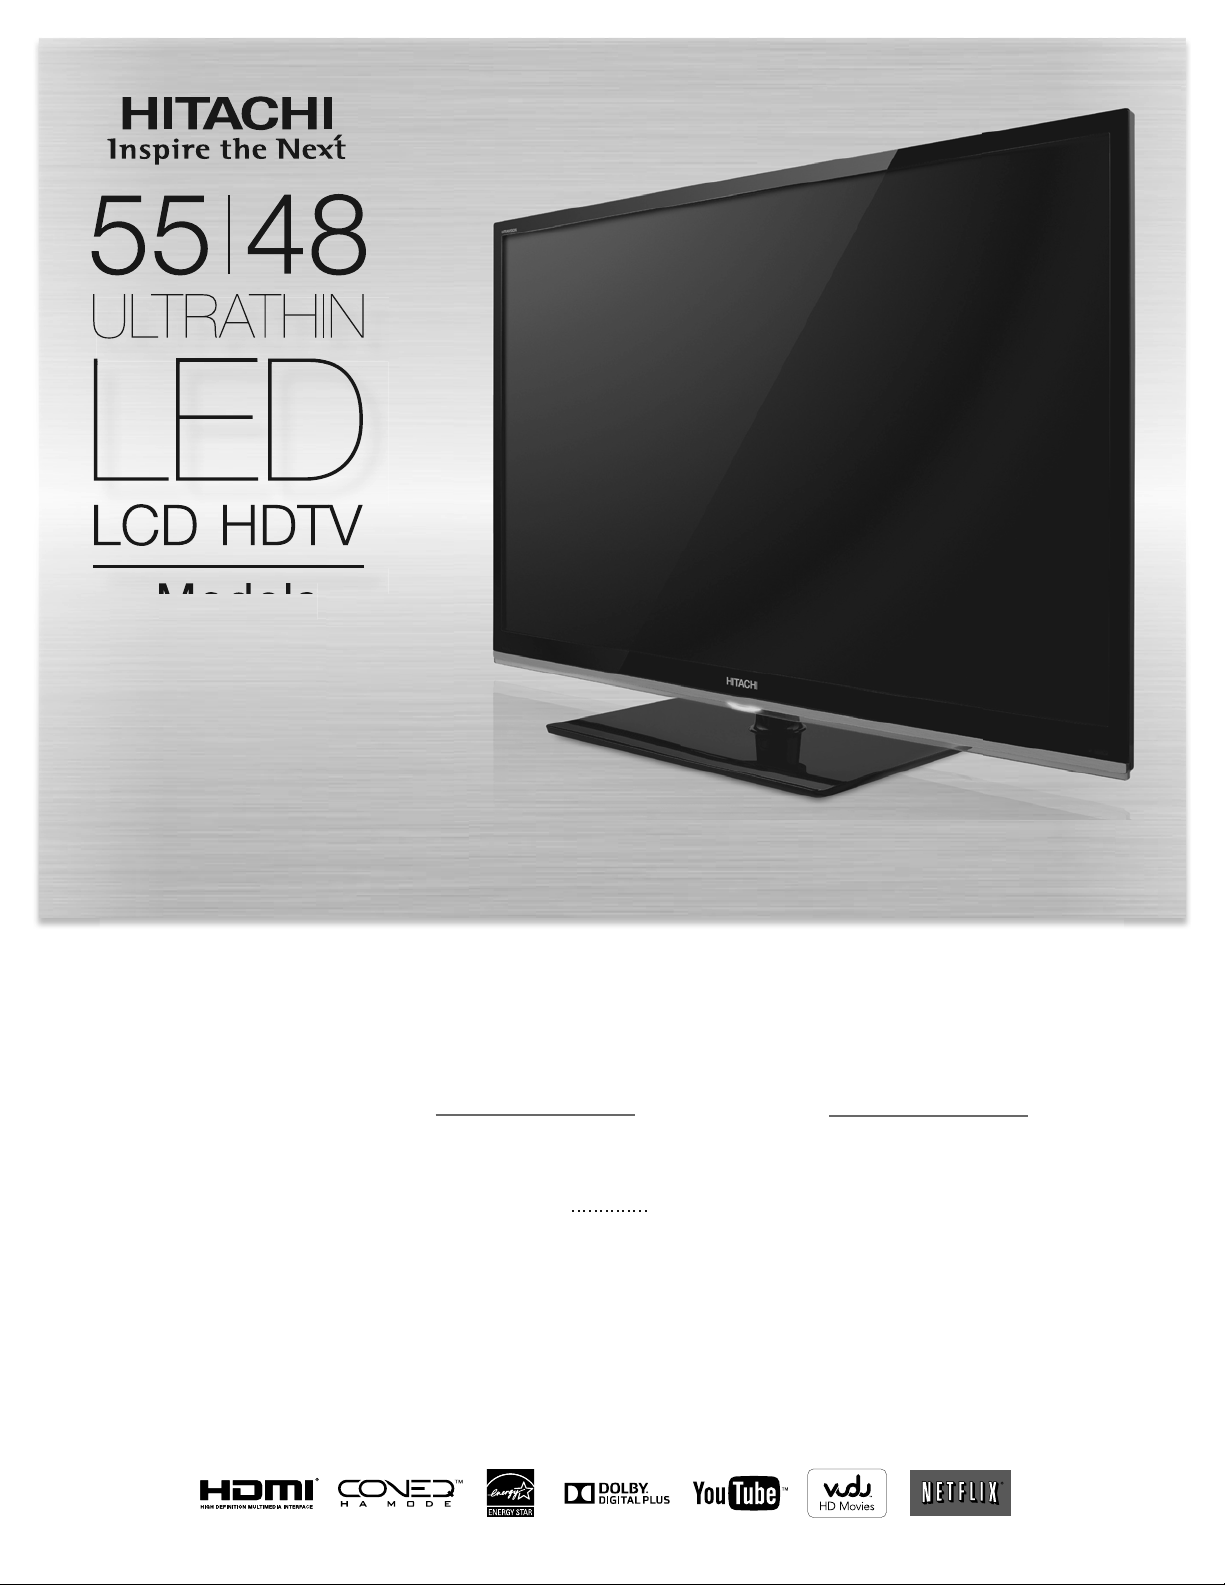
The unit emits heat when in operation. Do not place any covers or blankets on the unit, this may cause overheating. Do not block
ventilation holes, or set up near radiators. Do not place in direct sunlight. When placing on a shelf leave 4 inches (10 cm) free space
around the entire unit.
This TV is designed for tabletop or wall mounted use only. Please follow the guidelines below for safe use of this product.
4 inches
4 inches
Notes when mounting the LCD TV on a wall
If the unit is to be mounted on the wall, contact the retailer where you purchased the LCD
fessionally installed. Incomplete or improper installation may cause injury to you, and/or damage to the LCD TV.
The screws ISO M6 thread type should be used. The insertion length must be within 12 - 16mm.
If the insertion length is less than 12mm, the weight can not be maintained.
If the insertion length is more than 16mm, a space is created between the Wall Mount Bracket and the Television.
(Insertion Length) = (Screw Length) - (Washers Thickness) - (Mounting Bracket Thickness)
TV for advice, and have the equipment pro-
Securing to a Wall
1. Use metallic wire, clamp and screw (not provided) on the rear of the LCD TV as shown below.
2. Use proper hardware (drywall anchor, masonry screw, etc) to secure other end of wire to wall.
2.
4 inches
Wire
Wire
Clamp
Screw M6×12
Notice For Use With Included Tabletop Stand
If the unit is to be mounted on a cabinet smaller than length of the unit, it could result in an unstable location and the unit may tumble
over, creating a risk of personal, possibly fatal injury. Also, this would damage the product seriously. Accordingly, Hitachi accepts no
responsibility or liability for any injuries or property damage resulting from the improper installation.
YES !!
YES!!
NO !!
NO!!
6
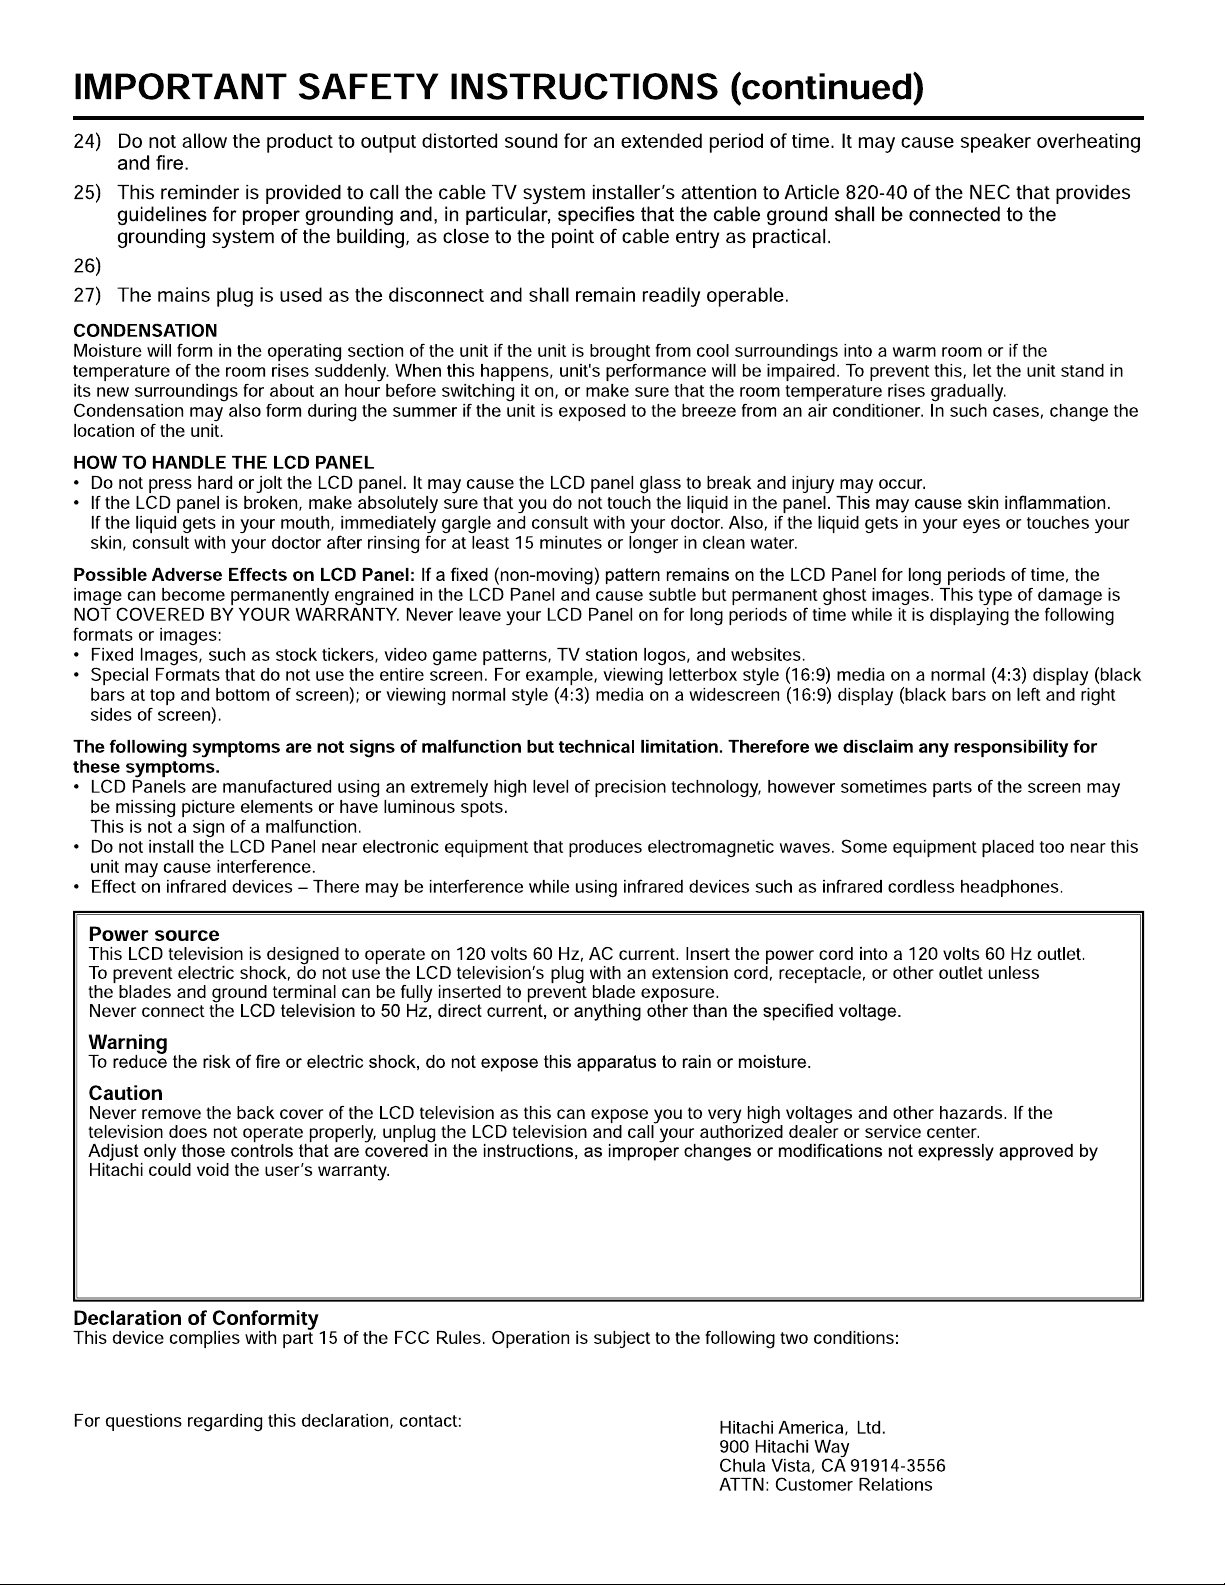
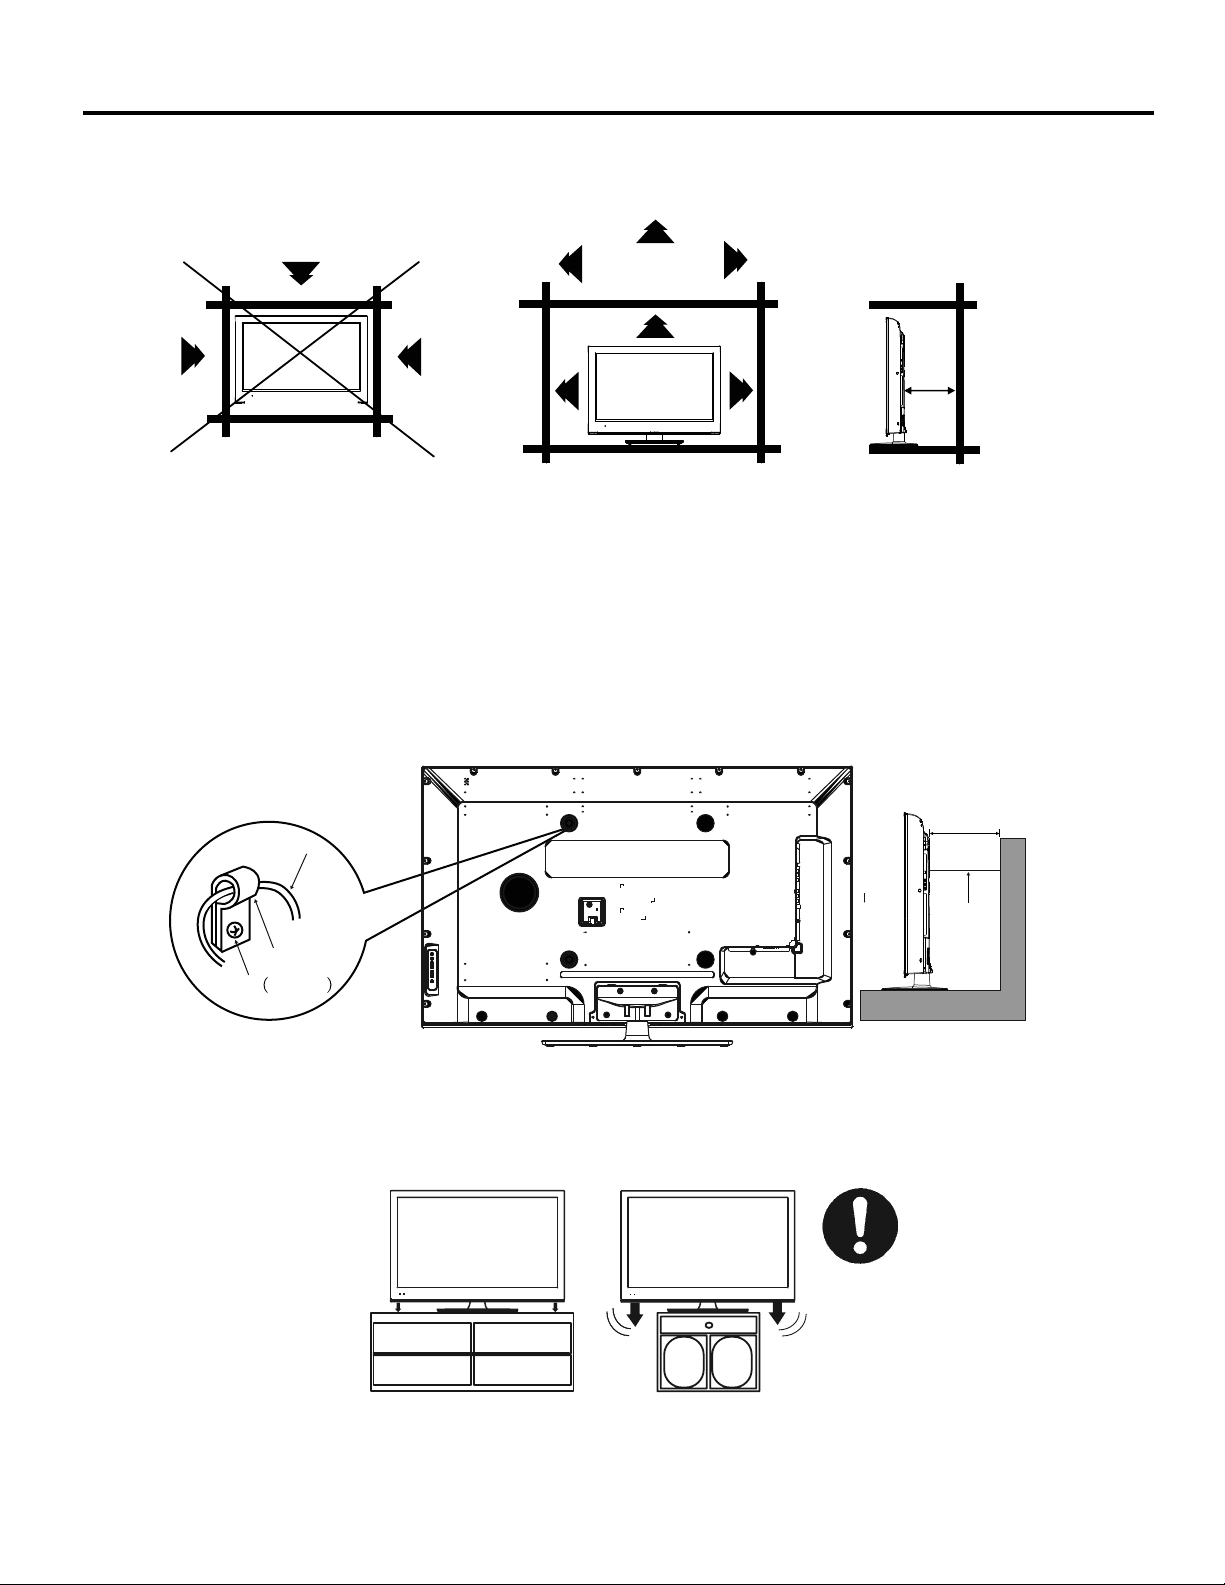
1 2
Installing the Tabletop Stand
1. Us e the four screws(GB/T 818-2000 M5x12) which are
in th e accessories bag to attach the base plate.
3 4
3. Use the two screws(SJ2822-87 ST4X14) which are
in th e accessories bag to attach the cover plate.
5
2. Use the two screws(GB/T818-2000 M4X12) which are
in th e accessories bag to attach the cover plate.
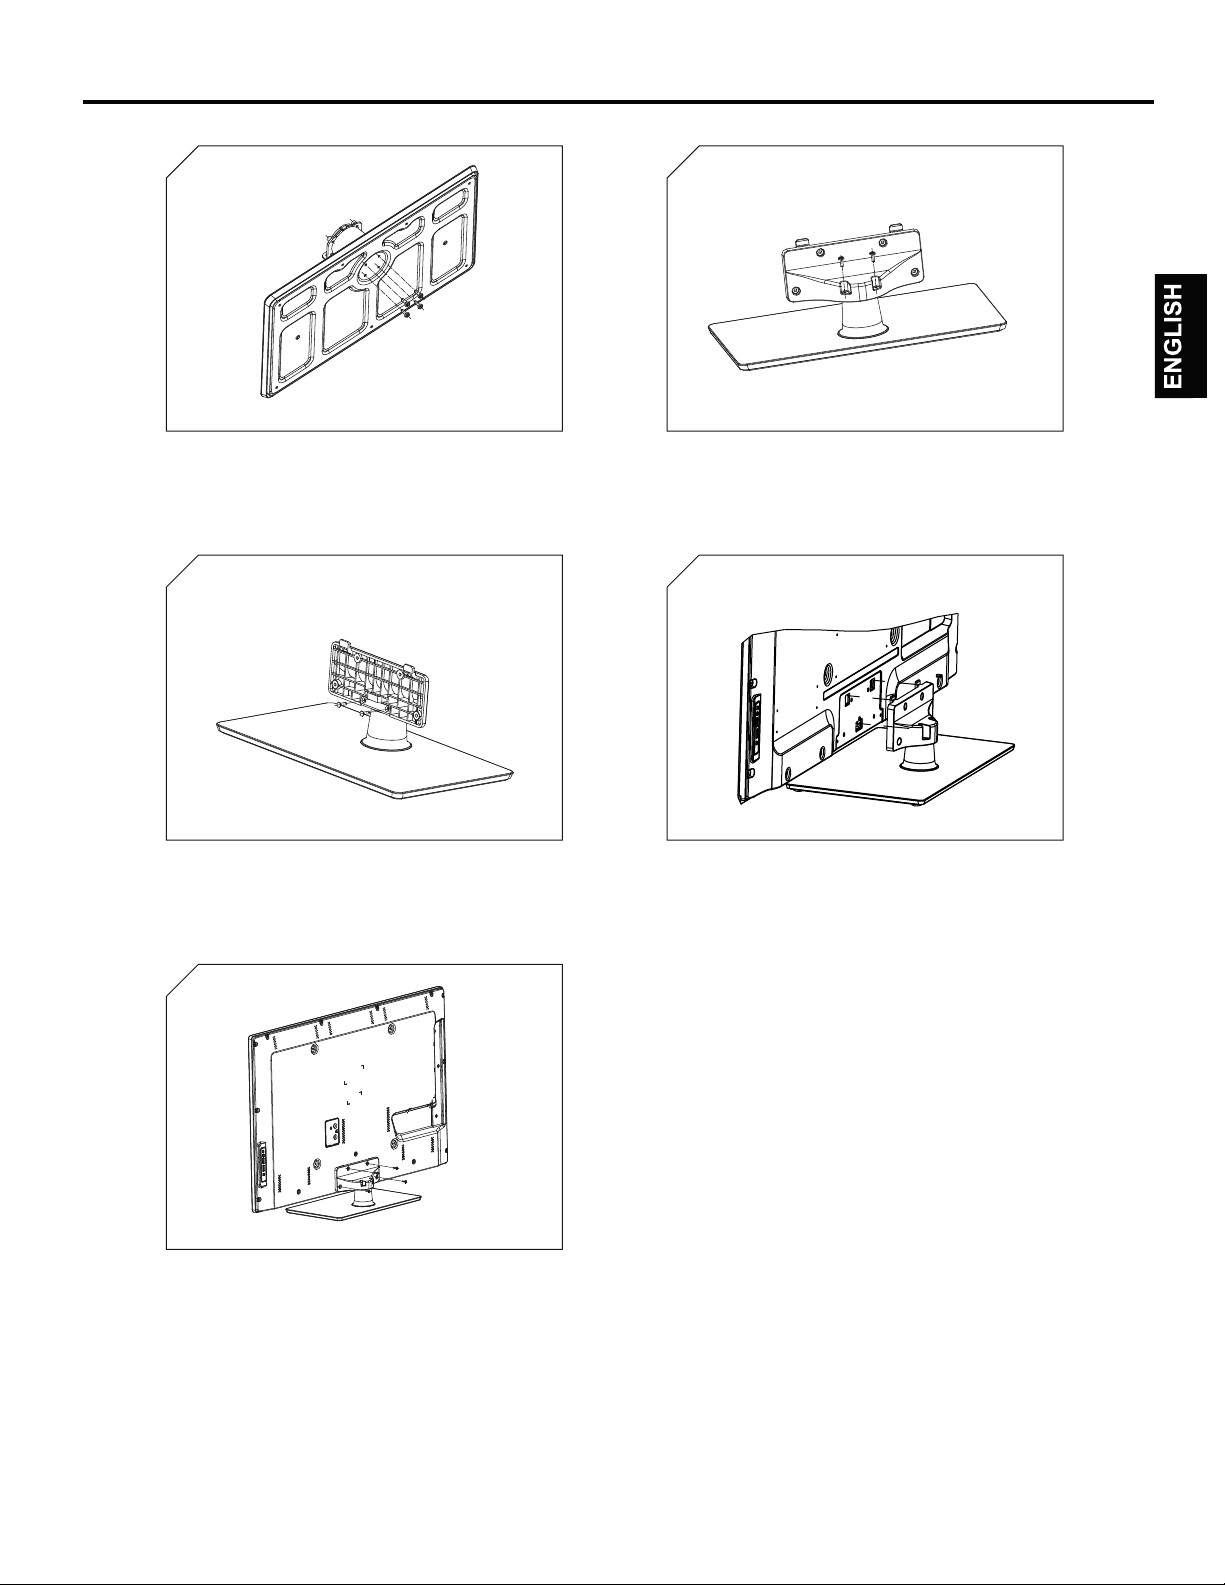
4. Please secure the assembled base are installed to
the TV. Make sure that the three hooks on the
the head bracket inserted into the three slots at the
rear of TV.
stand of
5.Use the four screws(GB/T818-2000 M5X12) which are in
the accessories bag to attach the base stand to the TV set.
7

Unique space saving design combines a 55"/ 48" LCD color TV with the 6 features noted below and more!
in accordance with FCC rules.
TM
Manufactured under license from Real Sound Lab. SIA. CONEQ is a trademark of Real Sound Lab, SIA.
TM
CONEQ delivers clear, rich sound using proprietary professional equalizing technology. Dialog is clear and music sounds
more dynamic when the speakers are perfectly optimized.
CONEQ HA MODE (Hearing Aid) technology produces natural sound for the hearing impaired. The listener can enjoy
details in music and clear dialog often without the help of a hearing aid.
TM
8
Before using your unit
IMPORTANT SAFETY INSTRUCTIONS
CHILD SAFETY NOTICE
SAFETY PRECAUTIONS
Installing the Tabletop Stand
Features
Power source
Contents
Location of controls
Remote control
Antenna connections
Cable TV connections
TV Operation
Starting setup
Using the Channels Menu
Using the Video Menu
Using the Audio Menu
Using the Setup Menu
Using the Parental Controls Menu
Advanced Features
2
5
6
7
8
8
9
10
11
12
12
13
14
14
16
16
17
Connections to other equipment
Network Settings
Network Connection
Connecting to a Wireless Network
Wireless Setting
Home Network Settings
Media Share Settings in computer
Setting to Share Files
Internet-based Services
VUDU HD Movies
VUDU Apps
Netflix
YouTube
Other
View the Shared Files on TV
Digital Media Player
Enjoy Video Files
Enjoy Music Files
Browse the Pictures
Other Information
Troubleshooting
Specifications
Limited Warranty
End User License Agreement for HITACHI DTV Software
End User License Agreement for Open Source Sofrware
Appendixes
20
23
23
25
26
27
27
28
29
30
31
32
32
32
33
33
33
34
35
36
38
39
41
42
43
9

0(18
,1387
92/
&+
32:(5
Power indicator3D emitter
red
Illuminates white when the TV is in on mode.
Selects input source to TV and used like remote control's ENTER key when
choosing an item in OSD menus.
Adjusts TV volume and used as Cursor Left and Right keys to navigate OSD menus.
3D emitter
Selects a TV channel and used as Cursor Up and Down keys to navigate OSD menus.
Sends signals to 3D glasses during playback of 3D movies and TV shows.
Do not put anything near the sensor,
as its function may be affected.
10
3( )
27
11
13
16. MUTE Button – To turn off the sound, press this button
once. The LCD TV will be silenced and the mute icon will
1
3
2
appear on the screen. The muting feature can be released by
pressing the MUTE button again or by pressing either of the
VOL(VOLUME) button.
17. Direct Input Key Buttons – Press to go Vudu/Netflix/DMP
18. Transport Keys – Use them with DMP/Vudu/ Netflix/HDMI
CEC features.
4
19. S.MODE – Press to select Sound mode.
20. P.MODE – Press to select Picture mode.
21. C.C.Button – Used to turn on/off the Closed Captions.
5
6
22. ASPECT Button – Press to change the picture size.
23. MTS/SAP Button – Press to change the audio language.
24. 3D Button – Press to open the 3D Menu.
25. SLEEP Button – To set the LCD TV to turn off after a
7
8
preset amount of time, use the SLEEP button on the remote
control.
9
ENTER
10
12
26. TIME Button – Press to display the time.
27. – Button – This button is the “-”button, used when
selecting digital channels.
28. Button – Press to display the application menu.
14
15
16
17
28
18
19
20
23
24
21
22
25
26
1. POWER Button – Press to turn the LCD TV’s power on/off.
2. Direct Input Key Buttons – Press to go to the
AV/COMP/RGB/HDMI.
3. INPUT Button – Press to change the TV’s input
4. Direct Channel Selection Button (0-9) – Allow direct
access to any channel of the LCD TV.
5. LAST CH Button – Pressing this button allows you to go
back to the previous channel selected. Press this button again
to return to the channel you were watching.
6. Color keys – Used for network features like VUDU.
7. MENU Button – Press to display the On-Screen menu.
8. EXIT Button – Press to exit the On-Screen menu.
9. CURSOR Buttons – Use to navigate and select
menu functions of the LCD TV.
10. ENTER Button – Press to enter or select functions for the
On-Screen menu.
11. RETURN Button – Return to the previous menu.
12. INFO Button – When you press this button, the current
information will the displayed on the screen.
13. FAV CH Button – Press to display favorite channels.
14. VOL(VOLUME) Buttons – Press the button to
increase, or the button to decrease the sound level.
15. CH(CHANNEL) Buttons – Press to change the
channels of the TV.
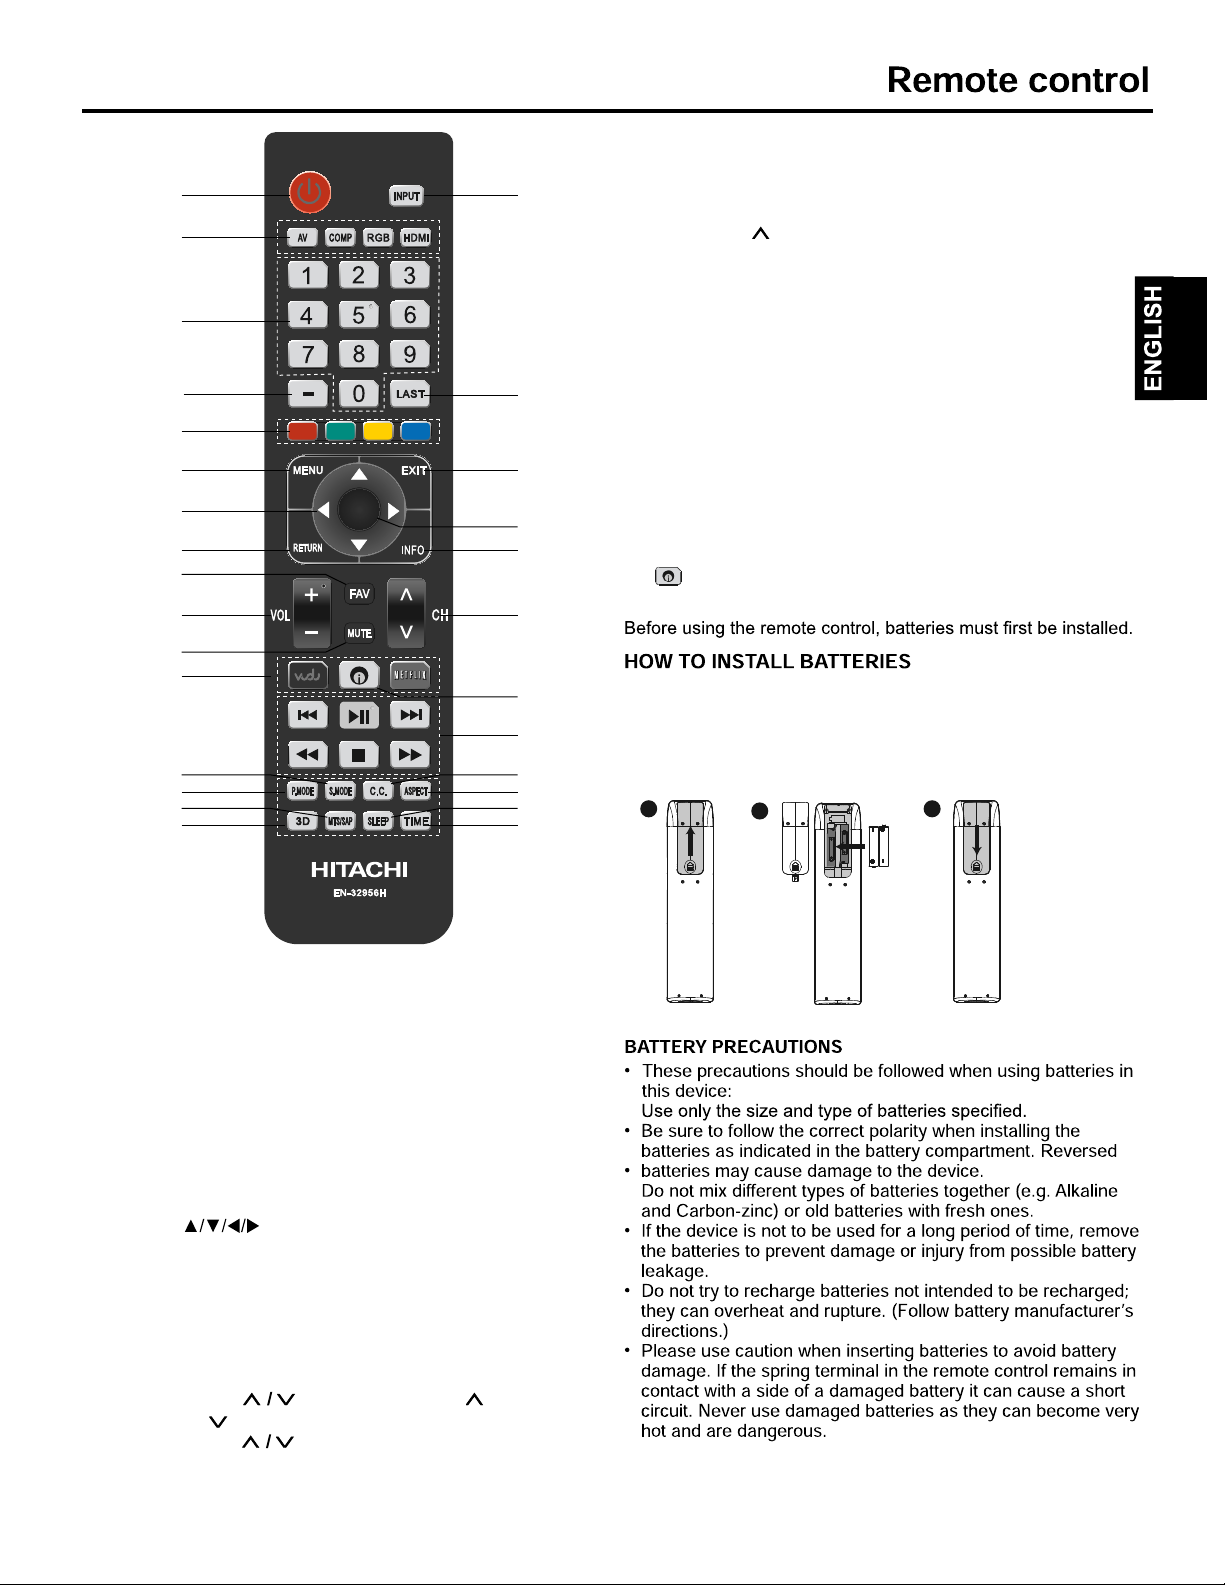
1. Slide open the battery cover on the back of the remote control.
2. Install two AAA size(1.5V) batteries. Match the “+” and “-”
signs on the batteries to the signs on the battery compartment.
3. Close the battery cover.
1
2
3
11
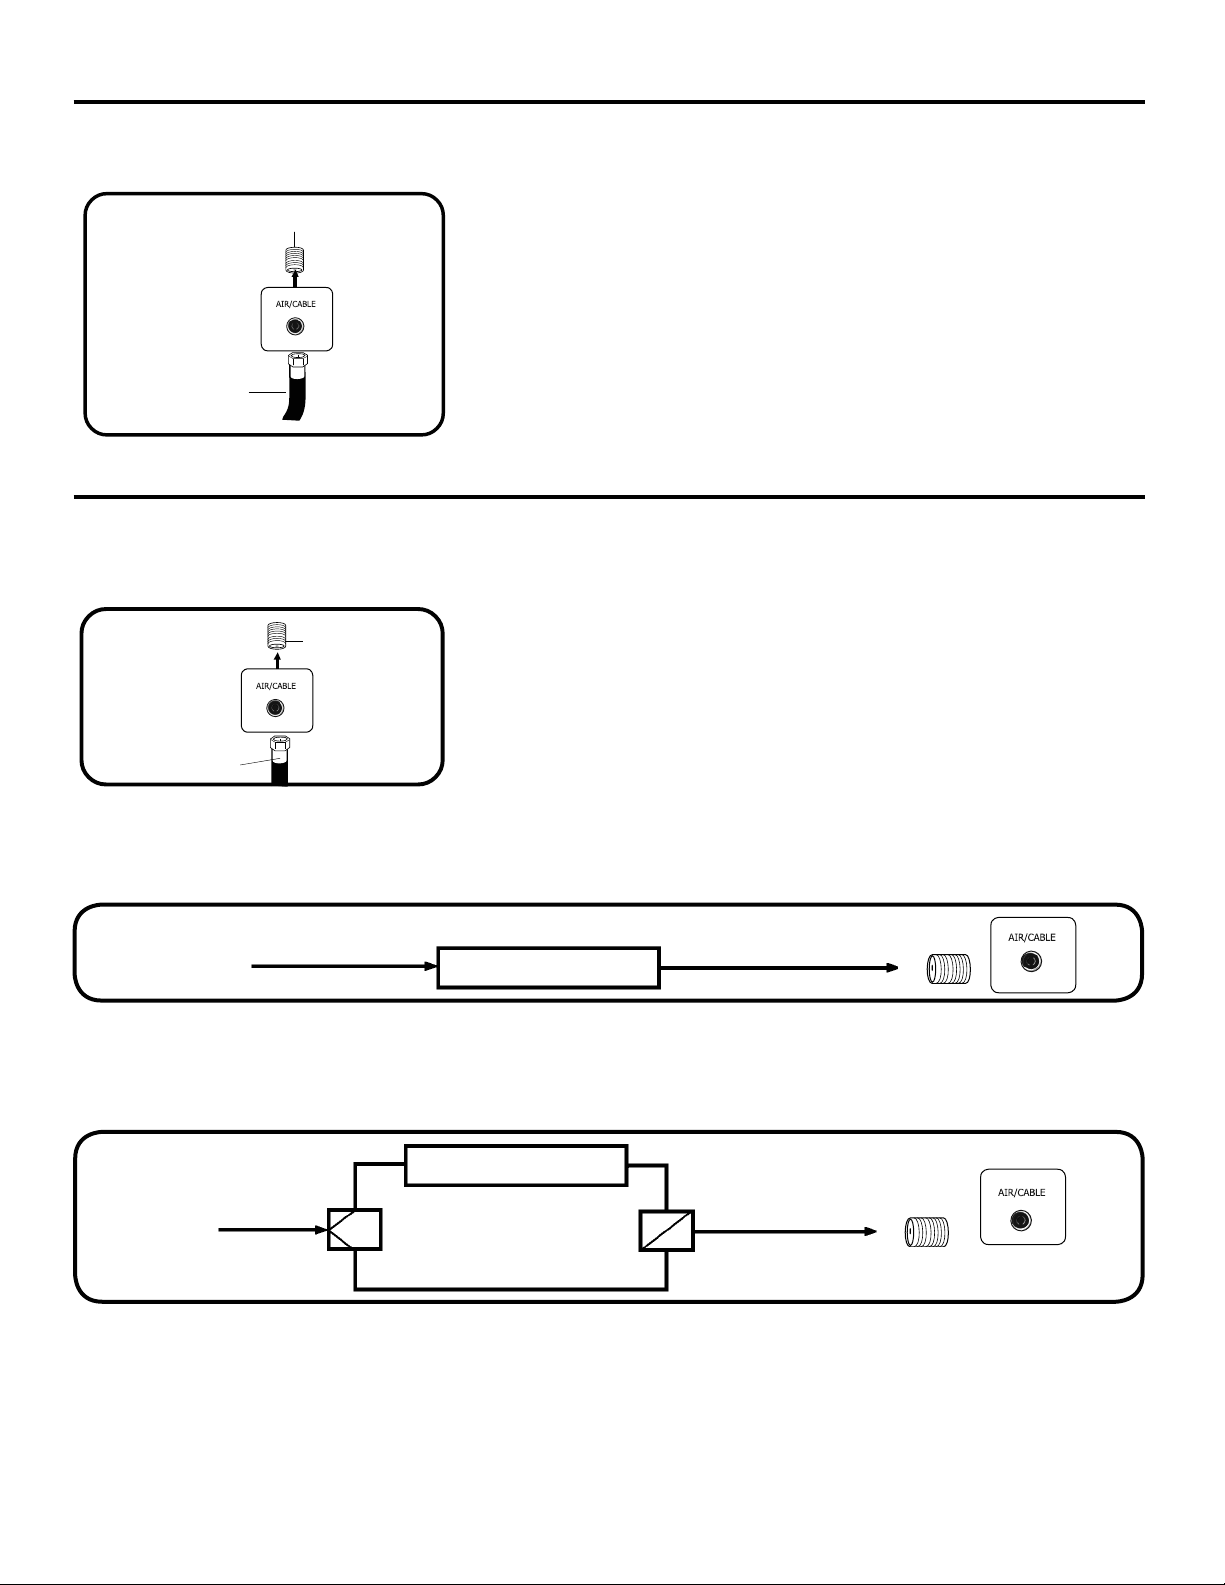
Antenna connections
If you are using an indoor or outdoor antenna, follow the instructions below that correspond to your antenna system. If you
are using a Cable TV service, see Cable TV connections.
Combination VHF/UHF Antenna (Single 75 ohm cable)
Antenna
Jack
75 ohm
Coaxial
Cable
Cable TV connections
This TV has an extended tuning range and can tune free access cable channels without using a Cable TV Converter box. Most
cable companies offer “premium pay channels” where the signal is scrambled. Descrambling these signals for normal
viewing requires the use of a descrambler device which is generally provided by the Cable TV company.
For subscribers to basic Cable TV service
For basic Cable TV service not requiring a Converter/Descrambler box, connect the
Antenna
Jack
75 ohm Coaxial Cable directly to the Antenna Jack on the back of the TV.
75 ohm
Coaxial Cable
For subscribers to scrambled Cable TV service
If you subscribe to a Cable TV service which requires the use of a Converter/Descrambler box, connect the incoming 75 ohm Coaxial
Cable to the Converter/Descrambler box. Using another 75 ohm Coaxial Cable, connect the output jack of the Converter/Descrambler
box to the Antenna Jack on the TV. Follow the connections shown below. Set the TV to the output channel of the Converter/
Descrambler box (usually channel 3 or 4) and use the Converter/Descrambler box to select channels.
Antenna
Incoming 75 ohm Cable TV Cable
Converter/
Descrambler
75 ohm Cable to TV
Jack
For subscribers to unscrambled Cable TV service with scrambled premium channels
If you subscribe to a Cable TV service in which basic channels are unscrambled and premium channels require the use of a
Converter/Descrambler box, you may wish to use a signal Splitter and an A/B Switch box (available from the Cable TV company
or an electronics supply store). Follow the connections shown below. With the switch in the “B” position, you can directly tune any
nonscrambled channels on your TV. With the switch in the “A” position, tune your TV to the output of the Converter/Descrambler box
(usually channel 3 or 4) and use the Converter/Descrambler box to tune scrambled channels.
Incoming
75 ohm
Cable TV
Cable
Splitter
Converter/
Descrambler
A/B Switch
75 ohm Cable to TV
A
B
Antenna
Jack
12
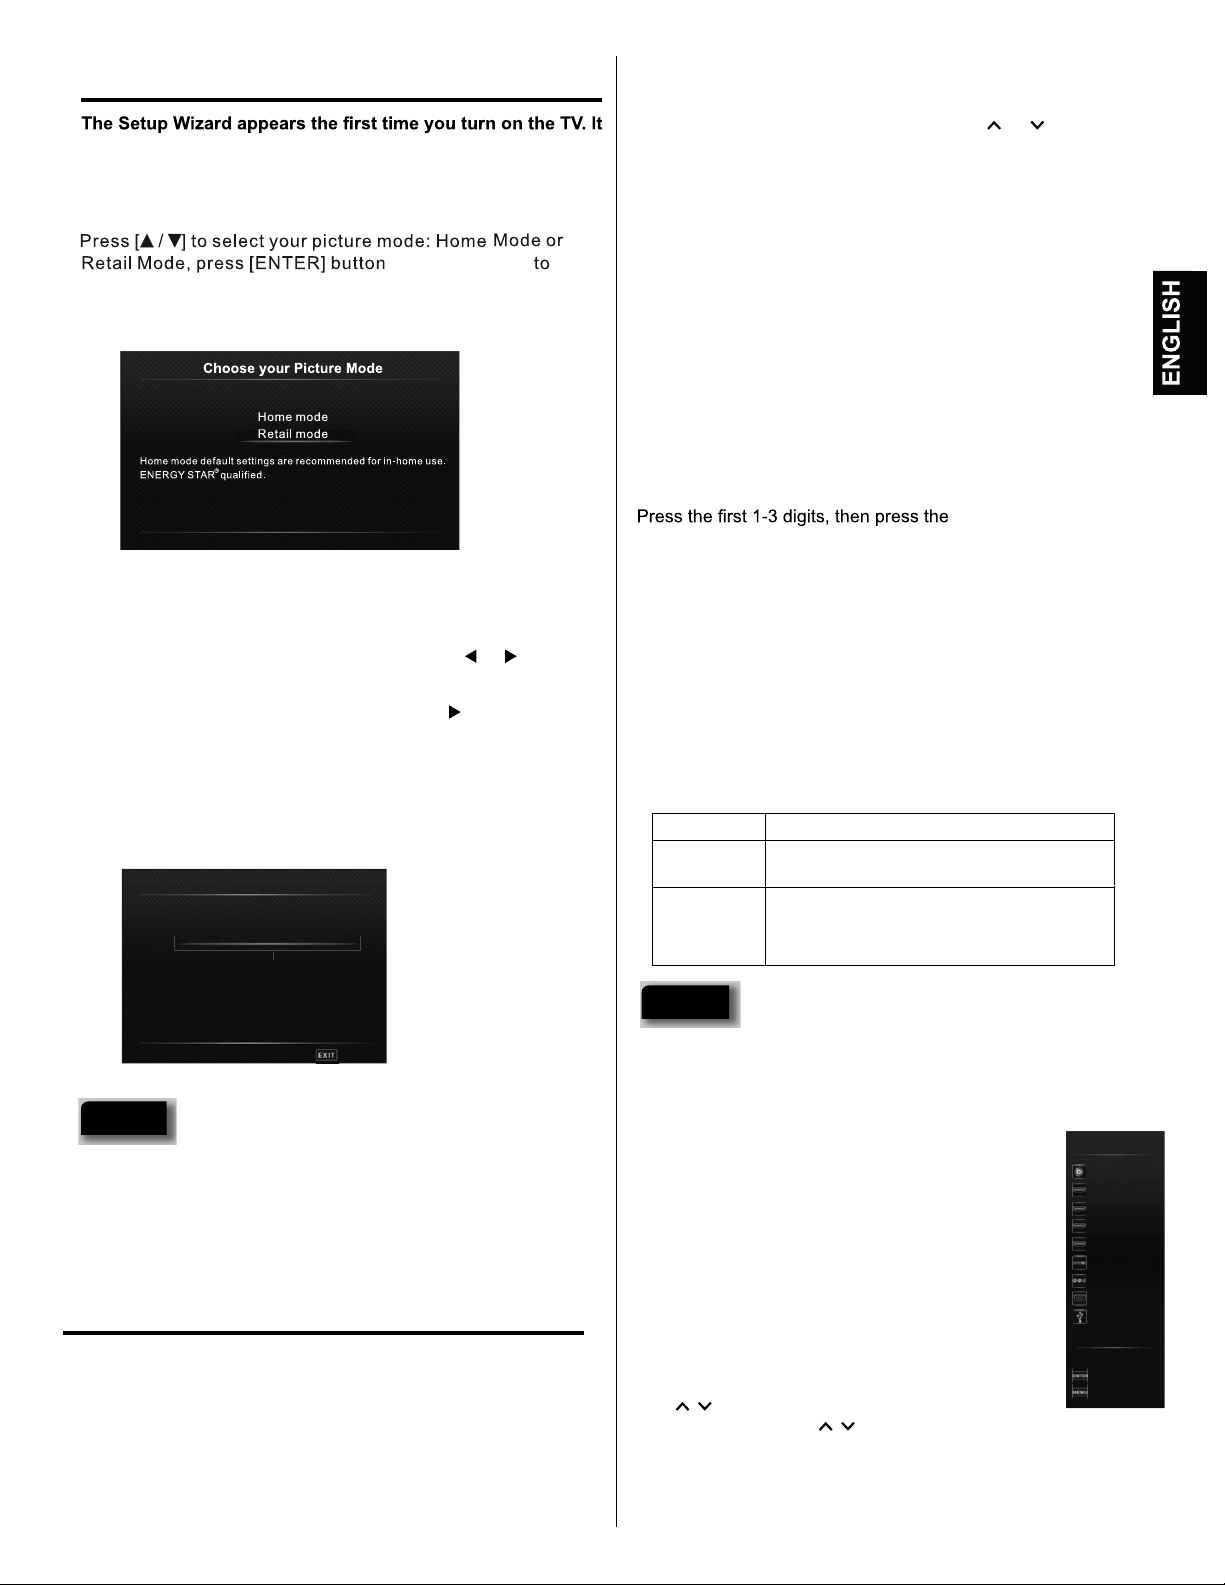
Starting setup
will assist you to specify the Air/Cable setting and program
your channels automatically.
IMPORTANT: Make sure that the antenna or cable TV system
connection is made.
on remote control
confirm. This product qualifies for ENERGY STAR in Home mode
default setting.
Retail mode is not an energy saving mode.
Adjust the volume level by pressing VOL or . The
2
volume level will be indicated on the screen by a volume bar.
Set the Source option to the appropriate position.
3
Press the Direct Channel Selection (0-9, –) buttons to
4
select the channel.
(If you press only the channel number, channel selection will
be delayed for a few seconds.)
TO SELECT ANALOG CHANNELS
1-9: Press 1-9 as needed. Example, to select channel
2, press 2, then press ENTER.
10-99: Press the 2 digits in order. Example, to select
channel 12, press 1 , 2, then press ENTER.
100-135: Press the 3 digits in order. Example, to select
channel 120, press 1, 2, 0, then press ENTER.
Retail mode is intended for in-store display and resets video
settings at Power On.
▲
Move
▼
To turn on the TV, press POWER (POWER indicator LED on the
1
▲
Select
front of the unit changes to white. It may take approx. 10 seconds
for a picture to appear on screen.). The
Setup Wizard
begins.
Press ▲ or ▼ to select “Source”, then press or to select
2
“Cable” or “Air”.
Press ▲ or ▼ to select “Scan”, then press or ENTER.
3
“Setup Wizard” will begin. After the Setup Wizard is
4
completed, the TV channel appears on the screen.
s
Depending on the reception condition, it may take up to 25
minutes or more to complete memorizing digital cable
channels. Please allow the process to complete without
interruption.
Please select your tuner mode:
Air
Air
Cable
▲
▲
▲
Move Select ExitReturn
▼
NOTE
s
If you press EXIT in the process of “Setup Wizard”, the Setup
Wizard stops and changes to the normal screen. When you
make a menu selection, your changes occur
immediately. You
do not have to press EXIT to see your changes.
TV operation
function
TO SELECT DIGITAL CHANNELS
– button followed by
the remaining number.
Example, to select channel 15-1, press 1, 5, –, 1, then press
ENTER.
s If a channel is selected with only audio content, “Audio
only” will be displayed on the screen.
s If a channel is selected with a weak digital signal, “Searching
for Signal....” will be displayed on the screen.
s The same program may be available on either an analog
channel or a digital channel. You may choose to watch
either format.
s If a channel is selected to which you have not subscribed,
“Scrambled Video” will be displayed on the screen.
VHF/UHF/CABLE CHANNELS
Air Cable
VHF
2-13
UHF
14-69
CATV
1-125
Digital Terrestrial Broadcast(8VSB):2-69
Digital cable(64/256 QAM):1-135
VHF
2-13
NOTES
s If a channel with no broadcast is selected, the sound will
automatically be muted.
s It may take a few seconds for a digital channel picture to
appear on screen after being selected.
To select the video input source
To view a signal from another device connected to
your LCD TV, such as a VCR player, press INPUT,
▲
then press or ,then press ENTER. You can
select Air/Cable, HDMI1, HDMI2, HDMI3, HDMI4,
Component, AV, RGB or USB depending on which
input jacks you used to connect your devices.
▼
INPUT
Air/Cable
HDMI 1
HDMI 2
HDMI 3
HDMI 4
Component
AV
RGB
USB
To turn on the TV, press POWER .
1
(POWER indicator LED on the front of the unit changes to white.
It may take approx. 10 seconds for a picture to appear on
screen.)
▲
Move
▼
Select
Exit
CH /
Press and release CH / . The channel automatically stops at
the next channel set into memory.
For proper operation, before selecting channels, they should be
set into the memory. Refer to the Channels Menu on page 14.
13
 Loading...