


HS903A-DZ
Manual Instruction HS803A-DZ
DZ-HS903A DZ-HS803A
Instruction Manual
(English)
DZ-HS903A
DZ-HS803A
DZ-HS903A
DZ-HS803A
Introduction
HDD/DVD/Cards
Battery Pack
Let’s Get Started
Recording — Viewing
Various Recording
Techniques
Dubbing on DVD
Editing
Viewing on the
Other Devices
Connecting to
Your PC
Additional
Information
Thank you for purchasing this Hitachi Camcorder.
Please read this Instruction Manual to understand its proper use. Before opening the CD-ROM included with this product, please read p.182.
After reading the Instruction Manual, store it safely.
The Instruction Manual contains an illustration of the DZ-HS803A on the cover page only.
QUICK GUIDE
|
This manual was printed |
|
with soy based ink. |
|
Printed on recycled paper |
QR74442 ©Hitachi, Ltd. 2008 |
Printed in Japan OY-K (I) |

Important Information
For Your Safety
The power switch turns the camcorder on and off, leaving the date/time feature unaffected. If the camcorder is to be left unattended for a long period of time, turn it off.
WARNING: TO PREVENT FIRE OR SHOCK HAZARD, DO NOT EXPOSE THIS UNIT TO RAIN OR MOISTURE.
WARNING: DANGER OF EXPLOSION IF BATTERY IS INCORRECTLY REPLACED. REPLACE ONLY WITH THE SAME OR EQUIVALENT TYPE.
WARNING: TO PREVENT FIRE OR SHOCK HAZARD,
BE SURE TO USE THE SPECIFIED AC ADAPTER/
CHARGER (DZ-ACS3).
The camcorder and AC adapter/charger have the following caution marks.
CAUTION
RISK OF ELECTRIC SHOCK
DO NOT OPEN
CAUTION: TO REDUCE THE RISK OF ELECTRIC SHOCK, DO NOT OPEN.
NO USER-SERVICEABLE PARTS INSIDE. REFER SERVICING TO QUALIFIED SERVICE PERSONNEL.
Identifications of caution marks
This symbol warns the user that uninsulated voltage within the unit may have sufficient magnitude to cause electric shock. Therefore, it is dangerous to make any kind of contact with any inside part of this unit.
This symbol alerts the user that important literature concerning the operation and maintenance of this unit has been included. Therefore, it should be read carefully to avoid any problems.
Precautions
WARNING: Many television programs and films are copyrighted. In certain circumstances, copy-right law may apply to private in-home videotaping of copyrighted materials.
The liquid crystal display (LCD) panel is made by highly precise technology. More than 99.99% of its picture elements (pixels) are effective, but some (less than 0.01%) may appear as colored bright dots. This does not indicate a fault as the LCD panel stretches the limits of current technology.
CLASS 1
LASER PRODUCT
CAUTION
This product contains a laser diode of higher class than 1. To ensure continued safety, do not remove any covers or attempt to gain access to the inside of the product. Refer all servicing to qualified personnel.
Avoid using and storing the battery pack in places subject to direct sunlight, high temperatures, or near a flame source.
2

Warning: This device complies with Part 15 of the FCC Rules. Operation is subject to the following two conditions: (1) This device may not cause harmful interference, and
(2) this device must accept any interference received, including interference that may cause undesired operation.
Note: This equipment has been tested and found to comply with the limits for a Class B digital device, pursuant to Part 15 of the FCC Rules. These limits are designed to provide reasonable protection against harmful interference in a residential installation. This equipment generates, uses, and can radiate radio frequency energy and, if not installed and used in accordance with the instructions, may cause harmful interference to radio communications. However, there is no guarantee that interference will not occur in a particular installation. If this equipment does cause harmful interference to radio or television reception, which can be determined by turning the equipment off and on, the user is encouraged to try to correct by one or more of the following measures:
•Reorient or relocate the receiving antenna.
•Increase the separation between the equipment and receiver.
•Connect the equipment into an outlet on a circuit different from that to which the receiver is connected.
•Consult the dealer or an experienced radio/TV technician for help.
Caution to the user: Changes or modifications not expressly approved by the manufacturer void the user’s authority to operate the equipment.
Microsoft®, Windows®, Windows® XP and Windows Vista® are registered trademarks of Microsoft Corporation.
Intel® and Pentium® Processor are registered trademarks of Intel Corporation. Intel® Core™ is a trademark of Intel Corporation.
Macintosh is a trademark of Apple, Inc.
IBM® and PC/AT® are registered trademarks of International Business Machines Corporation.
Manufactured under license from Dolby Laboratories.
“Dolby” and the double-D symbol are trademarks of Dolby Laboratories. SD logo is a trademark.
Other company names and product names listed are trademarks or brand names belonging to each individual company.
3

IMPORTANT SAFETY INSTRUCTIONS
1Read these instructions.
2Keep these instructions.
3Heed all warnings.
4Follow all instructions.
5Do not use this apparatus near water.
6Clean only with dry cloth.
7Do not block any ventilation openings. Install in accordance with the manufacturer’s instructions.
8Do not install near any heat sources such as radiators, heat registers, stoves, or other apparatus (including amplifiers) that produce heat.
9Do not defeat the safety purpose of the polarized or grounding-type plug. A polarized plug has two blades with one wider than the other. A grounding type plug has two blades and a third grounding prong. The wide blade or the third prong are provided for your safety. If the provided plug does not fit into your outlet, consult an electrician for replacement of the obsolete outlet.
10Protect the power cord from being walked on or pinched particularly at plugs, convenience receptacles, and the point where they exit from the apparatus.
11Only use attachments/accessories specified by the manufacturer.
12Use only with the cart, stand, tripod, bracket, or table specified by the manufacturer, or sold with the apparatus. When a cart is used, use caution
when moving the cart/apparatus combination to avoid injury from tip-over.
13 Unplug this apparatus during lightning storms or when unused for long periods of time.
14Refer all servicing to qualified service personnel. Servicing is required when the apparatus has been damaged in any way, such as power-supply cord or plug is damaged, liquid has been spilled or objects have fallen into the apparatus, the apparatus has been exposed to rain or moisture, does not operate normally, or has been dropped.
15Do not drip or splash liquids onto the camcorder or place the camcorder near objects filled with liquid such as vases.
16Use the equipment (AC adapter/Charger) near a power outlet with easy accessibility.
17Do not cover the camcorder with a cloth while using nor use the camcorder in a ill-ventilated space such as in a box or bookcase.
4

Table of Contents |
|
Important Information ............................ |
2 |
For Your Safety ...................................... |
2 |
Precautions.............................................. |
2 |
IMPORTANT SAFETY |
|
INSTRUCTIONS ............................... |
4 |
Introduction |
8 |
This camcorder makes all of the following |
|
possible! .......................................................... |
8 |
Choosing a disc to suit your purpose .............. |
9 |
How to Read this Instruction Manual................... |
9 |
Before Using the Product |
|
- Be sure to read this information - ............... |
11 |
Checking Provided Accessories ......................... |
13 |
Names of Parts.................................................... |
14 |
How to Open and Use the LCD Monitor ........... |
19 |
How to Change the LCD Brightness.................. |
20 |
Let’s Get Started |
21 |
Preparing ............................................................ |
21 |
Setting up the battery pack............................ |
21 |
Turning on the Power.................................... |
22 |
Changing the display language ..................... |
22 |
Setting the date and time............................... |
23 |
Recording Movies to the HDD........................... |
24 |
Recording Movies to a DVD.............................. |
25 |
Recording Stills to an SD card ........................... |
27 |
Playing Recorded Movies/Stills ......................... |
28 |
Deleting Recorded Movies/Stills........................ |
29 |
Functions and Characteristics of |
|
HDD/DVD/Cards |
30 |
About HDD/DVD ......................................... |
31 |
About cards ................................................... |
33 |
Cautions for discs and cards.......................... |
33 |
Inserting a DVD............................................ |
34 |
When loading a new DVD-RW/+RW .......... |
36 |
Battery Pack |
37 |
CHARGE lamp status and charging time ..... |
37 |
Recording time with a fully charged battery. 37 |
|
Connecting the camcorder to a wall outlet.... |
38 |
Detaching the DC power cord/battery pack from |
|
the camcorder .......................................... |
38 |
Efficient Use of the Battery .......................... |
39 |
Recording |
40 |
Recording Movies .............................................. |
40 |
Using the Quick Start function ..................... |
41 |
Information Display During Recording ........ |
42 |
Recording Still Pictures...................................... |
45 |
Viewing |
47 |
Playback (Watching Your Recordings).............. |
47 |
Playing back the last recorded scene ............ |
47 |
Deleting the last recorded scene ................... |
48 |
Choosing and playing back a scene .............. |
48 |
Choosing and playing back multiple scenes . 49 |
|
Jumping to the designated scene................... |
50 |
Adjusting speaker volume during movie |
|
playback................................................... |
52 |
Information Display During Playback .......... |
52 |
Simple functions you can use during playback |
|
or playback pause .................................... |
54 |
Playing still pictures on a card automatically |
|
(Slide Show) ........................................... |
55 |
Capturing a still picture from a movie |
|
(PHOTO Capture).................................... |
56 |
Playing back scenes repeatedly |
|
(Repeat Play) ........................................... |
56 |
Various Recording Techniques |
57 |
How to Operate the Menu .................................. |
57 |
Menu (While Recording).................................... |
58 |
How to use the LCD setup and initial setup . 60 |
|
About the demonstration function ................ |
61 |
Magnified Recording |
|
(Optical Zoom and Digital Zoom) ................ |
62 |
Recording at Close Range (Macro Recording) .. 63 |
|
Using the Separately-Sold Lenses to Increase the |
|
Wide-Angle or Telephoto Effect .................. |
63 |
Adjusting the Focus Manually (Manual Focus). 64 |
|
Adjusting the Brightness of the Image |
|
(Exposure)..................................................... |
66 |
Compensating for Backlight |
|
(Backlight Compensation) ............................ |
67 |
Selecting a Program AE Mode to Match the |
|
Conditions (Program AE) ............................. |
67 |
Adjusting the Color (White Balance)................. |
68 |
Setting the white balance manually (Set)...... |
70 |
Using the Electronic Image Stabilizer (EIS) ...... |
71 |
Reducing Wind Noise During Recording .......... |
71 |
Restoring all the Recording Settings to Default |
|
(Full Auto) .................................................... |
72 |
5

Using the Flash .................................................. |
72 |
Turning Off the Recording Indicator Beneath the |
|
Lens .............................................................. |
74 |
Changing the Movie Quality (VIDEO Mode)... |
75 |
Recording Movies for Wide-Screen TVs (16:9) 75 |
|
Changing Still Picture Quality (Quality) ........... |
77 |
Inputting Audio and Video Signals From an |
|
External Device (Input Source) |
|
(DZ-HS903A)............................................... |
78 |
Changing Capturing Still Picture Quality for |
|
External Input (PHOTO Input) |
|
(DZ-HS903A)............................................... |
78 |
Using the Self-Timer ......................................... |
79 |
Dubbing on DVD |
80 |
First Dubbing (“New”) ...................................... |
82 |
Dubbing All Scenes Recorded on the Same Day |
|
(“Date”) ........................................................ |
83 |
Dubbing All Scenes Recorded on the HDD |
|
(“All”)........................................................... |
84 |
Dubbing Scenes Selected (“Select”).................. |
85 |
Displaying only Dubbed or Not Dubbed Scenes |
|
(Category)..................................................... |
86 |
Clearing the dub marks on Thumbnails |
|
(MARK OFF)............................................... |
86 |
Editing |
87 |
Menu Items for the Disc Navigation ................. |
88 |
Menu flows for the disc navigation.............. |
90 |
Choosing Scenes by Program ............................ |
92 |
Switching to the display arranged by program |
|
(Program) ................................................ |
92 |
Playing back a program (Play)..................... |
93 |
Renaming the title of a program (Title)........ |
93 |
Playlist ............................................................... |
95 |
What is “Playlist”? ....................................... |
95 |
Creating a new Playlist (Create Playlist)...... |
96 |
Displaying a desired Playlist (Playlist) ........ |
97 |
Playing back a Playlist (Play)....................... |
97 |
Adding scenes to a Playlist (Edit) ................ |
98 |
Deleting scenes from Playlist (Edit)............. |
99 |
Adding scenes using the Submenu for Editing |
|
(Edit) ....................................................... |
99 |
Deleting scenes using the Submenu for Editing |
|
(Edit) ..................................................... |
100 |
Selecting scenes using the Submenu for Editing |
|
(Edit) ..................................................... |
100 |
Arranging the order of scenes in the Playlist |
|
(Edit) ..................................................... |
101 |
Renaming the title of a Playlist (Title)....... |
101 |
Deleting a Playlist (Delete) ........................ |
102 |
Deleting Scenes (Edit – Delete)....................... |
102 |
Dividing a Movie (Edit – Divide).................... |
103 |
Combining Multiple Scenes (Edit – Combine) 105 |
|
Adding Special Effects (Edit –Fade) ............... |
106 |
Skipping Scenes (Effect – Skip)..................... |
107 |
Changing Thumbnail Image |
|
(Effect – Thumbnail)................................. |
108 |
Go To............................................................... |
109 |
Copying still pictures on a DVD-RAM to the Card |
|
(Copy)......................................................... |
109 |
Locking Scenes on a Card (Lock) ................... |
110 |
Displaying Information Using the Menu Screen |
|
(Detail) ....................................................... |
111 |
Formatting the HDD/DVD/CARD.................. |
112 |
Protecting the HDD/DVD................................ |
113 |
Checking the Remaining Recording Capacity on |
|
the Medium (Capacity)............................... |
114 |
Displaying Movies or Stills Independently |
|
(Category)................................................... |
114 |
Viewing on the Other Devices |
115 |
Connecting to Your TV for Viewing............... |
115 |
Connecting to a TV .................................... |
115 |
Viewing on your TV .................................. |
116 |
Setting the on-screen display output On/Off |
|
(OSD Output)........................................ |
116 |
Playing back wide-mode images on a 4:3 TV |
|
(TV Type) ............................................. |
117 |
Viewing on Other Players/Recorders .............. |
118 |
About DVD-RW (VF mode)/DVD-R Discs and |
|
Finalization................................................. |
118 |
About +RW Discs and Finalization................. |
118 |
About DVD-RW (VR Mode) Discs and |
|
Finalization................................................. |
119 |
Playing back a DVD-RAM Disc on a DVD Player/ |
|
Recorder ..................................................... |
119 |
Notes on Finalization....................................... |
119 |
Finalizing a Disc.............................................. |
120 |
Unfinalizing a Disc.......................................... |
121 |
Dubbing With Another Audio/Video |
|
(A/V) Device |
122 |
Dubbing from another A/V device |
|
(DZ-HS903A) ....................................... |
122 |
Dubbing from the camcorder to another A/V |
|
device .................................................... |
124 |
6

Connecting to Your PC |
125 |
Software installation ................................... |
128 |
Preparation before importing images.......... |
130 |
Connecting the camcorder to your PC using the |
|
provided USB cable............................... |
130 |
How to remove/replace a DVD or remove a card |
|
during the connection ............................ |
132 |
Using a PC’s DVD drive to read a DVD |
|
recorded on the camcorder .................... |
133 |
Before terminating PC connection (removing |
|
the USB cable) and changing the power |
|
switch setting ......................................... |
134 |
How to Use the Software.................................. |
135 |
Uninstalling the software ............................ |
145 |
Precautions When Connecting to a PC............. |
145 |
Contact Information ......................................... |
146 |
Additional Information |
147 |
Optional Accessories........................................ |
147 |
Attaching the Shoulder Strap (Commercially |
|
Available).................................................... |
147 |
Error Messages ................................................. |
148 |
Troubleshooting................................................ |
157 |
Cautions on Use of this Product |
|
- Be sure to read this information - ............. |
167 |
System Reset .................................................... |
172 |
Major Specifications......................................... |
173 |
Glossary............................................................ |
178 |
Index................................................................. |
179 |
Be sure to read the following before opening the |
|
package of CD-ROM .................................. |
182 |
To Order in the United States........................... |
183 |
7

Introduction
Introduction
This camcorder makes all of the following possible!
Record movies and stills with this one device!
Stills Movies
Various media
HDD
DVD
SD card
After recording
View on large screen by hooking up the camcorder to a TV!
View on the TV
AV Cable
S Cable
View on the
LCD monitor
After Watching
Store the recordings! Create a gift disc! Select a disc easily!
Dubbing Menu
New |
All |
Date |
Select |
Dubbing the scene which
isn't dubbed in HDD.
 ENTER
ENTER  EXIT
EXIT
DVD-RAM/ DVD-RW/ DVD-R +RW
8

Choosing a disc to suit your purpose
Do you want to delete/edit images using this camcorder?
Do you want to play the disc on a DVD player/recorder?
Do you want to reuse the disc?
|
|
|
|
|
|
|
YES |
|
|
|
|
NO |
|
|
||
|
|
|
|
|
|
|
|
|
|
|
|
|
|
|
|
|
|
|
|
|
|
|
|
|
|
|
|
|
|
|
|
|
|
|
|
|
|
|
|
|
|
|
|
|
|
|
|
One-time |
||
Re-recordable |
|
Re-recordable |
|
|
||||||||||||
|
|
|
recording |
|||||||||||||
|
|
|
|
|
|
|
|
|
|
|
|
|
|
|||
DVD-RAM |
|
|
|
DVD-RW |
|
DVD-RW |
|
|
+RW |
|
DVD-R |
|||||
|
|
|
(VR mode) |
|
(VF mode) |
|
|
|
||||||||
|
|
|
|
|
|
|
|
|
|
|
|
|
||||
Playable on devices that are compatible with 8 cm DVD-RAM or 8 cm DVD-RW (VR mode) accordingly.
*For details, refer to the standards stated in "Recording format" (p.174).
Playable on most other DVD players/recorders once they are finalized after recording.
*For details, refer to the standards stated in "Recording format" (p.174).
Introduction
How to Read this Instruction Manual
This Instruction Manual is intended for the DZ-HS903A and DZ-HS803A models. The following table shows the differences between the two models.
|
DZ-HS903A |
DZ-HS803A |
|
HDD (Hard Disk Drive) Capacity |
Approx. 30 GB |
Approx. 8 GB |
|
|
|
|
|
Maximum movie recording time |
Approx. 11 hours |
Approx. 3 hours |
|
(FINE mode) |
(FINE mode) |
||
|
|||
External input function |
Equipped |
Not equipped |
|
|
|
|
About operations using the cursor
Use the cursor d/c/f/eto select the items that appear on the LCD screen. This manual indicates the cursor operations using the symbol  .
.
For details on how to operate the cursor, see "How to Operate the Menu" (p.57).
9

Introduction
About media descriptions
The camcorder functions available vary depending on the media (HDD/DVD/ Card) used. Refer to the icon headings shown below to determine whether the function explained complies with the media in use.
HDD |
RAM |
-RW(VR) |
-RW(VF) |
R |
+RW CARD |
Collective |
|
Icon |
Media |
term |
|
||
|
|
|
|
HDD |
|
|
Built-in hard disk drive (HDD) |
|
|
||
|
|
|
|
|
|
|
|
|
|
|
DVD-RAM |
|
|
|
|
|
|
|
DVD-RW (VR mode) |
|
|
|
|
DVD |
|
|
DVD-RW (VF (Video) mode) |
DVD-R
+RW
SD memory card
Card CARD miniSD memory card (exclusive adapter required) microSD memory card (exclusive adapter required)
Displays in the Instruction Manual
The display messages are omitted in this manual. Please use the LCD display of your camcorder to check the messages.
10
Before Using the Product
- Be sure to read this information -
Conduct test recording.
•Before recording important shots, always conduct test recording to confirm that images are normally recorded.
Recording surface
• |
Single-sided disc: unlabeled side. |
|
• |
Double-sided disc: both sides. |
|
|
Single-sided disc |
Double-sided disc |
|
Labeled side |
Recording side |
|
Recording side |
Recording side |
How to hold a disc
For correct recording
•Do not touch the recording surface of a disc.
•Check that a disc recording surface is not dirty or scratched.
•If the recording surface is dirty, wipe it clean using a soft cloth.
Caution on disc loading
• Never touch the pickup.
Caution on vibrations and impacts
•While the ACCESS/PC indicator (p.14) is lit, do not subject the camcorder to strong vibrations or impacts. Caution should be particularly observed while the indicator remains lit for a while after the end of recording.
About DVD
•We recommend using Hitachi Maxell brand discs. The compatibility of the discs with this camcorder is confirmed.
Use a soft cloth and gently wipe the disc surface from the inner to the outer region.
pickup
•If there is concern that the camcorder may be subjected to large vibrations or impact during transport, remove the DVD and protect the camcorder using soft protective materials.
Introduction
11

Using DVD with other equipment
|
• |
We cannot guarantee that playback is possible on all types of recorders/players. |
|
• |
Playback may not be possible depending on the model of the playback device or |
|
|
recording status of the disc. |
|
• |
When a DVD-RW/DVD-R recorded with this camcorder is used on another device, |
|
|
always finalize the disc (p.120) using the camcorder in advance. |
|
Hitachi will not compensate for recorded images. |
|
Introduction |
• |
Hitachi cannot compensate for any damages caused when recording is not made |
• |
If you or a third party make a mistake when handling this camcorder, disc, card, etc., |
|
|
|
normally or recorded contents cannot be played back because of a defect in the |
|
|
camcorder, disc or card. Also, Hitachi cannot be responsible for your recorded video |
|
|
and audio. |
|
|
the recorded contents may be lost. We cannot be responsible for compensation for |
|
|
damage due to loss of recorded contents. |
|
• |
In the event that your camcorder is sent for repair, whether repair is successful or not, |
|
|
recorded content may be lost. Hitachi cannot be held responsible for any lost data. |
|
Copyright |
|
|
• |
Be aware that recording is restricted for some demonstrations, performances and |
|
|
exhibitions, even for personal enjoyment. |
12
Checking Provided Accessories
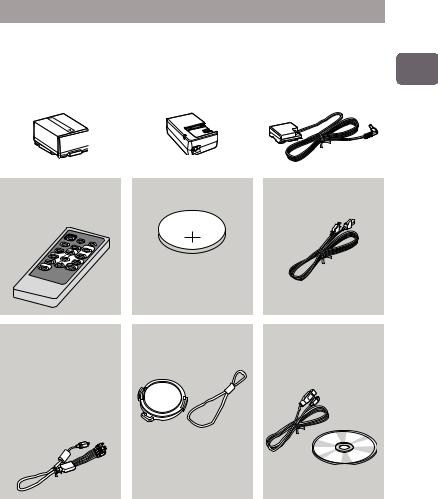
Make sure the following accessories are included in the package.
Battery pack (DZ-BP14S) |
|
AC adapter/charger |
|
DC power cord |
Portable power supply for your |
|
(DZ-ACS3) |
|
To power the camcorder from |
new Hitachi Camcorder. Be |
|
Use to power the camcorder |
|
an AC outlet, use this cord to |
sure to fully charge the battery |
|
from an AC power outlet, and |
|
connect the AC adapter/ |
before use. |
|
to charge the battery. |
|
charger to the camcorder. |
|
|
|
|
|
Remote control |
Lithium battery (CR2032) |
Power cable |
(DZ-RM4W) |
To power the remote control. |
Connects the AC adapter/ |
Use to control the camcorder |
|
charger to the AC outlet. |
from a distance. |
|
|
|
WARNING |
|
|
Keep this battery away from |
|
|
children. If swallowed, consult |
|
|
a physician immediately for |
|
|
emergency treatment. |
|
AV/S cable
Use this cable to view images from the camcorder on a TV.
The DZ-HS903A can input audio and video signals from external AV devices using this cable. (However, note that the S-Video connector is for output signals only.)
The DZ-HS803A has no external input function.
Lens cap and lens cap
string
Attach the lens cap when not recording, to protect the lens.
Software CD-ROM and
USB cable
Install the software on the CDROM onto your PC, then connect the camcorder to the PC using the USB cable.
Introduction
13
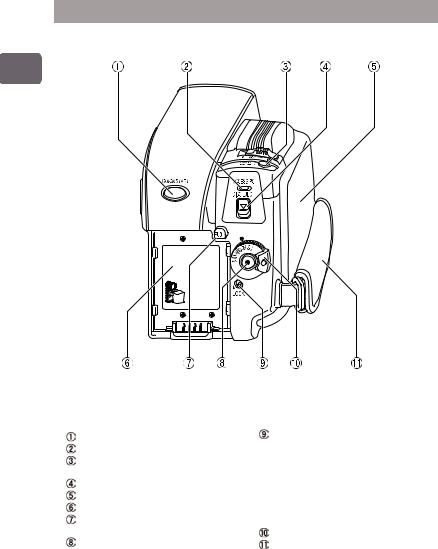
Names of Parts
Power switch side
Introduction
QUICK START button (p.41) ACCESS/PC indicator (p.11)
PHOTO/SELECT button (p.27, 47)
DISC EJECT switch (p.25) Disc compartment (p.25) Battery platform (p.21)
Battery eject switch (PUSH) (p.38)
Record button (p.25)
Lock switch (p.22)
When the power switch is set to “HDD”, set the LOCK switch to the upper position to prevent accidentally moving the power switch to “DVD”.
When the power switch is set to “DVD”, the LOCK switch cannot be moved.
Power switch (p.22) Hand strap (p.18)
14

LCD monitor side (when the LCD monitor is opened 90°), and bottom
Introduction
Bottom
 (Disc Navigation) button (p.28)
MENU button (p.23) DUBBING button (p.82) C(stop/exit) button (p.47)
f/e/d/c(cursor)/ A(confirmation) buttons
Used to choose scenes (movies and stills), select menu items and confirm, play/pause, or manually adjust exposure/focus.
Speaker
RESET button (p.172) FULL AUTO button (p.72)
DISPLAY button (p.42, 48-49, 52)
CARD ACCESS indicator Tripod receptacle
Used to attach the camcorder to a tripod.
Card slot (p.27)
QUICK MENU button (p.57)
Used to display only basic menu items
LCD BRIGHTNESS button (p.20)
BLC button (p.67)
15
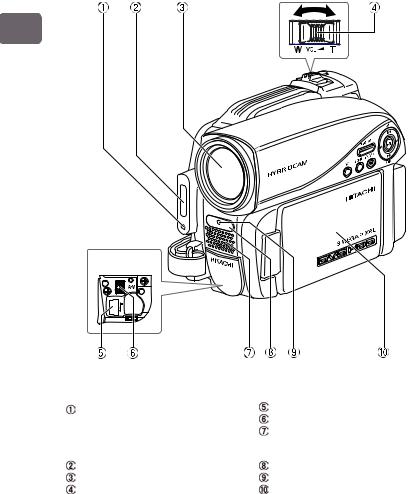
Lens side
Introduction
Inside the cover
Light receiving sensor
Used to control flash amount. Do not block the light receiving sensor with your hand when recording still pictures.
Flash (p.72)
Optical 10x zoom lens (p.62) Zoom lever/volume (p.52, 62, 64)
USB terminal (p.131) A/V terminal (p.115) Stereo microphone
Do not block the microphone with your hand during recording.
Remote control receiver Recording indicator (p.40)
LCD monitor (color wide-screen)
16

Remote control
REC |
PHOTO |
DISPLAY |
DIGITAL ZOOM
MENU ZOOM
SELECT
DELETE
DISC
NAVIGATION
PHOTO button (p.27) REC button (p.24) MENU button (p.23) SELECT button (p.47)
d(reverse search) button (p.54)
DELETE button (p.102)
DISC NAVIGATION button (p.28)
* Functions the same as  .
.
DISPLAY button (p.42) ZOOM T button (p.62) DIGITAL ZOOM button (p.62) ZOOM W button (p.62)
f(reverse skip) button (p.54)
c(forward search) button
(p.54)
Confirmation button (p.28) C(stop/cancel) button (p.47)
e(forward skip) button (p.54)
Inserting the provided lithium battery into the remote control
While inserting a thin |
Insert the lithium |
Slide the cover to |
tipped instrument |
battery with the |
close it. |
(paperclip, etc.) into the |
positive (+) terminal |
|
hole marked PUSH, |
facing down. |
|
swing the battery holder |
|
|
arm out. |
|
|
 Battery holder
* For instructions on handling batteries, see p.18.
Introduction
17

Introduction
Warning
BATTERY MAY EXPLODE IF NOT HANDLED PROPERLY. DO NOT RECHARGE, DISASSEMBLE, OR DISPOSE OF IN FIRE.
Note
Replace the battery with a Hitachi Maxell, Sony, Panasonic, Sanyo, Toshiba CR2032, or Duracell DL2032. Use of another battery may present a risk of fire or explosion.
Adjusting the hand strap
Fasten the hand strap according to the procedure in the diagram.
 Flip the cover.
 Flip the belt.
 Replace the belt.
 Replace the cover.
Attaching the lens cap
Tie the lens cap to the hand strap using the string (all supplied).
Pass the small loop end of the string through the lens cap |
|
eyelet and knot. |
small loop |
|
 Tie the strap to the the hand strap.
 Attach the lens cap to the lens.
Notes
•To protect the lens, attach the lens cap to the lens when you are not using the camcorder.
•Wipe the lens using a soft dry cloth if the lens gets dirty.
18
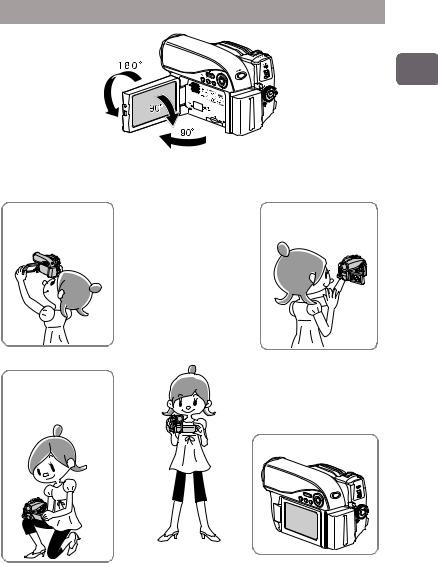
How to Open and Use the LCD Monitor
Introduction
You can use the LCD monitor as follows.
Recording high places above your line of sight
Effortlessly record small children or pets at their line of sight
To record yourself
(p.20)
Basic posture
Hold the camcorder with both hands and tuck your elbows to your chest or sides, and move the camcorder at a gentle pace. This will allow you to record effectively without blurring.
When playing back, etc.
•If the LCD monitor is hard to see while recording in bright outdoor conditions, adjust the LCD brightness (p.20).
19

Introduction
About the LCD monitor display when recording yourself (the lens and LCD monitor are facing you)
•The LCD monitor displays a mirror image of the subject.
•The remaining battery charge indicator will only appear when battery power is almost gone. The battery charge indicator flashes red in this case.
•A warning message will not be displayed (p.148). You can confirm the warning message by rotating the LCD monitor 180° back to its normal orientation.
How to Change the LCD Brightness
You can adjust the brightness of the LCD monitor when it is too dark or too bright to see the image on display.
The brightness changes every time you press LCD BRIGHTNESS. There are three settings available.
At time of purchase of this camcorder, the brightness is set to the brightest. The LCD brightness setting is retained in memory even when the power is turned off. However, if the camcorder is turned on while being powered from an AC power outlet, the LCD brightness setting will be reset to the brightest.
20
Let’s Get Started
Preparing
Setting up the battery pack
 Connect the power cable to the AC adapter/charger. Plug in the power cable to a wall outlet.
 Attach the battery pack to the AC adapter/charger.
  Attach the battery pack to the camcorder.
CHARGE indicator
If the CHARGE indicator does not light, check that the connections (  ,
,  ,
,  ) are firmly connected.
Note
Charging will not occur if the DC power cord is connected.
Terminal at bottom
Started Get Let’s
z Charge status of the battery pack
The CHARGE indicator of the AC adapter/charger allows you to check on the charge status of the battery pack.
Charge Status |
CHARGE indicator |
|
During charge |
lit |
* For details on charging time, |
Charge complete |
Unlit |
see p.37. |
Notes
•Charge battery pack in temperatures above +50ºF (10ºC) and below +86ºF (30ºC).
•Use only the AC adapter/charger which accompanied your camcorder or direct replacement as listed in this manual.
21

Started Get Let’s
Turning on the Power
 1
1
2
1 Turn on the power.
Press and hold the gray button, and turn the power switch to “HDD”, “DVD”, or “SD”.
* You do not need press the gray button when you turn off the switch or switch between “HDD” and “DVD”.
2 Open the LCD monitor.
Changing the display language
You can change the language used on screens and menus as follows.
A (Confirmation button)
 Press MENU, then select “Initial Setup” by pressing f/e. Then press c(or the confirmation button).
22

 Select “Language” by pressing f/e, then press c(or the confirmation button).
I n i t i a l S e t u p |
|
|
Be e p |
|
On |
P o w e r S a v e |
O f f |
|
R e c o r d LED |
On |
|
L a n g u a g e |
En g l i s h |
|
Demo Mode |
Au t o |
|
Reset |
|
|
ENTER |
RETURN |
|
 Choose the desired language by pressing d/c, then press the confirmation button.
Setting the date and time
 Press MENU, then select “Date Setup” by pressing f/e. Then press cto select “Date Set” and press cagain.
 Select each item by pressing d/cand set the correct value by pressing f/e.
• Repeat this step until year, month, date, hour, minute, and AM/PM are correctly set.
 Press the confirmation button.
The confirmation screen appears.
 Press dto select “YES”, then press the confirmation button to confirm.
• If you select “NO” and press e, the screen returns to step  .
.
Started Get Let’s
23

Started Get Let’s
Recording Movies to the HDD
1 Turn the power switch to “HDD”.
* You can change the movie recording quality (p.75).
2 Press the record button.
Recording begins.
To pause recording, press the record button again.
24
Recording Movies to a DVD
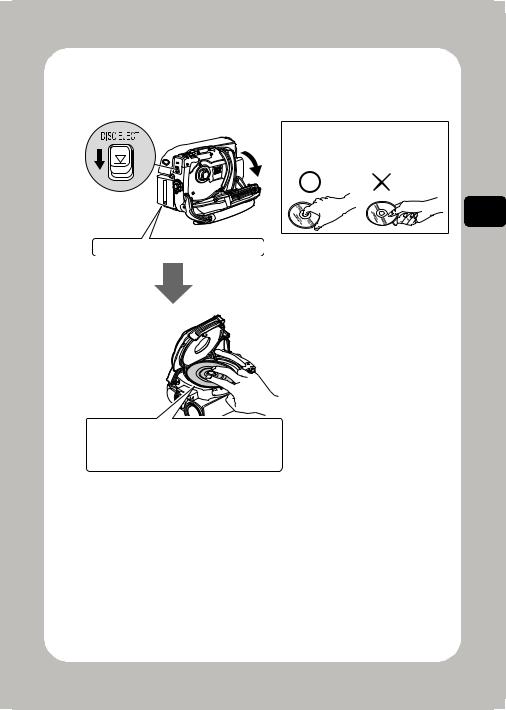
1 Insert a DVD.
When handling a disc:
Do not touch the recording surface of a disc (p.11).
Attach the charged battery pack.
Place the recording surface of the DVD face down. (For a single-sided disc, the side opposite the label is the recording surface.)
Started Get Let’s
25

2 Turn the power switch to “DVD”.
Started Get Let’s
Hint
If the format confirmation screen appears after loading a new DVD-RW/+RW, format the disc as guided through the LCD screens (p.36). Formatting is not necessary when recording on a DVD-RAM/DVD-R.
3 Press the record button.
Recording begins.
To pause recording, press the record button again.
26

Recording Stills to an SD card
1 Insert an SD card.
For usable card types, see p.33.
Pay attention to the orientation of the card. Face up the label side.
2 Turn the power switch to “SD”.
3 Press PHOTO/SELECT.
Started Get Let’s
Press PHOTO/SELECT halfway down so that a subject in the center of the screen is focused.
Fully press PHOTO/SELECT to record.
Single press of the PHOTO/SELECT button of the remote control enables focusing and recording at the same time.
27

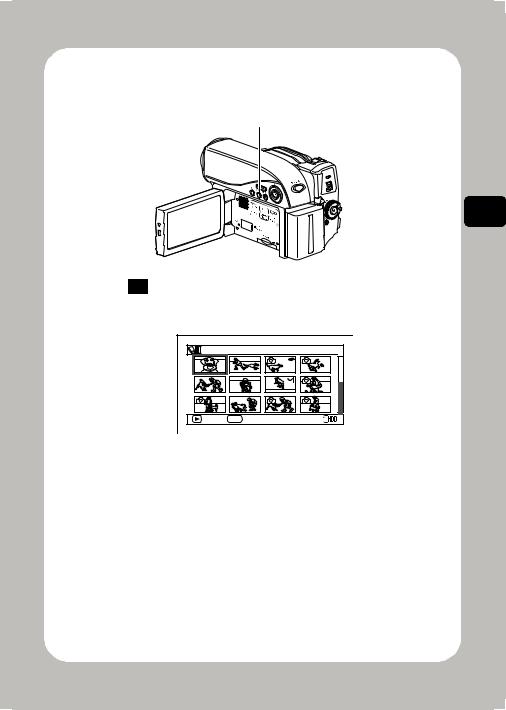
Playing Recorded Movies/Stills
1


 2
2
Started Get Let’s
1 |
Press |
|
. |
|
|||
2 |
Choose a scene (movie/still), then press the |
||
|
confirmation button. |
||
A l l |
Pr og r ams |
0 01 / 014 |
PLAY |
PHOTO SELECT |
|
See p.115 for the instructions on viewing the recordings on your TV screen.
28
Deleting Recorded Movies/Stills
2
1 
 3, 4
3, 4
1 |
Press |
|
. |
|
|||
2 |
Select a scene you want to delete, then press MENU. |
||
A l l |
Pr og r ams |
0 01 / 014 |
PLAY |
PHOTO SELECT |
|
3 Select “Scene”  “Edit”
  “Delete”, and then press the confirmation button.
4 Select “YES”, then press the confirmation button.
The selected scene is deleted.
yScenes on DVD-RW (VF mode)/DVD-R/+RW discs cannot be deleted.
yOn +RW, you can delete only the last recorded scene (p.48).
Started Get Let’s
29

HDD/DVD/Cards of Characteristics and Functions
Functions and Characteristics of HDD/DVD/Cards
The following table lists the storage media (discs and cards) and available functions that can be used with this camcorder.
Function |
|
|
|
Media |
|
|
|
|
●: Functions available |
Built-in |
DVD- |
DVD-RW |
DVD-RW |
DVD-R |
+RW |
SD |
|
HDD |
RAM |
(VR mode) |
(VF mode) |
card |
||||
—: Not available |
|
|
||||||
Recording movies (p.40) |
● |
● |
● |
● |
● |
● |
— |
|
|
|
|
|
|
|
|
|
|
Recording stills (p.45) |
— |
— |
— |
— |
— |
— |
● |
|
|
|
|
|
|
|
|
|
|
Deleting recordings |
● |
● |
● |
— |
— |
●*1 |
● |
|
(p.102) |
||||||||
|
|
|
|
|
|
|
||
|
|
|
|
|
|
|
|
|
Editing recordings (p.87) |
● |
● |
● |
— |
— |
— |
— |
|
|
|
|
|
|
|
|
|
|
Playing on other DVD |
— |
●*2 |
●*2 *3 |
●*3 |
●*3 |
●*2 *3 |
— |
|
players/recorders (p.118) |
||||||||
|
|
|
|
|
|
|
||
|
|
|
|
|
|
|
|
|
Initializing and reusing |
● |
● |
● |
● |
— |
● |
● |
|
(p.112) |
||||||||
|
|
|
|
|
|
|
||
|
|
|
|
|
|
|
|
|
Making additional |
●*4 |
●*4 |
|
●*5 |
— |
●*5 |
●*4 |
|
recordings after a disc is |
● |
|||||||
finalized (p.121) |
|
|
|
|
|
|
|
|
|
|
|
|
|
|
|
|
|
Copying recordings onto |
●*6 |
●*6 |
●*6 *7 |
●*6 *7 |
●*6 *7 |
●*6 *7 |
● |
|
a PC (p.125) |
||||||||
|
|
|
|
|
|
|
||
|
|
|
|
|
|
|
|
|
Making DVD video discs |
— |
●*6 *8 |
●*6 *8 |
●*6 *9 |
●*6 *9 |
— |
— |
|
using a PC |
||||||||
|
|
|
|
|
|
|
||
|
|
|
|
|
|
|
|
*1 Only the last recorded scene can be deleted (p.48).
*2 Not playable on some devices.
Playback is possible using a device which complies with the medium type. *3 Must be finalized. Not playable on some devices.
*4 As finalizing is unnecessary (cannot be performed), additional recordings are possible at any time. *5 To make additional recordings, the finalized disc must be unfinalized.
*6 The provided software is used. *7 Finalize the disc to edit on a PC. *8 A DVD-VR disc can be created. *9 A DVD video disc can be created.
30
 Loading...