

Page 1
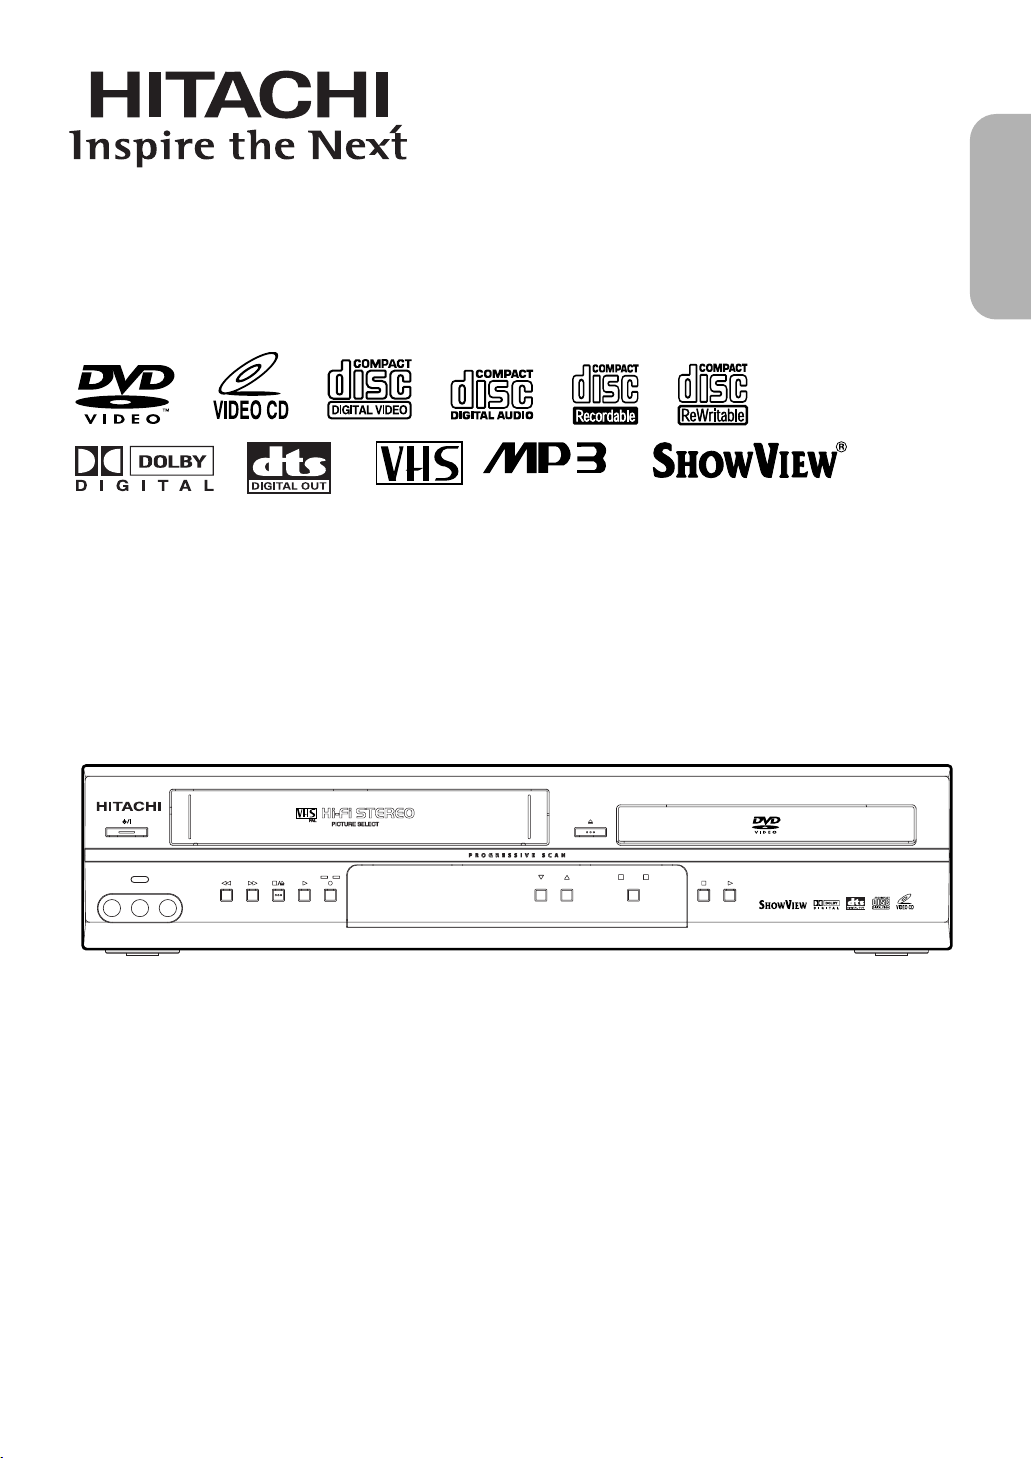
DVD/VCR Combo (DVD PLAYER with VIDEO CASSETTE RECORDER)
VIDEO IN AUDIO IN R
PROGRAM OUTPUT
DVD
DVD/VCR Combo DV-PF7E
MP3 / JPEG PLAYBACK DVD / DVD-R / VIDEO CD / CD / CD-R / CD-RW COMPATIBLE
VCR
REC
TIMER
L
(mono)
AV3
INSTRUCTION MANUAL
PAL
MODEL
DV-PF7E
SHOWVIEW is a
registered trademark of
Gemstar Development
Corporation.
HOWVIEW system is
The S
manufactured under
licence from Gemstar
Development Corporation.
English
Instruction manual
To obtain the best performance and ensure years of troublefree use, please read this instruction manual completely.
Page 2
WARNING
CLASS 1 LASER PRODUCT
KLASSE 1 LASER PRODUKT
KLASS 1 LASER APPARAT
CLASSE 1 PRODUIT LASER
: TO REDUCE THE RISK OF FIRE OR ELECTRIC SHOCK, DO NOT EXPOSE THIS
APPLIANCE TO RAIN OR MOISTURE.
CAUTION
RISK OF ELECTRIC SHOCK
DO NOT OPEN
CAUTION
TO REDUCE THE RISK OF ELECTRIC SHOCK, DO NOT REMOVE
COVER (OR BACK). NO USER SERVICEABLE PARTS INSIDE. REFER
SERVICING TO QUALIFIED SERVICE PERSONNEL.
:
The lightning flash with arrowhead symbol, within an
equilateral triangle, is intended to alert the user to the
presence of uninsulated “dangerous voltage” within the
product’s enclosure that may be of sufficient magnitude
to constitute a risk of electric shock to persons.
The exclamation point within an equilateral triangle is
intended to alert the user to the presence of important
operating and maintenance (servicing) instructions in
the literature accompanying the appliance.
PRECAUTIONS
A NOTE ABOUT RECYCLING
This product’s packaging materials are recyclable and can be reused. Please dispose of any materials in accordance with
your local recycling regulations.
Batteries should never be thrown away or incinerated but disposed of in accordance with your local regulations concerning chemical wastes.
Power Supply
The main power supply is engaged when the main plug is plugged in a 220-240V~ 50Hz AC outlet. To operate the unit, press
yy
/I (POWER/STANDBY) to turn on the unit.
Warning
TO AVOID THE HAZARDS OF ELECTRICAL SHOCK AND FIRE
1) Do not handle the power cord with wet hands.
2) Do not pull on the power cord when disconnecting it from AC wall outlet. Grasp it by the plug.
3) If, by accident, water is spilled on your DVD/VCR, unplug the power cord immediately and take the unit to our Authorized
Service Center for servicing.
4) Do not put your fingers or objects into the DVD/VCR cassette holder.
5) Do not expose this unit to rain or moisture.
WARNING: LIVE PARTS INSIDE.
DO NOT REMOVE ANY SCREWS.
Dew Warning
Moisture condensation may occur inside the unit when it is moved from a cold place to a warm place, or after heating a cold
room or under conditions of high humidity. Do not use the DVD/VCR at least for 2 hours until its inside is dry.
Caution
1) Do not attempt to open the cabinet. There are no parts you can service inside. Refer all servicing to qualified service personnel.
2) Slot and openings in the cabinet and at the side or bottom are provided for ventilation.To ensure reliable operation and to
protect the unit from overheating these opening must not be blocked or covered. Avoid enclosed spaces such as book
cases unless proper ventilation is provided.
3) Keep the unit away from the radiator heat sources.
4) Avoid using near strong magnetic fields.
5) Do not push objects of any kind into this through the cabinet slot as they could touch current carrying parts or short circuit
parts resulting in a fire or electric shock.
6) Never spill liquid of any kind on this unit.
If liquid is spilled into the unit, consult qualified service engineer.
7) Use this unit in a horizontal (flat) position only.
8) This equipment is in Stand-by mode when it turns off whilst the power cord is connected.
9) Do not place anything directly on top of the DVD/VCR. Do not place the DVD/VCR directly on top of the TV.
Laser Safety
This unit employs a laser. Only a qualified service person should remove the cover or attempt to service this device, due to possible
eye injury
CAUTION: USE OF CONTROLS OR ADJUSTMENTS OR PERFORMANCE OF PROCEDURES OTHER THAN THOSE SPECI-
CAUTION:
LOCATION: PRINTED ON THE BACK
.
FIED HEREIN MAY RESULT IN HAZARDOUS RADIATION EXPOSURE.
VISIBLE AND INVISIBLE LASER RADIATION WHEN OPEN AND INTERLOCK DEFEATED. DO NOT STARE INTO BEAM
.
–2–
EN
Page 3
PRECAUTIONS
OPEN/CLOSE
EJECT
SEARCH MODE
SURROUND
QUICK-FIND
1
2
3
4
56
789
+10
0
A-B REPEAT
CLEAR/C.RESET
DAILY/WEEKLY
REPEAT
MODE
ZOOM
ANGLE
SUBTITLE
TIMER
ENTER
i
B
A
C
D
F
E
K
K
L
Bs
L
j
MENU
TOP MENU/SHOW VIEW
AUDIO
DISPLAY
SETUP
DVDVCR
REC/OTR
SLOW
SKIP PROG
SPEED
DISC
NAVIGATION
RETURN
y
DV-RMPF7E
Declaration of Conformity
This product complies with the requirement of the directives
EMC-Directive: 89 / 336 / EEC
Low Voltage Directive: 73 / 23 / EEC
CE Marking: 93 / 68 / EEC
The DVD/VCR player
DV-PF7E
is in compliance with following norms:
EN 55013:2001
EN 55020:2002
EN 61000-3-2: 2000
EN 61000-3-3:1995+A1:2001
EN 60065:1998
EN 60825:1994+A2:2001
About Copyright
Unauthorized copying, broadcasting, public performance and lending of discs are prohibited.
This product incorporates copyright protection technology that is protected by method claims of certain U.S. patents and other
intellectual property rights owned by Macrovision Corporation and other rights owners. Use of this copyright protection technology must be authorized by Macrovision Corporation, and is intended for home and other limited viewing uses only unless
otherwise authorized by Macrovision Corporation. Reverse engineering or disassembly is prohibited.
Notice for the progressive scan outputs
Consumers should note that not all high definition television sets are fully compatible with this product and may cause artifacts to be displayed in the picture. In case of 625 progressive scan picture problems, it is recommended that the user switch
the connection to the “standard definition” output. If there are questions regarding our TV set compatibility with this model
625p DVD/VCR, please contact our customer service center.
The serial number of this product may be found on the back of the DVD/VCR. No others have the same serial number as
yours. You should record the number and other vital information here and retain this book as a
permanent record of your purchase to aid identification in case of theft. Serial numbers are not kept on file.
Date of Purchase
English
Dealer Purchase from
Dealer Address
Dealer Phone No.
Model No.
Serial No.
INTRODUCTION
Supplied Accessories Symbols Used in this Manual
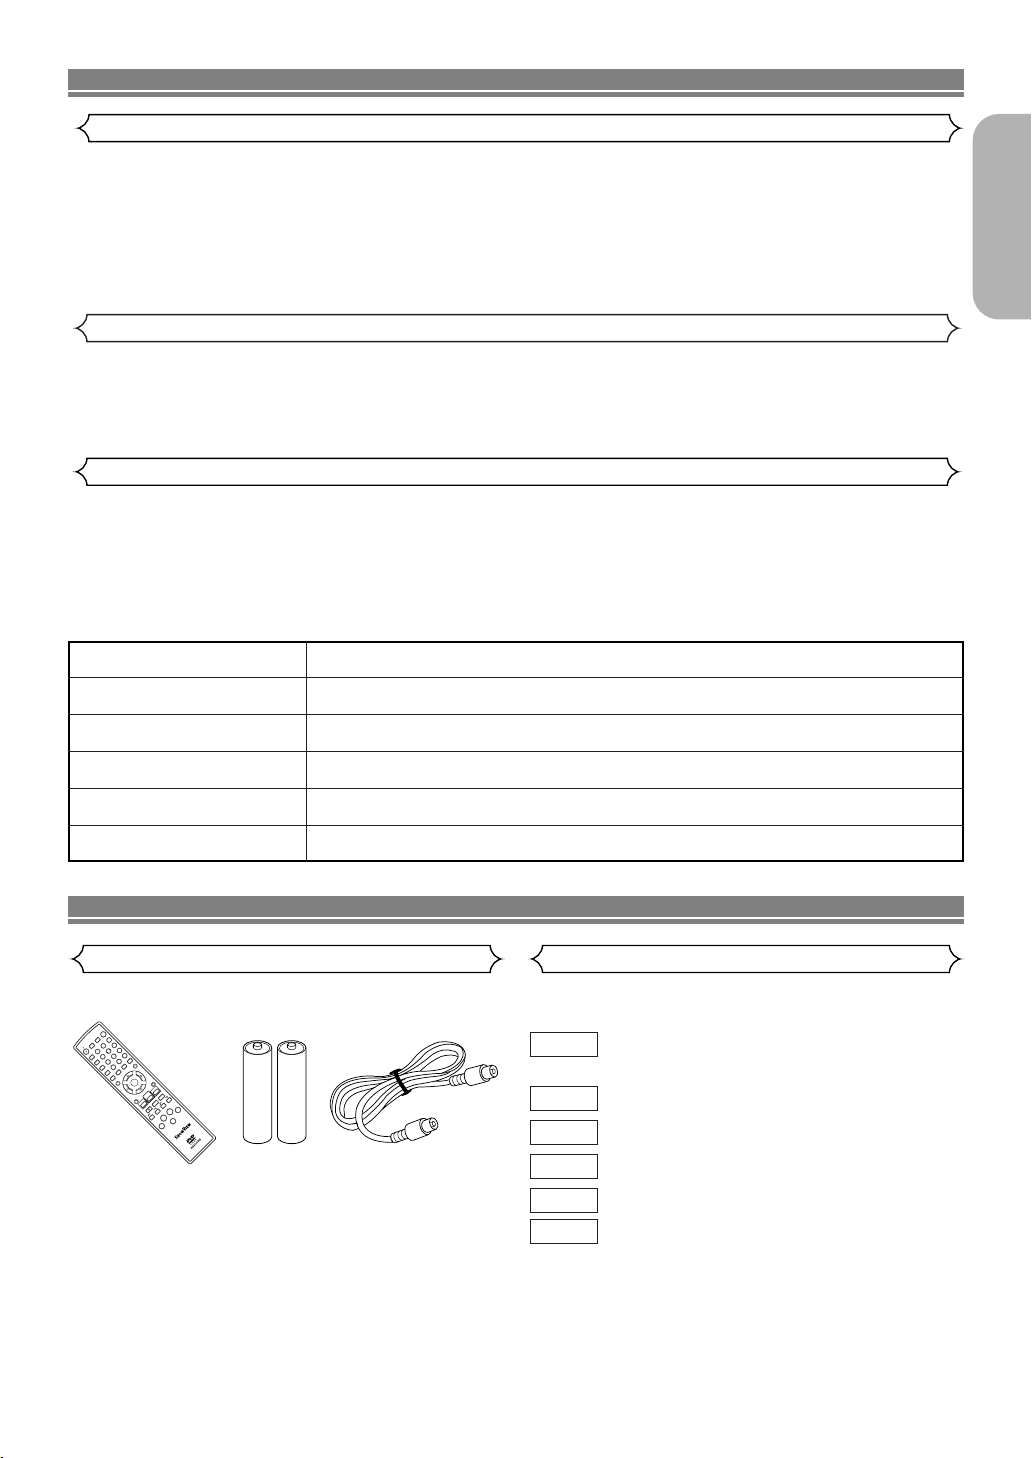
Remote control
DV-RMPF7E
(TS18858)
Two AA
batteries
Aerial Cable
75 ohm (TE15231)
As shown on the right symbols appear below in some headings and notes in this manual, with the following meanings!
DVD
: Description refers to playback of DVD video
discs.
VCD
MP3
JPEG
QUICK
: Description refers to playback of Video CDs.
: Description refers to playback of Audio CDs.
CD
: Description refers to playback of MP3 discs.
: Description refers to viewing of JPEG discs.
: Description refers to the items to be set in the
QUICK mode.
–3–
EN
Page 4

TABLE OF CONTENTS
■
PRECAUTIONS. . . . . . . . . . . . . . . . . . . . . . . . . . . . 2
Power Supply . . . . . . . . . . . . . . . . . . . . . . . . . . . . . . 2
Warning . . . . . . . . . . . . . . . . . . . . . . . . . . . . . . . . . . 2
Dew Warning . . . . . . . . . . . . . . . . . . . . . . . . . . . . . . 2
Caution . . . . . . . . . . . . . . . . . . . . . . . . . . . . . . . . . . 2
Laser Safety. . . . . . . . . . . . . . . . . . . . . . . . . . . . . . . 2
Declaration of Conformity . . . . . . . . . . . . . . . . . . . . . 3
About Copyright . . . . . . . . . . . . . . . . . . . . . . . . . . . . 3
Notice for the progressive scan outputs . . . . . . . . . . 3
■
INTRODUCTION . . . . . . . . . . . . . . . . . . . . . . . . . . . 3
Supplied Accessories . . . . . . . . . . . . . . . . . . . . . . . . 3
Symbols Used in this Manual . . . . . . . . . . . . . . . . . . 3
■
ABOUT THE DISCS. . . . . . . . . . . . . . . . . . . . . . . . . 5
Playable Discs . . . . . . . . . . . . . . . . . . . . . . . . . . . . . 5
Unplayable Discs . . . . . . . . . . . . . . . . . . . . . . . . . . . 6
■
FEATURES . . . . . . . . . . . . . . . . . . . . . . . . . . . . . . . 6
■
DVD/VCR SWITCHING . . . . . . . . . . . . . . . . . . . . . . 7
■
FUNCTIONAL OVERVIEW . . . . . . . . . . . . . . . . . . . 7
FRONT PANEL . . . . . . . . . . . . . . . . . . . . . . . . . . . 7
REAR PANEL . . . . . . . . . . . . . . . . . . . . . . . . . . . . 8
Display. . . . . . . . . . . . . . . . . . . . . . . . . . . . . . . . . . . 8
Displays During Operation . . . . . . . . . . . . . . . . . . . . 8
Remote Control . . . . . . . . . . . . . . . . . . . . . . . . . . . . 9
Loading the Batteries . . . . . . . . . . . . . . . . . . . . . . . . 9
Tour of the remote control. . . . . . . . . . . . . . . . . . . . 10
■
CONNECTIONS. . . . . . . . . . . . . . . . . . . . . . . . . . . 12
DVD/VCR to TV Connection . . . . . . . . . . . . . . . . . . 12
Other Connections . . . . . . . . . . . . . . . . . . . . . . . . . 12
Connection to an Audio System . . . . . . . . . . . . . . . 13
Connection to a TV (for DVD/VCR) . . . . . . . . . . . . . 14
■
HI-FI STEREO SOUND SYSTEM. . . . . . . . . . . . . . 15
Selecting the Sound Mode . . . . . . . . . . . . . . . . . . . 15
■
PRESET FOR USE . . . . . . . . . . . . . . . . . . . . . . . . 15
Selecting the Language . . . . . . . . . . . . . . . . . . . . . 15
Changing the Language . . . . . . . . . . . . . . . . . . . . . 15
Video Channel Setting . . . . . . . . . . . . . . . . . . . . . . 15
Setting the Clock . . . . . . . . . . . . . . . . . . . . . . . . . . 16
■
TUNING. . . . . . . . . . . . . . . . . . . . . . . . . . . . . . . . . 16
Automatic Tuning . . . . . . . . . . . . . . . . . . . . . . . . . . 16
Manual Tuning . . . . . . . . . . . . . . . . . . . . . . . . . . . . 17
To Skip a Preset Channel . . . . . . . . . . . . . . . . . . . . 17
Channel Order . . . . . . . . . . . . . . . . . . . . . . . . . . . . 17
■
PLAYBACK FUNCTION. . . . . . . . . . . . . . . . . . . . . 18
Normal Playback . . . . . . . . . . . . . . . . . . . . . . . . . . 18
Auto Repeat Playback . . . . . . . . . . . . . . . . . . . . . . 18
Picture Select. . . . . . . . . . . . . . . . . . . . . . . . . . . . . 18
Search Functions . . . . . . . . . . . . . . . . . . . . . . . . . . 18
■
RECORDING FUNCTION . . . . . . . . . . . . . . . . . . . 19
Normal Recording . . . . . . . . . . . . . . . . . . . . . . . . . 19
OTR (One Touch Recording). . . . . . . . . . . . . . . . . . 19
Timer Recording. . . . . . . . . . . . . . . . . . . . . . . . . . . 19
Hints for Timer Recording . . . . . . . . . . . . . . . . . . . . 20
SHOWVIEW®Guide Channel Set . . . . . . . . . . . . . . . . 20
Timer Recording using the SHOWVIEW System. . . . . 21
VPS (Video Programme System) /
PDC (Programme Delivery Control) . . . . . . . . . . . . 21
Auto Return . . . . . . . . . . . . . . . . . . . . . . . . . . . . . . 21
Copying a video tape . . . . . . . . . . . . . . . . . . . . . . . 22
Status Display . . . . . . . . . . . . . . . . . . . . . . . . . . . . 22
TV Colour System . . . . . . . . . . . . . . . . . . . . . . . . . 22
Auto Rewind. . . . . . . . . . . . . . . . . . . . . . . . . . . . . . 22
Real Time Tape Counter . . . . . . . . . . . . . . . . . . . . . 22
■
PLAYING A DISC . . . . . . . . . . . . . . . . . . . . . . . . . 23
Basic Playback. . . . . . . . . . . . . . . . . . . . . . . . . . . . 23
CANCELLING AND CALLING BACK
THE PBC FUNCTION . . . . . . . . . . . . . . . . . . . . . 23
General Features . . . . . . . . . . . . . . . . . . . . . . . . . . 23
Disc Navigation . . . . . . . . . . . . . . . . . . . . . . . . . . . 23
Pause. . . . . . . . . . . . . . . . . . . . . . . . . . . . . . . . . . . 23
Disc Menus . . . . . . . . . . . . . . . . . . . . . . . . . . . . . . 23
Title Menu . . . . . . . . . . . . . . . . . . . . . . . . . . . . . . . 23
CALLING UP A MENU SCREEN DURING
PLAYBACK . . . . . . . . . . . . . . . . . . . . . . . . . . . . . 23
Step by Step Playback . . . . . . . . . . . . . . . . . . . . . . 24
Resume . . . . . . . . . . . . . . . . . . . . . . . . . . . . . . . . . 24
Fast Forward / Reverse Search. . . . . . . . . . . . . . . . 24
Slow Forward / Slow Reverse . . . . . . . . . . . . . . . . . 24
Zoom . . . . . . . . . . . . . . . . . . . . . . . . . . . . . . . . . . . 24
Tr ack Search . . . . . . . . . . . . . . . . . . . . . . . . . . . . . 24
Title / Chapter Search. . . . . . . . . . . . . . . . . . . . . . . 24
Time Search. . . . . . . . . . . . . . . . . . . . . . . . . . . . . . 24
Repeat . . . . . . . . . . . . . . . . . . . . . . . . . . . . . . . . . . 25
REPEAT TITLE / CHAPTER . . . . . . . . . . . . . . . . 25
REPEAT TRACK . . . . . . . . . . . . . . . . . . . . . . . . . 25
A-B REPEAT. . . . . . . . . . . . . . . . . . . . . . . . . . . . 25
Program Playback (CD) . . . . . . . . . . . . . . . . . . . . . 25
Random Playback (CD) . . . . . . . . . . . . . . . . . . . . . 25
MP3 / JPEG Playback . . . . . . . . . . . . . . . . . . . . . . 25
Slide Show Mode (JPEG) . . . . . . . . . . . . . . . . . . . . 26
On-Screen Information . . . . . . . . . . . . . . . . . . . . . . 26
Program Playback (MP3 / JPEG) . . . . . . . . . . . . . . 26
Random Playback (MP3 / JPEG) . . . . . . . . . . . . . . 26
Audio Language . . . . . . . . . . . . . . . . . . . . . . . . . . . 26
Stereo Sound Mode . . . . . . . . . . . . . . . . . . . . . . . . 26
Subtitle Language . . . . . . . . . . . . . . . . . . . . . . . . . 26
Camera Angle . . . . . . . . . . . . . . . . . . . . . . . . . . . . 27
Changing the On-Screen Display . . . . . . . . . . . . . . 27
Ratings Control . . . . . . . . . . . . . . . . . . . . . . . . . . . 27
RATING LEVEL . . . . . . . . . . . . . . . . . . . . . . . . . 27
IF YOU FORGET THE PASSWORD . . . . . . . . . . 27
CONTROL LEVELS . . . . . . . . . . . . . . . . . . . . . . 27
Marker Setup Screen . . . . . . . . . . . . . . . . . . . . . . . 27
■
DVD SETUP . . . . . . . . . . . . . . . . . . . . . . . . . . . . . 28
Audio Setting . . . . . . . . . . . . . . . . . . . . . . . . . . . . . 28
Virtual Surround . . . . . . . . . . . . . . . . . . . . . . . . . . . 28
Display Setting . . . . . . . . . . . . . . . . . . . . . . . . . . . . 28
Language Setting . . . . . . . . . . . . . . . . . . . . . . . . . . 29
To Return All Selections of SETUP (except for RATINGS CONTROL and VIDEO OUT) to their Default
Settings . . . . . . . . . . . . . . . . . . . . . . . . . . . . . . . . . 29
■
TROUBLESHOOTING GUIDE . . . . . . . . . . . . . . . . 30
■
SPECIFICATIONS . . . . . . . . . . . . . . . . . . . . . . . . . 31
■
MAINTENANCE. . . . . . . . . . . . . . . . . . . . . . . . . . . 31
■
SUBSIDIARY INFORMATION . . . . . . . . . . . . . . . . 32
–4–
EN
Page 5
ABOUT THE DISCS
DVD-Video
* 1,2,4,6
* 4,6
* 4,5,6
or
* 1,2,3,4,5,6
DVD-R
* 1,4,6
Video CD
Audio CD
CD-R
CD-RW
Digital video
(MPEG2)
_
_
_
Digital audio
MP3
or
JPEG
Region code
Mark (logo)
Playable
discs
Recorded
signals
Disc size
Disc types
12 cm
or
8cm
12 cm
or
8cm
12 cm
or
8cm
Example
Title 1 Title 2
Chapter 1 Chapter 2 Chapter 1
Chapter 2
Chapter 3 Chapter 4
Example
Group 1 Group 2
Tra c k 1
Tra c k 2
Tra c k 5
Tra c k 6
Tra c k 3
Tra c k 4
Example
Tra c k 1
Tra c k 2
Tra c k 5
Tra c k 6
Tra c k 3
Tra c k 4
Audio CD,
Video CD
MP3, JPEG
Sound
and
Pictures
DIGITAL VIDEO
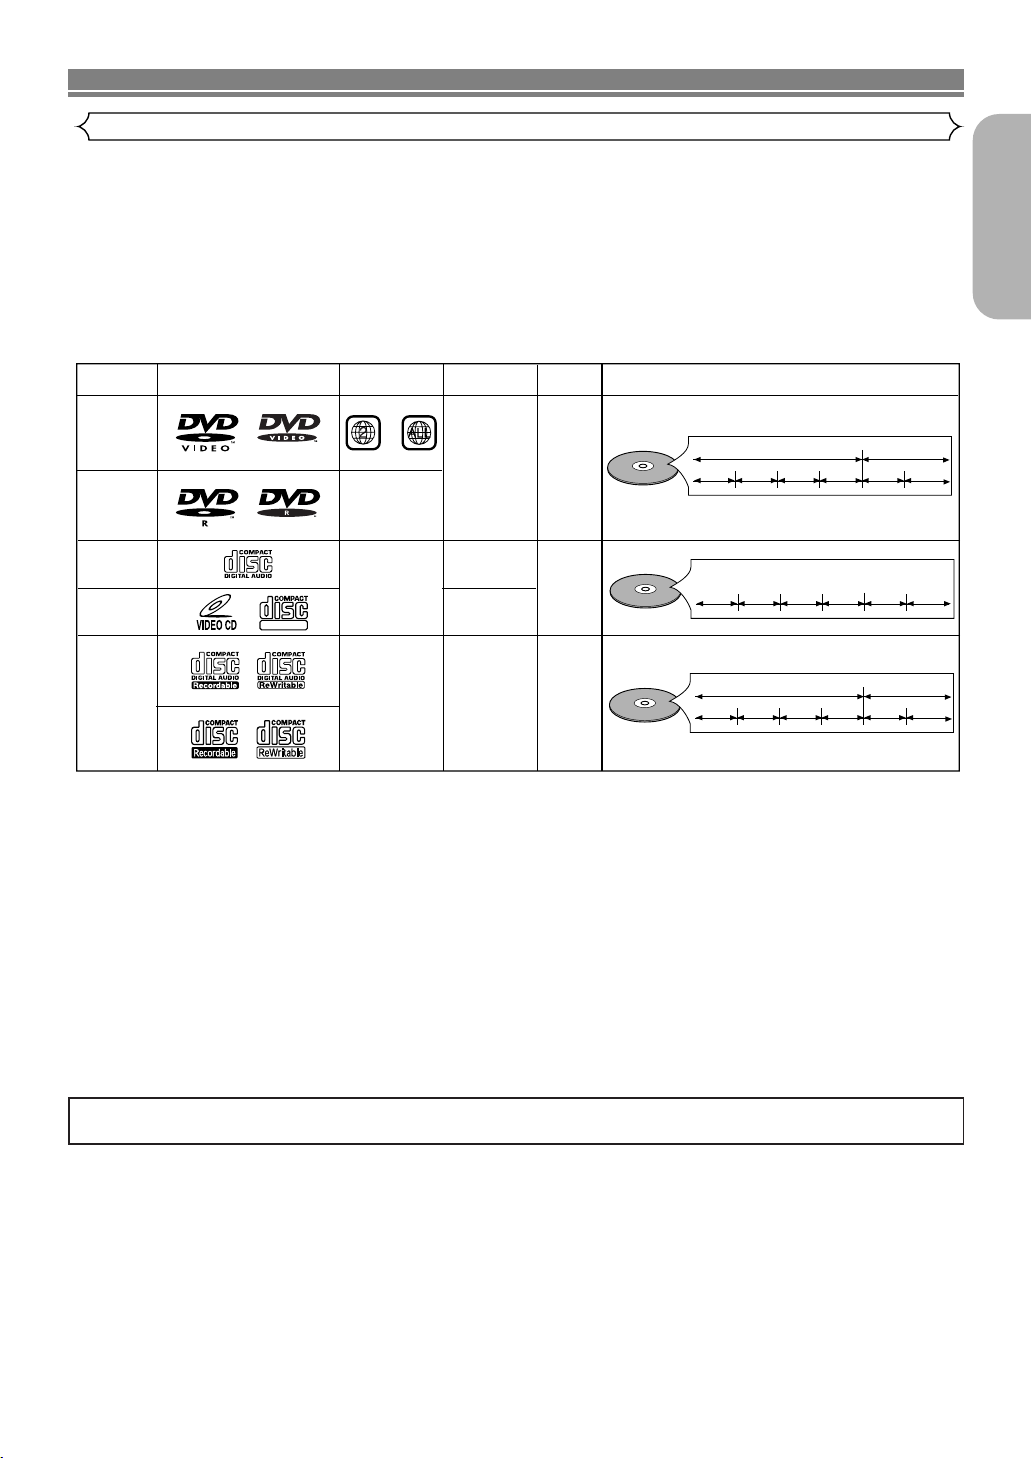
Playable Discs
The following discs can be played back on this DVD/VCR.
•
Depending on the types or the writing method of the medium, some discs can not be played.
• Some DVD-R or CD-R/RW discs made on personal computers, or on DVD recorders may not be played back properly due
to factors such as scratches, dirt or special properties of the disc.
• Discs made on personal computers may not be played back properly due to different environments or the settings of the
application you use. We recommend always to use the standardized, properly formatted discs. (Please contact your Hitachi
dealer for more detail.)
• Some discs include region codes as shown below.
• The number inside the symbol refers to a region of the world, and a disc encoded in a specific region format can only be
played back on DVD/VCR with the same region code.
English
If you cannot play back a disc which bears one of the marks above, check the following notes.
*1: This unit conforms to the PAL colour system. Also you can play discs recorded with the NTSC colour systems via a PAL sys-
tem TV set.
*2:
Certain DVD-Video discs do not operate as described in this manual due to the intentions of the disc’s producers.
*3: Only the discs which have been recorded in the video format and finalized can be played back.
Discs unfinalized or recorded in the video recording format cannot be played back.
Depending on the recording status of a disc, the disc may not be played back at all or normally
(the picture or sound may be not be smooth, etc.).
*4: Scratched or stained discs may not be played back.
*5: Some discs cannot be played back because of incompatible recording conditions, characteristics of the recorder or special
properties of discs.
*6: You can play back discs which bear the marks above. If you use nonstandardized discs, this unit may not play them back.
Even if they are played back, the sound or video quality will be compromised.
ABOUT THE PBC FUNCTION OF VIDEO CD
This unit conforms to ver.1.1 and ver.2.0 of Video CD standard, with PBC function.
Ver.1.1 (without PBC function): You can enjoy playback picture as well as music CD.
Ver.2.0 (with PBC function): While using a Video CD with PBC function, “PBC” appears on the screen and the display.
What is PBC? “PBC” stands for Playback Control. You can play interactive software using menu screens. Refer to the
instructions accompanying the Video CD.
NOTE:
When playing Video CDs with the PBC function, some operations (e.g., select and track repeat) cannot be performed unless
the function is cancelled temporarily (refer to page 23).
–5–
EN
Page 6
ABOUT THE DISCS
Unplayable Discs
¡
On the following discs, only the sound can be heard (picture cannot be viewed).
CDV CD-G
¡
NEVER play back the following discs. Otherwise, malfunction may result!
CD-I
DVD-RAM
DVD-ROM for personal computers
CD-ROM for personal computers
Photo CD
DVD with region codes other than 2 or ALL
¡
On the following disc, the sound MAY NOT be heard.
Super Audio CD
Note: Only the sound recorded on the normal CD layer can be delivered.
The sound recorded on the high density Super Audio CD layer cannot be delivered.
¡
Any other discs without compatibility indications.
FEATURES
DVD
¡Progressive Scan system
¡Dolby Digital sound
By connecting this DVD/VCR to a Multi-channel Dolby
Digital decoder, you can enjoy high-quality 5.1ch Dolby
Digital surround sound as heard in the movie theatres.
¡Pause/fast/slow/step playback
¡Random playback for Audio CD, MP3 and JPEG
¡Program playback for Audio CD, MP3 and JPEG
¡DVD menus in a desired language
¡Screen saver/Auto power-off functions
The screen saver program starts when there is no input
from the DVD/VCR for 5 minutes in the stop mode. When
the screen saver program is activated for 30 minutes, the
power is automatically turned off.
¡Subtitles in a desired language
¡Selecting a camera angle
¡Choices for audio language and sound mode
¡Ratings Control
¡Automatic detection of discs
This DVD/VCR automatically detects if a loaded disc is
DVD, Audio CD, Video CD, MP3 or JPEG on disc.
¡Playing an MP3 disc
¡Viewing a CD-ROM with JPEG files
¡Direct Search
¡On-screen display
Information about the current operation can be displayed
on the TV screen, allowing you to confirm the currently
active functions (such as program playback) by the remote
control.
¡DTS (Digital Theater System)
You can enjoy 5.1channel surround system developed by
the Digital Theater System co. which reproduces the original sound as truthfully as possible.
¡Search
Chapter search / Title search / Track search / Time search
¡Repeat
Chapter / Title / Track / Group / All / A-B
¡Zoom
¡Marker
Electronic references point designated by user can be
called back.
Mode
¡Disc Navigation
Displays the first scenes of each chapter in a title.
¡Resume Play
¡Virtual Surround
¡EURO A/V (SCART)
You can set SCART OUTPUT to RGB or S-VIDEO for
video output.
¡MPEG sound
This DVD/VCR can handle a disc that supports MPEG
audio and the DVD/VCR is connected to a MPEG decoder.
¡Dimmer
Dim the display brightness.
¡Bit rate indication
¡DRC (Dynamic range control)
You can control the range of sound volume.
VCR
Mode
Hardware specifications
¡AUDIO OUTPUT L/R jacks
¡Auto Head Cleaner
¡4 Head HiFi Stereo
¡On screen Display
¡PLL Synthesiser Tuner with 99 channels preset-
table
Automatic functions
¡Auto power on system
Automatically turns the VCR on when you insert the cassette.
¡Digital Auto Tracking (DTR)
Playback
¡Auto Repeat
¡2 Step Picture Search Operation
¡Index Search
¡Time Search
¡Quick-Find
¡NTSC Playback
Recording
¡1 Year, 8 events (including Daily and Weekly
Timer Recording)
¡OTR (One Touch Recording )
¡VPS (Video Programme System)/
PDC (Programme Delivery Control)
Manufactured under license from Dolby
Laboratories. “Dolby” and the double-D symbol
are trademarks of Dolby Laboratories.
“DTS” and “DTS Digital Out” are trademarks of
Digital Theater Systems,Inc.
–6–
EN
Page 7
VIDEO IN AUDIO IN R
PROGRAM OUTPUT
DVD
DVD/VCR Combo DV-PF7E
MP3 / JPEG PLAYBACK DVD / DVD-R / VIDEO CD / CD / CD-R / CD-RW COMPATIBLE
VCR
REC
TIMER
L
(mono)
AV3
1
11 13 14 15 181916
432 7 9 1085 6
12 17 20
DVD / VCR SWITCHING
VIDEO IN AUDIO IN R
PROGRAM OUTPUT
DVD
DVD/VCR Combo DV-PF7E
VCR
REC
TIMER
L
(mono)
AV3
OUTPUT
DVDVCR
OPEN/CLOSE
EJECT
SEARCH MODE
SURROUND
QUICK-FIND
123
456
789
+10
0
A-B REPEAT
CLEAR/C.RESET
DAILY/WEEKLY
REPEAT
MODE
ZOOM
ANGLE
SUBTITLE
TIMER
ENTER
i
BAC
D
F
E
K
K
L
Bs
L
j
MENU
TOP MENU/SHOW VIEW
AUDIO
DISPLAY
SETUP
DVDVCR
REC/OTR
SLOW
SKIP PROG
SPEED
DISC
NAVIGATION
RETURN
y
DV-RMPF7E
OUTPUT button
VCR OUTPUT Light
DVD OUTPUT Light
VCR button
DVD button
Since this product comprises DVD and VCR players, it is necessary to select the correct output mode.
SWITCHING TO DVD MODE
Press
DVD on the remote control.
(Verify that the DVD OUTPUT Light is lit.)
SWITCHING TO VCR MODE
Press VCR on the remote control.
(Verify that the VCR OUTPUT Light is lit.)
NOTE
• Pressing only OUTPUT on the front panel does not switch
the mode of the remote control. You always need to select
the correct mode on the remote control too.
FUNCTIONAL OVERVIEW
FRONT PANEL
English
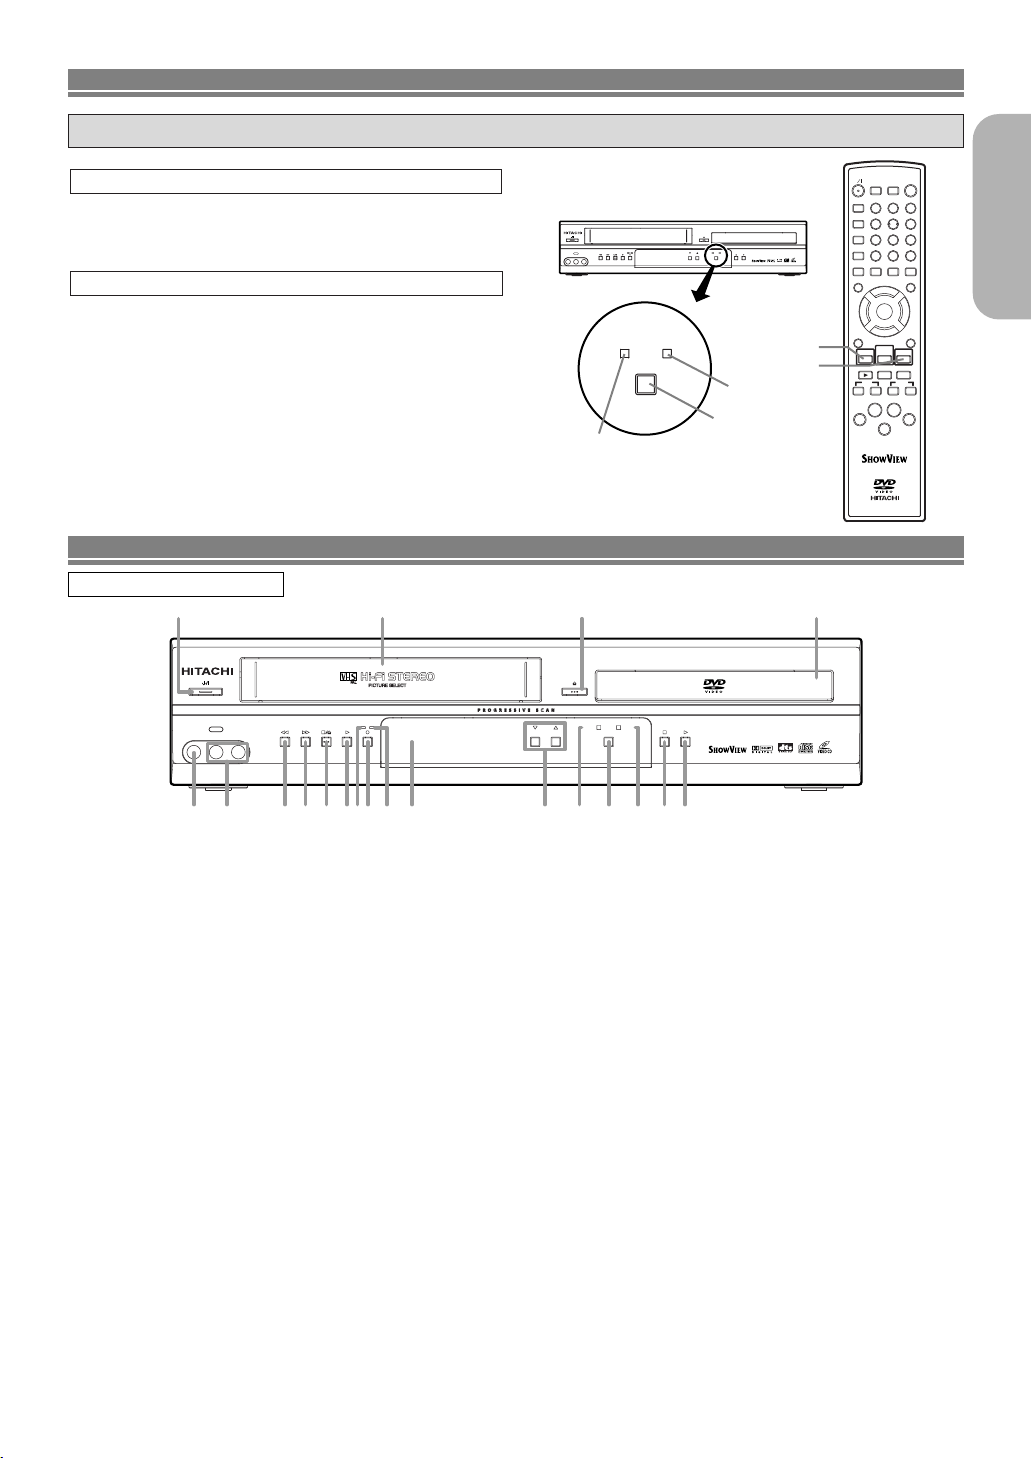
1.yy/I (Power/Standby)
Press to turn the power on and off.
(As to the indication of the Operate switch, “I
ON and “yy” indicates electrical power STANDBY.)
2. VIDEO IN Jack
Connect a video cable coming from the video out jack
of a camcorder, another VCR, or a video source (laser
disc player, etc.) here.
3. AUDIO IN Jacks
Connect audio cables coming from the audio out jacks
of a camcorder, another VCR, or an audio source here.
hh
4.
(REW) [VCR]
Press to rewind the tape, or to view the picture rapidly
in reverse during the playback mode (Rewind Search).
gg
5.
(F.FWD) [VCR]
Press to rapidly advance the tape, or view the picture
rapidly in forward during playback. (Forward Search).
6.CC/AA(STOP/EJECT) [VCR]
EJECT
Press to remove the tape from the VCR.
STOP
Press to stop the tape motion.
7.BB(PLAY) [VCR]
Press to begin playback.
8. REC Light
Lights up during recording.
9.II(REC) [VCR]
Press once to start a recording. Press repeatedly to
start a One Touch Recording.
10. TIMER Light
This light glows when the DVD/VCR is in standby mode
for a timer recording or during a One Touch Recording.
It flashes if TIMER is pressed for a timer recording, but
there is no tape in the DVD/VCR. It flashes when all
timer recordings or One Touch Recording are finished.
11. Display, Remote Sensor Window
12. Cassette compartment
” indicates
13. PROGRAM (K/L)
In VCR mode, press to change TV programmes on the
VCR; press to adjust the tracking during normal or slow
motion playback; press to remove vertical jitter in a Still
picture.
14. VCR OUTPUT Light (Green)
This light appears when the VCR output mode is selected. You can only watch tapes when the green VCR
OUTPUT light is on. To make the green VCR OUTPUT
light come on, press VCR on the remote control or
OUTPUT on the front panel.
15. OUTPUT
Press to select DVD mode or VCR mode.
You can switch the output mode either by pressing
–
–7–
OUTPUT on the front panel, or by pressing DVD or
VCR on the remote control. However, if you press
OUTPUT on the front panel first, you need to reselect the corresponding mode by pressing DVD or
VCR on the remote control.
16. DVD OUTPUT Light (Green)
This light appears when the DVD output mode is selected. You can only watch DVDs when the green DVD
OUTPUT light is on. To make the green DVD OUTPUT
light come on, press DVD on the remote control or
OUTPUT on the front panel.
17.AA(OPEN/CLOSE) [DVD]
Press to insert discs into or remove them from the tray.
18.CC(STOP) [DVD]
Stops operation of the disc.
19.BB(PLAY) [DVD]
Press to begin playback.
20. Disc loading tray
7–
EN
Page 8
Tr ay open
Tr ay closed
When a disc is being
played back
DVD
Loading the Disc
Lights up when the playback
control is activated
No disc inserted or cannot
read
COMPONENT VIDEO OUT
OPTICAL
COAXIAL
DIGITAL
AUDIO OUT
S
-
VIDEO
OUT
Y
DVD
DVD/VCR AV1
(TV)
AV2(DECODER
)
VCR
CB/
P
B
CR/
P
R
ANALOG
AUDIO OUT
L
R
AERIAL
RF OUT
5 6
1 2 3 4 7
8
9
FUNCTIONAL OVERVIEW
Lights up when the inserted
disc is being played back.
Displays a type of the disc
which is inserted on the tray.
• DVD: DVD disc
• CD: Audio CD, MP3, JPEG
• VCD: Video CD
Lights up when the
inserted disc comes
to a pause.
Lights up when the
A-B repeat function
is on.
Lights up when the
repeat function is on.
Lights up when playing back
in slow mode. (DVD or Video CD)
Displays how long the current title
or track has been played back. When
a chapter or track is switched, the
number of a new title, chapter or
track is displayed.
Lights up when
the ALL repeat
function is on.
GROUP P.SCAN
DVD
VCD
Lights up when the
progressive scan
system is activated.
Works as a tape counter
(hour,minute,second).
Also displays a channel number,
tape speed, remaining time for OTR or
current time.
REC
Lights up when a tape is
in the DVD/VCR.
Lights up during a recording.
Flashes when a recording
is paused.
Lights up when
the timer recording or an
OTR recording has been set.
Lights up when the inserted
cassette is being played
back.
Lights up when the
playback is in still or
slow mode.
Lights up during
playback when
the repeat function
is on.
REAR PANEL
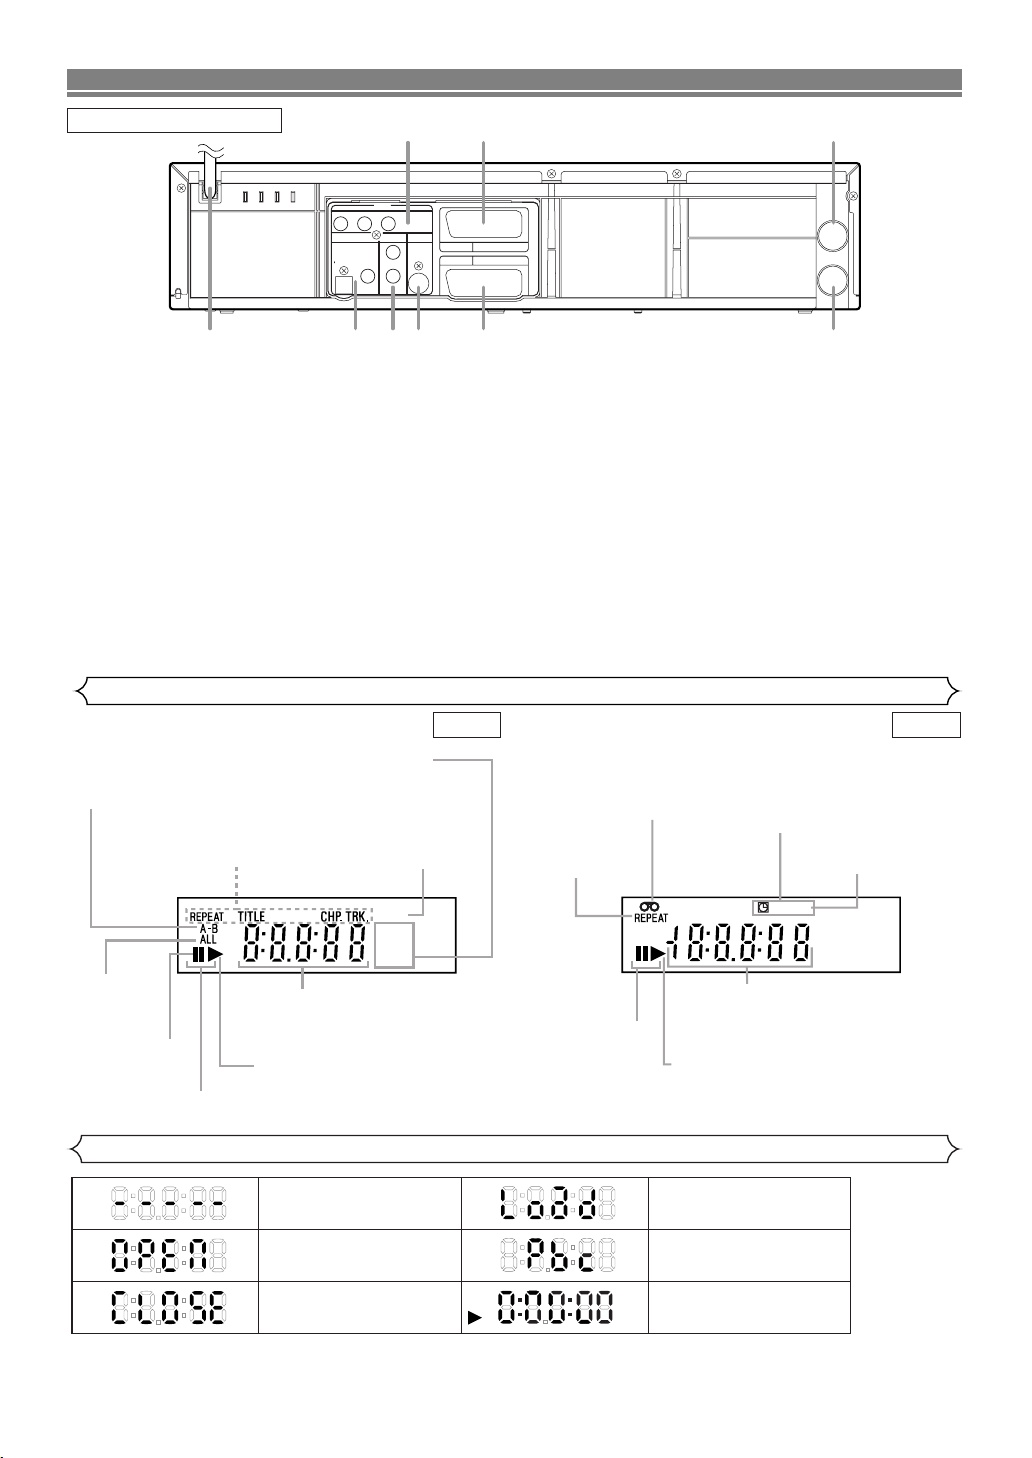
1. MAIN (AC Power Cord)
Connect to a standard AC plug.
2. DIGITAL AUDIO OUT Jacks
Use either an optical or coaxial digital cable to connect
to a compatible Dolby Digital receiver. Use to connect to
a Dolby Digital decoder, DTS decoder or MPEG
decoder.
3. ANALOG AUDIO OUT Jacks (Left/Right)
Connect to the Audio input jacks of A/V-compatible TV,
wide screen TV or Stereo system.
4. S-VIDEO OUT Jack (DVD Only)
Use the S-Video cable to connect this jack to the SVideo jack on your A/V-compatible TV or wide screen
TV for a higher quality picture.
5. COMPONENT VIDEO OUT Jacks (DVD Only)
Use these jacks if you have a TV with Component Video
in jacks. These jacks provide CR/PR, CB/PBand Y video.
Together with S-Video, Component Video provides the
best picture quality.
Display
6. EURO AV2 (DECODER) Jack
Use the Euro Audio/Video cable to connect this jack to
the 21 pin scart jack on your decoder.
7. EURO AV1 (TV) Jack
Use the Euro Audio/Video cable to connect this jack to
the 21 pin scart jack on your A/V-compatible TV or wide
screen TV for a best quality picture.
8. AERIAL Jack
Connect your antenna, Cable Box or Direct Broadcast
System.
9. RF OUT Jack
Use the supplied aerial cable to connect this jack to the
ANTENNA IN Jack on your TV.
Caution: Do not touch the inner pins of the jacks on the rear
panel. Electrostatic discharge may cause permanent damage to the DVD/VCR.
DVD VCR
Displays During Operation
–8–
EN
Page 9
FUNCTIONAL OVERVIEW
OPEN/CLOSE
EJECT
SEARCH MODE
SURROUND
QUICK-FIND
123
456
789
+1 0
0
A-B REPEAT
CLEAR/C.RESET
DAILY/WEEKLY
REPEAT
MODE
ZOOM
ANGLE
SUBTITLE
TIMER
ENTER
i
B
A
C
D
F
E
K
K
L
Bs
L
j
MENU
TOP MENU/SHOW VIEW
AUDIO
DISPLAY
SETUP
DVDVCR
REC/OTR
SLOW
SKIP PROG
SPEED
DISC
NAVIGATION
RETURN
y
DV-RMPF7E
2
1
3
30
32
31
27
28
8
10
17
4
7
5
9
6
22
23
21
19
18
20
33
29
12
13
11
16
14
15
24
26
25
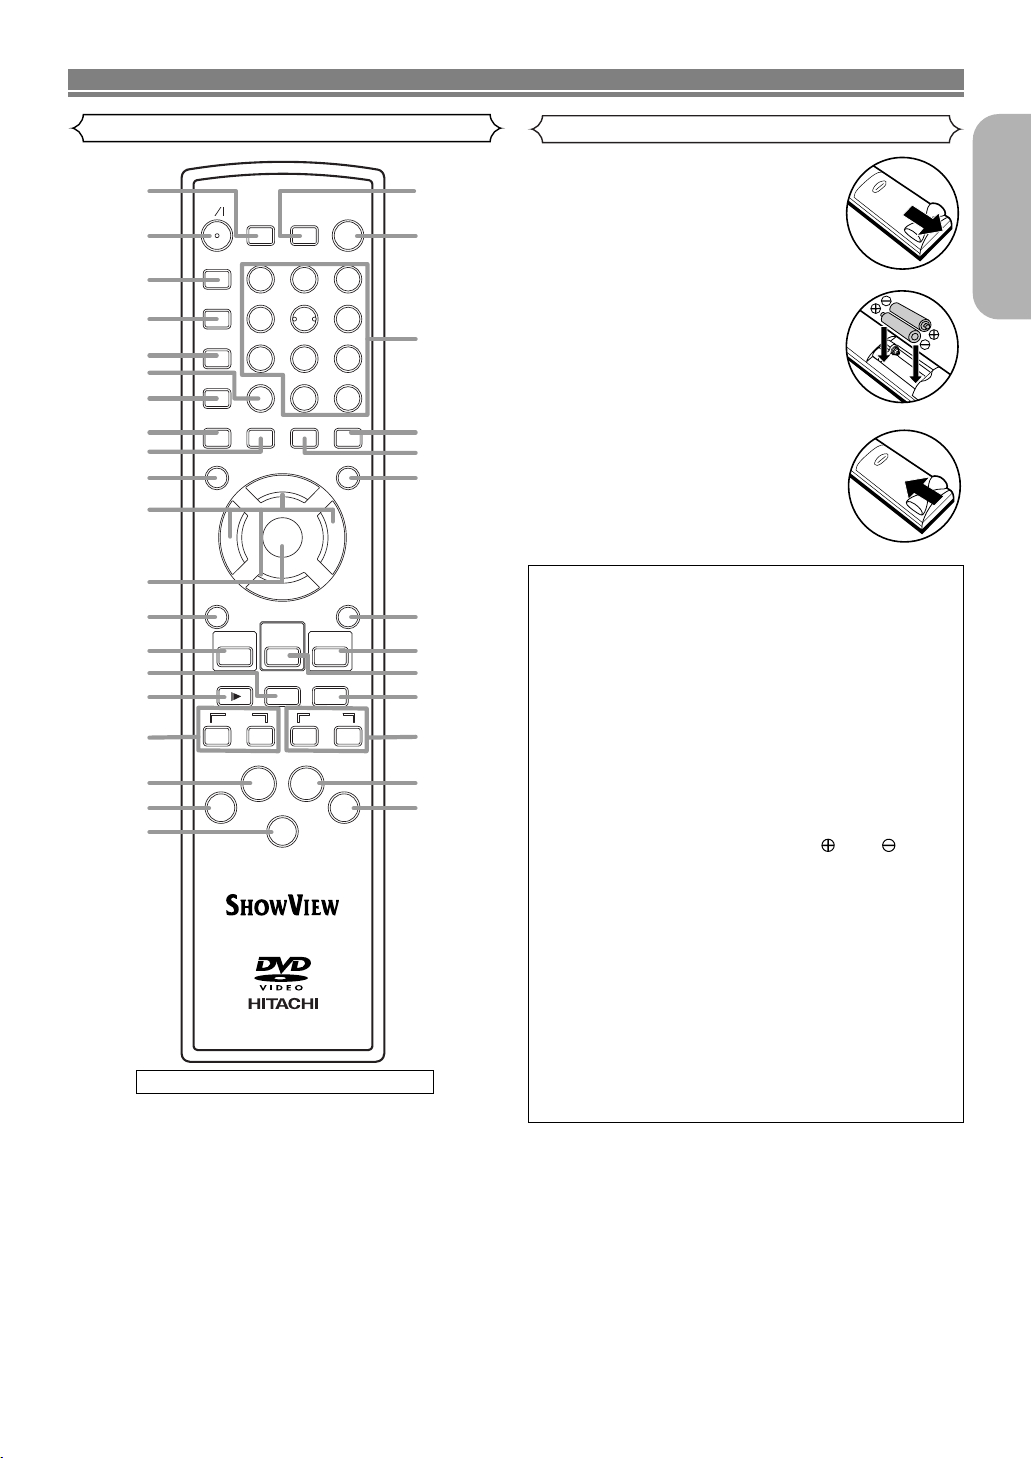
Remote Control
Details are on pages 10 and 11.
Loading the Batteries
1. Open the battery compartment
cover.
English
2. Insert two AA batteries, with
each one oriented correctly.
3. Close the cover.
Cautions On Batteries
• Use “AA” (R6P) batteries in this remote control unit.
• Replace the batteries with new ones approximately
once a year, though this depends on the frequency
with which the remote control unit is used.
• If the remote control unit does not operate from
close to the main unit, replace the batteries with
new ones, even if less then a year has passed.
• The included batteies are only for verifying operation. Replace them with a new batteries as soon as
possible.
• When inserting the batteries, be careful to do so in
the proper direction, following the and marks
in the remote control unit’s battery compartment.
• To prevent damage or battery fluid leakage:
• Do not use a new battery with an old one.
• Do not use two different types of batteries such
as alkaline and manganese.
• Do not short-circuit, disassemble, heat or dispose
of batteries in flames.
• Remove the batteries when not planning to use the
remote control unit for a long period of time.
• If the batteries should leak, carefully wipe off the
fluid from the inside of the battery compartment,
then insert new batteries.
–9–
EN
Page 10
A-B REPEAT
REPEAT
MODE
ZOOM
ANGLE
2
3
10
11
12
14
4
5
7
8
9
6
1
MENU
RETURN
ENTER
DVD
13
POWER/STANDBY Button
A-B REPEAT Button
REPEAT Button
MODE Button
SUBTITLE/TIMER Button
ZOOM Button
ANGLE Button
SURROUND/
QUICK-FIND Button
CLEAR/C.RESET Button
MENU Button
ENTER, Cursor Buttons
RETURN Button
VCR
15
16
SURROUND
QUICK-FIND
CLEAR/C.RESET
SUBTITLE
TIMER
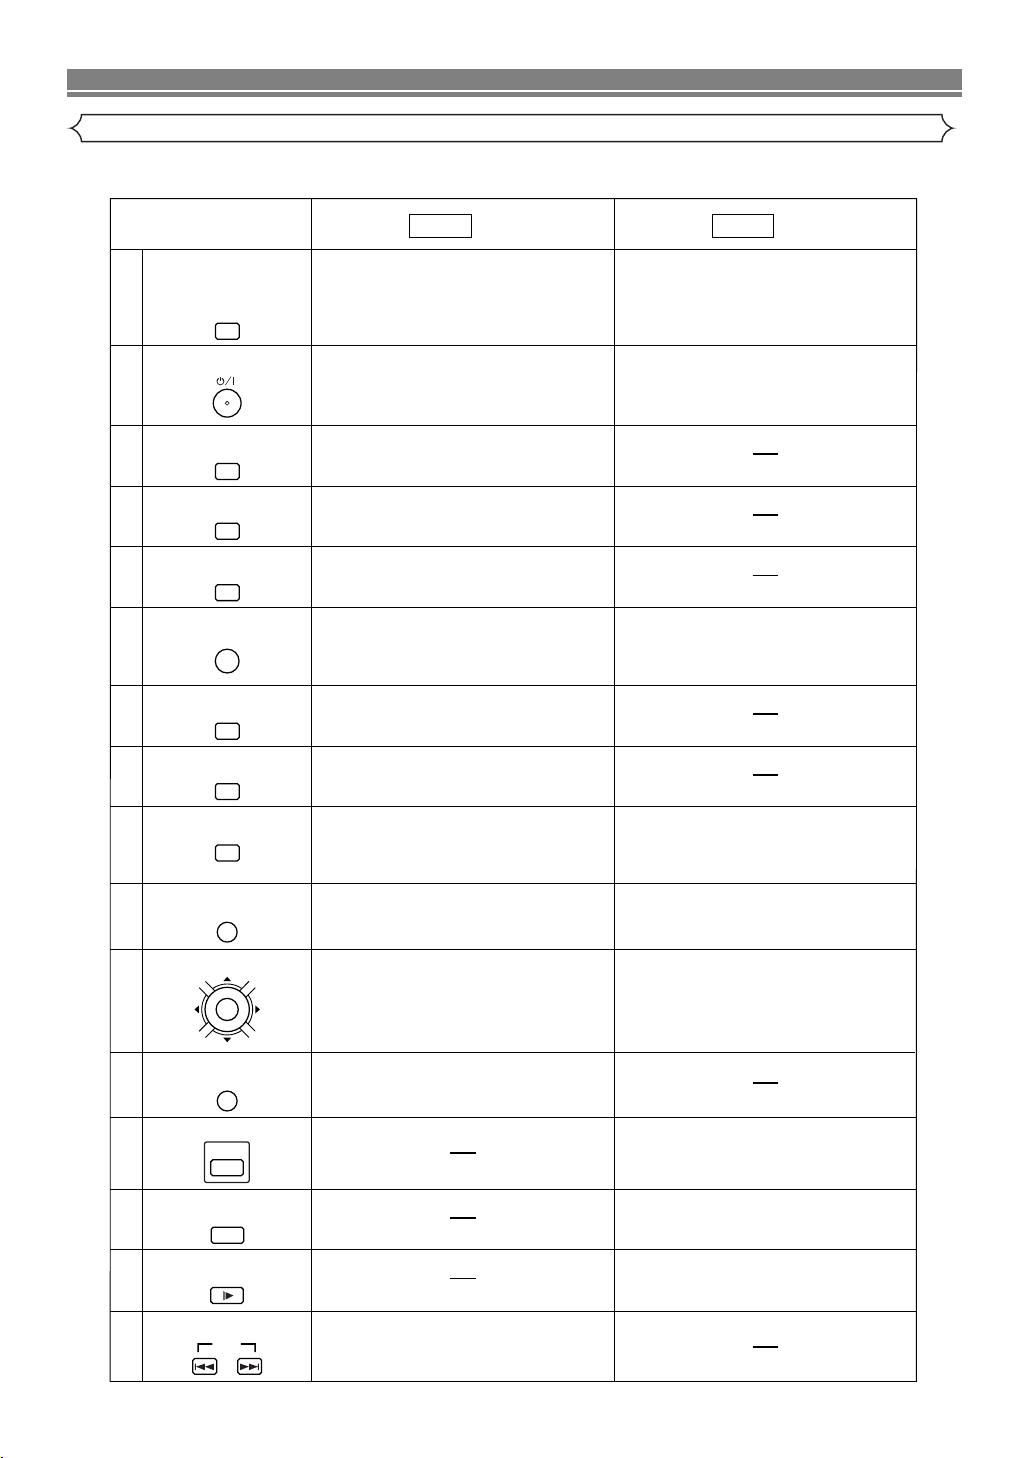
• To select the VCR output mode.
• To use the remote contorol in VCR mode.
• To view the tape in slow motion.
• To select the recording speed.
VCR Button
SLOW Button
SPEED Button
VCR
SPEED
SLOW
17
SKIP Buttons
SKIP
• To activate virtual surround.
• To search and confirm the contents of
the recorded programme(s).
Mode Mode
• Turns the DVD/VCR on and off.
• Marks a segment to repeat between A and B.
(DVD/VCD/CD)
•
Allows you to repeat play a chapter or title. (DVD)
• Allows you to repeat play a track or all.
(VCD/CD)
• To set virtual surround on/off.
• To arrange the playing order or play randomly.
(CD/MP3/JPEG)
• To magnify part of picture x2/x4. (DVD)
• To magnify part of picture x2. (VCD/JPEG)
• Accesses various camera angles on a disc.
(DVD)
• Accesses various subtitles on a disc. (DVD)
• Clear the markers.
• Clear the number that is entered incorrectly.
• Removes status No. in programme input.
(CD/MP3/JPEG)
• Brings up the Menu on a disc.
(DVD/MP3/JPEG)
• Moves the cursor and determines its position.
• Moves the cursor and determines its position.
• Cannot use the ENTER button.
• Returns to a previous menu. (DVD/VCD)
• Turns the DVD/VCR on and off.
• To reset the tape counter.
• Brings up the VCR Menu.
• Press to put the VCR into standby mode
for a timer recording.
• To skip chapters. (DVD)
• To skip tracks. (VCD/CD/MP3/JPEG)
FUNCTIONAL OVERVIEW
Tour of the remote control
Buttons on remote control work in different ways for DVD, Video CD, Audio CD, MP3, JPEG and VCR:
Refer to the following table for correct use.
–10–
EN
Page 11

AUDIO
DISPLAY
28
25
27
22
20
29
30
33
23
26
24
32
31
AUDIO Button
DISPLAY Button
OPEN/CLOSE/EJECT
Button
SEARCH MODE Button
Number Buttons
SETUP
TOP MENU/SHOW VIEW
Button
SETUP Button
PLAY Button
PAUSE/STEP Button
DISC NAVIGATION Button
18
STOP Button
19
21
SEARCH Buttons
DVD VCR
Mode Mode
PROG
RECORD/ONE-TOUCH-
RECORDING Button
PROGRAM Buttons
REC/OTR
DISC
NAVIGATION
DVD Button
DVD
TOP MENU/SHOW VIEW
123
456
789
+10
0
DAILY/WEEKLY
OPEN/CLOSE
EJECT
SEARCH MODE
• Displays the current time, tape counter or
channel.
• Press to eject the video cassette from the VCR.
• Press to call up the index or time search menu.
• To select STEREO, L-CH, R-CH or normal.
• To select channel.
• To set the S
HOWVIEW number.
DAILY / WEEKLY button
• Use when you record using SHOWVIEW system.
• To start a recording.
• To start One Touch Recording.
• Press to control the TV programmes.
• To adjust the tracking manually during playback.
• Begin tape playback.
• To programme timer recording
with the S
HOWVIEW system.
• To select the DVD output mode.
• To use the remote contorol in DVD mode.
• Accesses various audio functions on a disc. (DVD)
• To select STEREO, L-CH or R-CH. (VCD/CD)
• Displays the current disc mode.
• To search chapter or title. (DVD)
• To search track. (VCD/CD/MP3/JPEG)
• To search time. (DVD/VCD/CD)
• To rapidly return to a location of disc.
• Search the markers. (DVD/VCD/CD)
• To open or close the disc tray.
• To select chapter or title directly. (DVD)
• To select track directly. (VCD/CD/MP3/JPEG)
• Brings up the Top Menu on a disc. (DVD)
• Return to the top file of the highest hierarchy
in the program and MP3 menu. (MP3, JPEG)
• Brings up the DVD player's Setup menu.
• Begin disc play.
• Pause disc play.
• Advances playback one frame at a time.
(DVD/VCD)
• Pause tape playback or recording.
• Advances playback one frame at a time.
• The first scenes of each chapter of the title being
played will be displayed. (DVD)
• The first scenes of each track being played will
be displayed. (VCD)
• To stop playback. • To stop playback or record.
• Allows you to search forward/backward through
a disc.
• To begin slow backward through a disc. (DVD)
•
To begin slow forward through a disc. (DVD/VCD)
• Allows you to search forward/backward through
a tape.
FUNCTIONAL OVERVIEW
Tour of the remote control
English
–11–
EN
Page 12
CONNECTIONS
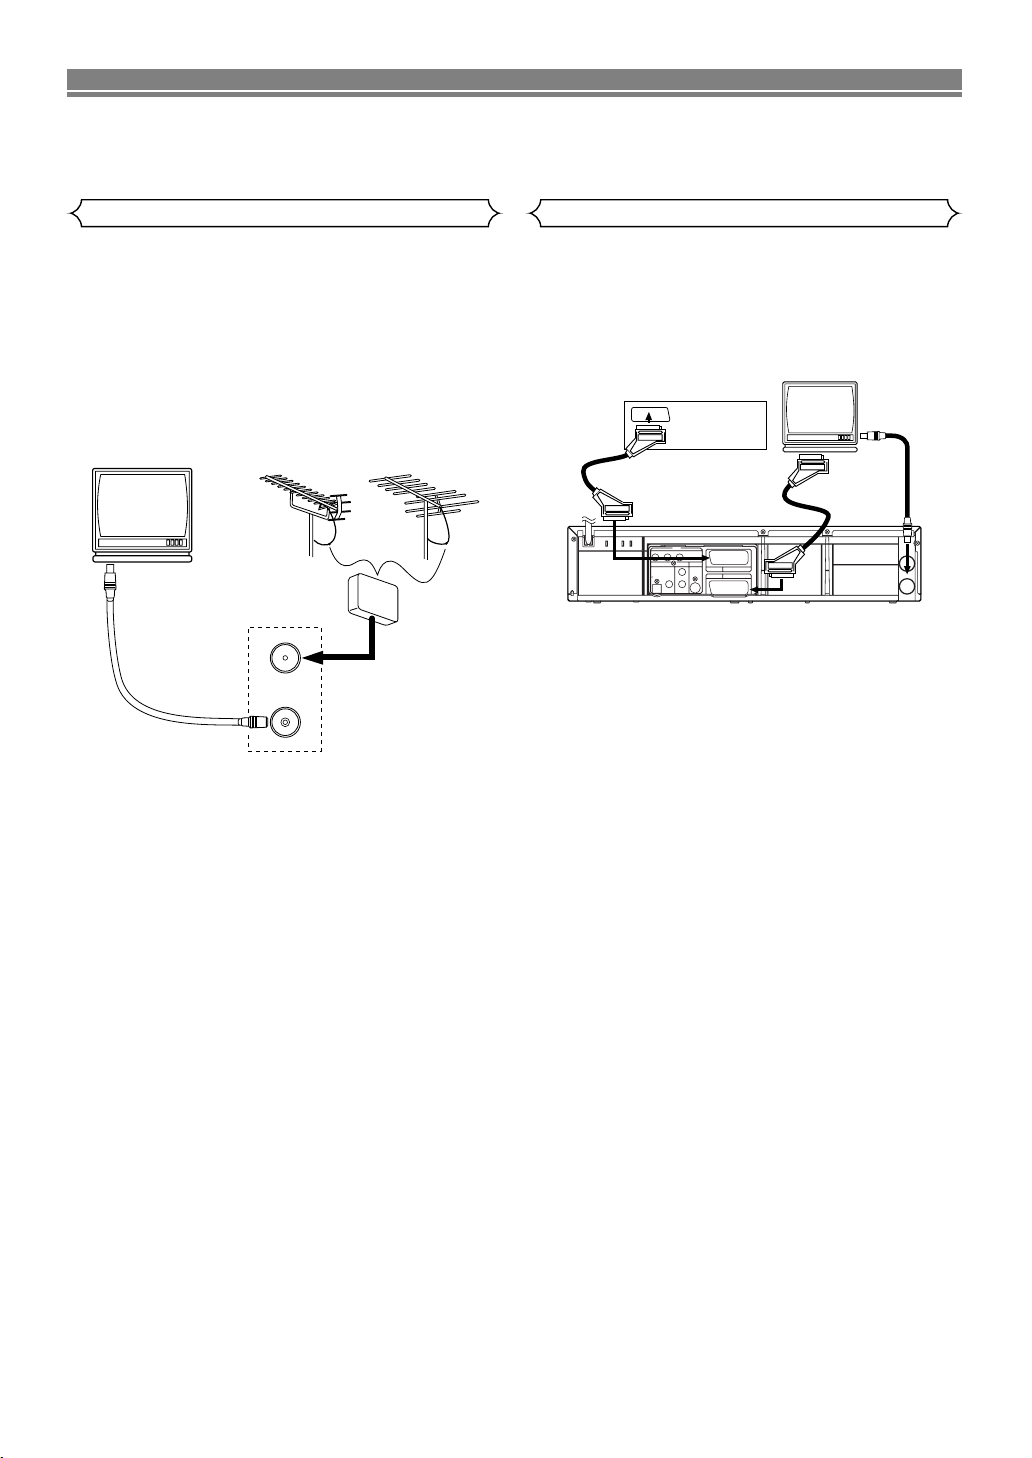
The following show examples of connections commonly used to connect the DVD/VCR to TV and other components.
NOTES
• Be sure to turn off the power to all components in the system before connecting another component.
• Refer to the Instruction Manuals for your TV, stereo system and any other components to be connected to the DVD/VCR.
DVD/VCR to TV Connection
1. Disconnect the TV’s power cord from the AC outlet.
2. Disconnect the VHF/UHF TV aerial cable from the TV.
3. Connect the VHF/UHF TV aerial cable to the DVD/VCR.
4. Connect the DVD/VCR to the TV using the coaxial cable.
5. Plug the Power cords of the DVD/VCR and TV into the AC
outlets.
UHF VHF
(TV)
to aerial socket
VHF/UHF
AERIAL
to AERIAL
RF OUT
to RF OUT
(Back of the unit)
MIXER
Other Connections
EURO SCART (AV) SOCKETS
Your DVD/VCR is provided with two Scart sockets which you
may connect to other external devices with Scart sockets.
We recommend this connection to ensure a better audio and
picture quality.
A2 or NICAM stereo sound is only achieved when using a
SCART lead.
Decoder (Not supplied)
to 21-Pin Scart Jack
DVD
COMPONENT VIDEO OUT
CB/
CR/
Y
P
P
B
R
DIGITAL
S
-
VIDEO
ANALOG
AUDIO OUT
OUT
AUDIO OUT
VCR
AV2(DECODER
L
(TV)
DVD/VCR AV1
COAXIAL
OPTICAL
R
Euro Scart cables are obtainable at your dealer.
AV1 (TV) CONNECTION TO TV
If your TV has Scart sockets, you may connect your
DVD/VCR’s AV1 (TV) scart socket to the Scart socket on the
back of your TV. Please see the instruction manual for your
TV.
AV2 (DECODER) CONNECTION FOR OTHER EXTERNAL
DEVICES
The second Scart socket AV2 (DECODER) is designated for
other external devices, e.g. decoder, another VCR, video
camera and so on.
NOTE:
• If you want to connect a TV with Scart socket to your
DVD/VCR, the TV must be connected to the DVD/VCR
through AV1 (TV). A connection to AV2 (DECODER) will
not function correctly.
EXTERNAL INPUT MODE
To receive the signal from an external input (decoder, video
camera, another VCR etc.), connect to the AV2 (DECODER)
socket, and press PROG (K or L) or enter “002” with the
Number buttons to show “AV2” on the TV screen. (“L2” will
appear on the DVD/VCR display panel.)
If you use the AV1 (TV) socket, press PROG (K or L) or enter
“001” with the Number buttons to appear “AV1” on the TV
screen. (“L1” will appear on the DVD/VCR display panel.)
If you use the front AUDIO/VIDEO In Jacks, press PROG (K
or L) or enter “003” with Number buttons to show “AV3” on
the TV screen. (“L3” will appear on the DVD/VCR display
panel.)
(TV)
to aerial
socket
to 21-Pin
Scart Jack
to RF OUT
)
AV1 (TV)
AERIAL
RF OUT
–12–
EN
Page 13
RL
ANALOG
AUDIO OUT
L
R
COAXIALOPTICAL
or
OPTICAL
COAXIAL
DIGITAL
AUDIO OUT
CONNECTIONS
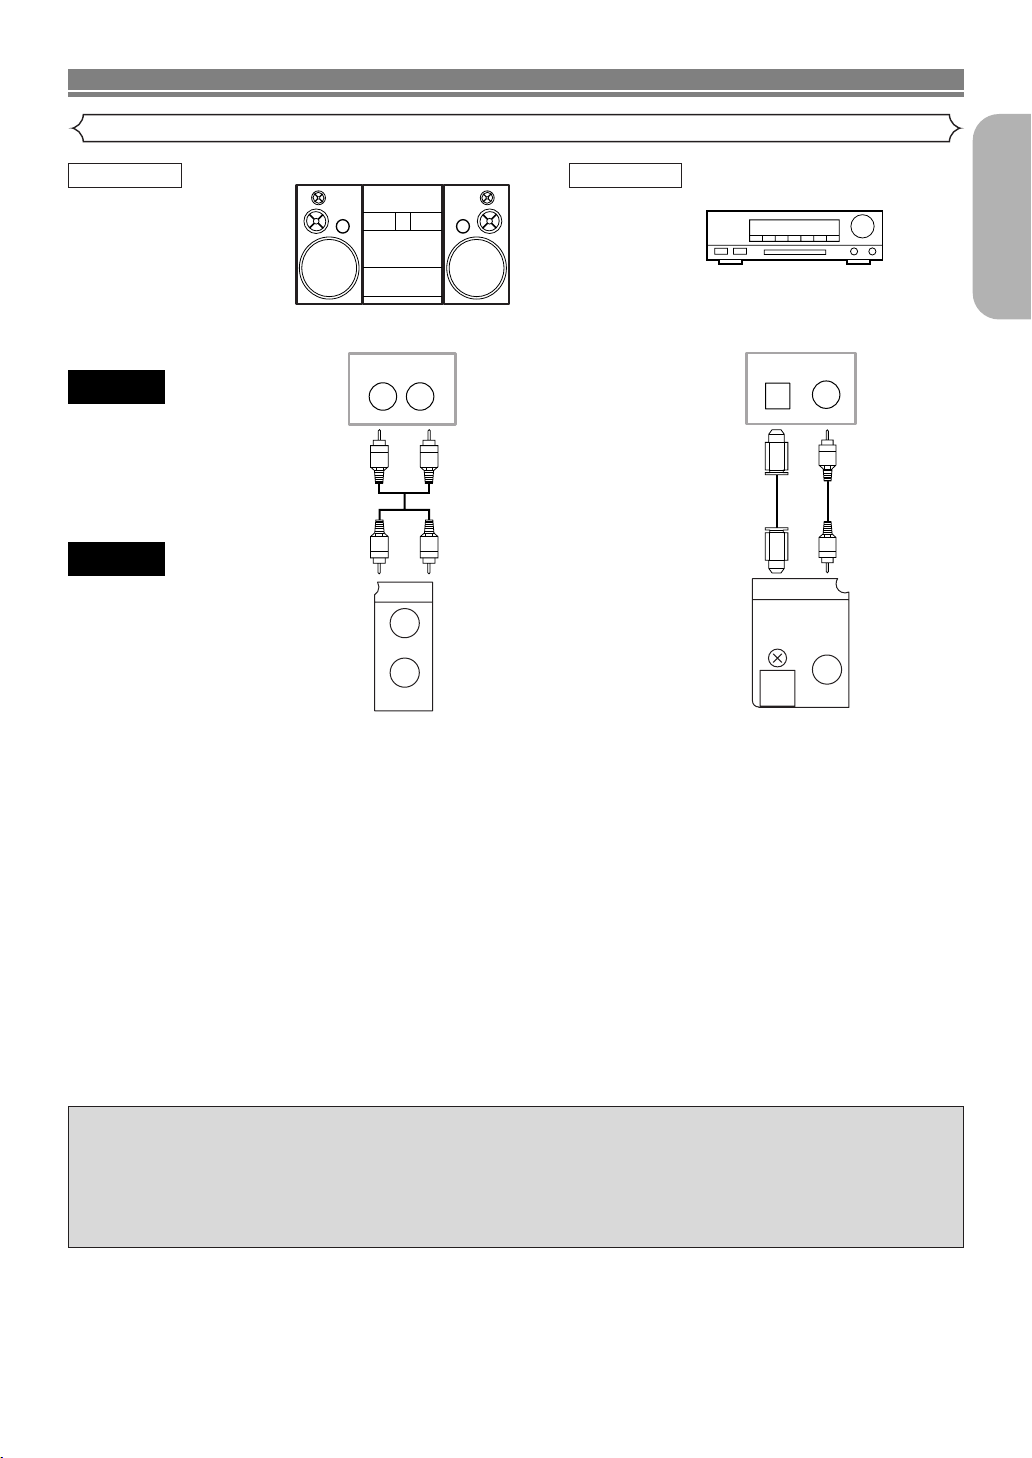
Connection to an audio system
Method 1 Method 2
Dolby Digital decoder,
DTS decoder,
Stereo system
AUDIO
DVD/VCR
• Method 1 DVD/VCR + Stereo system
• Method 2 DVD/VCR + Dolby Digital decoder, DTS decoder or MPEG decoder
Audio Input Jacks
Analog Audio Out
Digital Audio Input
Jacks
Digital Audio Out
or MPEG decoder
NOTES
• If you use the Euro audio/video cable, it is not necessary to connect the analog audio cable.
• If output Dolby Digital audio, connect to a Dolby Digital decoder, and set “DOLBY DIGITAL” to “BITSTREAM” for audio output in the setup mode. (See page 28.)
• If output DTS audio, connect to a DTS decoder, and set “DTS” to “BITSTREAM” for audio output in the setup mode. (See
page 28.)
• If output MPEG audio, connect to a MPEG decoder, and set “MPEG” to “BITSTREAM” for audio output in the setup mode.
(See page 28.)
• Unless connected to a Dolby Digital decoder, DTS decoder, or an MPEG decoder, set “DOLBY DIGITAL” and “MPEG” to
“PCM”, and “DTS” to “OFF” for audio output in the setup mode. Playing a DVD using incorrect settings may generate noise
distortion, and may also damage the speakers. (See page 28.)
• The audio source on a disc in a Dolby Digital 5.1 channel surround format cannot be recorded as digital sound by an MD or
DAT deck.
English
Optical cable (not supplied)
• Optical cable (not supplied) may be damaged when bent at sharp angles. Ensure cables are coiled in loops with a diameter of 15 cm or more when storing them.
• Use a cable which is 3 m or shorter.
• Insert cable plugs firmly into the jacks when making connections.
• If a plug has minor scratches or is dirty, clean it with a soft cloth before inserting it into a jack.
–13–
EN
Page 14
CONNECTIONS
Connection to a TV (for DVD/VCR)
Method 1 Method 2 Method 3
RL
Good pictureBasic Audio Better picture
21-pin Scart jack
S-VIDEO IN
Best picture
COMPONENT
VIDEO IN
CB/PBYCR/PR
TV
Audio Cable S-Video
Cable
ANALOG
AUDIO OUT
L
S-VIDEO
OUT
Euro
audio/video
Cable
AV
RGB TV
Component
Video
Cable
CR/
P
DVD
CB/
B
R
P
COMPONENT VIDEO OUT
Y
DVD/VCR
R
Analog Audio out
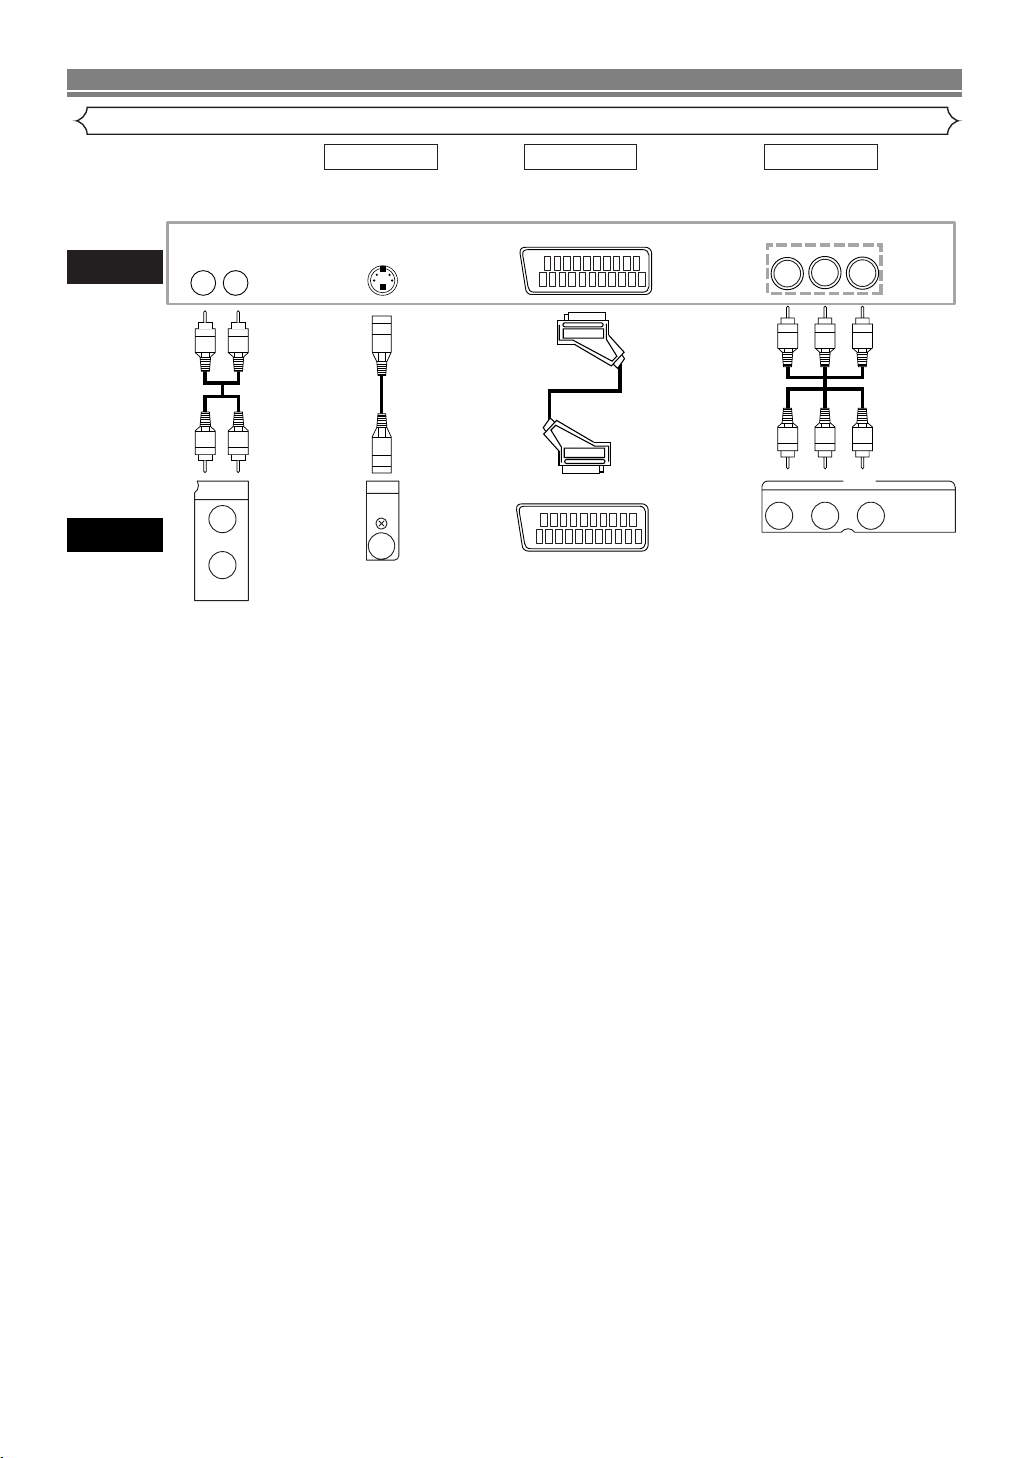
• Method 1 DVD/VCR + TV with S-Video Input Jack
• Method 2 DVD/VCR + TV with AV1 Jack
• Method 3 DVD/VCR + TV with DVD Player + TV with Component Video Jacks
NOTES
• S-Video output connector
The video signals are divided into colour (C) and brightness (Y) signals, achieving a clearer picture.
If the TV is equipped with a S-Video input connector, we recommend connecting it to the this product’s S-Video output connector using a commercially available S-Video connection cord.
• If you use the Euro A/V (SCART) jack, it is not necessary to connect the analog audio cable.
• Connect the DVD/VCR directly to a TV. If the A/V cables are connected to a VCR, pictures may be distorted due to the copy
protection system.
• Be sure not to use both the Euro A/V (SCART) jack and component Video jacks for video output at the same time.
• When changing the VIDEO OUT setting (SCART or COMPONENT INTERLACE / COMPONENT PROGRESSIVE, connect
to a VIDEO jack or an S-VIDEO jack on the TV. If the setting is changed, for example, to COMPONENT INTERLACE /
COMPONENT PROGRESSIVE while the Euro A/V (SCART) jack is connected to the TV, a distorted video signal may be
output.
• When your TV conforms to RGB input signal, the Euro AV (scart) connection ensures you the best picture and audio quality. However if your TV does not confirm to RGB input signal, the S-VIDEO OUT and analog AUDIO OUT connection is better. (for DVD features only)
S-Video out Euro
Audio/Video out
Component
Video out
Selecting Progressive Scan (625p<576p> or Interlaced 625i<576i>) Playback
¡If your TV is compatible with progressive scanning (625p<576p>), connect the TV to the Component Video Output jacks of
the DVD/VCR and set “VIDEO OUT” to “COMPONENT PROGRESSIVE” in the display setting. Next, set your TV to the progressive scan mode. Refer to page 28 for instructions on changing the display setting.
¡If your TV is not compatible with progressive scan, set “VIDEO OUT” to “COMPONENT INTERLACE”.
¡Use a commercially available adaptor if the video input jacks of your TVs or monitors are the BNC type.
What is Progressive Scanning?
¡Unlike conventional interlace scanning, the progressive scan system provides less flickering and images in higher resolution
than that of traditional (625i<576i>) television signals.
–14–
EN
Page 15
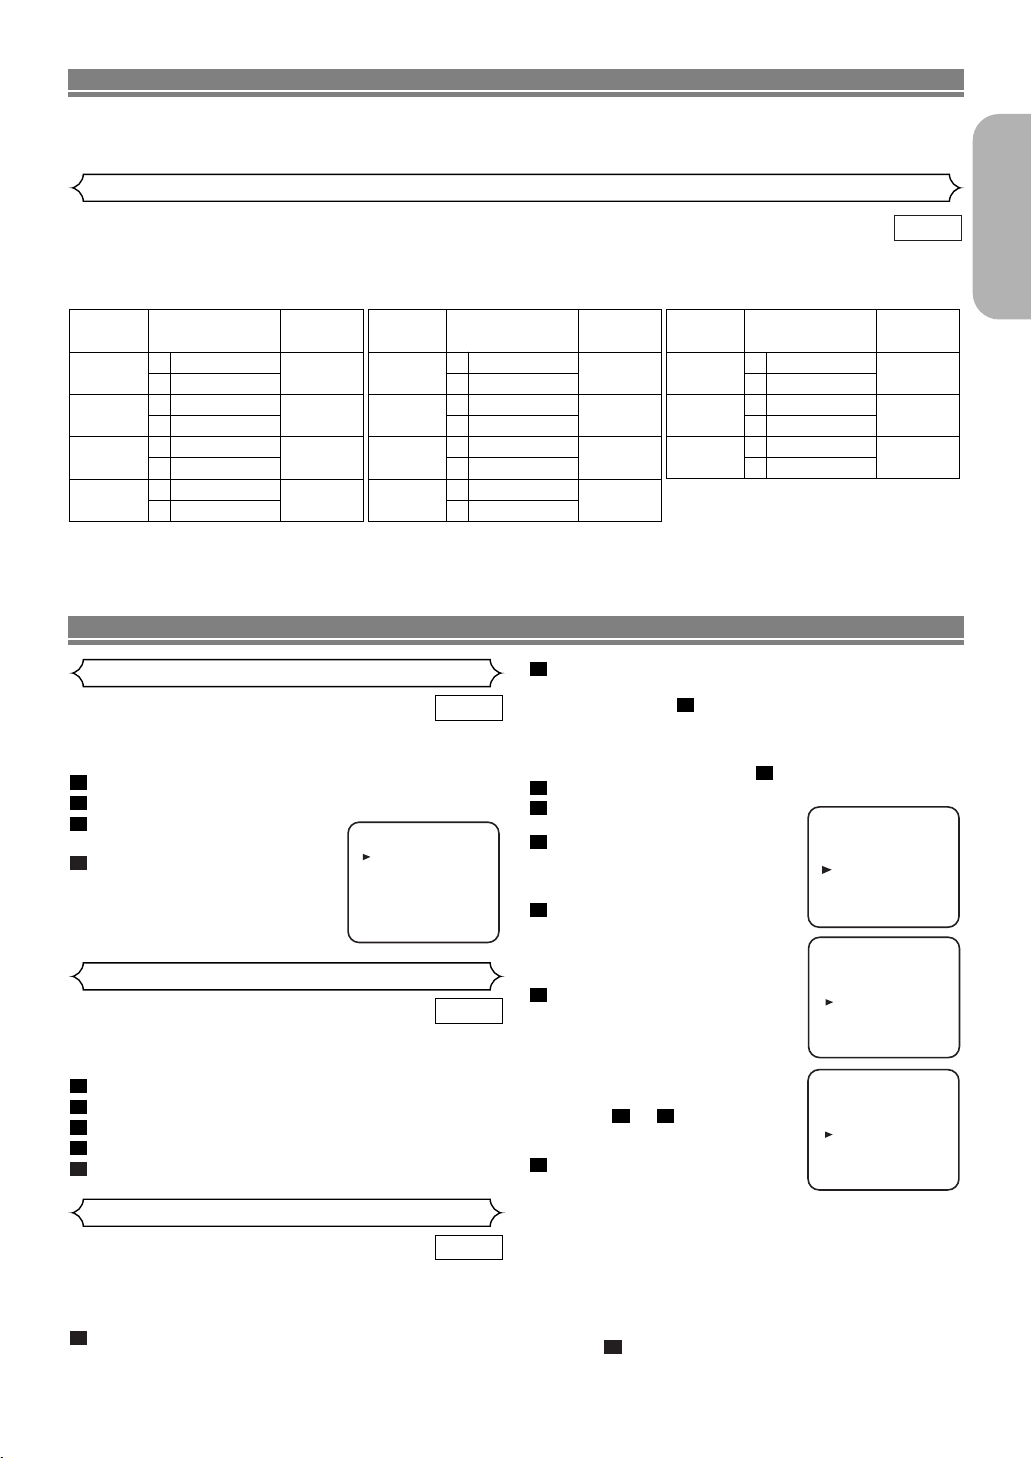
HI-FI STEREO SOUND SYSTEM
•
During reception of bilingual broadcasts:
Display on
the TV screen
Mode
MAIN
SUB
MAIN
SUB
MAIN
SUB
MAIN
SUB
Main Audio
Main Audio
Sub Audio
Sub Audio
Main Audio
Sub Audio
L
R
L
R
L
R
AUDIO OUTPUT
•
Reception of stereo broadcasts:
STEREO
LEFT
RIGHT
- None -
Display on
the TV screen
Mode
Stereo
L
R
Monaural
L Audio
R Audio
L Audio
L Audio
R Audio
R Audio
L+R Audio
L+R Audio
L
R
L
R
L
R
L
R
AUDIO OUTPUT
•
During playback of the recorded tape in
Hi-Fi mode:
Mode
Stereo
L
R
Normal
STEREO
LEFT
RIGHT
- None -
Display on
the TV screen
Hi Fi L Audio
Hi Fi R Audio
Hi Fi L Audio
Hi Fi L Audio
Hi Fi R Audio
Hi Fi R Audio
Normal Audio
Normal Audio
L
R
L
R
L
R
L
R
AUDIO OUTPUT
This DVD/VCR will record and playback Hi-Fi stereo sound. In addition it has a A2 or NICAM stereo sound decoder.
This equipment will receive stereo and bilingual broadcasts and there are several ways of recording and playing back the sound.
Selecting the Sound Mode
VCR
You can select each mode by pressing AUDIO on the remote control. Each mode is indicated on the TV screen as following.
NOTES:
• If you play non-Hi-Fi tapes, the DVD/VCR will play automatically in monaural even if you select any mode.
• If the stereo signal becomes weak, the broadcast is automatically recorded in monaural.
PRESET FOR USE
English
Selecting the Language
Follow the steps on this page only when you plug the
DVD/VCR for the first time.
• Use the remote control for this procedure.
1
Tu rn on the TV and select the video channel on the TV.
2
3
yy
Press
Press
/I.
K or L repeatedly to select
your desired language.
4
Press
MENU.
Changing the Language
If you want to change the language used on the TV screen
menus, follow the steps bellow.
• Use the remote control for this procedure.
1
Press MENU.
2
3
4
5
Skip this section when connected by SCART.
Video channel setting will be necessary, if your DVD/VCR is
connected to the TV via the aerial cable.
1
K or L to select “INITIAL”, then press BB.
Press
K or L to select “LANGUAGE”, then press BB.
Press
K or L repeatedly to select your desired language.
Press
MENU.
Press
Video Channel Setting
• Use the remote control for this procedure.
Insert a pre-recorded tape into the DVD/VCR.
• The DVD/VCR will turn on and start playback automatically. If playback does not start, press BB.
VCR
LANGUAGE
[ ]
ENGLISH
FRANÇAIS
ESPAÑOL
DEUTSCH
ITALIANO
SVENSKA
NEDERLANDS
VCR
VCR
NOTES:
–15–
2
Select and adjust your TV to channel 36.
• If the playback picture appears on the TV screen, continue with step .
8
• If channel 36 is employed for broadcasting, or interference lines appear on the picture, the RF converter
must be set to a different channel between CH22 and
CH69. Continue with step .
3
Press MENU.
4
5
K or L repeatedly to select
Press
“INITIAL”, then press B.
Press K or L repeatedly to select
“RF OUT”, then press B.
• The RF OUT CH menu will
appear.
6
Press K or L repeatedly to select
3
MENU
TIMER
SET UP
INITIAL
a channel which is not used for
broadcasts between channel 22
and channel 69 in your area, then
press
Press
B.
MENU to exit.
7
• Set the TV channel to the RF
OUT CHANNEL which was
INITIAL
CH TUNING
CLOCK
RF OUT
LANGUAGE
GUIDE CHANNEL
selected on the DVD/VCR. A
picture from the DVD/VCR will
appear on the TV screen. If a
picture does not appear, repeat
steps to using a different
channel which is not used for
broadcasts.
8
Press CCto stop the tape.
•You may also access the RF OUT CH menu by pressing and holding
onds during power off until the RF OUT CH menu
appears.
• If your DVD/VCR and TV are connected using a
SCART cable there is no need to have the RF converter operating so it can be switched off and avoid the
possibility of interference. To switch off the RF converter, follow the instructions for Video Channel Setting to
step then select channel 22 first and then press L
so that “--” appears next to “RF OUT CH” on the TV
screen and finally press MENU to finish.
73
RF OUT CH 36
6
MENU on the remote control for 3 sec-
EN
Page 16
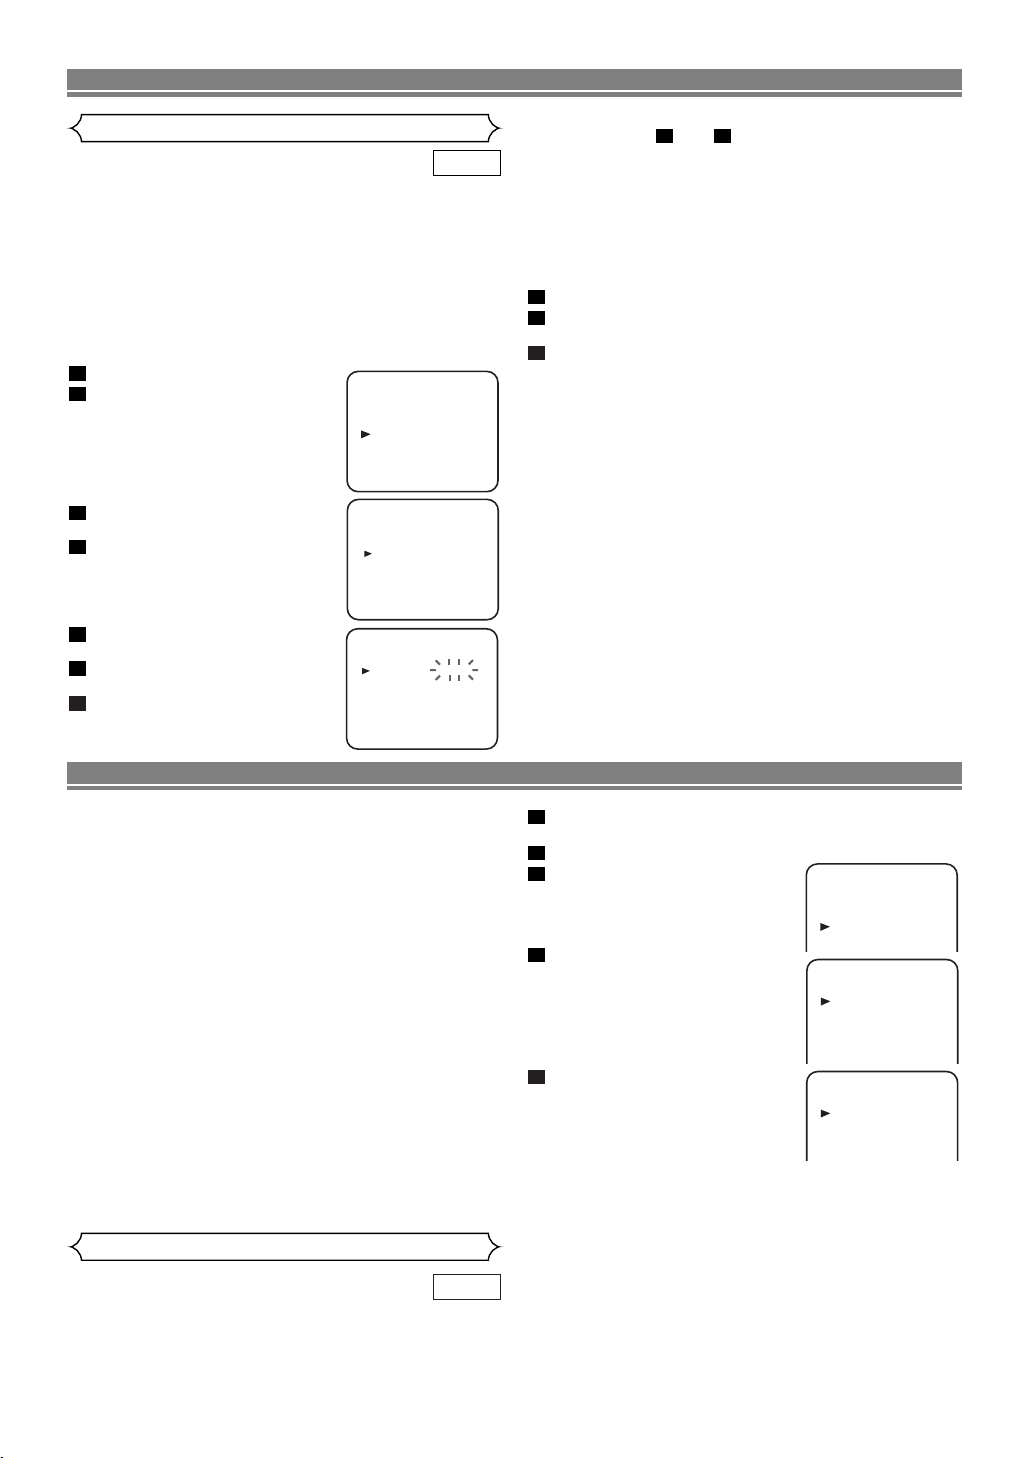
PRESET FOR USE
Setting the Clock
VCR
This DVD/VCR incorporates a 24-hour clock. The clock must
be set for the Automatic Timer Recording function to operate
correctly.
Your DVD/VCR is fitted with VPS/PDC (Refer to page 21). If
the VPS/PDC signal is available in your area, your DVD/VCR
can get the current time from your local PDC broadcast. It
keeps track of the time constantly referring to the time broadcasted by your VPS/PDC broadcast. If you want to use this
feature, refer to “Auto Clock Setting” in the next section.
• Use the remote control for this procedure.
Manual Clock Setting
1
Press MENU.
2
K or L to select “INITIAL”,
Press
then press BB.
3
4
K or L to select “CLOCK”,
Press
then press
BB
.
Press K or L to select “MANUAL”,
then press BB.
5
6
K or L until the relevant year
Press
appears, then press BB.
Likewise, set the relevant month,
day, hour, and minute.
7
Press MENU to start the clock.
MENU
TIMER
SET UP
INITIAL
INITIAL
CH TUNING
CLOCK
RF OUT
LANGUAGE
GUIDE CHANNEL
CLOCK
YEAR 2 0 0 4
MONTH 0 1
DAY 0 7 WE
HOUR
MINUTE
_ _
_ _
NOTES:
• In the steps and , you can go back to the item
you want to correct by pressing ss.
65
• Although seconds are not displayed, they begin counting from 00 when you exit by pressing MENU. Use this
feature to synchronise the clock with the correct time.
• When unplugging the power-cord or if there is a power
failure for more than thirty seconds, you may have to
reset the clock.
Auto Clock Setting
1
Follow the steps through 1 to 3 in “Manual Clock Setting”.
2
3
K or L to select “AUTO”, then press BBto select
Press
“ON”.
Tu rn off the DVD/VCR once by pressing yy/I (Standby/
Power ON).
• The clock will appear on the TV screen when you turn
on the DVD/VCR again.
NOTES:
• Channel Presetting must be set before the Auto Clock
is set.
• The DVD/VCR refers to the channel which was memorised into position 01.
The PDC channel must therefore be set to position 01.
• The clock cannot be set automatically if you are not
receiving a channel that carries a time signal in your
area. In this case, set the clock manually.
• Once the auto clock setting is performed, the DVD/VCR
will correct the current time by receiving PDC broadcasts whenever you turn off the DVD/VCR.
• The DVD/VCR will correct the current time automatically
at 8:00, if the DVD/VCR’s power is turned off.
• Between 23:00~1:00, the AUTO CLOCK function does
not work even if the DVD/VCR’s power is turned off.
TUNING
Tuning of broadcast channels not already preset in the
DVD/VCR can be performed in two ways.
AUTOMATIC TUNING
• By “AUTOMATICALLY” tuning channels and placing
them in sequential order in the DVD/VCR’s memory i.e.
the first channel found will be memorised into the
DVD/VCR’s channel position 1, the second channel
found will be memorised into the DVD/VCR’s channel
position 2 and so on.
•Execution of the “Automatic” tuning cancels all the preset channels. DO NOT use this feature if you intend to
use some of the pre-tuned channels. Use the “Manual”
tuning function to tune in the additional channels you
require.
MANUAL TUNING
• Each channel is tuned manually and individually. Follow
the steps laid out in the “Manual Tuning” section.
Before you preset Channel ...
• It is necessary to set the video channel if your
DVD/VCR is connected to the TV via the aerial cable,
and TV channel 36 is employed for broadcasting, or
interference lines appear on the picture. Please refer to
“Video Channel Setting”.
Automatic Tuning
VCR
You can programme the tuner to scan only the channels that
you can receive in your area.
• Use the remote control for this procedure.
1
Tu rn on the TV and select the TV channel to the video
channel on the TV.
2
Press MENU.
3
4
5
K or L to select “INITIAL”,
Press
then press BB.
Press K or L to select “CH TUNING”, then press BB.
Press
K or L to select “AUTO”,
then press BB.
• The tuner scans and memorises
all the active channels in your
area. After scanning, the tuner
MENU
TIMER
SET UP
INITIAL
INITIAL
CH TUNING
CLOCK
RF OUT
LANGUAGE
GUIDE CHANNEL
CH TUNING
AUTO
MANUAL
MOVE
stops on the lowest memorised
channel.
To Select a Desired Channel
You can select a desired channel by using
the PROG (K or L), or directly pressing Number on the
remote control.
• Enter a channel numbers as a two-digit number for the
quickest results. For example, to select channel 6,
press 0 and 6. If you only press 6, channel 6 will be
selected after a brief delay.
•You can only select channels 1–99.
–16–
EN
Page 17
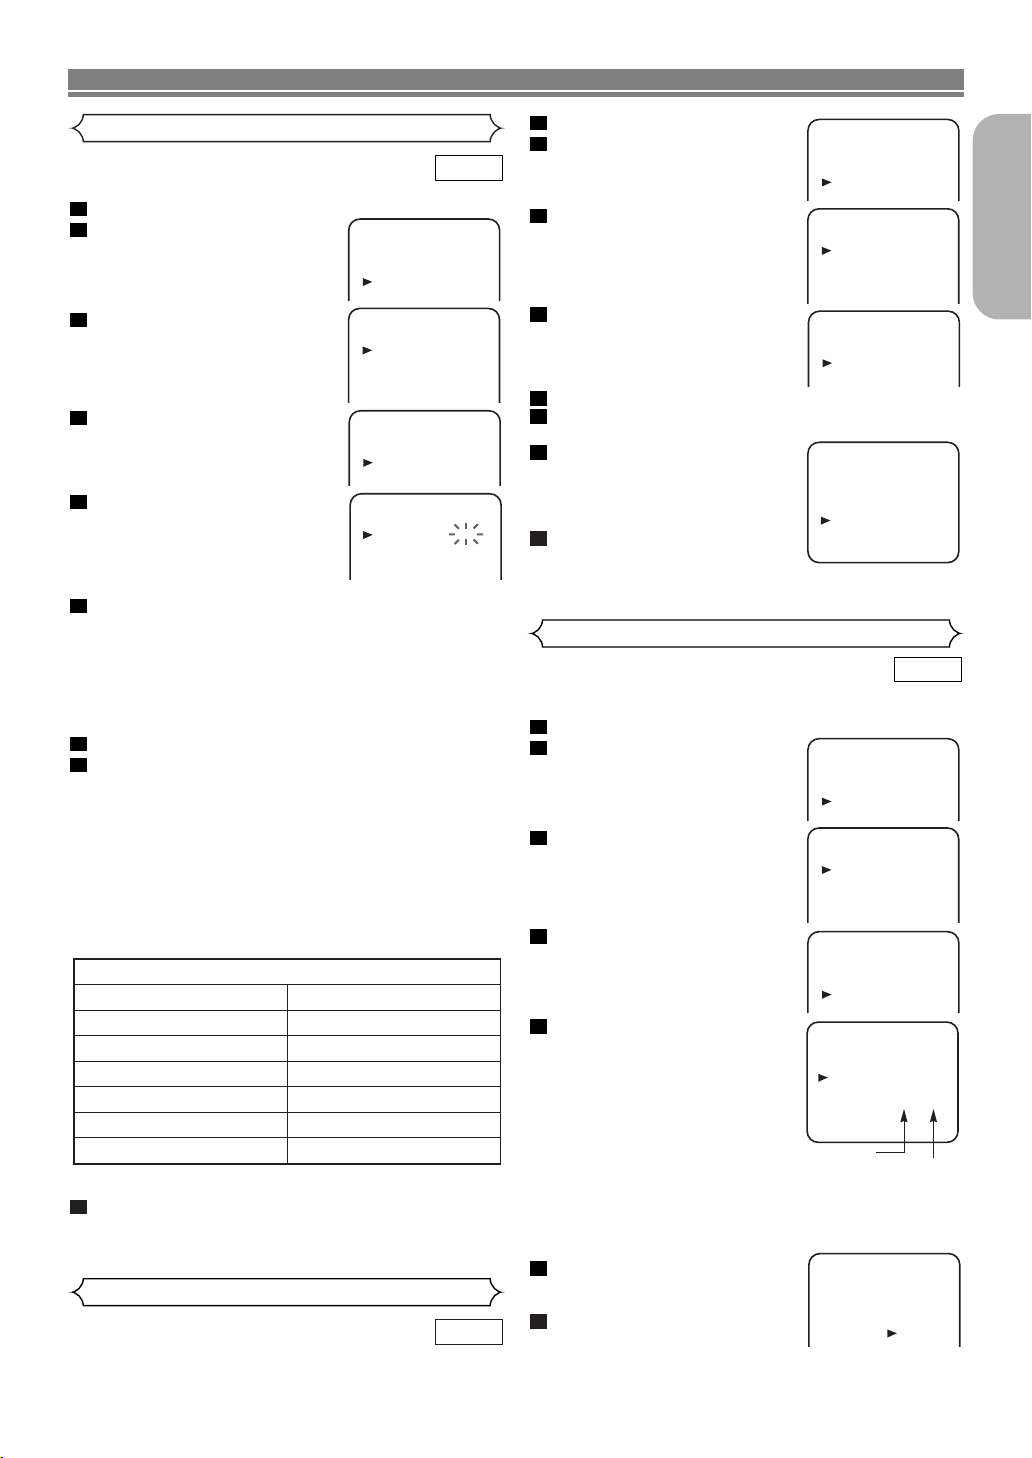
TUNING
Manual Tuning
VCR
• Use the remote control for this procedure.
1
Press MENU.
2
3
4
5
K or L to select “INITIAL”,
Press
then press B.
Press K or L to select “CH TUNING”, then press B.
Press K or L to select “MANUAL”,
then press B.
Press K or L to select “POSITION”, then press B.
• When a weak signal is received
in Manual Tuning mode, you can
change the background to solid
MENU
TIMER
SET UP
INITIAL
INITIAL
CH TUNING
CLOCK
RF OUT
LANGUAGE
GUIDE CHANNEL
CH TUNING
AUTO
MANUAL
MOVE
MANUAL
POSITION
CHANNEL
DECODER
SKIP
[OFF]
[OFF]
P08
008
blue or the static screen by pressing CLEAR/C.RESET.
6
Press Number buttons or (K or L) to select your
desired position number, then press B.
•You can select position number 01-99.
• If “ON” appears on the right side of “SKIP”, press K or
L to point to “SKIP”. Then, press B to select “OFF”.
• If you want to remove scrambled signals, press K or L
repeatedly to point to “DECODER”. Then, press B to
select “ON”.
7
Press K or L to select “CHANNEL”, then press B.
8
K or L to start scanning.
Press
• The DVD/VCR tuner will begin to search up or down
automatically. When a channel is found, the DVD/VCR
will stop searching and the picture will appear on the
TV Screen.
•You can select desired channel number by using the
Number Buttons. You must refer to the following channel
plan table and press three digits to select the channel
number. (To select channel 24, first press “0” and then
press “2” and “4”.)
• If this is the channel you want, press B.
Channel Plan
CH Indication TV Channel
02 – 12 E2 – E12
13 – 20 A – H (only ITALY)
21 – 69 E21 – E69
74 – 78 S01, S02, S03, X, Y
80 – 99,100 S1 – S20,GAP
121 – 141 S21 – S41
This DVD/VCR can receive Hyper and Oscar frequency bands.
9
Press MENU to exit.
NOTE:
•To confirm that a channel has been added, press
PROG (K or L).
To Skip a Preset Channel
VCR
The channels you can no longer receive or seldom watch can be
set to be skipped when you access channels with
• Use the remote control for this procedure.
PROG (K or L).
1
Press MENU.
2
K or L to select “INITIAL”,
Press
then press B.
3
Press K or L to select “CH TUNING”, then press B.
4
Press
K or L to select “MANUAL”,
then press B.
5
Press K or L to select “POSITION”, then press BB.
6
Press Number buttons or (K or L) to select relevant
MENU
TIMER
SET UP
INITIAL
INITIAL
CH TUNING
CLOCK
RF OUT
LANGUAGE
GUIDE CHANNEL
CH TUNING
AUTO
MANUAL
MOVE
position number, then press B.
7
8
K or L to select “SKIP”,
Press
then press B to select “ON”.
•To memorise the channel again,
press
B. “ON” will change to
“OFF”.
MENU to exit.
Press
MANUAL
POSITION
CHANNEL
DECODER
SKIP
NOTE:
•To confirm that a channel has been deleted, press
PROG (K or L).
Channel Order
You can arrange the channels in any order you want as follows.
• Use the remote control for this procedure.
1
Press MENU.
2
3
4
5
K or L to select “INITIAL”,
Press
then press B.
Press K or L to select “CH TUNING”, then press B.
Press K or L repeatedly to select
“MOVE”, then press B.
Press K or L repeatedly to select
the position number you want to
change the channel, then press
B.
•You cannot select a position
number where “---” appears next
MENU
TIMER
SET UP
INITIAL
INITIAL
CH TUNING
CLOCK
RF OUT
LANGUAGE
GUIDE CHANNEL
CH TUNING
AUTO
MANUAL
MOVE
MOVE
P01:
02
P02:
03
[ ]
P03:
04
P04:
05
P05:
06
to the number. This is because
SKIP is set to “ON” for this position number.
Position
Number
• When a weak signal is received
in Channel Order mode, you can change the background to solid blue by pressing CLEAR/C.RESET.If
you press the button again, the background will return
to the static screen.
6
Press
K or L repeatedly until the
channel move to another position
number, then press B.
7
Press
MENU to exit.
MOVE
P01:
P02:
P03:
P04:
P05:
02
03
11
05
06
–17–
P08
008
[OFF]
[ON]
VCR
P06:
07
P07:
08
P08:
09
P09:
10
P10:
11
Channel
Number
P06:
07
P07:
08
P08:
09
P09:
10
[ ]
P10:
04
English
EN
Page 18
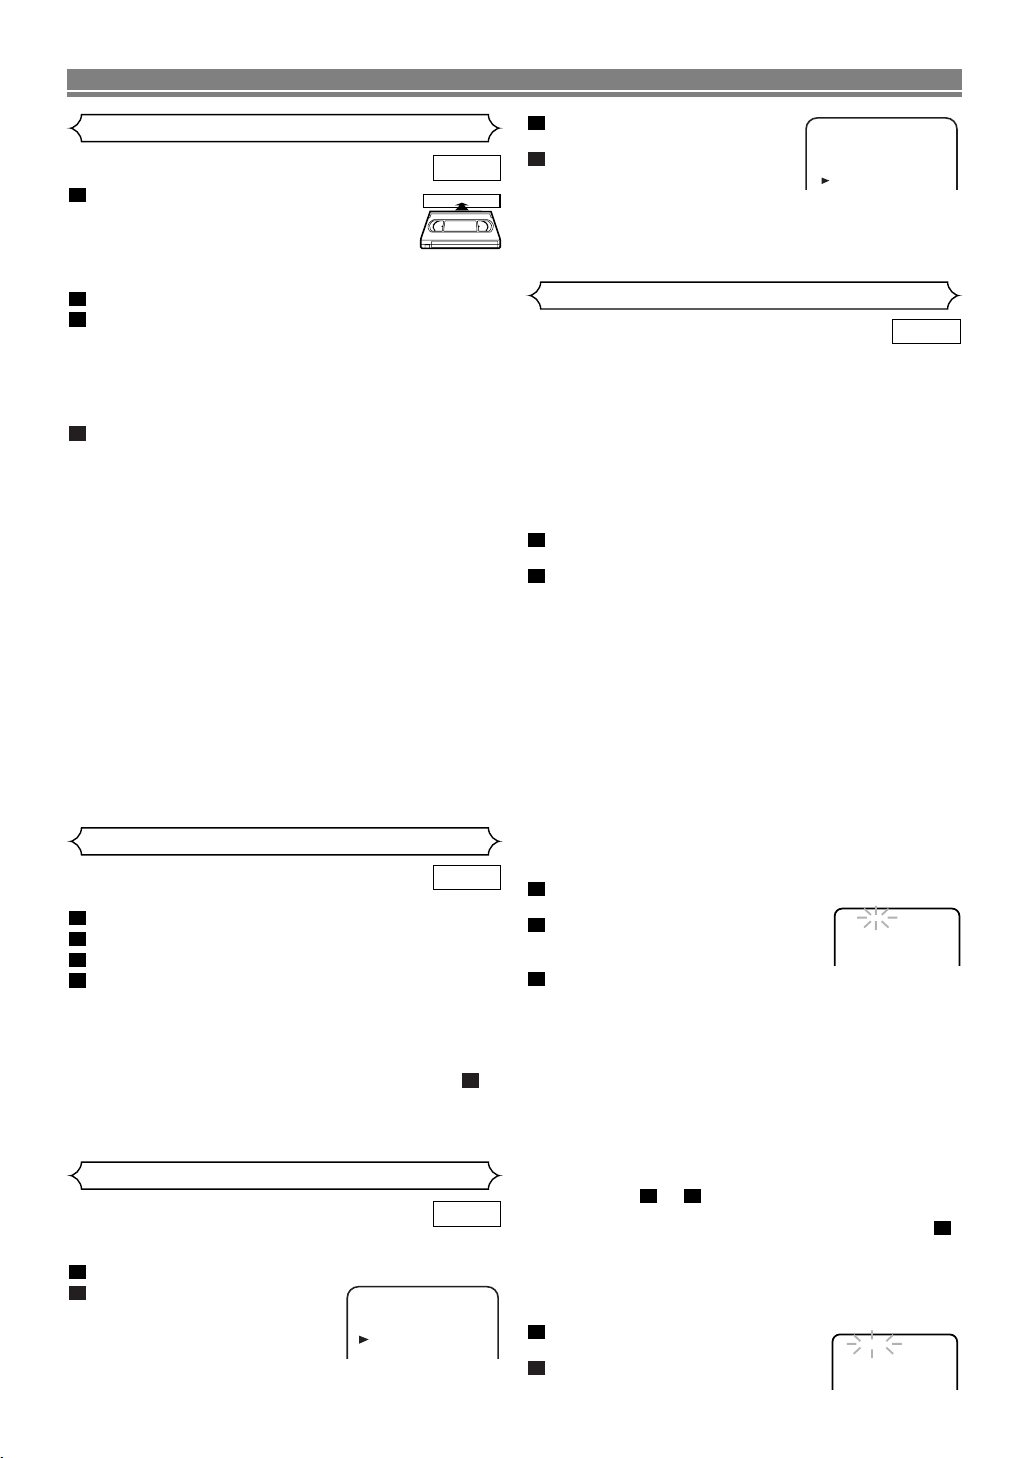
PLAYBACK FUNCTION
Normal Playback
VCR
1
Insert a prerecorded tape. The DVD/VCR will
turn on.
• If the safety tab has been removed, the
VCR will start playback automatically.
•
If a cassette is in the DVD/VCR, STOP symbol appears in
TV screen when turning on the DVD/VCR(VCR mode).
2
Tu rn on the TV and select the video channel on the TV.
3
Begin playback by pressing
•
Tr acking adjustment will be done automatically (Digital
B (PLAY).
Tr acking function) when you start playback. To adjust the
tracking manually, press PROG (K or L) on the remote
control or PROGRAM (K or L) on the DVD/VCR.
• When a tape has reached the end, the VCR will rewind
the tape to the beginning and eject the tape automatically.
4
To stop playback, press C.
•
If no corresponding symbols appear on the display when
you press buttons such as B, II, g or h, that means
no cassette tape is in the DVD/VCR. Please insert a tape.
Counter Reset
•You can reset the counter by pressing
CLEAR/C.RESET on the remote control.
STILL/SLOW
You can freeze the picture on TV screen by pressing FFduring playback.
•You can advance the picture one frame at a time by
pressing FFduring the Still mode.
• When the picture begins to vibrate vertically, stabilize the
picture by pressing PROG (K or L) in the STILL mode.
•You can watch in the slow motion by pressing SLOW
during playback or the still mode. (The DVD/VCR mutes
the sound during slow motion. You can control the
speed by pressing g or h.)
• If a noise bar appears on the TV screen, you can
reduce it by pressing PROG (K or L).
• After the DVD/VCR has been in Still/Slow mode for 5
minutes, it will stop automatically to protect the tape
and the video head from damage.
•To return to playback, press B (PLAY).
Auto Repeat Playback
VCR
This feature allows you to play a tape over and over.
1
Press MENU.
2
3
4
K or L to select “SETUP”, then press B.
Press
K or L to select “AUTO REPEAT”, then press B.
Press
Begin auto repeat playback by pressing
B so that “ON”
appears next to “AUTO REPEAT”.
• When in Stop mode, Auto Repeat mode will start automatically.
• If the on screen menu still remains, press MENU to exit
the menu.
•To cancel the Auto repeat mode, press B at step
“OFF” will appear next to “AUTO REPEAT” on the TV
4
screen.
• Once you select the Auto Repeat mode, it stays in
effect even after you turn off the DVD/VCR.
Picture Select
VCR
This function enables you to select the picture quality of a tape.
• Use the remote control for this procedure.
1
Press MENU.
2
K or L to select “SETUP”,
Press
then press B.
MENU
TIMER
SET UP
INITIAL
3
Press K or L to select “PICTURE”, then press B.
4
Press B until the desired mode
(NORMAL, SOFT, or SHARP) is
SET UP
AUTO RETURN[ON]
AUTO REPEAT[ON
PICTURE[NORMAL
indicated on the TV screen.
• If the on screen menu still remains, press MENU to exit
the menu.
• Once you select the Picture Select mode, it stays in
effect even after you turn off the DVD/VCR.
Search Functions
PICTURE SEARCH
If you want to skip or repeat a scene during playback, press
g or h.
• Press it again and the VCR will now search at super high
speed. (This function will not work for a NTSC tape.)
• Press B (PLAY) to return to normal playback.
QUICK-FIND
This function enables you to search and confirm the contents
of the recorded programme(s) using the index mark.
• Use the remote control for this procedure.
•The tape must be fully rewound.
1
Press QUICK-FIND to skip to the beginning of next programme.
2
Press B (PLAY) to view at normal speed.
The Quick-Find is cancelled.
NOTES:
• This function will not operate in the Recording mode.
• When you want to cancel the Quick-Find while in
progress, press C.
• When the end of a tape is reached during the QuickFind, the tape will automatically rewind to the beginning.
After rewinding finishes, the DVD/VCR will eject the tape.
INDEX SEARCH
• The index mark will be made automatically when I is
pressed. It will also be marked at the starting point of
Timer recording and OTR.
• The index mark is not recorded if FFis pressed and
released during recording.
• The time gap between index marks on the tape should
be greater than 1 minute for SP recording and 2 minutes for LP recording.
• Use the remote control for this procedure.
1
Press SEARCH MODE so that the Index Search menu
appears.
2
Enter the number of recordings you
INDEX 03
wish to skip by pressing K or L within
30 seconds.
3
Press s or B to start index search. The DVD/VCR
begins rewinding or fast forwarding to the beginning of
desired progamme. When the preset programme is
reached,the DVD/VCR will start playback automatically.
• If you want to go in the forward direction, press B.If
you want to go in the reverse direction, press s.
• If you want to stop search function, press C.
•
After index search, the DVD/VCR will play the tape automatically.
NOTES:
• Index Search can be set up to 20.
• This function will not operate in the Recording mode.
• Operations must be followed up within 30 seconds,
from step to . Otherwise the Index Search mode
will be cancelled.
32
•To exit the Index Search mode, press MENU at step .
TIME SEARCH
This feature allows you to go to a specific point on a tape by
entering the exact amount of time you wish to skip in order to
reach the point.
• Use the remote control for this procedure.
1
Press SEARCH MODE twice so that
the Time Search menu appears.
2
Enter your desired time to skip by
TIME 2 : 50
pressing K or L within 30 seconds.
–18–
VCR
]
]
2
EN
Page 19
PLAYBACK FUNCTION
3
Press s or B to start time search.
The DVD/VCR begins rewinding or fast forwarding to the
specified point.
When 0:00 is reached, the DVD/VCR will start playback
automatically.
• If you want to go in the forward direction, press B.
• If you want to go in the reverse direction, press
• If you want to stop search function, press
s.
C.
• After time search, the DVD/VCR will play the tape automatically.
RECORDING FUNCTION
VCR
It may be UNLAWFUL to record copyrighted material without
the consent of the copyright owner.
This DVD/VCR will operate with any cassette that bears the
VHS mark. For best results, we recommend the use of highquality tapes. Do not use poor quality or damaged tapes.
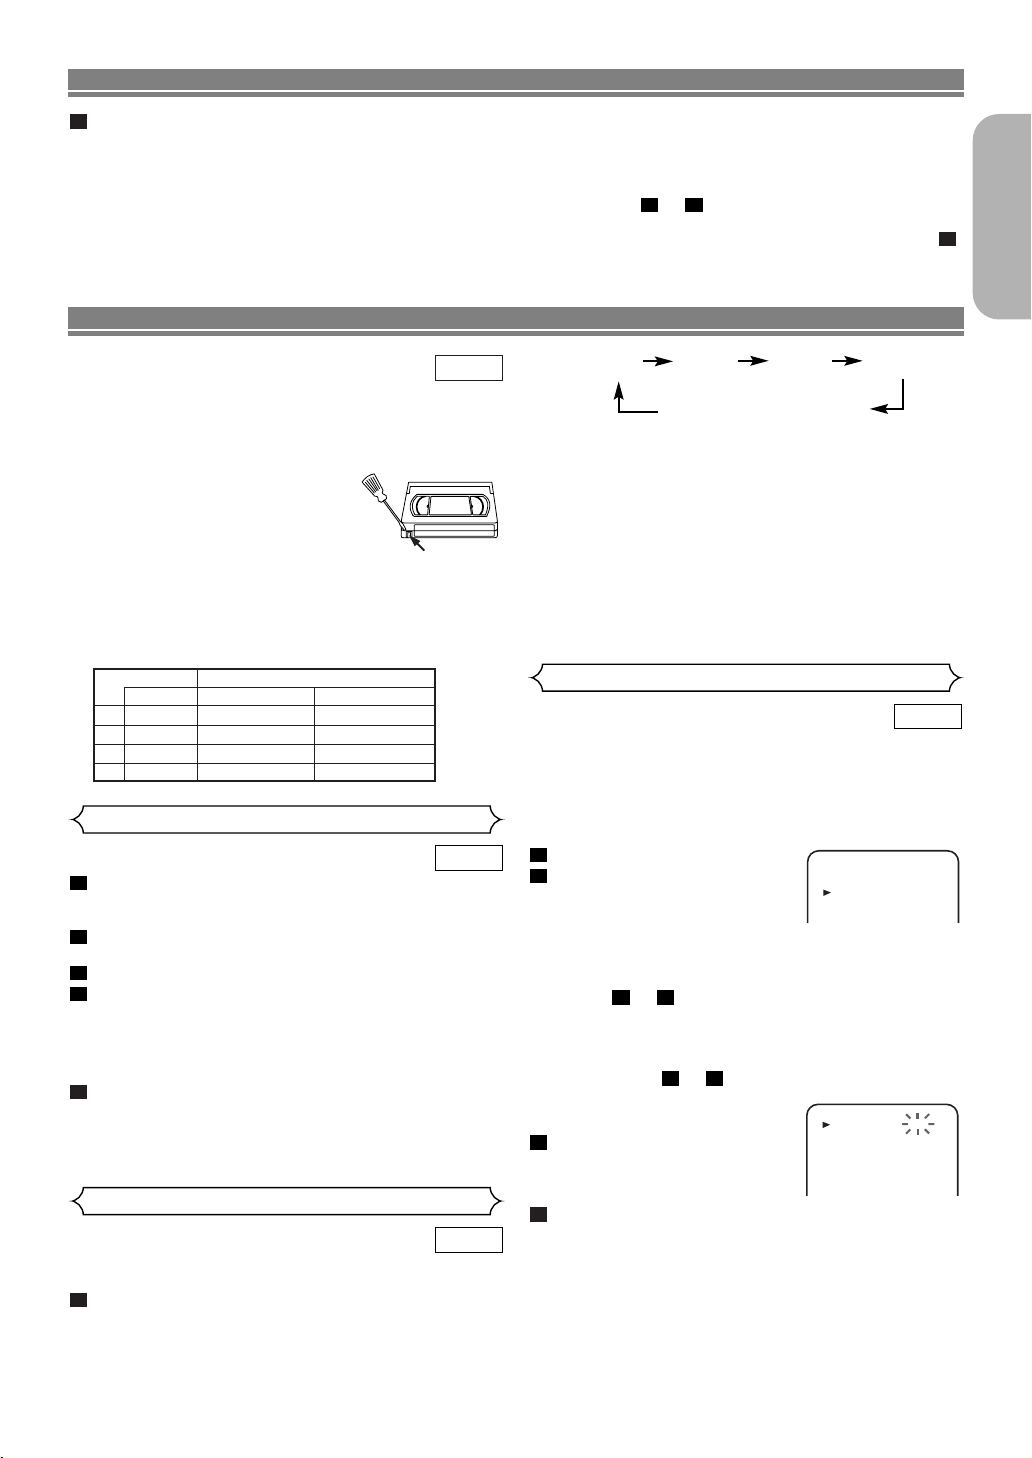
•You can prevent accidental erasing of a recording by breaking off
the erase prevention tab on the
back edge of the cassette.
• If you decide to record on the
tape again, cover the hole with
Ta b
plastic tape.
TWO DIFFERENT TAPE SPEEDS
Before recording, select the tape speed : SP mode (Standard
Play) or LP mode (Long Play).
The table below shows the maximum recording/playback
time using E-60, E-120, E-180 or E-240 tapes in each mode.
TYPE OF TAPE RECORDING/PLAYBACK TIME
TAPE SPEED
E-60 1 HOUR 2 HOURS
E-120 2 HOURS 4 HOURS
E-180 3 HOURS 6 HOURS
E-240 4 HOURS 8 HOURS
SP MODE LP MODE
Normal Recording
VCR
1
Insert a cassette tape with its erase-prevention tab in place.
(If necessary, rewind or fast forward the tape to the point
at which you want to begin recording.)
2
Press Number buttons or PROG (K or L) to select the
channel to be recorded.
3
Press SPEED to select the tape speed (SP/LP).
4
REC/OTR (I) to begin recording.
Press
• “REC” on the display comes on.
•To temporarily stop recording or to resume it, press
After the DVD/VCR has been in Pause mode for 5 min-
FF
utes, it will stop automatically to protect the tape and
the video head from damage.
5
Press C when recording is completed.
NOTE:
• When you wish to watch another programme while
recording, select desired channel on your TV.
OTR (One Touch Recording)
VCR
This feature allows you to set the recording length simply by
pressing REC/OTR (I).
1
REC/OTR (I) to begin OTR. The REC and TIMER
Press
lights come on. Change the recording length by pressing
REC/OTR (I) repeatedly.
NOTES:
• Time search can be set up to 9 hours 59 minutes
(9:59).
• This function will not operate in the Recording mode.
• Operations must be followed up within 30 seconds,
from step to . Otherwise the Time Search mode
32
will be cancelled.
•To exit the Time Search mode, press MENU at step .
I(0:30) I(1:00) I(7:30) I(8:00)
(OTR: 30minutes)
INormal recording
•To check time remaining during an OTR, press
•
To change the recording length during an OTR, press
REC/OTR (I) repeatedly until the desired length appears.
•To stop an OTR before recording is finished, press C.
•To cancel the OTR but continue recording, press
REC/OTR (I) repeatedly until “I” appears in the upper
left corner of the TV screen.
• If a tape ends during OTR, the VCR will stop, eject the
tape, and switch to the DVD mode automatically as the
TIMER light blinks. (If the DVD power is off, the VCR
will become STANDBY status).
•When OTR is finished , the DVD/VCR turns off automatically. To use the VCR again, press
remote, or STOP/EJECT A on the DVD/VCR.
TIMER on the
Timer Recording
You may programme the DVD/VCR to start and end a recording while you are away.You can set eight programmes to
record on specific days, daily or weekly within a 1 year period.
• Use the remote control for this procedure.
• Inser t a cassette tape with its erase prevention tab in
place. (If necessary, rewind or fast forward the tape to
the point at which you want to begin recording.)
1
2
NOTES:
If you have not set the clock yet, “CLOCK” setting menu
appears. If so, follow the steps outlined in the “Setting the
Clock” section. Then, set the timer.
.
3
4
For once-only recording: Press K or L repeatedly until the
relevant month appears.
For daily recording: To record a TV programme at the same
time on the same channel from Monday through Friday.
While the month digit is flashing, press K or L repeatedly to
select “MO-FR”.
For everyday recording: To record a TV programme at the
same time on the same channel every day. While the month
digit is flashing, press
MENU.
Press
K or L to select “TIMER”,
Press
then press B.
MENU
TIMER
SET UP
INITIAL
• When you press B after pressing (K or L) or during
steps to , the input mode will move to the next
10
3
step.
• If you do not press B within 5 seconds of setting an
item, the input mode will move to the next step.
• Press s to go back one step from the current setting
during steps to . If s is pressed when the
TIMER NUMBER is flashing, the
entire programme contents will
be erased.
Programme number flashes. Press
K or L repeatedly until the desired
programme number appears,
then, press
B.
10
4
TIMER NUMBER
DATE
START
END
CHANNEL
SPEED
VPS/PDC
Select once, daily, everyday or weekly recording.
K or L repeatedly to select “MO-SU”.
2
DISPLAY.
VCR
1
--/--
--:--
--:--
--
--
--
English
–19–
EN
Page 20
RECORDING FUNCTION
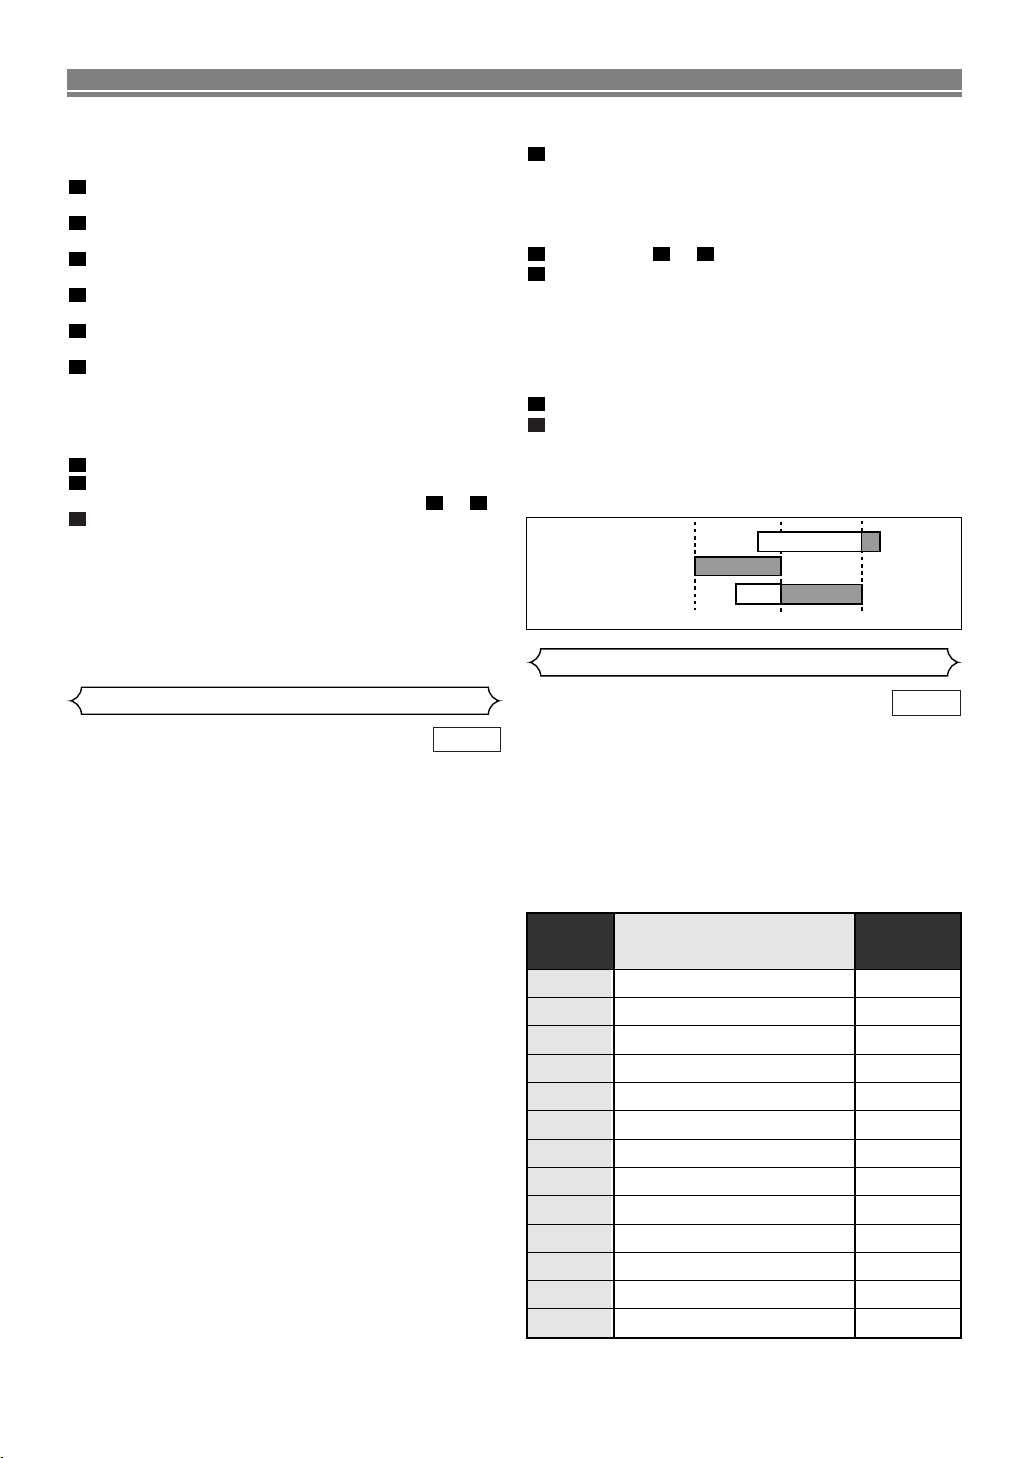
For weekly recording: To record a TV programme at the
same time on the same channel every week. While the
month digit is flashing, press K or L repeatedly to select “WMO” (example: every monday).
5
For once-only recording only : Press
until your desired day appears.
6
Press K or L repeatedly until the relevant start hour
appears. Next, enter the minute digit.
7
Press K or L repeatedly until the relevant end hour
appears. Next, enter the minute digit.
8
Press K or L repeatedly until the relevant channel number appears.
9
Press K or L repeatedly until your the desired tape
speed appears.
10
Press K or L repeatedly to set VPS/PDC “ON” or “OFF”.
• The Video Programme System (VPS) / The Programme
Delivery Control (PDC) is a very convenient system
which assures that the TV programmes you have programmed for timer recording will be recorded exactly
from beginning to end (refer to page 21).
11
Press B. Programme 1 is now completed.
12
Press MENU to exit.
To set another timer programme, repeat steps to .
13
Press TIMER to activate the timer.
• TIMER light comes on.
• As REC light comes on, the DVD/VCR becomes
STANDBY status, and switches to DVD mode automatically.
• When all timer recordings are finished, REC light will
flash. To use the DVD/VCR again as usual, press
TIMER to disable the flashing REC light, then press
DVD or VCR to choose DVD or VCR mode, then contin-
ue with the other features as described in this manual.
K or L repeatedly
3
11
TO CHECK, CORRECT, OR CANCEL AN AUTOMATIC
TIMER PROGRAMME
1
Press TIMER.
• If the VCR’s power is off, press yy/I instead of TIMER,
then go on to the next step.
• If the DVD output mode is selected, you have to switch
it to the VCR mode by pressing the VCR on the remote
control or the OUTPUT on the DVD/VCR.
Repeat steps to in the “Timer Recording” section.
3
Select the programme number you want to check by
pressing
• The details of the selected programme appears on the
• Go to the digit you want to change by pressing s or B.
•You may cancel the entire programme by pressing s
4
Press MENU to exit.
5
Press
TO AVOID OVERLAP OF TIMER PROGRAMMES
A timer programme will not work whilst another programme
is under execution.
K or L.
TV screen.
Then, enter correct numbers by pressing K or L.
while the programme number flashes.
TIMER to return to timer stand-by mode.
Programme 1
Programme 2
Programme 3
312
9:00 10:00 11:00
SHOWVIEW®Guide Channel Set
Hints for Timer Recording
• If there is a power failure or the DVD/VCR is unplugged
for more than 30 seconds, the clock setting and all
timer settings will be lost.
• If a tape ends during TIMER RECORDING, the
DVD/VCR will stop, eject the tape, and switch to the DVD
mode automatically as the REC light blinks. (If the DVD
power is off, the VCR will become STANDBY status).
• If a tape is not in the DVD/VCR or does not have a
safety tab, the REC light flashes and timer recording
will not operate. Please insert a recordable tape.
• When all timer recordings are finished, the REC light
will flash. To use the DVD/VCR again as usual, press
TIMER to disable the flashing REC light, then press
VCR to select the VCR mode. Select either VCR or
DVD mode, then continue with the other features as
described in this manual.
• When timer recordings are set, the REC light will come
on. To use the DVD/VCR as usual until the time for the
recording, press TIMER so that REC light disappears.
Press VCR to choose the VCR mode. Select either
VCR or DVD mode, then continue with the other features as described in this manual.
• In timer standby mode, VCR feature does not function.
•To exit timer standby mode, press TIMER. The REC
light disappears and you can operate the VCR.
If you want to use the DVD/VCR during a VCR timer
recording or while the TIMER light is on or flashes.
•You can use the DVD/VCR while the REC light is on or
flashes, or during a timer recording. Press yy/I to turn
on the DVD/VCR. Press DVD on the remote control to
choose DVD mode, then continue with the other DVD
features as described in this manual. You don’t have to
set the TIMER off to use the DVD only.
TO STOP AN AUTOMATIC TIMER PROGRAMME
ALREADY STARTED
Press C/A on the DVD/VCR.
VCR
VCR
SETTING THE GUIDE CHANNELS FOR THE SHOWVIEW
SYSTEM
First, make a table like below.
Then, referring to your local TV guide magazine or the TV
listings of your local newspaper, fill in the each boxes with
proper information.
•Write your local channel numbers in the “VCR Channel”
column, corresponding TV-stations in the “TVStation”column, and Guide channels in the “GUIDE
Channel” column. Then continue with the other features
as described in this manual.
GUIDE
Channel
TV-Station
VCR
Channel
–20–
EN
Page 21
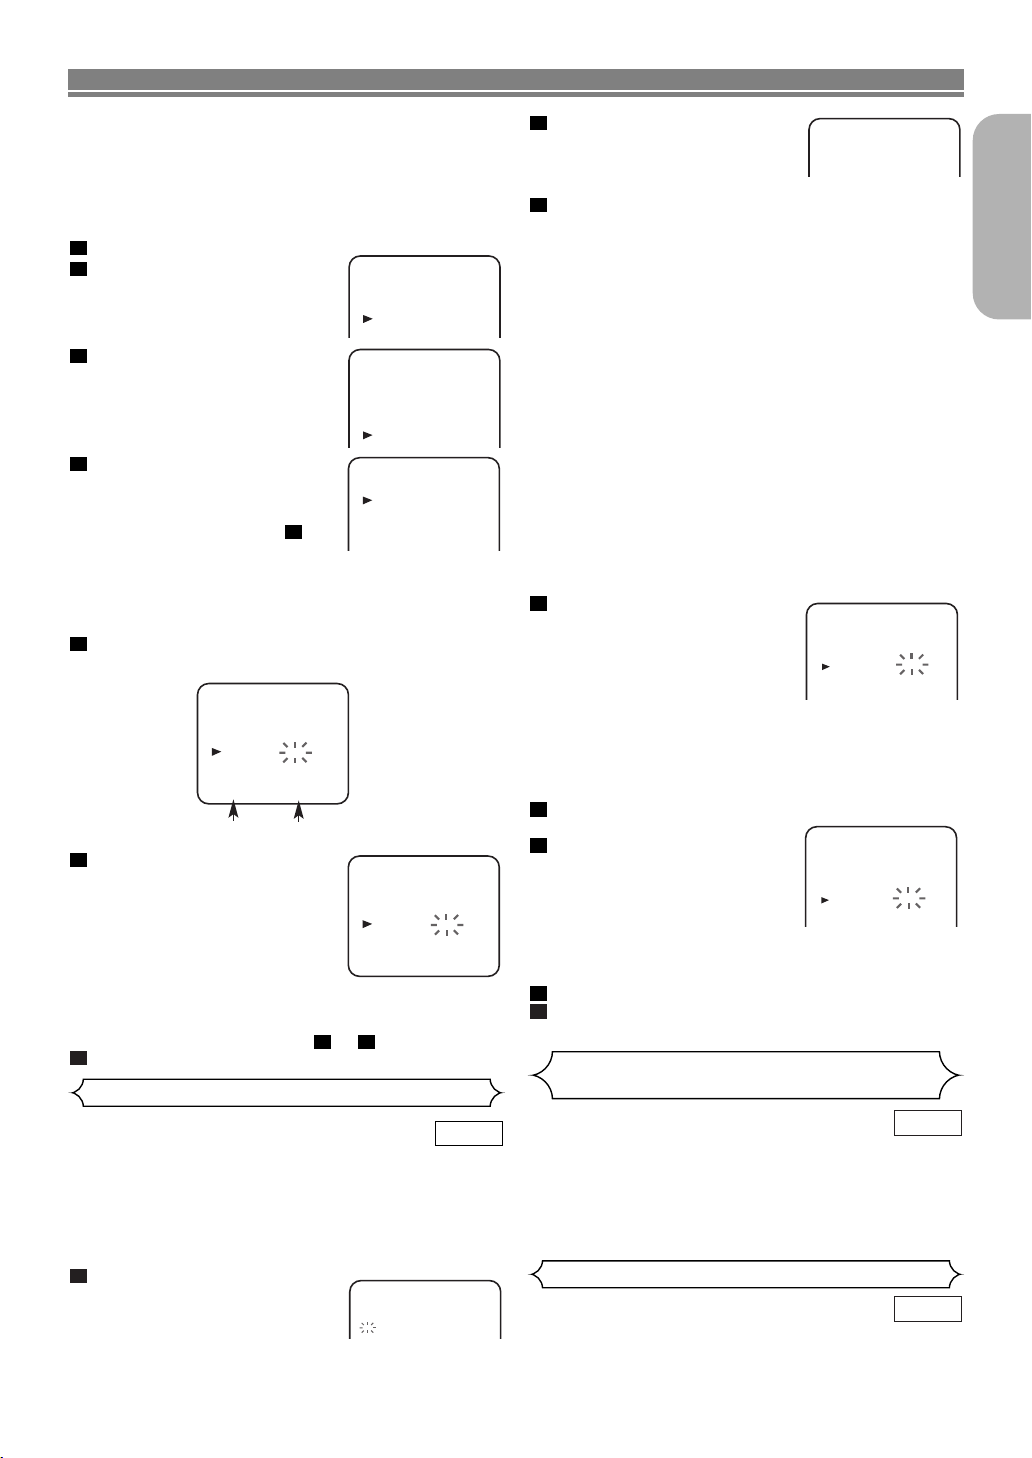
RECORDING FUNCTION
Now, compare the channel numbers you have written in the
GUIDE Channel and VCR Channel columns.You must set all
of these channel numbers that don't match using the following procedure before you programme the automatic timer
recording using the SHOWVIEW system.
• This setting only needs to be set once, but must be
done again if you use this DVD/VCR in another area by
moving it.
1
Press MENU.
2
3
4
K or L to select “INITIAL”,
Press
then press B.
Press K or L to select “GUIDE
CHANNEL”, then press B.
Press K or L to select the relevant mode, then press B.
•
To set the guide channel individually, select “MANUAL”. Then, press
B and continue with step .
•To set all the guide channels to
5
MENU
TIMER
SET UP
INITIAL
INITIAL
CH TUNING
CLOCK
RF OUT
LANGUAGE
GUIDE CHANNEL
GUIDE CH SELECTION
[MANUAL]
AV1
AV2
AV3
AV1, AV2, or AV3 select “AV1”, “AV2”, or “AV3”. Then
press MENU to exit.
• If you are recording from a Digital Satellite or Terrestrial
Set Top Box the channel should be set to AV2 (or is
connected to).
5
Press K or L repeatedly to select the position number,
then press B.
GUIDE CHANNEL
P96 : 99
P97 : --P98 : --P99 : --AV1 : --AV2 : ---
Position Number
6
Press Number buttons or (K or
L) to enter guide channel number,
then press B.
• Press s to erase all digit.
•You can select guide channels
1-255.
•To select channels from 1-9, first
press “0” twice, and then 1 to 9.
Guide Channel Number
GUIDE CHANNEL
P96 : 99
P97 : --P98 : 80
P99 : --AV1 : --AV2 : ---
•To select channels from 10 to 99, first press “0” once,
and then press the last two digits. (To select channel
80, first press “0” then press “8” and “0”.)
•To set another, repeat steps to .
7
Press
MENU to exit.
65
Timer Recording using the SHOWVIEW System
VCR
You can programme the timer using the SHOWVIEW programming numbers that are printed in TV guide magazine.You
can set eight programmes to record.
• Use the remote control for the this procedure.
• Inser t a cassette tape with its erase prevention tab in
place. (If necessary, rewind or fast forward the tape to
the point at which you want to begin recording.)
1
Press SHOW VIEW button.
If you have not set the clock yet,
“CLOCK” setting menu appears. If
so, follow the steps outlined in the
“Setting the Clock” section. Then, set the timer.
SHOWVIEW system
HOWVIEW No.
S
---------
2
Press Number buttons to set the
SHOWVIEW number of the programme you want to record.
• Press s to go back one digit
SHOWVIEW system
S
HOWVIEW No.
123456789
from current digit while you set the SHOWVIEW number.
3
Select once, daily, everyday, or weekly recording.
For once-only recording:
Press SHOW VIEW button.
For daily recording: To record a TV programme at the same
time on the same channel from Monday through Friday.
Press DAILY/WEEKLY repeatedly to select “DAILY (MO-
FR)”, then, press SHOW VIEW button.
For everyday recording: To record a TV programme at the
same time on the same channel every day. Press
DAILY/WEEKLY repeatedly to select “DAILY (MO-SU)”, then,
press
SHOW VIEW button.
For weekly recording: To record a TV programme at the
same time on the same channel every week.
Press DAILY/WEEKLY repeatedly to select “WEEKLY”, then,
press SHOW VIEW button.
NOTES:
•
If the SHOWVIEW number is not available, it will be cleared
automatically when you press
the correct S
button
• If the SHOWVIEW number flashes when you press SHOW
VIEW
entered was incorrect or the timer recording you just pro-
HOWVIEW number and press SHOW VIEW
again.
button, this means that the SHOWVIEW number you
SHOW VIEW
grammed and another timer recording overlap.
4
Confirm the channel number,
then, press B.
• If your local channel information
is programmed in DVD/VCR’s
memory, your local channel
number appears automatically.
•
If your local channel information is not programmed in
TIMER NUMBER
DATE
START
END
CHANNEL
SPEED
VPS/PDC
DVD/VCR’s memory, “– –” or an incorrect channel number
may appear. In this case, press K or L repeatedly until
your desired channel number appears.Then, press s.
• When you select the channel number using K or L it
memorises in DVD/VCR’s memory.
5
Press K or L repeatedly until the desired tape speed
appears.
6
Press K or L to choose “ON” or
“OFF”.
• The Video Programme System
(VPS) / The Programme
Delivery Control (PDC) is a very
TIMER NUMBER
DATE
START
END
CHANNEL
SPEED
VPS/PDC
convenient system which
assures that the TV programmes you have programmed for timer recording will be recorded exactly
from beginning to end. (refer to next column.)
7
Press
8
MENU to exit.
Press TIMER to activate the timer. The REC light on the
display comes on.
VPS (Video Programme System) /
PDC (Programme Delivery Control)
The VPS/PDC system looks for the start signal several hours
before published start time and for several hours afterwards.
This means that if the programme is broadcast anytime during this period it will be recorded correctly. Please note that if
you have set an incorrect Timer setting, it will stay in the
memory until you cancel it (see page 20 for details on how to
cancel a programme).
Auto Return
When timer recording is finished, the DVD/VCR will automatically rewind the tape to the beginning where it started
recording. If there are any remaining programmes including
Daily, Everyday, & Weekly, AUTO RETURN will not operate.
–21–
button
1
1
. Enter
06/05 SA
19:30
20:30
P10
SP
OFF
06/05 SA
19:30
20:30
P10
SP
OFF
VCR
VCR
English
EN
Page 22
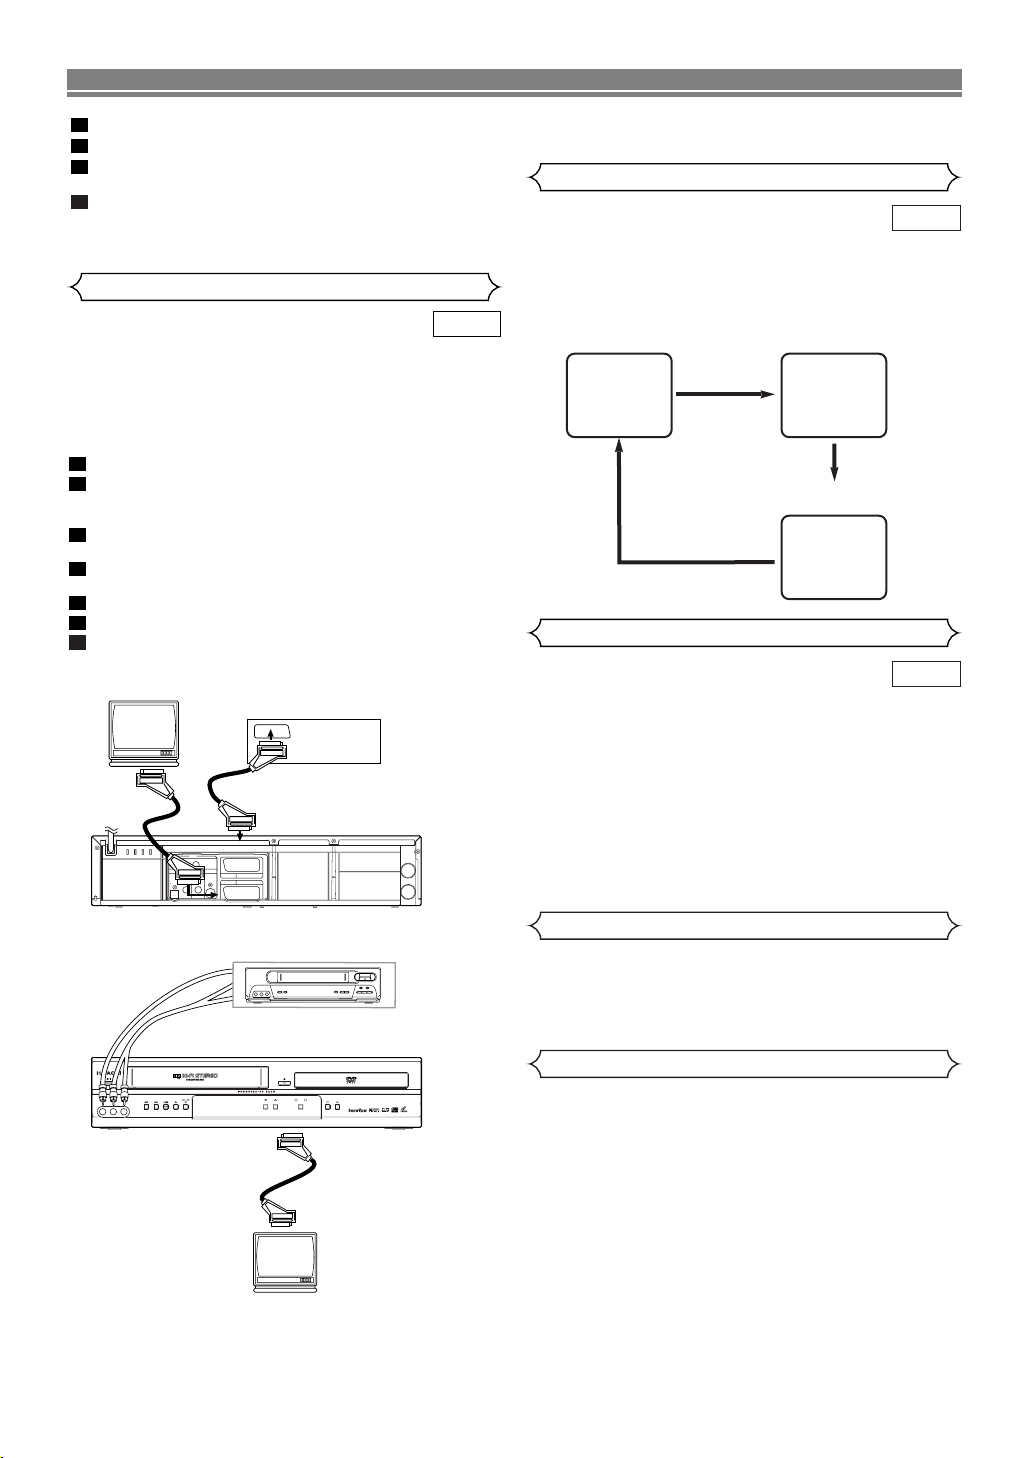
RECORDING FUNCTION
■
SP
0:12:34
■
SP
17:40
P02
<CLOCK and CHANNEL
NUMBER mode>
<COUNTER mode>
Press once.
Press once.
Press once.
<OFF mode>
1
Press
2
3
MENU.
Press K or L repeatedly to point to “SET UP”, then press B.
Press K or L to point to “AUTO RETURN”, then press B.
• [ON] will appear next to “AUTO RETURN”.
4
Press MENU to exit.
TO WATCH THE RECORDED TIMER PROGRAMME
Press TIMER to cancel the Timer Stand-by. Then, select VCR
mode by pressing VCR on your remote control. Press B.
Copying a video tape
VCR
You can make copies of videotapes made by friends or relatives for your own enjoyment.
WARNING:
Unauthorized recordings of copyrighted video tapes may
be an infringement of copyright laws.
Connect the recording DVD/VCR (this unit), playing VCR
(another VCR) and your TV as outline in the following diagram.
1
Insert a pre-recorded video cassette into the playing VCR.
2
Insert a blank video cassette, or one you want to record
over, into the cassette compartment of the recording
DVD/VCR.
3
4
5
6
7
SPEED on the remote control to select the desired
Press
recording speed (SP/LP).
Select “AV2” or “AV3” position on the recording DVD/VCR.
See “Other Connections” on page 12.
Press REC/OTR (I) on the recording DVD/VCR.
Begin playback of the tape in the playing VCR.
To stop recording, press
C on the recording DVD/VCR,
then stop playback of the tape in the playing VCR.
Using scart jacks
ANALOG
AUDIO OUT
Y
S
-
VIDEO
OUT
L
R
Playing VCR
Recording DVD/VCR
(this unit)
)
VCR
AV2(DECODER
(TV)
DVD/VCR AV1
AERIAL
RF OUT
(TV)
to 21-Pin
Scart Jack
COMPONENT VIDEO OUT
AUDIO OUT
OPTICAL
DVD
CB/
CR/
B
R
P
P
DIGITAL
AV1 (TV)
COAXIAL
TO MONITOR THE RECORDING
Tu rn on the TV and select the video channel on the TV.
Status Display
VCR
Press DISPLAY to check the Counter, or Clock & Channel
number. Each time you press the DISPLAY, TV screen will
change as illustrated:
When you select the channel using the remote control Number
buttons, select the desired channel (position number).
TV Colour System
VCR
Different countries use different television colour systems.
Tapes recorded in the PAL or NTSC system can be played
back on this unit. Usually, the picture on the TV screen will
be in black and white when you play back a tape that is
recorded in a different colour system.
•Tapes recorded in the NTSC system can be played
back on this unit and a PAL system TV set. This feature
is only available in the SP mode. When playing back
such tapes, the picture may roll up or down, shrink vertically and black bars may appear both at the top and
bottom of the screen. Adjust the vertical hold control on
your TV, if the TV features this control.
Using AUDIO/VIDEO IN jacks
to the audio
output jack
Recording DVD/VCR (this unit)
REC
AV3
VIDEO IN AUDIO IN R
L
(mono)
TIMER
to 21-Pin
Scart jack
NOTES:
•For best results during dubbing, use the DVD/VCR’s
front panel controls whenever possible. The remote
control might affect the playing VCR's operation.
• If video or colour fades in and out, you may be copying
a copy guarded video tape.
Playing VCR
to the video output jack
MP3 / JPEG PLAYBACK DVD / DVD-R / VIDEO CD / CD / CD-R / CD-RW COMPATIBLE
VCR
DVD
PROGRAM OUTPUT
(TV)
DVD/VCR Combo DV-PF7E
to AV1 (TV)
Scart jack on
the back of the
DVD/VCR
Auto Rewind
When a tape reaches the end during recording, playback or
fast-forward, the tape will automatically rewind to the beginning. After rewinding finishes, the DVD/VCR will eject the tape.
• The DVD/VCR will not rewind the tape automatically
during timer recording or One Touch Recording.
Real Time Tape Counter
• This shows the elapsed recording or playback time in
hours, minutes, and seconds. (The displayed time will
not change during blank portions of the tape. The front
display of DVD/VCR will show in hour, minute only.)
• The ‘_’ indication will appear when the tape is rewound
further than “0:00:00” on the tape counter.
–22–
EN
Page 23
PLAYING A DISC
Basic Playback
JPEGMP3CDVCDDVD
Getting started
•Turn on the power of the TV, amplifier and any other
components which are connected to the DVD/VCR.
• Make sure the TV and audio receiver (commercially
available) are set to the correct channel.
1
Press yy/I .
2
Press A to open disc loading tray.
3
Place the chosen disc on the tray, with the
label facing up.
4
Press BB(PLAY).
•
The tray will close automatically, and playback will then start
from the first chapter or track of the disc. If the playback
does not start automatically, press BB(PLAY)
•
When you playback the DVD with a title menu, it may
appear on the screen. In this case, refer to “Title Menu”.
5
Press CCto stop playback.
NOTES:
•A “prohibited icon” may appear at the top-right on the
TV screen during operation, warning
that a prohibited operation has been
encountered by the DVD/VCR or the
disc.
•With DVDs that use some titles for playback program signals, playback may start from the second title, or it may skip these titles.
• During the playback of two layered disc, pictures may
stop for a moment. This happens when the 1st layer
switches to the 2nd layer. This is not a malfunction.
.
CANCELLING AND CALLING BACK THE PBC FUNCTION
VCD
1
Insert a Video CD.
• Playback starts automatically.
2
Press CC.
3
Press the Number buttons to enter the desired Track
number.
• The PBC function is now cancelled and playback of the
Video CD will start.
4
To recall the PBC function, press CCtwice, and then press
BB
(PLAY).
• The title menu appears on the display.
General Features
DVD
DVD may contain menus to navigate the disc and access
special features. Press the appropriate Number buttons or
use Cursor buttons (L/K/B/s) to highlight your selection in
the DVD main menu and press ENTER to confirm.
NOTE:
• Unless stated, all operations described are based on
remote control use. Some operations can be carried
out using the menu bar on the TV screen.
Disc Navigation
VCDDVD
1
Press DISC NAVIGATION.
- During title playback or when resume is on:
• A shot from each chapter including the one currently
being played will be displayed on the screen.
• The chapter currently being played is selected in yellow.
- In STOP mode (resume off):
• The first scene of each chapter of the first title will be
displayed.
2
Cursor buttons (L/K/B/s) to select your desired
Press
chapter.
–23–
• Up to 6 chapters can be displayed at one time. If the
title has more than 6 chapters, press SKIP G to go to
the next page. Press SKIP H to go back to the previous page.
•You can change the title by moving up to the field
where the title number is shown with
(K), and entering a title number of your choice.
3
ENTER or BB(PLAY).
Press
• Playback of the selected chapter will start.
• Pressing
or BB(PLAY) at step will cease the DISC NAVIGA-
TION function, and the playback will be stopped. The
resume information will be lost.
• When a disc menu is shown, the DISC NAVIGATION
feature does not function.
• DISC NAVIGATION takes a few seconds to respond.
• With some discs, part of the DISC NAVIGATION screen
may not be displayed properly. This is not a malfunction.
• Some discs do not suppor t disc navigation feature.
• The sound is muted while DISC NAVIGATION is on the
screen.
•It takes about 15 seconds to display 6 shots.
DISC NAVIGATION before pressing ENTER
3
Cursor button
Pause
JPEGMP3CDVCDDVD
1
During playback, press FF.
• Playback will pause and sound will be muted.
2
To continue playback, press
NOTE:
• On DVDs, set “STILL MODE” to “FIELD” on the display
menu if pictures in the pause mode are blurred. (Refer to
page 28.)
BB
(PLAY).
Disc Menus
DVD
1
Press MENU.
• The DVD main menu will appear.
2
If the feature is not available, symbol may appear
on the TV screen.
3
If disc menu is available on the disc, audio language,
subtitle options, chapters for the title and other options
will appear for selection.
4
Cursor buttons (L/K/B/s) to select an item, and
Press
ENTER to confirm selection.
Title Menu
DVD
1
Press TOP MENU.
• The title menu will appear.
2
If the feature is not available, symbol may appear
on the TV screen.
3
Cursor buttons (L/K/B/s) to select an item, and
Press
ENTER to confirm selection.
• Playback will begin at the selected Title.
VCD
1
When playing a Video CD with the PBC function, the title
menu appears automatically.
2
Press the
• Playback will begin at the selected title.
3
Press
CALLING UP A MENU SCREEN DURING PLAYBACK
• Press MENU to call up the DVD main menu.
• Press
NOTE:
• Contents of menus and corresponding menu opera-
Number buttons to select the desired title.
RETURN to go back to the title menu.
TOP MENU to call up the title menu.
tions may vary depending on discs. Refer to the manual
accompanying the disc for details.
English
EN
Page 24
PLAYING A DISC
Step by Step Playback
1
During playback, press FF.
• Playback will pause and sound will be muted.
2
The disc advances by one frame each time
3
To exit step by step playback, press BB(PLAY).
NOTE:
• On DVDs, set “STILL MODE” to “FIELD” on the display
menu if pictures in the pause mode are blurred. (Refer to
page 28.)
FF
is pressed.
Resume
1
During playback, press CC.
• Resume message will appear on the TV screen.
2
NOTES:
BB
Press
which playback was stopped.
•To cancel resume, press
• The resume playback takes a little longer to take place
• Some Video CDs with PBC function resume playback
• The resume information stays on even when the power
•For MP3 or JPEG, playback will resume from the
(PLAY), playback will resume from the point at
CC
twice.
compared to the normal playback.
from the beginning of the disc.
is switched off.
beginning of the current track.
Fast Forward / Reverse Search
1
During playback, press g or h repeatedly to select
the required forward or reverse speed.
•For DVDs, fast forward or reverse search speed is different depending on the disc. Approximate speed is
1(x2), 2(x8), 3(x50), 4(x100).
•For Video CDs, fast forward or reverse search speed is
different depending on the disc. Approximate speed is
1(x2), 2(x8), 3(x30).
•For Audio CDs, the approximate speed is x16.
•For MP3, the approximate speed is x8.
2
To return to normal playback, press BB(PLAY).
Slow Forward / Slow Reverse
1
During playback, press FF.
2
3
4
NOTES:
gg
Press
• Slow motion playback will begin and sound will be
muted.
Press
speed.
• Slow forward or reverse speed is different depending
on the disc. Approximate speed is 1(1/16), 2(1/8),
3(1/2).
To return to normal playback, press BB(PLAY).
• On DVDs, set “STILL MODE” to “FIELD” on the Display
menu, if pictures in the slow playback mode are
blurred. (Refer to page 28.)
• Only Slow Forward is available when playing a Video
CD. The forward speed can be selected from 1(1/16),
2(1/8) or 3(1/2).
or hh.
gg
or hhrepeatedly to select the required
Zoom
VCDDVD
The Zoom function allows you to enlarge the video image
and to pan through the enlarged image.
1
Press ZOOM during playback.
• Playback will continue.
2
3
4
NOTES:
JPEGMP3CDVCDDVD
ZOOM repeatedly to select the required zoom fac-
Press
tor: x2, x4 or OFF.
Use Cursor buttons (L/K/B/s) to move the zoomed
picture across the screen.
To exit zoom mode, press ZOOM.
• Zooming function does not work while disc menu is
shown.
• x4 zoom is not available on some discs.
• Only x2 zoom is available on Video CDs and JPEG files.
•You cannot move the zoomed picture on some JPEG
files.
JPEGVCDDVD
Track Search
JPEGMP3CDVCD
There are three ways to begin playback of an Audio CD,
Video CD, MP3 and JPEG at a specific Track.
Using the Number buttons
1
Press the Number buttons to enter the desired Track
number.
• Playback will start at the selected track.
•For single digit tracks (1-9), press a single number
(eg. track 3, press
•To play track 26, press
MP3CDVCDDVD
VCDDVD
Using the SEARCH MODE
1
Press SEARCH MODE.
• The Track search display appears.
2
Within 30 seconds, select a desired track number using
Number buttons.For single digits press 0 first if the
the
total track of the disc is more than 10 tracks.
• Playback will start at the selected track.
Using the SKIP
During playback, press
Press it repeatedly to skip subsequent tracks. Press
HH
to go back to the beginning of the current track. Press it
repeatedly to go to the previous tracks.
•Track number will appear briefly on the front display
panel.
SKIP is pressed while the playback is paused,
• If any
the playback will be paused again after skipping to the
next track.
NOTE:
• SKIP HGare not available when playback is
stopped.
HH GG
3).
+10, 2, 6 on the Number buttons.
GG
SKIP
to move to the next track.
SKIP
Title / Chapter Search
DVD
1
Press SEARCH MODE once for the
Chapter search, twice for the Title
search during playback.
2
Enter the desired chapter/title number using the Number
buttons.
/2
Time Search
CDVCDDVD
1
Press SEARCH MODE repeatedly until the Time Search
appears during playback.
2
Within 30 seconds, enter a desired disc time using the
Number buttons.
–24–
EN
Page 25
PLAYING A DISC
• Playback will start at the specified time.
CLEAR to erase the incorrect input.
• Press
NOTE:
•For Time Search, “0” appears automatically when
there is no need to enter a number. For example,
“0:0_:_ _” appears in the Time Search display if the
total time of the disc is less than 10 minutes.
Repeat
• REPEAT is available only during playback.
REPEAT TITLE / CHAPTER
DVD
To activate the repeat function, press REPEAT during play-
back.
• The repeat mode changes as described below every
time you press the button.
CHAPTER TITLE OFF
(current chapter repeat) (current title repeat)
(repeat
NOTES:
• Repeat Title/Chapter is not available on some scenes.
• The REPEAT setting will be cleared when moving to
other titles or chapters.
REPEAT TRACK
CDVCD
To activate the repeat function, press
back.
• The repeat mode changes as described below every
time you press the button.
TRACK ALL OFF
(current track repeat) (entire disc repeat) (repeat
NOTES:
• The repeat setting will be cleared by moving to another
track.
• Repeat playback does not function during A-B repeat
playback.
• Repeat playback is not available when playing a Video
CD with the PBC function.
REPEAT during play-
JPEGMP3
TRACK ALL OFF
(current track repeat) (entire disc repeat)
GROUP
(current folder repeat)
A-B REPEAT
(repeat off)
CDVCDDVD
1
Press A-B REPEAT at your chosen starting point.
•“ A-” appears briefly on the TV screen.
2
3
NOTES:
A-B REPEAT again at your chosen end point.
Press
•“ A-B” appears briefly on the TV screen, and the
repeat sequence begins.
To exit the sequence, press
A-B REPEAT.
• The A-B repeat section can only be set within the cur-
rent title (for DVDs), or current track (for Audio CDs and
Video CDs).
• A-B Repeat is not available with some scenes in DVD.
•To cancel the A point which was set, press CLEAR.
• A-B Repeat playback does not function during title,
chapter, track or all repeat playback.
Program Playback (CD)
You may determine the order in which tracks will play.
1
In STOP mode press
• The PROGRAM screen will
appear.
2
▲ or ▼ to select a
Press
track, then press ENTER.
CLEAR to erase the
• Press
most recently entered program.
3
Press BB(PLAY) to play the
MODE.
CD-DA TOTAL 0:08:00
8 3:30
9 2:30
10 1:30
ALL CLEAR
ENTER
8 3:30
programmed tracks.
NOTES:
•
Press CConce and then BB(PLAY)
, playback will restart
from the point where CCwas pressed. (Program continued)
• Press CCtwice and then BB(PLAY), playback will restart
from the track in the usual way. (Program cleared)
off)
• Up to 99 programs can be entered.
•To repeat the current track in the program, press
REPEAT repeatedly until “ TRACK” appears during
playback. To repeat the entire program press
repeatedly until “ ALL” appears during playback.
•To erase all trsck in the program at once, select “ALL
CLEAR” and press ENTER at step .
2
Random Playback (CD)
This shuffles the order of tracks
instead of playing back of in the
original sequence.
1
In STOP mode, press MODE
twice.
off)
• RANDOM screen appears.
2
Press
BB
(PLAY) to start ran-
dom playback.
NOTE:
•To repeat the current track in the random selection,
press REPEAT repeatedly until “ TRACK” appears
during playback. To repeat the entire random selection
press REPEAT repeatedly until “ ALL” appears during playback.
RANDOM
CD-DA TOTAL 0:45:55
PLAY
RANDOM PROGRAM
MP3 / JPEG Playback
Insert an MP3 or JPEG disc, then press MENU to call up the
MP3 or JPEG menu on the TV screen.
1
In STOP mode, press K or L to select the desired group
or track.
• If a group is selected,
B (PLAY) or
press
ENTER to go to the track
selection screen. Press K
or L to choose a track,
then press BB(PLAY) or
ENTER.
FILE LIST
FOLDER
MP3
JPEG
ENTER
PLAY
DISC NAME
folder name 1
folder name 2
folder name 3
folder name 4
file name 1
file name 2
file name 3
folder name 1
• If a track is selected, press
BB
(PLAY) or ENTER to start playing from the track.
TOP MENU to return to the first item.
• Press
2
Press CCto stop playback.
NOTES:
•Folders are known as Groups; files are known as Tracks.
• The “ ” symbol is shown on the top of the group name.
• The “ ” symbol is shown on the top of MP3 files.
• The “ ” symbol is shown on the top of JPEG files.
–25–
CD
English
2/2
REPEAT
CD
--no indication--
JPEGMP3
1/2
EN
Page 26
PLAYING A DISC
• The system can recognize up to 255 groups/ folders
and up to 512 tracks/ files, and this applies even to the
case where mixed MP3 and JPEG files are recorded.
• Up to 8 hierarchies can be created.
• If a JPEG file is selected, the image will be reproduced
from the selected track and go to the next one in turn.
A track is displayed for 5 seconds and then the next
track is displayed.
Each press on the
image clockwise by 90 degrees when an image is displayed.
Each press on the
image counterclockwise by 90 degrees.
For best results use files recorded at these specifications:
[MP3]
• Sampling frequency: 44.1kHz or 48kHz
• Constant bit rate: 112kbps ~ 320kbps.
[JPEG] size of image
• Upper limit: 6,300 x 5,100 dots.
•Lower limit: 32 x 32 dots.
Cursor button B will rotate the
Cursor button s will rotate the
Slide Show Mode (JPEG)
JPEG
You can switch to the slide show mode during playback.
1
2
3
MODE during playback.
Press
• The slide show mode screen will appear.
• The slide show mode cannot be switched when it is
stopped, or from the file list screen.
ENTER.
Press
• The slide show mode will change.
CUT IN/OUT: The entire image appears in one time.
FADE IN/OUT: The image appears gradually and then
MODE to exit.
Press
disappears.
On-Screen Information
JPEGMP3
You can check each file during playback.
1
Press DISPLAY.
• The name of the file currently in play will be displayed.
2
3
DISPLAY again to show the track number, the
Press
elapsed time, the repeat status and the playback status
at the top of the screen.
• will be displayed when the repeat play has been
selected.
T- indicates Track repeat.
G- indicates Group (folder) repeat.
A- indicates Disc repeat.
Press
DISPLAY again to exit.
Program Playback (MP3 / JPEG)
JPEGMP3
This feature allows you to program an MP3 disc to play in a
desired sequence.
1
In STOP mode, press MODE.
• The PROGRAM screen will appear.
2
3
NOTE:
K or L to select a track, then press ENTER to
Press
save it in a program.
CLEAR to erase the incorrect input.
• Press
Press BB(PLAY) to start programmed playback.
•To erase all tracks in the program at once, select “ALL
CLEAR” and press ENTER at step .
2
Random Playback (MP3 / JPEG)
JPEGMP3
1
Press MODE twice while playback is stopped.
2
Press
BB
(PLAY) to play the tracks in random order.
Audio Language
DVD
The DVD/VCR allows you to select a specific language
during DVD disc playback when multiple languages are available.
1
Press
AUDIO during playback.
2
Press
AUDIO repeatedly to select your desired language.
NOTES:
• If your language is not shown after pressing AUDIO
several times, the disc may not have that language.
However, some discs allow you to change audio
language setting in the disc menu. (Operation varies
depending on the disc, so refer to the manual included
in the disc.)
• If you choose a language that has a 3 letter language
code, the code will be displayed every time you change
the Audio Language setting. If you choose any other
languages, “---” will be displayed instead. (Refer to
page 29.)
Stereo Sound Mode
CDVCD
1
Press AUDIO repeatedly during playback to select
among “STEREO”, “L-CH” or “R-CH”.
STEREO- both right and left channels are active
L-CH - only left channel is active
R-CH - only right channel is active
NOTES:
• If the Virtual Surround setting is “1” or “2”, the sound
mode will be fixed to “STEREO”, and can not be
changed.
• This function is not available on DTS-CD.
Subtitle Language
DVD
The DVD/VCR allows you to select a language for subtitle (if
available) during DVD disc playback.
1
Press SUBTITLE during playback.
2
3
NOTES:
SUBTITLE repeatedly to select your desired subti-
Press
tle language.
• The selected language will be displayed on the display
bar at the top of the screen.
To turn off subtitles, press
• If your language is not shown after pressing SUBTITLE
several times, the disc may not have that language.
However, some discs allow you to change subtitle language setting in the disc menu. (Operation varies
depending on the disc, so refer to the manual included
in the disc.)
• If you choose a language that has a 3 letter language
code, the code will be displayed every time you change
the Subtitle Language setting. If you choose any other
languages, “---” will be displayed instead. (Refer to
page 29.)
s or B until “OFF” appears.
–26–
EN
Page 27
PLAYING A DISC
Camera Angle
DVD
Some DVD discs contain scenes which have been shot
simultaneously from various angles. You can change the
camera angle when the ( ) mark appears on the screen. If
the “ANGLE MARK” setting is “OFF” in the Display setting,
the ( ) icon will not appear. (Refer to page 28.)
1
Press
ANGLE during playback.
• The selected angle will be displayed on the display bar
at the top of the screen.
2
ANGLE repeatedly to select your desired angle.
Press
Changing the On-Screen Display
DVD
You can check information about the current disc by pressing
DISPLAY on the remote control.
1
Press DISPLAY during playback to show current Chapter.
• The elapsed and remaining
time of the current chapter will be displayed.
2
Press DISPLAY again to show current title.
• The elapsed and remaining time of the current title will
be displayed.
3
Press DISPLAY again.
• The BIT RATE and the current repeat setting will be
displayed.
• If you are playing a dual layered disc, the layer number
will also be displayed ( L0: Layer 0 is playing. L1: Layer
1 is playing).
4
Press DISPLAY again to remove the display.
9/49 0:00:00 -0:03:30
CDVCD
1
Press
DISPLAY during playback, the current track will be
displayed on the TV screen.
• The elapsed and remaining time of the current track will
be displayed.
2
Press DISPLAY again to show the total time of the disc.
• The elapsed and remaining time of the total track will
be displayed.
3
Press DISPLAY again to remove the display.
Ratings Control
DVD
Ratings Control provides limits for DVDs with extreme violence
or adult themes. (A password you establish will override the
limits.)
This feature allows you to prevent discs with objectionable
scenes from being played by your children.
RATING LEVEL
Rating Level allows you to set the rating level of your DVDs.
Playback will stop if the disc’s ratings exceed the level you set.
1
Press SETUP in STOP mode.
2
3
4
5
6
s or B to select “CUS-
Press
TOM”, then press ENTER.
• CUSTOM menu will appear.
Press
s or B to select
“PARENTAL”, then press ENTER.
Enter your four-digit password then press
K or L to select “RATING LEVEL”, then press
Press
ENTER.
Press K or L to select the desired level, then press
ENTER.
PAR ENTAL
RATING LEVEL ALL
CHANGE
ENTER.
7
Press SETUP to exit.
NOTES:
• When doing this for the first time, enter any 4 digits except for 4737. This number will be used as the password
from the second time onward.
•To change the password, press K or L to select
“CHANGE” at step , then press ENTER. Enter the
four-digit pass-word, then press ENTER.
• With some DVDs, it may be difficult to find if they are
compatible with rating level. Be sure to check if the rating level function operates in the way that you have set.
• Record the password in case you forget it.
5
IF YOU FORGET THE PASSWORD
Press 4, 7, 3, 7 at step .
•Password will be cleared and Rating Level will be set to
“ALL”.
Repeat steps - to re-establish the Ratings Control.
41
742
CONTROL LEVELS
• ALL
Ratings control is cancelled.
• Level 8
DVD software of any grade (adult/general/children) can
be played back.
• Levels 7 to 2
Only DVD softwares intended for general use and children can be played back.
• Level 1
Only DVD softwares intended for children can be
played back, with those intended for adult and general
use prohibited.
Marker Setup Screen
CDVCDDVD
Use markers to memorise your favourite places on a disc.
1
Press
SEARCH MODE repeatedly until the Marker Setup
Screen appears during playback.
• The display screen and Markers will appear on the TV
screen.
2
Ensure that “- : - - : - -” appears in the display, and press
s or B to select the number of the marker (1~10).
3
When you reach the desired point, press ENTER.
• The Title or Track and elapsed playing time will appear
on the TV screen.
4
To return to a Marker later, press SEARCH MODE
repeatedly until the Marker Setup Screen appears during
playback and s or B to choose the desired marker, then
press ENTER.
NOTES:
• Opening the disc tray, turning off the unit or selecting
AC (All clear) followed by the ENTER key at step
will erase all markers.
•To clear a marker, using s or B, position the cursor on
to the marker number to be cleared and press CLEAR.
•You can mark up to 10 points.
5
SEARCH MODE or RETURN to exit.
Press
English
2
–27–
EN
Page 28
DVD SETUP
Audio Setting
DVD
Set your surround modes for the DVD/VCR through your
receiver or processor. DVD’s audio setup will not affect CD
playback.
1
In the STOP mode press
2
Press s or B to select “CUSTOM”,
then press ENTER.
• CUSTOM menu will appear.
3
4
s or B to select “AUDIO”,
Press
then ENTER to confirm.
Press K or L to select an item, then press ENTER.
SETUP.
AUDIO
DRC ON
DOWN SAMPLING ON
DOLBY DIGITAL BITSTREAM
DTS OFF
MPEG PCM
DRC (Dynamic Range Control) :
•To compress the range of sound volume.
• DRC function is available only on the discs that are
recorded in the Dolby Digital format.
• The default setting is ON.
DOWN SAMPLING :
• Set to ON when outputting in 48kHz.
• Set to OFF when outputting the original sound.
• When playing disc with copyright protection, the sound
will be down sampled at 48kHz even if you set it to
OFF.
•DOWN SAMPLING function is available only on digital
output of a disc recorded in 96kHz, and when the unit
is connected to another source using the digital out
jack.
•DOWN SAMPLING function is available only on the
discs that are recorded in the Dolby Digital format.
• The default setting is ON.
DOLBY DIGITAL :
QUICK
Set to BITSTREAM when the DVD/VCR is connected to
Dolby Digital Decoder.
(BITSTREAM : Dolby Digital OUTPUT)
(PCM : Converts the Dolby Digital to PCM)
• The default setting is BITSTREAM.
QUICK
DTS :
• Set to BITSTREAM when connected to DTS decoder.
• The default setting is OFF.
MPEG :
QUICK
BITSTREAM: Output MPEG sound
Set to BITSTREAM when the unit is connected to an
MPEG Decoder
• The default setting is PCM.
5
Press
SETUP to exit.
Virtual Surround
MP3VCDCDDVD
You can enjoy stereophonic virtual space on your existing 2
channel stereo system.
1
Press SURROUND during playback.
2
Press SURROUND to set it
1 (Natural effect), 2 (Emphasized effect) or OFF.
3
Press MODE or RETURN to exit.
NOTES:
• Vir tual Surround will not be effective if the surround
mode is set to any selection other than STEREO (for
CD and VCD play only).
•Turn down the level or turn it “OFF” if the sound is distorted.
• The setting will be saved even if the DVD/VCR is
turned off.
OFF
Display Setting
DVD
You can change certain aspects of the DVD display screens,
on-screen messages and the display panel on the front of
the DVD/VCR.
1
2
3
4
TV ASPECT :
STILL MODE :
ANGLE MARK :
LOGO:
VIDEO OUT :
5
NOTE:
SETUP in STOP mode.
Press
s or B to select “CUSTOM”, then press ENTER.
Press
• CUSTOM menu will appear.
Press s or B to select “DISPLAY”, then press ENTER to
confirm.
K or L to select from an item, then press ENTER.
Press
QUICK
• Press K or L for an item selec-
tion, then press ENTER.
• 4:3 LETTER BOX displays a
theater-like image. Black bars
appear at the top and bottom of
the screen.
• 4:3 PAN-SCAN is the traditional TV mode with a full
height picture with both sides trimmed.
• Select 16:9 WIDE if a wide-screen TV is connected to
the DVD/VCR.
• The default setting is 4:3 LETTER BOX.
• Press K or L for an item selection (AUTO, FIELD or
FRAME), then press ENTER.
• Select “AUTO” usually.
• If you select FIELD, pictures in the still mode will be
stabilized although they will be coarse due to little
amount of data.
• If you select FRAME, pictures in the still mode will be
highly defined although they will be blurred due to output of two fields at the same time.
• The default setting is AUTO.
• Press ENTER repeatedly to turn Angle mark ON or
OFF.
• The default setting is ON.
• Press ENTER to switch ON (opening picture)/OFF (black).
• The default setting is ON.
• Press K or L for an item selection (SCART, COMPO-
NENT INTERLACE or COMPONENT PROGRESSIVE),
then press ENTER.
• This setting will be effective when you exit the setup
screen by pressing SETUP.
• The default setting is SCART.
•When VIDEO OUT is COMPONENT PROGRESSIVE,
“P.SCAN” appears on the DVD/VCR’s display.
• Refer to page 14 for more details.
SETUP to exit.
Press
• Be sure to press SETUP, or the setting will not work.
DISPLAY
TV ASPECT 4:3 L-BOX
STILL MODE AUTO
ANGLE MARK ON
LOGO ON
VIDEO OUT
SCART
–28–
EN
Page 29
DVD SETUP
Language Setting
Language options are not available on some discs.
1
2
3
4
AUDIO :
SUBTITLE :
DISC MENU :
PLAYER MENU :
5
SETUP in STOP mode.
Press
s or B to select “CUSTOM”, then press ENTER.
Press
• CUSTOM menu will appear.
s or B to select “LANGUAGE”, then ENTER to
Press
confirm.
Press K or L to select from an item, then press ENTER.
• Sets the audio language.
• Sets the subtitle language.
LANGUAGE
AUDIO ORIGINAL
SUBTITLE OFF
DISC MENU ENGLISH
PLAYER MENU ENGLISH
• Sets the language for DVD
Menu.
QUICK
• Sets the language for the On-Screen display.
Press
K or L to select a setting, then press ENTER.
• If “OTHERS” is selected in the “AUDIO”, “SUBTITLE” or
“DISC MENU” screen, press four-digit number to enter
the code for the desired language. (Refer to the language code list below.)
• Only the languages suppor ted by the disc can be selected.
DVD
6
Press SETUP to exit.
NOTE:
• Language Setting for Audio and Subtitle is not available
with some discs.Then use AUDIO and SUBTITLE.Details
are on page 26.
To Return All Selections of SETUP
(except for RATINGS CONTROL and
VIDEO OUT)
to their Default Settings
DVD
This allows you to return all selections of SETUP (except for
RATINGS CONTROL and VIDEO OUT) to their default settings.
1
Press SETUP in STOP mode.
2
Press s or B to select “INIT.” (INITIALIZE), then press
ENTER.
• INITIALIZE menu will appear.
3
Press Kor L to select “YES”, then press ENTER.
4
Press ENTER to exit.
NOTE:
• When you cancel to initialize at step , select “NO”.
3
English
Language Code Language Code Languag e Code Language Code
Abkhazian 4748
Afar 4747
Afrikaans 4752
Albanian 6563
Amharic 4759
Arabic 4764
Armenian 5471
Assamese 4765
Aymara 4771
Azerbaijani 4772
Bashkir 4847
Basque 5167
Bengali;Bangla 4860
Bhutani 5072
Bihari 4854
Bislama 4855
Breton 4864
Bulgarian 4853
Burmese 5971
Byelorussian 4851
Cambodian 5759
Catalan 4947
Chinese [CHI] 7254
Corsican 4961
Croatian 5464
Czech 4965
Danish [DAN] 5047
Dutch [DUT] 6058
English [ENG] 5160
Esperanto 5161
Estonian 5166
Faroese 5261
Fiji 5256
Finnish [FIN] 5255
If you choose a Language that has a 3 letter language code, the code will be displayed every time you change the Audio or Subtitle language
setting on page 26. If you choose any other languages, “---” will be displayed instead. (3 letter language code is written in bracket.)
A-B
C-E
F-H
French [FRE] 5264
Frisian 5271
Galician 5358
Georgian 5747
German [GER] 5051
Greek [GRE] 5158
Greenlandic 5758
Guarani 5360
Gujarati 5367
Hausa 5447
Hebrew 5569
Hindi 5455
Hungarian [HUN] 5467
I-K
Icelandic [ICE] 5565
Indonesian 5560
Interlingua 5547
Interlingue 5551
Inupiak 5557
Irish [IRI] 5347
Italian [ITA] 5566
Japanese [JPN] 5647
Javanese 5669
Kannada 5760
Kashmiri 5765
Kazakh 5757
Kinyarwanda 6469
Kirghiz 5771
Kirundi 6460
Korean [KOR] 5761
Kurdish 5767
L-N
Laothian 5861
Latin 5847
Latvian;Lettish 5868
Lingala 5860
Lithuanian 5866
Macedonian 5957
Malagasy 5953
Malay 5965
Malayalam 5958
Maltese 5966
Maori 5955
Marathi 5964
Moldavian 5961
Mongolian 5960
Nauru 6047
Nepali 6051
Norwegian [NOR] 6061
Occitan 6149
Oriya 6164
Oromo(Afan) 6159
Panjabi 6247
Pashto;Pushto 6265
Persian 5247
Polish 6258
Por tuguese [POR] 6266
Quechua 6367
Rhaeto-Romance 6459
Romanian [RUM] 6461
Russian [RUS] 6467
Samoan 6559
Sangho 6553
Sanskrit 6547
Scots Gaelic 5350
Serbian 6564
Serbo-Croatian 6554
Sesotho 6566
Setswana 6660
Shona 6560
Sindhi 6550
Singhalese 6555
–29–
O-R
S
Siswat 6565
Slovak 6557
Slovenian 6558
Somali 6561
Spanish [SPA] 5165
Sundanese 6567
Swahili 6569
Swedish [SWE] 6568
T
Tagalog 6658
Tajik 6653
Tamil 6647
Tatar 6666
Telugu 6651
Thai 6654
Tibetan 4861
Tigrinya 6655
Tonga 6661
Tsonga 6665
Tu r kish [TUR] 6664
Tu r kmen 6657
Tw i 6669
U-Z
Ukrainian 6757
Urdu 6764
Uzbek 6772
Vietnamese 6855
Volapuk 6861
Welsh 4971
Wolof 6961
Xhosa 7054
Yiddish 5655
Yo r uba 7161
Zulu 7267
EN
Page 30
TROUBLESHOOTING GUIDE
If the DVD/VCR does not perform properly when operated as instructed in this Owner’s Manual, check the DVD/VCR, consulting the following checklist.
Problem Solution
No power –Check if the AC power cord is properly connected.
–Unplug the outlet once, and wait for 5-10 seconds and
then plug it in again.
No sound or picture –Check if the TV is switched on.
–Check the video connection.
–Check the VIDEO/AUDIO cable connections to the TV
(see Connecting to a TV).
–
Use a DIGITAL AUDIO OUT jack when outputting the DTS audio.
Distorted picture –Sometimes a small amount of picture distortion may appear.
This is not a malfunction.
–Connect the DVD/VCR directly to th TV.
Completely distorted picture or –Connect DVD/VCR directly to the TV.
black/white picture with DVD –Make sure the disc is compatible with the DVD/VCR.
No sound or distorted sound –Adjust the volume.
–Check that the speakers are connected correctly.
No audio at digital output –Check the digital connections.
–Check if the audio format of the selected audio language
matches your receiver capabilities.
No sound and picture –Check that the VIDEO/AUDIO cable is connected to the correct
device (see Connecting to a TV).
Picture freezes momentarily –Check the disc for fingerprints/scratches and
during playback clean with a soft cloth wiping from center to edge.
–Clean the disc.
Disc can’t be played –Clean the disc.
–Ensure the disc label is facing up.
–Check if the disc is defective by trying another disc.
–Cancel the parental lock or change the control level.
–Insert a correct disc that plays on this DVD/VCR.
No return to start-up screen when –Reset the DVD/VCR by switching the DVD/VCR off, then on
disc is removed again.
The DVD/VCR does not respond to –
the remote control
Buttons do not work or the DVD/VCR stops –To completely reset the DVD/VCR, unplug the AC
responding cord from the AC outlet for 5-10 seconds.
The DVD/VCR does not respond to some –Operations may not be permitted by the disc.
operating commands during playback. Refer to the instructions of the disc.
The DVD/VCR cannot read –Use a commonly available cleaning CD/DVD to
CDs/DVDs clean the lens before sending the DVD/VCR for repair.
Aim the remote control directly at the sensor on the
front of the DVD/VCR.
–Reduce the distance to the DVD/VCR.
–Replace the batteries in the remote control.
–
Re-insert the batteries with their polarities (+/– signs) as indicated.
NOTES:
Some functions are not available in specific modes, but this is not a malfunction. Read the description in this Owner’s Manual for details on correct operations.
• Playback from a desired track and random playback are not available during program playback.
• Some functions are prohibited on some discs.
–30–
EN
Page 31
SPECIFICATIONS
OUTPUT SIGNAL FORMAT
PAL colour
POWER SOURCE
220-240 V AC +/- 10%, 50 Hz +/- 0.5%
POWER CONSUMPTION
30 W (standby: 5.0W)
OPERATING TEMPERATURE
41°F(5°C) to 104°F(40°C)
DIMENSIONS
W17-3/16” (435 mm)
H 3-3/4” (94 mm)
D 9-3/16” (233 mm)
WEIGHT
Approx 7 lbs (3.2 kg)
• Designs and specifications are subject to change
without notice.
• If there is a discrepancy between languages, the
default language will be English.
MAINTENANCE
Servicing
• Should your DVD/VCR become inoperative, do not try to correct the problem by yourself. There are no user-serviceable
parts inside. Turn off, unplug the power cord,
Hitachi helpline to locate an Authorized Service Center.
Cleaning the Cabinet
• Use a soft cloth slightly moistened with a mild detergent solution. Do not use a solution containing alcohol, spirits,
ammonia or abrasives.
Cleaning Discs
• When a disc becomes dir ty, clean it with a cleaning cloth. Wipe the disc from the center out. Do not wipe in a circular
motion.
• Do not use solvents such as benzine, thinner, commercially available cleaners, detergent, abrasive cleaning agents or
antistatic spray intended for analogue records.
Cleaning the disc lens
• If the DVD/VCR still does not perform properly when it is operated while referring to the relevant sections and to “TROUBLESHOOTING GUIDE” in this Owner’s Manual, the laser optical pickup unit may be dirty. Consult your dealer or an
Authorized Service Center for inspection and cleaning of the laser optical pickup unit.
Disc Handling
• Handle the discs so that fingerprints and dust do not adhere to the surfaces of the discs.
• Always store the disc in its protective case when it is not used.
and please contact the Hitachi dealer who supplied the product or call the
English
Make your contribution to the environment!!!
• Used up batteries do not belong in the dust bin.
You can dispose of them at a collection point for used up batteries or special waste. Contact your council for details
•
–31–
.
EN
Page 32

SUBDIARY INFORMATION
SOME DOS AND DON’TS ON THE SAFE USE OF EQUIPMENT
This equipment has been designed and manufactured to meet international safety standards but like any elec-
trical equipment, care must be taken if you are to obtain the best results and safety is to be assured.
★★★★★★★★★★★
DO read the operating instructions before you attempt to use the equipment.
DO ensure that all electrical connections (including the mains plug, extension leads and interconnection
between pieces of equipment) are properly made and in accordance with the manufacturer’s instructions.
Switch off and withdraw the mains plug when making or changing connections.
DO consult your dealer if you are ever in doubt about the installation, operation or safety of your equipment.
DO be careful with glass panels or doors on equipment.
★★★★★★★★★★★
DON’T continue to operate the equipment if you are in any doubt about it working normally, or if it is damaged
in any way switch off, withdraw the mains plug and consult your dealer.
DON’T remove any fixed cover as this may expose dangerous voltages.
DON’T leave equipment switched on when it is unattended unless it is specifically stated that it is designed for
unattended operation or has a standby mode. Switch off using the switch on the equipment and make sure that
your family know how to do this. Special arrangements may need to be made for infirm or handicapped people.
DON’T use equipment such as personal stereos or radios so that you are distracted from the requirements of
traffic safety. It is illegal to watch television whilst driving.
DON’T listen to headphones at high volume, as such use can permanently damage your hearing.
DON’T obstruct the ventilation of the equipment, for example with curtains or soft furnishings.
Overheating will cause damage and shorten the life of the equipment.
DON’T use makeshift stands and NEVER fix legs with wood screws — to ensure complete safety always fix the
manufacturer’s approved stand or legs with the fixings provided according to the instructions.
DON’T allow electrical equipment to be exposed to rain or moisture.
ABOVE ALL
---NEVER let anyone especially children push anything into holes, slots or any other opening in
the case — this could result fatal electrical shock:
---NEVER guess or take chances with electrical equipment of any kind.
---it is better to be safe than sorry!
★★★★★★★★★★★
–32–
EN
Page 33

MEMO
English
Page 34

MEMO
Page 35

MEMO
English
Page 36

Hitachi, Ltd. Tokyo, Japan
International Sales Division
THE HITACHI ATAGO BUILDING,
No. 15 – 12 Nishi Shinbashi, 2 - Chome,
Minato – Ku, Tokyo 105-8430, Japan.
HITACHI EUROPE LTD,
Whitebrook Park
Lower Cookham Road
Maidenhead
Berkshire
SL6 8YA
UNITED KINGDOM
Tel: 01628 643000
Fax: 01628 643400
Email: [email protected]
HITACHI EUROPE GmbH
Munich Office
Dornacher Strasse 3
D-85622 Feldkirchen bei München
GERMANY
Tel: +49-89- 991 80-0
Fax: +49 - 89-991 80 -224
Hotline: +49-180 - 551 25 51 (12ct/min)
Email: [email protected]
HITACHI EUROPE srl
Via Tommaso Gulli N.39, 20147
Milano, Italia
ITALY
Tel: +39 02 487861
Tel: +39 02 38073415 Servizio Clienti
Fax: +39 02 48786381/2
Email: [email protected]
HITACHI EUROPE S.A.S
Lyon Office
B.P. 45, 69671 BRON CEDEX
FRANCE
Tel: +33 04 72 14 29 70
Fax: +33 04 72 14 29 99
Email: [email protected]
HITACHI EUROPE AB
Egebækgård
Egebækvej 98
DK-2850 Nærum
DENMARK
Tel: +45 43 43 6050
Fax: +45 43 60 51
Email: [email protected]
HITACHI EUROPE Ltd
Bergensesteenweg 421
1600 Sint -Pieters- Leeuw
BELGIUM
Tel: +32 2 363 99 01
Fax: +32 2 363 99 00
Email: [email protected]
Hitachi Europe Digital MediaGroup
Gewerberpark, Hintermattlistra. 3,
5506 Mägenwil SWITZERLAND
Tel: +41 62 889 8011
Fax: +41 62 896 4771
www.hitachidigitalmedia.com
Tel: 03 35022111
HITACHI EUROPE S.A.
364 Kifissias Ave. & 1, Delfon Str.
152 33 Chalandri
Athens
GREECE
Tel: 1-6837200
Fax:1-6835964
Email: [email protected]
HITACHI EUROPE S.A.
Gran Via Carlos III, 86, planta 5
Edificios Trade - Torre Este
08028 Barcelona
SPAIN
Tel: +34 93 409 2550
Fax: +34 93 491 3513
Email: [email protected]
HITACHI EUROPE AB
Box 77 S-164 94 Kista
SWEDEN
Tel: +46 (0) 8 562 711 00
Fax: +46 (0) 8 562 711 13
Email: [email protected]
HITACHI EUROPE LTD (Norway) AB
STRANDVEIEN 18
1366 Lysaker
NORWAY
Tel: 67 5190 30
Fax: 67 5190 32
Email: [email protected]
HITACHI EUROPE AB
Neopoli / Niemenkatu 73
FIN-15140 Lahti
FINLAND
Tel : +358 3 8858 271
Fax: +358 3 8858 272
Email: [email protected]
HITACHI EUROPE LTD
Na Sychrove 975/8
101 27 Pr aha 10 – Bohdalec
CZECH REPUBLIC
Tel: +420 267 212 383
Fax: +420 267 212 385
Email: [email protected]
Hitachi Europe Ltd. (Moscow Office)
Millenium House, 12 Trubnaya Street
Moscow 103045 RUSSIA
Tel: +7 95 787 4020
Fax: +7 95 787 4021
 Loading...