


IBM Deskstar
3.5 inch ATA/IDE hard disk drive
Installation and reference
manual

Technical support
Troubleshooting and Frequently Asked Questions sections are provided in the Appendix of this manual to aid you in the installation of your IBM Deskstar. If the answer to your installation question is not found in this manual, call technical support. Before calling, please gather as much of the following information as possible:
•IBM drive model number, part number, and serial number
•Operating system
•BIOS manufacturer, version, and date
•Any error codes and when they occurred
•System type and manufacturer
•Motherboard manufacturer
•Chipset manufacturer
•Adapter card manufacturer
•Other devices in systems
•Bus/cable layout (location of device, which device is at the end)
•Applications used (if relevant)
In North America
Web www.ibm.com/harddrive
Voice 888.IBM.5214 or 507.286.5825
Fax 507.253.DRIVE
e-mail drive@us.ibm.com
In the United Kingdom
Voice 44.1475.898.125
e-mail drive@uk.ibm.com
In Singapore
Voice 65.1800.840.9292 or 65.840.9292
e-mail drive@sg.ibm.com
In Germany
Voice 49.7032.153050
e-mail drive@de.ibm.com
i
ii
IBM Deskstar
3.5 inch ATA/IDE hard disk drive
Installation and reference manual
International Business Machines Corporation provides this publication “as is” without warranty of any kind, either expressed or implied, including, but not limited to, the implied warranties of merchantability or fitness for a particular purpose. Some states do not allow disclaimers of express or implied warranties in certain transactions. Therefore, this statement may not apply to you.
This publication could include technical inaccuracies or typographical errors. Product data and specifications are subject to change without notice. Changes are periodically made to the information herein; these changes will be incorporated in new editions of the publication. IBM may make improvements or changes in the products or the program described in this publication at any time.
This publication may contain reference to or information about IBM products (machines and programs), programming, or services that are not available in your country. Such references or information must not be construed to mean that IBM intends to make available such IBM products, programming, or services in your country.
Product description data contained herein represents IBM’s design objective and is provided for comparison among IBM products; actual results may vary based on a variety of factors. Except as explicitly stated in the Warranty section of this Manual, the product data contained herein does not constitute a warranty. Questions regarding IBM warranty terms or the methodology used to derive data should be referred to an IBM representative.
©Copyright International Business Machines Corporation 2000. All rights reserved. Note to US Government Users - Documentation related to restricted rights - Use, duplication or disclosure is subject to restrictions set forth in GSA ADP Schedule Contract with IBM Corp.
IBM is a registered trademark of the International Business Machines Corporation. The following are also trademarks or registered trademarks of the International Business Machines Corporations in the United States, other countries, or both: Deskstar, and OS/2. Any other products or trademarks are the property of their respective owners.
iii
iv

Table of contents |
|
Introduction ............................................................................................. |
1 |
Getting started ........................................................................................ |
3 |
Package contents .................................................................................................. |
3 |
Handling precautions ............................................................................................ |
4 |
Tools for installation.............................................................................................. |
4 |
IBM DriveGuide Easy Installation Software ......................................................... |
4 |
Options for installation ......................................................................................... |
5 |
Install a new drive as Master .................................................................. |
7 |
Begin the hardware install .................................................................................... |
7 |
Configure the jumper settings .............................................................................. |
7 |
Attach the cables ................................................................................................... |
8 |
Mount the drive ...................................................................................................... |
9 |
Complete the hardware install ............................................................................ |
10 |
Set the BIOS/CMOS ............................................................................................. |
10 |
Partition and format with IBM DriveGuide Easy Installation Software ............. |
11 |
Operating system installation ............................................................................. |
15 |
Add a new drive as Slave ..................................................................... |
17 |
Begin the hardware install .................................................................................. |
17 |
Configure the jumper settings ............................................................................ |
17 |
Attach the cables ................................................................................................. |
18 |
Mount the drive .................................................................................................... |
19 |
Complete the hardware install ............................................................................ |
20 |
Set the BIOS/CMOS ............................................................................................. |
20 |
Partition and format with IBM DriveGuide Easy Installation Software ............. |
21 |
Replace and copy a Master drive......................................................... |
27 |
Begin the hardware install .................................................................................. |
27 |
Configure the jumper settings ............................................................................ |
27 |
Attach the cables ................................................................................................. |
28 |
Mount the drive .................................................................................................... |
29 |
Complete the hardware install ............................................................................ |
30 |
Set the BIOS/CMOS ............................................................................................. |
30 |
Partition, format, and copy with IBM DriveGuide Easy Installation Software .. |
31 |
v
Add a new Master drive, install old Master as Slave and copy ......... |
37 |
Begin the hardware install .................................................................................. |
37 |
Configure the jumper settings ............................................................................ |
37 |
Attach the cables ................................................................................................. |
38 |
Mount the drive .................................................................................................... |
39 |
Complete the hardware install ............................................................................ |
40 |
Set the BIOS/CMOS ............................................................................................. |
40 |
Partition, format, and copy with IBM DriveGuide Easy Installation Software .. |
41 |
Appendix ................................................................................................ |
47 |
Record your IBM Deskstar drive information here: ........................................... |
47 |
Cables................................................................................................................... |
47 |
40 pin, 40 conductor ATA/IDE cables ......................................................... |
47 |
40 pin, 80 conductor ATA/IDE cables ......................................................... |
47 |
Jumpers................................................................................................................ |
48 |
Master ....................................................................................................... |
48 |
Slave ......................................................................................................... |
48 |
Cable Select .............................................................................................. |
48 |
Slave Present (Device 0 Forcing Device 1 Present ) .................................. |
48 |
2/32 GB Clip .............................................................................................. |
48 |
16 Head/15Head ....................................................................................... |
49 |
Auto Spin Disable ...................................................................................... |
49 |
Fdisk and format .................................................................................................. |
49 |
Partitioning with FDISK.EXE ...................................................................... |
49 |
Formatting with FORMAT.EXE ................................................................... |
49 |
Troubleshooting .................................................................................................. |
49 |
Advanced troubleshooting .................................................................................. |
50 |
Frequently asked questions................................................................. |
55 |
Glossary ................................................................................................. |
61 |
vi

Introduction
This manual was prepared to aid you in the installation of your new IBM Deskstar hard disk drive. Installation instructions are provided for the following model numbers:
•DTLA-3XXXXX
•DPTA-3XXXXX
•DJNA-3XXXXX
DTLA model drives
Your IBM Deskstar drive supports Ultra ATA/100 and is backward compatible with lower bus speeds, allowing it to obtain interface transfer rates of up to 100 MB per second. Your drive will function at the maximum speed supported by your system components. To obtain Ultra ATA/100 performance, the following components are required:
•40 pin, 80 conductor ATA/IDE cable
•A controller card or motherboard chipset with Ultra ATA/100 or higher capability
•Ultra ATA/100 compatible BIOS
DPTA and DJNA model drives
Your IBM Deskstar drive supports Ultra ATA/66 and is backward compatible, allowing it to obtain interface transfer rates of up to 66.6 MB per second. Your drive will function at the maximum speed supported by your system components. To obtain Ultra ATA/66 performance, the following system components are required:
•40 pin, 80 conductor ATA/IDE cable
•A controller card or motherboard chipset with Ultra ATA/66 or higher capability
•Ultra ATA/66 compatible BIOS
The IBM Deskstar drives listed above also support the following interface data transfer rates:
Ultra ATA Mode 2 |
33.3 MB per second |
Multi-word DMA Mode 2 |
16.6 MB per second |
Advanced PIO Mode 4 |
16.6 MB per second |
Further information on Ultra ATA/100 and Ultra ATA/66 is located in the Frequently Asked Questions section of this manual.
1
2

Getting started
IMPORTANT: If you have an existing drive in your system, perform a backup to avoid any loss of data during installation. Refer to your operating system manual for instructions on how to use the system’s backup utility.
Package contents
The following items are included with your IBM Deskstar retail packaged drive.
•Deskstar drive, contained in an electrostatic discharge (ESD) protective bag
•Mounting screws
•Extra jumper
•40 pin, 80 conductor ATA/IDE interface cable
•IBM Deskstar Installation and Reference Manual
•IBM Deskstar Quick Installation Guide
•IBM DriveGuide Easy Installation Software diskette
Note: It is important to save the original drive packaging for shipping if warranty service is
required.
3
Handling precautions
CAUTION: Most hard disk drive damage is caused by poor handling, physical impact, or electrical shock. Heeding the precautions listed below may eliminate the occurrence of such damage.
•To prevent damage from impact or vibration always set the drive down gently.
•Do not open the ESD bag containing the drive until required.
•Handle the drive carefully by the edges. Do not touch the exposed printed circuit board or any electronic components.
•Do not press on the top or bottom of the drive.
•Do not cover the drive’s breather hole.
•Before handling the drive, discharge any static electricity from you and your clothing. With one hand, touch an unpainted metal surface on your computer chassis, then touch the ESD bag with the other hand. Remain in contact with the chassis and the bag for at least two seconds.
Tools for installation
You may need the following items to install the IBM Deskstar drive.
•A flat-blade screw driver
•A Phillips head screw driver
•A small needle-nose pliers or tweezers.
•Your computer system manual
•Operating system startup diskette (see the FAQ section for instructions to create a startup diskette)
•Drive rails (Drive rails for 5.25 inch bays may be purchased at your local computer store, through your system manufacturer, or by calling the IBM Hard Disk Drive Technical Support Center.)
IBM DriveGuide Easy Installation Software
Overview
IBM DriveGuide partitions and formats a hard disk drive in less time than traditional partition and format programs. An integral part of IBM DriveGuide is EZ-BIOS. EZ-BIOS provides BIOS support for drives larger than 8.4GB, allowing earlier systems to utilize a drive’s full capacity. IBM DriveGuide will also allow you to copy system files to your IBM Deskstar or to copy the files from an existing hard drive to your new drive.
4
Compatibility
To use IBM DriveGuide and EZ-BIOS to partition and format the full capacity of a hard drive greater than 8.4GB, your operating system must support Interrupt 13 Extensions. (See the Frequently Asked Questions section of this manual for more information.) IBM DriveGuide is compatible with the following operating systems:
•DOS versions 5.0 and later*
•Windows 3.1x and Windows for Workgroups 3.11*
•Windows 95 and 98
•Windows NT**
•OS/2 Warp versions 3.0 and 4.0**
*Drive capacity limited to 8.4GB **FAT16 file system support only
Linux, Unix, Apple, and Netware provide their own partitioning and installation software.
Known issues
The following issues may be encountered during IBM DriveGuide installation:
•Award BIOS systems may hang during installation of drives larger than 32 GB.
•AMI BIOS systems may hang during drive detection.
•The IBM DriveGuide copy process may hang at 99%.
Workarounds for the above issues are addressed in the Advanced Troubleshooting section of this manual.
Options for installation
You are now ready to begin installing your IBM Deskstar hard disk drive. The following sections present four sets of installation instructions:
•Install a new drive as Master
•Add a new drive as Slave
•Replace and copy a Master drive
•Add a new Master drive, install old Master as Slave and copy
5
6

Install a new drive as Master
The following steps install the IBM Deskstar in a new system or replace your system’s existing Primary Master with the IBM Deskstar.
Begin the hardware install
•Turn off your computer system.
•Remove cover as instructed by your computer system manual.
•Discharge static electricity by touching an unpainted metal surface on your computer chassis with one hand. Touch the ESD bag with the other hand.
•Unplug your computer. Remain in contact with the chassis and the bag for at least two seconds.
•If replacing a drive or replacing a cable with a 40 pin, 80 conductor ATA/IDE cable, remove it. Store the drive or cable in a safe place in case it should be needed again.
Configure the jumper settings
•Remove the drive from its ESD bag.
•Record the serial number, part number, and model number in the spaces provided in the Appendix for future reference.
Note: Placement of model, part, and serial numbers may vary.
7

•Leave the jumpers as set. The jumpers are factory set to Master, 16 heads.
Note: The IBM Deskstar has an option jumper block located next to the interface connector. Setting these jumpers allows you to use the different options of the hard disk drive. See the “Jumpers” section of the Appendix for jumper setting descriptions.
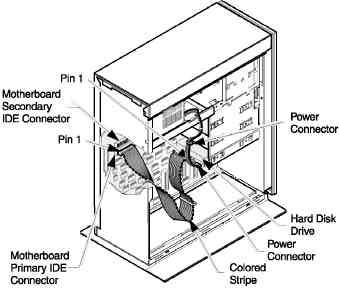
Attach the cables
Note: With some system chassis, it may be more convenient to attach the cable after the drive is mounted. The order of the steps below may change depending upon your system.
Note: The 40 pin, 80 conductor ATA/IDE cable provided with the IBM Deskstar is color coded for the master, slave, and system connectors. The Master connector is black, the Slave connector is gray, and the system connector is blue.
8

•To use the provided ATA/IDE cable, remove the existing cable from the primary ATA/IDE connector of your motherboard or controller card.
•Attach the blue connector of the ATA/IDE cable to the ATA/IDE connector marked “Primary” or “0” on the motherboard or controller card. The primary ATA/IDE connector controls the first and second ATA/IDE devices in the system.
Note: The pin 1 edge of an ATA/IDE cable is marked with a colored stripe. The connectors are also keyed to insert one way only.
•Attach a power cable to the hard disk drive.
•Attach the black connector of the ATA/IDE cable to the hard disk drive.
Mount the drive
Note: Drive bays and other enclosures vary in size and orientation from system to system. They may be oriented vertically, horizontally, upside down, or sideways. The IBM Deskstar can be mounted with any side or end vertical or horizontal, but must not be mounted in a tilted position.
•Mount the drive as instructed by your computer system manual.
9
Complete the hardware install
•Check the ATA/IDE cable and power connections.
•Ensure proper ATA/IDE cable and power cable routing.
•Recover any loose screws or parts.
•Replace the computer system cover.
•Plug in your computer and turn it on.
Set the BIOS/CMOS
Note: BIOS setups vary from system to system and these instructions are intended only as a
guide.
•Run the BIOS/CMOS setup utility. Key stroke sequences for accessing your BIOS are often displayed at boot, or can be found in your computer system manual.
•Locate disk drive type settings. Select the option for Autodetect, Primary Master, if available. If your computer autoconfigures itself at boot time, verify drive detection and capacity. If autodetection is unavailable, set the disk drive type to a User Definable Type (UDT) and enter the CHS parameters 1024 cylinders, 16 heads, and 63 sectors. If Autodetect or a UDT is unavailable, select Drive Type 1.
•Select translation or LBA options as provided by your computer system.
•Record drive CHS parameters and capacity as reported by the BIOS in the spaces provided in the Appendix. If the capacity displayed by the BIOS does not match your drive capacity, it is likely your system does not support drives greater than 8.4 GB.
•Save the settings and exit.
10
Partition and format with IBM DriveGuide Easy Installation Software
Note: You may choose to use Fdisk to partition and format your hard drive. Refer to the section
entitled Fdisk and Format in the Appendix for more information.
Due to system and hard drive variations, the IBM DriveGuide screens displayed may be
different than those presented here.
Note: Many BIOS setups refer to the drives in a system as 0, 1, and so on. IBM DriveGuide
refers to drives as 1, 2, etc.
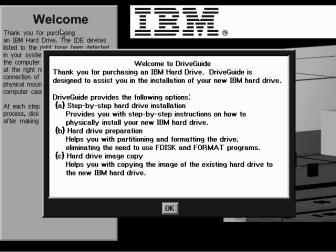
•Boot your computer with the IBM DriveGuide diskette in drive A. The IBM DriveGuide logo is displayed with the message “Loading DriveGuide - Please Wait”.
•The Welcome screen is displayed. Click “OK”.
Note: If a mouse is not detected, a screen is displayed explaining the use of Tab and Enter to
navigate.
•A License Agreement is displayed. Click “Accept”.
•The first screen on the following page appears. The message “Drive 1 is not formatted” is displayed. Select “Yes” to format the specified drive. Click “No” if the wrong drive is specified or you want to proceed manually.
11

Note: If your drive is already formatted, a Welcome screen is displayed with three options; guided
install, partition and format, and advanced options.
•The message “Insert a DOS system disk or a Windows 9x startup disk into the floppy drive A:” is displayed. Insert the startup disk you will be using to install the operating system.
•Choose the type of File Allocation Table (FAT) to be used in your drive partitions.
Note: Select FAT32 or FAT16 if you are using Windows 95 SR2 or Windows 98. FAT 32 partitions utilize disk space more efficiently and may be greater than 2GB in size. If you are using DOS, Windows 3.1x, or an earlier version of Windows 95, select FAT16.
12

•EZ-BIOS is required if your drive is larger than 8.4GB and your system BIOS does not support large capacities. Select “Install EZ-BIOS”. If you select “Do Not Install EZ-BIOS” your capacity will be limited to 8.4GB.
•If you selected FAT32, the following screen is displayed. Select an option. Click “Continue”.
13

•If you selected FAT16, the following screen is displayed. Select an option. Click “Continue”.
Note: DOS, Windows 3.1x, and early versions of Windows 95 only support FAT16. FAT16 file systems have a 2.1GB partition limit. If you have one of these operating systems, you must create multiple partitions of 2.1GB or less.
•Your partition selections are displayed. Select “Back” to change your selections. Select “Finish” to partition and format your hard drive.
14
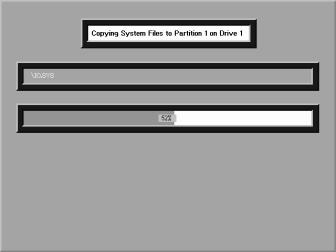
•The message “DriveGuide will now partition and format the hard drive. This is your last chance to cancel” is displayed. Select “Continue” to partition and format.
•IBM DriveGuide is now copying data to your drive.
•The message “Remove disk from floppy drive” is displayed. Remove the IBM DriveGuide diskette and click “Okay”. The drive installation is complete. If EZ-BIOS was installed, do not insert a floppy until prompted by EZ-BIOS.
Operating system installation
IMPORTANT: If the operating system presents the option to partition and format your drive, skip
this step. IBM DriveGuide has already partitioned and formatted your drive.
If EZ-BIOS was not installed during IBM DriveGuide installation, proceed to your operating system installation instructions.
If EZ-BIOS was installed during IBM DriveGuide installation, you must allow EZ-BIOS to load in memory prior to booting to a floppy. Perform the boot process below or your drive’s capacity and partitions will be unavailable.
•Boot your system to the hard drive to load EZ-BIOS in memory. EZ-BIOS displays this message:
EZ-BIOS: Initializing...
EZ-BIOS: Hold the CTRL key down for Status Screen or
to boot from floppy...
•P ress the CTRL key. A status screen is displayed.
•Insert the operating system setup diskette and press A to boot from a floppy.
15
 Loading...