


Projector
CP-X2530WN/CP-X3030WN
CP-WX3030WN
User's Manual (detailed)
Network Guide
Thank you for purchasing this product.
This manual is intended to explain only the network function. For proper use of this product, please refer to this manual and the other manuals for this product.
 WARNING ►Before using this product, be sure to read all manuals for this product. After reading them, store them in a safe place for future reference.
Features
This projector has the network function that brings you the following main features.
Network Presentation : allows the projector to project computer images transmitted through a network. ( 15)
Web Control : allows you to monitor and control the projector through a network from a computer. ( 16)
My Image : allows the projector to store up to four still images and project them. ( 50)
Messenger : allows the projector to display text sent from a computer through a network. ( 51)
Network Bridge : allows you to control an external device through the projector from a computer. ( 52)
NOTE • The information in this manual is subject to change without notice.
•The illustrations in this manual are for illustrative purposes. They may differ slightly from your projector.
•The manufacturer assumes no responsibility for any errors that may appear in this manual.
•The reproduction, transfer or copy of all or any part of this document is not permitted without express written consent.
Trademark acknowledgment
•Microsoft®, Internet Explorer®, Windows®, Windows Vista®, Windows 7®, Windows 8® and Aero® are registered trademarks of Microsoft Corporation in the U.S. and/or other countries.
•Adobe® and Flash® are registered trademarks of Adobe Systems Incorporated.
•Pentium® is a registered trademark of Intel Corporation.
•JavaScript® is a registered trademark of Sun Microsystems, Inc.
•HDMI, the HDMI logo and High-Definition Multimedia Interface are trademarks or registered trademarks of HDMI Licensing LLC in the United States and other countries.
•Crestron®, Crestron e-Control®, e-Control®, Crestron RoomView® and RoomViewTM are trademarks or registered trademarks of Crestron Electronics, Inc. in
the United States and other countries.
•Trademark PJLink is a trademark applied for trademark rights in
Japan, the United States of America and other countries and areas. |
|
All other trademarks are the properties of their respective owners. |
1 |

Contents |
|
Contents |
|
|
|
Caution .......................................................................................... |
4 |
1. Connection to the network ...................................................... |
5 |
1.1 System requirements ................................................................................. |
5 |
1.1.1 Required equipment preparation ..................................................................................... |
5 |
1.1.2 Hardware and software requirement for computer .......................................................... |
5 |
1.2 Manual network connection setting - Wired LAN -. ..................................... |
7 |
1.2.1 Equipments connection .................................................................................................... |
7 |
1.2.2 Network settings .............................................................................................................. |
7 |
1.2.3 “Internet Option” setting ................................................................................................. |
10 |
1.3 Manual network connection setting - Wireless LAN - ............................... |
11 |
1.3.1 Preparation for wireless LAN connection ....................................................................... |
11 |
1.3.2 Wireless LAN connection set up .................................................................................... |
12 |
2. Network Presentation ............................................................. |
15 |
3. Web Control ............................................................................ |
16 |
3.1 Projector Web Control ............................................................................... |
17 |
3.1.1 Logon ............................................................................................................................. |
17 |
3.1.2 Network Information ....................................................................................................... |
18 |
3.1.3 Network Settings ............................................................................................................ |
19 |
3.1.4 Port Settings .................................................................................................................. |
22 |
3.1.5 Mail Settings .................................................................................................................. |
24 |
3.1.6 Alert Settings .................................................................................................................. |
25 |
3.1.7 Schedule Settings .......................................................................................................... |
27 |
3.1.8 Date/Time Settings ......................................................................................................... |
30 |
3.1.9 Security Settings ............................................................................................................ |
32 |
3.1.10 Projector Control .......................................................................................................... |
33 |
3.1.11 Remote Control ............................................................................................................ |
39 |
3.1.12 Projector Status ........................................................................................................... |
40 |
3.1.13 Network Restart ........................................................................................................... |
41 |
3.2 Crestron e-Control® .................................................................................. |
42 |
3.2.1 Main window .................................................................................................................... |
43 |
3.2.2 Tools window ................................................................................................................... |
45 |
3.2.3 Info window ..................................................................................................................... |
47 |
3.2.4 Help Desk window ........................................................................................................... |
48 |
3.2.5 Emergency Alert .............................................................................................................. |
49 |
4. My Image Function ................................................................. |
50 |
5. Messenger Function ............................................................... |
51 |
2

Contents
6. |
Network Bridge Function |
|
|
52 |
|||
6.1 |
Connecting devices .................................................................................. |
52 |
|
6.2 |
Communication setup ............................................................................... |
53 |
|
6.3 |
Communication port ................................................................................. |
53 |
|
6.4 Transmission method ............................................................................... |
54 |
||
|
|
6.4.1 HALF-DUPLEX .............................................................................................................. |
54 |
|
|
6.4.2 FULL-DUPLEX ............................................................................................................... |
55 |
7. |
Other Functions ...................................................................... |
56 |
|
7.1 |
E-mail Alerts ............................................................................................. |
56 |
|
7.2 |
Projector Management using SNMP ........................................................ |
58 |
|
7.3 |
Event Scheduling ..................................................................................... |
59 |
|
7.4 |
Command Control via the Network .......................................................... |
62 |
|
7.5 |
Crestron RoomView® ................................................................................. |
67 |
|
8. |
Troubleshooting ..................................................................... |
68 |
|
9. |
Warranty and after-sales service .......................................... |
69 |
|
3

Caution
Caution
To use the wireless network function of this projector, the designated USB wireless adapter that is sold as an option is required. For precautions according to the standards and laws, refer to the documents that come with the adapter.
[Restriction on plugging and unplugging the USB wireless adapter]
Before you insert or pull out the USB wireless adapter from the projector, turn off the power of the projector and pull out the power cord’s plug from the outlet. Do not touch the USB wireless adapter that is connected to the projector while the projector is receiving AC power.
Do not use any extension cable or device when connecting the adapter to the projector.
[Security precautions when using wireless LAN]
It is recommended that security settings, such as SSID and ENCRYPTION, are specified when using wireless LAN communication. If the security settings are not specified, the contents may be intercepted or it may cause unauthorized access to the system. For details on wireless LAN security settings, refer to 3.1 Projector Web Control or NETWORK menu in the Operating Guide.
 CAUTION ►The optional IEEE802.11b/g/n USB wireless adapter uses the 2.4GHz radio frequency band. You do not need a radio license to use the adapter, but you should be aware of the following:
•DO NOT USE NEAR THE FOLLOWING!
•Microwave ovens
•Industrial, scientific or medical devices
•Designated low power radio stations
•Premises radio stations
Using the USB wireless adapter near the above may cause radio interference, which would result in a decrease in transmission speed or interruption, and even lead to malfunctioning of devices such as pacemakers.
•Depending on the location where the USB wireless adapter is used, radio wave interference may occur, which may result in a decrease in transmission speed or interruption in communication.In particular, please be aware that using the USB wireless adapter at locations where there is reinforced steel, other types of metals or concrete is likely to cause radio wave interference.
•Available Channels
The USB wireless adapter uses the 2.4GHz radio frequency band, but depending on the country or region you are in, the channels that you can use might be limited. Please consult your dealer for information on the usable channels.
• Bringing the optional USB wireless adapter out of the country or region you reside in and using it there could lead to a violation of the radio laws of that country or region.
4

1. Connection to the network
1.Connection to the network
1.1System requirements
1.1.1 Required equipment preparation
The following equipments are required to connect the projector to your computer through the network.
■ Common The projector: 1 unit, Computer : minimum 1 set
■Depending on how you want to connect
1)For the wired connection *1
LAN cable (CAT-5 or greater): 1 piece
2)For the wireless connection *2
- Projector side
IEEE802.11b/g/n USB wireless adapter (option : USB-WL-11N) : 1 unit - Computer side
IEEE802.11 b/g/n wireless LAN equipment: 1 unit for each *3
*1: The system for using the network function of the projector requires communication environment conforming 100Base-TX or 10Base-T.
*2: An access point is required when the wireless LAN connection is used as Infrastructure mode.
*3: Depending on the type of wireless network device and computer you are using, the projector may not be able to communicate properly with your computer, even if the computer is equipped with a built-in wireless LAN function.
To eliminate communication problems, please use a Wi-Fi certified wireless network device.
1.1.2 Hardware and software requirement for computer
To connect your computer to the projector and use the network function of the projector, your computer needs to meet the following requirements.
OS: One of the following.
Windows ® XP Home Edition /Professional Edition
Windows Vista ® Home Basic /Home Premium /Business /Ultimate /Enterprise (Service Pack 1 or later)
Windows ® 7 Starter /Home Basic /Home Premium /Professional /Ultimate / Enterprise
Windows ® 8
Windows ® 8 Pro/Enterprise
CPU: Pentium 4 (2.8 GHz or higher)
Graphic card: 16 bit, XGA or higher
* When using the “LiveViewer” it is recommended that the display resolution of your computer is set to 1024 x 768.
Memory: 512 MB or higher
Hard disk space: 100 MB or higher
Web browser: Internet Explorer ® 6.0 or higher
CD-ROM/DVD-ROM drive
5
1. Connection to the network
1.1 System requirements (continued)
NOTE • The network communication control is disabled while the projector is in standby mode if the STANDBY MODE item is set to SAVING. Please connect the network communication to the projector after setting the STANDBY MODE to NORMAL. ( SETUP menu in the Operating Guide)
• You can get the latest version of the applications for the network functions of the projector and the latest information for this product from the Hitachi website. (http://www.hitachi-america.us/projectors or http://www.hitachidigitalmedia. com).
6

1. Connection to the network
1.2 Manual network connection setting - Wired LAN -
This section explains how to set it up manually.
1.2.1 Equipments connection
Connect the projector and a computer with a LAN cable.
* Before connecting with an existing network, contact the network administrator.
Next, check the following computer settings.
1.2.2 Network settings
This is an explanation of network connection settings for Windows® 7.
1)Log on to Windows® 7 as administrator authority. Administrator authority is the account, which can access to all functions.
2)Open “Control Panel” from “Start” menu.
3)Open “View network status and tasks” in “Network and Internet”.
With the icons in the "Control Panel" window displayed, click "Network and Sharing Center".
4) Click "Change adapter settings" in the menu on the left side of the "Network and Sharing Center" window.
(continued on next page)
7
1. Connection to the network
1.2 Manual network connection setting - Wired LAN - (continued)
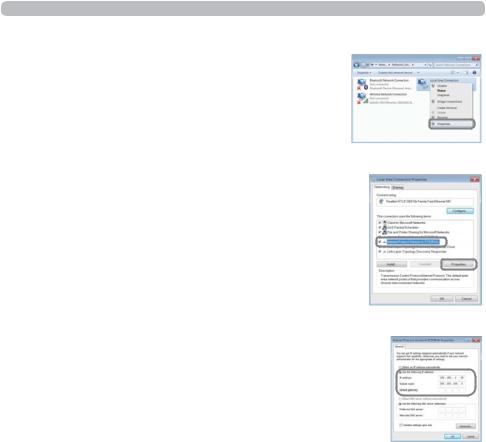
5)Right-click "Local Area Connection" to open the menu, and select "Properties".
6)Select "Internet Protocol Version 4 (TCP/IPv4)" and click [Properties].
7) Select "Use the following IP address" and configure the IP address, Subnet mask and Default gateway for the computer accordingly. If a DHCP server exists in the network, you
can select "Obtain an IP address automatically" and the IP address will be assigned automatically.
After setting is complete, click [OK] to close the window.
(continued on next page)
8

1. Connection to the network
1.2 Manual network connection setting - Wired LAN - (continued)
[About IP address]
■ Setting manually
The Network address portion of the IP address setting on your computer must be the same as the setting on the projector. Also, the entire IP address on the computer must not overlap with that of the other devices on the same network, including the projector.
For example
The projector’s settings are as follows. IP address: 192.168.1.254
Subnet mask: 255.255.255.0
(Network address: 192.168.1 in this case)
Therefore, specify the computer’s IP address as follows.
IP address: 192.168.1.xxx (xxx shows decimal number.) Subnet mask: 255.255.255.0
(Network address: 192.168.1 in this case)
Select from 1 to 254 for “xxx” not duplicating with any other equipments.
In this case, since the IP address of the projector is “192.168.1.254”, specify a setting between 1 to 253 for the computer.
NOTE • “0.0.0.0” cannot be set to the IP address.
•The projector’s IP address can be changed by using the configuration utility via a web browser. ( 21)
•If the projector and the computer exist in the same network (i.e., same network address), you can leave the default gateway field blank.
•When the projector and the computer exist in different networks, the default gateway must be set. Consult to the network administrator in detail.
■Setting automatically
When a DHCP server exists in the connected network, it is possible to assign an IP address to the projector and computer automatically.
* DHCP is abbreviation for “Dynamic Host Configuration Protocol” and has the function to provide necessary setting for network like IP address from server to client. A server that has DHCP function is called DHCP server.
(continued on next page)
9

1. Connection to the network
1.2 Manual network connection setting - Wired LAN - (continued)
1.2.3 “Internet Option” setting
1) Click “Internet Options” in “Network and Sharing Center” window to open “Internet Properties” window.
2) Click “Connections” tab and then click [LAN settings] button to open “Local Area Network (LAN) Settings”.
3) Uncheck all boxes in “Local Area Network (LAN) Settings” window.
After setting is complete, click [OK] to close the window.
10
1. Connection to the network
1.3 Manual network connection setting - Wireless LAN -
Using the designated USB wireless adapter (option) on the projector enables the projector and computer to communicate in both the Ad-Hoc and Infrastructure modes.
This section is intended to explain how to set up wireless LAN connection manually.
1.3.1 Preparation for wireless LAN connection
Fig. 1.3.1.a Without an access point communication (Ad-Hoc)
Fig. 1.3.1.b With an access point communication (Infrastructure)
*Ad-Hoc is one of the wireless LAN communication methods without having access point to communicate.
*Infrastructure is one of the wireless LAN communication methods with having access point to communicate. If certain quantities of equipments are used, this mode is efficient.
If communicating with existing network, consult to your network administrator.
First, insert the USB wireless adapter into the USB TYPE A port. ( Connecting with your devices in the Operating Guide) Then, set up the computer for wireless communication.
When the computer comes with a built-in IEEE802.11b/g/n wireless LAN device, enable it and disable other network connections. If a wireless LAN device is not built into the computer, connect an IEEE802.11b/g/n wireless LAN device and install the device driver. For details, refer to the user's guide for the computer and wireless LAN device.
11
1. Connection to the network
1.3 Manual network connection setting - Wireless LAN - (continued)
1.3.2 Wireless LAN connection set up
Using wireless LAN utility for Windows® 7 standard.
Wireless LAN initial settings for the projector is as follows.
Connection Control |
: Ad-Hoc |
SSID |
: wireless |
Channel |
: 1 |
Encryption rating |
: None |
IP address |
: 192.168.10.254 |
* You can change these settings via a web browser on your computer or from the menu of the projector. Refer to the item 3.1.3 Network Settings ( 20) or
NETWORK menu in the Operating Guide.
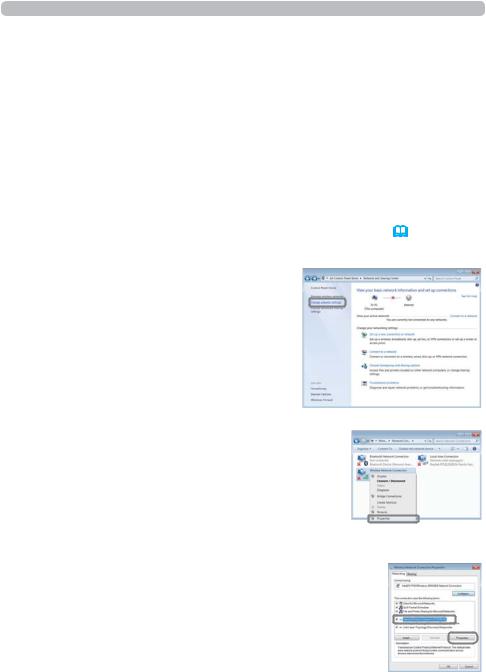
1) Select "Change adapter settings" from the menu on the left side of the "Network and Sharing Center" window.
2) Right-click "Wireless Network Connection" to open the menu, and select "Properties".
3) Select "Internet Protocol Version 4 (TCP/IPv4)" and click [Properties].
(continued on next page)
12

1. Connection to the network
1.3 Manual network connection setting - Wireless LAN - (continued)
4) Select "Use the following IP address" and configure the IP address, Subnet mask and Default gateway for the computer accordingly.
After setting is complete, click [OK] to close the window.
[About IP address]
The Network address portion of the IP address setting on your computer must be the same as the setting on the projector. Also, the entire IP address on the computer must not overlap with that of the other devices on the same network, including the projector.
For example
The projector’s settings are as follows.
IP address: 192.168.10.254 Subnet mask: 255.255.255.0
(Network address: 192.168.10 in this case)
Therefore, specify the computer’s IP address as follows.
IP address: 192.168.10.xxx (xxx shows decimal number.) Subnet mask: 255.255.255.0
(Network address: 192.168.10 in this case)
Select from 1 to 254 for “xxx” not duplicating with any other equipments.
In this case, since the IP address of the projector is “192.168.10.254”, specify a setting between 1 to 253 for the computer.
NOTE • “0.0.0.0” cannot be set to the IP address.
•The projector’s IP address can be changed by using the configuration utility via a web browser. ( 20)
•If the projector and the computer exist in the same network (i.e., same network address), you can leave the default gateway field blank.
•When the projector and the computer exist in different networks, the default gateway must be set.
(continued on next page)
13

1. Connection to the network
1.3 Manual network connection setting - Wireless LAN - (continued)
5)Right-click "Wireless Network Connection" to open the menu, and select "Connect / Disconnect".
6)From the connectable wireless networks, select the SSID of the projector (set to "wireless" by default), and click [Connect]. If you have enabled encryption, a window asking for input of the encryption key will be displayed. Input the preset key.
7)After connection is established, "Connected" will appear to the right of SSID.
14

2. Network Presentation
2. Network Presentation
The projector can display or play back the computer screen images and audio data that are transmitted through the network. This Network Presentation feature helps you to smoothly make your presentations and conduct conferences.
Wireless LAN
Wired LAN
To use Network Presentation, an exclusive application, "LiveViewer" is required. It can be installed from the bundled application CD. You can also download the latest version and relevant information from the Hitachi website (http://www. hitachi-america.us/projectors or http://www.hitachidigitalmedia.com). For details of Network Presentation and instructions to install the "LiveViewer", refer to the manual for "LiveViewer".
"LiveViewer" function use depends on the model you are using. If you want to use the latest downloaded "LiveViewer", please refer for the appropriate group item in the "LiveViewer" User's Manual.
This model will be in the Group of G.
15

3. Web Control
3. Web Control
You can adjust or control the projector via a network from a web browser on a computer that is connected to the same network.
NOTE • Internet Explorer® 6.0 or later is required.
•If JavaScript® is disabled in your web browser configuration, you must enable JavaScript® in order to use the projector web pages properly. See the Help files for your web browser for details on how to enable JavaScript®.
•It is recommended that all web browser updates are installed.
•If data is transferred via wireless and wired LAN at the same time, the projector may not be able to process the data correctly.
Refer to the following for configuring or controlling the projector via a web browser. Make sure that your computer and the projector is connected via network, and then start Web browser.
Enter the projector's IP address into URL input box of the Web browser as the example below, and then press the Enter key or  button.
Example: If the IP address of the projector is set to 192.168.1.10:
Enter “http://192.168.1.10/” into the address bar of the web browser and press the Enter key or click  button.
If a correct URL is input, and the projector and your computer are connected to the same network correctly, the selection window as shown on the right will be displayed. You can choose to use Projector Web Control or Crestron e-Control® as a tool for controlling the projector. Click one of them.
For more details, refer to 3.1 Projector Web Control ( 17) or 3.2 Crestron e-Control® ( 42).
NOTE • If Crestron e-Control in the Network Settings ( 21) is set to Disable, the selection window above does not appear, but the Logon window of the Projector Web Control is displayed.
• Crestron e-Control® is created using Flash®. You need to install Adobe® Flash® Player on your computer to use Crestron e-Control®.
16

3. Web Control
3.1 Projector Web Control
3.1.1 Logon
To use the Projector Web Control function, you need to logon with your user name and password.
Below are the factory default settings for user name and password.
User name |
Administrator |
Logon window |
|
||
|
|
|
Password |
<blank> |
|
Enter your user name and password, and then click the [OK]. If you logon successfully, the screen below will be displayed.
Main menu
Click the desired operation or configuration item on the main menu.
NOTE • The language used on the Projector Web Control screen is the same as that of the OSD on the projector. If you want to change it, you need to change the OSD language on the projector. ( SCREEN menu in the
Operating Guide)
17
3. Web Control
3.1 Projector Web Control (continued)
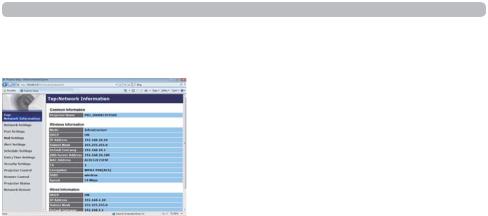
3.1.2 Network Information
Displays the projector’s current network configuration settings.
|
Item |
Description |
|
|
|
|
|
Common Information |
Displays information common to both wireless and wired |
||
LAN. |
|||
|
|
||
|
Projector Name |
Displays the projector name settings. |
|
Wireless Information |
Displays the current settings of wireless LAN. |
||
|
Mode |
Displays the mode of wireless LAN communication. |
|
|
DHCP |
Displays the DHCP setting. |
|
|
IP Address |
Displays the IP address. |
|
|
Subnet Mask |
Displays the subnet mask. |
|
|
Default Gateway |
Displays the default gateway. |
|
|
DNS Server Address |
Displays the DNS server address. |
|
|
MAC Address |
Displays the MAC address. |
|
|
Ch |
Displays the channel used for wireless LAN. |
|
|
Encryption |
Displays the data encryption setting. |
|
|
SSID |
Displays the SSID used by the projector. |
|
|
Speed |
Displays the current wireless LAN transmission speed. |
|
Wired Information |
Displays the current wired LAN settings. |
||
|
DHCP |
Displays the DHCP setting. |
|
|
IP Address |
Displays the IP address. |
|
|
Subnet Mask |
Displays the subnet mask. |
|
|
Default Gateway |
Displays the default gateway. |
|
|
DNS Server Address |
Displays the DNS server address. |
|
|
MAC Address |
Displays the MAC address. |
|
18

3. Web Control
3.1 Projector Web Control (continued)
3.1.3 Network Settings
Displays and configures network settings.
|
Item |
Description |
|
|
|
Common Setup |
Configures the settings common to wireless and wired LAN. |
|
|
|
Configures the name of the projector. |
|
|
The length of the Projector Name can be up to 64 |
|
Projector Name |
alphanumeric characters. Only alphabets, numbers and |
|
following symbols can be used. |
|
|
|
|
|
|
!"#$%&'()*+,-./:;<=>?@[\]^_`{|}~ and space. |
|
|
Particular projector name is pre-assigned by default. |
|
|
Configures the location to be referred to when using SNMP. |
|
sysLocation (SNMP) |
The length of the sysLocation can be up to 255 alphanumeric |
|
characters. Only numbers ‘0-9’ and alphabet ‘a-z’, ‘A-Z’ can |
|
|
|
|
|
|
be used. |
|
|
Configures the contact information to be referred to when |
|
|
using SNMP. |
|
sysContact (SNMP) |
The length of the sysContact can be up to 255 alphanumeric |
|
|
characters. Only numbers ‘0-9’ and alphabet ‘a-z’, ‘A-Z’ can |
|
|
be used. |
|
AMX D.D. |
Configures the AMX Device Discovery setting to detect the |
|
projector from the controllers of AMX connected to the same |
|
|
(AMX Device |
network. For the details of AMX Device Discovery, visit the |
|
Discovery) |
AMX web site. |
|
|
URL: http://www.amx.com |
(continued on next page) |
|
|
19

3. Web Control
3.1 Projector Web Control - Network Settings (continued)
|
|
|
Item |
|
|
|
Description |
|
|
|
|
|
|
|
|
|
|
|
|
Wireless Setup |
Configures the wireless LAN settings. |
|
|
||||||
|
Mode |
Select "Ad-Hoc" or "Infrastructure". |
|
|
|||||
|
IP Configuration |
Configures network settings. |
|
|
|||||
|
|
DHCP ON |
Enables DHCP. |
|
|
|
|||
|
|
DHCP OFF |
Disables DHCP. |
|
|
|
|||
|
|
|
IP Address |
Configures the IP address when DHCP is disabled. |
|||||
|
|
|
Subnet Mask |
Configures the subnet mask when DHCP is disabled. |
|||||
|
|
|
Default |
Configures the default gateway when DHCP is disabled. |
|||||
|
|
|
Gateway |
||||||
|
|
|
|
|
|
|
|
|
|
|
DNS Server Address |
Configures the DNS server address. |
|
|
|||||
|
|
|
|
Select a channel from “1” to “11” to use in the Ad-Hoc mode. |
|||||
|
|
|
|
NOTE • Depending on the country where you are the |
|||||
|
Ch |
channels may vary. In addition, depending on the country |
|||||||
|
or region where you are, you may be required to use a |
||||||||
|
|
|
|
||||||
|
|
|
|
wireless network card that confirm to the standards in the |
|||||
|
|
|
|
respective country or region. |
|
|
|||
|
|
|
|
|
|
|
|||
|
Encryption |
Select data encryption method. |
|
|
|||||
|
|
|
|
Input the WEP key. |
|
|
|
||
|
|
|
|
Either ASCII characters or hexadecimal numbers can be |
|||||
|
|
|
|
used during WEP key input. However, you cannot use a |
|||||
|
WEP Key |
combination of both.The length of the key is defined as |
|||||||
|
follows according to the WEP and character formats. |
||||||||
|
|
|
|
|
Encryption |
|
ASCII characters |
HEX numbers |
|
|
|
|
|
|
|
|
|
|
|
|
|
|
|
|
WEP 64bit |
|
5 characters |
10 characters |
|
|
|
|
|
|
WEP 128bit |
|
13 characters |
26 characters |
|
Input WPA Passphrase.
WPA Passphrase
Available number of input characters is 8 to 63. Only alphabets, numbers and following symbols can be used. !"#$%&'()*+,-./:;<=>?@ [\]^_`{|}~ and space
Select an SSID from the list.
If you require to set your unique SSID, select [Custom], then
SSID
set your own SSID following the rules below. Maximum number of input characters is 32.
Only alphabets, numbers and following symbols can be used. !"#$%&'()*+,-./:;<=>?@[\]^_`{|}~ and space.
(continued on next page)
20
3. Web Control
3.1 Projector Web Control - Network Settings (continued)
|
|
|
Item |
Description |
|
|
|
|
|
Wired Setup |
Configures the wired LAN settings. |
|||
|
IP Configuration |
Configures network settings. |
||
|
|
DHCP ON |
Enables DHCP. |
|
|
|
DHCP OFF |
Disables DHCP. |
|
|
|
|
IP Address |
Configures the IP address when DHCP is disabled. |
|
|
|
Subnet Mask |
Configures the subnet mask when DHCP is disabled. |
|
|
|
Default |
Configures the default gateway when DHCP is disabled. |
|
|
|
Gateway |
|
|
|
|
|
|
|
DNS Server Address |
Configures the DNS server address. |
||
Other Setup |
Configures other network settings. |
|||
|
|
|
|
Set whether to or not to use Crestron e-Control®. |
|
Crestron e-Control |
If you choose Disable, the Logon window of Projector Web |
||
|
Control will be displayed at first, but the selection window |
|||
|
|
|
|
|
|
|
|
|
will not appear. |
Click the [Apply] button to save the settings.
NOTE • The new configuration settings are activated after restarting the network connection. When the configuration settings are changed, you must restart the network connection. You can restart the network connection by clicking [Network Restart] on the main menu ( 41).
•If you connect the projector to an existing network, consult a network administrator before setting server addresses.
•The WEP Key, WPA passphrase and SSID settings will not be set if the invalid characters are used.
•The projector does not allow both wireless and wired LAN to be connected to the same network. Do not set the same network address for both wireless and wired LAN.
21
 Loading...