


Projector
CP-A222WN/CP-A302WN/CP-AW252WN/ CP-A352WN/CP-AW312WN
(Type nos. CP-A222WN, CP-A222WNM, CP-A302WN, CP-A302WNM, CP-AW252WN, CP-AW252WNM,
CP-A352WN, CP-A352WNM, CP-AW312WN, CP-AW312WNM)
User's Manual (detailed) Operating Guide
Thank you for purchasing this projector.
 WARNING ►Before using this product, please read all manuals for this product. Be sure to read “Safety Guide” first. After reading them, store them in a safe place for future reference.
About this manual
Various symbols are used in this manual. The meanings of these symbols are described below.
 WARNING This symbol indicates information that, if ignored, could possibly result in personal injury or even death due to incorrect handling.
 CAUTION This symbol indicates information that, if ignored, could possibly result in personal injury or physical damage due to incorrect handling.
NOTICE This entry notices of fear of causing trouble.
Please refer to the pages written following this symbol. NOTE • The information in this manual is subject to change without notice.
•The illustrations in this manual are for illustrative purposes. They may differ slightly from your projector.
•The manufacturer assumes no responsibility for any errors that may appear in this manual.
•The reproduction, transfer or copy of all or any part of this document is not permitted without express written consent.
Trademark acknowledgment
•Mac® is a registered trademark of Apple Inc.
•Windows®, DirectDraw® and Direct3D® are registered trademarks of Microsoft Corporation in the U.S. and/or other countries.
•VESA and DDC are trademarks of the Video Electronics Standard Association.
•HDMI, the HDMI logo, and High-Definition Multimedia Interface are trademarks or registered trademarks of HDMI Licensing LLC in the United States and other countries.
•Trademark PJLink is a trademark applied for trademark rights in Japan, the United States of America and other countries and areas.
•Blu-ray DiscTM and Blu-rayTM are trademarks of Blu-ray Disc Association.
All other trademarks are the properties of their respective owners. |
1 |

Contents
|
|
|
|
|
Introduction . . . . . . . . . . . . . . . . 3 |
SETUP menu. . . . . . . . . |
. .44. . . . |
||
Features. . . . . . . . . . . . 3 |
D-zoom, D-shift, Picture position / Pict.posit.h, |
|||
Checking the contents of package. . 3 |
Keystone, Keystone, Perfect fit, |
|
||
Part names. . . . . . . . . . . 4 |
Auto eco mode, Eco mode, Installation, |
|
|
|
Setting up. . . . . . . . . . . . . . . . . . 7 |
Standby mode, Monitor out |
|
|
|
Arrangement. . . . . . . . . . 7 |
AUDIO menu. . . . . . . . . . . . . . . 50 |
|||
Connecting with your devices. . . |
. 9 |
Volume, Speaker, Audio source, |
|
|
Connecting to a power supply. . . |
15 |
Mic level, Mic volume |
|
|
Using the security bar and slot. . |
. 15 |
SCREEN menu. . . . . . . . |
. |
.52. . . . |
Using the cable cover. . . . . . |
16 |
Language, Menu position, Blank, |
|
|
Remote control. . . . . . . . . 17. |
. S. tart. up, MyScreen, MyScreen Lock, |
|
|
|
Installing the batteries. . . . . . |
17 |
Message, Source name, Template, C.c. |
||
About the remote control signal. . |
17 |
OPTION menu. . . . . . . . . . . . . . 58 |
||
Changing the frequency of remote control signal. . 18 |
Auto search, Direct power on, |
|
|
|
Using as a simple PC mouse & keyboard. . 18 |
Auto power off, Usb type b, Lamp time, |
|||
Power on/off . . . . . . . . . . . . . . . 19 |
Filter time, My button, My source, |
|
|
|
Operating . . . . . . . . . . . . . . . . . 22 |
Service |
|
|
|
Adjusting the volume. . . . . . |
. 22 |
NETWORK menu. . . . . . . . .71. . . |
||
Temporarily muting the sound. . . |
22 |
Wireless setup, Wireless information, |
|
|
Selecting an input signal. . . . . |
22 |
Wired setup, Wired information, |
|
|
Searching an input signal. . . . |
. 24 |
Projector name, My image, Amx d.d., |
|
|
Selecting an aspect ratio. . . . . |
24 |
Presentation, Service |
|
|
Adjusting the projector's elevator. |
. 25 |
SECURITY menu. . . . . . . |
. .82. . . |
|
Adjusting the zoom and focus. . . |
25 |
Security password change, |
|
|
Using the automatic adjustment feature. . |
26 |
MyScreen password, Pin lock, |
|
|
Adjusting the position. . . . . . |
27 |
Transition detector, My text password, |
||
Correcting the keystone distortions |
. 27 |
My text display, My text writing, |
|
|
Using the magnify feature. . . . |
. 28 |
Cloning lock |
|
|
Temporarily freezing the screen. . |
29 |
Presentation tools . . . . . . . . . . 88 |
||
Temporarily blanking the screen . |
. 29 |
PC-LESS Presentation. . . . . |
. |
88 |
Using the menu function . . . . |
. 30 |
USB Display (Windows computer). |
. |
98 |
EASY MENU.. .. .. .. .. .. .. .. .. .. .. .. .. .. .. 32 |
USB Display (Mac computer). . . |
. 102 |
||
Aspect, D-zoom, Keystone, Keystone, |
Maintenance. . . . . . . . . .106. . . |
|||
Perfect fit, Picture mode, Eco mode, |
|
Replacing the lamp. . . . . . |
. 106 |
|
Installation, Reset, Filter time, Language, |
Cleaning and replacing the air filter. 108 |
|||
Advanced menu, Exit |
|
Caring for the mirror and lens. . . |
. 110 |
|
PICTURE menu. . . . . . . . . . . . . 34 |
Other care. . . . . . . . . . |
|
111 |
|
Brightness, Contrast, Gamma, Color temp, |
Troubleshooting. . . . . . . . . . . 112 |
|||
Color, Tint, Sharpness, Active iris, My memory |
Related messages. . . . . . |
. 112 |
||
IMAGE menu. . . . . . . . . . . . . . . 37 |
Regarding the indicator lamps. . |
|
114 |
|
Aspect, Over scan, V position, H position, |
Resetting all settings. . . . . . |
|
117 |
|
H phase, H size, Auto adjust execute |
|
Phenomena that may be easy to |
|
|
INPUT menu . . . . . . . . . . . . . . . 40 |
be mistaken for machine defects . . 117 |
|||
Progressive, Video nr, Color space, |
|
Specifications. . . . . . . . |
. .123. . . |
|
Video format, Hdmi format, Hdmi range, |
|
|
|
|
Computer in, Frame lock, Resolution
2
Introduction
Introduction
Features
The projector provides you with the broad use by the following features.
üThe unique lens and mirror system realizes ultra short distance projection,which gives you more various way of use.
üThe motorized lens door offers you very simple use of the projector.
üThe double layer filter system is expected to function longer and offers you less maintenance frequency.
üThe HDMI port can support various image equipment which have digital interface to get clearer pictures on a screen.
üThis projector can be controlled and monitored via LAN connection. Furthermore, you can use the designated USB wireless adapter (optional) to establish wireless LAN connection.
Checking the contents of package
Please see the Contents of package section in the User’s Manual (concise) which is a book. Your projector should come with the items shown there. Require of your dealer immediately if any items are missing.
NOTE • Keep the original packing materials, for future reshipment. Be sure to use the original packing materials when moving the projector. Use special caution for the lens.
3
Introduction
Part names
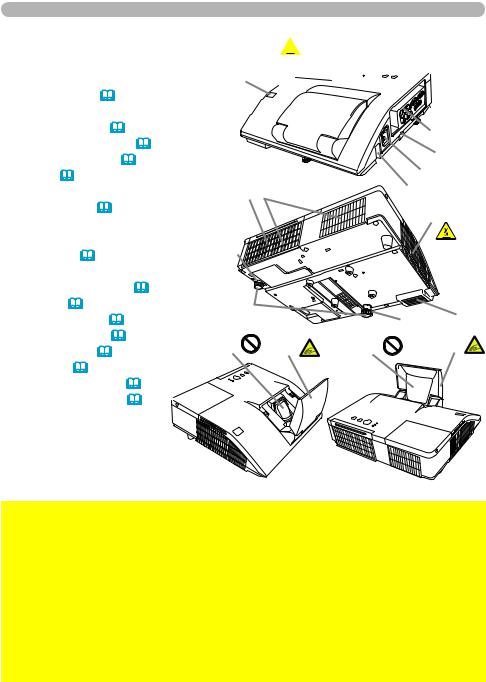
Projector
(1)Lamp cover (&106) The lamp unit is inside.
(2)Control panel (&5)
(3)Elevator feet (x 2) (&25)
(4)Remote sensor (&17)
(5)Lens (&110)
(6)Intake vents
(7)Filter cover (&108)
The air filter and intake vent are inside.
(8)Speaker (&12, 22, 50)
(9)Exhaust vent
(10) AC IN (AC inlet) (&15) (11) Ports (&5)
(12) Security bar (&15) (13) Security slot (&15)
(14)Lens door (&110)
(15)Mirror (&110)
(16)Spacer (Small) (&25)
(17)Spacer (Large) (&25) 
(1) HOT! (2)
(4)


|
|
(11) |
|
|
|
(13) |
|
(7) (6) |
|
(10) |
|
|
(12) |
|
|
|
|
(9) |
|
(16) |
|
|
HOT! |
|
|
|
|
Small |
|
|
|
(3) |
|
(17) |
(8) |
|
|
||
|
|
Large |
(14) |
(5) |
(14) |
(15) |
|
 WARNING ►HOT! : Do not touch around the lamp cover and the exhaust vents during use or just after use, since it is too hot.
►Be careful not to pinch your finger with the lens door, to prevent an injury. ►Never look into the projection lens or mirror while the projection lamp lights, since the projection lamp ray may cause a trouble on your eyes.
►Do not use the security bar and slot to prevent the projector from falling down, since it is not designed for it.
 CAUTION ►Maintain normal ventilation to prevent the projector from heating up. Do not cover, block or plug up the vents. Do not place anything that can stick or be sucked to the vents, around the intake vents. Clean the air filter periodically.
4

Part names (continued) |
|
|
|
|
|
Control panel |
|
|
|
|
|
(1) |
STANDBY/ON button (&19) |
(3) (4) |
|
(6) |
|
(2) |
INPUT button (&22) |
|
|
|
|
(3) |
POWER indicator (&19, 114) |
|
|
|
|
(4) |
TEMP indicator (&114) |
|
|
|
|
(5) |
LAMP indicator (&114) |
|
|
|
|
Buttons ◄/►/▲/▼ |
|
|
|
|
|
(6) |
FOCUS +/- buttons |
(5) |
(7) |
(2) |
(1) |
|
when no menu is displayed (&26), or |
||||
|
|
|
|
|
|
|
Cursor ◄/► buttons |
|
|
|
|
|
when a menu is displayed (&30). FOCUS +/- function is invalid when the |
|
|||
|
USB TYPE A port is selected as the input source. |
|
|
|
|
(7) |
MENU buttons |
|
|
|
|
|
when no menu is displayed (&30), or |
|
|
|
|
Cursor ▲/▼ buttons
when a menu is displayed (&30).
The ◄/►/▲/▼ buttons on the projector work only as the cursor buttons while the template is displayed (&56).
Ports (&9 ~ 14) |
|
|
|
(1) USB TYPE A port (x2) |
(9) AUDIO OUT (L,R) ports |
||
(2) |
LAN port |
(10) |
COMPUTER IN1 port |
(3) |
HDMI port |
(11) COMPUTER IN2 port |
|
(4) |
USB TYPE B port |
(12) |
MONITOR OUT port |
(5) |
MIC port |
(13) |
CONTROL port |
(6) |
AUDIO IN1 port |
(14) |
VIDEO port |
(7) |
AUDIO IN2 port |
(15) |
S-VIDEO port |
(8) |
AUDIO IN3(L,R) ports |
|
|
(1) |
(4) |
(3) |
|
(11) |
|
(10) |
|
||
(2) |
|
|
|
|
|
|
|
|
|
|
(15)(14) |
(9) |
(8) |
(13) |
(7) |
(6) |
(5) |
(12) |
5 |
|
|
|
|
|
|
|
|
|
|

Introduction
Part names (continued)
Remote control
(1)VIDEO button (&23)
(2)COMPUTER button (&23)
(3)SEARCH button (&24)
(4)STANDBY/ON button (&19)
(5)ASPECT button (&24)
(6)AUTO button (&26)
(7)BLANK button (&29)
(8)MAGNIFY - ON button (&28)
(9)MAGNIFY - OFF button (&28)
(10)MY SOURCE/DOC.CAMERA button (&23, 62)
(11)VOLUME - button (&22)
(12)PAGE UP button (&18)
(13)PAGE DOWN button (&18)
(14)VOLUME + button (&22)
(15)MUTE button (&22)
(16)FREEZE button (&29)
(17)MY BUTTON - 1 button (&61)
(18)MY BUTTON - 2 button (&61)
(19)KEYSTONE button (&27)
(20)FOCUS - button (&26)
(21)FOCUS + button (&26)
(22)D-ZOOM - button (&25)
(23)D-ZOOM + button (&25)
(24)POSITION button (&27, 31)
(25)MENU button (&30, 31)
(26)▲/▼/◄/► cursor buttons (&30)
(27)ENTER button (&30, 31)
(28)ESC button (&30)
(29)RESET button (&30)
(30)Battery cover (&17)
(2)(10)
(1) |
|
|
|
|
|
(4) |
(6) |
VIDEO |
|
|
MY SOURCE/ |
|
(3) |
|
COMPUTER DOC.CAMERA |
|
|
|||
(5) |
ASPECT |
AUTO |
SEARCH |
BLANK |
(7) |
|
(16) |
MAGNIFY |
FREEZE |
PAGE |
VOLUME |
(12) |
|
(8) |
ON |
UP |
|
(14) |
||
|
|
|
|
|
||
(9) |
OFF |
|
|
DOWN |
|
(11) |
(19) |
KEYSTONE |
1 |
MY BUTTON 2 |
MUTE |
(13) |
|
(17) |
- FOCUS |
+ |
- D-ZOOM + |
(15) |
||
(20) |
POSITION |
|
|
|
MENU |
(18) |
(21) |
|
|
|
|
|
(23) |
(24) |
|
|
ENTER |
|
(22) |
|
|
|
|
|
|
||
(26) |
ESC |
|
|
|
RESET |
(25) |
(28) |
|
|
|
|
|
(27) |
|
|
|
|
|
|
(29) |
(30) |
Back of
the remote control
6

Setting up
Setting up
Install the projector according to the environment and manner the projector will be used in.
Arrangement
Refer to table T-1 or T-2 and figures F-1 and F-2 at the end of User’s Manual (concise) to determine the screen size and projection distance.
The values shown in the table are calculated for a full size screen.
a Screen size (diagonal) b1 , b2 Projection distance (±8%) c1 , c2 Screen height (±8%)
•For the case of installation in special conditions such as on the wall or ceiling, the specified mounting accessories and service may be required. Tabletop use must be setup with the designated optional accessories. Before installing the projector, consult your dealer about your installation.
•The screen position may shift after installation if the projector is mounted on locations such as the wall or ceiling, due to the flexibility of the plastic projector body. If readjustment is necessary, consult with your dealer or service personnel.
•The projected image position and/or focus may change during warm-up (approx. 30 minutes after the lamp is turned on) or when the ambient conditions change. Readjust the image position and/or focus as necessary.
•Since the projector features an ultra short throw, be aware that it is required to select a screen carefully to have better performance.
-A soft screen such as a pull-down screen may cause serious distortion of a projected image. A hard screen such as a board screen is recommended for use with this projector.
-A high-gain screen such as a bead screen that has narrow viewing angle is not suitable for this projector. A low-gain screen (around 1.0) such as a matte screen that has wide viewing angle is recommended for use with this projector.
-Ascreen with a weave pattern may cause moiré on the projected image, which is not a failure of the projector.Ascreen that has less moiré effects is recommended for use with this projector.
 WARNING ►Place the projector in a stable horizontal position. If the projector falls or is knocked over, it could cause injury and/or damage to the projector. Using a damaged projector could then result in fire and/or electric shock.
•Do not place the projector on an unstable, slanted or vibrational surface such as a wobbly or inclined stand.
•Do not place the projector on its side or front position. To place the projector on its rear position for the table top use, it is required to use the designated optional parts. Consult with your dealer.
•Consult with your dealer before a special installation such as on the wall or ceiling.
(continued on next page)
7

Setting up
Arrangement (continued)
 WARNING ►Place the projector in a cool place, and ensure that there is sufficient ventilation. The high temperature of the projector could cause fire, burns and/or malfunction of the projector.
•Do not stop-up, block or otherwise cover the projector's vents.
•Keep a space of 30 cm or more between the sides of the projector and other objects such as walls.
•Do not place or attach anything that would block the lens or vent holes.
•Do not place the projector on metallic thing or anything weak in heat.
•Do not place the projector on carpet, cushions or bedding.
•Do not place the projector in direct sunlight or near hot objects such as heaters. Do not place the projector where the air from an air conditioner or similar unit will blow on it directly.
•Do not place anything near the projector lens or vents, or on top of the projector.
•Do not place anything that may be sucked into or stick to the vents on the bottom of the projector. This projector has some intake vents also on the bottom.
►Do not place the projector anyplace where it may get wet. Getting the projector wet or inserting liquid into the projector could cause fire, electric shock and/or malfunction of the projector.
•Do not place the projector in a bathroom or the outdoors.
•Do not place anything containing liquid near the projector.
•Do not place the projector where any oils, such as cooking or machine oil, are used. ►Use only the mounting accessories the manufacturer specified, and leave installing and removing the projector with the mounting accessories to the service personnel.
•Read and keep the user’s manual of the mounting accessories used.
 CAUTION ►Avoid placing the projector in smoky, humid or dusty place. Placing the projector in such places could cause fire, electric shock and/or malfunction of the projector.
• Do not place the projector near humidifiers, smoking spaces or a kitchen. Also do not use an ultrasonic humidifier near the projector. Otherwise chlorine and minerals contained in tap water are atomized and could be deposited in the projector causing image degradation or other problems.
►Position the projector to prevent light from directly hitting the projector's remote sensor. ►Do not place the product in a place where radio interference may be caused. ►Do not place this product in a magnetic field.
►If the projector is used at an altitude of about 1600 m or higher, set ALTITUDE of the SERVICE item in the OPTION menu to HIGH (&63). Otherwise, set it to NORMAL.
If the projector is used with a wrong setting, it may cause damage to the projector itself or the parts inside.
(continued on next page)
8

Setting up
Arrangement (continued)
NOTE • The projector may make a rattling sound when tilted, moved or
shaken, since a flap to control the air flow inside of the projector has moved. Be aware that this is not a failure or malfunction.
•The incoming light to the screen from the projector has a large angle. While
the white image is on the screen, you may see it with colors, but this is because of the type of the screen used or the angles viewed, and it is not a malfunction.
•When the ambient temperature is around 35 to 40°C, the brightness of lamp
is reduced automatically.
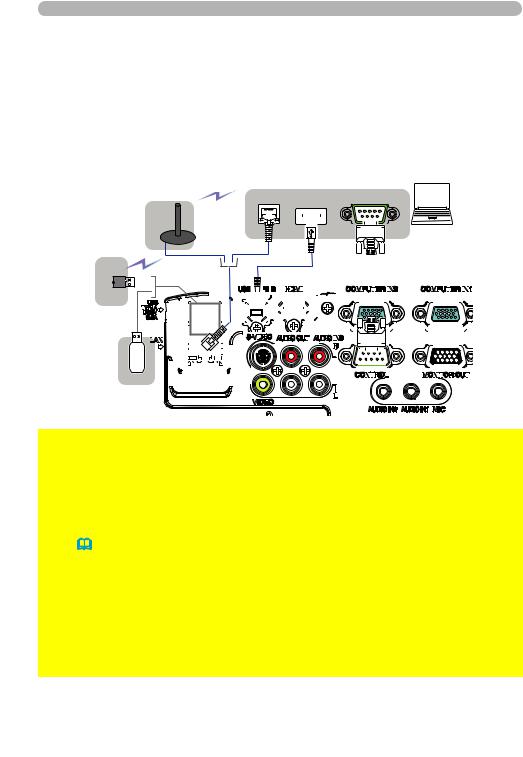
Connecting with your devices
Before connecting the projector to a device, consult the manual of the device to confirm that the device is suitable for connecting with this projector and prepare the required accessories, such as a cable in accord with the signal of the device. Consult your dealer when the required accessory did not come with the product or the accessory is damaged.
After making sure that the device and projector are turned off, connect them following the instructions below.
 WARNING ►Use only the appropriate accessories. Otherwise it could cause a fire or damage to the device and the projector.
-Use only the accessories specified or recommended by the projector’s manufacturer. Consult your dealer when the required accessory did not come with the product or the accessory is damaged. It may be regulated under some standard.
-For a cable with a core at only one end, connect the end with the core to the projector. That may be required by EMI regulations.
-Neither disassemble nor modify the projector and the accessories.
-Do not use the damaged accessory. Be careful not to damage the accessories. Route a cable so that it is neither stepped on nor pinched out.
 CAUTION ►Do not turn on or off the projector while connected to a device in operation, unless that is directed in the manual of the device. Otherwise it may cause malfunction in the device or projector.
►Be careful not to mistakenly connect a connector to a wrong port. Otherwise it may cause malfunction in the device or projector.
-When connecting a connector to a port, make sure that the shape of the connector fits the port.
-Tighten the screws to connect a connector equipped with screws to a port.
-Use the cables with straight plugs, not L-shaped ones, as the input ports of the projector are recessed.
(continued on next page)
9
Setting up
Connecting with your devices (continued)
About Plug-and-Play capability
• Plug-and-Play is a system composed of a computer, its operating system and peripheral equipment (i.e. display devices). This projector is VESA DDC 2B compatible. Plug-and-Play can be used by connecting this projector to a computer that is VESA DDC (display data channel) compatible.
-Take advantage of this feature by connecting a computer cable to the COMPUTER IN1 port (DDC 2B compatible). Plug-and-Play may not work properly if any other type of connection is attempted.
-Please use the standard drivers in your computer as this projector is a Plug-and- Play monitor.
•When AUTO is selected for the COMPUTER IN1 or COMPUTER IN2 port in
COMPUTER IN of the INPUT menu, that port will accept component video signals (&42).
•When the USB TYPE B port and the computer's type A USB port are connected,
you can use the USB TYPE B port as a picture input port from the computer, or use the remote control as a simple mouse and keyboard of the computer. (&18).
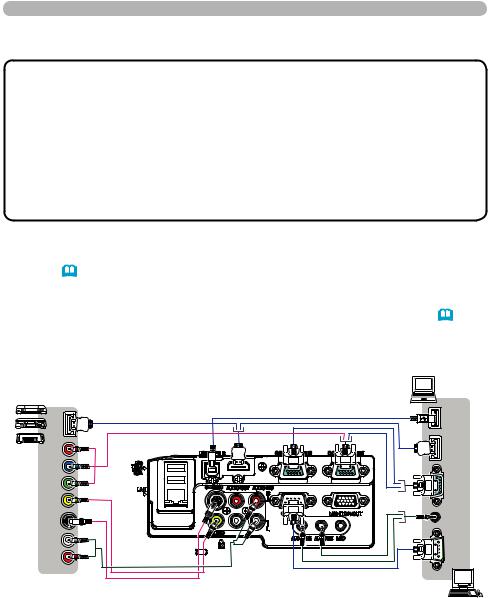
VCR/DVD/Blu-ray Disc |
|
|
player |
|
HDMI |
COMPONENT |
Y Cb/Pb Cr/Pr |
AUDIO |
S-VIDEO VIDEO |
R L |
|
OUT |
|
Computer
DISPLAY HDMI USB (A)
OUT |
AUDIO |
232C-RS |
(continued on next page)
10
Setting up
Connecting with your devices (continued)
NOTE • Before connecting the projector to a computer, consult the computer’s
manual and check the compatibility of the signal level, the synchronization methods and the display resolution output to the projector.
-Some signal may need an adapter to input this projector.
-Some computers have multiple screen display modes that may include some signals which are not supported by this projector.
-Although the projector can display signals with resolution up to UXGA (1600X1200), the signal will be converted to the projector’s panel resolution before being displayed. The best display performance will be achieved if the resolutions of the input signal and the projector panel are identical.
•If you connect this projector and a notebook computer, you need output the display to an external monitor, or output simultaneously to the internal display and an external monitor. Consult the computer's manual for the setting.
•Depending on the input signal, the automatic adjustment function of this projector may take some time and not function correctly.
-Note that a composite sync signal or sync-on-green signal may confuse the automatic adjustment function of this projector (&42).
-If the automatic adjustment function does not work correctly, you may not see the dialog to set the display resolution. In such a case, use an external display device. You may be able to see the dialog and set an appropriate display resolution.
(continued on next page)
11
Setting up
Connecting with your devices (continued)
•If you insert a USB storage device, such as a USB memory, into the USB TYPE
A port and select the port as the input source, you can view images stored in the device (&88).
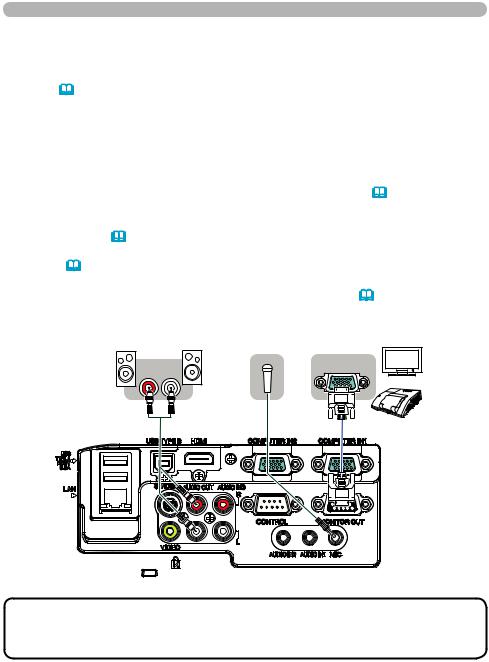
•You can connect a dynamic microphone to the MIC port with a 3.5 mm mini-plug. In that case, the built-in speaker outputs the sound from the microphone, even while the sound from the projector is output. You can input line level signal to the MIC port from equipment such as wireless microphone. Select HIGH in the MIC LEVEL item of the AUDIO menu when you input line level audio signal to the
MIC port. In the normal mode, the volume of the microphone can be adjusted separately from the volume of the projector using the menu. (&51)
In the standby mode, the volume of the microphone is adjustable with the
VOLUME +/- buttons on the remote control, in synchronization with the volume of the projector. (&22)
Even when the sound of projector is set to mute mode by the AUDIO SOURCE function (&50), the volume of the microphone is adjustable.
In both modes (standby or normal), the MUTE button on the remote control works on the sounds of the microphone and the projector. (&22)
|
Microphone system |
Monitor |
Speakers |
R L |
RGB IN |
(with an amplifier) |
|
NOTE • If a loud feedback noise is produced from the speaker, move the
microphone away from the speaker.
• This projector doesn't support plug-in power for the microphone.
(continued on next page)
12
Setting up
Connecting with your devices (continued)
To use network functions of the projector, connect the LAN port with the computer's LAN port, or with an access point that is connected to the computer with wireless LAN, using a LAN cable. To use NETWORK BRIDGE function, also connect the CONTROL port and an RS-232C port of the external device to communicate as a network terminal. See the User's Manual - Network Guide for details of the network functions.
Computer
Access point
|
|
|
|
|
|
|
|
|
|
|
|
|
|
|
|
|
|
|
|
|
|
|
|
|
|
|
|
|
|
LAN |
|
|
|
USB TYPE A |
|
RS-232C |
|
|
|
|
|
|
|
|
|
|
|
|
|
|
|
|
|
|
|
|
|
|
|
|
||||||||||||||||||||||||||||
|
|
|
|
|
|
|
|
|
|
|
|
|
|
|
|
|
|
|
|
|
|
|
|
|
|
|
|
|
|
|
|
|
|
|
|
|
|
|
|
|
|
|
|
|
|
|
|
|
|
|
|
|
|
|
|
|
|
|
|
|
|
|
|
|
|
|
|
|
|
|
|
|
|
|
|
|
|
|
|
|
|
|
|
|
|
|
|
|
|
|
|
|
|
|
|
|
|
|
|
|
|
|
|
|
|
|
|
|
|
|
|
|
|
|
|
|
|
|
|
|
|
|
|
|
|
|
|
|
|
|
|
|
|
|
|
|
|
|
|
|
|
|
|
|
|
|
|
|
|
|
|
|
|
|
|
|
|
|
|
|
|
|
|
|
|
|
|
|
|
|
|
|
|
|
|
|
|
|
|
|
|
|
|
|
|
|
|
|
|
|
|
|
|
|
|
|
|
|
|
|
|
|
|
|
|
|
|
|
|
|
|
|
|
|
|
|
|
|
|
|
|
|
|
|
|
|
|
|
|
|
|
|
|
|
|
|
|
|
|
|
|
|
|
|
|
|
|
|
|
|
|
|
|
|
|
|
|
|
|
|
|
|
|
|
|
|
|
|
|
|
|
|
|
|
|
|
|
|
|
|
|
|
|
|
|
|
|
|
|
|
|
|
|
|
|
|
|
|
|
|
|
|
|
|
|
|
|
|
|
|
|
|
|
|
|
|
|
|
|
|
|
|
|
|
|
|
|
|
|
|
|
|
|
|
|
|
|
|
|
|
|
|
|
|
|
|
|
|
|
|
|
|
|
|
|
|
|
|
|
|
|
|
|
|
|
|
|
|
|
|
|
|
|
|
|
|
|
|
|
|
|
|
|
|
|
|
|
|
|
|
|
|
|
|
|
|
|
|
|
|
|
|
|
|
|
|
|
|
|
|
|
|
|
|
|
|
|
|
|
|
|
|
|
|
|
|
|
|
|
|
|
|
|
|
|
|
|
|
|
|
|
|
|
|
|
|
|
|
|
|
|
|
|
|
|
|
|
|
|
|
|
|
|
|
|
|
|
|
|
|
|
|
|
|
|
|
|
|
|
|
|
|
|
|
|
|
|
|
|
|
|
|
|
|
|
|
|
|
|
|
|
|
|
|
|
|
|
|
|
|
|
|
|
|
|
|
|
|
|
|
|
|
|
|
|
|
|
|
|
|
|
|
|
|
|
|
|
|
|
|
|
|
|
|
|
|
|
|
|
|
|
|
|
|
|
|
|
|
|
|
|
|
|
|
|
|
|
|
|
|
|
|
|
|
|
|
|
|
|
|
|
|
|
|
|
|
|
|
|
|
|
|
|
|
|
|
|
|
|
|
|
|
|
|
|
|
|
|
|
|
|
|
|
|
|
|
|
|
|
|
|
|
|
|
|
|
|
|
|
|
|
|
|
|
|
|
|
|
|
|
|
|
|
|
|
|
|
|
|
|
|
|
|
|
|
|
|
|
|
|
|
|
|
|
|
|
|
|
|
|
|
|
|
|
|
|
|
|
|
|
|
|
|
|
|
|
|
|
|
|
|
|
|
|
|
|
|
|
|
|
|
|
|
|
|
|
|
|
|
|
|
|
|
|
|
|
|
|
|
|
|
|
|
|
|
|
|
|
|
|
|
|
|
|
|
|
|
|
|
|
|
|
|
|
|
|
|
|
|
|
|
|
|
|
|
|
|
|
|
|
|
|
|
|
|
|
|
|
|
|
|
|
|
|
|
|
|
|
|
|
|
|
|
|
|
|
|
|
|
|
|
|
|
|
|
|
|
|
|
|
|
|
|
|
|
|
|
|
|
|
|
|
|
|
|
|
|
|
|
|
|
|
|
|
|
|
|
|
|
|
|
|
|
|
|
|
|
|
|
|
|
|
|
|
|
|
|
|
|
|
|
|
|
|
|
|
|
|
|
|
|
|
|
|
|
|
|
|
|
|
|
|
|
|
|
|
|
|
|
|
|
|
|
|
|
|
|
|
|
|
|
|
|
|
|
|
|
|
|
|
|
|
|
|
|
|
|
|
|
|
|
|
|
|
|
|
|
|
|
|
|
|
|
|
|
|
|
|
|
|
|
|
|
|
|
|
|
|
|
|
|
|
|
|
|
|
|
|
|
|
|
|
|
|
|
|
|
|
|
|
|
|
|
|
|
|
|
|
|
|
|
|
|
|
|
|
|
|
|
|
|
|
|
|
|
|
|
|
|
|
|
|
|
|
|
|
|
|
|
|
|
|
|
|
|
|
|
|
|
|
|
|
|
|
|
|
|
|
|
|
|
|
|
|
|
|
|
|
|
|
|
|
|
|
|
|
|
|
|
|
|
|
|
|
|
|
|
|
|
|
|
|
|
|
|
|
|
|
|
|
|
|
|
|
|
|
|
|
|
|
|
|
|
|
|
|
|
|
|
|
|
|
|
|
|
|
|
|
|
|
|
|
|
|
|
|
|
|
|
|
|
|
|
|
|
|
|
|
|
|
|
|
|
|
|
|
|
|
|
|
|
|
|
|
|
|
|
|
|
|
|
|
|
|
|
|
|
|
|
|
|
|
|
|
|
|
|
|
|
|
|
|
|
|
|
|
|
|
|
|
|
|
|
|
|
|
|
|
|
|
|
|
|
|
|
|
|
|
|
|
|
|
|
|
|
|
|
|
|
|
|
|
|
|
|
|
|
|
|
|
|
|
|
|
|
|
|
|
|
|
|
|
|
|
|
|
|
|
|
|
|
|
|
|
|
|
|
|
|
|
|
|
|
|
|
|
|
|
|
|
|
|
|
|
|
|
|
|
|
|
|
|
|
|
|
|
|
|
|
|
|
|
|
|
|
|
|
|
|
|
|
|
|
|
|
|
|
|
|
|
|
|
|
|
|
|
|
|
|
|
|
|
|
|
|
|
|
|
|
|
|
|
|
|
|
|
|
|
|
|
|
|
|
|
|
|
|
|
|
|
|
|
|
|
|
|
|
|
|
|
|
|
|
|
|
|
|
|
|
|
|
|
|
|
|
|
|
|
|
|
|
|
|
|
|
|
|
|
|
|
|
|
|
|
|
|
|
|
|
|
|
|
|
|
|
|
|
|
|
|
|
|
|
|
|
|
|
|
|
|
|
|
|
|
|
|
|
|
|
|
|
|
|
|
|
|
|
|
|
|
|
|
|
|
|
|
|
|
|
|
|
|
|
|
|
|
|
|
|
|
|
|
|
|
|
|
|
|
|
|
|
|
|
|
|
|
|
|
|
|
|
|
|
|
|
|
|
|
|
|
|
|
|
|
|
|
|
|
|
|
|
|
|
|
|
|
|
|
|
|
|
|
|
|
|
|
|
|
|
|
|
|
|
|
|
|
|
|
|
|
|
|
|
|
|
|
|
|
|
|
|
|
|
|
|
|
|
|
|
|
|
|
|
|
|
|
|
|
|
|
|
|
|
|
|
|
|
|
|
|
|
|
|
|
|
|
|
|
|
|
|
|
|
|
|
|
|
|
|
|
|
|
|
|
|
|
|
|
|
|
|
|
|
|
|
|
|
|
|
|
|
|
|
|
|
|
|
|
|
|
|
|
|
|
|
|
|
|
|
|
|
|
|
|
|
|
|
|
|
|
|
|
|
|
|
|
|
|
|
|
|
|
|
|
|
|
|
|
|
|
|
|
|
|
|
|
|
|
|
|
|
|
|
|
|
|
|
|
|
|
|
|
|
|
|
|
|
|
|
|
|
|
|
|
|
|
|
|
|
|
|
|
|
|
|
|
|
|
|
|
|
|
|
|
|
|
|
|
|
|
USB storage device
 CAUTION ►Before connecting the projector to a network system be sure to obtain the consent of the administrator of the network.
►Do not connect the LAN port to any network that might have the excessive voltage. ►The designated USB wireless adapter that is sold as an option is required to use the wireless network function of this projector.
►Before removing the USB storage device from the port of the projector, be
sure to use the REMOVE USB function on the thumbnail screen to secure your data (91).
►Do not use any extension cable or device when connecting the adapter to the projector. Before you insert or pull out the USB wireless adapter from the projector, turn off the power of the projector and pull out the power cord’s plug from the outlet. Do not touch the USB wireless adapter while the projector is receiving AC power.
►To connect both the LAN cable and USB device to the projector, use a LAN cable that is fl at on the side where the plug’s wire is visible. Otherwise, both of them cannot be connected correctly, or the wire may break (malfunction).
(continued on next page)
13

Setting up
Connecting with your devices (continued)
NOTE • If an oversized USB storage device blocks the LAN port, use a USB extension cable to connect the USB storage device.
•The HDMI port of this model is compatible with HDCP (High-bandwidth Digital Content Protection) and therefore capable of displaying a video signal from HDCP compatible DVD players or the like.
-The HDMI supports the following signals.
Video signal : 480i@60, 480p@60, 576i@50, 576p@50, 720p@50/60, 1080i@50/60, 1080p@50/60
Audio signal : Format Linear PCM
Sampling frequency 48kHz / 44.1kHz / 32kHz
-This projector can be connected with another equipment that has HDMITM connector, but with some equipment the projector may not work properly, something like no video.
-Be sure to use an HDMITM cable that has the HDMITM logo.
-Use a Category 2-certified HDMITM cable to input 1080p@50/60 signal to the projector.
-When the projector is connected with a device having DVI connector, use a DVI to HDMITM cable to connect with the HDMI input.
•Up to one USB wireless adapter (optional) can be connected to a projector.
14

Setting up
Connecting to a power supply
1. Put the connector of the power cord into the AC IN (AC inlet) of the projector.
Firmly plug the power cord’s plug into the |
|
|
|
2. outlet. In a couple of seconds after the |
|
|
|
power supply connection, the POWER |
|
|
|
indicator will light up in steady orange. |
AC IN |
Power cord |
|
Please remember that when the DIRECT POWER |
|||
|
|
||
ON function activated (&58), the connection of the |
|
|
power supply make the projector turn on.
 WARNING ►Please use extra caution when connecting the power cord, as incorrect or faulty connections may result in fire and/or electrical shock.
•Do not touch the power cord with a wet hand.
•Only use the power cord that came with the projector. If it is damaged, consult your dealer to get a new one. Never modify the power cord.
•Only plug the power cord into an outlet whose voltage is matched to the power cord. The power outlet should be close to the projector and easily accessible. Remove the power cord for complete separation.
•Do not distribute the power supply to multiple devices. Doing so may overload the outlet and connectors, loosen the connection, or result in fire, electric shock or other accidents.
Using the security bar and slot
A commercial anti-theft chain or wire up to 10 mm in diameter can be attached to the security bar on the projector.
Also this product has the security slot for the Kensington lock.
For details, see the manual of the security tool.
Anti-theft chain or wire
Security slot


 Security bar
 WARNING ►Do not use the security bar and slot to prevent the projector from falling down, since it is not designed for it.
 CAUTION ►Do not place anti-theft chain or wire near the exhaust vents. It may become too hot.
NOTE • The security bar and slot is not comprehensive theft prevention measures. It is intended to be used as supplemental theft prevention measure.
15
Setting up
Using the cable cover
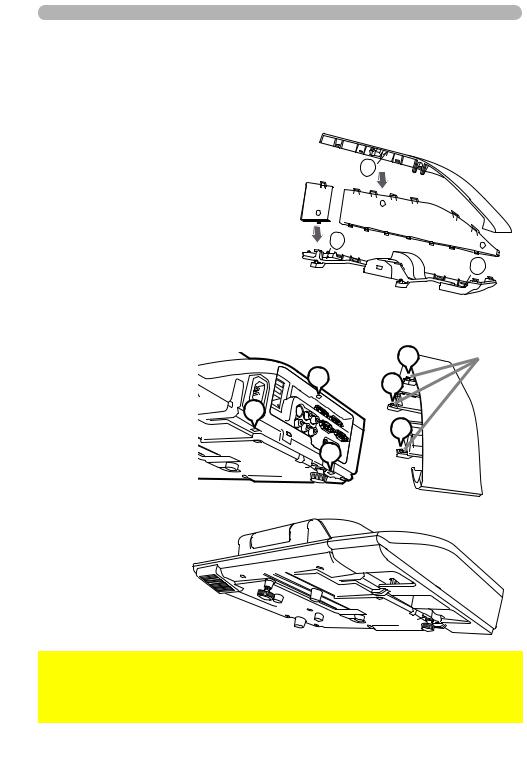
Utilize the cable cover as the guard and blind for the connecting parts.
1. Connect the signal cables and the power cord to the projector first.
2. |
Combine parts as shown in figure, |
|
|
and assemble the cable cover. |
3 |
3
1
1 |
2 |
 2
2
3. Insert the three knobs on the cable cover into the three holes on the projector as shown in the figure. Pass the cables through the holes on the bottom of
the cable cover.
1 |
knobs |
|
1 |
3 |
|
|
2 |
|
|
2 |
|
3 |
 CAUTION ► Be careful not to pinch the cables in the cable cover, to prevent damage to the cables.
► Use the cable cover that is supplied with the projector. Do not attempt any modifications to the cable cover.
16
Remote control
Remote control
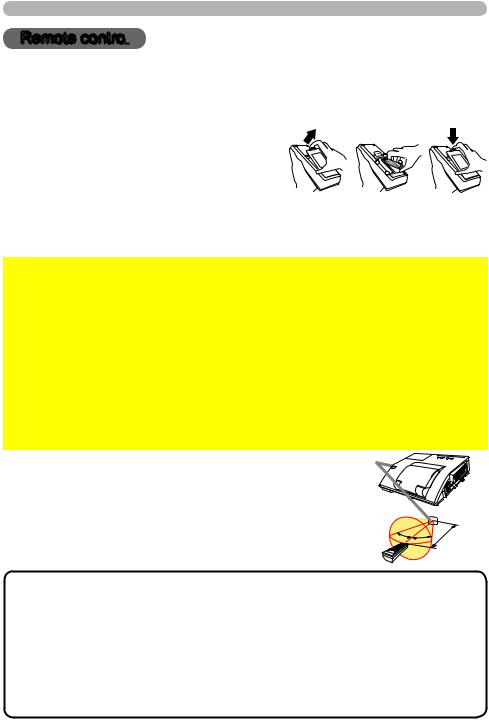
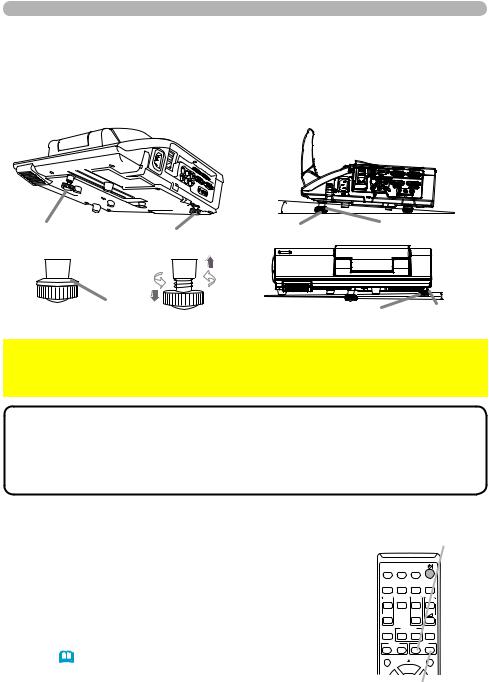
Installing the batteries
Please insert the batteries into the remote control before using it. If the remote control starts to malfunction, try to replace the batteries. If you will not use the remote control for long period, remove the batteries from the remote control and store them in a safe place.
1.
2.
3.
Holding the hook part of the battery |
1 |
2 |
3 |
cover, remove it. |
|
|
|
Align and insert the two AA batteries
(HITACHI MAXELL ENERGY, Part No.LR6 or R6P) according to their plus and minus terminals as indicated in the remote control.
Replace the battery cover in the direction of the arrow and snap it back into place.
 WARNING ►Always handle the batteries with care and use them only as directed. Improper use may result in battery explosion, cracking or leakage, which could result in fi re, injury and/or pollution of the surrounding environment.
•Be sure to use only the batteries specifi ed. Do not use batteries of different types at the same time. Do not mix a new battery with used one.
•Make sure the plus and minus terminals are correctly aligned when loading a battery.
•Keep a battery away from children and pets.
•Do not recharge, short circuit, solder or disassemble a battery.
•Do not place a battery in a fi re or water. Keep batteries in a dark, cool and dry place.
•If you observe battery leakage, wipe out the leakage and then replace a battery. If the leakage adheres to your body or clothes, rinse well with water immediately.
•Obey the local laws on disposing the battery.
About the remote control signal
The remote control works with the projector’s remote sensor. This projector has a remote sensor on the front. The sensor senses the signal within the following range when the sensor is active:
60 degrees (30 degrees to the left and right of the sensor) within 3 meters about.
30º 30º |
Approx. |
|
|
|
3 m |
NOTE • The remote control signal refl ected in the screen or the like may be available. If it is diffi cult to send the signal to the sensor directly, attempt to make the signal refl ect.
•The remote control uses infrared light to send signals to the projector (Class 1 LED), so be sure to use the remote control in an area free from obstacles that could block the remote control’s signal to the projector.
•The remote control may not work correctly if strong light (such as direct sun light) or light from an extremely close range (such as from an inverter fl uorescent lamp) shines on the remote sensor of the projector. Adjust the position of projector avoiding those lights.
17

Remote control
Changing the frequency of remote control signal
The accessory remote control has the two choices on signal |
|
ASPECT AUTO |
SEARCH |
BLANK |
|
||
frequency Mode 1:NORMAL and Mode 2:HIGH. If the remote control |
|
MAGNIFY |
|
PAGE |
VOLUME |
|
|
does not function properly, attempt to change the signal frequency. |
|
ON |
FREEZE |
UP |
|
|
|
|
OFF |
|
|
DOWN |
|
|
|
In order to set the Mode, please keep pressing the combination of |
(2) |
|
- FOCUS |
+ |
- D-ZOOM + |
(1) |
|
|
|
KEYSTONE 1 |
MY BUTTON 2 |
MUTE |
|
||
two buttons listed below simultaneously for about 3 seconds.
(1)Set to Mode 1:NORMAL... VOLUME - and RESET buttons
(2)Set to Mode 2:HIGH... MAGNIFY OFF and ESC buttons
POSITION |
MENU |
ENTER
Please remember that the REMOTE FREQ. in the SERVICE item of the OPTION menu (65) of the projector to be controlled should be set to the same mode as the remote control.
ESC |
RESET |
Using as a simple PC mouse & keyboard
The accessory remote control works as a simple mouse and keyboard of the computer, when the projector’s USB TYPE B port and the computer’s type A USB port are connected and MOUSE is selected for the USB TYPE B item in the OPTION menu (59).
(1)PAGE UP key: Press PAGE UP button.
(2)PAGE DOWN key: Press PAGE DOWN button.
(3)Mouse left button: Press ENTER button.
(4)Move pointer: Use the cursor buttons ▲, ▼, ◄ and ►.
(5)ESC key: Press ESC button.
(6)Mouse right button: Press RESET button.
USB TYPE B port
MY SOURCE/
VIDEO COMPUTER DOC.CAMERA
ASPECT |
AUTO |
SEARCH |
BLANK |
MAGNIFY |
FREEZE |
PAGE |
VOLUME |
ON |
UP |
|
|
OFF |
|
DOWN |
|
KEYSTONE |
1 MY BUTTON 2 |
MUTE |
|
(1)
(2)
 NOTICE ►Improper use of the simple mouse & keyboard function could damage your equipment. While using this
function, please connect this product only to a computer. Be sure to check your computer’s manuals before connecting this product to the computer.
(3)
(5)
- FOCUS + |
- D-ZOOM + |
POSITION |
MENU |
|
ENTER |
ESC |
RESET |
(4)
(6)
NOTE When the simple mouse & keyboard function of this product does not work correctly, please check the following.
•When a USB cable connects this projector with a computer having a built-in pointing
device (e.g. track ball) like a laptop PC, open BIOS setup menu, then select the external mouse and disable the built-in pointing device, because the built-in pointing device may have priority to this function.
•Windows XP SP3 or higher is required for this function. And also this function may not work
depending on the computer’s configurations and mouse drivers. This function can work with the computer which can operate general USB mouse or keyboard.
•You cannot do things like press two buttons at once (for instance, pressing two buttons at the same time to move the mouse pointer diagonally).
•This function is activated only when the projector is working properly. This function is not
available in any of the following cases:
-While the lamp is warming up. (The POWER indicator blinks in green.)
-When either USB TYPE A or USB TYPE B port is selected.
-While displaying BLANK (29), TEMPLATE (56) or MY IMAGE (79) screen.
-When any menu is displayed on the screen.
-While using the cursor buttons to operate the sound or screen functions such as adjusting the sound volume, correcting the keystone, correcting the picture position and magnifying the screen.
18
Power on/off
Power on/off
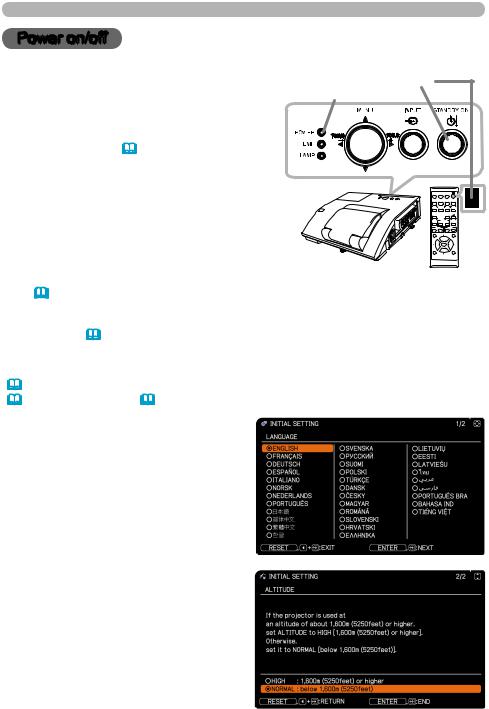
Turning on the power
1. Make sure that the power cord is firmly and correctly connected to the projector and the outlet.
2. Make sure that the POWER indicator is steady orange (114).
3. Confirm that there is nothing that the lens door hits while opening. Press STANDBY/ ON button on the projector or the
remote control. The lens door opens, the projection lamp lights up, and the POWER indicator begins to blink green. When the power is completely on, the indicator will
stop blinking and light in steady green
(114).
STANDBY/ON button
POWER indicator
- |
+ |
- |
+ |
To display the picture, select an input signal according to the section Selecting an input signal (22).
The INITIAL SETTING Menu will be displayed by factory default upon startup. Once the INITIAL SETTING Menu is set, it will not appear until FACTORY RESET (70) is executed. If you wish to change the settings, refer to the LANGUAGE (52) and ALTITUDE (63) menu.
(1)LANGUAGE: Use the ▲/▼/◄/► buttons to select the desired language and press the ENTER button of the remote control or the INPUT button of the projector to execute.
(2)ALTITUDE: Use the ▲/▼ buttons to select NORMAL for altitude below 1600 m (5250 feet), otherwise select HIGH and press the ENTER button of the remote control or the INPUT button of the projector to execute.
(continued on next page) |
19 |

Power on/off
 WARNING ►Never look into the projection lens or mirror while
the projection lamp lights, since the projection lamp ray may cause a trouble on your eyes.
►Be careful not to pinch your finger with the lens door, to prevent an injury. ►Do not place the projector vertically with the lens door open as
shown in the figure on the right. It could cause malfunction or injury. Tabletop use must be setup with the designated optional accessories. ►Do not stand under the projector mounted on the wall or ceiling,
when its lens door is opening or closing. Moreover, do not look at the mirror when the lens door is opening or closing. ►Never touch a lens door or mirror. If the mirror is broken, the
projected image will be distorted. Close the lens door, and contact your dealer.
20
Power on/off
Turning off the power
1. Press the STANDBY/ON button on the projector or the remote control. The message “Power off?” will appear on the screen for about 5 seconds.
2. Confirm that there is nothing that the lens door hits while closing. Press the STANDBY/ON button again while the message appears.
The projector lamp will go off, and the POWER indicator will begin blinking in orange. The lens door will close right after the lamp goes off.
However, to maintain better picture quality, the lens door will close after the lamp has been cooled down when the projector is installed upside down such as in ceiling mount installation. Then POWER indicator will stop blinking and light in steady orange when the lamp cooling is complete (114).
Do not turn the projector on for about 10 minutes or more after turning it off. Also, do not turn the projector off shortly after turning it on. Such operations might cause the lamp to malfunction or shorten the lifetime of some parts including the lamp.
 WARNING ►Be careful not to pinch your finger with the lens door, to prevent an injury.
►Do not touch around the lamp cover and the exhaust vents during use or just after use, since it is too hot.
►Remove the power cord for complete separation. The power outlet should be close to the projector and easily accessible.
NOTE • Turn the power on/off in right order. Please power on the projector prior to the connected devices.
• This projector has the function that can make the projector automatically turn on/ off. Please refer to the DIRECT POWER ON (58) andAUTO POWER OFF (59) items of the OPTION menu.
21

Operating
Operating
Adjusting the volume
Use the VOLUME +/VOLUME - buttons to adjust the volume. |
ASPECT |
|
AUTO |
SEARCH BLANK |
|||
|
|
|
|
|
|
||
1. A dialog will appear on the screen to aid you in adjusting the |
MAGNIFY |
|
|
FREEZE |
PAGE |
VOLUME |
|
ON |
|
|
UP |
|
|||
volume. If you do not do anything, the dialog will automatically |
OFF |
|
|
|
DOWN |
|
|
disappear after about ten seconds. |
KEYSTONE |
|
1 MY BUTTON 2 |
MUTE |
|||
● When |
is selected for current picture input port, the volume adjustment is |
||||||
disabled. Please see AUDIO SOURCE item of AUDIO menu (50). |
|
|
|
|
|||
● Even if the projector is in the standby mode, the volume is adjustable when |
|||||||
both of the following conditions are true: |
|
|
|
|
|
|
|
- An option other than is selected for STANDBY in the AUDIO SOURCE |
|||||||
item of the AUDIO menu (50). |
|
|
|
|
|
|
|
- NORMAL is selected in the STANDBY MODE item of the SETUP menu (48). |
|||||||
● In the standby mode, the volume of the microphone is adjustable with the |
|
||||||
VOLUME +/- buttons on the remote control, in synchronization with the volume |
|||||||
of the projector (12). |
|
|
|
|
|
|
|
Temporarily muting the sound |
MUTE button |
||||||
|
|
|
|
|
|
||
1. Press MUTE button on the remote control. |
VIDEO |
|
|
MY SOURCE/ |
|
||
COMPUTER DOC.CAMERA |
|
||||||
ASPECT |
|
AUTO SEARCH |
BLANK |
||||
A dialog will appear on the screen indicating that you have muted |
|
|
|
|
|
|
|
the sound. |
MAGNIFY |
FREEZE |
PAGE |
VOLUME |
|||
ON |
UP |
|
|||||
To restore the sound, press the MUTE, VOLUME + or |
OFF |
|
|
|
DOWN |
|
|
VOLUME - button. Even if you do not do anything, the dialog |
KEYSTONE |
|
1 |
MY BUTTON 2 |
MUTE |
||
will automatically disappear after about ten seconds. |
- FOCUS |
+ |
- D-ZOOM + |
||||
● When |
is selected for current picture input port, the sound is always muted. |
||||||
Please see AUDIO SOURCE item of AUDIO menu (50). |
|
|
|
|
|
|
|
● C.C. (Closed Caption) is automatically activated when sound is muted and an input signal containing C.C. is received. This function is available only when the signal is NTSC for VIDEO or S-VIDEO, or 480i@60 for COMPUTER IN1 or COMPUTER IN2, and when AUTO is selected for DISPLAY in the C.C. menu under the SCREEN menu (57).
Selecting an input signal |
INPUT button |
|
1. |
Press INPUT button on the projector. |
|
Each time you press the button, the projector |
|
|
|
switches its input port from the current port as below. |
|
|
COMPUTER IN1 COMPUTER IN2 |
|
|
VIDEO |
LAN |
S-VIDEO
HDMI
USB TYPE A USB TYPE B 
●While ON is selected forAUTO SEARCH item in OPTION menu (58), the projector will keep checking the ports in above order repeatedly till an input signal is detected.
●It may take several seconds to project the images from the USB TYPE B port.
(continued on next page)
22
|
|
|
|
|
Operating |
|||
Selecting an input signal (continued) |
|
|
|
|
|
|||
1. |
Press COMPUTER button on the remote control. |
COMPUTER button |
||||||
Each time you press the button, the projector switches its |
|
|
|
|
|
|||
|
input port from the current port as below. |
|
|
|
MY SOURCE/ |
|
||
|
COMPUTER IN1 COMPUTER IN2 LAN |
|
VIDEO COMPUTER DOC.CAMERA |
|
||||
|
|
MAGNIFY |
|
PAGE |
VOLUME |
|||
|
USB TYPE B |
|
USB TYPE A |
|
ASPECT AUTO |
SEARCH |
BLANK |
|
|
|
|
ON FREEZE |
UP |
|
|||
● While ON is selected for AUTO SEARCH item in OPTION |
|
OFF |
|
DOWN |
|
|||
|
KEYSTONE 1 |
MY BUTTON 2 |
MUTE |
|||||
|
menu, the projector will keep checking every port sequentially |
- FOCUS |
+ |
- D-ZOOM + |
||||
|
till an input signal is detected (58). If COMPUTER button is |
|
|
|
|
|||
pressed when VIDEO, S-VIDEO or HDMI port is selected, the projector will check COMPUTER IN1 port first.
●It may take several seconds to project the images from the
USB TYPE B port.
1. |
Press VIDEO button on the remote control. |
|
VIDEO button |
|||
Each time you press the button, the projector switches its |
|
|
|
|
||
|
input port from the current port as below. |
|
VIDEO COMPUTER |
MY SOURCE/ |
|
|
|
HDMI S-VIDEO |
|
DOC.CAMERA |
|
||
|
|
MAGNIFY |
|
PAGE |
VOLUME |
|
|
VIDEO |
|
ASPECT AUTO |
SEARCH |
BLANK |
|
|
|
ON FREEZE |
UP |
|
||
● While ON is selected for AUTO SEARCH item in OPTION |
OFF |
|
DOWN |
|
||
KEYSTONE 1 |
MY BUTTON 2 |
MUTE |
||||
|
menu, the projector will keep checking every port sequentially |
- FOCUS |
+ |
- D-ZOOM + |
||
|
till an input signal is detected (58). If VIDEO button is |
|
|
|
|
|
|
pressed when COMPUTER IN1, COMPUTER IN2, LAN, USB |
|
|
|
|
|
|
TYPE A or USB TYPE B port is selected, the projector will |
|
|
|
|
|
|
check HDMI port first. |
|
|
|
|
|
|
Press the MY SOURCE / DOC. CAMERA button on |
MY SOURCE / |
|
|
||
1. the remote control. The input signal will be changed |
DOC. CAMERA button |
|||||
into the signal you set as MY SOURCE (62).
●This function also can use for document camera. Select the input port that connected the document camera.
MY SOURCE/
VIDEO COMPUTER DOC.CAMERA
ASPECT |
AUTO |
SEARCH |
BLANK |
|
MAGNIFY |
FREEZE |
PAGE |
VOLUME |
|
ON |
UP |
|
||
OFF |
|
|
DOWN |
|
KEYSTONE |
1 |
MY BUTTON 2 |
MUTE |
|
- FOCUS |
+ |
- D-ZOOM + |
||
23
Operating
Searching an input signal
1. Press SEARCH button on the remote control.
The projector will start to check its input ports as below in order to find any input signals.
When an input is found, the projector will stop searching and display the image. If no signal is found, the projector will return to the state selected before the operation.
 COMPUTER IN1 COMPUTER IN2
VIDEO |
|
LAN |
S-VIDEO |
|
USB TYPE A |
HDMI |
|
USB TYPE B |
SEARCH button
MY SOURCE/
VIDEO COMPUTER DOC.CAMERA
ASPECT |
AUTO |
SEARCH |
BLANK |
|
MAGNIFY |
FREEZE |
PAGE |
VOLUME |
|
ON |
UP |
|
||
OFF |
|
|
DOWN |
|
KEYSTONE |
1 |
MY BUTTON 2 |
MUTE |
|
- FOCUS |
+ |
- D-ZOOM + |
||
●While ON is selected for AUTO SEARCH item in OPTION menu (58), the projector will keep checking the ports in above order repeatedly till an input signal is detected.
●It may take several seconds to project the images from the USB TYPE B port.
Selecting an aspect ratio
1. Press ASPECT button on the remote control.
Each time you press the button, the projector switches the mode for aspect ratio in turn.
For a computer signal
NORMAL 4:3 16:9 16:10 NATIVE
For an HDMITM signal
NORMAL 4:3 16:9 16:10 14:9 NATIVE
ASPECT button
MY SOURCE/
VIDEO COMPUTER DOC.CAMERA
ASPECT |
AUTO |
SEARCH |
BLANK |
|
MAGNIFY |
FREEZE |
PAGE |
VOLUME |
|
ON |
UP |
|
||
OFF |
|
|
DOWN |
|
KEYSTONE |
1 |
MY BUTTON 2 |
MUTE |
|
- FOCUS |
+ |
- D-ZOOM + |
||
For a video signal, s-video signal or component video signal
4:3 16:9 16:10 14:9 NATIVE
For an input signal from the LAN, USB TYPE A or USB TYPE B port, or if there is no signal
CP-A222WN, CP-A302WN, CP-A352WN: 4:3 (fixed) CP-AW252WN, CP-AW312WN: 16:10 (fixed)
●ASPECT button does not work when no proper signal is inputted.
●NORMAL mode keeps the original aspect ratio setting.
●The on-screen menu might be displayed outside of the image display area
depending on the adjustment value of the ASPECT, D-ZOOM, KEYSTONE,
  KEYSTONE and PERFECT FIT. Changing the values of ASPECT, D-ZOOM,
  KEYSTONE,
 KEYSTONE and PERFECT FIT may fix the symptom.
24
Operating
Adjusting the projector's elevator
The projector has Front foot for inclinations and Rear foot for horizontals. Spacers on the each elevator foot are installed at the time of shipment, and projector is in a condition to be able to just project. If necessary, detach the spacer, and the elevator feet can be manually twisted to make more precise adjustments.
|
|
2.3~4.3° |
|
|
Front foot |
Rear foot |
Front foot |
Spacer (Large) |
|
|
Spacer |
|
|
-1~1° |
|
|
Rear foot |
Spacer (Small) |
|
|
|
|
||
 WARNING ►Keep the spacers away from children and pets. Be careful not
to let them swallow the spacers. If swallowed, consult a physician immediately for emergency treatment.
NOTE • The adjustment angle can be adjusted up to plus or minus 1° each of FRONT and REAR foot.
• After the foot is adjusted, it is possible to return it to the state of the shipment with a spacer. Install Large on the Front foot and Small on the Rear foot of the spacer. If change the setting place of the projector, it will recommend keep and reuse the spacers.
Adjusting the zoom and focus
Press the D-ZOOM + or D-ZOOM - button on the remote control to display D-ZOOM dialog on screen.
Use the D-ZOOM + and D-ZOOM - buttons to adjust the picture size.
To finish the operation, do not touch these buttons for about ten seconds until the dialog is disappeared.
● If you want to expand a part of the image, use the magnify function (28).
(continued on next page)
D-ZOOM - button
MY SOURCE/
VIDEO COMPUTER DOC.CAMERA
ASPECT |
AUTO |
SEARCH |
BLANK |
|
MAGNIFY |
FREEZE |
PAGE |
VOLUME |
|
ON |
UP |
|
||
OFF |
|
|
DOWN |
|
KEYSTONE |
1 |
MY BUTTON 2 |
MUTE |
|
- FOCUS |
+ |
- D-ZOOM + |
||
POSITION |
|
|
|
MENU |
D-ZOOM + button
25
Operating
Press the FOCUS + or FOCUS - button on the remote control, or FOCUS + or FOCUS - button on the projector (5) while no menu is on screen, to display the FOCUS box on screen. Use the FOCUS + and FOCUS - buttons to adjust the screen focus. After the focus adjustment, wait for a while until the FOCUS box is disappeared, if you want to display any other menu on screen by pushing the MENU button on the projector.
●The ◄/►/▲/▼ buttons on the projector work only as the cursor buttons while the template is displayed (56).
●FOCUS +/- button on the projector is invalid when the USB TYPE A port is selected as the input source.
FOCUS - button
MY SOURCE/
VIDEO COMPUTER DOC.CAMERA
ASPECT |
AUTO |
SEARCH |
BLANK |
|
MAGNIFY |
FREEZE |
PAGE |
VOLUME |
|
ON |
UP |
|
||
OFF |
|
|
DOWN |
|
KEYSTONE |
1 |
MY BUTTON 2 |
MUTE |
|
- FOCUS |
+ |
- D-ZOOM + |
||
POSITION |
|
|
|
MENU |
FOCUS + button
Using the automatic adjustment feature
1. |
Press AUTO button on the remote control. |
AUTO button |
|
||
Pressing this button performs the following. |
|
For a computer signal
The vertical position, the horizontal position and the horizontal phase will be automatically adjusted.
Make sure that the application window is set to its maximum size prior to attempting to use this feature. A dark picture may still be incorrectly adjusted. Use a bright picture when adjusting.
MY SOURCE/
VIDEO COMPUTER DOC.CAMERA
ASPECT |
AUTO |
SEARCH |
BLANK |
|
MAGNIFY |
FREEZE |
PAGE |
VOLUME |
|
ON |
UP |
|
||
OFF |
|
|
DOWN |
|
KEYSTONE |
1 |
MY BUTTON 2 |
MUTE |
|
- FOCUS |
+ |
- D-ZOOM + |
||
For a video signal and s-video signal
The video format best suited for the respective input signal will be selected
automatically. This function is available only when the AUTO is selected for the VIDEO FORMAT item in the INPUT menu (41). The vertical position and horizontal position will be automatically set to the default.
For a component video signal
The vertical position and horizontal position will be automatically set to the default. The horizontal phase will be automatically adjusted.
●The automatic adjustment operation requires approx. 10 seconds. Also please note that it may not function correctly with some input.
●When this function is performed for a video signal, a certain extra such as a line may appear outside a picture.
●When this function is performed for a computer signal, a black frame may be displayed on the edge of the screen, depending on the PC model.
●The items adjusted by this function may vary when the FINE or DISABLE is selected for the AUTO ADJUST item of the SERVICE item in the OPTION menu (63).
26
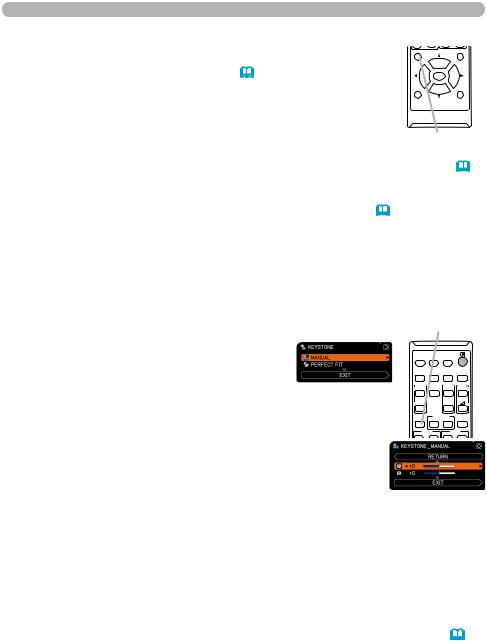
Adjusting the position
1. Press the POSITION button on the remote control while no menu is on screen, to display the D-SHIFT (44) dialog on screen.
2. Use the ▲, ▼, ◄ and ► buttons to adjust the picture position. Press the POSITION button again to finish this operation.
Operating
POSITION |
MENU |
|
ENTER |
ESC |
RESET |
POSITION button
●This is a function to shift the position of the shrunken picture by the D-ZOOM (44) function.
●When an OSD (On Screen Display) menu is displayed, this operation moves the position of the OSD menu, but not the position of the picture (31).
●The D-SHIFT adjustment values are not valid when the D-ZOOM is set to 256 (full screen). (CP-A222WN, CP-A302WN, CP-A352WN)
●The D-SHIFT adjustment values are not valid when the D-ZOOM is set to 320 (full screen). (CP-AW252WN, CP-AW312WN)
Correcting the keystone distortions |
KEYSTONE button |
||||
Press KEYSTONE button on the remote |
|
VIDEO COMPUTER DOC.CAMERA |
|
||
1. control. A dialog will appear on the screen |
|
|
|
MY SOURCE/ |
|
|
ASPECT AUTO |
SEARCH |
BLANK |
||
to aid you in correcting the distortion. |
|
ON FREEZE |
UP |
|
|
|
|
MAGNIFY |
|
PAGE |
VOLUME |
Use the ▲/▼ cursor buttons to select MANUAL or PERFECT |
|
|
|
|
|
2. FIT operation, and press the ► button to perform the following. |
OFF |
|
DOWN |
|
|
KEYSTONE 1 |
MY BUTTON 2 |
MUTE |
|||
(1) MANUAL displays a dialog for keystone correction. |
|
- FOCUS |
+ |
- D-ZOOM + |
|
Use the ▲/▼ buttons to select KEYSTONE /
  KEYSTONE, then use the ◄/► buttons for adjustment.
(2)PERFECT FIT displays a dialog for adjusting the shape of the projected image in each of the corners and sides.
To close the dialog and complete this operation, press KEYSTONE button again. Even if you do not do anything, the dialog will automatically disappear after about ten seconds.
●The adjustable range of this function will vary among inputs. For some input, this function may not work well.
●This function will be unavailable when TRANSITION DETECTOR is on (85).
27
Operating
Using the magnify feature
1. Press the MAGNIFY ON button on the remote control. The picture will be magnified, and the MAGNIFY dialog will appear on the screen. When the MAGNIFY ON button is pressed for the first time after the projector is turned on, the picture will be zoomed by 1.5 times. On the dialog, triangle marks to show each direction will be displayed.
2. The display magnification of the projector switches in order with every press of the MAGNIFY ON button.
MAGNIFY ON/OFF button
MY SOURCE/
VIDEO COMPUTER DOC.CAMERA
ASPECT |
AUTO |
SEARCH |
BLANK |
MAGNIFY |
FREEZE |
PAGE |
VOLUME |
ON |
UP |
|
|
OFF |
|
DOWN |
|
KEYSTONE |
1 MY BUTTON 2 |
MUTE |
|
For computer signals, HDMITM (RGB) signals, input signals from the LAN, USB TYPE A or USB TYPE B port
1.5times 2 times 3 times 4 times 1 time
For video signals, s-video signals, component video signals or HDMITM (Component) signals
1.5times 2 times 1 time
3.While the triangles are displayed on the dialog, use the ▲/▼/◄/► cursor buttons to shift the magnifying area.
4.Press the MAGNIFY OFF button on the remote control to exit magnification.
●The MAGNIFY dialog will automatically disappear in several seconds with no operation. The dialog will appear again if the MAGNIFY ON button is pressed when the dialog has automatically disappeared.
●The magnification is automatically disabled when the displaying signal or its display condition is changed.
●While the magnification is active, the keystone distortion condition may vary. It will be restored when the magnification is disabled.
●Some horizontal stripes might be visible on the image while magnification is active.
●This function is not available in the following cases:
-A sync signal in the range not supported is input.
-There is no input signal.
28
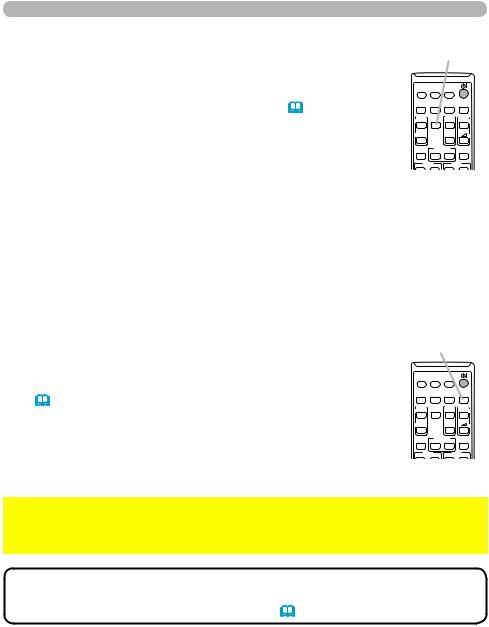
Temporarily freezing the screen
1. Press the FREEZE button on the remote control.
The “FREEZE” indication will appear on the screen (however, the indication will not appear when the OFF is selected for the MESSAGE item in the SCREEN menu (54)), and the projector will go into the FREEZE mode, which the picture is frozen.
To exit the FREEZE mode and restore the screen to normal, press the FREEZE button again.
Operating
FREEZE button
MY SOURCE/
VIDEO COMPUTER DOC.CAMERA
ASPECT |
AUTO |
SEARCH |
BLANK |
|
MAGNIFY |
FREEZE |
PAGE |
VOLUME |
|
ON |
UP |
|
||
OFF |
|
|
DOWN |
|
KEYSTONE |
1 |
MY BUTTON 2 |
MUTE |
|
- FOCUS |
+ |
- D-ZOOM + |
||
●The projector automatically exits from the FREEZE mode when some control buttons are pressed.
●If the projector continues projecting a still image for a long time, the LCD panel might possibly be burned in. Do not leave the projector in the FREEZE mode for too long.
●Images might appear degraded when this function is operated, but it is not a malfunction.
Temporarily blanking the screen
1. Press BLANK button on the remote control.
The BLANK screen will be displayed instead of the screen of
input signal. Please refer to BLANK item in SCREEN menu
(52).
To exit from the BLANK screen and return to the input signal screen, press BLANK button again.
●The projector automatically exits from the BLANK mode when some control buttons are pressed.
BLANK button
MY SOURCE/
VIDEO COMPUTER DOC.CAMERA
ASPECT |
AUTO |
SEARCH |
BLANK |
|
MAGNIFY |
FREEZE |
PAGE |
VOLUME |
|
ON |
UP |
|
||
OFF |
|
|
DOWN |
|
KEYSTONE |
1 |
MY BUTTON 2 |
MUTE |
|
- FOCUS |
+ |
- D-ZOOM + |
||
 CAUTION ►If you wish to have a blank screen while the projector’s lamp is on, use the BLANK function above.
Taking any other action may cause the damage on the projector.
NOTE • The sound is not connected with the BLANK screen function. If necessary, set the volume or mute first. To display the BLANK screen and mute the sound at one time, use AV MUTE function (62).
29

Operating
Using the menu function
This projector has the following menus:
PICTURE, IMAGE, INPUT, SETUP, AUDIO, SCREEN, OPTION, NETWORK, SECURITY and EASY MENU.
EASY MENU consists of functions often used, and the other menus are classified into each purpose and brought together as the ADVANCED MENU.
Each of these menus is operated using the same methods. While the projector is displaying any menu, the MENU button on the projector works as the cursor buttons. The basic operations of these menus are as follows.


 MENU button


 (Cursor buttons)
ENTER button |
MENU button |
Cursor buttons |
|
POSITION |
MENU |
|
ENTER |
|
- + - + |
ESC |
RESET |
ESC button |
RESET button |
1. To start the MENU, press the MENU button. The MENU you last used (EASY or ADVANCED) will appear. EASY MENU has priority to appear just after powered on.
2. In the EASY MENU
(1) Use the ▲/▼ cursor buttons to select an item to operate. If you want to change it to the ADVANCED MENU, select the ADVANCED MENU.
(2) Use the ◄/► cursor buttons to operate the item.
In the ADVANCED MENU
(1)Use the ▲/▼ cursor buttons to select a menu. If you want to change it to the EASY MENU, select the EASY MENU.
The items in the menu appear on the right side.
(2)Press the ► cursor button or ENTER button to move the cursor to the right side. Then use the
▲/▼ cursor buttons to select an item to operate and press the ► cursor button or ENTER button to progress. The operation menu or dialog of the selected item will appear.
(3)Use the buttons as instructed in the OSD to operate the item.
(continued on next page)
30
 Loading...