


Projector
CP-X260
User's Manual – Operating Guide
Thank you for purchasing this projector.
 WARNING ►Before using this product, please read the "User's Manual - Safety Guide" and related manuals to ensure the proper use of this product. After reading them, store them in a safe place for future reference.
About this manual
Various symbols are used in this manual. The meanings of these symbols are described below.
 WARNING This symbol indicates information that, if ignored, could possibly result in personal injury or even death due to incorrect handling.
 CAUTION This symbol indicates information that, if ignored, could possibly result in personal injury or physical damage due to incorrect handling.
Please refer to the pages written following this symbol.
NOTE • The information in this manual is subject to change without notice.
•The manufacturer assumes no responsibility for any errors that may appear in this manual.
•The reproduction, transfer or copy of all or any part of this document is not permitted without express written consent.
Trademark acknowledgment
•VGA and XGA are registered trademarks of International Business Machines Corporation.
•Apple and Mac are registered trademarks of Apple Computer, Inc.
•VESA and SVGA are trademarks of Video Electronics Standard Association.
•Windows is a registered trademark of Microsoft Corporation.
All other trademarks are the properties of their respective owners.

Content
Content
About this manual. . . . . . . . . . 1 Content. . . . . . . . . . . . . . . . . . . 2 Projector features. . . . . . . . . . 3
Preparations. . . . . . . . . . . . . . . 3
About contents of package. . . . .3 Fastening the lens cover. . . . . .3
Part names. . . . . . . . . . . . . . . . 4
Projector . . . . . . . . . . . .4 Control buttons . . . . . . . . . 6 Remote control . . . . . . . . . 6
Setting up. . . . . . . . . . . . . . . . . 7
Arrangement. . . . . . . . . . 8 Adjusting the projector's elevator . . 9 Using the Security Bar. . . . . . 10 Connecting your devices. . . . . 11 Connecting power supply . . . . .14
Remote control.. . . . . . . . . . . 15
Putting batteries . . . . . . . . 15 Using the remote control. . . . . 16
Power on/off . . . . . . . . . . . . . . 17
Turning on the power. . . . . . .17 Turning off the power. . . . . . .17
EASY Menu. . . . . . . . . . 25
Aspect, Auto keystone Execute, Keystone, Picture mode, Brightness, Contrast, Color, Tint, Sharpness, Whisper, Mirror, Reset, Filter time, Language, Go to advanced menu
PICTURE Menu. . . . . . . . .27
Brightness, Contrast, Gamma, Color temp, Color, Tint, Sharpness, My memory
IMAGE Menu. . . . . . . . . .30
Aspect, Over scan, V. position, H. position, H. phase, H. size, Auto adjust execute
INPUT Menu. . . . . . . . . .32
Progressive, Video NR, Color space, Component, Video format, Frame lock, RGB in, Resolution
SETUP Menu. . . . . . . . . .35
Auto keystone Execute, Keystone, Whisper, Mirror, Volume, Audio
SCREEN Menu. . . . . . . . .37
Operating . . . . . . . . . . . . . . . |
. |
18 |
OPTION Menu. . . . . . . . |
. |
40 |
|
Adjusting the volume. . . . . . |
|
.18 |
Auto search, Auto keystone, Auto on, |
|||
Temporarily muting the sound. . . 18 |
||||||
Auto off, Lamp time,Filter time, |
|
|
||||
Selecting an input signal. . . . |
. |
18 |
|
|
||
My button, Service, Security |
|
|
||||
Searching an input signal . . . . |
|
.19 |
|
|
||
|
Maintenance.. . . . . . . . . . . . . 50 |
|||||
Selecting an aspect ratio. . . . |
. |
19 |
||||
Adjusting the zoom and focus. . . 19 |
Lamp. . . . . . . . . . . |
. |
.50 |
|||
Air filter . . . . . . . . . . . .52 |
||||||
Using the automatic adjustment feature. .20 |
||||||
Adjusting the position . . . . . |
. |
20 |
Other care. . . . . . . . . |
. |
.54 |
|
Troubleshooting. . . . . . . . . . . 55 |
||||||
Correcting the keystone distortions. 21 |
||||||
Using the magnify feature. . . . |
|
.21 |
Related messages. . . . . . |
. |
.55 |
|
Freezing the screen. . . . . . |
. |
22 |
Regarding the indicator lamps. . |
. |
56 |
|
Temporarily blanking the screen. |
. 22 |
Phenomena that may be easy to be |
||||
Operating the computer screen. . |
|
.23 |
mistaken for machine defects. . |
. |
58 |
|
Multifunctional settings. . . . . 24 |
Warranty and after-service.. . . 61 |
|||||
Using the menu function . . . . |
. |
24 |
Specifications.. . . . . . . . . . . . 61 |
|||
Projector features / Preparations
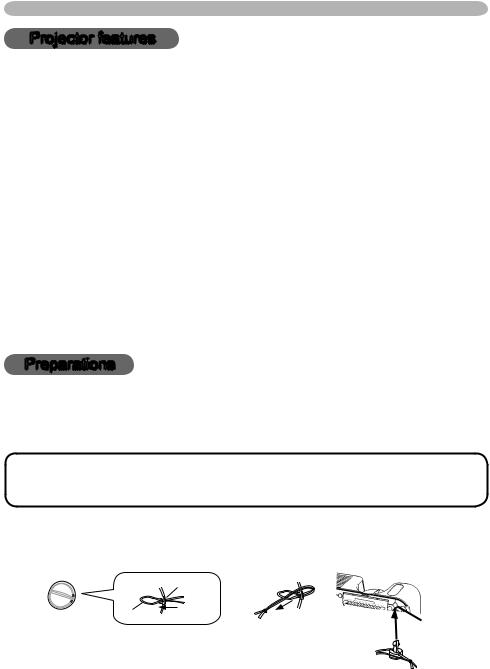
Projector features
This projector is used to project various computer signals as well as NTSC/PAL/ SECAM, Component (SD, HD) video signals onto a screen. It requires just a little space for installation and gets a large image from short distance.
High Brightness
Newly developed 200W UHB (Ultra High Brightness) lamp gives you a higher brightness image on a screen. The image can be still kept as bright and clean enough for use in bright rooms.
Low Noise
WHISPER mode is available for reducing acoustic noise to realize quieter operation. It is perfect for use in low luminance rooms where low noise is more important than brightness.
Rich Connectivity
This projector has a variety of I/O ports. It can be easily connected to many signal sources like PC, DVD and so on. The rich connectivity provides you more options to make your presentation impressive.
Compact Body
Even with its many features, this projector is extremely compact and slim, which gives you more flexibility and usability to use it where you want.
Preparations
About contents of package
Please see the "Contents of package" of the "User's Manual - Quick Guide". Your projector should come with the items shown there. Contact immediately your dealer if anything is missing.
NOTE • Keep the original packing materials for future reshipment. For moving the projector, be sure to use the original packing materials. Use special caution for the lens part.
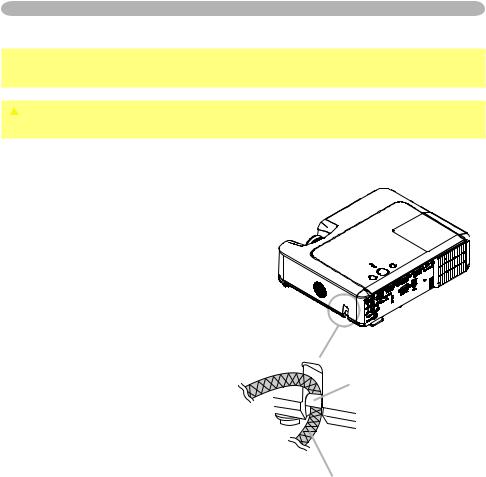
Fastening the lens cover
To avoid losing the lens cover, please fasten it the lens cap to the projector using the strap.
|
Strap ring |
|
Strap |
Bottom side |
Strap hole |
|
|
1. Fix the strap to the strap ring of the lens cover.
2. Put the strap into the groove on the rivet.
3. Push the rivet into the strap hole.
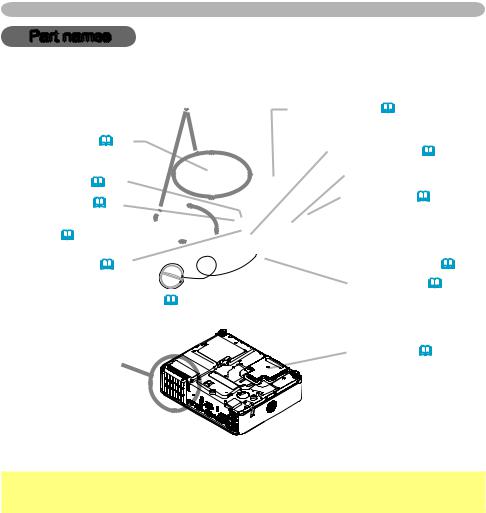
Part names
Part names
Projector
ê
Lamp cover (51) (Lamp unit is inside.)
Zoom ring (19)
Focus ring (19)  Vent (7)
Lens (17)
Lens cover (3)
ê
Control buttons (6)
Remote sensor (16) Speaker
Security bar (10) (Use for attaching a commercial anti-theft chain or wire.)
 Elevator button (9)
Front-Right side |
Elevator foot (9) |
Filter cover (52)
(Air filter and intake vent are inside.)
Bottom side
 WARNING ►During use or immediately after use, do not touch around the lamp and vents of the projector. (ê) It could cause a burn.
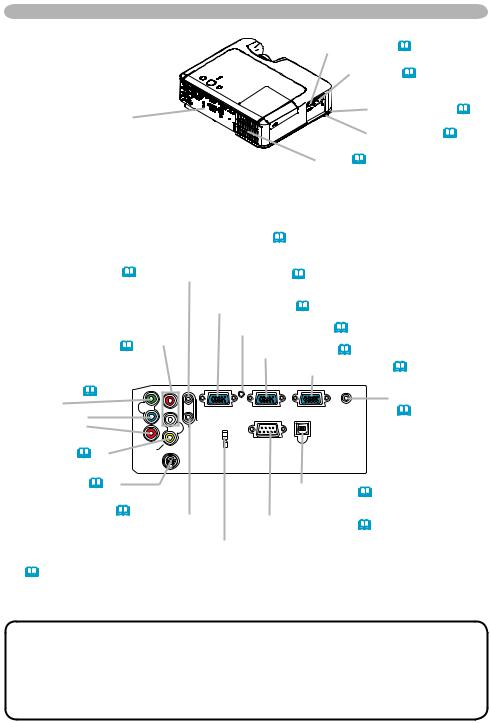
|
|
Part names |
|
|
Power switch (17) |
|
|
AC inlet (14) |
Ports (See below.) |
|
Elevator button (9) |
|
Elevator foot (9) |
|
|
|
|
|
Rear-Left side |
Vent (7) |
|
|
|
|
|
AUDIO IN1 port (12) |
|
|||
|
|
|
(In the default setting, the AUDIO IN1 port is the audio |
||||
AUDIO IN3 L/R port (13) |
|
port for the RGB IN1 port, however, it is possible to |
|||||
|
change the settings. 36) |
|
|||||
(In the default setting, the |
|
|
|
|
|
|
|
AUDIO IN3 L/R port is the audio |
|
RGB IN1 port (12) |
|
||||
port for the VIDEO, S-VIDEO |
|
|
|||||
and COMPONENT VIDEO |
|
|
|
Restart switch (*) (58) |
|
||
ports, however it is possible to |
|
|
|
||||
|
|
|
|
|
|||
change the settings. 36) |
|
|
|
RGB IN2 port (12) |
|
||
COMPONENT |
|
|
|
|
|
RGB OUT port (12) |
|
Y R |
|
|
|
|
|
||
VIDEO ports (13) |
|
|
|
|
|
||
|
|
AUDIO IN3 |
|
|
|
AUDIO OUT port |
|
Y |
|
|
|
|
|
|
|
|
|
|
RGB IN1 |
RGB IN2 |
RGB OUT AUDIO OUT |
(12) |
|
CB/PB |
|
|
|
||||
|
|
|
|
||||
CB/PB |
L |
|
AUDIO IN1 |
|
|
|
|
CR/PR |
|
AUDIO IN2 |
|
|
|
||
CR/PR |
|
|
|
|
|||
VIDEO port (13) |
|
|
K |
CONTROL |
USB |
|
|
VIDEO |
|
|
|
|
|||
|
|
|
|
|
Ports |
||
|
S-VIDEO |
|
|
|
|||
|
|
|
|
|
|
||
S-VIDEO port (13) |
|
|
|
|
|
USB port (12) |
|
|
|
|
|
|
|
|
|
AUDIO IN2 port (12) |
|
|
|
|
|
|
|
(In the default setting, the AUDIO |
CONTROL port (12) |
|
|||||
IN2 port is the audio port for |
|
|
|
|
|
||
the RGB IN2 port, however, it is |
Kensington lock slot |
|
|||||
possible to change the settings. |
|
|
|
|
|||
36) |
|
|
|
|
|
|
|
NOTE (*) About Restart switch: This projector is controlled by an internal microprocessor. Under certain exceptional circumstances, the projector may not operate correctly and the microprocessor will need to be reset. In such a case, please push the Restart switch by using a cocktail stick or similar, and before turning on again, make the projector cool down at least 10 minutes without operating. Only push the Restart switch in these exceptional instances.
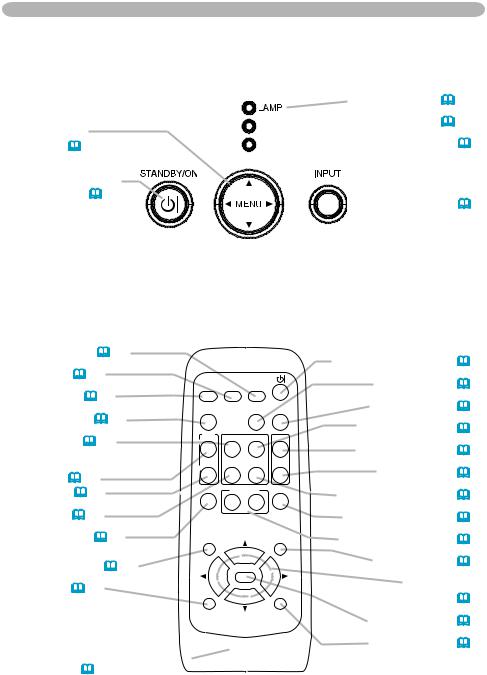
Part names
Control buttons
Cursor buttons
▲,▼,◄,► (24)
STANDBY/ON button (17)
Remote control
LAMP indicator (56, 57) 

 TEMP indicator (56, 57)

 POWER indicator (17)

 INPUT button (18)
SEARCH button (19) RGB button (18) VIDEO button (19) ASPECT button (19) HOME button (23)
MAGNIFY
ON button (21) OFF button (21)
END button (23)
VIDEO |
RGB |
SEARCH |
|
|
ASPECT |
|
AUTO |
BLANK |
|
MAGNIFY |
HOME |
PAGE UP |
VOLUME |
|
ON |
||||
|
|
|
||
OFF |
END |
PAGE DOWN |
MUTE |
|
|
|
|
||
FREEZE |
MY BUTTON |
KEYSTONE |
||
|
1 |
2 |
|
|
FREEZE button (22) |
POSITION |
MENU |
POSITION button (20) |
|
ENTER |
ESC button (23) |
ESC |
RESET |
Battery cover (15)  (on the back)
STANDBY/ON button (17) AUTO button (20) BLANK button (22)
PAGE UP button (23) VOLUME button (18)
MUTE button (18) PAGE DOWN button (23)
KEYSTONE button (21) MY BUTTON button (41)
MENU button (24)
Cursor buttons
▲,▼,◄,► (24) ENTER button (24) RESET button (24)

Setting up
Setting up
 WARNING ►Place the projector in a stable position horizontally. A fall or a turnover could cause an injury and/or damage to the projector. Then using damaged projector could result in a fire and/or an electric shock.
•Do not place the projector on an unstable, slant or vibrant surface such as a wobbly or inclined stand.
•Do not place the projector in the side/front/rear-up position, except cleaning the air filter.
►Place the projector in a cool place, and pay attention enough to ventilation. The high temperature of the projector could cause a fire, a burn and/or malfunction to the projector.
•Do not stop up, block and cover the projector's vents.
•Keep a space of 30 cm or more between the sides and other objects such as walls.
•Do not place the projector on a metallic thing or anything weak in heat.
•Do not place the projector on a carpet, cushion or bedding.
•Do not place the projector in direct sunlight or near a hot object such as a heater.
•Put nothing about lens and vents of the projector. Put nothing on the projector.
•Put nothing that is sucked or sticks to the bottom of projector. This projector has some intake vents also on the bottom.
►Do not place the projector on the place that gets wet. Damping the projector or inserting liquid in the projector could cause a fire, an electric shock and/or malfunction to the projector.
•Do not place the projector in a bathroom or the outdoors.
•Put nothing containing the liquid near the projector.
 CAUTION ►Avoid a smoky, humid or dusty place. Placing the projector in such place could cause a fire, an electric shock and/or malfunction to the projector.
• Do not place the projector near a humidifier, a smoking space or a kitchen. ►Adjust the direction of the projector to keep the light from directly hitting the projector's remote sensor.
Setting up
Arrangement
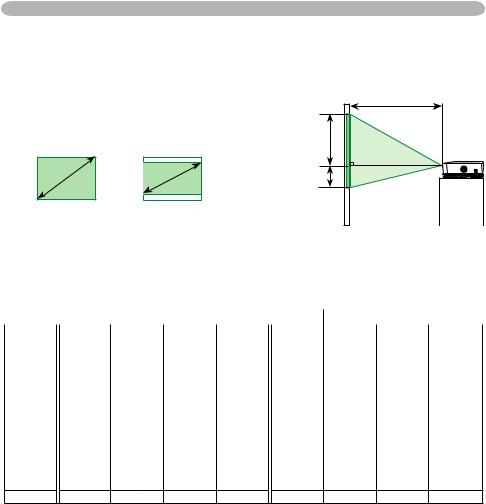
Refer to the illustrations and tables below to determine the screen size and projection distance.
The values shown in the table are calculated for a full size screen: 1024×768
(a) The screen size (diagonal) (b)
(b) Distance from the projector to the screen (±10%)
(c) The height of the screen (±10%)
4:3 |
16:9 |
(c) up |
|
(a) |
(a) |
(c) down |
|
|
(a) Screen |
|
|
|
|
4 : 3 screen |
|
|
|
|
|
|
16 : 9 screen |
|
|
||||||
size |
|
(b) Projection distance |
|
(c) Screen height |
|
(b) Projection distance |
(c) Screen height |
|||||||||||||
|
|
[m (inch)] |
|
|
|
[cm (inch)] |
|
|
|
[m (inch)] |
|
|
[cm (inch)] |
|
||||||
[inch (m)] |
|
|
|
|
|
|
|
|
|
|
|
|||||||||
|
min. |
max. |
down |
up |
|
min. |
max. |
down |
up |
|||||||||||
|
|
|
|
|||||||||||||||||
|
|
|
|
|
|
|
|
|
|
|
|
|
|
|
|
|
|
|
|
|
30 |
(0.8) |
0.9 |
(34) |
1.1 |
(41) |
5 |
(2) |
41 |
(16) |
|
1.0 |
(38) |
1.1 |
(45) |
-1 |
(0) |
39 |
(15) |
||
40 |
(1.0) |
1.2 |
(46) |
1.4 |
(56) |
6 |
(2) |
55 |
(22) |
|
1.3 |
(50) |
1.5 |
(61) |
-2 |
(-1) |
51 |
(20) |
||
50 |
(1.3) |
|
1.5 |
(58) |
1.8 |
|
(70) |
8 |
(3) |
69 |
(27) |
|
1.6 |
(63) |
1.9 |
(76) |
-2 |
(-1) |
64 |
(25) |
60 |
(1.5) |
|
1.8 |
(70) |
2.1 |
|
(84) |
9 |
(4) |
82 |
(32) |
|
1.9 |
(76) |
2.3 |
(91) |
-2 |
(-1) |
77 |
(30) |
70 |
(1.8) |
|
2.1 |
(81) |
2.5 |
|
(98) |
11 |
(4) |
96 |
(38) |
|
2.3 |
(89) |
2.7 |
(107) |
-3 |
(-1) |
90 |
(35) |
80 |
(2.0) |
|
2.4 |
(93) |
2.8 |
|
(112) |
12 |
(5) |
110 |
(43) |
|
2.6 |
(102) |
3.1 |
(122) |
-3 |
(-1) |
103 |
(41) |
90 |
(2.3) |
|
2.7 |
(105) |
3.2 |
|
(126) |
14 |
(5) |
123 |
(49) |
|
2.9 |
(115) |
3.5 |
(138) |
-4 |
(-1) |
116 |
(46) |
100 |
(2.5) |
|
3.0 |
(117) |
3.6 |
|
(140) |
15 |
(6) |
137 |
(54) |
|
3.2 |
(127) |
3.9 |
(153) |
-4 |
(-2) |
129 |
(51) |
120 |
(3.0) |
|
3.6 |
(140) |
4.3 |
|
(169) |
18 |
(7) |
165 |
(65) |
|
3.9 |
(153) |
4.7 |
(184) |
-5 |
(-2) |
154 |
(61) |
150 |
(3.8) |
|
4.5 |
(176) |
5.4 |
|
(211) |
23 |
(9) |
206 |
(81) |
|
4.9 |
(192) |
5.8 |
(230) |
-6 |
(-2) |
193 |
(76) |
200 |
(5.1) |
|
6.0 |
(235) |
7.2 |
|
(282) |
30 |
(12) |
274 |
(108) |
|
6.5 |
(256) |
7.8 |
(307) |
-8 |
(-3) |
257 |
(101) |
250 |
(6.4) |
|
7.5 |
(294) |
9.0 |
|
(353) |
38 |
(15) |
343 |
(135) |
|
8.1 |
(320) |
9.8 |
(384) |
-10 |
(-4) |
322 |
(127) |
300 (7.6) 9.0 (352) 10.8 (423) 46 (18) 411 (162) 9.8 (384) 11.7 (461) -12 (-5) 386 (152)
Setting up
Adjusting the projector's elevator
 CAUTION ►If you press the elevator button without holding the projector, the projector might crash down, overturn, smash your fingers and possibly result in malfunction. To prevent damaging the projector and injuring yourself, always hold the projector whenever using the elevator buttons to adjust the elevator feet.
►Do not incline the projector rightward or leftward. Also do not incline it backward or forward exceeding 30 degrees. Exceeding these range could cause malfunction, and could shorten the lifetime of the consumables.
►Except for inclining by the elevator feet adjustment, place the projector horizontally.
You can use the elevator feet to make adjustments if the surface on which you need to set the projector is uneven or if you otherwise need to adjust the angle of projection. The adjustment range of the elevator feet is 0 to 9 degrees.
Elevator feet |
Elevator button |
1. After making sure that the projector is cool adequately, press and hold in the elevator buttons while holding the projector.
The elevator buttons and the elevator feet are on the both sides.
2. Raise or lower the projector to the desired height and release the elevator buttons.
When you release the elevator buttons, the elevator feet will lock into position.
3. If necessary, you can also finely adjust the height of the projector by twisting the elevator feet by hand.
Setting up
Using the Security Bar
 WARNING ►Do not use the security bar to prevent the projector from falling. Dropping or knocking over the projector may cause damage or injury.
 CAUTION ►The security bar is not a comprehensive theft prevention measure. It is intended to be used as an extra theft prevention measure.
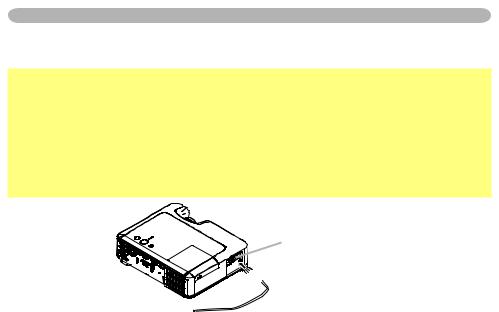
A commercial anti-theft chain or wire can be attached to the security bar on the projector.
1. How to attach
An anti-theft chain or wire can be attached as shown in the illustration. (Anti-theft chains or wires of up to 10mm in diameter can be used)
Security Bar
Anti-theft chain or wire [sold separately]
10
Setting up
Connecting your devices
 CAUTION ►Turn off all devices prior to connecting them to the projector.
Attempting to connect a live device to the projector may generate extremely loud noises or other abnormalities that may result in malfunction and/or damage to the device and/or projector.
►Use the accessory cable or a designated-type cable for the connection.
Some cables have to be used with core set. A too long cable may cause a certain picture degradation. Please consult with your dealer for details. For cables that have a core only at one end, connect the core to the projector.
►Make sure that you connect devices to the correct port. Incorrect connection may result in malfunction and/or damage to the device and/or projector.
NOTE • Whenever attempting to connect a laptop computer to the projector, be sure to activate the laptop’s RGB external image output (set the laptop to CRT display or to simultaneous LCD and CRT display). For details on how this is done, please refer to the instruction manual of the corresponding laptop computer.
•Secure the screws on the connectors and tighten.
•Some computers may have multiple display screen modes. Use of some of these modes will not be possible with this projector.
•For some RGB signal modes, the optional Mac adapter is necessary.
•When the image resolution is changed on a computer, depending on an input, automatic adjustment function may take some time and may not be completed. In this case, you may not be able to see a check box to select “Yes/No” for the new resolution on Windows. Then the resolution will go back to the original. It might be recommended to use other CRT or LCD monitors to change the resolution.
About Plug-and-Play capability
Plug-and-Play is a system composed of the computer, its operating system and peripheral equipment (i.e. display devices). This projector is compatible with VESA DDC 2B. Plug-and-Play can be achieved by connecting this projector to a computer is VESA DDC (display data channel) compatible.
•Please take advantage of this function by connecting the accessory RGB cable to the RGB IN1 port (DDC 2B compatible). Plug-and-Play may not work properly if any other type of connection is attempted.
•Please use the standard drivers in your computer as this projector is a Plug-and-Play monitor.
11

Setting up
Examples of connection with a computer
* In the default setting, the AUDIO IN1 port is the audio port for the RGB IN1, and the AUDIO IN2 port is the audio port for the RGB IN2 ports. To change the settings, refer to the AUDIO item in the SETUP menu. (36)
RGB cable
USB cable
AUDIO IN3
Y R
|
|
|
|
RGB IN1 |
RGB IN2 RGB OUT AUDIO OUT |
|
|
CB/PB |
L |
AUDIO IN1 |
|
RGB out Audio out RS-232C USB |
CR/PR |
IN2 |
|
||
|
|
||||
|
|
|
|
|
|
|
|
VIDEO |
|
K |
USB |
|
|
|
|
|
|
|
|
S-VIDEO |
|
|
|
Stereo mini |
RS-232C cable |
|
|
||
|
|
|
|
|
|
audio cable |
|
|
|
|
|
|
Stereo mini audio cable |
|
|||
RGB out |
Audio out |
AUDIO IN Y R
Y R 
|
|
|
RGB IN1 |
RGB IN2 |
RGB OUT |
AUDIO OUT |
|
CB/PB |
L |
AUDIO IN1 |
|
|
|
|
|
AUDIO IN2 |
|
|
|
|
|
|
|
|
|
|
|
|
CR/PR |
|
K |
CONTROL |
USB |
|
|
VIDEO |
|
|
|
||
|
|
|
|
|
|
|
RGB cable |
S-VIDEO |
|
|
|
|
|
|
|
|
|
|
|
|
Connecting to a monitor (output)
RGB in
RGB cable
Y |
AUDIO IN3 |
|
|
|
|
R |
|
|
|
|
|
|
|
RGB IN1 |
RGB IN2 |
RGBOUT |
AUDIO OUT |
|
|
|
|
T |
|
CB/PB |
L |
AUDIO IN1 |
|
|
|
|
AUDIO IN2 |
|
|
|
|
|
|
|
|
|
|
CR/PR |
|
K |
CONTROL |
USB |
|
VIDEO |
|
|
|
||
|
|
|
|
|
|
S-VIDEO |
|
|
|
|
|
Connecting to a speaker with amplifier (output)
Audio in |
AUDIO IN3 |
|
Y R |
||
|
|
|
RGB IN1 |
RGB IN2 |
RGB OUT AUDIO OUT |
CB/PB |
L |
AUDIO IN1 |
|
|
|
AUDIO IN2 |
|
|
|
|
|
|
|
|
CR/PR |
|
K |
CONTROL |
USB |
VIDEO |
|
|
||
|
|
|
|
|
S-VIDEO |
|
|
|
|
Stereo mini audio cable
12

Setting up
Examples of connection with a VCR/DVD player
* In the default setting, the AUDIO IN3 L/R port is the audio port for the VIDEO, S-VIDEO
and COMPONENT VIDEO ports. To change the settings, refer to the AUDIO item in the SETUP menu. (36)
Audio/Video cable
Audio (R) out
Audio (L) out
Video out
Audio cable
Y |
AUDIO IN3 |
|
|
|
R |
|
|
|
|
|
|
RGB IN1 |
RGB IN2 |
RGB OUT AUDIO OUT |
CB/PB |
L |
AUDIO IN1 |
|
|
|
AUDIO IN2 |
|
|
|
|
|
|
|
|
CR/PR |
|
K |
CONTROL |
USB |
VIDEO |
|
|
||
S-VIDEO
Audio (R) out
Audio (L) out
S-Video out
Y |
AUDIO IN3 |
|
|
R |
|
|
|
|
RGB IN1 |
RGB IN2 |
RGB OUT AUDIO OUT |
CB/PB |
AUDIO IN1 |
|
|
|
AUDIO IN2 |
|
|
CR/PR |
K |
CONTROL |
USB |
VIDEO |
|
||
|
|
|

 S
S


S-Video cable
Component video out |
Component video cable |
|
|
|
||
Y |
|
|
3 |
|
|
|
|
Y |
R |
|
|
|
|
CB/PB |
|
|
|
|
||
|
|
RGB IN1 |
RGB IN2 |
RGB OUT |
AUDIO OUT |
|
|
|
|
||||
|
CB/PB |
L |
AUDIO IN1 |
|
|
|
|
|
AUDIO IN2 |
|
|
|
|
CR/PR |
|
|
|
|
|
|
CR/PR |
|
K |
CONTROL |
USB |
|
|
|
VIDEO |
|
|
|
||
|
|
|
|
|
|
|
Audio (R) out |
S-VIDEO |
|
|
|
|
|
|
|
|
|
|
|
|
Audio (L) out |
Audio cable |
|
|
|
||
SCART cable |
G |
|
B |
|
R |
SCART |
Video |
out |
|
Y |
AUDIO IN3 |
|
|
|
R |
|
|
|
|
|
|
RGB IN1 |
RGB IN2 |
RGB OUT AUDIO OUT |
CB/PB |
L |
AUDIO IN1 |
|
|
|
AUDIO IN2 |
|
|
|
|
|
|
|
|
CR/PR |
|
K |
CONTROL |
USB |
VIDEO |
|
|
||
|
|
|
|
|
13
Setting up
Connecting power supply
 WARNING ►Please use extra caution when connecting the power cord, as incorrect or faulty connections may result in fire and/or electrical shock.
•Only use the power cord that came with the projector. If it is damaged, contact your dealer to newly get correct one.
•Only plug the power cord into an outlet rated for use with the power cord's specified voltage range.
•Never modify the power cord. Never attempt to defeat the ground connection of the three-pronged plug.
1.
2.
AC inlet
 Connector
of the power cord
Connect the connector of the power cord to the AC inlet of the projector.
Firmly plug the power cord's plug into the outlet.
14
Remote control
Remote control
Putting batteries
 WARNING ►Always handle the batteries with care and use them only as directed. Battery may explode if mistreated. Do not recharge, disassemble or dispose of in fire.
And also improper use may result in cracking or leakage, which could result in fire, injury and/or pollution of the surrounding environment.
•Be sure to use only the batteries specified. Do not use batteries of different types at the same time. Do not mix a new battery with used one.
•Make sure the plus and minus terminals are correctly aligned when loading a battery.
•Keep a battery away from children and pets. If swallowed consult a physician immediately for emergency treatment.
•Do not short circuit or solder a battery.
•Do not allow a battery in a fire or water. Keep batteries in a dark, cool and dry place.
•If you observe a leakage of a battery, wipe out the flower and then replace a battery.
If the liquid adheres to your body or clothes, rinse well with water immediately.
•Obey the local laws on disposing the battery.
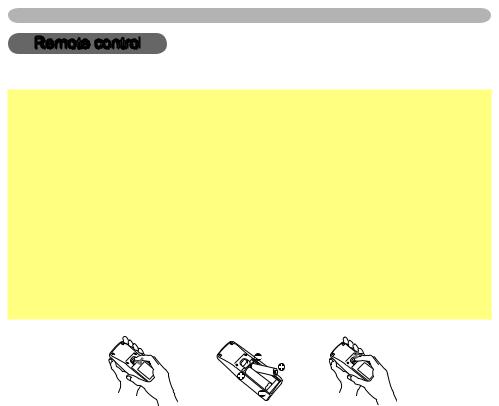
1. Remove the battery cover.
Slide back and remove the battery cover in the direction of the arrow.
2. Insert the batteries.
Align and insert the two AA batteries according to their plus and minus terminals as indicated in the remote control.
3. Close the battery cover.
Replace the battery cover in the direction of the arrow and snap it back into place.
15

Remote control
Using the remote control
 CAUTION ►Be careful in handling the remote control.
•Do not drop or expose the remote control to physical impact.
•Do not get the remote control wet or place it on wet objects. It may result in malfunction.
•Remove the batteries from the remote control and store them in a safe place if you won’t be using the remote control for an extended period.
•Replace the batteries whenever the remote control starts malfunctioning.
•When strong lights (such as direct sunlight) or light from an extremely close range (such as from an inverter fluorescent lamp), hit the projector’s remote sensor, the remote control may cause to function. Adjust the direction of the projector to keep the light from directly hitting the projector’s remote sensor.
The signal settings for the remote control transmitter and the projector's remote sensor can be changed. If the remote control does not function properly try changing the signal setting.
Changing the signal setting for the remote control transmitter
(1)Setting 1 (FREQ. : NORMAL)
Simultaneously press and hold the MUTE and RESET buttons for about 3 seconds. (2)Setting 2 (FREQ. : HIGH)
Simultaneously press and hold the MAGNIFY OFF and ESC buttons for about 3 seconds.
•Setting 1 is the factory default setting.
•When the batteries are removed from the remote control, user-specified settings are saved for about half a day. If the batteries are removed from the remote control for longer than half a day, the remote will reset to Setting 1.
Changing the signal setting for the projector's remote sensor
Switch between Setting 1 and 2 using the SERVICE/REMOTE FREQ. item found in OPTION MENU. (43)
If the remote control does not seem to function properly, try changing the settings for the remote control and the projector's remote sensor.
The remote control will not function properly if the remote control transmitter settings and the projector's remote sensor settings are not the same.
The remote control works with the projector’s remote sensor.
30º |
approx. 3 meters |
|
30º |
||
|
•The range of the remote sensor is 3 meters with a 60 degree range (30 degrees to the left and right of the remote sensor).
•Also a remote signal reflected in the screen etc. may be available. If it is difficult to send a remote signal to the sensor directly, please try to use the reflected signal.
•Since the remote control uses infrared light to send signals to the projector (Class1 LED), be sure to use the remote control in an area free from obstacles that could block the remote control’s output signal to the projector.
16

Power on/off
Power on/off
 WARNING ►When the power is on, a strong light is emitted. Do not look into the lens of projector. Also do not peep at the inside of projector through a hole.
NOTE • Turn the power on/off in right order. Please power on the projector prior to the connected devices. Power off the projector later than the connected devices.
Turning on the power
1. Make sure that the power cord is firmly and correctly connected to the projector and the outlet.
2. Remove the lens cover, and set the power switch to the ON position.
The power indicator will light up in steady orange. Then wait several seconds because the buttons may not function for these several seconds.
STANDBY/ON button
(1)When AUTO ON in the OPTION menu is set to TURN ON:(40) The lamp will only be automatically turned on when the Power switch is turned on after the power was turned off by Power switch last time. Afterwards the POWER indicator will begin blinking in green. When the power is completely on, the indicator will stop blinking and light in green.
(2)When AUTO ON in the OPTION menu is set to TURN OFF please see step 3.
3.Press the STANDBY/ON button on the projector or the remote control.
To display the picture, select an input signal according to the section "Selecting an input signal" (18).
POWER indicator
POWER
(Steady orange)
POWER
(Blinking in green)
POWER
(Steady green)
Turning off the power
Please pay special attention to below two points when you do:
(1) Please do not turn the projector on again for at least 10 minute in this case. Neglect could shorten the lifetime of the lamp.
(2) During use or immediately after use, do not touch around the lamp and vents of the projector (4 ê) It could cause a burn.
1. Press the STANDBY/ON button on the projector or the remote control.
The message "Power off?" will appear on the screen for about 5 seconds.
2. Press the STANDBY/ON button on the projector or the remote control again while the message appears.
The projector lamp will go off, and the POWER indicator will begin blinking in orange.
Then the POWER indicator will stop blinking and light in steady orange when the lamp cooling is complete.
3. Make sure that the power indicator lights in steady orange, and set the power switch to the OFF position. The POWER indicator will go
off. Attach the lens cover.
Operating
Operating
Adjusting the volume
Press the VOLUME button on the remote control.
A dialog will appear on the screen to aid you in adjusting the volume.
Use the cursor buttons ▲/▼ to adjust the volume.
To close the dialog and complete the operation, press the VOLUME button again. Even if you don’t do anything, the dialog will automatically disappear after a few seconds.
Temporarily muting the sound
1. Press the MUTE button on the remote control.
A dialog will appear on the screen indicating that you have muted the sound.
To restore the sound, press the MUTE or VOLUME button. Even if you don’t do anything, the dialog will automatically disappear after a few seconds.
VIDEO |
RGB |
SEARCH |
|
|
ASPECT |
|
AUTO |
BLANK |
|
MAGNIFY |
HOME |
PAGE UP |
VOLUME |
|
ON |
||||
|
|
|
||
|
END |
PAGE DOWN |
|
|
ASPECT |
|
AUTO |
BLANK |
|
MAGNIFY |
HOME |
PAGE UP |
VOLUME |
|
ON |
||||
|
|
|
||
OFF |
END |
PAGE DOWN |
MUTE |
|
|
|
|
||
FREEZE |
MY BUTTON |
|
||
|
1 |
2 |
|
|
Selecting an input signal
1. Press the INPUT button on the projector.
Each time you press the button, the projector switches its input port as below.
RGB IN1 RGB IN2
VIDEO S-VIDEO COMPONENT VIDEO
1. Press the RGB button on the remote control to select an input port for the RGB signal.
Each time you press the button, the projector switches its RGB input port as below.
VIDEO |
RGB SEARCH |
ASPECT |
AUTO BLANK |
RGB IN1 RGB IN2
●If the RGB button is pushed (when switching from VIDEO to RGB signals) when TURN ON is selected for the AUTO SEARCH item in the OPTION menu the projector will check the RGB IN1 port first. If no input is detected at the port, the projector will check the RGB IN2 port.
18
Operating
Selecting an input signal (continued)
1. Press the VIDEO button on the remote control to select an input for video signal.
Each time you press the button, the projector switches its video input port as below.
COMPONENT VIDEO S-VIDEO VIDEO
VIDEO RGB SEARCH
AUTO BLANK
●If the VIDEO button is pushed (when switching from RGB to VIDEO signals) when TURN ON is selected for the AUTO SEARCH item in the OPTION menu the projector will check the COMPONENT VIDEO port first. If no input is detected at the port, projector will begin to check other ports in above order.
Searching an input signal
1. |
Press the SEARCH button on the remote control. |
VIDEO |
RGB SEARCH |
|
The projector will start to check its input ports in order to |
ASPECT |
BLANK |
find any input signals.
When an input is found, the projector will stop searching and display the image. If no signal is found, the projector will return to the state selected before the operation.
RGB IN 1 RGB IN 2 COMPONENT VIDEO S-VIDEO VIDEO
Selecting an aspect ratio
1. Press the ASPECT button on the remote control.
Each time you press the button, the projector switches the mode for aspect ratio in turn.
For an RGB signal
NORMAL 4:3 16:9 SMALL
For a video signal, s-video signal or component video signal
4:3 16:9 14:9 SMALL
VIDEO |
RGB SEARCH |
ASPECT |
AUTO BLANK |
ON |
HOME |
PAGE UP VOLUME |
|
|
For a no signal
4:3 (fixed)
●The NORMAL mode keeps the original aspect ratio of the signal.
●Performing the automatic adjustment initializes the aspect ratio setting.
Adjusting the zoom and focus
1. |
Use the zoom ring to adjust the screen size. |
Focus ring |
Zoom ring |
2. |
Use the focus ring to focus the picture. |
|
|
19
 Loading...