


GE PP7036SJ2SS, PP7036SJ1SS, PP7036EJ1ES, PP7036DJ2BB, PP7030SJ2SS Owner’s Manual
...COOKTOP
Radiant
SAFETY INFORMATION . . . . . . . . . . 3
USING THE COOKTOP
Cooktop Features. . . . . . . . . . . . . . . . . . . . . . . 5 Radiant Glass Cooktop . . . . . . . . . . . . . . . . . .10 Home Canning Tips . . . . . . . . . . . . . . . . . . . . .10 Cookware for Radiant Glass Cooktop. . . . . . 11 Element Cycling . . . . . . . . . . . . . . . . . . . . . . . .12 Turn Product On/Off . . . . . . . . . . . . . . . . . . . .12 Operating The Cooking Elements . . . . . . . . .12 How To Synchronize Left Elements . . . . . . .13 Selecting Cooktop Settings . . . . . . . . . . . . . .13 Cooktop Lockout . . . . . . . . . . . . . . . . . . . . . . .14 Hot Light Indicator. . . . . . . . . . . . . . . . . . . . . .14 Griddle (optional accessory) . . . . . . . . . . . . .15
CARE AND CLEANING
Cleaning the Glass Cooktop . . . . . . . . . . . . . .16
TROUBLESHOOTING TIPS. . . . . . . .18
WARRANTY. . . . . . . . . . . . . . . . . . . . . . . 22
ACCESSORIES . . . . . . . . . . . . . . . . . . . . 23
CONSUMER SUPPORT . . . . . . . . . . . 24
Write the model and serial numbers here:
Model #_________________
Serial # _________________
You can find them on a label under the cooktop.
OWNER’S MANUAL
JP3030
JP3036
JP3530
JP3536
PP7030
PP7036
CP9530
CP9536
ENGLISH/FRANÇAIS/ESPAÑOL
GE is a trademark of the General Electric Company. Manufactured under trademark license.
49-80745-1 02-17 GEA

THANK YOU FOR MAKING GE APPLIANCES A PART OF YOUR HOME.
Whether you grew up with GE Appliances, or this is your first, we’re happy to have you in the family.
We take pride in the craftsmanship, innovation and design that goes into every GE Appliances product, and we think you will too. Among other things, registration of your appliance ensures that we can deliver important product information and warranty details when you need them.
Register your GE appliance now online. Helpful websites and phone numbers are available in the Consumer Support section of this Owner’s Manual. You may also mail in the pre-printed registration card included in the packing material.
2 |
|
49-80745-1 |
IMPORTANT SAFETY INFORMATION
READ ALL INSTRUCTIONS BEFORE USING THE APPLIANCE
WARNING Read all safety instructions before using the product. Failure to follow these instructions may result in fire, electrical shock, serious injury or death.
 WARNING GENERAL SAFETY INSTRUCTIONS
Ŷ 8VH WKLV FRRNWRS RQO\ IRU LWV LQWHQGHG SXUSRVH DV described in this Owner’s Manual.
Ŷ %H VXUH \RXU FRRNWRS LV SURSHUO\ LQVWDOOHG DQG grounded by a qualified installer in accordance with the provided installation instructions.
Ŷ 'R QRW DWWHPSW WR UHSDLU RU UHSODFH DQ\ SDUW RI \RXU cooktop unless it is specifically recommended in this manual. All other servicing should be performed by a qualified technician.
Ŷ %HIRUH SHUIRUPLQJ DQ\ VHUYLFH XQSOXJ WKH FRRNWRS or disconnect the power supply at the household distribution panel by removing the fuse or switching off the circuit breaker.
Ŷ 'R QRW OHDYH FKLOGUHQ DORQH FKLOGUHQ VKRXOG QRW be left alone or unattended in an area where the cooktop is in use. They should never be allowed to climb, sit or stand on any part of the cooktop.
Ŷ  CAUTION 'R QRW VWRUH LWHPV RI LQWHUHVW WR
FKLOGUHQ DERYH WKH FRRNWRS FKLOGUHQ FOLPELQJ RQ WKH cooktop to reach items could be seriously injured.
Ŷ 8VH RQO\ GU\ SRW KROGHUV PRLVW RU GDPS SRW holders on hot surfaces may result in burns from
VWHDP 'R QRW OHW SRW KROGHUV WRXFK KRW VXUIDFH
XQLWV RU KHDWLQJ HOHPHQWV 'R QRW XVH D WRZHO RU other bulky cloth in place of pot holders.
Ŷ 1HYHU XVH \RXU FRRNWRS IRU ZDUPLQJ RU KHDWLQJ WKH room.
Ŷ 'R QRW WRXFK VXUIDFH HOHPHQWV 7KHVH VXUIDFHV may be hot enough to burn even though they are
GDUN LQ FRORU 'XULQJ DQG DIWHU XVH GR QRW WRXFK or let clothing or other flammable materials contact the surface elements or areas nearby the surface elements; allow sufficient time for cooling first.
Ŷ 3RWHQWLDOO\ KRW VXUIDFHV LQFOXGH WKH FRRNWRS DQG areas facing the cooktop.
Ŷ 'R QRW KHDW XQRSHQHG IRRG FRQWDLQHUV 3UHVVXUH could build up and the container could burst, causing an injury.
Ŷ &RRN PHDW DQG SRXOWU\ WKRURXJKO\ PHDW WR DW OHDVW an internal temperature of 160°F and poultry to at least an internal temperature of 180°F. Cooking
to these temperatures usually protects against foodborne illness.
|
KEEP FLAMMABLE MATERIALS AWAY FROM THE COOKTOP |
WARNING |
|
|
Failure to do so may result in fire or personal injury. |
|
Ŷ''R QRW VWRUH RU XVH IODPPDEOH PDWHULDOV QHDU the cooktop, including paper, plastic, pot holders,
linens, wall coverings, curtains, drapes and gasoline or other flammable vapors and liquids.
Ŷ 1HYHU ZHDU ORRVH ILWWLQJ RU KDQJLQJ JDUPHQWV ZKLOH using the cooktop. These garments may ignite if they contact hot surfaces causing severe burns.
Ŷ 'R QRW OHW FRRNLQJ JUHDVH RU RWKHU IODPPDEOH materials accumulate in or near the cooktop. Grease on the cooktop may ignite.
INFORMATION SAFETY
READ AND SAVE THESE INSTRUCTIONS
49-80745-1 |
3 |

SAFETY INFORMATION
IMPORTANT SAFETY INFORMATION
READ ALL INSTRUCTIONS BEFORE USING THE APPLIANCE
 WARNING COOKTOP SAFETY INSTRUCTIONS
Ŷ ,Q WKH HYHQW RI D ILUH GR QRW XVH ZDWHU RU JUHDVH RQ
ILUHV 1HYHU SLFN XS D IODPLQJ SDQ 7XUQ WKH FRQWUROV off. Smother a flaming pan on a surface unit by covering the pan completely with a well-fitted lid,
FRRNLH VKHHW RU IODW WUD\ 8VH D PXOWL SXUSRVH GU\ chemical or a foam-type fire extinguisher.
Ŷ 1HYHU OHDYH WKH VXUIDFH XQLWV XQDWWHQGHG DW PHGLXP
RU KLJK KHDW VHWWLQJV %RLORYHUV FDXVH VPRNLQJ DQG greasy spillovers that may catch on fire.
Ŷ 1HYHU OHDYH RLO XQDWWHQGHG ZKLOH IU\LQJ ,I DOORZHG to heat beyond its smoking point, oil may ignite resulting in fire that may spread to surrounding
FDELQHWV 8VH D GHHS IDW WKHUPRPHWHU ZKHQHYHU possible to monitor oil temperature.
Ŷ 7R DYRLG VSLOORYHU DQG ILUH XVH D PLQLPXP DPRXQW of oil when shallow pan-frying and avoid cooking frozen foods with excessive amounts of ice.
Ŷ 8VH WKH SURSHU SDQ VL]H VHOHFW FRRNZDUH KDYLQJ flat bottoms large enough to cover the surface heating element. The use of undersized cookware will expose a portion of the surface unit to direct
FRQWDFW DQG PD\ UHVXOW LQ LJQLWLRQ RI FORWKLQJ 3URSHU relationship of cookware to surface unit will also improve efficiency.
Ŷ 7R PLQLPL]H WKH SRVVLELOLW\ RI EXUQV LJQLWLRQ RI flammable materials and spillage, the handle of a container should be turned toward the center of the range without extending over nearby surface units.
Ŷ ,I SRZHU LV ORVW WR DQ HOHFWULF FRRNWRS ZKLOH D VXUIDFH
XQLW LV 21 WKH VXUIDFH XQLW ZLOO WXUQ EDFN RQ DV soon as power is restored. In the event of a power loss, failure to turn all surface unit knobs to the OFF position may result in ignition of items on or near the cooktop, leading to serious injury or death.

 WARNING RADIANT COOKTOP SAFETY INSTRUCTIONS
Ŷ 2QO\ FHUWDLQ W\SHV RI JODVV JODVV FHUDPLF earthenware or other glazed containers are suitable for cooktop service; others may break because of the sudden change in temperature.
Ŷ 8VH FDUH ZKHQ WRXFKLQJ WKH FRRNWRS 7KH JODVV surface of the cooktop will retain heat after the controls have been turned off.
Ŷ 'R QRW FRRN RQ D EURNHQ FRRNWRS ,I WKH JODVV cooktop should break, cleaning solutions and spillovers may penetrate the broken cooktop and create a risk of electric shock. Contact a qualified technician immediately.
Ŷ $YRLG VFUDWFKLQJ WKH JODVV FRRNWRS 7KH FRRNWRS can be scratched with items such as knives, sharp instruments, rings or other jewelry, and rivets on clothing.
Ŷ 'R QRW SODFH RU VWRUH LWHPV WKDW FDQ PHOW RU FDWFK fire on the glass cooktop, even when it is not being used. If the cooktop is inadvertently turned on, they may ignite. Heat from the cooktop or oven vent after it is turned off may cause them to ignite also.
Ŷ 8VH &(5$0$ %5<7(® ceramic Cooktop Cleaner
DQG &(5$0$ %5<7(® &OHDQLQJ 3DG WR FOHDQ the cooktop. Wait until the cooktop cools and the indicator light goes out before cleaning. A wet sponge or cloth on a hot surface can cause steam burns. Some cleaners can produce noxious fumes if applied to a hot surface. Read and follow all instructions and warnings on the cleaning cream label. NOTE: Sugary spills are an exception. They should be scraped off while still hot using an oven mitt and a scraper. See the Cleaning the glass cooktop section for detailed instructions.
How to Remove Protective Shipping Film and Packaging Tape
Carefully grasp a corner of the protective shipping film with your fingers and slowly peel it from the appliance
VXUIDFH 'R QRW XVH DQ\ VKDUS LWHPV WR UHPRYH WKH ILOP
Remove all of the film before using the appliance for the first time.
To assure no damage is done to the finish of the product, the safest way to remove the adhesive from packaging tape on new appliances is an application of a household liquid dishwashing detergent. Apply with a soft cloth and allow to soak.
NOTE: The adhesive must be removed from all parts. It cannot be removed if it is baked on.
READ AND SAVE THESE INSTRUCTIONS
4 |
49-80745-1 |

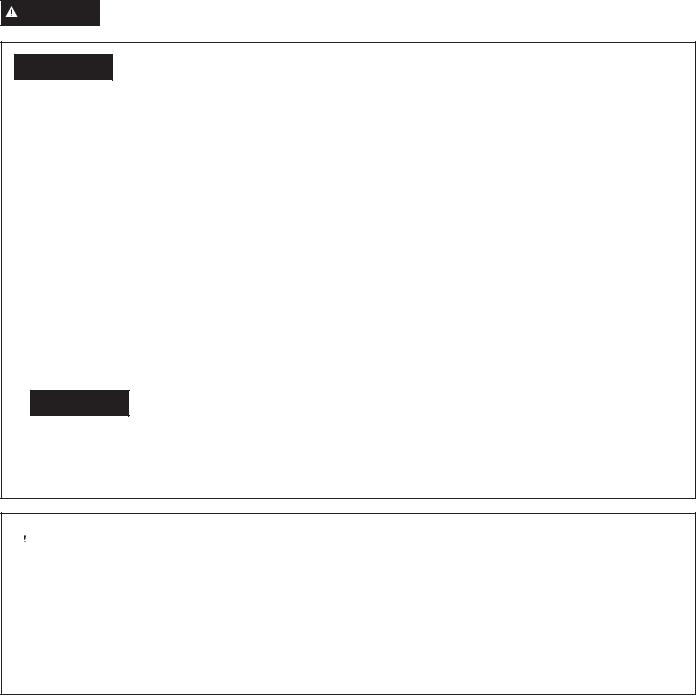
Cooktop Features
Throughout this manual, features and appearance may vary from your model.
1 |
2 |
&3 FRRNWRS |
|
4 |
3 |
|
8VHU ,QWHUIDFH &RQWUROV |
1 |
2 |
33 FRRNWRS
4 3
8VHU ,QWHUIDFH &RQWUROV
1.Cooking Element(s): See page 13.
2.Control Knob(s): See page 13.
3.Lock: See page 15.
4.Sync Burners: See page 14.
Features Cooktop COOKTOP: THE USING
49-80745-1 |
5 |
USING THE COOKTOP: Cooktop Features
Cooktop Features
Throughout this manual, features and appearance may vary from your model.
3
1
2
-3 FRRNWRS
8VHU ,QWHUIDFH &RQWUROV
1.Cooking Element(s): See page 13.
2.Control Knob(s): See page 13.
3.Lock: See page 15.
6 |
49-80745-1 |
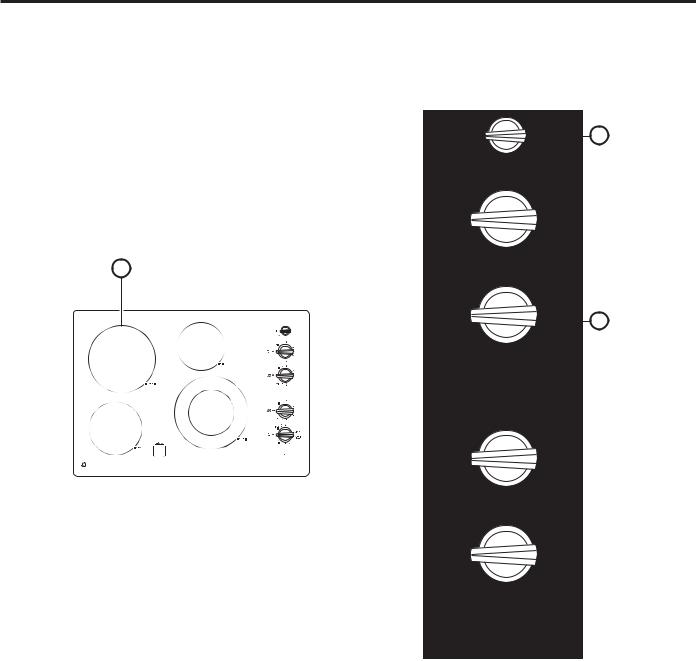
Cooktop Features
Throughout this manual, features and appearance may vary from your model.
1
2
-3 cooktop
8VHU ,QWHUIDFH &RQWUROV
1.Cooking Element(s): See page 13.
2.Control Knob(s): See page 13.
Features Cooktop COOKTOP: THE USING
49-80745-1 |
|
USING THE COOKTOP: Cooktop Features
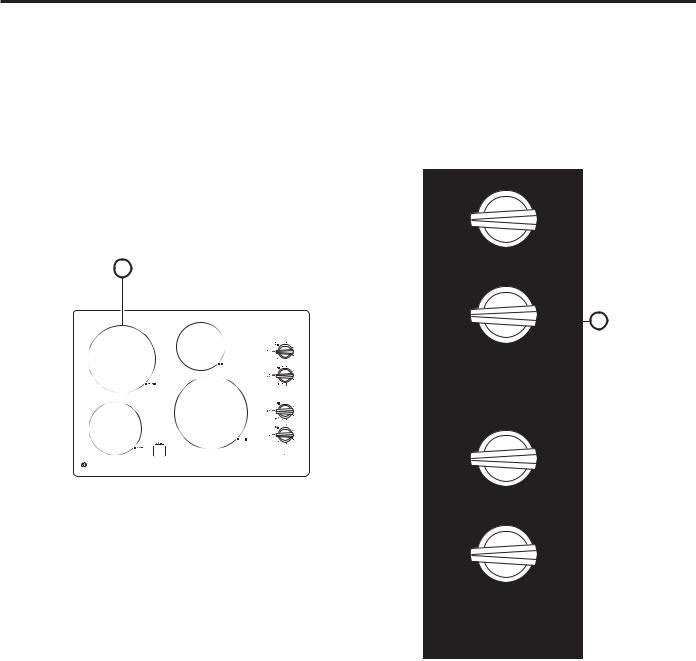
Cooktop Features
Throughout this manual, features and appearance may vary from your model.
1 |
2 |
-3 FRRNWRS
8VHU ,QWHUIDFH &RQWUROV
1 |
2 |
-3 FRRNWRS
3
8VHU ,QWHUIDFH &RQWUROV
1.Cooking Element(s): See page 13.
2.Control Knob(s): See page 13.
3.Lock: See page 15.
4.Sync Burners: See page 14.
8 |
49-80745-1 |

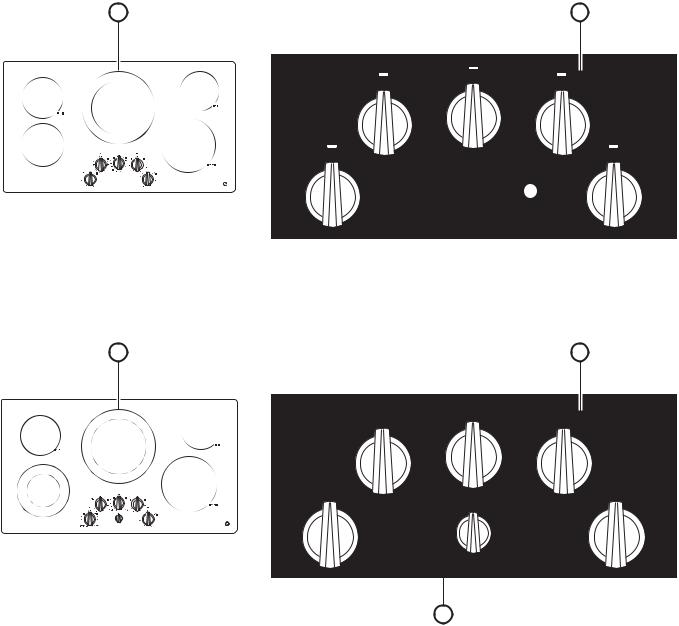
Cooktop Features
Throughout this manual, features and appearance may vary from your model.
1 |
1 |
33 FRRNWRS
4 |
3 |
|
8VHU ,QWHUIDFH &RQWUROV |
1 |
2 |
Features Cooktop COOKTOP: THE USING
&3 FRRNWRS
4 3
8VHU ,QWHUIDFH &RQWUROV
1.Cooking Element(s): See page 13.
2.Control Knob(s): See page 13.
3.Lock: See page 15.
4.Sync Burners: See page 14.
49-80745-1 |
|

USING THE COOKTOP:5DGLDQW*ODVV&RRNWRS+RPH&DQQLQJ7LSV
Radiant Glass Cooktop
The radiant cooktop features heating units beneath a smooth glass surface.
NOTE: A slight odor is normal when a new cooktop is used for the first time. It is caused by the heating of new parts and insulating materials and will disappear in a short time.
NOTE: This cooktop has Rapid Response surface units. The cooktop will automatically heat up or cool down
to the desired power level setting in the quickest time possible. While the surface units are on, you may not see them glow red during certain heat up or cool down conditions.
Cooktop temperatures increase with the number of surface units that are on. With 3 or 4 units turned on, surface temperatures are high. Always use caution when touching the cooktop.
1HYHU FRRN GLUHFWO\ RQ WKH JODVV
Always use cookware.
Always place the pan in the center of the surface unit you are cooking on.
|
'R QRW VOLGH FRRNZDUH DFURVV WKH FRRNWRS |
||
|
EHFDXVH LW FDQ VFUDWFK WKH JODVV WKH JODVV |
||
|
is scratch-resistant, not scratch proof. |
||
Home Canning Tips |
|
|
|
%H VXUH WKH FDQQHU LV FHQWHUHG RYHU WKH VXUIDFH XQLW |
8VH UHFLSHV DQG SURFHGXUHV IURP UHSXWDEOH VRXUFHV 7KHVH |
||
Make sure the canner is flat on the bottom. |
DUH DYDLODEOH IURP PDQXIDFWXUHUV VXFK DV %DOO® and Kerr® |
||
DQG WKH 'HSDUWPHQW RI $JULFXOWXUH ([WHQVLRQ 6HUYLFH |
|||
To prevent burns from steam or heat, use caution when |
|||
)ODW ERWWRPHG FDQQHUV DUH UHFRPPHQGHG 8VH RI ZDWHU |
|||
canning. |
|||
bath canners with rippled bottoms may extend the time |
|||
|
|||
|
required to bring the water to a boil. |
||
10 |
49-80745-1 |
Cookware for Radiant Glass Cooktop
The following information will help you choose cookware which will give good performance on glass cooktops.
NOTE: Follow all cookware manufacturer’s recommendations when using any type of cookware on the ceramic cooktop.
Recommended
Stainless Steel
Aluminum:
heavy weight recommended
Good conductivity. Aluminum residues sometimes appear as scratches on the cooktop but can be removed if cleaned
LPPHGLDWHO\ %HFDXVH RI LWV ORZ PHOWLQJ point, thin weight aluminum should not be used.
Copper Bottom:
Copper may leave residues which can appear as scratches. The residues can be removed, as long as the cooktop
is cleaned immediately. However, do not let these pots boil dry. Overheated metal can bond to glass cooktops. An overheated copper bottom pot will leave a residue that will permanently stain the cooktop if not removed immediately.
Enamel (painted) on Cast Iron:
recommended if bottom of pan is coated
Avoid/Not Recommended
Enamel (painted) on Steel:
Heating empty pans can cause permanent damage to cooktop glass. The enamel can melt and bond to the ceramic cooktop.
Glass-ceramic:
3RRU SHUIRUPDQFH :LOO VFUDWFK WKH surface.
Stoneware:
3RRU SHUIRUPDQFH 0D\ VFUDWFK WKH surface.
Cast Iron:
QRW UHFRPPHQGHG XQOHVV GHVLJQHG specifically for glass cooktops
3RRU FRQGXFWLYLW\ DQG VORZ WR DEVRUE heat. Will scratch the cooktop surface.
Check pans for flat bottoms by using a straight edge.
3DQV ZLWK URXQGHG FXUYHG ridged or warped bottoms are not recommended.
For Best Results
Ŷ 3ODFH RQO\ GU\ SDQV RQ WKH VXUIDFH HOHPHQWV 'R QRW place lids on the surface elements, particularly wet lids. Wet pans and lids may stick to the surface when cool.
Ŷ 'R QRW XVH ZRNV WKDW KDYH VXSSRUW ULQJV 7KLV W\SH RI wok will not heat on glass surface elements.
Ŷ :H UHFRPPHQG WKDW \RX XVH RQO\ D IODW ERWWRPHG wok. They are available at your local retail store. The bottom of the wok should have the same diameter as the surface element to ensure proper contact.
Ŷ 6RPH VSHFLDO FRRNLQJ SURFHGXUHV UHTXLUH VSHFLILF cookware such as pressure cookers or deep-fat fryers. All cookware must have flat bottoms and be the correct size.
'R QRW SODFH ZHW SDQV RQ WKH JODVV FRRNWRS
'R QRW XVH ZRNV ZLWK VXSSRUW ULQJV RQ WKH JODVV FRRNWRS
8VH IODW ERWWRPHG ZRNV RQ WKH JODVV FRRNWRS
Cooktop Glass Radiant for Cookware RANGE: THE USING
49-80745-1 |
11 |
USING THE COOKTOP:(OHPHQW&\FOLQJ7XUQ3URGXFW2Q2II2SHUDWLQJ7KH&RRNLQJ(OHPHQWV
Element Cycling
Surface elements will cycle on and off to maintain the |
Ŷ 7KH SDQ ERLOV GU\ |
|
temperature you have selected. All radiant surface elements |
Ŷ 7KH SDQ ERWWRP LV QRW IODW |
|
have a temperature limiter that protects the glass cooktop |
Ŷ 7KH SDQ LV RII FHQWHU |
|
from getting too hot, this is normal. The temperature limiter |
||
Ŷ 7KHUH LV QR SDQ RQ WKH HOHPHQW |
||
may cycle the elements off more frequently if: |
||
|
||
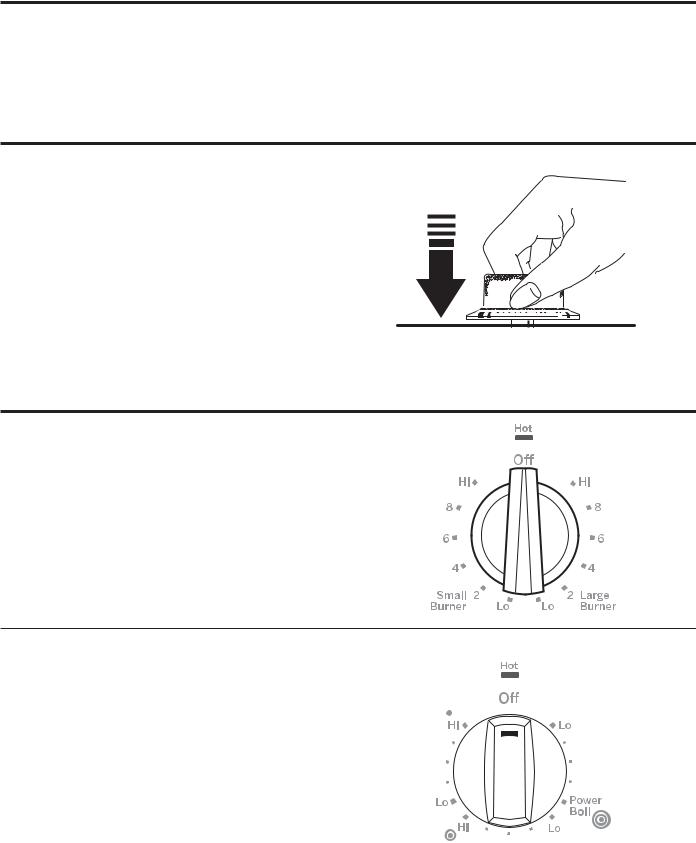
Turn Product On/Off |
|
|
Ŷ 3XVK WKH NQRE GRZQ DQG WXUQ LQ HLWKHU GLUHFWLRQ WR WKH |
|
|
setting you want. When the control is in any position |
|
|
other than Off, it may be rotated without pushing it |
|
|
down. You may feel a slight bump when it is rotated |
|
|
through the Lo or Hi positions. You may hear slight |
|
|
clicking sounds during cooking, indicating the control |
|
|
is keeping the power level you set. |
|
|
Ŷ $ HOT SURFACE indicator light will glow when any |
|
|
radiant element is turned on and will remain on until |
|
|
the surface is cooled to approximately 150°F. |
|
|
Ŷ %H VXUH \RX WXUQ WKH FRQWURO NQRE WR Off when you |
|
|
finish cooking. It will snap into the Off position. |
|
Operating The Cooking Elements
Dual Surface Element
Ŷ 7R XVH WKH VPDOO VXUIDFH HOHPHQW WXUQ WKH FRQWURO knob to the Small Burner settings.
Ŷ 7R XVH WKH ODUJH VXUIDFH HOHPHQW WXUQ WKH FRQWURO knob to the Large Burner settings.
Tri-Ring Surface Element
Ŷ 7R XVH WKH ODUJH VXUIDFH HOHPHQW SXVK DQG WXUQ WKH center control knob clockwise to  , stopping at the desired setting. This will activate the entire heating area.
Ŷ 7R XVH WKH PHGLXP VXUIDFH HOHPHQW SXVK DQG WXUQ the center control knob clockwise to  , stopping at the desired setting. This will activate the medium-size heating area.
Ŷ 7R XVH WKH VPDOOHVW VXUIDFH HOHPHQW SXVK DQG WXUQ the center control knob clockwise to  , stopping at the desired setting. This will activate the smallest, inside heating area.
12 |
49-80745-1 |
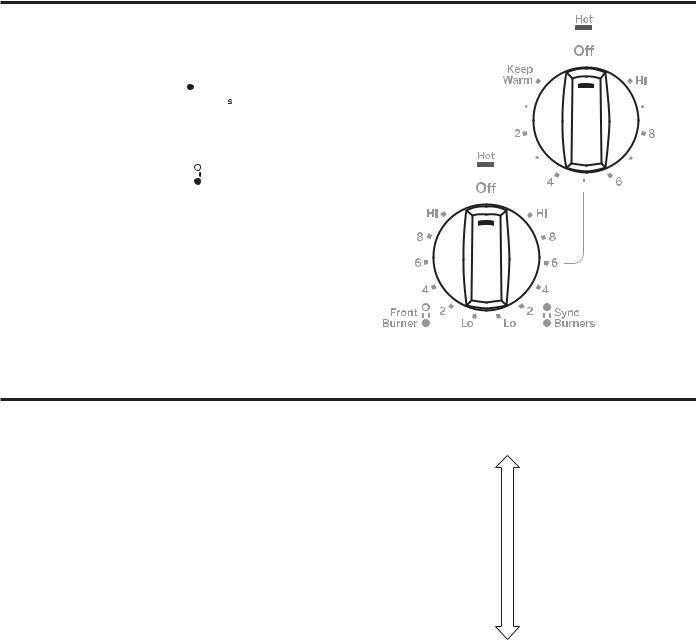
How To Synchronize Left Burners
Ŷ 0DNH VXUH WKH SDQ UHVWV IODW RQ WKH JODVV FRRNWRS
&KRRVH SDQV WKDW PDWFK WKH FLUFOH EULGJH DUHD DV closely as possible.
Ŷ 7R XVH ERWK OHIW HOHPHQWV DW WKH VDPH VHWWLQJ SXVK
and turn the control knob to

 , stopping at the desired settings. It is normal to hear a clicking noise when the elements are in sync mode.
Ŷ 7R XVH WKH OHIW IURQW VXUIDFH HOHPHQW RQO\ SXVK DQG
turn the control knob to

 , stopping at the desired settings.
&RQWHQW MXVW IRU WKH IROORZLQJ PRGHOV &3 &3 DQG -3 -3 ± %DFNOLW .QREV
:KHQ XVLQJ 6\QF %XUQHU WKH OHIW UHDU NQRE OLJKWLQJ ZLOO slightly flicker. The rear element is controlled by the front element and briefly lights the knob as the two elements heat. This is normal.
Selecting Cooktop Settings
&KRRVH WKH HOHPHQW EXUQHU WKDW LV WKH EHVW ILW WR WKH
FRRNZDUH VL]H (DFK HOHPHQW EXUQHU RQ \RXU QHZ cooktop has its own power levels ranging from low to
KLJK 3RZHU OHYHO VHWWLQJV QHFHVVDU\ IRU FRRNLQJ ZLOO YDU\ depending on the cookware being used, the type and quantity of food, and the desired outcome.
In general:
Ŷ 8VH ORZHU VHWWLQJV IRU PHOWLQJ KROGLQJ DQG simmering.
Ŷ 8VH KLJKHU VHWWLQJV IRU KHDWLQJ TXLFNO\ VHDULQJ DQG frying.
Ŷ )RU ³:DUPLQJ =RQH´ HOHPHQWV LQWHQGHG IRU KROGLQJ
(some models), use the Med-Hi settings.
When keeping foods warm confirm selected setting is sufficient to maintain food temperature above 140°F. Larger elements are not recommended for melting.
3RZHU ERLO HOHPHQWV DUH EHVW VXLWHG IRU ERLOLQJ ZDWHU SDUWLFXODUO\ ZLWK SRWV WKDW DUH ´ RU ODUJHU
Hi |
boiling quickly |
frying
searing
reducing
simmering
holding
Low melting
6HWWLQJV&RRNWRS6HOHFWLQJ(OHPHQWV/HIW6\QFKURQL]H7R+RZCOOKTOP: THE USING
49-80745-1 |
13 |
USING THE COOKTOP:&RRNWRS/RFNRXW+RW/LJKW,QGLFDWRU
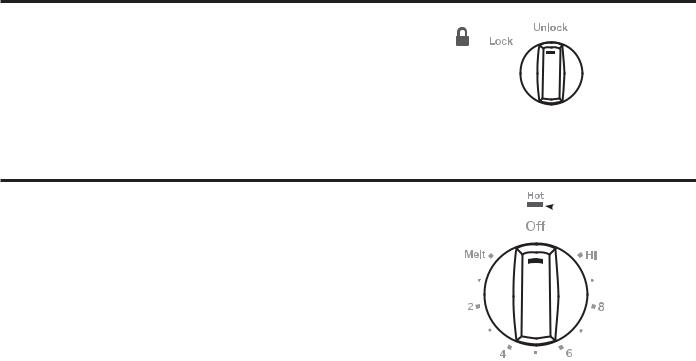
Cooktop Lockout (on some models)
To lock the cooktop and prevent unwanted use, turn the control lock knob to Lock. An indicator light will glow
to show that the cooktop is locked. To unlock, press and turn the knob to Unlock. In the locked position, the cooktop will produce an audible sound if any control knob is set to a position other than Off.
Hot Light Indicator
A hot surface indicator light (one for each cooking element) will glow when the glass surface is hot and will remain on until the surface has cooled to temperature that is safe to touch.
 Hot Surface
Indicator Light
14 |
49-80745-1 |

Griddle (optional accessory)
Using the Griddle
 CAUTION Burn Hazard
Ŷ *ULGGOH VXUIDFHV PD\ EH KRW HQRXJK WR FDXVH EXUQV GXULQJ DQG DIWHU XVH 3ODFH DQG UHPRYH WKH griddle when it is cool and all surface units are off. Use oven mitts if you will touch the griddle while hot. Failure to do so can result in burns.
Ŷ 3ODFH DQG UHPRYH WKH JULGGOH RQO\ ZKHQ JULGGOH LV FRRO DQG DOO VXUIDFH EXUQHUV DUH WXUQHG 2II
%HIRUH XVLQJ WKLV FRRNZDUH IRU WKH ILUVW WLPH ZDVK LW WR PDNH VXUH LW LV FOHDQ 7KHQ VHDVRQ LW OLJKWO\ UXEELQJ FRRNLQJ oil onto the cooking surface.
How To Place The Griddle
IMPORTANT: Always place and use your griddle at the designated location on the cooktop.
IMPORTANT NOTES:
Ŷ Clean the griddle with a sponge and mild detergent
LQ ZDUP ZDWHU '2 127 XVH EOXH RU JUHHQ VFUXEELQJ pads or steel wool.
Ŷ Avoid cooking extremely greasy foods and be careful of grease spillover while cooking.
Ŷ 1HYHU SODFH RU VWRUH DQ\ LWHPV RQ WKH JULGGOH HYHQ when it is not in use. The griddle can become heated when using the surrounding surface units.
Ŷ Avoid using metal utensils with sharp points or rough
HGJHV ZKLFK PLJKW GDPDJH WKH JULGGOH 'R QRW FXW foods on the griddle.
Ŷ 'R QRW XVH FRRNZDUH DV D VWRUDJH FRQWDLQHU IRU IRRG
RU RLO 3HUPDQHQW VWDLQLQJ DQG RU FUD]H OLQHV FRXOG result.
Ŷ Your griddle will discolor over time with use.
Ŷ 'R QRW FOHDQ WKH JULGGOH LQ D VHOI FOHDQLQJ RYHQ
Ŷ Always allow the cookware to cool before immersing in water.
Ŷ 'R QRW RYHUKHDW WKH JULGGOH
Type of Food |
Cook Setting |
Warming Tortillas |
Med-Lo |
3DQFDNHV |
Med-Lo |
Hamburgers |
Med |
Fried Eggs |
Med-Lo |
%UHDNIDVW 6DXVDJH /LQNV |
Med |
Hot Sandwiches (such as Grilled Cheese) |
Med-Lo |
Griddle settings are intended to be a guideline and may need to be adjusted based on individual cooking preferences.
Griddle Operation
To turn on the surface units for the entire griddle, use
WKH 6\QF %XUQHU FRQWURO IHDWXUH 7RXFK WKH Sync Burner pad and then adjust power level to desired setting as described on page 11.
accessory) (optional Griddle COOKTOP: THE USING
49-80745-1 |
15 |
CARE AND CLEANING: Cleaning the Glass Cooktop
Cleaning the Glass Cooktop
Normal Daily Use Cleaning
21/< XVH &(5$0$ %5<7(® Ceramic Cooktop Cleaner on the glass cooktop. Other creams may not be as effective.
To maintain and protect the surface of your glass cooktop, follow these steps:
%HIRUH XVLQJ WKH FRRNWRS IRU WKH ILUVW WLPH FOHDQ LW ZLWK &(5$0$ %5<7(® Ceramic Cooktop Cleaner. This helps protect the top and makes cleanup easier.
'DLO\ XVH RI &(5$0$ %5<7(® Ceramic Cooktop Cleaner will help keep the cooktop looking new.
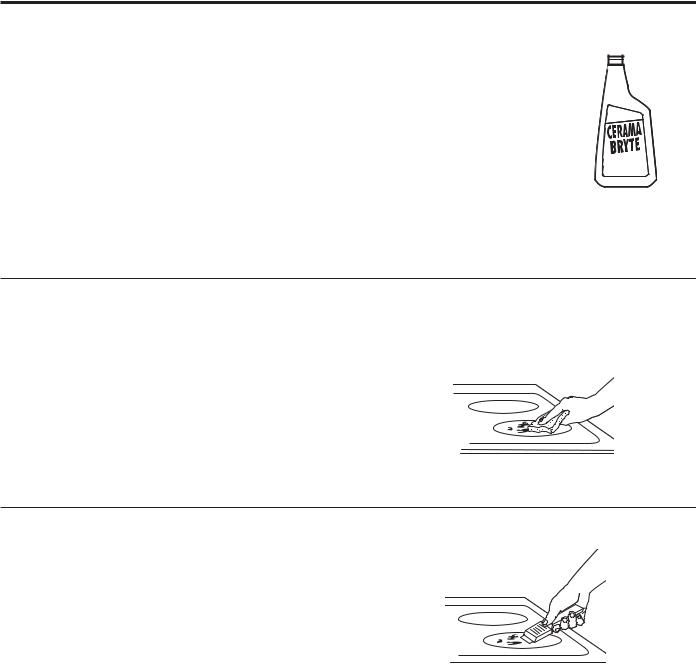
3.Shake the cleaning cream well. Apply a few drops of &(5$0$ %5<7(® Ceramic Cooktop Cleaner directly to the cooktop.
8VH D SDSHU WRZHO RU &(5$0$ %5<7(® Cleaning
3DG IRU &HUDPLF &RRNWRSV to clean the entire cooktop surface.
8VH D GU\ FORWK RU SDSHU towel to remove all cleaning
UHVLGXH 1R QHHG WR ULQVH
NOTE: It is very important that
\RX '2 127 KHDW WKH FRRNWRS until it has been cleaned thoroughly.
Clean your cooktop after each
VSLOO 8VH &(5$0$ %5<7(®
Ceramic Cooktop Cleaner.
Burned-On Residue
NOTE: '$0$*( WR \RXU JODVV VXUIDFH PD\ RFFXU LI \RX use scrub pads other than those recommended.
1. Allow the cooktop to cool.
6SUHDG D IHZ GURSV RI &(5$0$ %5<7(® Ceramic Cooktop Cleaner on the entire burned residue area.
8VLQJ WKH LQFOXGHG &(5$0$ %5<7(® &OHDQLQJ 3DG for Ceramic Cooktops, rub the residue area, applying pressure as needed.
4.If any residue remains, repeat the steps listed above as needed.
5.For additional protection, after all residue has been removed, polish the entire surface with CERAMA %5<7(® Ceramic Cooktop Cleaner and a paper towel.
8VH D &(5$0$ %5<7(® Cleaning
3DG IRU &HUDPLF &RRNWRSV
Heavy, Burned-On Residue
1. Allow the cooktop to cool.
8VH D VLQJOH HGJH UD]RU EODGH VFUDSHU DW DSSUR[LPDWHO\ a 45° angle against the glass surface and scrape the soil. It will be necessary to apply pressure to the razor scraper in order to remove the residue.
3.After scraping with the razor scraper, spread a few drops RI &(5$0$ %5<7(® Ceramic Cooktop Cleaner on the
HQWLUH EXUQHG UHVLGXH DUHD 8VH WKH &(5$0$ %5<7(® &OHDQLQJ 3DG WR UHPRYH DQ\ UHPDLQLQJ UHVLGXH
4.For additional protection, after all residue has been removed, polish the entire surface with CERAMA %5<7(® Ceramic Cooktop Cleaner and a paper towel.
7KH &(5$0$ %5<7(® Ceramic Cooktop Scraper and all
UHFRPPHQGHG VXSSOLHV DUH DYDLODEOH WKURXJK RXU 3DUWV &HQWHU 6HH LQVWUXFWLRQV XQGHU ³$VVLVWDQFH $FFHVVRULHV´ VHFWLRQ NOTE: 'R QRW XVH D GXOO RU QLFNHG EODGH
16 |
49-80745-1 |
Cleaning the Glass Cooktop
Metal Marks and Scratches
%H FDUHIXO QRW WR VOLGH SRWV DQG SDQV DFURVV \RXU cooktop. It will leave metal markings on the cooktop surface.
These marks are removable using the CERAMA %5<7(® Ceramic Cooktop Cleaner with the CERAMA
%5<7(® &OHDQLQJ 3DG IRU &HUDPLF &RRNWRSV
2.If pots with a thin overlay of aluminum or copper are allowed to boil dry, the overlay may leave black discoloration on the cooktop.
This should be removed immediately before heating again or the discoloration may be permanent.
NOTE: Carefully check the bottom of pans for roughness that would scratch the cooktop.
Damage from Sugary Spills and Melted Plastic
Special care should be taken when removing hot substances to avoid permanent damage of the glass surface. Sugary spillovers (such as jellies, fudge, candy, syrups) or melted plastics can cause pitting of the surface of your cooktop (not covered by the warranty) unless the spill is removed while still hot. Special care should be taken when removing hot substances.
%H VXUH WR XVH D QHZ VKDUS UD]RU VFUDSHU
'R QRW XVH D GXOO RU QLFNHG EODGH
1.Turn off all surface units. Remove hot pans.
2.Wearing an oven mitt:
D 8VH D VLQJOH HGJH UD]RU EODGH VFUDSHU WR PRYH the spill to a cool area on the cooktop.
b. Remove the spill with paper towels.
3.Any remaining spillover should be left until the surface of the cooktop has cooled.
'RQ¶W XVH WKH VXUIDFH XQLWV DJDLQ XQWLO DOO RI WKH residue has been completely removed.
NOTE: If pitting or indentation in the glass surface has already occurred, the cooktop glass will have to be replaced. In this case, service will be necessary.
Cleaning Trim
Do not use a steel wool or green pad; it will scratch the surface.
To clean the stainless steel surface, use warm sudsy water or a stainless steel cleaner or polish. Always wipe the surface in the direction of the grain. Follow the cleaner instructions for cleaning the stainless steel surface. To inquire about purchasing stainless steel appliance cleaner or polish, or to find the location of a dealer nearest you, please
FDOO RXU WROO IUHH QXPEHU 1DWLRQDO 3DUWV &HQWHU *($SSOLDQFHV FRP
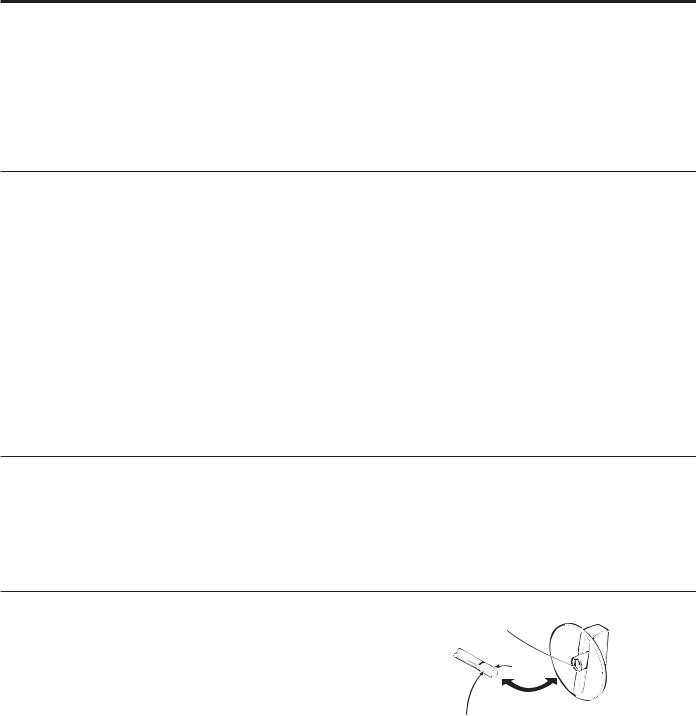
Cleaning Knobs
The control knobs may be removed for easier cleaning. Make sure the knobs are in the Off positions and pull them straight off the stems for cleaning. The knobs can be cleaned in a dishwasher or they may also be washed with soap and water. Make sure the insides of the knobs are dry before replacing. Replace the knobs in the Off position to ensure proper placement.
Molded rib
Stem
Spring clip
Clear groove
Cooktop Glass the Cleaning CLEANING: AND CARE
49-80745-1 |
|

TROUBLESHOOTING TIPS
Troubleshooting Tips ... %HIRUH \RX FDOO IRU VHUYLFH
Save time and money! Review the charts on the following pages first and you may not need to call for service. If an error occurs in the control operation, a fault code will flash in the display. Record the error code and call for service.
Problem |
Possible Cause |
What To Do |
Surface elements will not |
Improper cookware being used. |
8VH SDQV WKDW DUH DEVROXWHO\ IODW DQG PDWFK |
maintain a rolling boil or |
|
the diameter of the surface unit selected. |
cooking is slow |
|
|
Surface elements do not |
Cooktop controls improperly set. |
Check to be sure the correct control is set for |
work properly |
|
the surface element you are using. |
Scratches on cooktop |
Incorrect cleaning methods being used. |
8VH UHFRPPHQGHG FOHDQLQJ SURFHGXUHV 6HH |
glass surface |
|
the Cleaning the glass cooktop section. |
|
Cookware with rough bottoms being used |
To avoid scratches, use the recommended |
|
or coarse particles (salt or sand) were |
cleaning procedures. Make sure bottoms |
|
between the cookware and the surface of |
of cookware are clean before use, and use |
|
the cooktop. Cookware has been slid across |
cookware with smooth bottoms. |
|
the cooktop surface. |
|
Areas of discoloration on |
Food spillovers not cleaned before next use. |
See the Cleaning the glass cooktop section. |
the cooktop |
Hot surface on a model with a light-colored |
This is normal. The surface may appear |
|
||
|
glass cooktop. |
discolored when it is hot. This is temporary |
|
|
and will disappear as the glass cools. |
Plastic melted to the |
Hot cooktop came into contact with plastic |
6HH WKH *ODVV VXUIDFH ± SRWHQWLDO IRU |
surface |
placed on the hot cooktop. |
permanent damage section in the Cleaning |
|
|
the glass cooktop section. |
Pitting (or indentation) of |
Hot sugar mixture spilled on the cooktop. |
Call a qualified technician for replacement. |
the cooktop |
|
|
18 |
49-80745-1 |

Notes
49-80745-1 |
|

Notes
20 |
49-80745-1 |
Notes
49-80745-1 |
21 |

WARRANTY
GE Appliances Electric Cooktop Warranty
GEAppliances.com
All warranty service is provided by our Factory Service Centers, or an authorized Customer Care® technician. To schedule service online, visit us at www.geappliances.com/service_and_support/, or call GE Appliances at 800.GE.CARES
3OHDVH KDYH \RXU VHULDO QXPEHU DQG \RXU PRGHO QXPEHU DYDLODEOH ZKHQ FDOOLQJ IRU VHUYLFH
Servicing your appliance may require the use of the onboard data port for diagnostics. This gives a GE Appliances factory service technician the ability to quickly diagnose any issues with your appliance and helps GE Appliances improve its products by providing GE Appliances with information on your appliance. If you do not want your appliance data to be sent to GE Appliances, please advise your technician not to submit the data to GE Appliances at the time of service.
For the period of |
GE Appliances will replace |
One year |
Any part RI WKH FRRNWRS ZKLFK IDLOV GXH WR D GHIHFW LQ PDWHULDOV RU ZRUNPDQVKLS 'XULQJ |
From the date of the |
this limited one-year warranty, GE Appliances will provide, free of charge, all labor and |
original purchase |
in-home service to replace the defective part. |
6WDSOH\RXUUHFHLSWKHUH3URRIRIWKHRULJLQDOSXUFKDVH date is needed to obtain service under the warranty.
What GE Appliances will not cover:
Ŷ |
Service trips to your home to teach you how to use |
Ŷ 5HSODFHPHQW RI KRXVH IXVHV RU UHVHWWLQJ RI FLUFXLW |
|
the product. |
breakers. |
Ŷ |
,PSURSHU LQVWDOODWLRQ GHOLYHU\ RU PDLQWHQDQFH |
Ŷ 'DPDJH WR WKH SURGXFW FDXVHG E\ DFFLGHQW ILUH |
Ŷ |
)DLOXUH RI WKH SURGXFW LI LW LV DEXVHG PLVXVHG |
floods or acts of God. |
|
modified or used for other than the intended purpose |
Ŷ ,QFLGHQWDO RU FRQVHTXHQWLDO GDPDJH FDXVHG E\ |
|
or used commercially. |
possible defects with this appliance. |
Ŷ |
'DPDJH WR WKH JODVV FRRNWRS FDXVHG E\ XVH RI |
Ŷ 'DPDJH FDXVHG DIWHU GHOLYHU\ |
|
cleaners other than the recommended cleaning |
Ŷ 3URGXFW QRW DFFHVVLEOH WR SURYLGH UHTXLUHG VHUYLFH |
|
creams and pads. |
Ŷ 6HUYLFH WR UHSDLU RU UHSODFH OLJKW EXOEV H[FHSW IRU |
Ŷ |
'DPDJH WR WKH JODVV FRRNWRS FDXVHG E\ KDUGHQHG |
/(' ODPSV |
|
spills of sugary materials or melted plastic that are |
|
|
not cleaned according to the directions in the |
|
|
Owner’s Manual. |
|
EXCLUSION OF IMPLIED WARRANTIES
Your sole and exclusive remedy is product repair as provided in this Limited Warranty. Any implied warranties, including the implied warranties of merchantability or fitness for a particular purpose, are limited to one year or the shortest period allowed by law.
This warranty is extended to the original purchaser and any succeeding owner for products purchased for home use
ZLWKLQ WKH 86$ ,I WKH SURGXFW LV ORFDWHG LQ DQ DUHD ZKHUH VHUYLFH E\ D *( $SSOLDQFHV $XWKRUL]HG 6HUYLFHU LV QRW DYDLODEOH you may be responsible for a trip charge or you may be required to bring the product to an Authorized GE Appliances Service location for service. In Alaska, the warranty excludes the cost of shipping or service calls to your home.
Some states do not allow the exclusion or limitation of incidental or consequential damages. This warranty gives you specific legal rights, and you may also have other rights which vary from state to state. To know what your legal rights are, consult your local or state consumer affairs office or your state’s Attorney General.
Warrantor: GE Appliances
Extended Warranties: 3XUFKDVH D *( $SSOLDQFHV H[WHQGHG ZDUUDQW\ DQG OHDUQ DERXW VSHFLDO GLVFRXQWV WKDW DUH available while your warranty is still in effect. You can purchase it online anytime at
www.geappliances.com/service_and_support/shop-for-extended-service-plans.htm
or call 800.626.2224 during normal business hours. GE Appliances Service will still be there after your warranty expires.
22 |
49-80745-1 |
 Loading...