

Page 1
PAGE 1
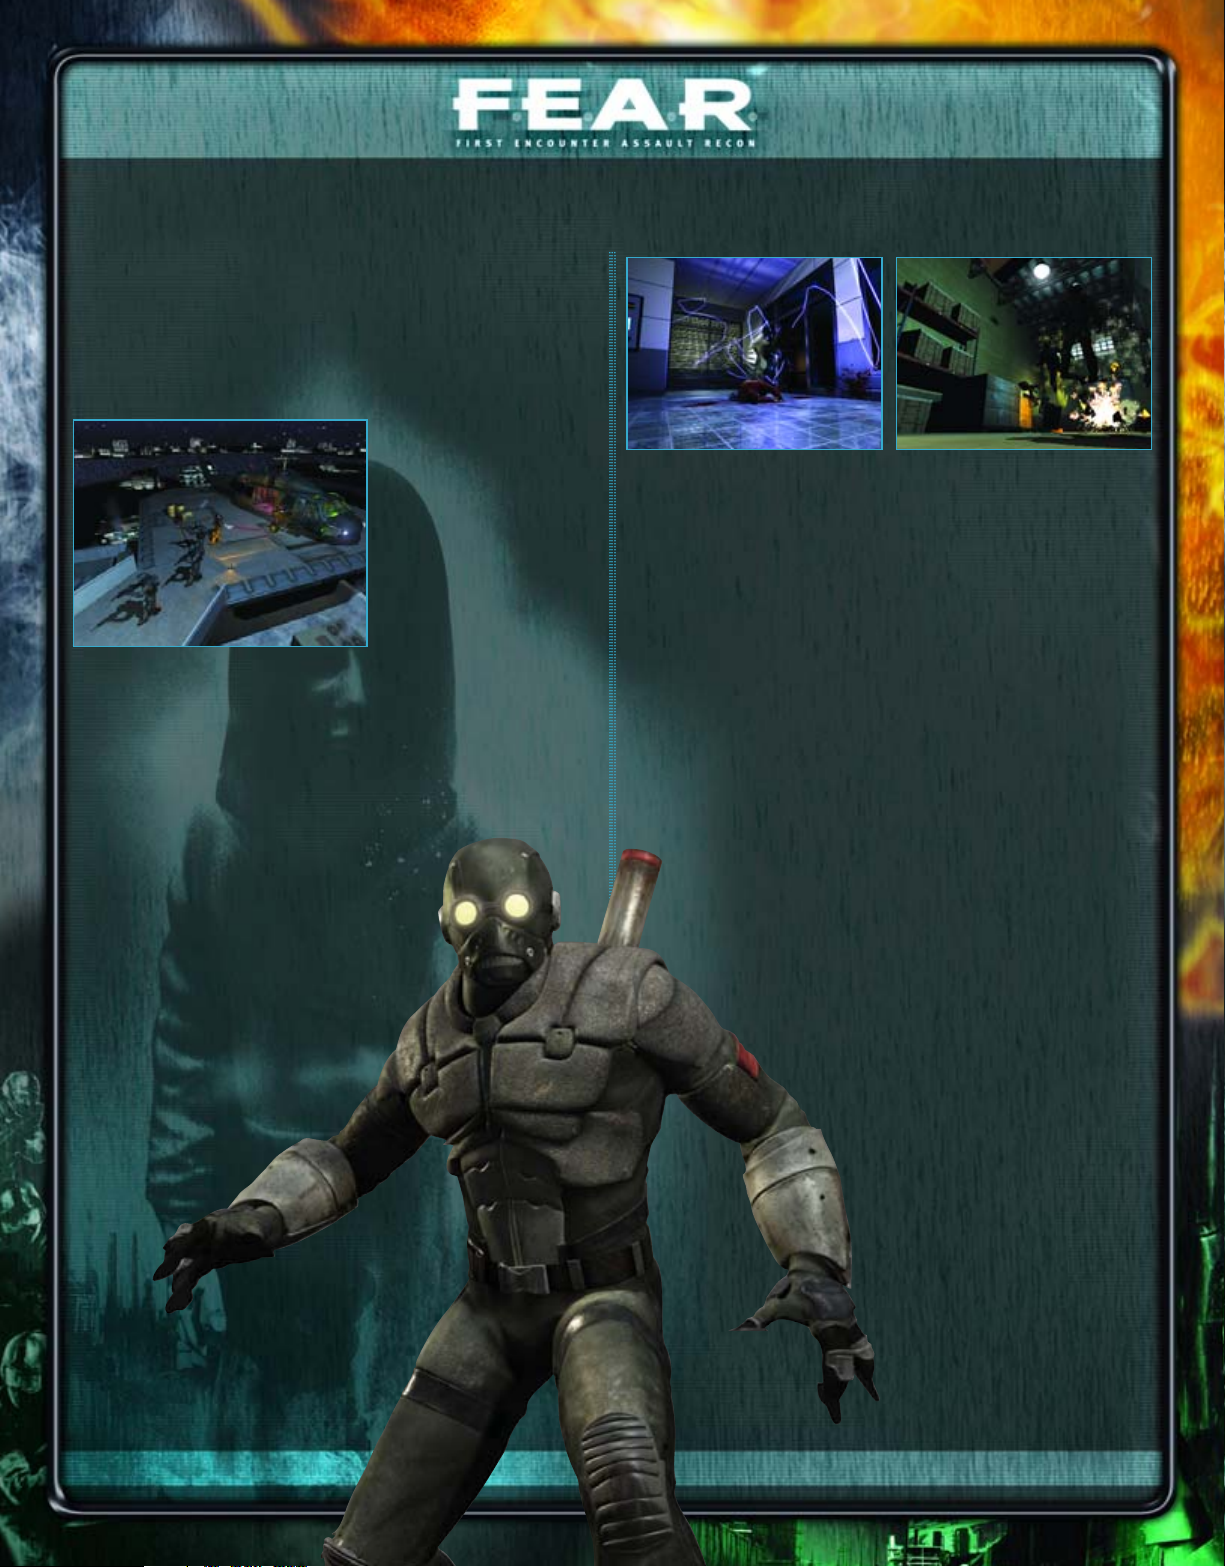
In F.E.A.R., you find yourself trapped in an office complex full of assassins and a supernatural horror that dogs your every move. You must
rely on your instincts and cunning to make it out of here alive.
F.E.A.R. follows the exploits of the First Encounter Assault Recon
team, an elite force tasked with cleaning up messes that possibly
have origins beyond the fringe. You are a highly-trained soldier given
full access to a vast arsenal of weaponry (including some high tech
gear that will blow your
mind). In addition, you also
have full clearance to use
any means necessary to stop
your enemy.
The only catch in F.E.A.R.
is that you know little about
your opposition, save for its
terrifying ability to kill. To put
it bluntly, something has
gone awry. It seems that Fettel, a psychic commander, has caused an
uprising, making short work of his minders and overrunning a secret
complex with mind-controlled clones. His agenda is a mystery and his
methods are...extreme. That's where F.E.A.R. comes in. You haven't
spent any time in the field with the team, but it's up to you to get down
there and put a stop to the situation. They may not have much confidence in your experience but at least one teammate thinks you can
get the job done. Now you just have to prove it....
Fearful Features
F.E.A.R. certainly capitalizes on its name. Developer Monolith's goal is
to create an experience that transcends the traditional first-person
shooter. There is certainly no shortage of action, but the infusion of
horror movie elements serves to heighten the tension and drama that
unfold alongside the spiraling plot.
In order to create the atmosphere of dread, Monolith is employing
some tricks from the classics of horror cinema. Sound plays a particularly large role. A droning soundtrack inspires dread—creating the ultimate in mood-setting music. Distorted voices linger in far-off hallways, confusing you as to where you think it originated from. Was that
the sound of a tormented man in his last moments of agony? Or the
giggling of an innocent child? Aural tricks like these keep you on your
toes, and turning up the volume on your PC ensures that you absorb
every last bit of the tension.
The visuals work in tandem with the audio to further
intensify the madness. The sights you see are not always real,
so you cannot completely trust your eyes. Why is there a lake of
blood on the ceiling? Did you really just see that little girl round
the corner, only to vanish into thin air moments before you catch
up with her? Even your on-screen head's-up display (HUD)
flickers in and out of view, furthering the mind-tweak.
Sometimes the best chills come from straight-up
horror, and F.E.A.R. has no shortage of this. Your ene-
mies have long since left the realm of the sane
behind, and it appears that some of them aren't
even human anymore. They attack with
frightening skill and in dizzyingly erratic
patterns. Just when you think you have
a bead on a foe, it rethinks its strategy.
The thrill-ride that is F.E.A.R.
ships this fall, but to whet your
appetite for destruction, mayhem, and
otherworldly madness, we will discuss
some of the features and weapons
you'll find in the final game. In addi-
tion, we also have two maps from
F.E.A.R.'s multiplayer game, which
is currently undergoing a successful closed beta test.
™
Welcome to F.E.A.R.
Welcome to F.E.A.R.
PRIMA OFFICIAL HINT BOOK
Page 2
PRIMA OFFICIAL HINT BOOK PAGE 2
Hardware
No matter if you are wading into the
thick of an online deathmatch or daring
to venture further into the wicked conspiracy of
the single-player campaign, you are armed to the
teeth with the latest in weapons. Your loadout includes
basics like pistols and shotguns—both of which are effective in the
hands of a skilled player—but you also have eventual access to some
high-tech tools of destruction.
Who can deny a MOD-3 Multi-Rocket Launcher that volleys three
rockets at your target, or the ferocity of the Type-7 Particle Weapon
that doubles as a high tech sniper rifle? Or who would pass up a
chance to wrap their fingers around the barrel of a MP-50 Repeating
Cannon, which can peel the paint off a house from a mile away?
In F.E.A.R., you can only carry three weapons at a time. When you
come across a more desirable weapon, you must discard one from your
current inventory. This not only introduces an element of realism to the
game, but it also inspires an increased level of strategy. For example,
the MP-50 Repeating Cannon is indeed a precious piece of weaponry,
but if you're about to slog your way down a hall full of enemy assassins, wouldn't the VK-12 Combat Shotgun be a little more effective?
You can also use all of the weapons as melee weapons when you are
out of ammunition. Pistol-whipping may take a little time, but it's certainly a satisfying method of bludgeoning an enemy into the great beyond.
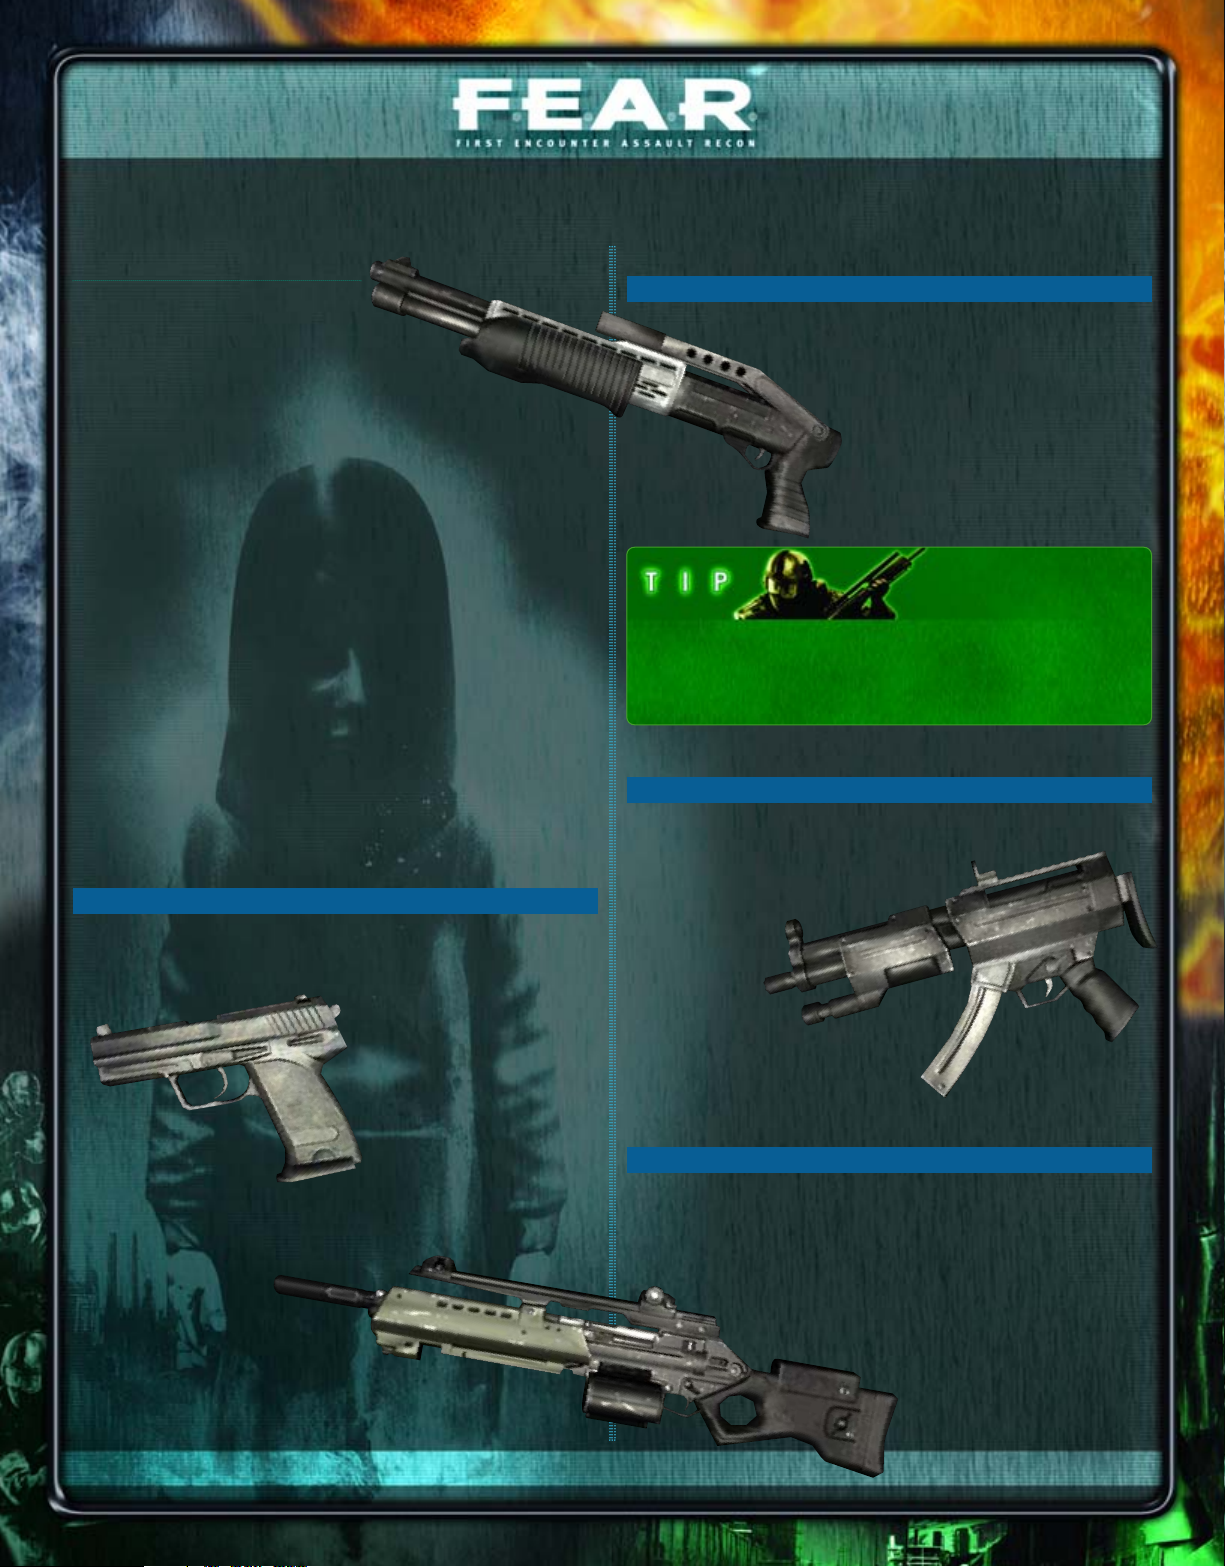
AT-14 Pistol
Rounds per Clip: 18
AT-14 Pistols are the most basic weapon in F.E.A.R.. By themselves,
they are able to drop low-level foes or perhaps offer a last-ditch attack
when better hardware is on empty. However, you can fill both hands
with a pistol apiece, doubling
your stopping power. Pressing
fire rapidly pulls the trigger on a
random pistol each time, increas-
ing the rate of fire.
VK-12 Combat Shotgun
Rounds per Clip: 12
The best of the close-quarters weapons, the VK-12 Combat Shotgun
can destroy a foe with a single well-placed blast. One shot
direct to the chest or head is usually enough to stop
most basic enemies. (The opposition you
encounter later in the game will have
enough vitality and armor to withstand a
blast or two.) However, in a multiplayer
game, popping out and offering one well-
aimed shot is enough to get the job done.
The hard stock of the VK-12 Combat Shotgun, along with the rest of the
weapons, also makes it an effective melee weapon. If you can sneak up
on your quarry, a good crack to the back of the neck with the butt of
this gun (as well as many of the bigger artillery) is enough to drop him.
RPL Sub-Machinegun
Rounds per Clip: 50
The RPL Sub-Machinegun (RPL SMG) is a fast-firing weapon that specializes in close-up killing power. Its primary drawback is its short
range. You cannot target a foe from across a
courtyard with the RPL SMG and hope for
an easy kill, but if
you run right up
alongside an opponent or enemy
and start unloading the fifty-round clip,
you score a kill before the last bullet
casing hits the ground.
G2A2 Assault Rifle
Rounds per Clip: 30
The G2A2 Assault Rifle is an excellent all-around weapon. What it lacks
in accuracy it makes up for in power. Running straight for an enemy
with your finger on the trigger eliminates him if he doesn't figure out
your location first. This rifle is a good weapon to use when taking
cover because its fast rate of fire works well in situations where
you have only sporadic chances to lean out and squeeze
off a few rounds. In a deathmatch round, you will find
stronger weapons, but this gun will
never serve you wrong should you
get caught in a firefight before
finding a more advanced gun.
™
The Gear of F.E.A.R.
The Gear of F.E.A.R.
Page 3
PRIMA OFFICIAL HINT BOOK PAGE 3
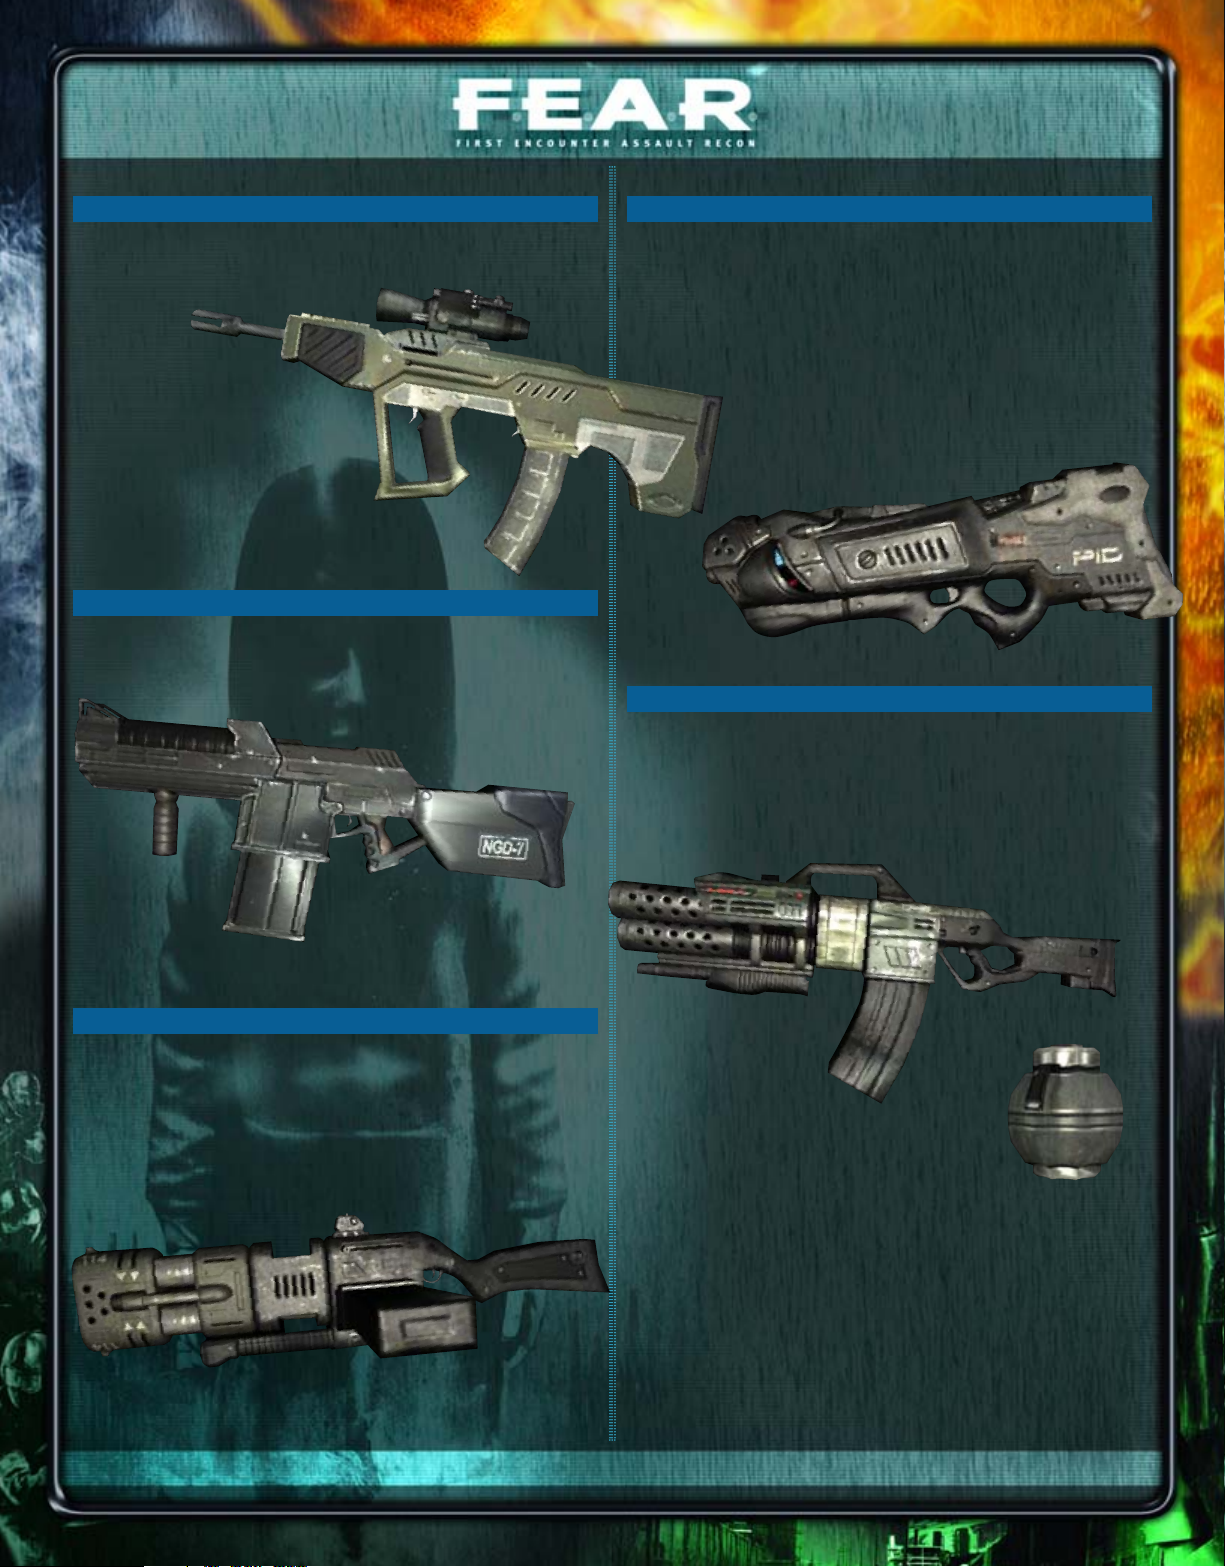
ASP Rifle
Rounds per Clip: 30
The ASP Rifle is a force to be reckoned with when in the hands of a
capable shooter. You cannot just hold down the fire button and unload,
as you can with the G2A2 Assault Rifle.
However, this
more controlled rate of fire has the
benefit of greater accuracy. If
you can find a good, safe position to
fire upon enemies in a lobby area
(don't forget to fortify your position
with AT-5 Proximity Mines), switch to
sniper mode and zoom in on enemies
to line up lethal headshots.
10mm HV Penetrator
Rounds per Clip: 25
This weapon sounds like a novelty, but if used correctly in the field, it
has tremendous stopping power—literally. The 10mm HV Penetrator
can actually nail enemies to flat surfaces, such as walls, and holds
them in place. Not only do you get a very satisfying kill, but
your artwork will hang on the wall for
all to see.
MP-50 Repeating Cannon
Rounds per Clip: 50
There is no recourse from a direct hit from the MP-50 Repeating
Cannon. This brute unloads so much lethal force that it actually bends
space as the round rockets to its target. Even if you miss, the resulting
shockwave has the power to kill, or at least seriously reduce the target's health to a fraction of its original level. If you spy a grouping of
enemy assassins, this is the way to wipe them all out with a single
shot. To unleash maximum destructive force, hold down the fire button to
unload up to 15 shots in a row.
Type-7 Particle Weapon
Rounds per Clip: 10
This experimental weapon fires a blast that cuts like a knife through
the air—and your enemies, too. The Type-7 Particle Weapon is akin to
a railgun, firing a single round that slices through its target. With a
well-aimed shot, you can pierce through multiple enemies at once.
The Type-7 Particle Weapon features a more advanced zoom mode
than other weapons. In this sniping mode, you can really dig in and
start dishing out death from above. However, you better
make every shot count. The Type-7 Particle Weapon
leaves a trail that, while difficult to see, is still visible to
a trained eye. All an enemy survivor has to do
is follow the trail straight to you.
MOD-3 Multi-Rocket Launcher
Rounds per Clip: 15
The MOD-3 Multi-Rocket Launcher may not be the most graceful
weapon—its rockets are not always on-target, thanks to their spiraling
trajectory—but it's among the most lethal. This weapon fires three
missiles at a time, which zip toward your target with a velocity that
makes dodging a none-too-easy task. The drawback of wielding such
power is that not only are reloads a little slow, but you also run
through your ammo quickly,
thanks to the three-
shot blasts.
N6A3 Fragmentation Grenades
N6A3 Fragmentation Grenades are thrown explosives set on a timer. While they are on a timer, contact
with an enemy will cause the grenades to explode instantly. Once the
handle is released, the seconds count down to detonation. If you see a
grenade roll toward your feet, it is best to get out of there quickly.
There are several occasions when you have reason to celebrate
frags, such as when you spy an enemy dug into a make-shift bunker
and realize they have yet to see you. Throw a grenade into their position. By the time the grenade lands, the timer has run out and the
resulting explosion tears their body in two. If you are stalking an
enemy down a hallway, bounce a frag off of a wall, banking it around
the corner to clear out any potential hazards just out of view.
™
Page 4

PRIMA OFFICIAL HINT BOOK PAGE 4
AT-5 Proximity Mine
AT-5 Proximity Mines are charges you can set in slightly out of the way
places, or just out of view, and can be detonated when motion is
detected. The resulting blast is enough to neutralize a player if they
are right on top of the mine, or at least do significant damage if they
are nearby.
The uses of AT-5 Proximity Mines are endless. You can put one next
to the wall just around a corner. Nobody will ever see it coming. Or you
can slide one behind a desk or next to some
crates. By the time your foe sees the blinking
red light, it's too late. If you fancy yourself a
sniper, you can place AT-5 Proximity Mines
around your position to protect your rear
from other players.
It is possible to be damaged by your own AT-5 Proximity Mine if you
are caught within its damage radius when it is triggered by the
opposition.
M77 Remote Bomb
If you can establish your enemy's patterns, you can do tremendous
damage with an M77 Remote Bomb. These explosives are planted by
the player and set to a detonator that can be activated later. If you are
playing with a camper who has predictable tastes in hiding spots, you
can lace his locations with M77 Remote Bombs, then set them off
when he returns to his hiding spot. M77 Remote Bombs are also sticky
and can be stuck to walls, ceilings, or
players. For an especially heinous
attack, stick an M77 Remote
Bomb to your teammate and
send him into the midst of
your enemies. After det-
onation, your enemies
will be damaged while
your teammate walks
away unharmed (unless
he fell prey to friendly fire).
Reflexes
In addition to this litany of weapons, you have another talent to help
level the playing field against superior foes or conniving players in
online games: reflexes. Thanks to your extreme training, you can slip
into short bursts of hardcore concentration that seem to slow the
world around you. During these slo-mo moments, you can move a little
bit faster than the world around you, resulting in the appearance of
everybody else moving at a crawl.
Your reflexes are a pivotal tool in achieving success. If a situation
looks overwhelming, kick in your innate ability and enjoy the extra
second or two to plan your course of action. For example, say you spy
a lobby full of enemies that must be crossed. Your first shot would
most likely put the foes on high alert. So, as soon as you eliminate
the first target, fire up slo-mo and outrun the other enemies' bullets
while getting off a few shots of your own. It's a great way to even the
odds, if only for a few seconds.
Between bursts of hyper-awareness, you must rebuild your meter. In
single-player, you can seek out Reflex Boosters (they look like
syringe guns) that completely refill and even extend your meter. Not
only can you now immediately activate slo-mo, the length of your
slo-mo is permanently increased for the rest of the game.
™
Page 5

PRIMA OFFICIAL HINT BOOK PAGE 5
Multiplayer Maps
F.E.A.R.'s spooky single-player campaign will certainly get your heart
pumping. When you need to take a breather from the supernatural
antics, switch over to the multiplayer game, which offers a variety of
game types.
The pre-order bonus edition of F.E.A.R. includes two
full multiplayer maps: Office
and Factory. Each level
reveals Monolith's master
plan for eliminating your free
time. These maps spill out in
every direction, offering plenty of hiding spots for
clever campers as
well as wide-open spaces for some heated firefights. To augment those showdowns, each map has been loaded with
some pretty impressive firepower, such as the Type-7 Particle
Weapon and the MP-50 Repeating Cannon.
Office
The office complex map is two stories of fragging madness, especially if you can lure a few players into the central lobby where few
environmental features impede the melee. The individual offices
upstairs, and the winding corridors that connect them, moderate only
the speed of killshots, not the intensity. Hide-and-seek games can be
played within the cubicle farms, with players crouching down and
waiting for just the right moment to
spring up and unleash onto an
unsuspecting passerby.
™
Fragging with Friends
Fragging with Friends
M77 REMOTE BOMB x3
BODY ARMOR
AT-5 PROXIMITY
MINE
BODY ARMOR
MEDICAL
STAT ION
AMMO BOXES
N6A3 FRAGMENTATION GRENADE x2
MP-50
REPEATING
CANNON
REFLEX BOOSTER
A
B
A
B
C
C
BODY ARMOR
BODY ARMOR
Page 6

PRIMA OFFICIAL HINT BOOK PAGE 6
Strategies
Gotta-Haves
Every map has a collection of pick-ups that you must be aware of to survive with a decent score. The Office map has a few features you absolutely must take advantage of—especially before somebody else can.
The MP-50 Repeating
Cannon is in a corner office
upstairs, accessed by the
walkway over the main lobby.
You have a limited number of
shots, but with good aim,
each one will do enough
horrific damage to boost
your score.
The Medical Station—
where all wounds are
healed—is tucked in a small
room upstairs, near the cubicle farm. Beware of a player
camping out in the cubicle
directly across from the
entrance. Always enter the
room back-first, making sure
nobody has a surprise
planned for you.
If you are playing a SloMo match, there is typically a
mad rush for the Reflex
Booster, which is stashed in a
small alcove on the upper
level of the map.
Lobby Showdowns
The central lobby in the heart of the map is often the sight of some
spectacular gunplay, thanks to the wide open space.
Use the planters near the
bottom of the stairs to fire on
incoming players. The G2A2
Assault Rifle can cut down
players streaming in from the
right and left. Working with a
teammate armed with something more appropriate for
close-quarters, like the VK-12
Combat Shotgun, will help
you fortify this position.
You are extremely vulnerable to a frag grenade in a hidden, crouching position. Repeat gunfire will kick up a lot of dust, which could
potentially obscure sight of a grenade zooming overhead.
There is a walkway circling the lobby overhead, granting players a
vantage point for firing down on players in the lobby. Always keep one
eye on the sky (or have a teammate capable of doing so) to prevent getting sniped from above, while holding down the fort on the main level.
Corridor Hunt
Every room in this map is somehow connected, making the hallways
extremely well-traveled. The rapid traffic keeps the action going, even
away from the hot spots, such as the main lobby.
Never underestimate the
use of corners as cover. Before
entering a larger area, such as
this foyer, peek around the
corner. You may spot another
player in the middle of doing
something else (such as trying
to mine this receptionist's
desk), and that's when you get
your shot in.
™
Page 7

PRIMA OFFICIAL HINT BOOK PAGE 7
Use AT-5 Proximity Mines in places like desks, cubicles, or under
stairs. A potential camper looking for a place to perch might not
notice the blinking red light until it's too late.
Another player's panic
can often work in your favor.
You don't always have to be
involved in a major firefight
to pick up some points.
Cleaning up the aftermath,
such as picking off a player
running away from the violence, is always a good tactic.
In their hurry to flee, they
miss you standing in the corner.
Shattering glass is always a
good heads-up that other players are nearby. Noise carries, so
if you hear the crinkling of broken glass or can see a few fragments cascading through the
air, make sure your weapon is
armed and ready to go.
Cubicle Cat-and-Mouse
The cubicle farm on the upper level provides some excellent cover for
players that prefer stalking their prey or wounded players that need a
place to catch their breath before making a run for the Medical Station.
The cubicle desks are
just the right height for
crouching. The desk will block
some of your torso, so if you
dig in, it's possible that other
players will not see you as
they go running by. As soon
as their back is turned, you
can draw a bead and remind
them of your presence.
Of course, there are caveats to camping techniques such as this.
These are not full desks, and your legs are unprotected as you crouch
down. A sniper (or lucky shot) could put one in your thigh before you
know what's happening. Should other players become wise to your
position, you could find yourself on the receiving end of an N6A3
Fragmentation Grenade. The three-walled cubicles leave only one way
out, and by the time you pop up and try to clear the desk, it may be
too late.
Look for the red arrow over the
head of the player with the
Reflex Booster. If you can nail
that soldier, you can quickly
pick-up the slo-mo juice.
Melee Attacks
There are occasions in combat where you will want to drop your
weapon and settle scores with hand to hand combat. You have
access to a handful of melee attacks that can be just as deadly as a
well-placed bullet, such as a Jump Kick to the back of the neck.
You can use most melee attacks with your weapons out, but to
perform a punch or foot stomp, you must holster your weapons. The
basic attack button will now throw a punch, but if you run at somebody at full steam, you can then deliver a more stunning blow.
Attack while jumping to go for the Jump Kick, or crouch and unleash
a Slide Kick that knocks their feet out from under them. One of the
most satisfying melee attacks is the Roundhouse, a neck-snapping
kick that will knock your enemy on his rear.
™
Page 8

PRIMA OFFICIAL HINT BOOK PAGE 8
Factory
An assembly line of mayhem runs right through the middle of this
map, providing an open-air arena where braver players can stand their
ground. However, the machine shops and storage rooms off the central
area are cavities where stealthy soldiers can practice the finer arts of
sneaking and shooting the legs out from under their opponents. This
map has also been infused with some
killer weaponry, such as the Type-7
Particle Weapon. Memorize the weapon
locations and as soon as the green
flag is dropped on the chaos, make
a beeline for the good stuff.
Strategies
Gotta-Haves
The MOD-3 Multi-Rocket
Launcher has been cleverly
dropped in the center of the
factory's shipping yards.
There is no cover for an
attempt on the weapon—only
speed and a nimble finger on
the jump button will keep you
safe while grabbing this
coveted weapon.
™
TYPE-7 PARTICLE WEAPON
MP-50 REPEATING CANNON
BODY ARMOR
BODY ARMOR
MEDKIT
BODY ARMOR
BODY ARMOR
MEDKIT
M77 REMOTE BOMB x3
BODY ARMOR
N6A3 FRAGMENTATION GRENADE x2
AMMO BOXES
MEDICAL STATION
REFLEX BOOSTER
AT-5
PROXIMITY
MINE
MEDKIT
MOD-3 MULTI-ROCKET LAUNCHER
Page 9

PRIMA OFFICIAL HINT BOOK PAGE 9
You can make a spectacular entrance to a firefight with
the MP-50 Repeating Cannon.
It's situated on some boxes in
the northernmost chamber,
but the catwalk surrounding
the MP-50 Repeating Cannon
gives other players ample
vantage points for taking
you down.
The Type-7 Particle
Weapon is a brutal killing
machine. Its lightning-fast
shots are nearly impossible
to dodge, making it the
weapon of choice for snipers.
This weapon is tucked behind
a line of generators, accessible only by rounding a blind
corner. This isn't a bad place
for campers, just watch out for frag grenades coming from the other
side of the generators.
The Reflex Booster is a
precious commodity in
Slo-Mo matches, but it's not
exactly easy to get to first.
The power-up is in the easternmost room, but you must
run a gauntlet of other rooms
before reaching it.
Doorways to Death
Snipers have no shortage of perches in this map. One of the best locations snipers can cover are doorways, which are in a constant state of
use. There is simply no way to move around this map without passing
through doors, so never use one without either peeking out first or
doing so at a dead run.
Position yourself across from a door and draw a bead at head- or
chest-level. Always seek cover before trying to snipe a door—if you're
standing straight up in the open, your quarry could lean out and see
you before running through the door. A bay of windows (with only one
or two windows shot out) or a stack of crates and barrels make excellent cover.
Sniping requires patience and a willingness to keep your back
turned on a potential route to your position. Use AT-5 Proximity Mines
to cover your rear should another player discover your position.
When you're trying to
cover wide doors, such as this
entrance to a shipping bay,
you may want to use a
weapon with a larger blast
radius. The MP-50 Repeating
Cannon's area of effect will
eliminate an opponent if they
try to slip through an entrance
not directly in your sights.
There is a hole in the floor in the central chamber that you can use
to either snipe players running through this hallway, or stand over and
pick off players that walk too close to the crates you use to ascend
through the opening.
Of course, each tactic has a shortcoming. Standing
in the hole leaves your legs partially exposed, while
standing above leaves your entire
frame open to attack. Consider
this opening as more of a tar-
get of opportunity. Don't bank
your entire game on camping here,
but check in from time to time to see
if there's an easy kill.
™
Page 10

PRIMA OFFICIAL HINT BOOK PAGE 10
Better Living Through Killing
Here's a few tricks and tactics to consider before waging war in the
factory. Always be aware of your surroundings—and the surroundings
of other players—because you can often use them to your advantage.
The Type-7 Particle
Weapon by itself has impressive stopping power, but if
you can combine it with
slo-mo, you can be unstoppable. The Type-7 Particle
Weapon's lethal shots move
too fast to dodge, but this
can also make it difficult for
you to line up your shots with
any authority—especially when you're on the move. However, with slomo turned on, you can make every shot count.
Use objects in your environment, such as exploding
barrels, whenever possible.
Only yellow barrels can be
detonated with gunfire—regular blue barrels are harmless.
When you spy another
player standing dangerously
close to a yellow barrel, aim
for the barrel and pull the
trigger. The resulting explosion is more than enough to
kill him. However, be aware
that several hiding spots in
this map are near yellow barrels. Make sure you're safe
before crouching down and waiting for a kill.
Fire extinguishers are also excellent tools of destruction. If you're a
poor shot, you can use these wall-mounted extinguishers as makeshift explosives to compensate. If you spot a player standing near one,
blast the fire extinguisher. The blast radius will drop an opponent.
Use weapons as bait. This
MOD-3 Multi-Rocket Launcher
is going to be irresistible to a
lot of players, so lie in wait on
the walkway above the open
shipping yard.
Use the shadows. The
lighting in the factory casts a
variety of shadows across
rooms and splashes swathes
of light on corner walls. When
you are decked out in military black, you can practically melt into the shadows and
be undetected by players too
busy running to notice little
details, like the light on your gun.
Speed is extremely important in online matches, so remember that
the weapon you hold in your hand has an effect on your running rate.
Bigger weapons, such as the MOD-3 Multi-Rocket Launcher and MP-50
Repeating Cannon, really sap your speed. Smaller instruments, such
as an AT-14 Pistol, have little effect. For maximum speed, empty your
hands. A new weapon is just a scroll wheel away, or you could rely on a
melee attack like a Jump Kick. One of these to the back of the head
can be just as lethal as a bullet.
™
 Loading...