

Page 1
®
ELECTRIC CHAIN SAW FKS 2200 F3
ELECTRIC CHAIN SAW
Translation of the original instructions
ELEKTRICKÁ ŘETĚZOVÁ PILA
Překlad originálního provozního návodu
ELEKTRO-KETTENSÄGE
Originalbetriebsanleitung
IAN 280275
ELEKTRIČNA VERIŽNA ŽAGA
Prevod originalnega navodila za uporabo
ELEKTRICKÁ REŤAZOVÁ PÍLA
Preklad originálneho návodu na obsluhu
Page 2

Before reading, unfold the page containing the illustrations and familiarise yourself with all functions of the
device.
Pred branjem odprite stran s slikami in se nato seznanite z vsemi funkcijami naprave.
Před čtením si otevřete stranu s obrázky a potom se seznamte se všemi funkcemi přístroje.
Pred čítaním si odklopte stranu s obrázkami a potom sa oboznámte so všetkými funkciami prístroja.
Klappen Sie vor dem Lesen die Seite mit den Abbildungen aus und machen Sie sich anschließend mit allen
Funktionen des Gerätes vertraut.
GB Translation of the original instructions Page
SI Prevod originalnega navodila za uporabo Stran
CZ Překlad originálního provozního návodu Strana
SK Preklad originálneho návodu na obsluhu Strana
DE / AT / CH Originalbetriebsanleitung Seite
5
29
53
77
102
Page 3

3
C
1 2 3
5 6
7
A
10 1198
13
13
14
14
17
18
19
B
2
4
12
16
15
3
8
20
21
22
Page 4
4
R
N
S
Q
P
O
M
L
K
1
2
1
2
3
Page 5
5
G B
The operating instructions constitute
part of this product. They contain
important information on safety, use
and disposal.
Before using the product, familiarise
yourself with all of the operating
and safety instructions. Use the
product only as described and for
the applications specied. Keep this
manual safely and in the event that
the product is passed on, hand over
all documents to the third party.
Content
Introduction .................................5
Intended purpose .........................6
General description ......................6
Extent of the delivery.......................6
Overview ......................................6
Function description ........................7
Technical Data ..............................7
Notes on safety............................8
Symbols used on the saw ................8
Symbols used
in the instructions ............................9
General notes on safety...................9
General safety instructions for power
tools .............................................9
Causes and operator ...................13
prevention of kickback ..................13
Further safety directions .................13
Safety functions ............................14
Assembly ...................................14
Mount the saw chain.....................14
Mount the saw bar .......................15
Tensioning the saw chain ...............15
Chain lubrication ..........................16
Operating the chainsaw .............16
Switching on ................................16
Checking the chain brake .............17
Checking the chain ......................17
lubrication ...................................17
Changing the saw bar ..................17
Sawing techniques .....................18
General.......................................18
Felling trees .................................18
Limbing ......................................19
Bucking .......................................20
Maintenance and cleaning .........20
Cleaning .....................................21
Maintenance intervals ...................21
Maintenance Interval Table ............21
Oiling the saw chain .....................22
Sharpening the saw chain .............22
Adjusting the chain tension ............23
Starting up a new saw chain .........23
Maintaining the chain bar .............23
Turn the chain bar.........................23
Waste disposal and environmental
protection ..................................24
Replacement parts/Accessories ..25
Trouble shooting ........................26
Guarantee .................................27
Repair Service ............................28
Service-Center ............................28
Importer ....................................28
Introduction
Congratulations on the purchase of your
new device. With it, you have chosen a
high quality product. During production,
this equipment has been checked for qual-
ity and subjected to a nal inspection. The
functionality of your equipment is therefore
guaranteed. It cannot be ruled out that residual quantities of water or lubricants will
remain on or in the equipment/hose lines
in isolated cases. This is not a fault or defect and it represents no cause for concern.
Translation of the original
EC declaration of conformity ....130
Exploded Drawing ................... 136
Page 6

6
G B
Intended purpose
The electric chainsaw is constructed for
sawing wood only. The saw is not designed for any other types of application
(e.g. cutting of brickwork, plastic or food).
The chainsaw is designed for employment
in the do-it-yourselfer sector. It was not
designed for continuous employment in the
commercial sector.
The device is designed for use by adults.
Young people over 16 years old may use
the chainsaw under supervision only.
The manufacturer is not liable for damages, which were caused through use in
applications for which it was not designed,
or incorrect operation.
This electric chainsaw is to be used only
by one person and only for sawing wood.
The chainsaw must be held with the right
hand on the rear handle and the left hand
on the front handle. Before use, the user
must have read and understood all of the
information and directions in the operating
instructions. The user must wear appropriate personal protective equipment (PPE).
The chainsaw is to be used only for sawing
wood. Materials such as plastic, stone,
metal or wood containing foreign objects
(e.g. nails or screws) must not be cut with
the chain saw!
General description
The illustration of the principal
functioning parts can be found
on the front and back foldout
pages.
Extent of the delivery
Carefully unpack the appliance and check
that it is complete:
- Chainsaw
- Chain bar (guide rail)
(already mounted)
- Saw chain (already mounted)
- Saw bar protection sheath
- Oil bottle with 180ml bio chain oil
- Instruction Manual
Dispose of the packaging material
correctly.
Overview
A
1 Rear handle
2 Oil ller cap
3 Chain brake handle, front hand
guard
4 Chain bar
5 Saw chain
6 Nose sprocket
7 Bumper
8 Front handle
9 Electric motor
10 On/off switch
11 Safety lock
12 Chain catcher
13 Chain adjustment ring
14 Fastening bolt for sprocket chain
wheel covering
15 Sprocket chain wheel covering
16 Rear hand guard
17 Cable holder
18 Mains cable
19 Saw bar protection sheath
20 Oil bottle
C
21 Oil level indicator
22 Minimum mark “MIN”
on the oil level indicator
Page 7
7
G B
F
23 Bar bolt
24 Tensioning plate
G
25 Sprocket
26 Tab
J
27 Oil passages
28 Fixing screw
29 Clamping screw bolt
Function description
The chainsaw is driven by an electric motor. The circulating chain is led around a
saw bar (guide rail).
The tool is tted with a rapid-action chain-
tensioning system and a fast-acting chain
brake. An automatic oil dosing regulator
ensures continuous chain lubrication.
The chainsaw is equipped with various pro-
tection ttings for the protection of the user.
Refer to the following descriptions for the
function of control elements.
Technical Data
Electrical chainsaw ................FKS 2200 F3
Rated input
voltage U ................. 230-240 V~, 50 Hz
Input power P ............................2200 W
Safety class ......................................
II
Protection category...........................IP20
Chain speed v
0
.........................15.3 m/s
Weight (without guide rail and chain) .4.4 kg
Weight (with guide rail and chain) ..5.3 kg
Oiltank ...........................approx. 190 ml
Chain ..........................Oregon 91P057X
Chrome cutting teeth, low-kickback
Chain bar .......Oregon 16“ Double-Guard
......................... 160SDEA041 - 112364
Chain link separation ...................10 mm
Chain width ...............................1.3 mm
Teeth of the sprocket chain wheel ........... 7
Length of the chain bar ............... 460 mm
Sawing length ...........................395 mm
Acoustic pressure level
(L
pA
) .................. 84.9 dB (A); KpA= 3 dB
Sound power level (L
WA
)
measured .. 107.7 dB (A); K
WA
= 2.58 dB
guaranteed ......................... 110 dB(A)
Vibration (a
h
) .... 7.612 m/s2 ; K= 1.5 m/s
2
Noise and vibration values were determined
according to the standards and stipulations
mentioned in the declaration of conformity.
Technical and optical changes can be
carried out in the course of further development without notice. All dimensions, references and information of this instruction
manual are therefore without guarantee.
Legal claims, which are made on the basis
of the instruction manual, cannot thus be
considered as valid.
The stated vibration emission value was
measured in accordance with a standard
testing procedure and may be used to compare one power tool to another.
The stated vibration emission value may
also be used for a preliminary exposure
assessment.
Warning: The vibration emission
value may differ during actual use
of the power tool from the stated
value depending on the manner in
which the power tool is used.
Safety precautions aimed at protect-
ing the user should be based on
estimated exposure under actual
usage conditions (all parts of the
operating cycle are to be considered, including, for example, times
during which the power tool is
turned off and times when the tool
is turned on but is running idle).
Page 8

8
G B
Only use the saw with
both hands on the device
Caution! Spring-back - Be careful of
spring-back of the machine during
work.
Do not expose the unit to rain. The
device must not be wet, nor should it
be operated in a moist environment.
Caution! Remove the plug immedi-
ately from the plug socket in case
of damage or cutting through of the
mains cable
dB
L
WA
Information of the acoustic power
level L
WA
in dB.
Graphical symbol on the nameplate:
460 mm
Length of the chain bar
Safety class II
Machines do not belong with do-
mestic waste.
Graphical symbol beneath the chain sprocket cover:
Observe direction of travel of the saw chain.
Caution! Read the operating instructions.
Graphical symbol on the blade:
Direction of travel
of the saw chain
Graphical symbol on the oil tank
cap: Saw chain lubrication.
Notes on safety
This section deals with the basic safety
regulations while working with the electric
chainsaw.
An electric chainsaw is a dangerous
device, which can cause serious or
even fatal injuries with incorrect or
careless use. Thus, for your own safety
and the safety of others, you should
always take note of the instructions
on safety and, in case of difculties,
consult a specialist for advice.
Symbols used on the saw
Make yourself familiar with all
control elements before any work.
Practice handling the saw and have
explained the functions, operating
methods and sawing techniques by
a practiced user or specialist.
The motor cannot be turned on if the
chain brake has engaged. Release
the chain brake by shifting the brake
arm over against the front grip.
Read and take note of the operating
manual belonging to the machine!
Wear personal
protective equipment.
Basically, wear protective goggles
and ear protection
Wear a safety helmet!
Wear cut-resistant gloves!
Wear anti-slip safety shoes!
Use protective clothing!
Page 9
9
G B
Graphical symbol on the xing screw for
the chain sprocket cover:
OPEN
CLOSE
Graphical symbol on the chain brake lever:
O chain brake: OFF
I chain brake: ON
Symbols used
in the instructions
Hazard symbols with informa-
tion on prevention of personal
injury and property damage.
Precaution symbol (explanation of
precaution instead of exclamation
mark) with information on prevention of harm / damage.
Notice symbol with information on
how to handle the device properly.
General notes on safety
Before you do any work with the elec-
tric chainsaw, make yourself familiar
with all operating parts. Practise using
the saw (sawing logs on a sawhorse)
and get an experienced user or a specialist to explain to you the function of
the saw, the way of working, the techniques of sawing and the personal
protection equipment.
Observe noise control and local
regulations.
Caution! When using power tools,
observe the following basic safety
measures for the prevention of
electric shocks and the risk of injury
and re. There is a risk of injury!
General safety instructions
for power tools
WARNING! Read all safety
directions and instructions.
Omissions in the compliance with
safety directions and instructions
can cause electrical shock, re
and/or severe injuries.
Retain all safety directions and instructions for future use.
The term “Power Tools” used in the safety
instructions refers to mains-operated power
tools (with power cord) and to battery-operated power tools (without power cord).
Work area safety
• Keep work area clean and well lit.
Cluttered or dark areas invite accidents.
• Do not operate power tools in
explosive atmospheres, such as
in the presence of ammable
Iiquids, gases or dust. Power tools
create sparks which may ignite the
dust or fumes.
• Keep children and bystanders
away while operating a power
tool. Distractions can cause you to
lose control.
Electrical safety
CAUTION! The following states
how to avoid accidents and injuries
due to electric shock:
• Power tool plugs must match
the outlet. Never modify the
plug in any way. Do not use
Page 10
1 0
G B
• Use only approved power cable of
type H05RN-F, which are no more than
75 m in length and intended for use
outdoors. The conductor cross section
of the cord must be at least 2.5 mm
2
.
Always fully unroll a cable drum before
use. Check the power cord for damage.
Personal safety
CAUTION: In this way you avoid
accidents and injuries:
• Stay alert, watch what you are
doing and use common sense
when operating a power tool.
Do not use a power tool while
you are tired or under the inuence of drugs, alcohol or medication. A moment of inattention white
operating power tools may result in
serious personal injury.
• Wear personal protective equip-
ment and always wear safety
glasses. Wearing personal protective
equipment such as nonslip safety boots,
cut protection trousers, a hard hat or ear
protection reduces the risk of injuries.
• Prevent unintentional starting.
Ensure the switch is in the offposition before connecting to
power source and/or battery
pack, picking up or carrying
the tool. Carrying power tools with
your nger on the switch or energising
power tools that have the switch on
invites accidents.
• Remove any adjusting key or
wrench before turning the power tool on. A wrench or a key left at-
tached to a rotating part of the power
tool may result in personal injury.
• Do not overreach. Keep proper
footing and balance at all times.
any adapter plugs with earthed
(grounded) power tools. Unmodi-
ed plugs and matching outlets will
reduce risk of electric shock
• Avoid body contact with
earthed or grounded surfaces,
such as pipes, radiators, ranges
and refrigerators. There is an in-
creased risk of electric shock if your
body is earthed or grounded.
• Do not expose power tools to
rain or wet conditions. Water
entering a power tool will increase the
risk of electric shock.
• If the supply cord of this power tool
is damaged, it must be replaced by
a specially prepared cord available
through the service organization.
• If it is necessary to replace the connection cable, we recommend that this be
performed by the manufacturer or an
authorised representative (e.g. authorised workshop, customer service, etc.).
• Do not abuse the cord. Never
use the cord for carrying, pulling
or unplugging the power tool.
Keep cord away from heat, oil,
sharp edges or moving parts.
Damaged or entangled cords increase
the risk of electric shock.
• When operating a power tool
outdoors, use an extension cord
suitable for outdoor use. Use of a
cord suitable for outdoor use reduces
the risk of electric shock.
• If operating a power tool in a
damp location is unavoidable,
use a residual current device
(RCD) protected supply. Use of an
RCD reduces the risk of electric shock.
Connect the appliance to a power
socket with a residual current circuit
breaker of rated residual current no
more than 30 mA.
Page 11

1 1
G B
This enables better control of the power tool in unexpected situations.
• Keep your hair, clothing and
gloves away from moving
parts. Jewellery or long hair can be
caught in moving parts.
• Warning! During operation, this
electric tool generates an electromagnetic eld which, under certain circumstances, may impair the functionality of
active or passive medical implants. To
reduce the risk of serious or lethal injuries, we recommend that persons with
medical implants consult their doctor
and the manufacturer of their medical
implant before operating the machine.
Power tool use and care
• Do not force the power tool. Use
the correct power tool for your
application. The correct power tool
will do the job better and safer at the
rate for which it was designed.
• Do not use the power tool if the
switch does not turn it on and
off. Any power tool that cannot be
controlled with the switch is dangerous
and must be repaired.
• Disconnect the plug from the
power source and/or the battery pack from the power tool
before making any adjustments, changing accessories, or
storing power tools. Such preven-
tive safety measures reduce the risk of
starting the power tool accidentaIly.
• Store idle power tools out of the
reach of children and do not allow persons unfamiliar with the
power tool or these instructions
to operate the power tool. Power
tools are dangerous in the hands of
untrained users.
• Maintain power tools. Check
for misalignment or binding
of moving parts, breakage of
parts and any other condition
that may affect the power tool’s
operation. If damaged, have
the power tool repaired before
use. Many accidents are caused by
poorly maintained power tools.
• Keep cutting tools sharp and
clean. Properly maintained cutting
tools with sharp cutting edges are less
Iikely to bind and are easier to control.
• Use the power tool, accessories
and tool bits etc. in accordance
with these instructions, taking
into account the working conditions and the work to be performed. Use of the power tool for op-
erations different from those intended
could result in a hazardous situation.
• For sawing work on a slope, always
stand above the tree trunk. To keep
control at the moment of “sawing
through”, reduce the contact pressure
at the end of the cut without loosening
the rm grip on the chainsaw handles.
Ensure that the saw chain does not
come into contact with the ground.
After completing the cut, wait for the
chainsaw to come to a standstill before
removing the chainsaw. Always switch
off the chainsaw motor before moving
from one tree to another.
• Dirt, stones, loose bark, nails, staples
and wire must be removed from the tree.
Service
• Have your power tool serviced
by a qualied repair person using only identical replacement
parts. This will ensure that the safety
of the power tool is maintained.
Page 12

1 2
G B
• Follow the maintenance, control and service instructions in this manual carefully.
Damaged safety equipment and parts
must be repaired or replaced professionally by our service centre, unless
otherwise indicated in the operating
instructions.
Chain saw safety warnings:
• Keep all parts of the body
away from the saw chain when
the chain saw is operating. Before you start the chain saw,
make sure the saw chain is not
contacting anything. A moment of
inattention white operating chain saws
may cause entanglement of your clothing or body with the saw chain.
• Always hold the chain saw with
your right hand on the rear
handle and your left hand on
the front handle. Holding the chain
saw with a reversed hand conguration increases the risk of personal injury and should never be done.
• Hold the power tool only on the
insulated handle surfaces, as
the saw chain may come into
contact with concealed power
cables. Contact between the saw
chain and a live cable may render metallic components live and result in an
electric shock
• Wear safety glasses and ear
protection. Other protective
equipment for the head, hands,
legs and feet is compulsory. Ad-
equate protective clothing will reduce
personal injury by ying debris or accidentaI contact with the saw chain.
• Do not operate a chain saw in a
tree. Operation of a chain saw white up
in a tree may result in personal in jury.
• Always keep proper footing and
operate the chain saw only when
standing on xed, secure and
level surface. Slippery or unstable surfaces such as ladders may cause a loss
of balance or control of the chain saw.
• When cutting a branch that is
under tension be alert for spring
back. When the tension in the wood
bres is released the spring loaded Iimb
may strike the operator and/or throw
the chain saw out of control.
• Use extreme caution when cut-
ting brush and saplings. The slender material may catch the saw chain
and be whipped toward you or pull
you off balance.
• Carry the chain saw by the
front handle with the chain saw
switched off and away from
your body. When transporting
or storing the chain saw always
t the guide bar cover. Proper
handling of the chain saw will reduce
the Iikelihood of accidentaI contact
with the moving saw chain.
• Follow instructions for lubri-
cating, chain tensioning and
changing accessories.
Improperly tensioned or lubricated
chain may either break or increase the
chance for kickback.
• Keep handles dry, clean, and
free from oil and grease. Greasy,
oily handles are slippery causing loss
of control.
• Cut wood only. Do not use chain
saw for purposes not intended.
For example: do not use chain
saw for cutting plastic, masonry
or non-wood building materials.
Use of the chain saw for operations
different than intended could result in a
hazardous situation
Page 13

1 3
G B
Causes and operator
prevention of kickback
Beware of kickback! Be careful of
kickback of the machine during
work. There is danger of injury
here. You can avoid kickbacks by
exercising caution and using a correct sawing technique.
Fig. 1
• Kickback may occur when the nose or
tip of the guide bar touches an object,
or when the wood closes in and pinches the saw chain in the cut
(cf. image 1/g. B).
• Tip contact in some cases may cause
a sudden reverse reaction, kicking the
guide bar up and back towards the
operator (cf. image 1/g. A).
• Pinching the saw chain along the top
of the guide bar may push the guide
bar rapidly back towards the operator.
• Either of these reactions may cause
you to lose control of the saw which
could result in serious personal injury.
Do not rely exclusively upon the safety
devices built into your saw. As a chain
saw user, you should take several steps
to keep your cutting jobs free from accident or injury.
Kickback is the result of tool misuse and/
or incorrect operating procedures or conditions and can be avoided by taking proper
precautions as given below:
• Maintain a rm grip, with
thumbs and ngers encircling
the chain saw handles, with
both hands on the saw and position your body and arm to allow
you to resist kickback forces.
Kickback forces can be controlled by
the operator, if proper precautions are
taken. Do not let go of the chain saw.
• Do not overreach and do not cut
above shoulder height. This helps
prevent unintended tip contact and
enables better control of the chain saw
in unexpected situations.
• Only use replacement bars and
chains specied by the manufacturer. Incorrect replacement bars
and chains may cause chain breakage
and/or kickback.
• Follow the manufacturer´s
sharpening and maintenance
instructions for the saw chain.
Decreasing the depth gauge height
can lead to increased kickback.
Further safety directions
• If the supply cord of this power tool
is damaged, it must be replaced by
a specially prepared cord available
through the service organization.
• If it is necessary to replace the connection cable, we recommend that this be
performed by the manufacturer or an
authorised representative (e.g. authorised workshop, customer service, etc.).
• Lay the extension cable in such a way
that it will not be caught by branches
or similar during sawing.
• Use a surge protector with a release
current of 30 mA or less.
• Comply carefully with maintenance,
control and service instructions in this
manual.
Page 14
1 4
G B
Damaged protective devices and parts
have to be repared or changed except
as noted otherwise in this manual.
Safety functions
A
1 Rear grip
with hand guard (16)
Protects the hand against branch-
es and boughs in the case of
springing away by the chain.
3 Chain braking lever/
hand guard
Control system, which stops the
saw chain immediately in case
of a spring-back; lever can also
be activated manually; protects
the left hand of the operator if it
slides from the front grip.
The motor cannot be turned on if
the chain brake has engaged.
5 Saw chain with small
spring-back
Helps you to catch spring-backs
with specially developed control
systems.
7 Metal stop claw
Reinforces the stability when
vertical cuts are carried out and
facilitates sawing.
9 Electric motor
Double insulated for safety
reasons.
10 On-off switch with safety
chain brake
On releasing the On/Off switch,
the device immediately switches off.
11 Switch-on block
The switch-on block must be
released for switching on the
device.
12 Chain catcher
Decreases the danger of injuries if
the chain breaks or if it comes off.
Assembly
Always wear protective
gloves when working with
the chainsaw and employ
only original parts. Pull out
the power plug before doing
any work on the chainsaw
itself -– injury hazard!
Before putting the electric chain saw into
operation, you must:
- install the blade, saw chain and chain
cover where necessary,
- adjust the saw chain tension,
- pour in chain oil,
- check the function of the chain brake
and the automatic oil pump.
Mount the saw chain
G
1. Spread the chain (5) out into a
loop with the cutting edges running clockwise .
2. Relax the tensioning screw (24)
against the clockwise
direction.
3. Slide the saw chain (5) into the
bar guide groove. To mount the
guide bar (4), raise it to an angle
of approx. 45 degrees. This will
make it easier to replace the saw
chain (5) onto the sprocket (25).
It is normal that the saw chain (5)
is slack. Sagging in the chain is
normal.
4. Pre-tighten the chain (5) by turning the tensioning plate (24)
clockwise.
Page 15
1 5
G B
5. Position the sprocket chain wheel
covering (15). First place the tab
(26) on the cover into the corresponding notch on the plate (15).
Only lightly tighten the fastening
bolt (14), as you will still have to
tension the saw.
Note that the saw can re-oil.
Please note that the saw re-oils after use
and oil may leak out if it is stored on its
side or on the head. This is a normal
process due to the necessary ventilation
opening on the upper edge of the tank and
does not constitute a reason for complaint.
As each saw is checked during production
and tested with oil, a small residue may
be in the tank despite draining, which may
slightly dirty the housing with oil in transit.
Please clean the housing with a cloth.
Prior to changing the chain, the nut of the
guide rail must be cleaned of dirt because
dirt deposits available can cause the chain
to break out of the rail. The deposits can
also absorb the chain oil. So the consequence would be that the chain oil would
not or only a small part of it would reach
the underside of the rail and the lubrication
would be reduced.
Mount the saw bar
F
1. Lay the saw on a at surface.
2. Turn the fastening bolt (14) anticlockwise (
) to remove
the sprocket chain wheel covering (15).
3. To t the new bar, place the bar
(4) onto the bar bolt (23) with
the tensioning plate pointing outwards (24).
Tensioning the saw chain
Regularly tightening the saw chain provides
safety for the user and reduces and/or prevents wear and chain damages. Before the
start of work and in approx. 10 minute intervals, we recommend the user to examine the
chain tension and correct it, if necessary.
The chain warms up when working with
the saw and thus expands slightly. These
“expansions” can be expected especially
from newer chains.
Do not re-tighten or change the chain
when it is hot because it shrinks slightly once it has cooled down. In case of
non-observance, this can lead to damages on the guide rail or the engine
because now the chain is too taut on
the blade. Chain tension and chain
lubrication have a signicant impact on the service life of the chain.
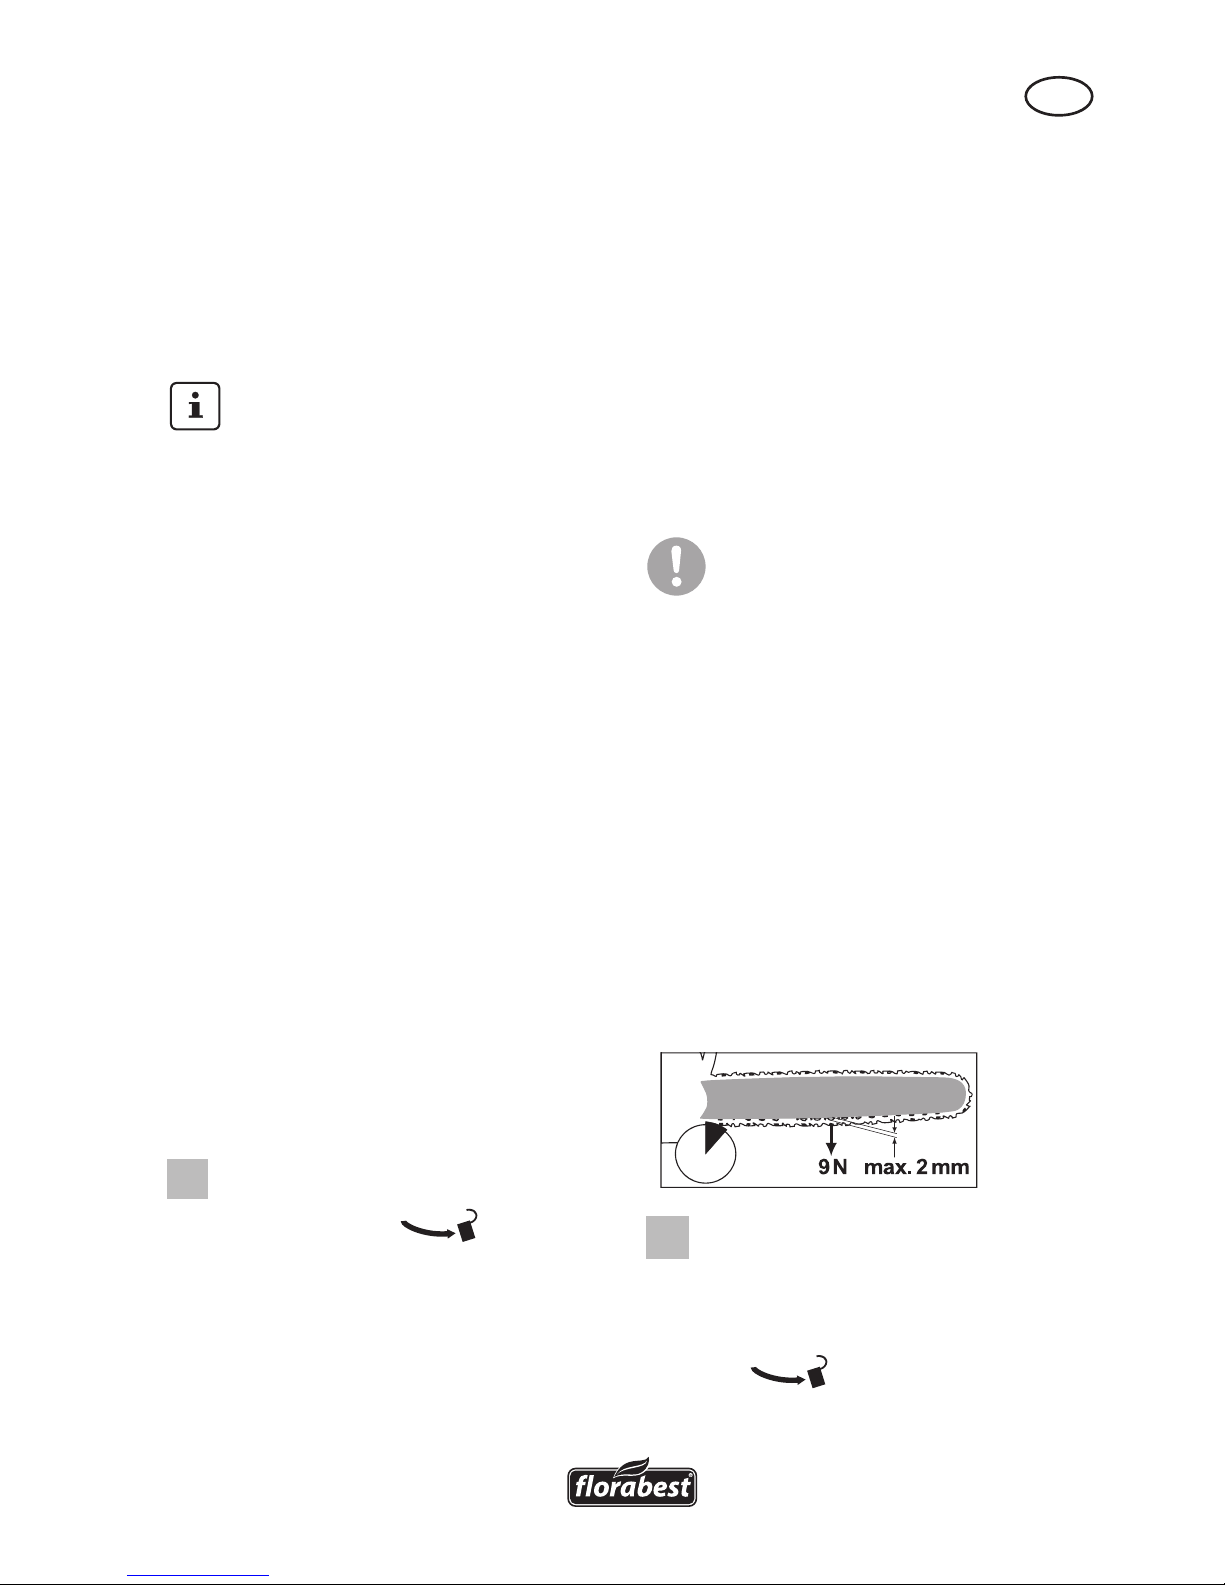
The chain is correctly tensioned if it does
not sag at the rail underside and can be
rotated completely around with the gloved
hand. When the saw chain is tensioned
with 9 N (approx. 1 kg), the gap between
the saw chain and the guide rail may not
be more than 2 mm.
10 min
B
1. Ensure that the chain brake has
been released, that is, that the chain
brake lever (3) is pulled up against
the front grip (8) (position
O).
2. Unscrew the fastening bolt (14)
(
).
3. To tighten the saw, turn the chain
adjustment ring (13) clockwise.
Page 16

1 6
G B
To loosen the tension, turn the
chain adjustment ring anti-
clockwise.
4. Tighten up the fastening bolt (14)
again (
).
With a new saw chain, you must
readjust the chain tension after at
least 5 cutting operations.
Chain lubrication
The rail and chain must never be
without oil. If you operate the electric chainsaw with too little oil, the
cutting performance and the lifetime
of the saw chain is reduced, since
the chain becomes blunt faster. You
can identify a case of too little oil
where smoke development or discoloration of the rail occurs.
As soon as the motor is speeded up, the oil
also ows faster to the chain bar (4).
Filling up with chain oil:
• Check the oil level indicator (
C
21)
regularly and top-up the oil if the minimum mark „MIN“ (
C
22) is reached on
the oil level indicator. The oil tank holds
about 190 ml of oil.
• Use Parkside bio-oil; this product contains additives that reduce wear and
tear and does not damage the pump
system. bio-oil is available from our
Service-Center.
• If you have no Grizzly bio-oil available,
use chain lubrication oil with low adhesive additive content.
• Empty the oil tank before longer periods
(6-8 weeks) of non-use.
C
1. Unscrew the oil ll cap (2) and ll
up with chain oil.
2. Wipe off any spilled oil and
close the cap (2) again.
Always switch off the device
and allow the motor to cool
before lling with chain oil.
There is a risk of re if oil
overows.
Operating the chainsaw
Switch on the chainsaw only when
chain bar, saw chain and sprocket
chain wheel covering are correctly
assembled. Ensure the voltage of the
mains connection agrees with the
label on the device. Make sure you
have a secure stance. Make sure
before you start that the electric
chain saw is not touching anything.
Caution! Saw can oil up, see notes
on “Assembly“.
Switching on
D
1. Check before the start, whether
sufcient chain oil is in the tank
and, if necessary, rell with
chain oil (see Chapter Operation
Startup).
2. Form a loop from the end of the
extension cable and hang this
into the tension relief (17) on the
rear grip (1).
3. Connect the device to the mains
voltage.
4. Release the chain brake, where
you shift the brake arm (3) back
against the front grip (8).
5. Hold the electric chainsaw rmly
with both hands, with the right
hand on the rear grip (1) and
the left hand on the front handle
Page 17
1 7
G B
(8). Thumb and nger must close
securely over the handles.
6. For switching on, activate the
switch-on block (11) with the right
thumb and then press the On/Off
switch (10), the electric power saw
runs with highest speed. Release
the switch-on block (11)again.
7. The power saw switches off when
you release the On/Off switch
(10) again. Switching for continuous running is not possible.
Checking the chain brake
The motor cannot be turned on if the
chain brake has engaged. Do not
employ the chain brake in order to
start the chainsaw or to switch it off.
E
1. Place the electric chainsaw onto
a solid, at surface. It must not
contact any objects.
2. Connect the device to the mains
voltage.
3. Release the chain brake by shifting the brake arm (3) over against
the front grip (8) (position
O).
4. Hold the electric chainsaw rmly
with both hands, with the right
hand on the rear handle (
A
1)
and the left hand on the front
handle (8). Thumb and nger
must close securely over the handles.
5. Turn on the electric chainsaw.
6. Activate the chain braking lever
(3), with running motor, with
the left hand. To do so, push the
chain braking lever/front hand
protection (3) away from the front
handle (8) (position
I). Chain
should stop abruptly.
7. Once the chain brake is working properly, release the on/off
switch and the chain brake.
If the chain brake does not
function correctly, you must
not use the electric chainsaw.
A slack saw chain leads to
danger of injury.
Return the electric chainsaw to
our Service-Center for repair.
Checking the chain
lubrication
Check the oil level and the chain lubrication system before commencement of work.
• Switch on the chainsaw and hold it
above a bright background. The saw
must not touch the ground.
If an oil trace can be seen, the chainsaw is
working trouble-free.
If no oil trace can be seen clean the
oil passages or turn the chainsaw
to our Service-Center for repair.
J
4. Clean the oil passages of the chain
bar (27), in order to guarantee a
trouble-free, automatic oiling of the
saw chain during operation. Use
a brush or a cloth to help remove
residues from the oil passage.
Changing the saw bar
F
1. Switch the saw off and unplug it
from the mains (
A
18).
2. Lay the saw on a at surface.
3. Turn the fastening bolt (14) anticlockwise (
) and loose
the chain adjustment ring (
A
13) to
Page 18
1 8
G B
remove the sprocket chain wheel
covering (15).
4. Remove the saw bar (4) and saw
chain (5). To remove the guide
bar (4), raise it to an angle of approx. 45 degrees. This will make
it easier to take the saw chain (5)
off the sprocket
(25).
5. Loosen the screw (28) on the
reverse side of the tension adjustment screw (24). Re-install the
tension adjustment screw (24) in
reverse order.
In doing so, ensure that the tensi-
on adjustment screw bolt (29), as
shown in Figure
, is underneath
(see also “turn blade“
+ ).
6. To t the new bar, place the bar
(4) onto the bar bolt (23) with
the tensioning plate pointing outwards (24).
Sawing techniques
General
• You have better control when you saw
with the bottom side of the chain bar
(with pulling saw chain) and not to
with the top side of the chain bar (with
pushing saw chain).
• The saw chain must not contact either the
ground or another object during sawing
through or after sawing completion.
• Make sure that the saw chain does not
become jammed in the wood. Do not
let the tree trunk break or split off.
• Consider also the precautions against
spring-back (see notes on safety).
If the saw chain jams, you
do not attempt to pull out the
electric chainsaw using power. There is a danger of injury
here. Switch off the motor
and use a lever or wedge to
free the electric chainsaw.
Felling trees
A lot of experience is nec-
essary in felling trees. Cut
down trees only when you
can safely handle the electric
chainsaw. In no case should
you use the electric chainsaw
if you feel unsure about anything.
For safety reasons, we advise inex-
perienced users not to fell any logs
with a rail length which is smaller
than the trunk diameter.
• Ensure that no people or animals are
in the eld of action. The safety distance between the tree to be felled and
the nearest-located workplace must be
2 ½ tree lengths.
• Note the felling direction:
The user must be able to move safely
near the felled tree, to saw off the tree
easily and remove branches.It is to be
avoided that the felled tree snags itself
on another tree. Note the natural felling direction, which is dependent on
the slope and curvature characteristic
of the tree, wind direction and the
number of branches.
• In the case of sloping ground, stand
above the tree to be felled.
• Small trees, with a diameter of 15-18
cm, can usually be sawn off with one
cut.
• In case of trees with a larger diameter,
a notched cut and a back cut must be
implemented (see diagram
Q
).
Page 19
1 9
G B
Do not fell any trees when
a strong or changing wind
is blowing, if the danger of
property damage exists or if
the tree could fall on electric
wires.
Immediately after termination of
the sawing procedure, remove the
ear protection so that you can hear
hooter and alarm signals.
1. Removal of branches:
Remove hanging branches by
positioning the cut from above
the branch. With removal of
branches, never work higher than
shoulder level.
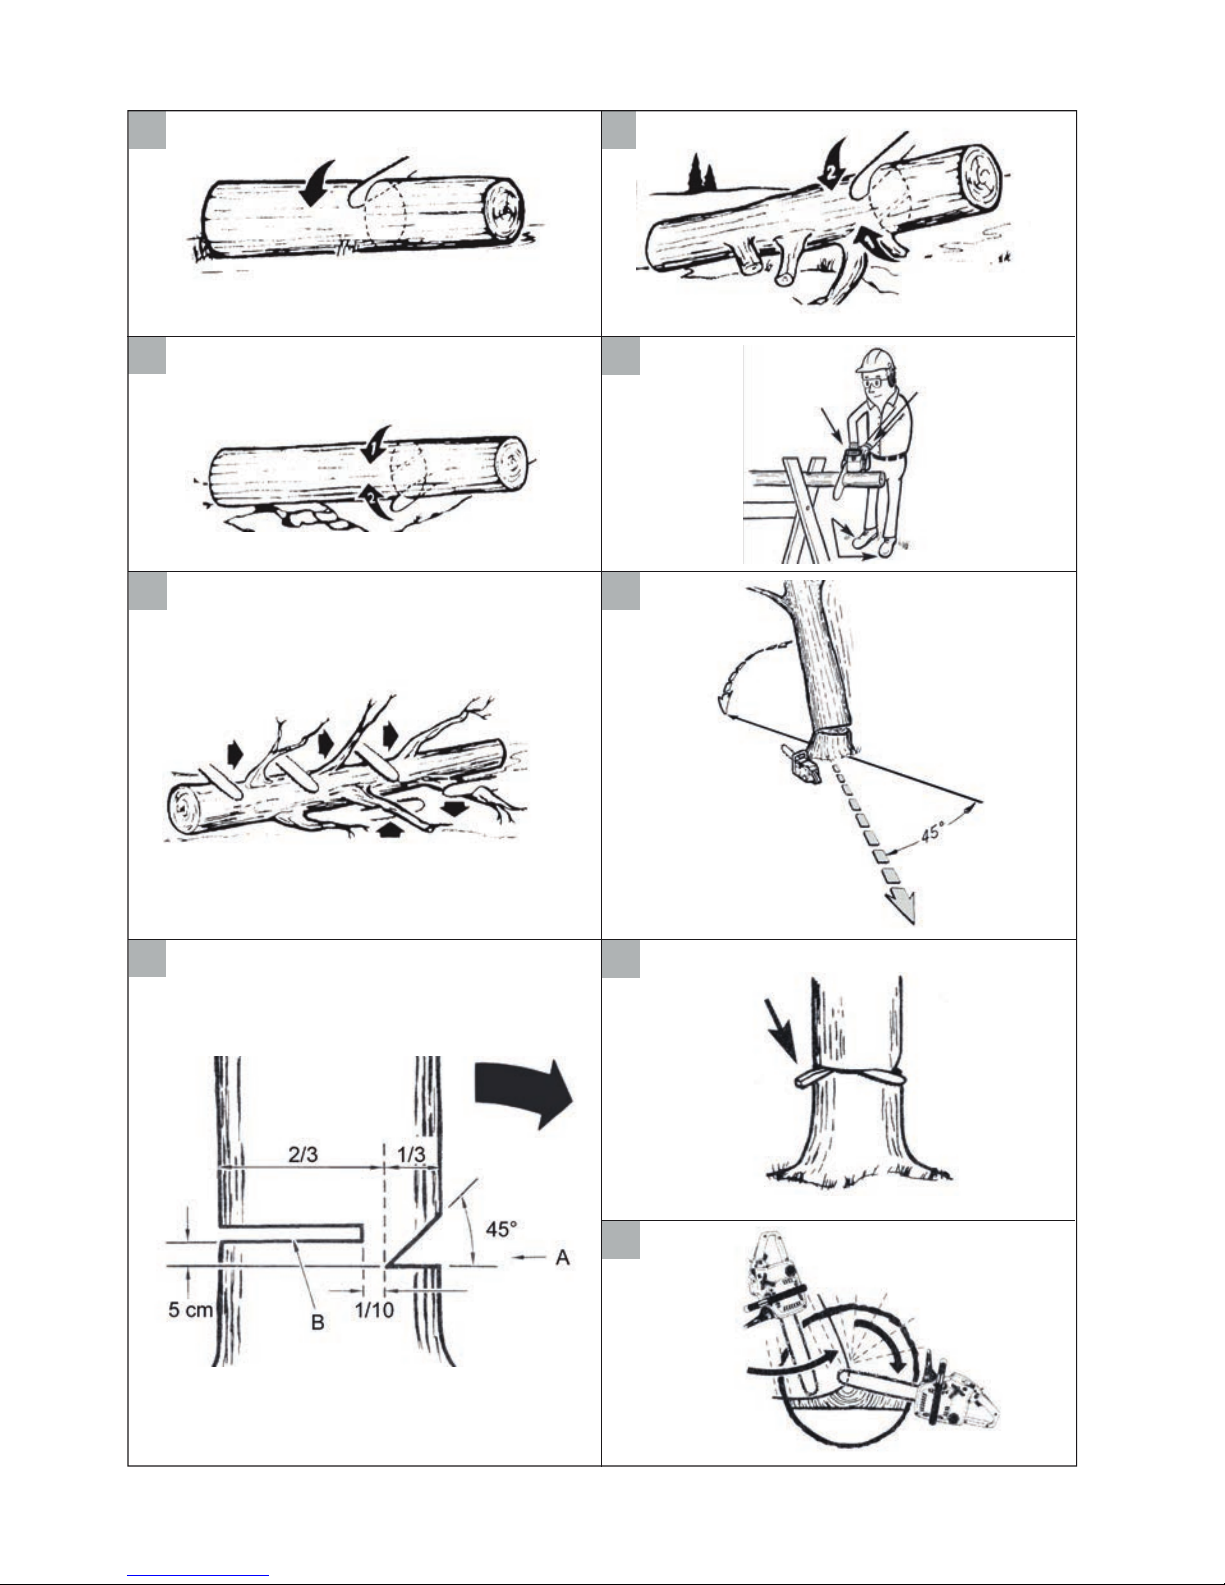
P
2. Escape area:
Remove the undergrowth around
the tree to ensure an easy escape. The escape area (1) should
be around 45° either side behind
the planned felling direction (2).
Q
3. Cutting notch (A):
Make a felling notch in the direc-
tion in which you wish the tree to
fall. Start with the bottom, horizontal cut. The cut depth should
be around 1/3 of the trunk diameter. Now make a slanted saw
cut from above at an angle of
roughly 45° to meet exactly with
the bottom saw cut.
Never step in front of a tree
which is notched.
Q
4. Felling back cut (B):
Make the back cut from the other
side of the log, where you stand
to the left of the log and saw with
the chainsaw pulling. The back
cut must run horizontally 5 cm
above the horizontal notched cut.
The back cut should be so deep
that the separation distance between the back cut and the notch
cutting line is at least 1/10 of the
trunk diameter. The part of the
log not sawed through is designated as a break dimension.
R
5. Insert a felling wedge or a crowbar into the back cut, as soon as
the depth of cut permits this, in
order to prevent a jamming of the
chain bar.
S
6. If the trunk diameter is larger than
the length of the chain bar, make
two cuts.
7. After carrying out of the back cut,
the tree falls by itself or with the
aid of the felling wedge or crowbar.
As soon as the tree begins to
fall, pull out the saw from the
section, stop the motor, place
the electric chainsaw down
and leave the workplace using the withdrawal path.
O
Limbing
Limbing is the designation for the sawing
off of branches and boughs from a felled
tree.
Many accidents occur during the
removal of branches. Never cut tree
limbs when you are standing on the
log. Keep the spring-back area in
mind if branches are under tension.
• Do not remove support branches until
after the sawing off.
Page 20
2 0
G B
the rst cut to prevent the bar
from becoming jammed in the
wood.
M
3. Log is supported at both
ends:
Start from the top and work down
(with the lower edge of the bar)
to a third of the diameter of the
trunk. Then saw from underneath
with the upper edge of the bar
until the two cuts meet.
N
4. Sawing on a sawhorse:
Hold the electric chainsaw steady
with both hands, keeping the
saw in front of you while sawing. Once the saw is through
the wood, guide the machine
passed you on the right (1). Hold
your left arm as straight as you
can (2). Watch out for the falling
trunk. Position yourself to prevent
any danger from the separated
trunk. Watch your feet. The trunk
may cause injuries when falling.
Keep your balance (3).
Maintenance and
cleaning
Basically, carry out mainte-
nance and cleaning works
with switched-off motor and
power plug removed. Danger
of injury!
Leave any maintenance and
servicing work not covered
by this manual to our Service-Center. Use only original
spare parts.
Allow the machine to cool
down before all maintenance
and cleaning works. Danger
of burn injuries!
• Branches under tension must be sawed
from below to above, in order to prevent jamming of the chainsaw.
• When working on thicker branches,
use the same technique as when you
are sawing up a felled trunk.
Work to the left of the log and as near
as possible to the electric chainsaw. As
far as possible, the weight of the saw
should rest on the log.
• Change position to saw off branches
on the other side of the trunk.
• Branches sticking out are cut off separately.
Bucking
This refers to sawing up a felled tree trunk
into smaller sections.
• Ensure that the saw chain does not
come in contact with the ground during
sawing.
• Make sure you have a secure stance
and, in the case of sloping ground,
stand above the log.
K
1. Log is lying on the ground:
Saw through the log completely
from above and ensure at the
end of the cut not to contact the
ground.
If you can turn the tree trunk, saw
two-thirds of the way through it.
Then turn the trunk around and
saw the rest of the way through
from above.
L
2. Log is supported at one end:
Start sawing from the bottom and
work your way up (with the upper edge of the bar) a third of the
way into the diameter of the trunk
to prevent splitting. Then saw
from the top downwards with the
lower edge of the bar towards
Page 21

2 1
G B
Cleaning
• Clean the machine thoroughly after
every use. In this way, you extend the
life of the machine and avoid accidents.
• Keep the gripping handles free of petrol, oil or grease. Clean the gripping
handles, where appropriate, with a
moist cloth soaked in soap. Use no solvents or petrol for cleaning!
• Clean the saw chain after every use.
Use a paint brush or wipe for that. Do
not use any liquids to clean the chain.
After cleaning, oil the chain lightly with
chain oil.
• When cleaning, also remove the chain
wheel cover (15) so that this area can
be cleaned as well.
• Clean the chain bar (Guide) (4).
• Clean the ventilation slots and the
surfaces of the machine with a paint
brush, whisk or dry cloth. Do not use
any liquids for cleaning.
• Clean the oil passages of the chain
bar (27), in order to guarantee a trouble-free, automatic oiling of the saw
chain during operation.
Maintenance intervals
Regularly carry out the maintenance operations listed in the following table. The life
of the saw is extended by regular maintenance of your chainsaw. Furthermore,
you get optimum cutting performance and
avoid accidents.
Maintenance Interval Table
Machine part Action
Before
every
use
After 10
hours
of operation
After
every
use
Components of the chain brake
Check, replace if required
Sprocket chain wheel (25)
Check, replace if required
Saw chain (5)
Check oil, regrind or
replace if required
Saw chain (5) Clean and oil
Guide bar (4) Check, clean and oil
Guide bar (4) turn around
Oil automatic system
check and, where
appropriate, clean oil
outow duct
Page 22
2 2
G B
• The sawing parts of the chain are the
cutting elements, which consist of a cutting tooth and a depth limiting projection. The vertical separation distance
between these two determines the
sharpness depth.
• The following values must be noted in
sharpening the cutting teeth:
H
- Sharp edge angle (30°)
- Breast angle (85°)
- Sharpness depth (0.65 mm)
- Round le diameter (4.0 mm)
Deviations from the meas-
urement data of the cutting
geometry can lead to an
increase of the spring-back
slope of the machine. Increased danger of accident!
Special tools are necessary for sharpening
the chain, which guarantee that the cutting
edges are sharpened at the correct angle
and to the correct depth. For the inexperienced user of chainsaws, we recommend
to have the saw chain sharpened by a
specialist or a specialist workshop. If you
think yourself capable of sharpening the
chain, you can acquire the special tools in
the specialist trade.
I
1. Switch the saw off and unplug it
from the mains.
2. Remove the saw chain (refer to the
section on operating the saw). The
chain should be well-tensioned to
ensure proper sharpening.
3. For the sharpening, a round le
with 4.0mm diameter is necessary.
Other diameters damage the
chain and can lead to danger
during work!
Oiling the saw chain
Clean and oil the chain regularly. In
this way, you keep the chain sharp
and get optimum machine performance. In case of damage due to
inadequate maintenance of the saw
chain, the guarantee claim is invalid.
Remove the power plug and use
cut-protection gloves when you are
handling the chain or the chain bar.
• Oil the chain after cleaning, after 10
hours of use or at least once weekly,
depending on which comes rst.
• Before oiling, the chain bar must be
cleaned thoroughly, in particular the
teeth of the rail. Use a whisk and a dry
cloth for that.
• Oil the individual chain links with the
aid of an oil suction gun with pinpoint
tip (available in the specialist trade).
Place individual oil drops onto the articulated links and onto the tooth tips of
the individual chain links.
Sharpening the saw chain
An incorrectly sharpened
saw chain increases the danger of spring-back!
Use cut-protection gloves
when you are handling the
chain or the chain bar.
A sharp chain guarantees an optimal
cutting performance. It eats effortlessly
through the wood and leaves large,
long wooden chips. A saw chain is
blunt if you have to press the cutting
equipment through the wood and the
wooden chips are very small. In the
case of a very blunt saw chain, no chip
cuttings result at all, only sawdust.
Page 23
2 3
G B
4. Sharpen only from the inside to
the outside. Guide the le from
the inner side of the cutting teeth
to the outer side. Lift the le when
you are withdrawing it.
5. Sharpen rst the teeth on one side.
Turn the saw around and sharpen
the teeth of the other side.
6. The chain is worn and must be
replaced by a new saw chain if
only approx. 4 mm of the cutting
teeth is remaining.
7. After the sharpening, all cutting
elements must now be equal in
length and width.
8. After every third sharpening, the
sharpness depth (depth limitation)
must be checked and the height led
with the aid of a at le. The depth
limitation should be set back about
0.65 mm from the cutting tooth.
After the setting back of depth limitation, round it off a little at the front.
Adjusting the chain tension
The adjustment of the chain tension is described in the chapter: Assembly, tension-
ing chainsaw.
Starting up a new saw chain
In the case of a new chain, the tensioning
force decreases after some time. Therefore,
you have to re-tension the chain after the
rst 5 cuts and no later than after 10 minutes’ sawing time.
Never attach a new chain to
a worn drive pinion or place
onto a damaged or worn
chain bar. The chain could
spring back or break, potentially leading to serious injury.
Maintaining the chain bar
Use cut-protection gloves
when handling the chain or
the chain bar.
1. Switch off the saw and pull out the
power plug (18).
2. Remove the sprocket chain wheel covering (15), the saw chain (5) and the
chain bar (4).
3. Check the chain bar (4) for wear. Remove burrs and straighten the guide
surfaces with a at le.
4. Clean the oil passages (
J
27) of
the chain bar, in order to guarantee
a trouble-free, automatic oiling of the
saw chain during operation.
5. Mount chain bar (4), chainsaw (5) and
sprocket chain wheel covering (15)
and tighten the chainsaw.
With the oil nozzles in good condi-
tion and the oil regulator set correctly, the saw chain will spray a
little oil off after starting.
Turn the chain bar
Use cut-protection gloves
when handling the chain or
the chain bar.
The blade (4) has to be reversed regularly
after a working time of approximately 10
hours in order to ensure even wear.
1. Switch off the saw and pull out
the power plug (18).
2. Remove the sprocket chain wheel
covering (15), the saw chain (5)
and the chain bar (4).
3. Put the sword (4) front and rotate
it on the back. Loosen the xation
Page 24
2 4
G B
screw (28) and remove the ten-
sioning plate (24).
4. Attach the tensioning plate (24)
with the xing screw (28) from
the other side to the sword (4).
This, make sure that the clamping
screw bolt (29) is down. The
round nose (24a) the clamping
screw sprocket must point in the
direction.
F
5. Mount chain bar (4), chainsaw
(5) and sprocket chain wheel
covering (15) and tighten the
chainsaw.
Direction of travel of the
saw chain
Use the graphical symbol below the chain
sprocket cover (15) as a guide to the alignment of the saw chain (5) when the blade
is rotated. The illustrated direction of travel
on the blade is no longer true.
Storage
• Clean the device prior to storage.
• Empty the oil tank prior to longer periods of non-use. Dispose of used oil
in an environmentally-responsible way
(see „Disposal/Environmental Protection“).
• Attach the protective blade cover.
• Store the device in a dry and dustproof
location and out of reach of children.
Waste disposal
and environmental
protection
Do not dispose of used oil in the sewage
system or drains. Dispose of used oil in an
environmentally correct manner - bring it to
a waste disposal center.
Be environmentally friendly. Return the
tool, accessories and packaging to a recy-
cling centre when you have nished with
them.
Machines do not belong with do-
mestic waste.
Labelled products must not be disposed of
with normal household waste but must be
returned to a collection point for the recycling of electrical and electronic equipment.
Recycling helps to reduce both the consumption of raw materials and the environmental impact. Information about disposal
and the location of the nearest recycling
centre may be obtained, for example, from
your local waste management department
or from Yellow Pages.
Empty the oil tank carefully and hand in
your electric chainsaw at a disposal center.
The plastic and metal parts employed can
be separated out and thus recycled use
can be implemented. Ask our ServiceCenter for details.
Page 25
2 5
G B
Replacement parts/Accessories
Spare parts and accessories can be obtained at
www.grizzly-service.eu
If you do not have internet access, please contact the Service Centre via telephone (see
“Service-Center” Page 28). Please have the order number mentioned below ready.
Oil ller cap ...........................................................................................75118246
Saw chain Oregon 91P057X ...................................................................30091571
Saw chain Oregon 91VXL ........................................................................30091598
16“ Chain bar ........................................................................................30100420
Bio chain oil 1 liter ..................................................................................30230001
Bio chain oil 5 liter ..................................................................................30230002
The Oregon replacement saw chain is to be used only in conjunc-
tion with the associated Oregon blade and the electric chainsaw
approved for this. There is a risk of injury.
Page 26

2 6
G B
Trouble shooting
Problem Possible cause Fault correction
Device does not start
Chain brake locked into
place.
Check chain brake.
Possibly release chain brake
Mains voltage defective
House protection fuse
activated
Check plug socket, cable, line
and plug, where appropriate,
repair by electrical specialist.
Check house protection fuse,
see note
Defective On/Off switch (10) Repair by customer service
Worn carbon brushes Repair by customer service
Defective motor Repair by customer service
Chain does not
rotate
Chain brake blocks saw
chain (5)
Check chain brake.
Possibly release chain brake
Inferior cutting
performance
Incorrectly mounted saw
chain (5)
Mount saw chain correctly
Saw chain (5) blunt
Sharpen cutting teeth or place
on new chain
Chain tension insufcient Check chain tension
Saw runs with
difculty, chain
comes off
Chain tension insufcient Check chain tension
Chain becomes hot,
smoke development
during sawing,
discoloration of the
rail
Too little chain oil
Check oil level and, where
appropriate, rell with chain oil,
check oil automatic system and,
where appropriate, clean oil
outow duct or have repaired by
customer service
Page 27

2 7
G B
Guarantee
Dear Customer,
This equipment is provided with a 3-year
guarantee from the date of purchase.
In case of defects, you have statutory rights
against the seller of the product. These
statutory rights are not restricted by our
guarantee presented below.
Terms of Guarantee
The term of the guarantee begins on the
date of purchase. Please retain the original
receipt. This document is required as proof
of purchase.
If a material or manufacturing defect
occurs within three years of the date of
purchase of this product, we will repair or
replace – at our choice – the product for
you free of charge. This guarantee requires
the defective equipment and proof of purchase to be presented within the three-year
period with a brief written description of
what constitutes the defect and when it occurred.
If the defect is covered by our guarantee,
you will receive either the repaired product
or a new product. No new guarantee period begins on repair or replacement of the
product.
Guarantee Period and Statutory
Claims for Defects
The guarantee period is not extended by
the guarantee service. This also applies for
replaced or repaired parts. Any damages
and defects already present at the time of
purchase must be reported immediately after unpacking. Repairs arising after expiry
of the guarantee period are chargeable.
Guarantee Cover
The equipment has been carefully produced in accordance with strict quality
guidelines and conscientiously checked
prior to delivery.
The guarantee applies for all material and
manufacturing defects. This guarantee
does not extend to cover product parts that
are subject to normal wear and may therefore be considered as wearing parts (e.g.
saw chain) or to cover damage to breakable parts (e.g. switches).
This guarantee shall be invalid if the product has been damaged, used incorrectly or
not maintained. Precise adherence to all of
the instructions specied in the operating
manual is required for proper use of the
product. Intended uses and actions against
which the operating manual advises or
warns must be categorically avoided.
The product is designed only for private
and not commercial use. The guarantee
will be invalidated in case of misuse or
improper handling, use of force, or interventions not undertaken by our authorised
service branch.
Processing in Case of Guarantee
To ensure quick handling of you issue,
please follow the following directions:
• Please have the receipt and item number (IAN 280275) ready as proof of
purchase for all enquiries.
• Please nd the item number on the rating plate.
• Should functional errors or other defects occur, please initially contact the
service department specied below by
telephone or by e-mail. You will then
receive further information on the processing of your complaint.
• After consultation with our customer
service, a product recorded as defective can be sent postage paid to the
service address communicated to you,
Page 28

2 8
G B
with the proof of purchase (receipt)
and specication of what constitutes
the defect and when it occurred. In order to avoid acceptance problems and
additional costs, please be sure to use
only the address communicated to you.
Ensure that the consignment is not sent
carriage forward or by bulky goods,
express or other special freight. Please
send the equipment inc. all accessories
supplied at the time of purchase and
ensure adequate, safe transport packaging.
Repair Service
For a charge, repairs not covered by the
guarantee can be carried out by our service branch, which will be happy to issue
a cost estimate for you.
We can handle only equipment that has
been sent with adequate packaging and
postage.
Attention: Please send your equipment to
our service branch in clean condition and
with an indication of the defect.
Equipment sent carriage forward or by
bulky goods, express or other special
freight will not be accepted.
We will dispose of your defective devices
free of charge when you send them to us.
Service-Center
G B
Service Great Britain
Tel.: 0871 5000 720
(£ 0.10/Min.)
E-Mail: grizzly@lidl.co.uk
IAN 280275
Importer
Please note that the following address is
not a service address. Please initially con-
tact the service centre specied above.
Grizzly Tools GmbH & Co. KG
Stockstädter Straße 20
63762 Großostheim
Germany
www.grizzly-service.eu
Page 29
2 9
S I
Kazalo
Úvod......................................... 29
Namen uporaba ....................... 30
Splošni opis .............................. 30
Obseg dobave ............................ 30
Pregled ...................................... 30
Opis funkcij ................................ 31
Tehnični podatki ........................ 31
Varnostna navodila .................. 31
Varnostna navodila/
simboli na žagi ........................... 32
Simboli v navodilih
za uporabo ................................ 33
Splošna varnostna navodila .......... 33
Splošni varnostni napotki
za električna orodja ..................... 33
Previdnostni ukrepi proti
Prevod originalne izjave o
skladnosti CE ...........................133
Eksplozijska risba ....................136
Úvod
Čestitke ob nakupu vaše nove naprave.
Odločili ste se za visokokakovosten izde-
lek.
Kakovost naprave je bila preverjena med
postopkom proizvodnje in pri končnem
preverjanju, s čimer je zagotovljeno pravilno delovanje vaše naprave. Kljub temu ni
mogoče izključiti, da so v posameznih pri-
merih v napravi oz. v ceveh ostanki vode
ali maziv. To ni napaka ali pomanjkljivost
in ni vzrok za skrb.
Izdelku so priložena navodila za
uporabo. Vsebujejo pomembna
navodila glede varnosti uporabe in
odstranitve. Pred uporabo izdelka
se seznanite z navodili za uporabo
in varnostnimi navodili. Izdelek
uporabljajte zgolj na opisani način
in v naštete namene.
Navodila skrbno shranite in pri
predaji naprave tretji osebi priložite
tudi vso dokumentacijo.
povratnemu udarcu ...................... 37
Dodatni varnostni napotki ............. 38
Varnostne funkcije ....................... 38
Montaža ................................... 39
Montaža verige ........................... 39
Montaža meča ............................ 39
Napenjanje verige ...................... 40
Oljenje verige ............................. 40
Upravljanje verižne žage .......... 41
Vklop ......................................... 41
Preverjanje verižne zavore ............ 41
Preverjanje avtomatike za oljenje .. 42
Menjava meča ............................ 42
Tehnike žaganja........................ 42
Splošno ...................................... 42
Podiranje dreves .......................... 42
Obvejevanje ............................... 44
Rezanje na dolžino ...................... 44
Vzdrževanje in čiščenje ............. 45
Čiščenje ..................................... 45
Intervali vzdrževanja ................... 46
Tabela intervalov vzdrževanj......... 46
Oljenje verige ............................. 46
Brušenje verige ........................... 47
Nova veriga se mora uteči ........... 48
Vzdrževanje meča ....................... 48
Pa meča ..................................... 48
Shranjevanje ............................. 48
Nadomestni deli / Pribor .......... 49
Odstranjevanje/varstvo okolja . 49
Odpravljanje napak .................. 50
Garancijski list .......................... 51
Page 30
3 0
S I
Namen uporaba
Električna verižna žaga je primerna samo
za žaganje lesa in ni namenjena obdelo-
vanju drugih materialov, npr. zidov, ume-
tnih snovi ali živil.
Električna žaga je namenjena domači
uporabi in ni primerna za profesionalno
uporabo.
Žago lahko uporabljajo samo odrasli. Mladoletniki, starejši od 16 let, smejo žago upo-
rabljati samo pod nadzorom odrasle osebe.
Proizvajalec ne odgovarja za škodo,
povzročeno zaradi nenamenske ali napačne uporabe.
Električno verižno žago lahko uporablja
zgolj ena oseba za žaganje lesa. Verižno
žago z desno roko držite za zadnji ročaj
in z levo roko za sprednji ročaj. Uporabnik
mora pred uporabo verižne žage prebrati
in razumeti vse opozorila in navodila v
navodilih za uporabo. Uporabnik mora
nositi ustrezno osebno zaščitno opremo.
Z verižno žago je dovoljeno žagati le
les. Žaganje materialov, kot so plastika,
kamen, kovina ali les, ki vsebuje tujke (npr.
žeblje ali vijake), ni dovoljeno!
Splošni opis
Slikovni prikaz najpomembnej-
ših funkcijskih delov najdete na
sprednji in zadnji razklopni strani.
Obseg dobave
- Električna verižna žaga
- Meč (vodilna tirnica) (že montirani)
- Veriga (že montirani)
- Ščitnik meča
- Steklenica s 180 ml bioolja
za verigo žage
- Navodila za uporabo
Pregled
A
1 Zadnji ročaj
2 Pokrovček posode za olje
3 Ročica verižne zavore / prednja
zaščita za roke
4 Meč (vodilna tirnica)
5 Veriga
6 Menjalna konica
7 Zobati prislon
8 Sprednji ročaj
9 Elektromotor
10 Stikalo za vklop/izklop
11 Zapora vklopa
12 Lovilec verige
13 Obroček za napenjanje verige
14 Pritrdilni vijak pokrova verižnika
15 Pokrov verižnika
16 Zadnja zaščita za roke
17 Držalo za kabel
18 Priključni kabel
20 Steklenica za olje
C
21 Prikaz nivoja olja
22 Oznaka za minimum „MIN“ na
prikazu nivoja olja
F
23 Železniškega vijaka
24 Pritrdilni vijak
G
25 Zobnik
26 Nos
J
27 Olje prehod
28 Vijak za pritrjevanje
29 Pritrdilni vijak vijak
Page 31

3 1
S I
Opis funkcij
Verižno žago poganja elektromotor. Veriga
žage teče okrog meča (vodilna tirnica).
Naprava je opremljena s sistemom za hitro
napenjanje verige in verižno zavoro za
hitro zaustavitev. Avtomatika skrbi za stalno podmazovanje verige. Zaradi varnosti
uporabnika je verižna žaga opremljena z
različnimi varovalnimi napravami.
Funkcije delov za upravljanje so navedene
v naslednjem opisu.
Tehnični podatki
Električna
verižna žaga ...............FKS 2200 F3
Nazivna napetost U .. 230-240 V~, 50 Hz
Nazivna moč P ..........................2200 W
Razred zaščite .................................
II
Vrsta zaščite ....................................IP20
Hitrost verige v
0
.......................15,3 m/s
Teža (brez meča in verige) .............4,4 kg
Teža (z mečem in verigo) ...............5,3 kg
Prostornina posode
za olje znaša .................... pribl. 190 ml
Veriga ........................Oregon 91P057X
......................................... kromiran zob
......zmanjšana možnost povratnih udarcev
Meč ...............Oregon 16“ Double-Guard
........................... 160SDEA041-112364
Razmak verige ............................. 10 mm
Širina verige ............................... 1,3 mm
Ozobje verižnika ................................. 7
Meč (vodilna tirnica) ................. 460 mm
Dolžina reza ............................ 395 mm
Raven zvočnega
tlaka (L
pA
) ............ 84,9 dB (A); KpA=3 dB
Raven zvočne moči
(L
WA
) ............. 107,7 dB (A); KWA=2,58 dB
Zajamčena raven zvočne moči 110 dB (A)
Vibracije (a
h
) ..... 7,612 m/s2 ; K=1,5 m/s
2
Navedena vrednost vibracij je izmerjena
po standardiziranem postopku ter jo je
možno uporabiti za medsebojno primerjavo električnih orodij.
Navedeno vrednost vibracij je prav tako
možno uporabiti za oceno izpostavljenosti
uporabnika.
Opozorilo:
Vrednost vibracij med dejansko
uporabo se lahko razlikuje od nave-
dene vrednosti, odvisno od načina
uporabe električnega orodja.
Določiti je treba varnostne ukrepe
za zaščito uporabnika, ki so odvis-
ni od ocene izpostavljenosti med
dejansko uporabo (pri tem je treba
upoštevati tudi čas, ko je orodje
izključeno, in čas, ko je vključeno,
vendar deluje brez obremenitve).
Pridržujemo si pravico do tehničnih in
oblikovnih sprememb, ki so povezane z
nadaljnjim razvojem žage.
Zaradi tega ne jamčimo za mere, navodila
in podatke v teh navodilih za uporabo.
Pravnih zahtevkov na podlagi navodil za
uporabo ni možno uveljavljati.
Varnostna navodila
V tem poglavju so podana osnovna varno-
stna navodila za delo z električno verižno
žago.
Električna verižna žaga je nevarna
naprava, ki lahko pri napačni ali
malomarni uporabi povzroči resne ali
celo smrtne poškodbe. Da bi zagotovili lastno varnost in varnost drugih,
vedno upoštevajte naslednja varnostna navodila ter v primeru negotovosti prosite za nasvet strokovnjaka.
Page 32

3 2
S I
Varnostna navodila/
simboli na žagi
Pred delom se dobro seznanite z vse-
mi upravljalnimi elementi naprave.
Vadite delo z žago ter prosite strokovnjaka, da vam razloži funkcije,
način delovanja in tehnike žaganja.
Veriga žage se ne vrti, če je aktivira-
na verižna zavora. Sprostite verižno
zavoro tako, da potisnete zavorno
ročico proti sprednjemu ročaju.
Preberite in upoštevajte navodila za
uporabo naprave!
Nosite zaščitna očala
in zaščito za sluh
Nosite zaščito glave!
Nosite zaščitne rokavice, da
preprečite ureznine!
Nosite varnostne čevlje s stabilnim
podplatom!
Nosite zaščitno obleko!
Verižno žago vedno
uporabljajte z dvema
rokama
Pozor! Nevarnost povratnih udar-
cev! Pri delu pazite na povratne
udarce naprave.
Naprave ne izpostavljajte dežju ali
vlagi. Naprave ne uporabljajte v
vlažnem okolju.
Pozor! V primeru, da se priključni
kabel med žaganjem poškoduje ali
prereže, ga nemudoma izvlecite iz
vtičnice.
dB
L
WA
Zajamčena raven zvočne moči
Simboli na tablici s podatki:
Električne naprave ne odstranite z
gospodinjskimi odpadki.
460 mm
Meč (vodilna tirnica)
Zaščitni razred II
Simboli pod pokrovom zobnika:
Upoštevajte smer vrtenja verige žage.Pozor! Preberite navodila za uporabo.
Simboli na meču:
Smer vrtenja verige žage
Simbol na pokrovu posode za olje:
Naoljite verigo žage
Simbola na pritrdilnem vijaku pokrova
zobnika:
ODPRTO
ZAPRTO
Simboli na ročici verižne zavore:
O Verižna zavora: izključena
I Verižna zavora: vključena
Page 33

3 3
S I
Simboli v navodilih
za uporabo
Opozorilni simboli z napotki
za preprečevanje poškodb in
materialne škode.
Simbol za obveznost (namesto kli-
caja je podana zapoved) z naved-
bami za preprečevanje škode.
Obvestilni simbol z informacijami
za boljše rokovanje z napravo.
Splošna varnostna navodila
Pred uporabo žage se seznanite z
vsemi upravljalnimi elementi. Vadite
žaganje (žagajte hlodovino na kozi
za žaganje) in prosite izkušeno osebo ali strokovnjaka, da vam razloži
funkcije, način delovanja in tehnike
žaganja ter vas seznani z osebno
zaščitno opremo.
Upoštevajte navodila za zaščito
pred hrupom in lokalne predpise za
podiranje dreves. V skladu z lokalnimi predpisi je morebiti potreben
preizkus sposobnosti. Povprašajte
pri svojem gozdarskem uradu.
Pozor! Pri uporabi električnih orodij
je treba za zaščito pred električnim
udarom, nevarnostjo telesnih
poškodb in požara upoštevati naslednje temeljne varnostne ukrepe:
Obstaja nevarnost telesnih
poškodb.
Splošni varnostni napotki
za električna orodja
OPOZORILO! Preberite vsa
varnostva opozorila in navodila. Neupoštevanje varnostnih
navodil in opozoril lahko povzroči
električni udar, požar in/ali težke
poškodbe.
Varnostna navodila in opozorila
shranite za prihodnjo uporabo.
Pojem ,,električno orodje”, uporabljen v
varnostnih navodilih, se nanaša na električna orodja s priklopom na omrežje (s
priključnim kablom) in na akumulatorska
električna orodja (brez priključnega kabla)
Varnost na delovnem mestu
• Poskrbite, da bo vaše delov-
no mesto vedno čisto in dobro
osvetljeno. Nered ali neosvetljena
delovna področja lahko povzročijo
nezgode.
• Električne verižne žage ne upo-
rabljajte v okolju, kjer obstaja
nevarnost eksplozije in v katerem se nahajajo gorljive tekočine, plini ali prah. Električna orodja
povzročajo iskrenje, zato se gorljiv
prah ali pare lahko vnamejo.
• Ne dovolite otrokom in drugim
osebam, da bi se med delom
približale električni verižni žagi.
Druge osebe lahko odvrnejo vašo pozornost in izgubili boste nadzor nad
orodjem.
Page 34

3 4
S I
Električna varnost:
Previdno: Z upoštevanjem nasled-
njih navodil lahko preprečite nesreče in poškodbe zaradi električnega
udara:
• Priključni vtič električne verižne
žage mora ustrezati vtičnici.
V nobenem primeru vtiča ne
smete spreminjati. Uporaba
adapterskih vtičev v kombinaciji
z zaščitno ozemljenimi električ-
nimi orodji ni dovoljena. Nespre-
menjen vtič in ustrezna vtičnica zmanjšujeta nevarnost električnega udara.
• Izogibajte se telesnemu stiku
z ozemljenimi površinami, na
primer s cevmi, grelci, štedilniki
in hladilniki. Če je ozemljeno tudi
vaše telo, obstaja povečano tveganje
električnega udara.
• Električno verižno žago zavarujte pred dežjem in vlago. Vstop
vode v električno orodje povečuje nevarnost električnega udara.
• Električnega kabla ne upo-
rabljajte za prenašanje ali obe-
šanje električne verižne žage
in ne vlecite vtiča iz vtičnice
tako, da vlečete za kabel. Kabel
zavarujte pred vročino, oljem,
ostrimi robovi in premikajočimi
se deli orodja. Poškodovan ali zavo-
zlan kabel povečuje nevarnost električnega udara.
• Če električno verižno žago upo-
rabljate na prostem, uporabljajte samo podaljšek, ki je primeren za delo na prostem. Uporaba
podaljševalnega kabla, ki je primeren
za uporabo na prostem, zmanjšuje
nevarnost električnega udara.
• Če se ne morete izogniti uporabi
električne verižne žage v vlažnem okolju, uporabite zaščitno
stikalo okvarnega toka. Uporaba
zaščitnega stikala okvarnega toka
zmanjša tveganje električnega udara.
Zaščitno stikalo okvarnega toka upo-
rabljajte z zagonskim tokom 30 mA ali
manj.
• Uporabljajte samo odobreno napa-
jalni kabel tip H05RN-F, ki so več kot
75 m v dolžino in je namenjeno za
uporabo na prostem. Dirigent presek
kabla mora biti vsaj 2,5 mm
2
. Vedno
popolnoma Odvijte kabel boben pred
uporabo. Preverite napajalni kabel za
škodo.
Varnost oseb:
Previdno: Tako preprečite nesreče in
poškodbe:
• Bodite zbrani in pazite, kaj de-
late. Dela z električno verižno
žago se lotite razumno. Električne verižne žage ne uporabljajte,
ko ste utrujeni ali pod vplivom
mamil, alkohola oziroma zdravil. En sam trenutek nepazljivosti pri
uporabi električne verižne žage ima
lahko za posledico resne telesne poškodbe.
• Uporabljajte osebno zaščitno
opremo in vedno nosite zaščitna očala. Nošenje osebne zaščitne
opreme, na primer nedrsečih zaščitnih
čevljev, zaščitne čelade ali glušnikov,
zmanjšuje tveganje telesnih poškodb.
• Izogibajte se nenamernemu
vklopu orodja. Preden električno verižno žago priključite na
električno omrežje, jo dvignete
Page 35

3 5
S I
Uporaba in ravnanje
z električno verižno žago:
• Ne preobremenjujte orodja.
Uporabljajte samo električno
orodje, ki je predvideno za
opravljanje določenega dela. Z
ustreznim električnim orodjem boste
delali bolje in varneje v predvidenem
območju zmogljivosti.
• Ne uporabljajte električnega
orodja, ki ima pokvarjeno stikalo. Električno orodje, ki ga ni mož-
no vklopiti ali izklopiti, je nevarno in
ga je treba popraviti.
• Pred nastavljanjem naprave,
zamenjavo pribora ali odlaganjem naprave vedno izvlecite
vtič iz električne vtičnice. Ta previ-
dnostni ukrep onemogoča nenamerni
zagon električne verižne žage.
• Električno verižno žago, ki je ne
uporabljate, shranjujte izven dosega otrok. Osebam, ki orodja
ne poznajo ali niso prebrale teh
navodil, ne dovolite uporabljati
orodja. Električna orodja so nevarna,
če jih uporabljajo neizkušene osebe.
• Električno verižno žago skrbno
vzdržujte. Prepričajte se, da gib-
ljivi deli delujejo brezhibno in da
niso stisnjeni. Prav tako ne smejo biti zlomljeni ali poškodovani
do te mere, da ovirajo delovanje
električne verižne žage. Pred
ponovno uporabo je treba poškodovani del orodja popraviti.
Vzrok za številne nezgode so prav sla-
bo vzdrževana električna orodja.
• Rezalna orodja naj bodo ostra
in čista. Skrbno negovana rezalna
orodja z ostrimi robovi se manj zatika-
jo in so lažje vodljiva.
ali prenašate, se prepričajte, da
je izključena.
Če pri nošenju električne verižne žage
držite prst na stikalu ali če vklopljeno
orodje priključite na omrežje, lahko
pride do nesreče.
• Pred vklopom z električne verižne žage odstranite nastavitvena
orodja ali vijačni ključ. Orodje ali
ključ, ki se nahaja na vrtečem se delu
orodja, lahko povzročita nezgodo.
• Izogibajte se nenormalni telesni
drži. Poskrbite za varno stojišče
in ohranite ravnotežje. Tako boste
lahko v nepričakovani situaciji bolje
obvladali električno verižno žago.
• Uporabljajte primerno obleko.
Ne nosite širokih oblačil ali nakita. Lasje, oblačila in rokavice
naj se ne približujejo premikajočim se delom orodja. Premikajoči
se deli orodja lahko zagrabijo ohlapno obleko, nakit ali dolge lase.
• Če je mogoče namestiti priprave za odsesavanje in prestrezanje prahu, poskrbite, da
so priključene in se pravilno
uporabljajo. Uporaba odsesavanja
prahu lahko zmanjša nevarnosti zaradi
prahu.
• Opozorilo! Električno orodje med delovanjem ustvarja elektromagnetno po-
lje. To polje lahko v določenih pogojih
vpliva na aktivne in pasivne medicinske vsadke. Da bi zmanjšali nevarnost
resnih ali smrtnih poškodb, osebam z
medicinskimi vsadki priporočamo, da
se pred uporabo orodja posvetujejo
s svojim zdravnikom in proizvajalcem
medicinskega vsadka.
Page 36

3 6
S I
• Električno verižno žago, pribor,
nastavke itd. uporabljajte v
skladu s temi navodili. Pri tem
upoštevajte delovne pogoje in
vrsto dela, ki ga nameravate
opravljati. Zaradi uporabe električne
verižne žage v druge, nepredvidene
namene, lahko nastanejo nevarne situacije.
• Pri žaganju na klancu vedno stojte nad
deblom. Da bi v trenutku, ko z žago v
celoti prežagate deblo, obdržali po-
poln nadzor, proti koncu reza zmanj-
šajte pritisk, vendar verižno žago še
naprej trdno držite za ročaja. Pazite,
da se veriga ne dotakne tal. Ko končate z rezom, počakajte, da se verižna
žaga zaustavi, preden jo odstranite.
Preden se premaknete do naslednjega
drevesa, motor verižne žage vedno
izklopite.
• Iz bližine drevesa po potrebi odstranite
umazanijo, odpadlo skorjo, žeblje,
sponke in žico.
Servis:
• Električno orodje lahko popra-
vlja samo usposobljen strokovnjak, in to izključno z originalnimi nadomestnimi deli. Le tako bo
tudi vnaprej zagotovljena varna raba
električnega orodja.
• Dosledno upoštevajte navodila za
vzdrževanje, preverjanje in servisiranje, ki so podana v teh navodilih za
uporabo.
Poškodovano zaščitno opremo in dele
mora popraviti ali zamenjati naš ser-
visni center, razen če je v navodilih za
uporabo navedeno drugače.
Varnostni predpisi za verižne žage:
• Med delovanjem žage se z deli
telesa ne približujte verigi. Pred
zagonom žage se prepričajte,
da se veriga ničesar ne dotika.
Pri delu z verižno žago lahko en sam
trenutek nepazljivosti povzroči, da veri-
ga zagrabi obleko ali del telesa.
• Verižno žago vedno držite z
desno roko za zadnji ročaj in z
levo roko za sprednji ročaj. Drža-
nje verižne žage v obratnem delovnem
položaju povečuje nevarnost nastanka
poškodb in se ne sme uporabljati.
• Napravo držite samo na izoliranih površinah ročaja, saj lahko
veriga žage pride v stik s skritimi električnimi napeljavami ali
električnim kablom naprave.
Stik verige žage z napeljavo pod
napetostjo lahko spravi pod napetost
tudi kovinske dele naprave in povzroči
električni udar.
• Nosite zaščitna očala in zaščito
za sluh. Priporočamo tudi uporabo druge zaščitne opreme za
glavo, roke, noge in stopala.
Ustrezna zaščitna obleka zmanjšuje
nevarnost nastanka poškodb zaradi
trsk in odrezkov, ki letijo naokrog, in
nenamernega dotika z verigo.
• Z verižno žago ne delajte na
drevesu. Pri delu z verižno žago na
drevesu obstaja nevarnost poškodb.
• Poskrbite za stabilno držo in
verižno žago uporabljajte le,
ko stojite na stabilnih, varnih
in ravnih tleh. Drseča podlaga ali
nestabilne stojne površine, kot je na
primer lestev, lahko povzročijo izgubo
ravnotežja ali nadzora nad verižno
žago.
Page 37

3 7
S I
• Pri rezanju upognjene veje upoštevajte, da se bo ta vrnila v
izhodiščni položaj. Ko se napetost
v lesnih vlaknih sprosti, lahko napeta
veja uporabnika udari in/ali verižna
žaga uide iz nadzora.
• Še posebej previdni bodite pri
rezanju podrasti in mladih dreves. Tanek material se lahko zatakne
v verigo in udari proti vam ali pa vas
spravi iz ravnotežja.
• Verižno žago prenašajte tako,
da jo držite za sprednji ročaj
in iztegnjeno proč, tako da
je veriga obrnjena stran od
vašega telesa. Pri transportu
ali shranjevanju verižne žage
nanjo vedno nataknite zaščitni
pokrov. Previdno ravnanje z verižno
žago zmanjšuje verjetnost nenamernega dotika vrteče se verige.
• Upoštevajte navodila za mazanje, napenjanje verige in menjavo pribora. Nepravilno napeta
in namazana veriga se lahko pretrga
ali pa povečuje nevarnost povratnega
udarca.
• Roči naj bodo vedno suhi, čisti
in nemastni. Mastni ročaji drsijo in
lahko povzročijo izgubo
nadzora nad orodjem.
• Žagajte samo les. Verižne žage
ne uporabljajte za dela, za
kakršna ni namenjena. Primer:
Verižne žage ne uporabljajte za
žaganje plastike, zida ali ne-
lesenih gradbenih materialov.
Uporaba verižne žage, ki ni v skladu
z njeno namembnostjo, lahko povzroči
nevarnost.
Previdnostni ukrepi proti
povratnemu udarcu
Pozor, nevarnost povratnega udar-
ca! Pri delu pazite na možnost povratnega udarca orodja. Nevarnost
poškodb! S previdnostjo in pravilno
tehniko žaganja lahko preprečite
povratne udarce.
• Do povratnega udarca lahko pride, če
se konica vodila dotakne predmeta ali
če se les upogne in se veriga uklešči v
rez (gl. sliko 1/sl. B).
• Stik z vodilom lahko v večini primerov povzroči nepričakovano, nazaj
usmerjeno reakcijo, pri kateri se vodilo
odbije navzgor in nazaj v smeri uporabnika (gl. sliko 1/sl. A).
• Ukleščenje verige na zgornjem robu
vodila lahko vodilo močno odbije na-
zaj proti uporabniku.
• Vsaka taka reakcija lahko povzroči izgubo nadzora nad žago in celo težke
poškodbe. Ne zanašajte se samo na
varnostne elemente, vgrajene v verižno
žago. Kot uporabnik verižne žage morate za varno delo uporabiti različne
ukrepe.
Povratni udarec je posledica napačne
oziroma neustrezne uporabe električnega
orodja. Izogniti se mu je mogoče s primer-
nimi varnostnimi ukrepi, ki so opisani v
nadaljevanju:
Page 38

3 8
S I
• Skrbno upoštevajte navodila za
vzdrževanje, nadzor in servisiranje v
teh navodilih za uporabo.
Poškodovane zaščitne priprave in
dele mora strokovno popraviti naša
servisna služba ali pa jih zamenjati, če
ni v navodilih za uporabo navedeno
drugače.
Varnostne funkcije
A
1 Zadnji ročaj z zaščito za
roke (16):
Ščiti roko pred vejami ter verigo,
če le-ta zdrsne z meča.
3 Ročica verižne zavore /
zaščita za roke
Varnostna naprava, ki verigo pri
povratnem udarcu takoj zaustavi.
Ročico lahko upravljate tudi ročno. Ščiti levo roko uporabnika, če
zdrsne z ročaja.
Veriga žage se ne vrti, če je aktivi-
rana verižna zavora.
5 Veriga z majhnjim povra-
tnim udarcem
s pomočjo posebej razvitih var-
nostnih naprav pomaga prestreči
povratne udarce.
7 Zobati prislon
Poveča stabilnost pri vertikalnih
rezih in olajša žaganje.
9 Elektromotor
je iz varnostnih razlogov dvojno
izoliran.
10 Stikalo za vklop/izklop s
funkcijo takojšnje zaustavitve verige
Ko izpustite stikalo vklop/izklop,
se žaga takoj izklopi.
• Žago trdno držite z obema ro-
kama, tako da palca in prsti
objemajo ročaja verižne žage.
Telo in roki naj bodo v položaju,
v katerem se lahko uprete silam
povratnih udarcev. Z uporabo
ustreznih ukrepov lahko uporabnik klju-
buje silam povratnih udarcev. Verižne
žage nikoli ne izpustite.
• Izogibajte se nenormalni drži
telesa in ne žagajte nad višino
ramen. S tem se izognete nenamernim dotikom s konico vodila in zago-
tovljen je boljši nadzor verižne žage v
nepredvidenih situacijah.
• Vedno uporabljajte le nadome-
stna vodila in verige, ki jih je
predpisal proizvajalec. Neustre-
zna nadomestna vodila in verige lahko
povzročijo, da se veriga pretrga in/ali
pride do povratnega udarca.
•
Pri brušenju in vzdrževanju verige upoštevajte navodila proizvajalca. Premajhni omejevalniki globine
povečujejo možnost povratnega udarca.
Dodatni varnostni napotki
• Če se poškoduje priključni kabel tega
orodja, naj ga zaradi varnostnih razlogov zamenja proizvajalec, njegova
servisna služba ali podobno ustrezno
usposobljen strokovnjak.
• Če je treba zamenjati priključni kabel,
priporočamo, da to stori proizvajalec
ali njegov zastopnik (npr. pooblaščena
servisna delavnica, servisna služba itd.).
• Priključno napeljavo položite tako, da
je med žaganjem ne morejo zadeti
veje ali podobno.
• Uporabljajte zaščitno stikalo za
udarne tokove z diferencialnim tokom
30 mA ali manj.
Page 39

3 9
S I
11 Zapora vklopa
Za vklop mora biti zapora vklopa
sproščena.
12 Lovilec verige
zmanjša nevarnost poškodb, če
se veriga pretrga ali sname.
Montaža
Pri delu z žago vedno no-
site zaščitne rokavice in
uporabljajte samo originalne dele. Preden se lotite
kakršnihkoli del na žagi, vedno izvlecite priključni kabel iz
vtičnice.Nevarnost poškodb!
Preden začnete uporabljati električno
verižno žago, morate:
- po potrebi montirati meč, verigo žage
in pokrov verige,
- napeti verigo žage,
- naliti olje za mazanje verige,
- preverite funkcijo verižne zavore in
avtomatike za oljenje.
Montaža verige
G
1. Razprostite verigo v obliki zanke
tako, da kažejo rezalni robovi v
smeri urnega kazalca (5).
2. Napenjalno ploščo (24) sprostite
z vrtenjem v levo.
3. Namestite verigo (5) v utor na
meču. Da namestite meč (4), ga
držite dvignjenega za pribl. 45
stopinj, da boste verigo (5) lažje namestili na zobnik (25). Običajno je,
da je veriga (5) povešena. Povsem
običajno je, da veriga visi navzdol.
4. Napnite verigo tako, da vrtite
napenjalno ploščo (24) v smeri
urnega kazalca.
5. Pritdite pokrov verižnika. Pri tem
najprej vstavite nastavek pokrova
v za to predvideno zarezo (16).
Rahlo privijte pritrdilni vijak (24),
saj morate žago še napeti.
Pokrov verižnika dodatno pritrdite
z varnostnim vijakom (15).
Bodi previden! Lahko namažite ele-
ktrična verižna žaga.
Prosimo, upoštevajte, da električna verižna
žaga po uporabi za olje in olje lahko pride do
uhajanja če je shranjen na strani ali na glavo.
To je normalen proces, rezultat potrebno pre-
zračevanje, odpiranje na vrhu rezervoarja in
ni razloga za pritožbo. Vsako električno žago
nadzira in testira z oljem med proizvodnjo,
malo počitka v rezervoarju lahko kljub praznjenje, ki enostavno spotted ohišje z oljem med
prevozom. Prosimo, čisto stanovanje s krpo
Pred menjavo verige morate očistiti umazanijo
iz zareze vodila, saj lahko v primeru kopičenja
umazanije veriga skoči iz vodila. Umazanija
lahko poleg tega tudi vpije olje verige. Posledica
tega je, da se olje za verigo ne porazdeli oz. se
porazdeli v manjši meri do spodnje strani vodila, tako da ni namazano v zadostnem obsegu.
Montaža meča
F
1. Položite žago na ravno podlago.
2. Odstranite varnostni vijak pod
napenjalno enoto.
Da bi odstranili pokrov verižnika
(14), odvijte pritrdilni vijak (15)
v nasprotni smeri urnega
kazalca (
).
3. Za montažo položite meč (4)
na zatič tirnice tako (23), da bo
napenjalna plošča obrnjena nav-
zven (24).
Page 40

4 0
S I
Napenjanje verige
Redno napenjanje verige poveča varnost
uporabnika in zmanjša oz. prepreči obra-
bo in poškodbe na verigi. Uporabnikom
priporočamo, da pred začetkom del in v
pribl. 10-minutnih razmakih preverijo napetost verige in jo po potrebi popravijo.
Pri delu z žago se veriga segreje, zaradi
česar se nekoliko raztegne. Do tega poja-
va pride predvsem pri novih verigah.
Verige ne smete napenjati ali
zamenjati, če je vroča, saj se po
ohladitvi spet nekoliko skrči. Če tega ne
boste upoštevali, lahko pride do poškodb
na vodilu ali motorju, saj bo tako veriga
na meču nameščena pretesno.
Napetost in mazanje verige zelo vplivata
na življenjsko dobo verige.
Veriga je pravilno napeta, če na spodnji
strani meča ne visi navzdol in če jo je mogoče s prosto roko (zaščiteno z rokavico)
voditi okrog meča. Če povlečete verigo s
silo 9 N (približno 1 kg), sme razmak med
verigo in mečem znašati največ 2 mm.
10 min
B
1. Prepričajte se, da je verižna zavora sproščena (da je ročica verižne
zavore potisnjena proti prednjemu
ročaju) (8) (položaj
O).
2. Sprostite pritrdilni vijak (14)
(
).
3. Če želite napeti verigo, zavrtite
obroček za napenjanje verige
(13) v smeri urnega kazalca
Če želite sprostiti verigo, zavrtite
obroček za napenjanje verige
(13) v nasprotni smei urnega kazalca.
4. Zategnite pritrdilni vijak (14)
(
).
Pri novi verigi za žago morate na-
petost verige ponovno nastaviti po
največ petih rezih.
Oljenje verige
Meč in veriga ne smeta nikoli biti
brez olja. Delovanje žage s premalo
olja zmanjšuje učinkovitost žaganja
in skrajšuje življenjsko dobo žage,
saj bo veriga hitreje otopela. Pomanjkanje olja prepoznate po nastajanju
dima ali spremembi barve meča.
Takoj ko zaženete motor, teče olje proti meču.
Polnjenje olja:
• Redno preverjajte prikaz nivoja olja
(
C
21) in dolijte olje, ko gladina
doseže oznako za minimum „MIN“
(
C
22) na prikazu. Prostornina posode
za olje je pribl. 190 ml.
• Uporabljajte biološko olje Grizzly, ki
vsebuje dodatke za zmanjševanje tre-
nja in obrabe. Naročite ga lahko prek
naše servisne službe.
• Če biološko olje Grizzly ni na voljo,
uporabite olje za mazanje verig z
malo dodatki za oprijemanje.
• Pred daljšimi obdobji neobratovanja
izpraznite posodo za olje (6-8 tednov).
C
1. Odvijte pokrovček posode za
olje (2) in natočite olje za verige.
2. Obrišite morebitno razlito olje in
zaprite pokrovček.
Page 41

4 1
S I
izklop (10) Žaga teče z najvišjo
hitrostjo. Izpustite zaporo vklopa.
7. Žaga se sama izklopi, če izpus-
tite stikalo za vklop/izklop (10).
Trajen vklop ni možen.
Preverjanje verižne zavore
Veriga žage se ne vrti, če je aktivi-
rana verižna zavora.
E
1. Položite žago na trdno ravno
podlago. Ne sme se dotikati nobenih predmetov.
2. Priključite napravo na električno
omrežje.
3. Izključite verižno zavoro, tako da
potisnete ročico proti sprednjemu
ročaju (položaj
O).
4. Držite žago čvrsto z obema rokama, z eno roko za zadnji in drugo
roko za prednji ročaj. Palec in prsti
se morajo čvrsto oklepati ročajev.
5. Vklopite električno verižno žago.
6. Ko motor deluje, z levo roko
aktivirajte ročico verižne zavore
(11). Za izvedbo potisnite ročico
za zaviranje verige/sprednjo
zaščito za roke (3) stran od sprednjega ročaja (8) (položaj
I ).
Veriga se takoj zaustavi.
7. Če verižna zavora deluje brezhibno, spustite stikalo za vklop/
izklop in sprostite verižno zavoro.
Če verižna zavora ne deluje
pravilno, električne verižne
žage ne smete uporabljati.
Obstaja nevarnost
poškodb zaradi še naprej se
vtreče verige.
Žago oddajte v popravilo
naši servisni službi.
Preden dolijete olje za veri-
go, vedno izključite orodje
in počakajte, da se motor
ohladi. Zaradi prelivanja olja
obstaja nevarnost požara.
Upravljanje
verižne žage
Verižno žago vklopite šele, ko so
meč, veriga in pokrov verižnika
pravilno montirani. Pazite, da se
omrežna napetost ujema s podatki
na tipski ploščici. Pred zagonom
žage se namestite v varen položaj.
Pred zagonom se prepričajte, da se
žaga ne dotika nobenih predmetov.
Pozor! Žaga lahko pušča olje, glej-
te poglavje Varnostna navodila.
Vklop
D
1. Pred zagonom preverite, če je v
posodi za olje dovolj olja in ga
po potrebi dolijte (glejte poglavje
Polnjenje olja).
2. Iz konca kabelskega podaljška
naredite zanko in jo obesite na
držalo za razbremenitev kabla
(17) na zadnjem ročaju (1).
3. Priključite napravo na električno
omrežje.
4. Sprostite verižno zavoro, tako da
ročico potisnete proti prednjemu
ročaju (8).
5. Držite žago čvrsto z obema roka-
ma, z eno roko za zadnji in drugo
roko za prednji ročaj. Palec in prsti
se morajo čvrsto oklepati ročajev.
6. Za vklop žage pritisnite zaporo
vklopa z desnim palcem (11) nato
pa pritisnite stikalo za vklop/
Page 42

4 2
S I
Preverjanje avtomatike za
oljenje
Pred začetkom dela preverite nivo olja in
avtomatiko za oljenje
• Vklopite verižno žago in jo držite nad
svetlo podlago. Žaga se ne sme doti-
kati tal.
Če vidite sled olja, to pomeni, da
žaga deluje brezhibno. Izberite
nastavitev olja, pri kateri olje ne
kaplja, vendar je veriga naoljena.
Preden žago pospravite, nastavite
gumb za reguliranje olja na ničlo.
J
. Očistite dozirne odprtine za olje, da
bi zagotovili brezhibno samodejno
oljenje žage med obratovanjem.
Menjava meča
F
1. Izklopite žago in izvlecite vtič iz
vtičnice.
2. Položite žago na ravno podlago.
3. Pritrdilni vijak (14) zavrtite v levo
(
) in popustite obroček za
napenjanje verige (
A
13), ), da
sprostite napetost verige in odstranite pokrov zobnika (15).
4. Odstranite meč (4) in verigo
žage (5).
Da odstranite meč (4), ga držite
dvignjenega za pribl. 45 stopinj,
da boste verigo (5) lažje sneli z
zobnika (25).
5. Popustite vijak (28) na zadnji
strani napenjalne plošče (24).
Ponovno montirajte napenjalno
ploščo (24) v obratnem vrstnem
redu.
Pri tem pazite, da bo čep napen-
jalne plošče (29) spodaj, kot je
prikazano na Sliki
(glejte tudi
„Obračanje meča“,
+ ).
5. Za montažo položite meč (4)
na zatič tirnice tako (23), da bo
napenjalna plošča obrnjena nav-
zven (24).
Tehnike žaganja
Splošno
• Pri žaganju imate boljši nadzor, če ža-
gate s spodnjo stranjo meča (z vlečno
verigo), kot če žagate z zgornjo stranjo meča (s potiskajočo verigo).
• Veriga žage se med in po žaganju ne
sme dotikati tal ali dugih predmetov.
• Pazite, da se veriga v rezu ne zatakne.
Deblo drevesa se ne sme zlomiti ali
razklati.
• Upoštevajte vsa varnostna navodila za
preprečevanje povratnih udarcev (glejte poglavje Varnostna navodila).
Če se veriga zatakne, ele-
ktrične verižne žage ne poskušajte izvleči na silo, saj
obstaja nevarnost poškodb.
Ugasnite motor in osvobodite
žago z vzvodom ali klinom.
Podiranje dreves
Za podiranje dreves potrebu-
jete veliko izkušenj. Podirajte
drevesa, samo če znate dobro upravljati električno verižno žago. Žage nikakor ne
uporabljajte, če ste negotovi.
Page 43

4 3
S I
Neizkušenim uporabnikom iz var-
nostnih razlogov odsvetujemo podi-
ranje drevesa, če je premer debla
večji od dolžine meča.
• Pazite, da v bližini delovnega območja
ni oseb ali živali. Varnostna razdalja
med drevesom, ki ga želite podreti,
in naslednjim delovnim mestom mora
znašati 2 ½ dolžini drevesa.
• Pazite na smer padanja.
Uporabnik se mora v bližini podrtega
drevesa prosto gibati, da bi lahko eno-
stavneje razžagal in obvejil drevo. Preprečite, da bi se podirajoče se drevo
naslonilo ob drugo drevo. Upoštevajte
naravno smer padca, ki je odvisna od
naklona in krivosti drevesa, smeri vetra
in števila vej.
• Pri strmem terenu stojte nad drevesom,
ki ga želite podreti.
• Majhna drevesa s premerom 15-18
cm lahko načeloma odžagate z enim
rezom.
• Pri drevesih z večjim premerom je treba uporabiti tehniko zaseka in podža-
govanja (glejte
Q
).
Ne podirajte dreves, če piha
močan veter ali veter spremenljivih smeri , če obstaja
nevarnost poškodovanja
lastnine ali v primeru možnosti, da drevo zadane ob
nadzemni vod.
Takoj ko prenehate žagati, si snemi-
te zaščito za sluh, da boste lahko
slišali zvoke in varnostne signale.
O
1. Obvejevanje:
Odstranite veje, ki visijo navzdol,
tako da vejo odžagate na zgornji
strani. Nikoli ne žagajte vej nad
višino svojih ramen.
P
2. Območje umika:
Odstranite podrastje okoli dreve-
sa, da si zagotovite lažji umik.
Območje umika (1) mora biti za
drevesom zamaknjeno za prib-
ližno 45° od smeri načrtovanega
padca drevesa (2).
Q
3. Zasek za smer padca (A):
Zažagajte zasek v smer, v kate-
ro naj bi padlo drevo. Najprej
naredite zgornji rez, nato pa še
spodnjega. Slednji mora potekati
vodoravno in se natančno stikati
s prvim.
Globina zaseka naj znaša prib-
ližno 1/3 premera debla, kot pa
najmanj 45°.
Nikoli ne stopite pred drevo
z zasekom.
Q
4. Podžagovanje (B):
Deblo podžagajte z druge strani,
pri tem pa stojte na levi strani
debla in žagajte z vlečno verigo.
Deblo podžagajte približno 5 cm
nad vodoravnim rezom zaseka.
Rez naj bo tako globok, da
razdalja do zaseka znaša
najmanj 1/10 premera debla.
Neprežagani del se imenuje ščetina.
Ko je rez dovolj globok, vanj
potisnite klin za podiranje ali
lomilko. S tem preprečite, da se
meč zagozdi.
R
5. Potisnite zagozdo za podiranje
ali lomilko v zarezo na drevesu,
kakor hitro globina reza to omo-
goča, da preprečite ukleščenje
žaginega lista.
Page 44

4 4
S I
S
6. Če je premer debla večji od dolžine meča, naredite dva reza.
7. Po podžagovanju pade drevo
samo od sebe, lahko pa si pomagate s klinom za podiranje ali
lomilko.
Takoj ko začne drevo padati,
izvlecite žago iz reza, ugasnite motor, odložite žago in
zapustite delovno mesto po
poti za umik.
O
Obvejevanje
Obvejevanje pomeni odstranjevanje vej in
vejic s podrtega drevesa.
Veliko nesreč se zgodi prav pri ob-
vejevanju
Nikoli ne žagajte vej, če stojite na
deblu. Bodite pozorni na povratne
udarce, če so veje napete.
• Oporne veje odstranite šele po rezanju
na dolžino.
• Napete veje žagajte od spodaj
navzgor, da preprečite zagozditev ža-
gine verige.
• Pri rezanju debelejših vej uporabljajte
enako tehniko kot pri rezanju na dolžino.
• Delajte na levi strani debla in karseda
blizu žage. Po možnosti težo žage oprite na deblo.
• Če želite žagati veje na drugi strani,
pojdite na drugo stran debla.
• Razvejane veje odžagajte posamično.
Rezanje na dolžino
Rezanje na dolžino pomeni žaganje debla
na manjše kose.
• Pazite, da se veriga med žaganjem ne
dotika tal.
• Postavite se v stabilen položaj in pri
strmem terenu stojte nad deblom.
K
1. Deblo leži na tleh:
Prežagajte deblo od zgoraj
navzdol in pazite, da se na
koncu reza ne dotaknete tal.
Če obstaja možnost, da deblo
obrnete, ga najprej prežagajte
do 2/3, ga obrnite ter ga nato
prežagajte do konca od zgoraj
navzdol.
L
2. Deblo je na enem koncu
podprto:
Najprej od spodaj navzgor pre-
žagajte (z zgornjo stranjo meča)
1/3 debla, da preprečite, da bi
se le-to razklalo. Nato žagajte od
zgoraj navzdol (s spodnjo stranjo
meča) v smeri prvega reza, da se
izognete zagozditvi verige.
M
3. Deblo je podprto na obeh
koncih:
Najprej od zgoraj navzdol pre-
žagajte (s spodnjo stranjo meča)
1/3 debla. Nato žagajte od spo-
daj navzgor (z zgornjo stranjo
meča), dokler se reza ne srečata.
N
4. Žaganje na kozi:
Držite električno verižno žago
čvrsto z obema rokama in jo med
žaganjem vodite pred telesom.
Ko je deblo prežagano, vodite
napravo po desni strani ob svo-
jem telesu (1). Levo roko držite
karseda iztegnjeno (2). Pazite
na padajoče deblo. Postavite se
Page 45

4 5
S I
Čiščenje
• Po vsaki uporabi temeljito očistite napravo. S tem boste podaljšali njeno življenjsko dobo in se izognili nesrečam.
• Zavarujte ročaje pred bencinom, oljem
ali maščobo. Po potrebi očistite ročaje
s krpo, namočeno v milnico. Za čiščenje ne uporabljajte razredčil ali benci-
na!
• Po vsaki uporabi očistite verigo s
čopičem ali metlico. Za čiščenje ne
uporabljajte tekočin. Po čiščenju rahlo
naoljite verigo z verižnim oljem.
• Pri čiščenju odstranite tudi pokrov
verižnika (15), da boste lahko orodje
očistili tudi na tem mestu.
• Očistite prezračevalne reže in površino
žage s čopičem, metlico ali suho krpo.
Ne uporabljajte tekočin.
• Očistite dozirne odprtine za olje, da bi
zagotovili brezhibno samodejno olje-
nje žage med obratovanjem.
• Očistite dotok za olje (27), da zagoto-
vite nemoteno, samodejno oljenje ve-
rige žage med njenim delovanjem. V
ta namen uporabite čopič ali krpo za
brisanje in iz dotoka za olje odstranite
ostanke.
tako, da padajoče deblo ne predstavlja nobene nevarnosti. Pazite
na stopala, saj vas lahko deblo
pri padanju poškoduje. Držite
ravnotežje (3).
Vzdrževanje in
čiščenje
Vzdrževalna in čistilna dela
vedno opravljajte pri ugasnjenem motorju in izvlečenemu vtiču. Nevarnost poškodb!
Popravila in vzdrževalna
dela, ki niso opisana v teh
navodilih za uporabo, naj
opravi naš specializirani
servis. Uporabljajte samo
originalne nadomestne dele
Grizzly. Počakajte, da se naprava ohladi, preden začnete
z vzdrževalnimi in čistilnimi
deli, saj obstaja nevarnost
opeklin!
Page 46

4 6
S I
Intervali vzdrževanja
Redno opravljajte vzdrževalna dela, navedena v spodnji preglednici. Z rednim vzdrževanjem žage podaljšujete njeno življenjsko dobo. Poleg tega dosežete optimalno učinkovitost žaganja in se izognete nesrečam.
Tabela intervalov vzdrževanj
Sklop
naprave Delo
Pred
vsako
uporabo
Po 10 urah
obratovanja
Po vsaki
uporabi
Komponente
verižne zavore
Kontrola, po potrebi menjava
Verižnik Kontrola, po potrebi menjava
Veriga žage
(5)
Kontrola, oljenje, po potrebi brušenje ali menjava
Veriga žage
(5)
Čiščenje, oljenje
Meč (4) Kontrola, čiščenje, oljenje
Meč (4) Obračanje
Avtomatiko za
oljenje
Preverite avtomatiko za oljenje in
po potrebi očistite iztočni kanal za
olje
Oljenje verige
Redno čistite in oljite verigo. Tako
jo boste ohranili ostro in dosegli
optimalno učinkovitost naprave. V
primeru škode, nastale zaradi ne-
zadostnega vzdrževanja, garancija
ne velja. Kadar opravljate dela na
meču in verigi, izvlecite vtič in nosite zaščitne rokavice.
• Naoljite verigo po čiščenju, po 10
urah obratavanja ali najmanj enkrat
tedensko.
• Preden se lotite oljenja meča, ga temeljito očistite, predvsem ozobje meča.
Za čiščenje uporabite metlico in suho
krpo.
• Posamezne člene verige naoljite s
koničasto brizgalko za olje (na voljo
v specializiranih trgovinah). Nanesite
posamezne kapljice na členke in konice zob posameznih členov verige.
Page 47

4 7
S I
Brušenje verige
Slabo nabrušena veriga po-
veča nevarnost povratnega
udarca!
Kadar opravljate dela na
meču in verigi, nosite zaščitne rokavice.
Ostra veriga zagotavlja optimalno
žaganje. Brez težav zareže skozi les
in za seboj pušča velike ostružke lesa.
Če morate meč potiskati skozi les in
so ostružki drobni, je veriga topa. Pri
delu z zelo topo verigo ne nastajajo
ostružki, temveč samo lesni prah.
• Veriga žaga z rezalnimi členi, ki so
sestavljeni iz zoba in omejevalnika
globine. Razdalja v višini med obema
deloma določa globino brušenja.
• Pri brušenju zob upoštevajte naslednje
vrednosti:
H
- kot brušenja (30°),
- prsni kot (85°),
- globina brušenja (0,65 mm),
- premer okrogle pile (4,0 mm).
Odstopanja od navedenih
vrednosti lahko povečajo nevarnost povratnega udarca,
zaradi česar se poveča nevarnost nesreče!
Za brušenje verige potrebujete posebna
orodja, ki omogočajo brušenje rezil pod
pravilnim kotom in v pravi globini. Neizkušenim uporabnikom svetujemo, da verigo
oddajo v brušenje strokovnjaku ali servisni
delavnici. Če boste verigo nabrusili sami,
si potrebno orodje priskrbite v specializirani trgovini.
I
1. Izklopite žago in izvlecite vtič.
2. Snemite verigo (glejte poglavje
Upravljanje verižne žage). Za
pravilno brušenje mora biti veriga dobro napeta.
3. Za brušenje potrebujete okroglo
pilo s premerom 4,00 mm.
Brusilne pile z drugačnim
premerom lahko poškodujejo
verigo in ogrozijo varnost pri
delu!
4. Brusite samo od znotraj navzven. Vodi-
te pilo z notranje strani zoba navzven.
Dvignite pilo, ko jo povlečete nazaj.
5. Najprej nabrusite zobe na eni strani,
nato obrnite žago ter nabrusite še
zobe na drugi strani.
6. Če zob meri samo še približno 4 mm,
je veriga obrabljena in jo je treba zamenjati z novo.
7. Po brušenju morajo biti vsi rezalni členi
enako dolgi in široki.
8. Po vsakem tretjem brušenju preverite
globino brušenja (omejevalnik globine)
in uravnajte višino s ploščato pilo.
Omejevalnik globine naj bo od zoba
zamaknjen za približno 0,65 mm. Ko
ga zamaknete, ga spredaj nekoliko
zaoblite.
Page 48

4 8
S I
Nova veriga se mora uteči
Pri novi verigi se napetost po določenem
času zmanjša. Zato morate po petih rezih
ali po najmanj 10-minutnih žaganja verigo
ponovno napeti.
Verige nikoli ne pritrdite na
obrabljeno gonilno vreteno
ali poškodovan meč, saj se ta
lahko sname ali pretrga ter
povzroči hude poškodbe.
Vzdrževanje meča
Pri delih na verigi ali meču
nosite zaščitne rokavice.
1. Izklopite žago in izvlecite vtič.
2. Snemite pokrov verižnika, verigo in
meč.
3. Preverite obrabljenost meča. Odstrani-
te zarobke in izravnjajte vodilne povr-
šine s ploščato pilo.
4. Očistite dozirne odprtine za olje, da bi
zagotovili brezhibno samodejno olje-
nje žage med obratovanjem.
5. Montirajte meč, verigo in pokrov verižnika ter napnite verigo žage.
Če so dozirne odprtine za olje v
optimalnem stanju in je gumb za
regulacijo olja pravilno nastavljen,
veriga po nekaj sekundah obratovanja avtomatsko razprši manjšo
količino olja.
Pa meča
Pri delih na verigi ali meču
nosite zaščitne rokavice.
Meč je treba vsakih 10 obratovalnih ur
obrniti, s čimer zagotovite enakomerno
obrabo.
1. Izklopite žago in izvlecite vtič.
2. Snemite pokrov verižnika, verigo
in meč.
3. Položite meč (4) predse in ga
obrnite na hrbtno stran. Sprostite
pritrdilni vijak (28) in odstranite
napenjalno ploščo (24).
4. Napenjalno ploščo (24) s pri-
trdilnim vijakom (28) z druge
strani pritrdite na meč (4). Pri tem
pazite, da bo čep napenjalne
plošče (29) spodaj. Okroglo uho
(24a) napenjalne plošče mora
biti usmerjeno proti zobniku.
F
5. Montirajte meč, verigo in pokrov
verižnika ter napnite verigo
žage.
Smer vrtenja verige
žage
Če je meč obrnjen, se pri usmerjanju verige
žage (5) ravnajte po simbolu pod pokrovom
verižnika (15). Smer teka verige, prikazana
na meču, v tem primeru ne velja.
Shranjevanje
• Orodje očistite, preden ga shranite.
• Pred daljšimi prekinitvami delovanja
izpraznite posodo za olje. Odpadno
olje odstranite na okolju prijazen način
(glejte poglavje „Odstranjevanje/varstvo okolja“).
Page 49

4 9
S I
• Namestite ščitnik meča.
• Orodje hranite na suhem in pred
prahom zaščitenem mestu zunaj dosega otrok.
Odstranjevanje/
varstvo okolja
Odstranite staro olje na okolju prijazen
način, in sicer na mestu za odstranjevanje
nevarnih odpadkov. Nikoli ne izlijte starega olja v odtok ali kanalizacijo.
Napravo, pribor in embalažo predajte v
postopek okolju prijaznega recikliranja.
Električne naprave ne sodijo med
gospodinjske odpadke!
Nadomestni deli / Pribor
Nadomestni deli in pribor so na voljo na spletni strani
www.grizzly-service.eu
Če nimate dostopa do spleta, pokličite servisni center (stran 51). Navedite ustrezno kataloško številko.
Pokrovček posode za olje ......................................................................... 75118246
Veriga za žago 91P057X ........................................................................ 30091571
Veriga za žago 91VXL ............................................................................ 30091598
Meč ...................................................................................................... 30100420
Biološko olje za verige 1 l .......................................................................... 30230001
Biološko olje za verige 5 l ......................................................................... 30230002
Nadomestno verigo Oregon je dovoljeno uporabljati le s
pripadajočim mečem Oregon in odobreno električno verižno žago.
Nevarnost telesnih poškodb.
Označenih izdelkov ni dovoljeno odstranjevati skupaj z navadnimi gospodinjskimi
odpadki. Odnesite jih na sprejemno mesto
za recikliranje električnih in elektronskih
naprav.
Recikliranje pomaga pri zmanjšanju
porabe surovin in razbremenjuje okolje.
Informacije o odstranjevanju odpadkov
in najbližji lokaciji za sprejem surovin v
recikliranje lahko dobite npr. pri mestni
komunali ali na rumenih straneh.
Previdno izpraznite posodo za olje in od-
nesite napravo na ustrezno zbirališče odpadkov. Plastične in železne dele naprave
odstranite ločeno. Več informacij dobite v
našem servisnem centru.
Page 50

5 0
S I
Odpravljanje napak
Napaka Možni vzroki Ukrep
Naprava se ne
vklopi
Zavora verige se je
zaskočila
Preverite zavoro verige, po potrebi
zavoro verige sprostite
Ni omrežne napetosti
Hišna varovalka se izklaplja
Preverite vtičnico, kabel, napeljavo
in vtič. Dele v okvari naj popravi
električar.
Preverite hišno varovalko (glejte navodila).
Stikalo za vklop/izklop (10)
je v okvari
Napako naj odpravi servisna služba.
Oglena ščetka je obrabljena
Napako naj odpravi servisna služba.
Okvara motorja
Napako naj odpravi servisna služba.
Veriga ne teče
Verižna zavora blokira ve-
rigo (5)
Preverite verižno zavoro in jo po potrebi izključite, po potrebi izključite
Naprava slabo
žaga
Napačno montirana veriga
(5)
Pravilno montirajte verigo.
Topa veriga (5)
Nabrusite zobe ali namestite novo
verigo.
Premajhna napetost verige Preverite napetost verige.
Moteno delovanje
žage, veriga se
snema
Premajhna napetost verige Preverite napetost verige.
Veriga postane vro-
ča, med žaganjem
se pojavi dim, tirnica spremeni barvo
Premajhna količina olja za
verigo
Preverite nivo olja in po ga po potrebi dolijte.
Preverite avtomatiko za oljenje in
po potrebi očistite iztočni kanal za
olje oz. napako naj odpravi servisna
služba.
Preverite no nastavitev olja (gumb
za regulacijo olja).
Page 51

5 1
S I
#
Grizzly Tools GmbH & Co. KG
Stockstädter Straße 20, 63762 Großostheim, Germany
Pooblaščeni serviser:
Tel.: 080080917
E-Mail: grizzly@lidl.si
(Birotehnika, Hodošček Renata s.p., Lendavska ULICA 23, 9000 Murska Sobota)
Garancijski list
1. S tem garancijskim listom «Grizzly Tools GmbH & Co. KG, Stockstädter Straße 20,
63762 Großostheim, Germany» jamčimo, da bo izdelek v garancijskem roku ob
normalni in pravilni uporabi brezhibno deloval in se zavezujemo, da bomo ob izpolnjenih spodaj navedenih pogojih odpravili morebitne pomanjkljivosti in okvare zaradi napak v materialu ali izdelavi oziroma po svoji presoji izdelek zamenjali ali vrnili
kupnino.
2. Garancija je veljavna na ozemlju Republike Slovenije.
3. Garancijski rok za proizvod je 36 od datuma izročitve blaga. Datum izročitve blaga
je razviden iz računa.
4. Kupec je dolžan okvaro javiti pooblaščenemu servisu oziroma se informirati o nadalj-
njih postopkih na zgoraj navedeni telefonski številki. Svetujemo vam, da pred tem
natančno preberete navodila o sestavi in uporabi izdelka.
5. Kupec je dolžan pooblaščenemu servisu predložiti garancijski list in račun, kot potrdilo in dokazilo o nakupu ter dnevu izročitve blaga.
6. V primeru, da proizvod popravlja nepooblaščeni servis ali oseba, kupec ne more
uveljavljati zahtevkov iz te garancije.
7. Vzroki za okvaro oziroma nedelovanje izdelka morajo biti lastnosti stvari same in
ne vzroki, ki so zunaj proizvajalčeve oziroma prodajalčeve sfere. Kupec ne more
uveljavljati zahtevkov iz te garancije, če se ni držal priloženih navodil za sestavo in
uporabo izdelka ali če je izdelek kakorkoli spremenjen ali nepravilno vzdrževan.
8. Jamčimo servisiranje in rezervne dele za minimalno dobo, ki je zahtevana s strani
zakonodaje.
9. Obrabni deli oz. potrošni material so izvzeti iz garancije.
10. Vsi potrebni podatki za uveljavljanje garancije se nahajajo na dveh ločenih dokumentih (garancijski list, račun).
11. Ta garancija proizvajalca ne izključuje pravic potrošnika, ki izhajajo iz odgovornosti
prodajalca za napake na blagu.
Prodajalec:
Lidl Slovenija d.o.o. k.d., Pod lipami 1, SI-1218 Komenda
Page 52

5 2
S I
Page 53

5 3
CZ
Obsah
Úvod.........................................53
Účel použití ............................... 54
Obecný popis ............................54
Objem dodávky ........................... 54
Přehled ....................................... 54
Popis funkce ................................ 55
Technická data .......................... 55
Bezpečnostní pokyny ................ 55
Bezpečnostní pokyny / ................ 56
symboly na pile ...........................56
Symboly v návodu .......................57
Všeobecné bezpečnostní pokyny ...57
Všeobecné bezpečnostní pokyny pro
elektrická zařízení ........................ 57
Preventivní opatření proti ............... 61
zpětnému nárazu .........................61
Další bezpečnostní pokyny ............ 62
Bezpečnostní funkce ..................... 62
Montáž ..................................... 63
Namontovat pilový řetěz ............... 63
Namontovat čepel ........................63
Napnutí řetězu ............................64
Mazání řetězu ............................. 64
Obsluha řetězové pily ...............65
Zapnutí pily ................................. 65
Kontrola řetězové brzdy ................65
Kontrola olejové automatiky ..........66
Vyměnit čepel .............................. 66
Techniky řezání ......................... 66
Všeobecně .................................. 66
Kácení stromů .............................. 67
Odřezávání větví ......................... 68
Odřezávání na délku....................68
Údržba a čištění ........................ 69
Čištění ........................................ 69
Intervaly údržby ........................... 69
Tabulka intervalů údržby ...............70
Olejování řetězu .......................... 70
Ostření řetězu pily ........................70
Nastavení napnutí řetězu .............. 71
Záběh nového řetězu pily ..............72
Překlad originálního prohlášení
o shodě CE .............................. 131
Rozvinuté náčrtky ...................136
Úvod
Blahopřejeme vám ke koupi vašeho nového přístroje. Rozhodli jste se pro vysoce
kvalitní výrobek.
Kvalita tohoto přístroje byla kontrolována
během výroby a byla provedena také
závěrečná kontrola. Tím je zaručena funkčnost přístroje. Nelze vyloučit, že v jednotlivých případech bude na přístroji, v přístroji
nebo v hadicových rozvodech zbytek vody
nebo maziv. Nejedná se o vadu nebo zá-
vadu a není to důvodem k obavám.
Návod k obsluze je součástí tohoto
výrobku. Obsahuje důležité pokyny
týkající se bezpečnosti, používání a
likvidace. Před použitím výrobku se
seznamte se všemi pokyny k obsluze
a bezpečnosti. Výrobek používejte
jen k popsaným účelům a v rámci
uvedených oblastí použití.
Návod dobře uschovejte a při
předávání výrobku třetímu předejte
i všechny podklady.
Údržba vodicí lišty ....................... 72
Zapnutí lišty.................................72
Skladování ............................... 72
Náhradní díly ..........................73
Odklízení a ochrana okolí ......... 73
Záruka .....................................74
Opravna ................................... 75
Dovozce ....................................75
Hledání závad .......................... 76
Page 54

5 4
CZ
Účel použití
Elektrická řetězová pila je zkonstruována
pouze pro řezání dřeva. Pro všechny ostatní
druhy použití (např. řezání zdiva, plastů
nebo potravin) není pila vhodná. Pila je
určena pouze pro domácí práce. Není konstruována pro profesionální trvalé nasazení.
Přístroj je určen pro používání dospělými.
Mladiství pod 16 let nesmějí přístroj používat.
Výrobce neručí za škody, které vznikly
nesprávným použitím nebo chybnou
obsluhou. Tento přístroj není určený pro
komerční využití.
Při komerčním použití záruka zanikne.
Tato elektrická řetězová pila může být používána jen jednou osobou a jen k řezání dřeva.
Řetězovou pilu musíte držet pravou rukou za
zadní rukojeť a levou rukou za přední rukojeť.
Před použitím řetězové pily si musí uživatel
přečíst všechny pokyny a upozornění uvedená
v návodu k použití a porozumět jim. Uživatel
musí nosit přiměřenou osobní ochrannou výstroj (PSA). Řetězovou pilou můžete řezat jen
dřevo. Nesmí být obráběny materiály, jako
např. plast, kámen, kov nebo dřevo, které obsahují cizí tělesa (příkl. hřebíky nebo šrouby)!
Obecný popis
Obrázky týkající se ovládání a
údržby najdete na rozkládací
stránce.
Objem dodávky
Přístroj vybaltej a zkontrolujte, je-li kompletní. Obalový materiál řádně zlikvidujte.
- Řetězová pila
- Vodicí lišta (vodicí kolejnice)
(již namontovaný)
- Pilový řetěz (již namontovaný)
- Ochranná pochva čepele
- Olejová láhev 180 ml bio-olej
- Návod k obsluze
Přehled
A
1 Zadní držadlo
2 Zátka olejové nádrže
3 Páka řetězové brzdy/přední
chránič rukou
4 Vodicí lišta
5 Pilový řetěz
6 Hvězdicové vodítko řetězu
7 Ozubená opěrka
8 Přední držadlo
9 Elektromotor
10 Vypínač
11 Pojistka vypínače
12 Zachycovací čep řetězu
13 Napínací prstenec řetězu
14 Upevňovací šroub
krytu řetězového kola
15 Kryt řetězového kola
16 Zadní chránič ruky
17 Držák kabelu
18 Přívodní kabel
20 Láhev oleje
C
21 Ukazatel stavu naplnění oleje
22 Značka minimálního stavu
naplnění „MIN“ ukazatele stavu
naplnění oleje
F
23 Železniční šroub
24 Upínací šroub
G
25 Pastorek
26 Nos
J
27 Průjezd ropy
28 Vijak za pritrjevanje
29 Upínací šroub bolt
Page 55

5 5
CZ
Popis funkce
Řetězová pila má jako pohon elektromotor. Oběžný pilový řetěz je veden podél
čepele (vodicí kolejnice). Přístroj je vybaven systémem pro rychlé upnutí řetězu a
rychlobrzdou řetězu. Olejová automatika
zajišťuje plynulé mazání řetězu. Tato
řetězová pila je k ochraně uživatele vybavena různými ochrannými zařízeními.
Funkci obslužných částí najdete v následujících popisech.
Technická data
Elektrická řetězová pila .......... FKS 2200 F3
Jmenovité vstupní
napětí U................... 230-240 V~, 50 Hz
Příkon P ....................................2200 W
Ochranná třídax ...............................
II
Druh ochrany...................................IP20
Rychlost řetězu v
0
......................15,3 m/s
Hmotnost
(bez vodící kolejnice a řetězu) ........4,4 kg
Hmotnost
(s vodicí kolejnicí a řetězem) ..........5,3 kg
Objem nádrže ....................... cca 190 ml
řetěz ............................Oregon 91P057X
.. pochromovaný řezací zub, bez zpětného
Nárazu lišta .... Oregon 16“ Double-Guard
......................... 160SDEA041 - 112364
Rozteč řetězu ............................... 10 mm
Tloušťka řetězu ........................... 1,3 mm
Počet zubů řetězového kola ................... 7
Délka pilového listu .................... 460 mm
Délka řezu ................................395 mm
Hladina akustického
tlaku (L
pA
) ............ 84,9 dB (A); KpA=3 dB
úroveň akustického
výkonu (L
WA
) ...107,7 dB (A); KWA= 2,58 dB
Zaručená úroveň akustického
výkonu .................................. 110 dB (A)
Vibrace (a
h
) ...... 7,612 m/s2 ; K= 1,5 m/s
2
Uvedená hodnota emisí vibrací byla
změřena podle normovaného zkušebního
postupu a může se použít ke srovnání jednoho elektrického nářadí s jiným.
Uvedená hodnota emisí vibrací se může
použít také k odhadnutí přerušení funkce.
Výstraha:
Hodnota emisí vibrací se může
během skutečného používání elektrického nářadí lišit od uvedené
hodnoty, v závislosti na způsobu,
kterým se elektrické nářadí používá.
Existuje nutnost stanovit bezpečnostní
opatření pro ochranu obsluhy,
spočívající v odhadnutí přerušení
funkce za podmínek skutečného
používání (přitom je třeba zohlednit
všechny podíly provozního cyklu,
například doby, v nichž je elektrické
nářadí vypnuté, a doby, v nichž je
sice zapnuté, ale běží bez zatížení).
Technické a optické změny mohou být během
dalšího vývoje změněny bez oznámení
předem. Všechny rozměry, pokyny a údaje
této příručky jsou proto bez záruky. Právní
nároky, které mohou být vzneseny na základě
této příručky, nemohou být uplatněny.
Bezpečnostní pokyny
Tento odstavec pojednává o základních
bezpečnostních předpisech při práci s
elektrickou řetězovou pilou.
Elektrická řetězová pila je nebez-pečný
nástroj, který při špatném používání
může způsobit vážné nebo dokonce
smrtelné zranění. Mějte proto stále
na zřeteli násle-dující bezpečnostní
pokyny. V případě jakýchkoli pochybností se poraďte s odborníkem.
Page 56

5 6
CZ
Bezpečnostní pokyny /
symboly na pile
Před započetím práce se dobře sez-
namte se všemi ovládacími prvky.
Cvičte zacházení s pilou a nechte
si vysvětlit funkci, účinek a techniku
řezání odborníkem.
Řetěz se netočí, pokud je řetězová
brzda aktivována. Uvolněte brzdu
řetězu posunutím páčky brzdy proti
přední rukojeti.
Čtěte ke stroji příslušející návod k
obsluze a říďte se dle něho!
Používejte ochranu zraku a sluchu!
Noste zásadně ochrannou helmu!
Noste rukavice, které jsou
bezpečné proti pořezání!
Noste protiskluzovou bezpečnostní
obuv!
Používejte ochranný oděv!
Řetězovou pilu oužívejte
vždy oběma rukama
Pozor! Zpětný ráz – při práci pa-
matujte na zpětný ráz stroje.
Přístroj nevystavujte vlivům deště. Sa-
motný přístroj nesmí být vlhký a nesmí
být provozován ve vlhkém prostředí.
Pozor! Při poškození anebo
přeříznutí síťového kabelu ihned
vytáhněte zástrčku ze zásuvky.
dB
L
WA
Hladina akustického výkonu
Piktogram na typovém štítku:
Elektrické přístroje nepatří do
domácího odpadu
460 mm
Délka pilového listu
Ochranná třídax II
Piktogram pod krytem řetězu:
Dbejte na směr běhu pilového řetězu.
Pozor! Přečtěte si návod k obsluze.
Piktogram na listu:
Směr běhu pilového řetězu
Piktogram na krytce olejové
nádrže:
Mazání pilového řetězu.
Piktogram na upevňovacím
šroubu krytu řetězu:
OTEVŘENO
ZAVŘENO
Piktogram na páce brzdy řetězu:
O brzda řetězu: VYPNUTO
I brzda řetězu: ZAPNUTO
Page 57

5 7
CZ
Symboly v návodu
Označení nebezpečí s údaji
k vyvarování se škodám na
zdraví a věcných škodám.
Znaky zákazů (místo uvozovek je
uveden příkaz) s údaji zamezení
škod.
Upozornění s informacemi k
lepšímu zacházení s přístrojem.
Všeobecné bezpečnostní
pokyny
Před prvním použitím pily se seznamte
se vším co souvisí s řádným použitím
této pily. Nacvičujte zacházení
s pilou (zkracování kulatiny na
koze na řezání dřeva) a nechte si
zkušeným uživatelem anebo odborníkem vysvětlit funkci, způsob
účinku, techniky řezání a osobní
ochrannou výstroj.
Při kácení dřeva dodržujte ochranu
proti hluku a místní předpisy. Na
základě místních předpisů může být
vyžadována zkouška způsobilosti.
Na základě místních předpisů
může být vyžadována zkouška
způsobilosti. Obraťte se naObraťte
se na lesní správu. lesní správu.
Pozor! Při použití elektrických
nástrojů je nutné v rámci ochrany
proti úrazu el. proudem, zranění
a požáru nutné respektovat níže
uvedená základní bezpečnostní
opatření:
Hrozí nebezpečí úrazu.
Všeobecné bezpečnostní pokyny pro elektrická zařízení
VAROVÁNÍ! Přečtěte si všechny
bezpečnostní pokyny a instrukce.
Opomenutí při dodržování bezpečnostních
pokynů a instrukcí mohou způsobit úder
elektrickým proudem, požár a/nebo těžká
zranění.
Všechny bezpečnostní pokyny a instrukce uchovejte pro budoucnost.
Pojem „elektrický nástroj” používaný v bezpečnostních pokynech se vztahuje na elektrické nástroje napájené ze sítě (se síťovým
kabelem) a na elektrické nástroje napájené
akumulátorem (bez síťového kabelu).
Bezpečnost pracoviště:
• Udržujte svůj pracovní úsek čistý
a dobře osvětlený. Nepořádek ane-
bo neosvětlené pracovní oblasti mohou
vést k nehodám.
• Nepracujte s elektrickými řetězo-
vými pilami v okolí ohroženém
výbuchem, v kterém se nachází
hořlavé tekutiny, plyny anebo
prachy. Elektrické nástroje vytváří jiskry,
které mohou zapálit prach anebo páry.
• Během používání elektrické
řetězové pily udržujte děti a jiné
osoby vzdáleně od sebe. Při ne-
pozornosti můžete ztratit kontrolu nad
nástrojem.
Elektrická bezpečnost:
Pozor: Takto se vyvarujete nehodám
a poraněním skrz elektrický úder:
• Přípojná zástrčka elektrické
řetězové pily se musí hodit do
Page 58

5 8
CZ
zásuvky. Zástrčka se nesmí žádným způsobem změnit. Nepoužívejte žádné adaptérové zástrčky
ve spojení elektrickými nástroji s
ochranným uzemněním. Nezměně-
né zástrčky a vhodné zásuvky zmenšují
riziko elektrického úderu.
• Vyvarujte se tělesnému kontaktu
se zemněnými povrchy jako jsou
roury, topná tělesa, sporáky a
ledničky. Existuje zvýšené riziko skrze
elektrický úder, když je Vaše tělo zemněné.
• Nevystavujte elektrickou řetězovou pilu dešti anebo mokru. Vnik-
nutí vody do elektrického nástroje zvyšuje
riziko elektrického úderu.
Je-li přípojné vedení tohoto nástroje po-
škozené, musí být skrze výrobce anebo
jeho servisní službu zákazníkům anebo
podobně kvalikovanou osobou nahrazené, aby se vyvarovalo ohrožením.
• Nepoužívejte kabel k jinému
účelu, jako je nošení nebo
zavěšení elektrické řetězové pily
anebo vytažení zástrčky ze zásuvky. Udržujte kabel vzdáleně
od žáru, od oleje, od ostrých
hran anebo od pohybujících se
částí nástrojů.
Poškozené anebo zamotané kabely
zvyšují riziko elektrického úderu.
• Kdy81ž pracujete s elektrick-
ou řetězovou pilou pod širým
nebem, pak používejte pouze
prodlužovací kabely, které jsou
vhodné i pro venkovní oblast.
Použití prodlužovacího kabelu vhodného pro venkovní oblast, zmenšuje riziko
elektrického úderu.
• Když nejde vyhnout se provozu elektrické řetězové pily ve
vlhkém prostředí, používejte
ochranný vypínač chybové-
ho proudu. Používání ochranného
vypínače chybového proudu snižuje
riziko elektrického úderu.
Používejte ochranný vypínač chybového
proudu s vybavovacím proudem 30 mA
anebo s menším.
• Používejte pouze schválené napájecí
kabel typu H05RN-F, které jsou více
než 75 metrů na délku a určených k
použití ve venkovním prostoru. Dirigent
průřez kabelu musí být minimálně 2,5
mm
2
. Vždy plně rozviňte kabelového
bubnu před použitím. Zkontrolujte
napájecí kabel za škody.
Bezpečnost osob:
Pozor: Takto se vyvarujete nehodám
a poraněním:
• Buďte pozorní, dbejte na to, co
děláte a pusťte se s elektrickou
řetězovou pilou rozumně do
práce. Nepoužívejte elektrickou
řetězovou pilu, když jste unaveni
anebo pod vlivem drog, alkoholu
anebo léků. Jediný okamžik nepozornosti při používání elektrické řetězové
pily může vést k vážným poraněním.
• Noste osobní ochrannou výbavu
a vždy ochranné brýle. Nošení
osobní ochranné výbavy jako jsou protismyková bezpečnostní obuv, ochranné
pracovní kalhoty, ochranná helma
anebo ochrana sluchu snižují riziko
poranění.
• Vyvarujte se nezáměrnému uve-
dení do provozu. Přesvědčte se
o tom, že je elektrická řetězová
pila vypnuta předtím, než ji
připojíte na napájení elektrickým
proudem, než ji zvednete anebo
nesete.
Page 59

5 9
CZ
Když při nošení elektrické řetězové pily
držíte prst na spínači anebo když tento
nástroj v zapnutém stavu připojíte na
napájení elektrickým proudem, pak toto
může vést k nehodám.
• Odstraňte nastavovací nářadí
anebo šroubováky předtím,
než elektrickou řetězovou pilu
zapnete. Nářadí anebo klíč, který se
nachází v otáčející se části nástroje,
může vést k poraněním.
• Vyvarujte se abnormálnímu
držení těla. Postarejte se o
bezpečný postoj a udržujte
vždy rovnováhu. Tímto můžete v
neočekávaných situacích lépe kontrolovat elektrickou řetězovou pilu.
• Noste vhodný oděv. Nenoste
žádné volné oblečení anebo
šperky. Udržujte vlasy, oděv a
rukavice vzdáleně od pohybujících se částí. Volné oblečení, šperky
anebo dlouhé vlasy mohou být zachyce-
né pohybujícími se částmi.
• Lze-li namontovat zařízení na
odsávání či zachytávání prachu,
dbejte, aby takové zařízení
bylo namontováno a správně
používáno. Při používání zařízení na
odsávání prachu se snižuje nebezpečí
vznikající v důsledku prachu.Při používání
zařízení na odsávání prachu se snižuje
nebezpečí vznikající v důsledku prachu.
• Varování! Toto elektrické
nářadí vytváří během provozu
elektromagnetické pole. Toto pole může
za určitých okolností omezovat aktivní
nebo pasivní lékařské implantáty.
Pro snížení nebezpečí vážného nebo
smrtelného zranění doporučujeme
osobám s lékařskými implantáty před
obsluhou stroje konzultovat implantát se
svým lékařem a výrobcem.
Používání a ošetřování
elektrické řetězové pily:
• Nepřetěžujte tento nástroj.
Použijte pro svoji práci elektrické
nářadí, určené pro tento účel. S
vhodným elektrickým nástrojem pracujete v udaném výkonovém rozsahu lépe
a bezpečněji.
• Nepoužívejte žádné elektrické
nářadí, jehož spínač je defektní.
Elektrické nářadí, které se již nedá zaanebo vypnout, je nebezpečné a musí
být opravené.
• Vytáhněte zástrčku ze zásuvky
předtím, než provedete nastavování na nástroji, než vyměníte
části příslušenství anebo než
nástroj odložíte. Toto preventivní
bezpečnostní opatření zabrání neúmyslnému startu elektrické řetězové pily.
• Uložte nepoužívanou elektrick-
ou řetězovou pilu mimo dosahu
dětí. Nepřenechávejte používání
této pily osobám, které s tímto
nástrojem nejsou obeznámené
anebo tyto pokyny nečetly. Elek-
trické nástroje jsou nebezpečné, když je
používají nezkušené osoby.
• Ošetřujte pečlivě tuto elektrickou
řetězovou pilu. Kontrolujte, jestli
pohyblivé díly bezvadně fungují a
neváznou, jestli jsou části zlomené
anebo natolik poškozené, že je
funkce elektrické řetězové pily
narušena. Nechte poškozené části
před použitím nástroje opravit.
Příčiny mnohých nehod tkví ve špatně
udržovaných elektrických nástrojích.
• Udržujte řezné nástroje ostré a
čisté. Pečlivě ošetřované řezné nástroje
s ostrými řeznými hranami se méně zaseknou a lépe se vedou.
Page 60

6 0
CZ
• Používejte tuto elektrickou
řetězovou pilu, její příslušenství,
vložné nástroje atd. v souladu s
těmito instrukcemi.
Zohledněte přitom pracovní podmínky a činnost, která se má
vykonávat. Používání elektrické
řetězové pily pro jiné účely, než pro které je určena, může vést k nebezpečným
situacím.
• Při řezání na svahu vždy stůjte
nad kmenem stromu. Abyste si při
„rozřezávání“ udrželi plnou kontrolu,
na konci řezu snižte přítlačný tlak bez
toho, že byste přestali pevně držet
rukojeti řetězové pily. Dbejte, aby se
řetěz pily nedotkl země. Po dokončení
řezu počkejte, až se řetězová pila
zastaví, dříve než ji z řezu odstraníte.
Před přechodem od jednoho stromu ke
druhému motor řetězové pily vypněte.
• Ze stromu odstraňte nečistotu, kameny,
volnou kůru, hřebíky, svorky a dráty.
Servis:
• Svoje elektrické nářadí nechte
opravit pouze kvalikovaným
odborným personálem a jenom
pomocí originálních náhradních
dílů. Tímto se zajistí to, že bezpečnost
elektrického nářadí zůstává zachována.
• Pečlivě dodržujte instrukce pro údržbu,
kontroly a servis, obsažené v tomto ná-
vodu k obsluze.
Poškozená ochranná zařízení a díly se
musí odborně opravit anebo vyměnit
skrze náš Service-Center, pokud v návo-
du k obsluze není nic jiného udáno.
Bezpečnostní pokyny
pro řetězové pily:
• Při běžící pile udržujte všechny
části těla vzdáleně od řetězu
pily. Před startem pily se
přesvědčte o tom, že se řetěz
pily ničeho nedotýká. Při práci s
řetězovou pilou může jediný okamžik
nepozornosti vést k tomu, že se řetězem
pily zachytí oblečení anebo části těla.
• Vždy držte řetězovou pilu pravou rukou za zadní rukojeť a
levou rukou za přední rukojeť.
Pevné držení řetězové pily v opačném
pracovním držení, zvyšuje riziko
poranění a nesmí se používat.
• Držte elektrický nástroj pouze
za izolované rukojeti, protože
pilový řetěz se může dostat
do kontaktu se skrytým elek-
trickým vedením nebo síťovým
kabelem nástroje. Při kontaktu
pilového řetězu s napěťovým vedením
mohou být kovové součásti přístroje
vystaveny napětí, a proto může dojít k
úrazu elektrickým proudem.
• Noste ochranné brýle a ochranu
sluchu. Další ochranná výbava
pro hlavu, ruky, nohy a chodidla
je předepsaná.
Vhodný ochranný oděv snižuje
nebezpečí poranění skrze poletující
třískový materiál a skrze náhodný dotyk
s řetězem pily.
• Nepracujte s řetězovou pilou na
stromě. Při provozu řetězové pily na
stromě existuje nebezpečí poranění.
• Dbejte vždy na pevný postoj a
používejte řetězovou pilu pouze
tehdy, když stojíte na pevném,
bezpečném a rovném podkladu.
Kluzký podklad anebo nestabilní plochy
Page 61

6 1
CZ
k stání, jako například na žebříku, mohou vést ke ztrátě rovnováhy anebo ke
ztrátě kontroly nad řetězovou pilou.
• Počítejte při řezání větve, která
je vystavena pnutí s tím, že bude
zpětně pružit. Když se pnutí ve vlá-
knech dřeva uvolní, může napnutá větev
tret obsluhující osobu a/anebo vytrhnout řetězovou pilu z kontrolovaného
stavu.
• Buďte obzvlášť opatrní při řezání
podrostu a mladých stromů. Ten-
to tenký materiál se může s řetězovou
pilou zaplést a uhodit Vás anebo Vás
vyvést z rovnováhy.
• Noste řetězovou pilu za přední
rukojeť ve vypnutém stavu, s
řetězem odvráceným od Vašeho
těla. Při transportu anebo ukládání řetězové pily, vždy na ni
natáhněte ochranný kryt. Pečlivé
zacházení s řetězovou pilou snižuje
pravděpodobnost náhodného dotyku s
běžícím řetězem pily.
• Dodržujte instrukce pro ma-
zání, pro napínání řetězu a pro
výměnu příslušenství. Neodborně
napnutý anebo namazaný řetěz buď
se může přetrhnout anebo může zvětšit
riziko zpětného nárazu.
• Udržujte rukojeti suché, čisté a
prosté oleje a tuků. Zamaštěné, na-
olejované rukojetě jsou kluzké a vedou
ke ztrátě kontroly.
• Řežte pouze dřevo. Nepoužívejte
řetězovou pilu pro práce, pro
které není určena - příklad:
nepoužívejte řetězovou pilu na
řezání plastů, zdiva anebo stavebních materiálů, které nejsou
ze dřeva. Používání řetězové pily pro
práce, pro které není určena, může vést
k nebezpečným situacím.
Preventivní opatření proti
zpětnému nárazu
Pozor, zpětný náraz! Dbejte při
práci na zpětný náraz stroje. Existuje nebezpečí poranění. Zpětným
nárazům se vyvarujete opatrností a
správnou technikou řezání.
obr. 1
• Zpětný náraz se může vyskytnout tehdy,
když se špička vodicí kolejničky dotkne
nějakého předmětu anebo když se
dřevo ohne a pilový řetěz se v zářezu
zasekne (viz obrázek 1/ obr. B).
• Dotyk se špičkou vodicí kolejničky
může v některých případech vést k
neočekávané, zpátky směřované reakci, u které se vodicí kolejnička vyrazí
nahoru, směrem k obsluhující osobě (viz
obrázek 1/ obr. A).
• Zaseknutí pilového řetězu na horní
hraně vodicí kolejničky může kolejničku
prudce vrazit zpět do směru k obsluhující osobě.
• Každá z těchto reakcí může vést k
tomu, že ztratíte kontrolu nad pilou a
případně se těžce poraníte.
Nespoléhejte se výlučně na bezpečnostná
zařízení zabudovaná do řetězové pily.
Jakožto uživatel řetězové pily byste měl
učinit rozličná opatření, abyste mohl pracovat bez nehod a bez poranění.
Zpětný náraz je následkem nesprávného anebo chybného používání elektrického nářadí.
Může mu být zabráněno vhodnými preventivními opatřeními, jak následovně popsáno:
Page 62

6 2
CZ
• Držte pilu pevně oběma rukama,
přičemž palec a prsty obepínají
rukojetě řetězové pily. Uveďte
Vaše tělo a ramena do takové
polohy, v které můžete odolat
silám zpětného nárazu. Když
se učiní vhodná opatření, potom
může obsluhující osoba překonat síly
zpětného nárazu. Nikdy řetězovou pilu
nepouštějte.
• Vyvarujte se abnormálnímu držení
těla a neřežte nad výškou svých
ramen. Tímto se vyvaruje nezáměrnému
dotyku se špičkou kolejničky a umožní
se lepší kontrola nad řetězovou pilou v
neočekávaných situacích.
• Používejte vždy výrobcem
předepsané náhradní kolejničky
a pilové řetězy. Nesprávné náhradní
kolejničky a pilové řetězy mohou vést k
přetržení řetězu a/anebo ke zpětnému
nárazu.
• Dodržujte instrukce výrobce
ohledně ostření a údržby pilového řetězu. Příliš nízké omezovače
hloubky zvyšují náchylnost ke zpětnému
nárazu.
Další bezpečnostní pokyny
• V případě, že bude nutné vyměnit
připojovací kabel, doporučujeme, aby
jej vyměnil výrobce nebo příslušný zástupce (například autorizovaná odborná
dílna, zákaznický servis atd.).
• Pokládejte přípojné vedení tak, aby během řezání nebylo zachyceno větvemi
nebo podobnými věcmi.
• Připojovací vedení položte tak, aby
během řezání nebylo zachyceno
větvemi apod.
• Zapojte přístroj do zásuvky s prou-
dovým chráničem (diferenciální prou-
dová ochrana) s reakčním proudem
nepřesahující 30 mA.
• Postupujte pozorně podle pokynů k
údržbě, kontrole a servisu v tomto návo-
du k obsluze.
Poškozená ochranná zařízení a díly
je nutné nechat řádně opravit nebo
vyměnit v našem servisním centru, není-li
v návodu k obsluze uvedeno jinak.
Bezpečnostní funkce
A
1 Zadní držadlo
s ochranou rukou (16)
chrání ruce před větvemi a
vystřeleným řetězem
3 Páka řetězové brzdy/
chránič rukou
Bezpečnostní zařízení, které
zastaví okamžitě pilový řetěz při
„kopnutí“ řetězu. Páka může být
ovládána i ručně, chrání levou
ruku při nárazu na tuto rukojeť.
Řetěz se netočí, pokud je řetězová
brzda aktivována.
5 Pilový řetěz s nepatrnými
zpětnými rázy
pomáhá Vám se specielně vyvi-
nutým bezpečnostním zařízením
tlumit zpětné rázy.
7 Ozubená řezací opěrka
Zvyšuje stabilitu při vertikálním
řezu a odlehčuje pilu.
9 Elektromotor
má z bezpečnostních důvodů
dvojitou izolaci.
10 Spínač pro zapnutí a vyp-
nutí s funkcí okamžitého
zastavení řetězu
Při uvolnění vypínače se přístroj
okamžitě zastaví
Page 63

6 3
CZ
11 Pojistka vypínače
Před zapnutím přístroje musí být
vypínač odjištěn pojistkou.
12 Zachycovací čep řetězu
snižuje nebezpečí zranění, když
praskne nebo vypadne řetěz.
Montáž
Při práci s řetězovou pilou
vždy používejte ochranných
rukavic a výhradně originálních dílů. Před jakýmikoliv prácemi na pile vždy
vytáhněte síťovou zástrčku.
Před uvedením elektrické řetězové pily do
provozu je nutné provést tyto činnosti:
- případně namontovat list, pilový řetěz a
kryt řetězu,
- napnout pilový řetěz,
- doplnit řetězový olej,
- zkontrolovat řetězovou brzdu a funkci
olejové automatiky.
Namontovat pilový řetěz
G
1. Pilový řetěz (5) rozprostřete do
smyčky tak, že řezné hrany jsou ve
směru hodinových ručiček.
2. Uvolněte upínací závitnici (24)
otočením směrem doleva.
3. Vložte pilový řetěz (5) do drážky
vodicí lišty. Při montáži držte
vodicí lištu (4) otočenou nahoru
v úhlu přibližně 45 stupňů, aby
se mohl pilový řetěz (5) snadněji
vést na řetězový pastorek (25).
Je normální, když se pilový řetěz
(5) prověsí.
4. Upněte pilový řetěz (5) tím, že
upínací závitnici (24) otočíte do-
prava.
5. Nasaďte kryt řetězového kola
(15). Přitom je nutné nejdříve
zasunout výstupek (26) na krytu
(15) do příslušného zářezu na
přístroji. Utáhněte upevňovací
šroub (14) jen zlehka, protože
řetěz je třeba ještě napnout.
Dej si pozor! Lze mazat elektrická
řetězová pila.
Vezměte prosím na vědomí, že elektrická
řetězová pila po použití oleje a olej může
unikat, pokud je uložen na boku nebo na
hlavu. To je normální proces, výsledek
nezbytné ventilační otvor v horní části
nádrže a žádný důvod reklamace. Každá
elektrická řetězová pila je kontrolován
a testovány s olejem během výroby, trochu si odpočinout v nádrži by mohlo být
navzdory vyprazdňování, který snadno
spatřen bydlení s olejem během přepravy.
Vyčistěte bydlení s látkou
Před výměnou řetězu je nutné očistit matici
vodící lišty od nečistot, protože v případě
nánosů nečistot může řetěz z vodící lišty
vyskočit. Nánosy mohou také nasávat
řetězový olej. V důsledku by se pak řetězový
olej nedostal ke spodní části lišty (nebo jen
nedostatečně) a mazání by bylo omezeno.
Namontovat čepel
F
1. Odmontujte zajišťovací šroub
pod napínací jednotkou.
2. Upevňovacím šroubem (14)
otáčejte proti směru hodino-
vých ručiček (
), abyste
sejmuli kryt řetězového kola.
3. Nasaďte lištu (4) na kolejnicový
čep (23), aby byla upínací závitnice (24) orientována směrem ven.
Page 64

6 4
CZ
Napnutí řetězu
Řetěz je nutné pravidelně napínat, a to z
důvodu bezpečnosti uživatele a omezení,
resp. zamezení opotřebení a poškození
řetězu. Napnutí řetězu doporučujeme
zkontrolovat a v případě potřeby upravit
před započetím práce a poté každých asi
10 minut.
Při práci s pilou se řetěz zahřívá
a poněkud roztahuje. S tímto
„prodlužováním“ je nutné počítat zejména
u nových řetězů.
Řetěz nedopínejte ani nevyměňujte, je-li je
horký. Po ochlazení se totiž opět poněkud
smrští. Při nerespektování tohoto pokynu
může kvůli příliš napjatému řetězu dojít k
poškození vodicí lišty nebo motoru.
Životnost řetězu je značně ovlivněna jeho
napnutím a mazáním.
Řetěz je správně napnut, když se na spodní
straně neprověšuje a lze jej tahem ruky
volně posunovat. Při zatažení za řetěz silou
9 N (ca 1 kg) se řetěz nesmí vzdálit od lišty
o více jak 2 mm.
10 min
B
1. Přesvědčte se, že brzda řetězu je
povolená, tzn. že páčka brzdy
řetězu (3) je přitlačena na přední
držadlo (8) (poloha
O).
2. Povolte upevňovací šroub (14)
(
).
3. Pro napnutí pily otáčejte napínacím
prstencem řetězu (13) ve
směru hodinových ručiček.
K povolení napětí otáčejte
napínacím prstencem řetězu (13)
proti směru hodinových
ručiček.
4. Upevňovací šroub (14) znovu
utáhněte (
).
U nové řetězové pily musíte napnutí
řetězu následně nastavit po max.
5-ti řezech.
Mazání řetězu
Kolejnice a řetěz nesmí nikdy zůstat
bez oleje. Provozujete-li elektrickou
řetězovou pilu s nedostatkem oleje, klesá řezný výkon a životnost
řetězu pily, poněvadž se řetěz
rychleji otupí. Nedostatek oleje
poznáte na základě vzniku kouře
anebo zbarvení kolejnice.
Jakmile běží motor, stéká olej na řetěz.
Plnění oleje pro mazání řetězu:
•
Pravidelně kontrolujte ukazatel stavu
hladiny oleje (
C
21) doplňte olej při
dosažení značky minimální hladiny
„MIN“ (
C
22) ukazatele stavu hladiny
oleje. Nádrž na olej má cca 190 ml oleje.
• používejte bio-olej s přídavkem látek,
které snižují tření a opotřebení. Můžete
si jej objednat prostřednictvím našeho
Service-Center.
• Není-li k dispozici olej Grizzly bio-olej,
použijte mazací olej na řetězy s nízkým
obsahem ulpívajících přísad.
• Před delšími provozními přestávkami
vyprázdněte olejovou nádrž (6-8 týdnů).
C
1. Odšroubujte víčko nádrže na
olej (2) a naplňte nádrž olejem
na řetězy.
Page 65

6 5
CZ
2. Otřete uniklý olej za uzavřete
opět olejovou nádržku.
Před doplňováním řetězového
oleje přístroj vždy vypněte a
nechejte motor vychladnout.
Při přetečení oleje vzniká
nebezpečí požáru.
Obsluha řetězové pily
Řetězovou pilu zapněte teprve tehdy,
jestliže jsou vodicí lišta, řetěz a kryt
řetězky správně namontovány. Zkontrolujte, zda síťové napětí souhlasí s
údaji na štítku přístroje. Ujistěte se
před startem, že se pila nedotýká
žádných předmětů.
Pozor! Z pily může odkapávat olej!
Viz kapitola „Montáž“.
Zapnutí pily
D
1. Před startem zkontrolujte, zda se
v olejové nádržce nachází dostatek oleje a event. doplňte olej.
2. Uvolněte řetězovou brzdu,
přičemž přitla-číte páku brzdy
proti přednímu držadlu.
3. Z konce prodlužovacího kabelu
vytvarujte poutko a toto zavěste do
odlehčení pnutí na zadní rukojeti.
4. Připojte přístroj k síťovému napětí.
5. Držte řetězovou pilu pevně
oběma rukama, pravou rukou za
zadní a levou rukou za přední
držadlo. Palce a prsty musí
držadla pevně obejmout.
6. Před zapnutím stlačte pravým
palcem pojistku vypínače (11)
a poté stlačte vypínač (10), pila
se rozeběhne nejvyšší rychlostí.
Nyní můžete pojistku uvolnit.
7. Pila se vypne, když vypínač
uvolníte. Trvalé zapnutí není
možné.
Kontrola řetězové brzdy
Řetěz se netočí, pokud je řetězová
brzda aktivována.
E
1. Položte řetězovou pilu na pevnou a rovnou podložku. nesmí
se dotýkat žádných předmětů.
2. Připojte přístroj k síťovému napětí.
3.
Uvolněte řetězovou brzdu,
přičemž stlačíte brzdovou páku
proti přední rukojeti (8) (poloha O).
4. Držte pilu pevně oběma rukama,
pravou rukou za přední a levou
rukou za zadní rukojeť. Palce a
prsty musí rukojeti pevně objímat.
5. Zapněte motorovou pilu.
6. Při běžícím motoru zatlačte levou
rukou do brzdové páky. Odsuňte
páčku brzdy řetězu / přední
ochranu rukou (3) od předního
madla (8) (poloha
I). Řetěz se
musí okamžitě zastavit.
7. Pokud řetězová pila správně
funguje, pusťte dvoupolohový vypínač (10) a uvolněte
řetězovou brzdu.
Jestliže řetězová brzda ne-
funguje správně, nesmíte pilu
používat. Existuje nebezpečí
poranění skrze dobíhající
řetěz pily. Nechte elektrickou
motorovou řetězovou pilu
opravit naším servisem pro
zákazníky.
Page 66

6 6
CZ
Kontrola olejové automatiky
Před započetím práce zkontrolujte stav oleje a olejovou automatiku.
• zapněte pilu a držte ji nad světlým podkladem. Pila se nesmí dotýkat země.
Jestliže se ukáže olejová stopa, pracuje
mazání řetězu správně.
Jestliže se žádná olejová skvrna
neobjeví, vyčistěte případně pro-
pust oleje nebo nechte elektrickou
řetězovou pilu opravit v našem zákaznickém servisu.
J
Vyčistěte otvory pro olej (27) ve vo-
dící liště, aby bylo během provozu
zajištěno bezporu-chové automatické mazání řetězu pily.
Štětečkem nebo hadříkem otřete
zbytky z olejové propusti.
Vyměnit čepel
F
1. Vypněte přístroj a vytáhněte
síťovou zástrčku ze
zásuvky (
A
18).
2. Pilu položte na rovný povrch.
3. Upevňovacím šroubem otáčejte
proti směru hodinových
ručiček (
), a uvolněte
upínací kroužek řetězu (
A
13),
čímž uvolníte napnutí řetězu a
sejmete kryt řetězu (15).
4. Odmontujte čepel (4) a pilový
řetěz (5). Při demontáži držte
vodicí lištu (4) otočenou nahoru
v úhlu přibližně 45 stupňů, aby
se mohl pilový řetěz
(5) snadněji sejmout z
řetězového pastorku (25).
5. Uvolněte šroub „(28) na zadní
straně upínací závitnice (24).
Znovu namontujte upínací závitnici (24) v obráceném pořadí.
Dbejte přitom na to, aby byl čep
závitnice (29), viz obrázek
, byl dole (viz také část „Otáčení
listu“,
+ ).
6.
Pro montáž čepel (4) usaďte
na kolejnicový čep tak (23), že
napínací destička (24) směřuje
ven.
Techniky řezání
Všeobecně
• Ovládání pily je dokonalejší, když
řežete spodní stranou vodicí kolejnice
(tažnou větví řetězu) a nikoliv horní
stranou vodicí kolejnice (tlačnou větví
řetězu).
• Řetěz pily se při řezání anebo po jeho
ukončení nesmí dotknout ani země, ani
jiného předmětu.
• Dbejte na to, aby pilový řetěz nebyl
během řezání v řezu svírán. Kmen stromu nesmí praskat nebo se odlupovat.
• Dbejte rovněž na bezpečnostní opatření
proti zpětnému rázu (viz Bezpečnostní
pokyny).
Zasekne-li se řetěz pily,
nepokoušejte se vytáhnout
elektrickou řetězovou pilu
násílím. Vzniká tím nebezpečí
poranění. Vypněte motor a
použíjte páky anebo klínu k
uvolnění elektrické řetězové
pily.
Page 67

6 7
CZ
Kácení stromů
Ke kácení stromů je
zapotřebí mnoho zkušeností.
Kácejte stromy jen tehdy,
umíte-li bezpečně zacházet s elektrickou řetězovou
pilou. V případě nejistoty
nepoužívejte v žádném
případě elektrické řetězové
pily.
Nezkušeným uživatelům
nedoporučujeme z bezpečnostních
důvodů kácet stromy lištou, která je
kratší než průměr káceného kmenu.
• Dbejte na to, aby se poblíž pracovní
oblasti nezdržovali lidé anebo zvířata.
Bezpečnostní odstup od káceného stromu a vedlejšího pracoviště musí obnášet
2 1/2 délek stromu. Uživatel musí mít
možnost bezpečného pohybu poblíž
skáceného stromu, aby mohl strom
lehce rozřezat a odřezat větve. Musí se
zamezit, aby padající strom se zachytil
v jiném stromě. Dbejte na přírozený
směr kácení, který závisí na sklonu
a zakřivení stromu, na směru větru a
počtu větví.
• Na svahu stůjte nad káceným stromem.
• Malé stromy s průměrem 15- 18 cm mohou běžně být uříznuty jedním řezem.
• U stromů větších průměrů se musí použít
zásekového a porážecího řezu (viz
Q
).
Nekácejte strom, když věje
silný anebo proměnlivý
vítr, existuje-li nebezpečí
poškození majetku anebo
kdyby strom mohl padnout
na vedení.
Ihned po skončení řezání odklopte
ochranu sluchu, abyste slyšeli tóny
a varovné signály.
O
1. Odřezávání větví:
Větve visící směrem dolů
odstraňte tím, že řez nasadíte
nad větví. Nikdy neodřezávejte
větve výše, než ve výši ramen.
P
2. Únikový prostor:
Kolem stromu odstraňte podrost,
abyste si zajistili bezpečný
ústup. Únikový prostor (1) by
měl být za zamýšleným směrem
kácení (2) posunutý asi o 45°.
Q
3. Řezání pádového záseku
(A):
Proveďte pádový zásek ve
směru, ve kterém má strom
padnout. Začněte s dolním, horizontálním řezem. Hloubka řezu
má být přibližně 1/3 průměru
kmene. Udělejte šikmý řez pilou
v úhlu řezu přibližně 45°, ze
shora, který přesně směruje na
dolní řez pilou.
Nikdy nevstupujte před
strom se zásekem.
Q
4. Porážecí řez (B):
Porážecí řez proveďte z druhé
strany kmene, příčemž stojíte
vlevo od kmene a řežete tažnou
větví řetězu pily. Řežte plným
výkonem a pomalu do kmene.
Porážecí řez musí probíhat
vodorovně asi 5 cm nad vodorovnou částí zásekového řezu.
Porážecí řez by měl být tak
hluboký, aby vzdálenost mezi
porážecím řezem a řeznou
čárou zásekového řezu obnášela
Page 68

6 8
CZ
nejméně 1/10 průměru kmene.
Neproříznutá část kmene se
označuje jako míra lomu.
R
5. Zasuňte do porážecího řezu klín
anebo páčidlo jakmile to hloubka řezu dovolí, aby se zabránilo
sevření vodící kolejnice.
S
6. Je-li průměr kmene větší,
než délka vodicí kolejnice,
proveďte dva řezy řeznou čárou
zásekového řezu obnášela
nejméně 1/10 průměru kmene.
Neproříznutá část kmene se
označuje jako míra lomu.
7. Po provedení porážecího řezu
padne strom sám od sebe,
anebo za pomoci klínu anebo
páčidla.
Jakmile začne strom padat,
vytáhněte pilu z řezu, vypněte
motor, odložte řetězovou
pilu a opusťte pracoviště
ústupovou cestou.
O
Odřezávání větví
Odřezáváním větví se označuje odstraňování
větví a haluzí skáceného stromu.
Ke mnoha úrazům dochází
při odřezávání větví. Nikdy
neodřezávejte větve, když stojíte
na kmeni stromu. Pozorujte oblast
možného odpružení větví, jsou-li
tyto pod napětím.
• Opěrné větve odstraňte až po skončení
odřezávání větví.
• Pod napětím stojící větve musí být
odřezávány zdola nahoru, aby se
zabránilo sevření řetězové pily.
• Při odřezávání tlustších větví používejte
stejnou techniku jako při krácení.
• Pracujte vlevo od kmene a dle možnosti
co nejblíže u elektrické řetězové pily.
Váha pily spočívá dle možnosti na kme-
ni.
• Abyste odřezali větve i po druhé straně
kmene, měňte svou pozici.
• Rozvidlené větve se rozřezávají
jednotlivě.
Odřezávání na délku
Krácení je řezání poražených kmenů na
malé kusy.
• Dbejte na to, aby se řetěz pily při
řezání nedotkl země.
• Dbejte na pevný postoj a při řezání ve
svahu stůjte nad kmenem.
K
1. Kmen leží na zemi:
Rozřežte kmen shora úplně a na
konci řezu dejte pozor, abyste
se nedotkli země. Pokud existuje
možnost kmen otočit, prořízněte
jej ze 2/3. Potom kmen otočte a
odshora dořízněte zbytek kmene.
L
2. Kmen je na jednom konci
podepřen:
Nejprve prořízněte 1/3 průměru
kmene odzdola nahoru (horní stranou pilového listu), abyste předešli
jeho tříštění. Poté na jeden řez
kmen dořízněte odshora dolů
(spodní stranou pilového listu),
abyste předešli vzpříčení pily.
M
3. Kmen je podepřen na obou
koncích:
Nejprve prořízněte 1/3 průměru
kmene odshora dolů (spodní
stranou pilového listu). Potom
řezejte odzdola nahoru (horní
stranou pilového listu), až se
řezy setkají.
Page 69

6 9
CZ
N
4. Řezání na kozlíku:
Elektrickou motorovou řetězovou
pilu držte pevně oběma rukama a přístroj veďte během
řezání před tělem. Když dojde
k protnutí kmene, veďte přístroj
vpravo od těla (1). Levou ruku
mějte co možná nejrovněji (2).
Dávejte pozor na padající strom.
Postavte se tak, aby oddělený
kmen nepředstavoval žádné
nebezpečí. Dávejte pozor na své
nohy. Oddělený kmen může pří
pádu způsobit zranění. Udržujte
rovnováhu (3).
Údržba a čištění
Provádějte zásadně
údržbářské a čisticí práce
s vypnutým motorem a
vytaženou síťovou zástrčkou.
Nebezpečí zranění!
Opravářské a údržbářské
práce, které nejsou popsány v tomto návodu, nechte
provést prostřednictvím naší
odborné opravny. Používejte
pouze originálních náhradních dílů. Před veškerými
údržbářskými a čisticími
prácemi nechte stroj vychladnout. Je nebezpečí popálenin!
Čištění
• Po každém použití stroj pečlivě
vyčistěte. Tím prodloužíte životnost stroje a zamezíte nehodám.
• Nedovolte, aby rukojeti byly znečištěny
benzínem, olejem anebo tukem.
Případně rukojeti očistěte vlhkým, v
mýdlovém louhu vypraným hadrem. K
čištění nepoužívejte rozpouštědel anebo
benzínu!
• Po každém použití vyčistěte řetěz pily.
K tomuto účelu použijte štětec anebo
smeták. K čištění řetězu nepoužívejte
kapaliny. Po vyčištění řetěz lehce naolejujte řetězovým olejem.
• Při čištění sejměte také kryt řetězového
kola (15), abyste zařízení mohli vyčistit
i na tomto místě.
• Vyčistěte vzduchové štěrbiny a povrchy
stroje štětcem, smetákem anebo suchým
hadrem. K čištění nepoužívejte žádných
kapalin.
• Vyčistěte otvory pro olej ve vodící liště,
aby bylo během provozu zajištěno bezporu-chové automatické mazání řetězu
pily.
• Vyčistěte propust oleje (27), aby bylo
zajištěno bezvadné, automatické olejování pilového řetězu během provozu.
Stětečkem nebo hadříkem otřete zbytky
z olejové propusti.
Intervaly údržby
Provádějte pravidelně údržbářské práce
uvedené v následující tabulce. Pravidelnou
údržbou Vaší řetězové pily se prodlouží
její životnost. Navíc docílíte optimálních
řezných výkonů a zamezite nehody.
Page 70

7 0
CZ
Tabulka intervalů údržby
Strojní součást Akce
Před
každým
použitím
Po 10 provo-
zních
hodinách
Po
každém
použití
Komponenty brzdy
řetězu
Kontrolovat, v případě
potřeby nahradit
Řetězové kolo
Kontrolovat, v případě
potřeby nahradit
Řetěz pily (5)
Kontrovat, olejovat, v příp.
potřeby nabrousit či nahradit
Řetěz pily (5) Vyčistit, naolejovat
Vodící kolejnice (4)
Kontrolovat, vyčistit, naole-
jovat
Vodící kolejnice (4) Otočit
Olejovou automatiku
kontrolovat olejovou automa-
tiku a příp. vyčistit výstupní
kanál oleje anebo
Olejování řetězu
Čistěte a olejujte řetěz pravidelně.
Tím udržíte jeho ostrost a docílíte
optimálního výkonu stroje. Při
poruchách následkem nedostatečné
údržby řetězu pily zaniká nárok na
záruku. Vytáhněte síťovou zástrčku
a při manipulaci s řetězem anebo
vodící kolejnicí použíjte rukavic s
ochranou proti pořezání!
• Naolejujte řetěz po jeho vyčištění, a
to po 10ti-hodinovém provozu anebo
nejméně jed-nou za týden, podle toho,
co nastane dříve.
• Před naolejováním se musí vodící kolejnice a zejména ozubení řádně vyčistit.
K tomuto účelu použijte ručního smetáku
a suchého hadru
.• Olejujte jednotlivé články řetězu
olejničkou s jehlovou špičkou (lze zakoupit v odborné prodejně). Naneste
jednotlivé kapky oleje na klouby a na
špičky zubů jednotlivých článků řetězu.
Ostření řetězu pily
Nesprávně naostřený řetěz
pily zvýšuje nebezpečí
zpětného rázu! Při manipulaci s řetězem anebo vodící
kolejnicí použijte rukavic s
ochranou proti pořezání.
Ostrý řetěz zaručuje optimální řezný
výkon. Dobře naostřený řetěz se
bez námahy prokusuje dřevem a
zanechává velké, dlouhé piliny.
Řetěz pily je tupý, musíte-li řezné
zařízení do dřeva tlačit a piliny jsou
velmi malé. Při velmi tupém řetězu
pily nevystupují již vůbec žádné piliny, nýbrž pouze prach.
Page 71

7 1
CZ
• Řezné části řetězu jsou nožové články,
které sestávají z řezného zubu a z nosu,
ohraničujícího hloubku řezu. Výškový rozdíl těchto dvou určuje hloubku ostření.
• Při ostření řezných zubů se musí dbát
na následující hodnoty:
H
- ostřicí úhell (30°)
- úhel čela (85°)
- hloubku ostrosti (0,65 mm)
- průměr kulatého pilníku (4,0 mm)
Odchylky od udaných
rozměrů řezací geometrie mohou vést ke zvýšení náchylnosti stroje ke zpět-ným rázům.
Zvýšené nebezpečí úrazu!
K ostření řetězu je třeba speciálních nástrojů,
které zaručují, že jsou nože nabroušeny
ve správném úhlu a do správné hloubky.
Pro nezkušeného uživatele řetězových pil
doporučujeme, aby si řetěz pily nechal naostřit
odborníkem anebo v odborné dílně. Když si
troufáte provést ostření řetězu sami, obdržíte
speciální nástroje v odborné prodejně.
I
1. Pilu vypněte a vytáhněte síťovou
zástrčku.
2. Sejměte pilový řetěz (viz kapitola „Obsluha řetězové pily“).
Pro nabroušení by měl být řetěz
dobře napnutý, aby bylo možné
nabrousit jej správně.
3. K ostření je zapotřebí kulatý pilník s průměrem 4,0 mm.
Jiné průměry poškodí řetěz
a mohou vést k ohrožení při
práci!
4. Bruste pouze zevnitř na venek.
Veďte pilník z vnitřní strany
řezného zubu směrem ven.
Nadzvedněte pilník, když jej táhnete zpět.
5. Ostřete napřed zuby na jedné
straně. Otočte pilu a ostřete zuby
na druhé straně.
6. Řetěz je opotřebován a musí být
nahrazen novým řetězem pily,
zbývají-li z řezného zubu pouze
asi 4 mm.
7. Po nabroušení musí všechny
řezné články být stejně dlouhé a
široké.
8. Po každém 3. ostření se musí
kontrolovat hloubka ostření
(ohraničení hloubky), a výška se
musí dopilovat za pomoci plochého pilníku. Ohraničení hloubky
by mělo vůčí řeznému zubu být
posunuto vzad asi o 0,65 mm.
Zakulaťte ohraničení hloubky
poněkud zepředu po jeho posazení vzad.
Nastavení napnutí řetězu
Nastavení napnutí řetězu je popsáno v kapitole „Montáž – napnutí pilového řetězu“.
Page 72

7 2
CZ
Záběh nového řetězu pily
U nového řetězu se po nějaké době
snižuje
jeho napětí. Proto musíte po prvních 5ti
řezech, pozdějí ve větších odstupech, řetěz
dopínat.
Nikdy nenasazujte nový řetěz
na opotřebovaný hnací pastorek anebo na poškozenou
anebo opotřebovanou vodicí kolejnici. Řetěz by mohl
seskočit anebo se přetrhnout.
Těžká poranění mohou být
následkem.
Údržba vodicí lišty
Při manipulaci s řetězem ane-
bo s vodicí lištou používejte
ochranných rukavic s ochranou proti pořezání.
1. Vypněte pilu a vytáhněte síťovou
zástrčku.
2. Sejměte kryt řetězového kola, řetěz pily
a vodicí lištu.
3. Zkontrolujte opotřebení vodicí lišty.
Odstraňte otřepy a zarovnejte vodicí
plochu plochým pilníkem.
4. Vyčistěte otvory pro olej ve vodící liště, aby
bylo během provozu zajištěno bezporuchové automatické mazání řetězu pily.
5. Namontujte vodící kolejnici, řetěz pily a
kryt řetězového kola a napněte řetěz pily.
Při optimálním stavu otvorů pro
průtok oleje a správném nastavení
regulačního knoíku oleje odstříkne
pilový řetěz několik sekund po
rozběhnutí automaticky trochu oleje.
Zapnutí lišty
Při manipulaci s řetězem anebo s
vodicí lištou používejte ochranných
rukavic s ochranou proti pořezání.
Aby se umožnilo rovnoměrné opotřebení,
musí se vodicí kolejnice každých 10 pracovních hodin otočit.
1. Vypněte pilu a vytáhněte síťovou
zástrčku.
2. Sejměte kryt řetězového kola,
řetěz pily a vodicí lištu.
3. Vložte přední meč (4) a otočte ho na
zádech. Uvolněte zajišťovací šroub
(28) a odstraňte upínací šroub (24).
4. Připojte svěrací šroub (24) s
upevňovací šroub (28) z druhé
strany meč (4). Toto, zkontrolujte, zda že svěrací šroub šrouby
(29) je dole. Kolem nosu (24a)
upínací šroub ozubeného musí
směřovat ve směru.
F
5. Namontujte vodící kolejnici, řetěz
pily a kryt řetězového kola a
napněte řetěz pily.
Směr běhu pilového
řetězu
Při vyrovnání pilového řetězu (5) se orientujte podle obrázku pod krytem řetězu (15),
když se list otáčí. Zobrazení směr běhu na
listu se poté již neshoduje.
Skladování
• Před uskladněním přístroj vyčistěte.
• Před delšími provozními přestávkami
vyprázdněte olejovou nádrž. Starý olej
zlikvidujte ekologicky (viz část „Likvidace / ochrana životního prostředí“ ).
Page 73

7 3
CZ
• Nasuňte ochranný kryt vodicí lišty.
• Skladujte zařízení na suchém místě
chráněném před prachem a mimo dosah dětí.
Odklízení a ochrana
okolí
Nelijte starý olej do kanalizace anebo
do odtoku vody. Odkliďte starý olej
způsobem, odpovidajícím ochraně okolí –
odevzdejte jej ve sběrně pro tento druh odpadu. V případě, že jednoho dne elektrickou řetězovou pilu již nebudete potřebovat
anebo byla-li tak intenzivně používána, že
ji budete muset nahradit novou, pak starý
stroj rovněž odkliďte způsobem, odpovídajícím ochraně okolí.
Stroje nepatří do domácího odpadu.
Označené produkty není dovoleno vyhazovat spolu s domácím odpadem. Je nutné je
odevzdat na přijímacím místě pro recyklaci
elektrických a elektronických přístrojů.
Díky recyklaci se snižuje spotřeba surovin
a chrání se životní prostředí. Informace k
likvidaci a místě nejbližšího recyklačního
sběrného dvora vám poskytne odbor
úklidu města nebo je najdete ve Zlatých
stránkách.
Pečlivě vyprázdněte olejovou nádrž a
odevzdejte elektrickou řetězovou pilu ve
sběrně šrotu. Tam se použité díly z plastu
a kovu patříčně roztřídí a zavedou do
recyclingu. Zeptejte se k tomu v našem
Service-Center.
Náhradní díly
Náhradní díly a příslušenství obdržíte na stránkách
www.grizzly-service.eu
Pokud nemáte internet, tak prosím zavolejte na servisní středisko (viz „ Service-Center “
strana 75). Ujistěte se, že budete mít po ruce níže uvedená čísla objednávky.
Zátka olejové nádrže ............................................................................ 7511 8246
Řetěz pily 91P057X ............................................................................. 3009 1571
Řetěz pily 91VXL .................................................................................. 3009 1598
Lišta ................................................................................................... 3010 0420
Bio-řetězový olej 1 l .............................................................................. 3023 0001
Bio-řetězový olej 5 l ............................................................................. 3023 0002
Náhradní pilový řetěz Oregon může být používán jen ve spojení s
příslušným mečem Oregon a s přípustnou elektrickou řetězovou pilou. Hrozí nebezpečí poranění.
Page 74

7 4
CZ
Záruka
Vážení zákazníci,
Na tento přístroj poskytujeme 3letou záruku od data zakoupení.
V případě závady tohoto výrobku vám vůči
prodejci výrobku přináleží zákonná práva.
Tato zákonná práva nejsou omezena naší
následovně uvedenou zárukou.
Záruční podmínky
Záruční doba začíná běžet ode dne nákupu. Uschovejte si, prosím, originál účtenky
pro pozdější použití. Tento dokument budete potřebovat jako doklad o koupi.
Zjistíte-li během tří let od data koupě u
tohoto výrobku materiálovou nebo výrobní
vadu, bude výrobek námi, podle našeho
výběru, bezplatně opraven nebo nahrazen. Tato záruční oprava předpokládá, že
během 3leté lhůty předložíte poškozený
přístroj s dokladem o koupi (pokladní stvrzenka) a písemně krátce popíšete, v čem
spočívá závada a kdy k ní došlo.
Bude-li závada kryta naší zárukou, získáte zpět opravený nebo nový výrobek.
Opravou nebo výměnou výrobku nezačíná
záruční doba běžet od začátku.
Záruční doba a zákonné nároky na
odstranění vady
Záruční doba se neprodlužuje poskytnutím
záruky. Toto platí i pro nahrazené a opravené díly. Již při koupi zjištěné závady
a nedostatky musíte nahlásit okamžitě
po vybalení výrobku. Po uplynutí záruční
doby musíte uhradit náklady za provedené
opravy.
Rozsah záruky
Přístroj byl precizně vyroben podle přísných jakostních směrnic a před dodáním
byl svědomitě zkontrolován.
Záruční oprava se vztahuje na materiálové
nebo výrobní vady. Tato záruka se netýká
dílů výrobku, které jsou vystaveny normálnímu opotřebení, a lze je považovat
za spotřební materiál (např. Pilový řetěz),
nebo poškození křehkých dílů (např. spínače).
Tato záruka neplatí, je-li výrobek poškozen
z důvodu neodborného používání, nebo
pokud u něj nebyla prováděna údržba.
Pro odborné používání výrobku musí být
přesně dodržovány všechny pokyny uvedené v návodu k obsluze. Bezpodmínečně je
třeba zabránit používání a manipulacím s
výrobkem, které nejsou v návodu k obsluze
doporučeny, nebo je před nimi varováno.
Výrobek je určen jen pro soukromé účely
a ne pro komerční využití. Záruka zaniká
v případě zneužívání a neodborné manipulace, používání nadměrné síly a při
zásazích, které nebyly provedeny naším
autorizovaným servisem.
Postup v případě uplatňování
záruky
Pro zajištění rychlého zpracování vaší
žádosti, prosím, postupujte podle následujících pokynů:
• Na důkaz, že jste výrobek zakoupili,
mějte pro jakékoli případné dotazy
připravenou pokladní stvrzenku a číslo
výrobku (IAN 280275).
• Číslo výrobku je uvedeno na typovém
štítku.
Page 75

7 5
CZ
• Pokud by došlo k funkční poruše nebo
jiným závadám, nejdříve telefonicky
nebo e-mailem kontaktujte níže uvedené servisní oddělení. Pak získáte další
informace o vyřízení vaší reklamace.
• Výrobek označený jako vadný můžete
po domluvě s naším zákaznickým
servisem, s připojením dokladu o koupi (pokladní stvrzenky) a po uvedení, v
čem závada spočívá a kdy k ní došlo,
přeposlat bez platby poštovného na
vám sdělenou adresu příslušného servisu. Aby bylo zabráněno problémům
s přijetím a dodatečnými náklady,
bezpodmínečně použijte jen tu adresu,
která vám bude sdělena. Zajistěte, aby
zásilka nebyla odeslána nevyplaceně
jako nadměrné zboží, expres nebo
jiný, zvláštní druh zásilky. Přístroj zašlete včetně všech částí příslušenství
dodaných při zakoupení a zajistěte
dostatečně bezpečný přepravní obal.
Opravna
Opravy, které nespadají do záruky, můžete nechat udělat v našem servisu oproti
zúčtování. Rádi vám připravíme předběžný
odhad nákladů.
Můžeme zpracovávat jen ty přístroje, které
byly dostatečně zabalené a odeslány vyplaceně.
Pozor: Prosím, přístroj zašlete našemu autorizovanému servisu vyčištěný a s upozorněním na závadu.
Nepřijmeme přístroje zaslané nevyplaceně
jako nadměrné zboží, expres nebo jiný,
zvláštní druh zásilky.
Likvidaci vašich poškozených zaslaných
přístrojů provedeme bezplatně.
Service-Center
CZ
Servis Česko
Tel.: 800143873
E-Mail: grizzly@lidl.cz
IAN 280275
Dovozce
Prosím, respektujte, že následující adresa
není adresou servisu. Nejdříve kontaktujte
shora uvedené servisní středisko.
Grizzly Tools GmbH & Co. KG
Stockstädter Straße 20
63762 Großostheim
Německo
www.grizzly-service.eu
Page 76

7 6
CZ
Hledání závad
Problém Možná příčina Odstranění závady
Přístroj nestartuje
Zacvaknutá řetězová brzda
Zkontrolujte řetězovou brzdu,
případně řetězovou brzdu uvolněte.
Chybí síťové napětí
Domovní pojistka vypíná
Zásuvku, kabel, vedení, zástrčku
kontrolovat, příp. oprava elektroodborníkem
Kontrola domovní pojistky, viz pokyn
Vadný spínač/vypínač (10) Oprava servisem
Opotřebované uhlík. kartáčky Oprava servisem
Motor defektní Oprava servisem
Řetěz se netočí
Brzda řetězu blokuje řetěz
pily (5)
Kontrola brzdy řetězu,
příp. povolit brzdu řetězu
Špatný řezný
výkon
Řetěz pily (5) nesprávně namontov.
Řetěz pily správně namontovat
Tupý řetěz pily (5)
Naostřit řezací zuby anebo
nasadit nový řetěz
Nedostatečné napětí řetězu Zkontrolovat napětí řetězu
Pila běží
ztěžka, řetěz
seskakuje
Nedostatečné napětí řetězu Zkontrolovat napětí řetězu
Řetěz se zahřívá,
tvoření kouře při
řezání, zbarvení
kolejnice
Příliš málo řetězového oleje
Kontrola stavu oleje, příp. doplnit řetěz.
olej, kontrolovat olejovou automatiku a
příp. vyčistit výstupní kanál oleje anebo
oprava servisem
Překontrolujte přesné nastavení oleje
(regulační knoík oleje).
Page 77

7 7
S K
Údržba vodiacej lišty ..................... 96
Otočenie lišty ............................... 96
Odloženie ................................. 97
Odstránenie a ochrana životného
prostredia ................................. 97
Náhradné diely/Príslušenstvo .. 98
Zisťovanie závad ...................... 99
Záruka ................................... 100
Servisná oprava ..................... 101
Service-Center ......................... 101
Dovozca .................................. 101
Obsah
Úvod......................................... 77
Použitie ..................................... 78
Všeobecný popis ....................... 78
Objem dodávky ............................ 78
Prehľad ........................................ 78
Popis funkcie ................................ 79
Technické údaje ......................... 79
Bezpečnostné pokyny ............... 80
Bezpečnostné pokyny/
obrázkové znaky na píle ................ 80
Symboly v návode ........................ 81
Všeobecné bezpečnostné pokyny .... 81
Všeobecné bezpečnostné pokyny
pre elektrické náradia ................... 81
Preventívne opatrenia proti
spätnému nárazu .......................... 85
Pokračujúce bezpečnostné pokyny .. 86
Bezpečnostné funkcie .................... 86
Montáž ..................................... 87
Montáž reťaze .............................. 87
Montáž vodiacej lišty .................... 87
Napínanie reťaze .......................... 88
Mazanie reťaze ............................ 88
Obsluha reťazovej píly .............. 89
Zapínanie .................................... 89
Kontrola reťazovej brzdy ................ 89
Kontrola automatiky olejového mazania
90
Výmena vodiacej lišty .................... 90
Techniky pílenia ........................ 90
Všeobecné pokyny ........................ 90
Stínanie stromov ........................... 91
Odvetvovanie ............................... 92
Skracovanie ................................. 92
Údržba a čistenie ...................... 93
Čistenie ....................................... 93
Intervaly údržby ............................ 94
Tabuľka intervalov údržby .............. 94
Olejovanie reťaze ......................... 94
Brúsenie reťaze ............................. 95
Zabehávanie novej reťaze .............. 96
Úvod
Gratulujeme Vám k zakúpeniu Vášho nové-
ho prístroja. Tým ste sa rozhodli pre kvalitný produkt. Tento prístroj bol počas výroby
testovaný na kvalitu a podrobený výstupnej
kontrole. Tým je zabezpečená funkčnosť
vášho prístroja. Nie je vylúčené, že v ojedinelých prípadoch sa na prístroji alebo v
prístroji, resp. v hadiciach nachádza zvy-
šková voda alebo mazivá. Nie je to chyba
alebo defekt a ani dôvod na obavu.
Návod na obsluhu je súčasťou
tohto produktu. Obsahuje dôležité
upozornenia ohľadom bezpečnos-
ti, obsluhy a likvidácie. Pred
používaním produktu sa oboznámte
so všetkými pokynmi pre obsluhu
a bezpečnosť. Používajte produkt
len predpísaným spôsobom a len v
uvedených oblastiach použitia.
Návod na obsluhu uschovajte a v prí-
pade odovzdania produktu tretím oso-
bám odovzdajte aj všetky podklady.
Preklad originálneho
prehlásenia o zhode CE ............135
Výkres náhradných dielov .......136
Page 78

7 8
S K
Použitie
Elektrická reťazová píla je skonštruovaná
len na pílenie dreva. Na všetky ostatné
druhy použitia (napr. rezanie stien a múrov, umelých hmôt alebo potravín) táto píla
nie je vhodná.
Reťazová píla je určená na použitie pre
domáce práce. Nie je koncipovaná pre
nepretržité profesionálne používanie.
Prístroj je určený len na používanie dospelými osobami. Mladiství nad 16 rokov
môžu používať reťazovú pílu len pod do-
zorom.
Výrobca nezodpovedá za škody, ktoré boli
spôsobené používaním nezodpovedajúcim
účelu použitia alebo nesprávnou obsluhou.
S touto elektrickou reťazovou pílou môže
pracovať len jedna osoba a môže sa
používať len na pílenie dreva. Reťazovú
pílu musíte držať pravou rukou za zadnú
rukoväť a s ľavou rukou za prednú rukoväť.
Pred použitím reťazovej píly musí používateľ prečítať a pochopiť všetky pokyny a
predpisy v návode na obsluhu. Používateľ
musí nosiť primeranú osobnú ochrannú výbavu (PSA). S reťazovou pílou môžete píliť
iba drevo. Materiály ako napríklad plast,
kameň, kov alebo drevo, ktoré obsahuje
cudzie predmety (napr. klince alebo skrut-
ky) sa nesmú opracovávať!
Všeobecný popis
Vyobrazenia pre obsluhu a
údržbu nájdete na prednej odklápacej strane.
Objem dodávky
Přístroj vybaltej a zkontrolujte, je-li kompletní:
- Reťazová píla
- Lišta (vodiaca lišta) (už montovaný)
- Reťaz píly (už montovaný)
- Ochranný kryt lišty
- Fľaša oleja s 180 ml „Bio-olej“
- Návod na obsluhu
Obalový materiál řádně zlikvidujte.
Prehľad
A
1 zadná rukoväť
2 viečko olejovej nádržky
3 páka reťazovej brzdy / predný
chránič rúk
4 lišta (vodiaca lišta)
5 reťaz píly
6 hviezdicové vodítko reťaze
7 ozubený doraz
8 predná rukoväť
9 elektromotor
10 zapínač/vypínač
11 poistka vypínača
12 zachytávací čap reťaze
13 krúžok na napínanie reťaze
14 upevňovacia skrutka pre kryt
reťazového kolesa
15 kryt reťazového kolesa
16 zadný chránič rúk
17 držiak kábla
18 sieťový kábel
20 Fľaša oleja
C
21 ukazovateľ stavu oleja
22 značka „MIN“ minimálneho
stavu oleja
F
23 Železničná skrutka
24 Upínacia skrutka
Page 79

7 9
S K
G
25 Ozubené koleso
26 Nos
J
27 Olej priechod
28 Upevňovacia skrutka
29 Upínacia skrutka skrutka
Popis funkcie
Reťazová píla je vybavená elektromotorovým pohonom. Obiehajúca reťaz píly je
vedená cez lištu (vodiaca lišta). Píla je vybavená systémom rýchleho napínania reťaze a reťazovou brzdou umožňujúcou jej
rýchle zastavenie. Automatika olejového
mazania reťaze zabezpečuje jej kontinuálne mazanie. Za účelom ochrany osoby obsluhujúcej pílu je reťazová píla vybavená
rôznymi ochrannými zariadeniami. Infor-
mácie o funkcii jednotlivých obsluhovacích
prvkov nájdete v nasledujúcich popisoch.
Technické údaje
Elektrická
reťazová píla ....................FKS 2200 F3
menovité vstupné
napätie U ................. 230-240 V~, 50 Hz
príkon P ................................ 2200 Watt
ochranná trieda ................................
II
druh ochrany ...................................IP20
rýchlosť reťaze v
0
......................15,3 m/s
hmotnosť (bez lišty a reťaze) ..........4,4 kg
hmotnosť (s lištou a reťazou) ..........5,3 kg
Objem nádrže ........................asi 190 ml
reťaz ...........................Oregon 91P057X
......................pochrómované rezné zuby,
...............s minimálnym spätným nárazom
lišta ................ Oregon 16“ Double-Guard
........................... 160SDEA041-112364
rozteč reťaze ............................... 10 mm
hrúbka reťaze ............................. 1,3 mm
ozubenie reťazového kolesa .................. 7
dĺžka listu píly ........................... 460 mm
dĺžka rezu ................................. 395 mm
hladina akustického
tlaku (L
pA
) ............ 84,9 dB (A); KpA=3 dB
hladina akustického
výkonu (L
WA
) ... 107,7 dB (A); KWA=2,58 dB
zaručená hladina
akustického výkonu ................. 110 dB (A)
vibrácie (a
h
) ....... 7,612 m/s2 ; K=1,5 m/s
2
Uvedená emisná hodnota vibrácií bola nameraná podľa normovanej skúšobnej metódy
a môže byť použitá na porovnanie jedného
elektrického prístroja s druhým. Uvedená
emisná hodnota vibrácií môže byť použitá aj
na úvodné posúdenie vysadenia prístroja.
Výstraha:
Emisná hodnota vibrácií sa môže
počas skutočného používania
elektrického nástroja odlišovať od
uvádzanej hodnoty, v závislosti od
druhu a spôsobu, v akom sa elek-
trický prístroj používa.
Existuje nutnosť, stanoviť ochranné
opatrenia na ochranu užívateľa,
ktoré sa opierajú o odhadnutie vy-
sadenia prístroja počas skutočných
podmienok používania (pri tom
treba zohľadniť všetky časti prevádzkového cyklu, napríklad doby,
počas ktorých je elektrický prístroj
vypnutý, a také, v ktorých je síce
zapnutý, ale beží bez zaťaženia).
Technické a optické zmeny môžu byť v
priebehu ďalšieho vývoja prevedené bez
predchádzajúceho ohlásenia. Všetky miery, pokyny a údaje obsiahnuté v tomto
návode na obsluhu sú preto bez záruky.
Právne nároky vznesené na základe návo-
du na obsluhu nemožno preto uplatniť.
Page 80

8 0
S K
Bezpečnostné pokyny
Tento odstavec pojednáva o základných
bezpečnostných predpisoch pri práci s
elektrickou reťazovou pílou.
Elektrická reťazová píla je nebez-
pečný nástroj, ktorý pri nesprávnom
alebo neopatrnom používaní môže
spôsobiť vážne alebo dokonca
smrteľné zranenia. Preto pre Vašu
bezpečnosť ako i pre bezpečnosť
iných vždy dodržujte nasledovné
bezpečnostné pokyny a v prípade
nejasností sa poraďte s odborníkom.
Bezpečnostné pokyny/obrázkové znaky na píle
Pred začatím práce sa dobre oboz-
námte so všetkými obsluhovacími
prvkami píly. Naučte sa s pílou zaobchádzať a nechajte si jej funkciu,
spôsob fungovania ako i techniky
pílenia vysvetliť od odborníka.
Reťaz píly sa netočí, keď je reťazo-
vá brzda aktivovaná.
Uvoľnite brzdu reťaze, pričom páku
brzdy posuňte k prednému držadlu.
Prečítajte si a dodržujte návod na
obsluhu patriaci k píle!
Používejte ochranu zraku a sluchu
Noste zásadně ochrannou helmu!
Noste rukavice, které jsou
bezpečné proti pořezání!
Noste protiskluzovou bezpečnostní
obuv!
Note ochranný odev!
Reťazovú pílu používajte
vždy oboma rukami
Pozor! Nebezpečenstvo spätného
rázu – Pri práci s pílou dávajte po-
zor na jej spätný ráz.
Pílu nevystavujte dažďu. Nástroj
nesmie byť vlhký a ani nesmie byť
prevádzkovaný vo vlhkom prostredí.
Pozor! V prípade poškodenia alebo
prerezania sieťového kábla ihneď
vytiahnite zástrčku zo zásuvky.
dB
L
WA
Zaručená hladina akustického výkonu
Nápis na typovom štítku:
ochranná trieda II
Elektriska apparater hör inte hem-
ma bland hushållsavfallet.
460 mm
Dĺžka listu píly
Znak pod krytom reťazového kolesa:
Dodržiavajte smer chodu reťazovej píly.
Pozor! Prečítajte si návod na používanie.
Znak na lište:
Smer chodu reťazovej píly
Znak na uzávere olejovej nádrže:
Olejovanie reťazovej píly.
Page 81

8 1
S K
Znak na upevňujúcej skrutke krytu
reťazového kolesa:
OTVOR
ZATVOR
Znak na páke brzdy reťaze:
O brzda reťaze: VYP
I brzda reťaze: ZAP
Symboly v návode
Výstražné značky s údajmi pre
zabránenie škodám na zdraví
alebo vecným škodám.
Príkazové značky (namiesto výkrič-
níka je vysvetľovaný príkaz) s údaj-
mi pre prevenciu škôd.
Informačné značky s informáciami pre
lepšie zaobchádzanie s nástrojom.
Všeobecné bezpečnostné
pokyny
Skôr, než začnete s elektrickou
reťazovou pílou pracovať, dobre
sa oboznámte so všetkými jej
obsluhovacími prvkami. Nacvičte
si zaobchádzanie s pílou (skracovanie guľatiny na koze na pílenie)
a nechajte si skúseným užívateľom
alebo odborníkom vysvetliť funkciu,
spôsob činnosti, techniky pílenia a
osobné ochranné vybavenie.
Dodržiavajte ochranu proti hluku
a miestne predpisy pri rúbaní
dreva. Miestne ustanovenia môžu
vyžadovať skúšku spôsobilosti. In-
formujte sa u Lesnej správy.
Pozor! Pri používaní elektrického
náradia sa musia dodržiavať
predpisy ochrany proti úrazu elek-
trickým prúdom a tiež základné
bezpečnostné predpisy prevencie
pred úrazmi a predpisy požiarnej
ochrany.
Hrozí nebezpečenstvo zranenia.
Všeobecné bezpečnostné pokyny pre elektrické náradia
VAROVANIE! Prečítajte si
všetky bezpečnostné pokyny
a nariadenia. Zanedbanie dodr-
žiavania bezpečnostných pokynov
a nariadení môže zapríčiniť zásah
elektrickým prúdom, požiar a/alebo ťažké poranenia.
Všetky bezpečnostné pokyny a
nariadenia si uschovajte pre bu-
dúcnosť.
Pojem „elektrický nástroj“ použitý v bezpečnostných pokynoch sa vzťahuje na elektrické
nástroje napájané zo siete (so sieťovým
káblom) a na elektrické nástroje napájané z
akumulátora (bez sieťového kábla).
Bezpečnosť pracoviska:
• Udržujte svoj pracovný úsek čis-
tý a dobre osvetlený. Neporiadok
alebo neosvetlené pracovné oblasti
môžu viesť k nehodám.
• Nepracujte s elektrickými reťazovými pílami v okolí ohrozenom
výbuchom, v ktorom sa nachá-
dzajú horľavé tekutiny, plyny
alebo prachy. Elektrické stroje vy-
tvárajú iskry, ktoré môžu zapáliť prach
alebo pary.
Page 82

8 2
S K
• Behom používania elektrickej
reťazovej píly udržujte deti a iné
osoby vzdialene od seba. Pri ne-
pozornosti môžete stratiť kontrolu nad
nástrojom.
Elektrická bezpečnosť:
Pozor: Takto sa vyvarujete nehodám
a poraneniam skrz elektrický úder:
• Prípojná zástrčka elektrickej
reťazovej píly sa musí hodiť do
zásuvky. Zástrčka sa nesmie
žiadnym spôsobom zmeniť. Nepoužívajte žiadne adaptérové
zástrčky v spojení s elektrickými
nástrojmi s ochranným uzemne-
ním. Nezmenené zástrčky a zásuvky
zmenšujú riziko elektrického úderu.
• Vyvarujte sa telesnému kontaktu
s uzemnenými povrchmi ako sú
rúry, vyhrievacie telesá, sporáky
a chladničky. Existuje zvýšené riziko
skrz elektrický úder, keď je Vaše telo
uzemnené.
• Nevystavujte elektrickú reťazo-
vú pílu dažďu alebo mokrosti.
Vniknutie vody do elektrického nástroja
zvyšuje riziko elektrického úderu.
• Nepoužívajte kábel na iný účel,
ako je nosenie alebo zavesenie
elektrickej reťazovej píly alebo
vytiahnutie zástrčky zo zásuvky.
Udržujte kábel vzdialene od horúčavy, od oleja, od ostrých hrán
alebo od pohybujúcich sa častí
nástrojov.
Poškodené alebo zamotané káble zvyšujú riziko elektrického úderu.
• Keď pracujete s elektrickou reťa-
zovou pílou pod šírym nebom,
potom používajte iba predlžova-
cie káble, ktoré sú vhodné aj pre
vonkajšiu oblasť. Použitie predlžova-
cieho kábla vhodného pre vonkajšiu ob-
lasť, zmenšuje riziko elektrického úderu.
• Keď sa nemožno vyhnúť prevádzke elektrickej reťazovej píly
vo vlhkom prostredí, používajte
ochranný vypínač chybového
prúdu. Používanie ochranného
vypínača chybového prúdu znižuje riziko elektrického úderu.
Používajte ochranný vypínač chybového
prúdu s vybavovacím prúdom 30 mA
alebo s menším.
• Používajte iba schválené napájací
kábel typu H05RN-F, ktoré sú viac ako
75 m na dĺžku a určených na použitie
vo voľnom priestranstve. Vodiče prierezu kábla musia byť aspoň 2,5 mm2.
Vždy plne rozvinúť káblový bubon
pred použitím. Skontrolujte napájací
kábel poškodenie.
Bezpečnosť osôb:
Pozor: Takto sa vyvarujete nehodám
a poraneniam:
• Buďte pozorní, dbajte na to, čo
robíte a pustite sa s elektrickou
reťazovou pílou rozumne do práce. Nepoužívajte elektrickú reťazovú pílu, keď ste unavení alebo
pod vplyvom drog, alkoholu
alebo liekov. Jediný okamžik
nepozornosti pri používaní elektrickej reťazovej píly môže viesť
k vážnym poraneniam.
Noste osobný ochranný výstroj a vždy
ochranné okuliare. Nosenie osobného
ochranného výstroja, ako je protišmyková obuv, ochranná prilba a ochrana
sluchu, znižuje riziko poranenia.
Page 83

8 3
S K
Používanie a ošetrovanie
elektrickej reťazovej píly:
•
Nepreťažujte tento nástroj. Použite
pre svoju prácu elektrické náradie,
určené pre tento účel. S vhodným
elektrickým nástrojom pracujete v udanom
výkonovom rozsahu lepšie a bezpečnejšie.
• Nepoužívajte žiadne elektrické
náradie, ktorého spínač je de-
fektný. Elektrické náradie, ktoré sa už
nedá za- alebo vypnúť, je nebezpečné
a musí byť opravené.
• Vytiahnite zástrčku zo zásuvky
predtým, než vykonáte nastavovania na nástroji, než vymeníte
časti príslušenstva alebo než
nástroj odložíte. Toto preventívne
bezpečnostné opatrenie zabráni neúmyselnému štartu elektrickej reťazovej píly.
• Uložte nepoužívanú elektrickú
reťazovú pílu mimo dosahu detí.
Neprenechávajte používanie
tejto píly osobám, ktoré nie sú
oboznámené s týmto nástrojom
alebo tieto pokyny nečítali. Elek-
trické nástroje sú nebezpečné, keď ich
používajú neskúsené osoby.
• Starostlivo ošetrujte túto elektrickú reťazovú pílu. Kontrolujte,
či pohyblivé diely bezchybne
fungujú a neviaznu, či sú časti
zlomené alebo natoľko poškodené, že je funkcia elektrickej reťazovej píly narušená. Nechajte
poškodené časti pred použitím
nástroja opraviť. Príčiny mnohých
nehôd spočívajú v zle udržovaných
elektrických nástrojoch.
• Udržujte rezné nástroje ostré
a čisté. Starostlivo ošetrované rezné
nástroje s ostrými reznými hranami sa
menej zaseknú a lepšie sa vedú.
• Noste osobnú ochrannú výbavu
a vždy ochranné okuliare. Nosenie osobnej ochrannej výbavy ako
protišmyková bezpečná obuv, ochranné
pracovné nohavice, ochranná helma
alebo ochrana sluchu znižujú riziko poranení.
• Odstráňte nastavovacie náradie
alebo skrutkovače predtým, než
zapnete elektrickú reťazovú pílu.
Náradie alebo kľúč, ktorý sa nachádza
v otáčajúcej sa časti nástroja, môže
viesť k poraneniam.
• Vyvarujte sa abnormálnemu
držaniu tela. Postarajte sa o
bezpečný postoj a udržujte vždy
rovnováhu. Týmto môžete pri neočakávaných situáciách lepšie kontrolovať
elektrickú reťazovú pílu.
• Noste vhodný odev. Nenoste žiadne
voľné oblečenie alebo šperky. Udržujte
vlasy, odev a rukavice vzdialene od
pohybujúcich sa častí. Voľné oblečenie,
šperky alebo dlhé vlasy môžu byť zachytené pohybujúcimi sa časťami.
• Ak možno namontovať zari-
adenia na odsávania prachu
a záchytné zariadenie, tak sa
presvedčte, či sú tieto zapojené a či sa správne používajú.
Používanie odsávania prachu môže
znížiť ohrozenia prachom.
• Upozornenie! Tento elektrický prístroj
počas prevádzky vytvára elektromagnetické pole. Toto pole môže za určitých okolností ovplyvniť aktívne alebo
pasívne lekárske implantáty. Aby sa
zabránilo nebezpečenstvu vážnych
alebo smrteľných zranení, odporúčame,
aby osoby s lekárskymi implantátmi konzultovali svojho lekára alebo výrobcu
lekárskeho implantátu pred samotnou
obsluhou prístroja.
Page 84

8 4
S K
• Používajte túto elektrickú reťazovú pílu, jej príslušenstvo, vložné
nástroje atď. v súlade s týmito
inštrukciami. Zohľadnite pritom
pracovné podmienky a činnosť,
ktorá sa má vykonávať. Používa-
nie elektrickej reťazovej píly pre iné účely, než pre ktoré je určená, môže viesť k
nebezpečným situáciám.
• Pri pílení na svahu stojte vždy nad
kmeňom. Pre udržanie úplnej kontroly v
momente „prepílenia“, zredukujte prítlak
proti koncu rezu bez toho, aby ste uvoľ-
nili pevné uchopenie na rukovätiach
reťazovej píly. Dávajte pozor, aby ste
sa pílovou reťazou nedotkli zeme. Po
dokončení rezu počkajte, kým sa píla
zastaví, až potom môžete reťazovú pílu
z miesta odobrať. Predtým, než prejdete
k inému stromu, motor reťazovej píly
vždy vypnite.
• Nečistoty, kamene, uvoľnenú kôru,
klince, svorky a drôt musíte zo stromu
odstrániť.
Servis:
• Svoje elektrické náradie nechajte opraviť iba kvalikovaným
odborným personálom a iba pomocou originálnych náhradných
dielov. Týmto sa zaistí to, že bezpeč-
nosť elektrického náradia zostane zachovaná.
• Starostlivo dodržujte inštrukcie
pre údržbu, kontroly a servis,
obsiahnuté v tomto návode na
obsluhu.
Poškodené ochranné zariadenia a diely
sa musia odborne opraviť alebo vymeniť
skrz náš Service-Center, pokiaľ v návode na obsluhu nie je nič iného udané.
Bezpečnostné pokyny
pre reťazové píly:
• Pri bežiacej píle udržujte všetky
časti tela vzdialene od reťaze
píly. Pred štartom píly sa presvedčte o tom, že sa reťaz píly
ničoho nedotýka. Pri práci s reťazo-
vou pílou môže jediný okamžik nepozornosti viesť k tomu, že sa reťazou píly
zachytí oblečenie alebo časti tela.
• Vždy držte reťazovú pílu pravou
rukou za zadnú rukoväť a ľavou
rukou za prednú rukoväť. Pevné
držanie reťazovej píly v opačnom pracovnom držaní, zvyšuje riziko poranenia a nesmie sa používať.
• Noste ochranné okuliare a
ochranu sluchu. Ďalšia ochranná
výbava pre hlavu, ruky, nohy a
chodidlá je predpísaná. Vhodný
ochranný odev znižuje nebezpečenstvo
poranenia skrz poletujúci trieskový ma-
teriál a skrz náhodný dotyk s reťazou
píly.
• Nepracujte s reťazovou pílou na
strome. Pri prevádzke reťazovej píly
na strome existuje nebezpečenstvo po-
ranenia.
• Dbajte vždy na pevný postoj
a používajte reťazovú pílu iba
vtedy, keď stojíte na pevnom,
bezpečnom a rovnom podklade.
Šmykľavý podklad alebo nestabilné plochy na státie, ako napríklad na rebríku,
môžu viesť k strate rovnováhy alebo k
strate kontroly nad reťazovou pílou.
• Počítajte pri rezaní konára, ktorý
je vystavený pnutiu s tým, že sa
odpruží. Keď sa pnutie vo vláknach
dreva uvoľní, môže napätý konár trať
obsluhujúcu osobu a/alebo vytrhnúť
reťazovú pílu z kontrolovaného stavu.
Page 85

8 5
S K
obr. 1
• Spätný náraz sa môže vyskytnúť vtedy, keď sa špička vodiacej koľajničky
dotkne nejakého predmetu alebo keď
sa drevo ohne a reťaz píly sa v záreze
zasekne (viď obrázok 1/ obr. B).
• Dotyk so špičkou vodiacej koľajničky
môže v niektorých prípadoch viesť k neočakávanej, naspäť smerovanej reakcii,
u ktorej sa vodiaca koľajnička vyrazí
nahor, smerom k obsluhujúcej osobe
(viď obrázok 1/ obr. A).
• Zaseknutie reťaze píly na hornej hrane
vodiacej koľajničky môže koľajničku
prudko vraziť späť do smeru k obsluhujú-
cej osobe.
• Každá z týchto reakcií môže viesť k
tomu, že stratíte kontrolu nad pílou a
prípadne sa ťažko poraníte.
Nespoliehajte sa výlučne na bezpečnostné opatrenia zabudované do reťazovej píly. Ako používateľ reťazovej píly
by ste mali učiniť rozličné opatrenia,
aby ste mohli pracovať bez nehôd a
bez poranení.
Spätný náraz je následkom nesprávneho
alebo chybného používania elektrického
náradia. Možno mu zabrániť vhodnými
preventívnymi opatreniami, ako to je nasledovne popísané:
• Držte pílu pevne obomi rukami, pričom
palec a prsty obopínajú rukoväti reťazovej píly. Uveďte Vaše telo a ramená do
takej polohy, v ktorej môžete odolať si-
• Buďte obzvlášť opatrní pri rezaní
podrastu a mladých stromov. Ten-
to tenký materiál sa môže s reťazovou
pílou zapliesť a udrieť Vás alebo Vás
vyviesť z rovnováhy.
• Noste reťazovú pílu za rukoväť
vo vypnutom stave, s reťazou
odvrátenou od Vášho tela. Pri
transporte alebo ukladaní reťazovej
píly, vždy na ňu natiahnite ochranný
kryt. Starostlivé zaobchádzanie s reťazovou pílou znižuje pravdepodobnosť
náhodného dotyku s bežiacou reťazou
píly.
• Dodržujte inštrukcie pre mastenie, pre napínanie reťaze a pre
výmenu príslušenstva. Neodborne
napnutá alebo namastená reťaz sa buď
môže pretrhnúť alebo môže zväčšiť rizi-
ko spätného nárazu.
• Udržujte rukoväti suché, čisté
a bez oleja a tukov. Zamastené,
naolejované rukoväti sú klzké a vedú k
strate kontroly.
• Režte iba drevo. Nepoužívajte
reťazovú pílu pre práce, pre ktoré nie je určená - príklad: nepoužívajte reťazovú pílu na rezanie
plastov, muriva alebo staveb-
ných materiálov, ktoré nie sú z
dreva. Používanie reťazovej píly pre
práce, pre ktoré nie je určená, môže
viesť k nebezpečným situáciám.
Preventívne opatrenia proti
spätnému nárazu
Pozor, spätný náraz! Dbajte pri
práci na spätný náraz stroja. Exis-
tuje nebezpečenstvo poranenia.
Spätným nárazom sa vyvarujete
opatrnosťou a správnou technikou
rezania.
Page 86

8 6
S K
lám spätného nárazu. Keď sa vykonajú
vhodné opatrenia, potom môže obsluhujúca osoba prekonať sily spätného
nárazu. Nikdy reťazovú pílu nepúšťajte.
• Vyvarujte sa abnormálnemu držaniu
tela a nerežte nad výškou svojich
ramien. Týmto sa vyvarujete nezámer-
nému dotyku so špičkou koľajničky a
umožní sa lepšia kontrola nad reťazovou pílou v neočakávaných situáciách.
• Používajte vždy výrobcom predpísané
náhradné koľajničky a reťaze píly. Nesprávne náhradné koľajničky a reťaze
píly môžu viesť k pretrhnutiu reťaze a/
alebo k spätnému nárazu.
• Dodržujte inštrukcie výrobcu ohľadne
ostrenia a údržby reťaze píly. Príliš nízke obmedzovače hĺbky zvyšujú náchylnosť k spätnému nárazu.
Pokračujúce bezpečnostné
pokyny
• Ak sa prípojné vedenie tohto nástroja
poškodí, musí byť nahradené skrz výrobcu alebo jeho servisnú službu zákazníkom alebo podobne kvalikovanú
osobu, aby sa vyvarovalo ohrozeniam.
• Ak je potrebná náhrada prívodného
vedenia, odporúčame, aby to vykonal
výrobca alebo jeho zástupca (napr.
autorizovaný odborný servis, služba
zákazníkom a pod.).
• Prípojné vedenie položte tak, aby sa
nemohol zachytiť počas pílenia vetiev
alebo podobného.
• Používajte prúdový chránič s vypínacím
prúdom 30 mA alebo nižším.
• Dôsledne dodržiavajte návody na
údržbu, kontroly a servis v tomto Ná-
vode na prevádzku.
Poškodené ochranné zariadenia a
diely musia sa odborne opraviť v
našom servisnom stredisku alebo
vymeniť, pokiaľ v návode na obsluhu
nie je uvedené niečo iné.
Bezpečnostné funkcie
A
1 Zadná rukoväť
s chráničom rúk (16)
chráni ruku pred konármi a
vetvami a pred padajúcou reťazou.
3 Páka reťazovej brzdy /
chránič rúk
Bezpečnostné zariadenie, ktoré
reťaz píly pri spätnom ráze
okamžite zastaví; páka môže byť
aktivovaná aj manuálne; chráni
ľavú ruku osoby obsluhujúcej
pílu pri jej zošmyknutí z prednej
rukoväte.
Reťaz píly sa netočí, keď je reťazo-
vá brzda aktivovaná.
5 Reťaz píly s malým
spätným rázom
Táto Vám so špeciálne vyvinutými
bezpečnostnými zariadeniami
pomáha tlmiť spätné rázy.
7 Ozubený doraz
Zvyšuje stabilitu pri prevádzaní
vertikálnych rezov a uľahčuje
pílenie.
9 Elektromotor
má z bezpečnostných dôvodov
dvojitú izoláciu.
10 Zapínač/vypínač s funkciou
okamžitého zastavenia
reťaze
Pri pustení zapínača/vypínača sa
prístroj okamžite vypne.
11 Poistka vypínača
Za účelom zapnutia prístroja
treba poistku odistiť.
Page 87

8 7
S K
12 Zachytávací čap reťaze
znižuje nebezpečenstvo poranení
v prípade, že dôjde k roztrhnutiu
alebo spadnutiu reťaze.
Montáž
Pri práci s reťazou používaj-
te vždy ochranné rukavice
a používajte len originálne
diely. Pred začatím akýchkoľvek prác na reťazovej píle
vytiahnite zástrčku zo zásuvky. Existuje nebezpečenstvo
zranenia.
Predtým než uvediete do prevádzky elektrickú reťazovú pílu, musíte:
- v prípade potreby namontovať lištu,
reťazovú pílu a kryt reťaze,
- napnúť reťazovú pílu,
- naplniť olej,
- skontrolovať funkciu brzdy reťaze a
automatiku oleja.
Montáž reťaze
G
1. Rozprestrite reťaz píly do tvaru
sľučky tak, aby rezné hrany boli
usporiadané v smere hodinových
ručičiek.
2. Uvoľnite napínaciu závitovku (24)
proti smeru otáčania hodinových ručičiek.
3. Reťaz píly (5) naložte do drážky
lišty. Za účelom montáže držte
lištu (4) v uhle cca 45 stupňov
natočenú smerom nahor, aby sa
reťaz píly (5) mohla ľahšie naložiť
na reťazový pastorok (25). Je
normálne, keď reťaz píly (5)
prevísa. Je normálne, keď reťaz
prevísa.
4. Predpnite reťaz tým, že napínaciu
lištu otáčate v smere hodinových
ručičiek.
5. Nasaďte kryt reťazového kolesa
(16). Pritom sa musí najskôr nasadiť
výstupok na kryte do príslušnej
drážky na prístroji. Upevňovaciu
skrutku len ľahko utiahnite, pretože
reťaz treba ešte napnúť.
Kryt reťazového kolesa pripevnite
ešte pomocou poistnej skrutky (15).
Dávaj si pozor! Môžu mazať elek-
trické reťazové píly.
Upozorňujeme, že elektrické reťazové píly
po použití na olej a olej môže unikať ak
je uložené na strane alebo na hlavu. To je
normálny proces, výsledkom potrebné Krty
v hornej časti nádrže a bez dôvodu na
sťažnosť. Každá elektrická reťazová píla je
kontrolované a testované s olejom počas
výroby, trochu odpočinúť v nádrži môže
byť napriek vyprázdňovania, ktoré ľahko
videli bývanie s olejom počas prepravy.
Prosím čistou handričkou
Pred výmenou reťaze sa drážka vodiacej
lišty vyčistí od nečistôt, pretože v prípade
nánosu nečistôt môže reťaz vyskočiť z lišty.
Nánosy môžu tiež odsávať olej reťaze. Dôsledkom by mohlo byť, že olej sa nedostane
alebo sa dostane len v nepatrnom množstve
na spodnú stranu lišty a mazanie sa zhorší.
Montáž vodiacej lišty
F
1. Položte pílu na rovnú plochu.
2. Upevňovaciu skrutku (14) otočte
proti smeru hodinových
ručičiek (
), aby ste
mohli odstrániť kryt reťazového
kolesa (15).
Page 88

8 8
S K
3. Za účelom montáže nasaďte
vodiacu lištu na kolík koľajničky
tak, aby sa napínacia lišta
nachádzala na vonkajšej strane.
Napínanie reťaze
Pravidelné napínanie reťaze prispieva k
bezpečnosti používateľa a znižuje resp.
zabraňuje opotrebovaniu a poškodeniu reťaze. Odporúčame používateľovi pred začiatkom práce a v pravidelných intervaloch
asi 10 minút kontrolovať napnutie reťaze a
v prípade potreby ho korigovať.
Počas práce s pílou sa reťaz zohrieva a
tým sa mierne roztiahne. S týmto „predĺžením“ sa má počítať hlavne u nových reťazí.
Reťaz nenapínajte alebo nevymie ňajte v horúcom stave, pretože
po vychladnutí sa opäť o niečo stiahne. Pri
nedodržaní uvedeného sa môže poškodiť
motor alebo vodiaca lišta, pretože reťaz je
potom na lište veľmi napnutá.
Napnutie a mazanie reťaze vo veľkej miere ovplyvňujú jej životnosť.
Reťaz je vtedy správne napnutá, keď neprevísa na spodnej strane vodiacej lišty a keď ju
môžete ťahom ruky chránenej rukavicou voľne posúvať okolo celej lišty. Pri ťahu za reťaz
píly silou 9 N (cca 1 kg) nesmie byť odstup
medzi reťazou a lištou väčší než 2 mm.
10 min
B
1. Uistite sa, že reťazová brzda je
uvoľnená, to znamená, že páka
reťazovej brzdy je zatlačená proti
prednej rukoväti (8) (poloha
O).
2. Povoľte upevňovaciu skrutku (14)
(
).
3. Za účelom napnutia reťaze otočte
krúžok na napínanie reťaze
(13) v smere hodinových
ručičiek.
Za účelom uvoľnenia napnutia
reťaze (13) otočte krúžok na
napínanie raťaze proti smeru
hodinových ručičiek.
4. Upevňovaciu skrutku (14) opäť
utiahnite (
).
U novej reťaze musíte napnutie re-
ťaze po max. 5 rezoch dodatočne
nastaviť.
Mazanie reťaze
Vodiaca lišta a reťaz nikdy nesmú
zostať bez oleja. Ak prevádzkujete
reťazovú pílu s príliš malým množstvom oleja, rezný výkon a životnosť reťaze sa znižuje, pretože sa
reťaz rýchlejšie otupí. Nedostatok
oleja rozpoznáte podľa toho, že
dochádza k tvorbe dymu alebo k
sfarbeniu vodiacej lišty.
Akonáhle motor píly začne bežať, tečie
olej k vodiacej lište.
Plnenie reťazového oleja:
• Pravidelne kontrolujte ukazovateľ stavu
oleja (
C
21) a pri dosiahnutí značky
minima „MIN“ (
C
22), olej doplňte.
Olejová nádržka obsahuje asi 190 ml
oleja.
• Používajte „Bio-olej Grizzly“, ktorý ob-
sahuje prísady znižujúce trenie a opotrebovanie. Môžete ho objednať prostredníctvom nášho servisného strediska.
Page 89

8 9
S K
• Ak nemáte k dispozícii „Bio-olej Grizzly“, použite olej na mazanie reťazí,
ktorý obsahuje malé množstvo adhéznych prísad.
• Pred dlhšími prevádzkovými prestávkami vyprázdnite olejovú nádrž (6-8
týždňov).
C
1. Odskrutkujte viečko olejovej
nádržky (2) a nalejte reťazový
olej do nádržky.
2. Prípadne uniknutý olej poutierajte
a nádržku opäť uzavrite.
Pred doplňovaním reťazového
oleja prístroj vždy vypnite a
nechajte motor vychladnúť.
Pri pretečení oleja vzniká
nebezpečenstvo požiaru.
Obsluha reťazovej píly
Reťazovú pílu zapnite až vtedy, keď
sú lišta, reťaz a kryt reťazového ko-
lesa správne namontované. Dbajte
na to, aby sieťové napätie súhlasilo
s údajmi na typovom štítku prístroja.
Pri spúšťaní píly dbajte na bezpečný
postoj. Pred štartom sa uistite, že sa
píla nedotýka žiadnych predmetov.
Pozor! Z píly môže odkvapkávať
olej, pozri kapitolu „Bezpečnostné
pokyny“.
Zapínanie
D
1. Pred zapnutím píly skontrolujte, či
sa v olejovej nádržke nachádza
dostatočné množstvo oleja a v
prípade potreby olej doplňte (viď
kapitolu „Plnenie reťazového oleja“).
2. Uvoľnite reťazovú brzdu tým, že
páku reťazovej brzdy zatlačíte
proti prednej rukoväti.
3. Z konca predlžovacieho kábla
sformujte sľučku a zaveste túto na
odľahčovač ťahu (2) na zadnej
rukoväti.
4. Pripojte pílu na sieťové napätie.
5. Elektrickú reťazovú pílu držte pevne
obidvomi rukami, pravou rukou
za zadnú rukoväť a ľavou rukou
za prednú rukoväť. Palec a prsty
musia rukoväte pevne obopínať.
6. Za účelom zapnutia píly stlačte
pravým palcom poistku vypínača
(11) a potom stlačte zapínač/
vypínač (10), píla beží najvyššou
rýchlosťou. Poistku vypínača opäť
pustite.
7. Motorová píla sa vypne, keď
opäť pustíte zapínač/vypínač.
Nepretržité zapnutie nie je možné.
Kontrola reťazovej brzdy
Reťaz píly sa netočí, keď je reťazo-
vá brzda aktivovaná.
E
1. Položte reťazovú pílu na pevnú,
rovnú podložku. Píla sa nesmie
dotýkať žiadnych predmetov.
2. Pripojte pílu na sieťové napätie.
3.
Uvoľnite reťazovú brzdu tým (3), že
páku reťazovej brzdy zatlačíte proti
prednej rukoväti (8) (poloha O).
4. Elektrickú reťazovú pílu držte
pevne obidvomi rukami, pravou
rukou za zadnú rukoväť (
A
1) a
ľavou rukou za prednú rukoväť
(8). Palec a prsty musia rukoväte
pevne obopínať.
5. Pílu zapnite.
Page 90

9 0
S K
6. Pri bežiacom motore zatlačte
ľavou rukou páku reťazovej
brzdy. Pritom odsuňte páčku
brzdy reťaze/predná ochrana
ruky (3) predného držadla (8)
(poloha
I ). Reťaz by sa mala
okamžite zastaviť.
7. Keď reťazová brzda správne
funguje, pustite zapínač/vypínač
a uvoľnite reťazovú brzdu.
Keď reťazová brzda nefun-
guje správne, nesmiete elektrickú reťazovú pílu používať.
Existuje nebezpečenstvo
zranenia dobiehaním pílovej
reťaze.
Nechajte previesť opravu píly
naším zákazníckym servisom.
Kontrola automatiky
olejového mazania
Pred začatím práce s pílou skontrolujte stav
oleja a automatiku olejového mazania.
• Reťazovú pílu zapnite a podržte ju nad
svetlým podkladom. Píla sa pritom nesmie dotýkať zeme.
Ak sa vytvorí olejová stopa, znamená to,
že reťazová píla pracuje bezchybne.
J
Vyčistite olejové priechody lišty,
aby sa zabezpečilo bezporuchové,
automatické mazanie reťaze počas
prevádzky. Na vytrenie nečistôt z
priepuste oleja si na pomoc zoberte štetec alebo handru.
Výmena vodiacej lišty
F
1. Pílu vypnite a vytiahnite zástrčku
(
A
18)zo zásuvky.
2. Položte pílu na rovnú plochu.
3. Vyberte poistnú skrutku (15) pod
napínacou jednotkou.
Upevňovaciu skrutku (14) otočte
proti smeru hodinových
ručičiek (
), aby ste
mohli odstrániť kryt reťazového
kolesa (16).
4. Snímte vodiacu lištu a reťaz píly.
Za účelom demontáže držte lištu
píly (4) v uhle cca 45 stupňov
natočenú smerom nahor, aby sa
mohla ľahšie zložiť reťaz píly (5)
z reťazového pastorka (25).
5. Uvoľnite skrutku (28) na zadnej
strane napínacej závitovky (24).
Napínaciu závitovku (24) založte
späť v obrátenom poradí.
Pritom dávajte pozor, aby kolík
napínacej závitovky (29) bol
dole, tak ako je to znázornené
na obrázku
(viď tiež
„Otáčanie lišty“,
+ ).
6. Za účelom montáže nasaďte
vodiacu lištu na kolík koľajničky
tak, aby sa napínacia lišta
nachádzala na vonkajšej strane.
Techniky pílenia
Všeobecné pokyny
• Lepšiu kontrolu nad pílou si udržíte
vtedy, keď budete píliť spodnou stranou
lišty (strana ťahu) a nie vrchnou stranou
lišty (strana tlaku).
• Reťaz píly sa nesmie počas pílenia
dreva alebo po jeho prepílení dotknúť
zeme ani iných predmetov.
Page 91

9 1
S K
• Dbajte na to, aby sa reťaz píly nezasekla v záreze. Kmeň stromu sa nesmie
zlomiť alebo rozštiepiť.
• Dbajte taktiež na bezpečnostné opatre-
nia proti spätnému rázu (pozri kapitolu
„Bezpečnostné pokyny“).
Ak sa reťaz píly zasekne, ne-
pokúšajte sa vytiahnuť elektrickú reťazovú pílu násilím.
Hrozí nebezpečenstvo úrazu.
Odstavte motor a na uvoľnenie reťazovej píly použite
páku alebo klin.
Stínanie stromov
Stínanie stromov si vyžaduje
veľa skúseností. Stínajte stromy len vtedy, keď dokážete
s elektrickou reťazovou pílou
bezpečne narábať. V žiadnom prípade nepoužívajte
reťazovú pílu vtedy, keď sa
cítite neistí.
Neskúseným užívateľom z bezpeč-
nostných dôvodov neradíme, aby
stínali stromy pílou, ktorej vodiaca
lišta je menšia než priemer kmeňa
stromu.
• Dbajte na to, aby sa v blízkosti pracovného priestoru nezdržiavali iné osoby
alebo zvieratá. Bezpečnostný odstup
medzi stromom, ktorý treba zoťať, a
najbližším pracoviskom musí byť 2 1/2
– násobok dĺžky stromu .
• Dávajte pozor na smer stínania stromu:
Osoba obsluhujúca pílu musí mať možnosť bezpečne sa pohybovať v blízkosti
zoťatého stromu, aby mohla strom ľahko
skrátiť a odvetviť. Treba zabrániť tomu,
aby sa padajúci strom zachytil v konároch iného stromu. Dbajte na prirodze-
ný smer pádu stromu, ktorý závisí od
sklonu a zakrivenia stromu, smeru vetra
a počtu konárov.
• Pri práci vo svahu stojte nad stínaným
stromom.
• Malé stromy o priemere 15-18 cm možno zvyčajne odpíliť jedným rezom.
• U stromov s väčším priemerom musí byť
prevedený vrubový (smerový) zárez a
hlavný rez (viď
Q
).
V žiadnom prípade nestínajte
strom, keď fúka silný alebo
premenlivý vietor, keď hrozí
nebezpečenstvo poškodenia
majetku alebo keď by strom
mohol zasiahnuť vedenie.
Hneď po ukončení pílenia snímte z
uší tlmiče hluku, aby ste mohli počuť
tóny a varovné signály.
O
1. Odvetvovanie:
Nadol visiace konáre odstráňte
tak, že pílu nasadíte nad
konárom. Nikdy neodstraňujte
konáre vyššie než po výšku
ramien.
P
2. Úniková cesta:
Odstráňte podrast okolo stromu,
aby ste si zaistili ľahký únik.
Úniková cesta (1) posunutá asi o
45° by mala ležať za plánovaným
smerom pádu stromu (2).
Q
3. Vrubový (smerový) zárez
(A):
Vrubový zárez preveďte na
tej strane, na ktorú má strom
spadnúť. Začnite s dolným,
horizontálnym rezom. Hĺbka rezu
má byť približne 1/3 priemeru
Page 92

9 2
S K
kmeňa. Urobte šikmý rez pílou v
uhle rezu približne 45°, z hora,
ktorý presne smeruje na dolný
rez pílou.
Nikdy sa nestavajte pred
strom, na ktorom bol prevedený vrubový zárez.
Q
4. Hlavný rez (B):
Hlavný rez prevádzajte z druhej
strany kmeňa, pričom stojíte
vľavo od kmeňa stromu a pílite
stranou ťahu. Hlavný rez musí
prebiehať vodorovne asi 5 cm
nad úrovňou vodorovnej časti
vrubového zárezu.Hlavný rez by
mal byť taký hlboký, aby odstup
medzi ním a líniou vrubového
zárezu predstavoval minimálne
1/10 priemeru kmeňa.
Neprepílená časť kmeňa sa
označuje ako nedorez.
R
5. Akonáhle to hĺbka rezu dovolí,
zasuňte do hlavného rezu klin
alebo páčidlo, aby sa zabránilo
zaseknutiu vodiacej lišty.
S
6. Ak je priemer kmeňa väčší než
dĺžka vodiacej lišty, urobte dva
rezy.
7. Po prevedení hlavného rezu
spadne strom sám od seba alebo
za pomoci klina alebo páčidla.
Akonáhle začína strom pa-
dať, vytiahnite pílu z rezu,
zastavte motor, reťazovú pílu
odložte a opustite pracovisko
únikovou cestou.
O
Odvetvovanie
Pojem odvetvovanie označuje odstraňovanie konárov a vetví zo zoťatého stromu.
Pri odvetvovaní dochádza často
k nehodám. Nikdy neodstraňujte
pílou konáre, keď stojíte na kmeni
stromu. Všímajte si oblasť spätného
rázu, keď sú konáre napnuté.
• Oporné konáre odstráňte až po ich
skrátení.
• Napnuté konáre sa musia píliť zdola nahor, aby sa zabránilo zovretiu reťazovej
píly.
• Na odpílenie hrubších konárov použite
tú istú techniku ako pri skracovaní.
• Pracujte vľavo od kmeňa stromu a podľa
možnosti čo najbližšie k reťazovej píle.
Váha píly spočíva podľa možnosti na
kmeni.
• Aby ste mohli odpíliť konáre na druhej
strane kmeňa, zmeňte stanovisko.
• Rozvetvené konáre treba jednotlivo skrátiť.
Skracovanie
Skracovaním sa rozumie pílenie zoťatých
kmeňov stromov na malé odrezky.
• Dbajte na to, aby sa reťaz pri pílení ne-
dotkla zeme.
• Dbajte na pevný postoj a pri práci vo
svahu stojte nad kmeňom.
K
1. Kmeň leží na zemi:
Kmeň zhora úplne prepílte a
na konci rezu dbajte na to, aby
ste sa nedotkli zeme. Ak máte
možnosť kmeň stromu otočiť,
prepílte ho najskôr do 2/3.
Potom kmeň stromu obráťte a
prepílte zhora i zvyšok kmeňa.
Page 93

9 3
S K
L
2. Kmeň je na jednom konci
podopretý:
Prepílte najskôr zdola nahor
(vrchnou stranou lišty) 1/3
priemeru kmeňa, aby ste
zabránili rozštiepeniu. Potom
pílte zhora nadol (spodnou
stranou lišty) smerom k
prvému rezu, aby ste zabránili
zaseknutiu.
M
3. Kmeň je podopretý na
obidvoch koncoch:
Prepílte najskôr zhora nadol
(spodnou stranou lišty) 1/3
priemeru kmeňa. Potom pílte
zdola nahor (vrchnou stranou
lišty), kým sa obidva rezy
nestretnú.
N
4. Pílenie na koze:
Držte elektrickú reťazovú pílu
pevne obidvomi rukami a počas
pílenia ju veďte pred vaším telom.
Keď sa kmeň rozdelí, veďte pílu
po pravej strane popri Vašom tele
(1). Ľavú ruku držte čo najviac
vyrovnanú (2). Dávajte pritom
pozor na padajúci kmeň. Postavte
sa tak, aby Vás oddelený kmeň
nijako neohrozoval. Dávajte si
pozor na nohy. Odpílená časť
kmeňa by mohla pri padaní
spôsobiť zranenia. Udržujte
rovnováhu (3).
Údržba a čistenie
Údržbové a čistiace práce
prevádzajte zásadne len keď
je motor vypnutý a zástrčka
vytiahnutá zo zásuvky. Nebezpečenstvo úrazu!
Opravárenské a údržbové
práce, ktoré nie sú popísané
v tomto návode na obsluhu,
nechajte previesť našou odbornou dielňou. Používajte
len originálne náhradné
diely Grizzly. Pred začatím
akýchkoľvek údržbových a
čistiacich prác nechajte stroj
vychladnúť. Hrozí nebezpečenstvo popálenia!
Čistenie
• Pílu po každom použití dôkladne vyčistite. Tým predĺžite jej životnosť a zabráni-
te vzniku úrazov.
• Rukoväte chráňte pred znečistením
benzínom, olejom alebo mastnotou. V
prípade potreby ich vyčistite vlhkou handričkou vypranou v mydlovom roztoku.
Na čistenie nepoužívajte žiadne rozpúšťadlá ani benzín!
• Po každom použití vyčistite reťaz píly.
Za týmto účelom použite štetec alebo
malú metličku. Na čistenie reťaze nepoužívajte žiadne tekutiny. Po vyčistení reťaz ľahko naolejujte reťazovým olejom.
• Pre čistenie odoberte tiež kryt reťazového kolesa (15), aby ste mohli čistiť aj v
tomto mieste.
• Vetracie otvory a povrchové časti píly
vyčistite štetcom, metličkou alebo suchou handričkou. Na čistenie nepouží-
vajte nijaké tekutiny.
• Vyčistite olejové priechody lišty, aby sa
zabezpečilo bezporuchové, automatické mazanie reťaze počas prevádzky.
• Vyčistite priepust oleja (27), aby bolo
zaistené bezporuchové, automatické
mastenie pílovej reťaze olejom počas
prevádzky. Na vytrenie nečistôt z prie-
puste oleja si na pomoc zobrete štetec
alebo handru.
Page 94

9 4
S K
Olejovanie reťaze
Reťaz píly pravidelne vyčis-
tite a naolejujte. Tým udržíte
reťaz ostrú a dosiahnete
optimálny výkon píly. Pri
škodách spôsobených nedostatočnou údržbou reťaze
zaniká nárok zo záruky. Pri
narábaní s reťazou alebo s
lištou vytiahnite zástrčku a
používajte ochranné rukavice
odolné voči prerezaniu.
• Reťaz naolejujte po jej vyčistení, po 10
hodinách prevádzky alebo minimálne
raz do týždňa, podľa toho, čo nastane
skôr.
• Pred naolejovaním treba lištu, predovšetkým ozubenie lišty, dôkladne vyčistiť. Za týmto účelom použite metličku a
suchú handričku.
• Jednotlivé články retiazky olejujte pomocou olejničky s ihlovou špičkou (obdržíte v odbornej predajni). Naneste jednotlivé kvapky oleja na kĺby a na špičky
zubov jednotlivých článkov reťaze.
Intervaly údržby
Údržbové práce uvedené v nasledovnej tabuľke prevádzajte pravidelne. Pravidelnou
údržbou Vašej reťazovej píly sa predĺži jej životnosť. Okrem toho dosiahnete optimálny
rezný výkon a zabránite vzniku úrazov.
Tabuľka intervalov údržby
časť stroja úkon
pred
každým
použitím
po 10
hodinách
prevádzky
Po
každom
použití
komponenty
reťazovej brzdy
skontrolovať, v prípade
potreby vymeniť
reťazové koleso
skontrolovať, v prípade
potreby vymeniť
reťaz píly (5)
skontrolovať, naolejovať, v
prípade potreby dobrúsiť
alebo vymeniť
reťaz píly (5) vyčistiť, naolejovať
lišta (4) skontrolovať, vyčistiť, naolejovať
lišta (4) obrátiť
automatiku olejového
vyčistite olejový výtokový
kanálik alebo nechajte previesť
Page 95

9 5
S K
Brúsenie reťaze
Nesprávne nabrúsená reťaz
píly zvyšuje nebezpečenstvo
spätného rázu! Pri narábaní
s reťazou alebo lištou používajte ochranné rukavice
odolné voči prerezaniu.
Dobre nabrúsená reťaz zaručuje
optimálny rezný výkon. Bez námahy
sa prehrýza drevom a zanecháva
veľké, dlhé piliny. Reťaz píly je tupá,
keď musíte rezacie zariadenie pretláčať drevom a piliny sú veľmi malé.
Pri veľmi tupej reťazi nepadajú vôbec
žiadne piliny, ale len drevený prach.
• Reznými časťami reťaze sú rezacie člán-
ky, ktoré pozostávajú z rezného zuba a
z nosa ohraničujúceho hĺbku rezu (obmedzovacieho zuba). Výškový rozdiel
medzi nimi určuje hĺbku ostrenia.
• Pri brúsení rezných zubov musia byť
zohľadnené nasledujúce hodnoty:
H
- brúsny uhol (30°)
- čelný uhol (133°)
- hĺbka ostrenia (0,65 mm)
- priemer guľatého pilníka (4,0 mm)
Odchýlky od udaných roz-
merov geometrie ostria môžu
viesť k zvýšenej náchylnosti
stroja na spätný ráz. Zvýšené nebezpečenstvo úrazu!
K brúseniu reťaze je potrebné špeciálne
náradie, ktoré zaručuje, že sa nože nabrúsia v správnom uhle a do správnej hĺbky.
Neskúsenému užívateľovi reťazových píl
odporúčame, aby si reťaz nechal nabrúsiť
u odborníka alebo v odbornej dielni. Ak si
trúfate previesť brúsenie reťaze sami, obdržíte potrebné náradie v odbornej predajni.
I
1. Pílu vypnite a vytiahnite zástrčku
zo zásuvky.
2. Snímte reťaz píly (viď kapitolu
„Obsluha reťazovej píly“). Za
účelom brúsenia by mala byť
reťaz dobre napnutá, aby sa
umožnilo jej správne nabrúsenie.
3. K brúseniu je potrebný guľatý
pilník s priemerom 4,0 mm.
Iný priemer poškodzuje reťaz
a môže viesť k Vášmu ohrozeniu pri práci!
4. Brúsenie prevádzajte len zvnútra
smerom von. Pilník veďte z
vnútornej strany rezného zuba
smerom von. Pri spätnom ťahu
pilník nadvihnite.
5. Brúste najskôr zuby na jednej
strane. Potom pílu obráťte a
brúste zuby na druhej strane.
6. Reťaz je opotrebovaná a musí byť
vymenená za novú, keď z rezného
zuba zostali už len cca 4 mm.
7. Po nabrúsení musia byť všetky
rezacie články rovnako dlhé a
rovnako široké.
8. Po každom treťom brúsení treba
skontrolovať hĺbku ostrenia
(obmedzovacie zuby) a výšku
dobrúsiť pomocou plochého
pilníka. Obmedzovací zub by mal
byť voči reznému zubu asi o 0,65
mm nižšie. Po jeho znížení ho
trochu zaguľaťte smerom dopredu.
Page 96

9 6
S K
Zabehávanie novej reťaze
U novej reťaze sa po určitom čase znižuje
jej
predpínacia sila. Preto musíte reťaz po
prvých 5-tich rezoch, najneskôr po 1 hodi-
ne práce s pílou dotiahnuť.
Novú reťaz nikdy nenasa-
dzujte na opotrebovaný
hnací pastorok alebo na
poškodenú alebo opotrebovanú lištu. Reťaz by mohla
spadnúť alebo sa pretrhnúť.
Následkom môžu byť ťažké
zranenia.
Údržba vodiacej lišty
Pri narábaní s reťazou alebo
lištou používajte ochranné rukavice odolné voči prerezaniu.
1. Pílu vypnite a vytiahnite zástrčku zo zá-
suvky.
2. Snímte kryt reťazového kolesa, reťaz
píly a vodiacu lištu.
3. Skontrolujte opotrebovanie vodiacej lišty.
Odstráňte ostré hrany a vodiace plochy
vyrovnajte pomocou plochého pilníka.
4. Vyčistite olejové priechody lišty, aby sa
zabezpečilo bezporuchové, automatické mazanie reťaze počas prevádzky.
5. Namontujte lištu, reťaz a kryt reťazového kolesa a napnite reťaz.
Pri optimálnom stave olejových
priechodov a správnom nastavení
regulačného gombíka odstrekne od
reťaze niekoľko sekúnd po spustení
píly automaticky určité množstvo
oleja.
Otočenie lišty
Pri narábaní s reťazou alebo
lištou používajte ochranné
rukavice odolné voči prerezaniu.
Po každých 10 hodinách prevádzky treba
vodiacu lištu obrátiť, aby sa zabezpečilo
jej rovnomerné opotrebúvanie (viď k tomu
kapitolu „Uvedenie do prevádzky“).
1. Pílu vypnite a vytiahnite zástrčku zo zá-
suvky.
2. Snímte kryt reťazového kolesa, reťaz
píly a vodiacu lištu.
3. Skontrolujte opotrebovanie vodiacej
lišty. Odstráňte ostré hrany a vodiace
plochy vyrovnajte pomocou plochého
pilníka.
4. Vyčistite olejové priechody lišty, aby sa
zabezpečilo bezporuchové, automatické mazanie reťaze počas prevádzky.
5. Namontujte lištu, reťaz a kryt reťazového kolesa a napnite reťaz.
1. Pílu vypnite a vytiahnite zástrčku
zo zásuvky.
2. Snímte kryt reťazového kolesa,
reťaz píly a vodiacu lištu.
3. Dal meč (4) prednej a otočiť ho
na zadnej strane. Povoľte skrutku
xácie (28) a odstrániť zvieraciu
skrutku (24).
4. Upínaciu skrutku (24) s
upevňovacie skrutky (28) z druhej
strany pripisujú meč (4). Uistite
sa, že zvieraciu skrutku skrutky
(29) je dole. Okrúhle nos (24a)
Upínaciu skrutku ozubeného musí
ukazovať v smere.
F
5. Namontujte lištu, reťaz a kryt reťazového kolesa a napnite reťaz.
Page 97

9 7
S K
Smer chodu reťazovej
píly
Pri nastavovaní reťazovej píly (5) sa orientujte podľa znaku pod krytom reťazového
kolesa (15), keď sa lišta otáča. Znázornený
smer otáčania na lište potom nesúhlasí.
Odloženie
• Pred odložením zariadenie vyčistite.
• Pred dlhšími prevádzkovými prestávkami vyprázdnite olejovú nádrž. Starý
olej zlikvidujte ekologicky (viď „Likvidácia/ochrana životného“).
• Založte ochranný kryt lišty.
• Zariadenie majte odložené na suchom
mieste chránenom pred prachom,
mimo dosahu detí.
Odstránenie a
ochrana životného
prostredia
Starý olej odstráňte spôsobom, ktorý zodpovedá požiadavkám ochrany životného
prostredia – odovzdajte ho do špecializovanej zberne. Nevylievajte starý olej do
kanalizácie alebo do odtoku vody.
Prístroj, príslušenstvo a obal odovzdajte v
súlade s požiadavkami na ochranu životného prostredia do recyklačnej zberne.
Stroje nepatria do domáceho
odpadu.
Označené výrobky sa nesmú likvidovať s
domácim odpadom, ale sa musia odovzdať
na zbernom dvore pre recykláciu elek-
trických a elektronických zariadení.
Recyklácia pomáha znižovať spotrebu
surovín a chráni životné prostredie. Informácie o likvidácii a mieste najbližšieho
recyklačného zberného dvora získate napr.
vo vašich mestských službách na odvoz odpadu alebo na žltých stránkach.
Olejovú nádržku dôkladne vyprázdnite a
prístroj odovzdajte do recyklačnej zberne.
Použité umelohmotné a kovové časti sa
môžu podľa druhu materiálu roztriediť a
tak odovzdať do recyklačnej zberne.
V prípade otázok sa obráťte na naše ser-
visné stredisko.
Page 98

9 8
S K
Náhradné diely/Príslušenstvo
Náhradné diely a príslušenstvo nájdete na strane
www.grizzly-service.eu
Ak nemáte Internet, kontaktujte sa telefonicky na Service-Center (viď „Service-Center“
strana 101). Dodržiavajte nižšie uvedené objednávacie čísla
Viečko olejovej nádržky .......................................................................... 7511 8246
Reťaz píly 91P057X ...............................................................................3009 1571
Reťaz píly 91VXL .................................................................................... 3009 1598
Vodiaca lišta (16“, Oregon) .................................................................... 3010 0420
Bio-reťazový olej 1 l................................................................................3023 0001
Bio-reťazový olej 5 l ...............................................................................3023 0002
Náhradnú pílovú reťaz Oregon môžete použiť len v spojení s
príslušným nožom Oregon a elektrickou reťazovou pílou, ktorá je
na to schválená. Vzniká nebezpečenstvo poranenia.
Page 99

9 9
S K
Zisťovanie závad
Problém Možná príčina Odstránenie poruchy
prístroj nechce
naštartovať
Zaskočená brzda reťaze
Skontrolovať brzdu reťaze, príp. brzdu
reťaze uvoľniť
chýba sieťové napätie
domová poistka vypína
skontrolujte zásuvku, kábel, el.
vedenie, zástrčku, príp. nechajte
previesť opravu odborníkom na
elektrické prístroje.
skontrolujte domovú poistku, viď pokyn
porucha zapínača/
vypínača (10)
potrebná oprava servisným strediskom
opotrebované uhlíkové
kefky
potrebná oprava servisným strediskom
porucha motora potrebná oprava servisným strediskom
reťaz píly sa
netočí
reťazová brzda blokuje
reťaz (5)
skontrolujte reťazovú brzdu,
príp. ju uvoľnite
zlý rezný výkon
reťaz (5) je nesprávne
namontovaná
reťaz správne namontujte
reťaz (5)je tupá
nabrúste rezné zuby alebo nasaďte
novú reťaz
reťaz je nedostatočne
napnutá
skontrolujte napnutie reťaze
píla beží ťažko,
reťaz padá
reťaz je nedostatočne
napnutá
skontrolujte napnutie reťaze
reťaz sa
zahrieva, pri
pílení dochádza
k tvorbe dymu,
lišta sa sfarbuje
príliš málo reťazového
oleja
skontrolujte stav reťazového oleja príp.
reťazový olej doplňte,
skontrolujte automatiku olejového
mazania a príp. vyčistite olejový
výtokový kanálik alebo nechajte
previesť opravu v servise
skontrolujte nastavenie množstva oleja
(regulačný gombík)
Page 100

1 0 0
S K
Rozsah záruky
Prístroj bol vyrobený podľa prísnych smerníc kvality a pred dodaním bol svedomite
kontrolovaný.
Záruka sa týka materiálových alebo výrob-
ných chýb. Táto záruka sa nevzťahuje na
diely produktu, ktoré sú vystavené normál-
nemu opotrebeniu a preto sa môžu považovať za opotrebované diely (napr. reťaz
píly) alebo na poškodenia na krehkých
dieloch (napr. vypínač).
Táto záruka zaniká, ak bol produkt po-
užívaný poškodený, neodborne alebo
nebola vykonávaná údržba. Pre odborné
používanie produktu je nutné presne dodržiavať všetky návody uvedené v návode
na obsluhu. Bezpodmienečne sa vyhnite
používaniu, ktoré sa v návode na obsluhu
neodporúča alebo pred ktorým ste boli
vystríhaní.
Produkt je určený len pre súkromné použitie a nie v oblasti podnikania. Záruka
zaniká pri nesprávnom a neodbornom
používaní, pri násilnom používaní a pri
zásahoch, ktoré neboli vykonané v našej
servisnej pobočke.
Postup v prípade reklamácie
Pre zabezpečenie rýchleho spracovania
vašej žiadosti postupujte prosím podľa na-
sledujúcich pokynov:
• Pri všetkých požiadavkách predložte
pokladničný doklad a číslo artiklu (IAN
280275) ako dôkaz o zakúpení.
• Číslo artiklu nájdete na typovom štítku,
na rytine.
• Ak sa vyskytnú chyby funkcie alebo iné
nedostatky, kontaktujte najskôr následne
uvedené servisné oddelenie telefonicky
alebo emailom. Následne obdržíte
ďalšie informácie o priebehu vašej reklamácie.
Záruka
Vážená zákazníčka, vážený zákazník,
Pre tento prístroj platí záruka 3 roky od
dátumu zakúpenia.
Ak je prístroj poškodený, podľa zákona
máte právo ho reklamovať u výrobcu pro-
duktu. Tieto práva vyplývajúce zo zákona
nie sú našou následne opísanou zárukou
obmedzené.
Záručné podmienky
Záručná lehota začína dňom zakúpenia.
Pokladničný doklad ako originál prosím
starostlivo uschovajte. Je potrebný ako dô-
kaz o zakúpení.
Ak sa počas troch rokov od dátumu zakú-
penia tohto produktu vyskytne materiálna
alebo výrobná chyba, produkt - podľa nášho rozhodnutia - bezplatne opravíme alebo
nahradíme. Predpokladom záruky je, že v
priebehu trojročnej lehoty bude predložený
poškodený prístroj a pokladničný doklad a
stručne opísaná chyba a kedy sa vyskytla.
Ak sa v rámci našej záruky chyba pokryje,
obdržíte späť opravený alebo nový prístroj.
S opravou alebo výmenou produktu sa ne-
začína nová záručná doba.
Záručná doba a nárok na odstránenie vady
Záručná doba sa poskytnutím záruky
nepredlžuje. To platí aj pre nahradené
a opravené diely. Prípadné škody a nedostatky vzniknuté už pri zakúpení sa
musia ihneď po vybalení ohlásiť. Opravy
vykonané po uplynutí záručnej doby sú
spoplatnené.
 Loading...