

Page 1

®
ELETTROZAPPA FGH 710 A1
ELETTROZAPP A
Traduzione delle istruzioni d’uso originali
GARDEN CULTIVATOR
Translation of original operation manual
IAN 102836
MOTOENXADA
Tradução do manual de instruções original
GARTENKUL TIV A TOR
Originalbetriebsanleitung
Page 2

Prima di leggere aprire la pagina con le immagini e prendere confidenza con le diverse funzioni
dell’apparecchio.
Antes de começar a ler abra na página com as imagens e, de seguida, familiarize-se com todas as
funções do aparelho.
Before reading, unfold the page containing the illustrations and familiarise yourself with all functions of the
device.
Klappen Sie vor dem Lesen die Seite mit den Abbildungen aus und machen Sie sich anschließend mit allen
Funktionen des Gerätes vertraut.
IT / MT Traduzione delle istruzioni d’uso originali Pagina 4
PT Tradução do manual de instruções original Página 16
GB / MT Translation of original operation manual Page 29
DE / AT / CH Originalbetriebsanleitung Seite 40
Page 3

A
D
E
1a
1b
B
1a 1b
12
10
2
3a
3b
6
11
13
3a
4
4
15
14
2
5
5
14
C
7
8
9
3b
15
17
18
16
2
14
5
14
12
22
21
23 10
20
19
6
15
15
11
Page 4

IT MT
Indice
Introduzione ...............................4
Utilizzo ........................................4
Descrizione generale ....................5
Contenuto della confezione .............. 5
Descrizione delle funzionamento .......5
Sommario ......................................5
Dati tecnici ...................................6
Consigli di sicurezza .....................6
Simboli nelle istruzioni .................... 6
Simboli sull’apparecchio .................. 7
Consigli di sicurezza generali ..........7
Istruzioni per il montaggio .........10
Montaggio delle staffe del manico ..10
Comando ..................................11
Accensione e spegnimento ............ 11
Istruzioni di lavoro ........................11
Pulizia/Manutenzione ................12
Lavori di pulizia e manutenzione
generali ....................................... 12
Sostituzione delle lame da taglio ....12
Deposito ....................................13
Smaltimento/
Tutela dell’ambiente ...................13
Pezzi di ricambio ........................13
Garanzia ...................................14
Servizio di riparazione ...............15
Service-Center ............................15
Importatore ...............................15
Traduzione della dichiarazione
di conformità CE originale ..........53
Vista esplosa .............................57
Introduzione
Congratulazioni per l’acquisto del Suo
nuovo apparecchio. Ha scelto un prodotto
altamente pregiato. Le istruzioni per l’uso
costituiscono parte integrante di questo
prodotto.
Questo apparecchio è stato sottoposto a
un controllo di qualità durante la produzione e quindi sottoposto a un controllo
nale. Quindi è garantito il funzionamento
del vostro apparecchio. Non si esclude
tuttavia che in casi singoli possano trovarsi
nell’apparecchio o nelle condutture essibili residui di acqua o lubricanti. Questo
non rappresenta un vizio o difetto e nean-
che un motivo di preoccupazione.
Contengono indicazioni importanti
per la sicurezza, l’uso e lo smaltimento. Prima dell’uso del prodotto,
si raccomanda di familiarizzare
con tutte le indicazioni di comando
e di sicurezza. Usare il prodotto
solo come descritto e per i campi
d’impiego specicati. Conservare
le istruzioni in un luogo sicuro e
consegnare la documentazione in
caso di cessione del prodotto a terzi.
Utilizzo
L’apparecchio è destinato alla frantumazione e allo sminuzzamento del suolo e
all’introduzione di fertilizzanti , torba e
composto in campo domestico.
Qualsiasi altro utilizzo non espressamente
autorizzato dalle presenti istruzioni, può
causare danni all’apparecchio e rappresentare un grave pericolo per l’utilizzatore.
L’utilizzatore è responsabile per incidenti o
danni ad altre persone o alla proprietà dei
medesimi.
4
Page 5

IT MT
A
B
C
D
L’apparecchio è destinato all’uso da parte
di persone adulte. Bambini e persone che
non hanno familiarizzato con le istruzioni
non devono utilizzare l’apparecchio. L’uso
dell’apparecchio durante la pioggia o in
ambienti umidi è interdetto.
Il fabbricante declina ogni responsabilità
per danni causati da un uso improprio o
errato.
Descrizione generale
L’ illustrazione dell’apparecchia-
tura si trovano sul lato apribile
della confezione.
Contenuto della confezione
Rimuovere delicatamente l’apparecchio
dalla confezione e controllare se i seguenti
componenti sono completi:
• Alloggiamento motore con lame da
taglio e staffa della barra.
• Due traverse centrali
• Manico a forcella di destra con interruttore e cavo di rete montato
• Manico a forcella di sinistra
• Barra trasversale di plastica con serracavo
• Accessori per il montaggio, morsetti e
clip per la cinta
• Istruzioni d’uso
Descrizione delle
funzionamento
La elettrozappa azionato a mano è dotato
di un elettromotore che non richiede interventi di manutenzione e di un ingranaggio
con lubricazione a bagno d’olio.
Il dispositivo da taglio dell’apparecchio è
composto da quattro lame da taglio rotan-
ti, indurite che penetrano autonomamente
nel suolo.
La tiranteria di alluminio è pieghevole per
garantire un ingombro minimo.
La funzione dei componenti di comando è
riportata nelle seguenti descrizioni.
Sommario
1a Manico a forcella di destra con
leva d’avviamento, pulsante di
sblocco e scarico della trazione
1b Manico a forcella di sinistra
2 Cavo di rete
3a morsetto grande
3b morsetto piccolo
4 Barra trasversale di plastica
5 Due traverse centrali
6 Staffa della barra
7 Feritoia di ventilazione
8 Allacciamento del motore
9 Trasmissione
10 Albero motore
11 Lame da taglio
12 Clip per la cinta
13 Cavo di rete nell’entrata del
cavo
14 Viti fornite
15 Dadi ad aletta
16 Scarico della trazione
17 Pulsante di sblocco
18 Leva di azionamento
19 Vite esagonale
20 Dado autobloccante
5
Page 6
IT MT
Dati tecnici
Elettrozappa ............... FGH 710 A1
Potenza assorbita del motore ........710 W
Tensione nominale ........... 230 V~, 50 Hz
Classe di protezione ..........................
Tipo di protezione ...........................IP24
Larghezza di lavoro ..................360 mm
Profondità di lavoro ........... max. 180 mm
Numero di lame da taglio ..................... 4
Numero di giri di lavoro ...... ca. 230 min
Peso .........................................7,85 kg
Livello di pressione acustica
(L
) ................ 81 dB (A), KpA = 3 dB(A)
pA
Livello di potenza sonora (L
misurata .......... 91 dB(A), K
)
wA
wA
= 2 dB(A)
garantito ..............................93 dB (A)
Vibrazione sui manici (a
) ..........2,7 m/s
h
...........................................K=1,4 m/s
I valori relativi al rumore e alle vibrazioni
sono stati rilevati conformemente alle norme e disposizioni riportate nella dichiara-
zione di conformità.
Modiche tecniche e ottiche possono esse-
re eseguite nell’ambito dello sviluppo dei
prodotti senza preavviso. Tutte le dimensioni, indicazioni e avvertenze delle presenti
istruzioni d’uso sono quindi senza garanzia. Sono quindi esclusi eventuali diritti
legali, avanzati sulla base delle presenti
istruzioni d’uso.
Il valore di emissione di vibrazioni indicato
è stato misurato attraverso un procedimento
di controllo standardizzato e può essere
utilizzato per il confronto di un apparecchio
elettrico con un altro. Il valore di emissione
di vibrazioni indicato può essere anche
utilizzato per una prima valutazione dell’esposizione alla quale si è soggetti.
II
Avvertenza: Durante l’uso effettivo
dell’apparecchio elettrico, il livello
di emissione di vibrazioni può differire da quello indicato a seconda
della tipologia e della modalità
d’uso.
Per proteggere l’utilizzatore, è
necessario stabilire alcune misure
di sicurezza sulla base dei valori
d’esposizione alla quale si è sotto-
-1
posti durante l’uso effettivo dell’apparecchio (qui bisogna considerare
tutte le fasi del ciclo di lavoro, ad
esempio i periodi in cui l’apparecchio è spento e quelli in cui invece
è acceso, ma senza sottoporre la
macchina a carico).
2
2
Consigli di sicurezza
Questo capitolo tratta le disposizioni di
sicurezza di base durante il lavoro con la
elettrozappa.
Simboli nelle istruzioni
Simboli dei pericoli con appo-
site indicazioni per prevenire
danni a persone o cose.
Simboli dei divieti (al posto del
punto esclamativo, viene spiegato il
divieto) con indicazioni relative alla
prevenzione di danni.
Simboli di avvertenza con informa-
zioni relative ad un migliore trattamento dell’apparecchio.
6
Page 7
IT MT
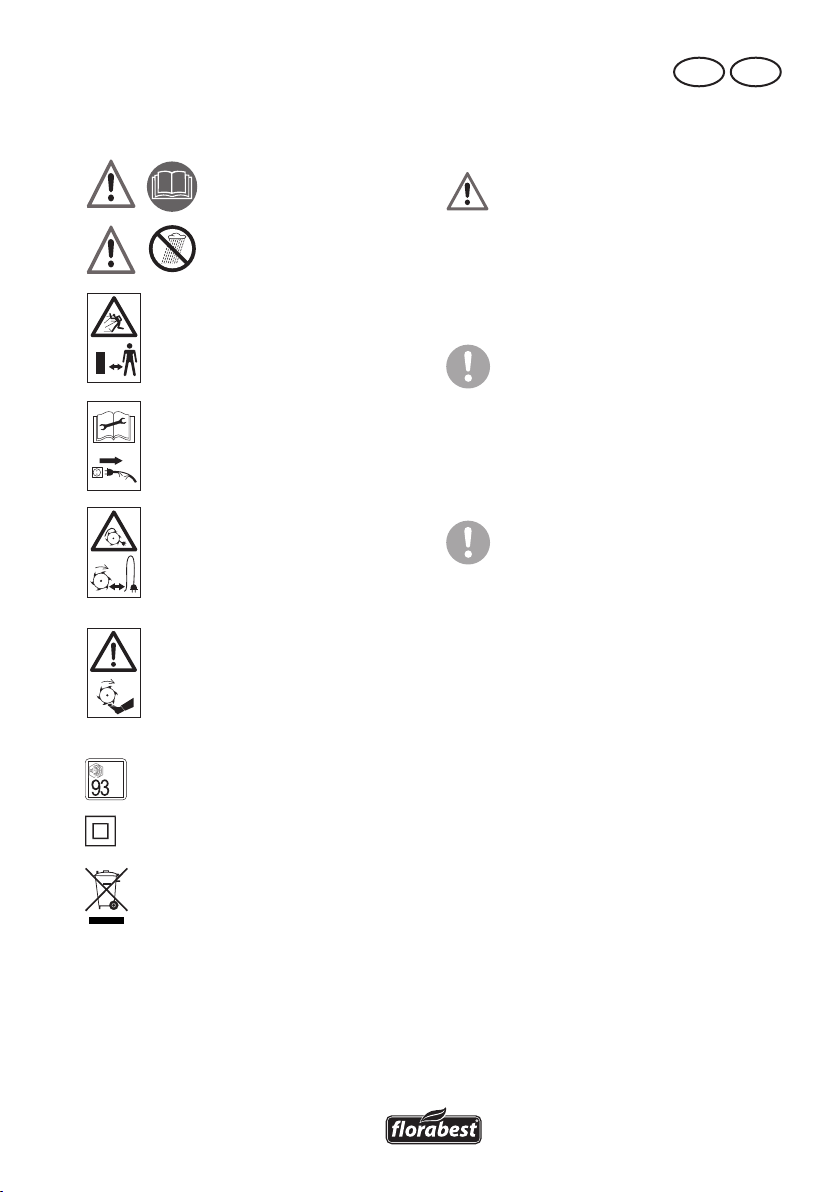
Simboli sull’apparecchio
Attenzione!
Leggere le istruzioni d’uso.
Attenzione! Proteggere dal-
la pioggia e dall’umidità.
Pericolo di ferite a causa di parti
espulse! Tenere lontane persone
non autorizzate dall’area di pericolo.
Attenzione! Prima di procedere
con lavori di pulizia e di manutenzione, spegnere l’apparecchio e
staccare la spina dalla rete.
Pericoli a causa di un cavo di rete
danneggiato. Tenere lontano i
cavi dalle lame da taglio.
Pericolo di ferite a causa di parti
rotanti! Dopo lo spegnimento
dell’apparecchio, le lame da taglio
continuano a ruotare. Attendere
l’arresto completo dei medesimi.
Indicazione del livello di rumore
L
WA
L
in dB.
dB
WA
Classe di protezione II
Gli elettrodomestici non devono
essere smaltiti insieme ai riuti domestici.
Consigli di sicurezza generali
Attenzione! Questo apparecchio
può provocare ferite gravi se usato
in modo improprio. Prima di lavorare con l’apparecchio, leggere
attentamente le istruzioni d’uso e
familiarizzare con tutti i dispositivi
di comando.
Nel caso in cui la conduttura di
collegamento di questo apparecchio
venga danneggiata, deve essere sostituita da parte del produttore o dal
servizio di assistenza cliente dello
stesso oppure da una persona quali-
cata, al ne di evitare pericoli.
Inoltre leggere attentamente le
seguenti istruzioni di sicurezza per
prevenire danni a persone e cose:
Preparazione:
• L’apparecchio non è adatto all’uso da
parte di persone con facoltà siche,
sensoriali o mentali limitate o con scar-
se esperienze o conoscenze; a meno
che non siano sorvegliati da una per-
sone responsabile per la loro sicurezza
o abbiamo ricevuto istruzioni su come
usare l’apparecchio.
• Bambini devono essere sorvegliati per
assicurarsi che non giochino con l’ap-
parecchio.
• L’apparecchio deve essere azionato
solo da persone sufcientemente istrui-
te.
• Non permettere mai a bambini nonché
ad altre persone, le quali non cono-
scono le istruzioni per l’uso, di usare
l’apparecchio. Disposizioni di legge
locali possono stabilire l’età minima
dell’utente.
7
Page 8

IT MT
• Non accendere mai l’apparecchio in
presenza di persone, in particolare di
bambini, e gi animali domestici.
• Non dimenticare che l’operatore è responsabile per incidenti con altre persone o con la proprietà delle stesse.
• Familiarizzare con l’ambiente circostante e prestare attenzione ai possibili
pericoli che eventualmente possono
essere trascurati durante il lavoro.
• Controllare l’area nella quale viene
impiegato l’apparecchio e rimuovere
pietre, bastoni, li metallici o altri corpi
estranei che possono essere afferrati
ed espulsi.
• Indossare abiti da lavoro adeguati e
scarpe solide con suola antiscivolo e
un pantalone lungo resistente. Non
utilizzare l’apparecchio scalzi o con
sandali aperti.
• Indossare un’attrezzatura di sicurezza
personale e sempre occhiali protettivi.
Indossando un’attrezzatura di sicurezza personale, come maschera antipolvere, scarpe di sicurezza antiscivolo,
casco o protezione dell’udito a seconda dell’impiego dell’utensile elettrico si
riduce il pericolo di lesioni.
• Per evitare ferite da taglio non accendere l’apparecchio se non si trova nella posizione operativa.
• Prima di ogni utilizzo eseguire un
controllo visivo sull’apparecchio. Non
utilizzare l’apparecchio se mancano,
sono consumati o danneggiati i dispositivi di sicurezza (p. es. blocco di
accensione o copertura di protezione),
i componenti del dispositivo di taglio
o i bulloni. Controllare in particolare
eventuali danneggiamenti al cavo di
rete e alla leva di avvio.
• Per evitare squilibri gli utensili e i bulloni danneggiati devono essere sostituiti
solo in set.
• Utilizzare solo accessori o ricambi forniti e consigliati dal produttore. L’utilizzo
di parti estranei comporta la perdita
immediata della garanzia.
Lavorare con l’apparecchio:
Tenere i piedi e le mani lontane dal-
le lame di taglio durante il lavoro,
soprattutto durante la messa in funzione. Rischio di ferite!
• Osservare le regole e le disposizioni locali in materia di protezione antirumore.
• L’apparecchio non deve essere utilizza-
to per frantumare pietre o per zappare
superci seminate a prato. Si rischia di
danneggiare l’apparecchio.
• Non utilizzare l’apparecchio sotto la
pioggia, con cattivo tempo, in ambienti
umidi (come p. es. vicino a stagni o
piscine). Lavorare solo con la luce del
giorno o in presenza di una buona illuminazione.
• Lavorare con la dovuta attenzione. Non
lavorare con l’apparecchio quando si
è stanchi o poco concentrati o dopo
assunzione di alcolici o farmaci. Fare
soventemente una pausa di lavoro.
• Durante il lavoro assicurarsi che l’apparecchio sia posizionato in modo stabile,
soprattutto sui pendii. Lavorare sempre
trasversalmente al pendio, mai su e giù.
Prestare particolare attenzione quando
si cambia la direzione di lavoro sul
pendio. Non lavorare su pendii eccessivamente ripidi.
• Nelle aree scoscese a rischio di scivolamento l’apparecchio deve essere tenuto
da una seconda persona mediante una
barra o una fune. La seconda persona
deve posizionarsi sopra l’apparecchio
ad una distanza sufciente dagli utensili
da lavoro.
8
Page 9

IT MT
• Durante il lavoro tenere sempre l’apparecchio saldamente con entrambe le
mani.
• Assicurarsi che i manici siano sempre
asciutti e puliti.
Attenzione quando si cammina all’in-
dietro. Rischio di inciampare!
• Prestare particolare attenzione quando
si inverte la direzione della macchina
o si tira la macchina verso di sé.
• Qualora si vericasse un blocco delle
lame trincianti a causa di un corpo
estraneo, si raccomanda di spegnere
l’apparecchio e di staccare la spina di
rete. Rimuovere il corpo estraneo (p.
es. radici) prima di rimettere in esercizio l’apparecchio.
• Non lavorare con un apparecchio
danneggiato, incompleto o trasformato
senza l’autorizzazione del fabbricante.
Soprattutto non lavorare con l’apparecchio se i dispositivi di sicurezza sono
danneggiati o mancanti.
• Non sovraccaricare l’apparecchio.
Lavorare solo nell’ambito della potenza indicata. Non utilizzare macchine
di bassa potenza per lavori pesanti.
Non utilizzare l’apparecchio per scopi
diversi da quelli previsti.
• Evitare danneggiamento all’apparecchio. Non applicare pesi aggiuntivi e
non trascinare l’apparecchio su un pavimento duro come mattonelle o scale.
Pause di lavoro:
Attenzione! Dopo lo spegnimento
dell’apparecchio le lame da taglio
continuano a ruotare ancora per
alcuni secondi. Attendere l’arresto
completo delle lame da taglio si
siano fermati del tutto. Pericolo di
ferite.
• L’apparecchio non deve essere solle-
vato o trasportato, no a quando il
motore continua a girare. Quando si
cambia zona di lavoro, spegnere l’apparecchio e attendere l’arresto comple-
to delle lame da taglio si fermino del
tutto. Solo allora tirare la spina di rete.
• Non lasciare mai l’apparecchio sul posto di lavoro incustodito.
• Spegnere l’apparecchio, attendere l’arresto completo delle lame da taglio e
tirare la spina di rete:
- ogni volta che si abbandona la mac-
china,
- quando si rimuovono parti del suolo
o parti di piante,
- quando l’apparecchio non viene uti-
lizzato,
- durante i lavori di manutenzione o di
lavoro,
- quando la conduttura d’allacciamen-
to è danneggiata o aggrovigliata,
- quando durante il lavoro l’apparec-
chio incontra un ostacolo oppure
quando si vericano vibrazioni insolite. In questo caso controllare eventuali danneggiamenti dell’apparec-
chio e, all’occorrenza, farlo riparare.
• Non utilizzare l’apparecchio nelle vici-
nanze di liquidi o gas inammabili. In
caso di mancata osservanza, vi sono
pericoli di incendio o di esplosione.
Manutenzione e immagazzinamento:
• Assicurarsi che tutti i dadi, i bulloni e
le viti siano ben strette e l’apparecchio
si trovino ad una distanza di sicurezza
sufciente.
• Non tentare di riparare l’apparecchio
autonomamente, salvo nei casi in cui
si è stati sufcientemente istruiti in
materia. Fare eseguire tutti i lavori non
specicati nelle presenti istruzioni dal
nostro centro di assistenza.
9
Page 10
IT MT
B
A
• Conservare l’apparecchio in un luogo
asciutto e fuori dalla portata di bambini.
• Trattare l’apparecchio con cura. Tenere
gli utensili aflati e puliti, per lavorare
in modo migliore e più sicuro.
• Seguire le disposizioni di manutenzione.
Sicurezza elettrica:
Attenzione! L’apparecchio può
essere usato solo con cavi di allacciamento e prolunghe non danneggiate. Pericolo di scosse elettriche.
• Tenere i cavi di rete lontani dagli utensili da taglio. Condurre il cavo di rete
sempre dietro l’operatore. Se il cavo
viene danneggiato durante l’uso, staccarlo subito dalla rete.
Non toccare in nessun caso il cavo di
rete n tanto che la spina non è stata
staccata.
• Assicurarsi che la tensione di rete corrisponda alle indicazioni della targhetta.
• Evitare il contatto del corpo con le parti interrate (p. es. recinzioni o pali di
metallo).
• Il giunto della prolunga deve essere
protetta da spruzzi d’acqua ed essere
composta o rivestita di gomma. Utilizzare solo prolunghe destinate all’uso
all’aperto appositamente contrassegnate. La sezione del cavetto della prolunga deve essere minimo di 2,5 mm
Srotolare sempre un tamburo per cavi
intero prima dell’uso. Vericare la presenza di eventuali danni ai cavi.
• Utilizzare per il ssaggio della prolunga il gancio previsto.
• Non tirare l’apparecchio per il cavo.
Non utilizzare il cavo per staccare la
2
.
spina dalla presa. Proteggere il cavo
da fonti di calore, olio e angoli vivi.
• Attaccare l’apparecchio ad una presa
con dispositivi di protezione contro
correnti di dispersione (interruttore FI)
con una corrente misurata di max.
30mA.
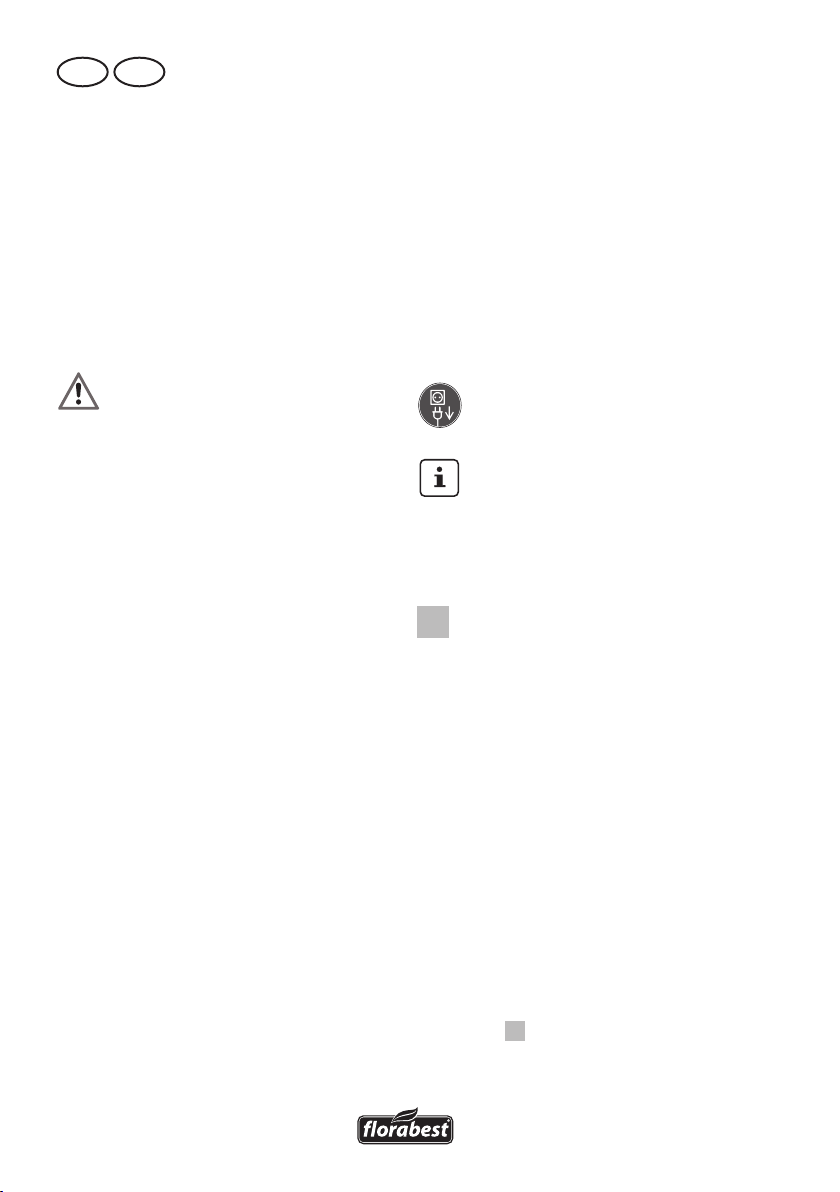
Istruzioni per il
montaggio
Prima di tutti i lavori con l’apparec-
chio staccare la spina di rete.
Durante il montaggio assicurarsi
che il cavo di rete non sia incastra-
to e abbia sufciente gioco.
Montaggio delle staffe del
manico
1. Inserire i due manici a forcella
(1a/1b) nella barra trasversale
di plastica (4). Avvitarli con le
viti fornite da dietro nei fori previsti sul la staffa del manico.
Inserire il cavo di rete nell’en-
trata del cavo (13) della staffa
trasversale.
2. Avvitare le due traverse centrali
(5) ai manici a forcella (1a/1b).
A tale proposito inserire le due
viti fornite (14) dall’esterno
verso l’interno attraverso i fori
e stringere con i dadi ad aletta
(15).
3. Posizionare la tiranteria del
manico con le estremità dei tubi
lateralmente a destra e sinistra
sulla traversa ad arco inferiore
(
6) e stringerla mediante le
viti (14) e i dadi ad aletta (15)
forniti.
10
Page 11
IT MT
A
C
A
Il montaggio è corretto quando le
estremità del manico indicano nella
direzione opposta del lato frontale
dell’apparecchio con le feritoie di
ventilazione (vedi
4. Fissare il cavo di rete con i mor-
setti forniti:
- Morsetto grande (3a) sopra
la barra trasversale,
- Morsetto piccolo (3b) sulla
staffa.
7).
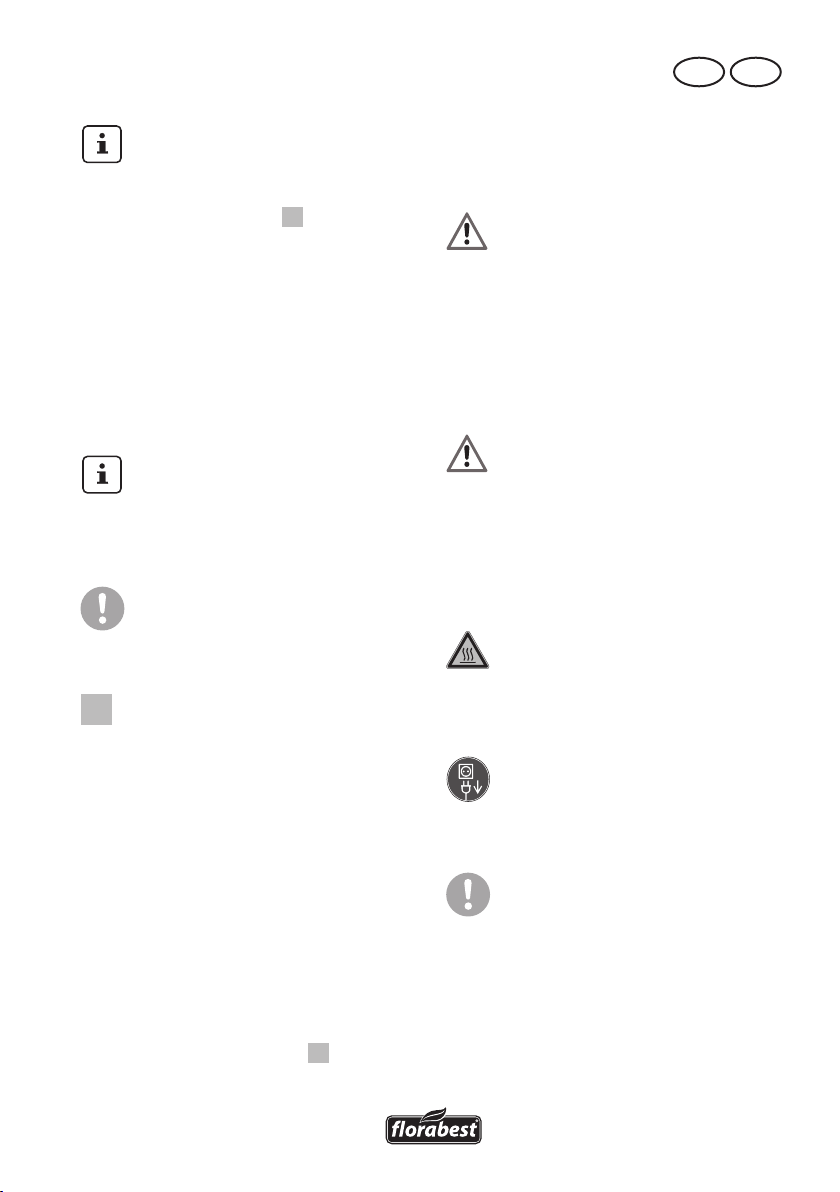
Comando
Osservare i regolamenti e le norme
locali in materia di protezione antirumore.
Accensione e spegnimento
Prima di accendere prestare atten-
zione che l’apparecchio non tocchi
oggetti e tenerlo ben saldo con entrambe le mani.
1. Collegare la prolunga alla spina
di rete.
2. Per garantire lo scarico della
trazione formare con l’estremità
della prolunga un occhiello e
appenderlo nello dispositivo di
scarico della trazione (16).
3. Attaccare l’apparecchio alla tensione di rete.
4. Appendere la prolunga nel clip
della cinta (12) e ssarla alla cintura dei pantaloni.
5. Per aprire premere il pulsante di
sblocco (17) sul manico e quindi
la leva di azionamento (18). Rilasciare il pulsante di sblocco (17).
Le lame da taglio (
no a ruotare e a penetrare nel
11) inizia-
suolo.
6. Per spegnere rilasciare la leva
d’azionamento (18).
Attenzione! Dopo lo spegni-
mento dell’apparecchio le
lame da taglio continuano a
ruotare ancora per alcuni secondi. Non toccare le lame da
taglio (11) rotanti. Rischio di
ferite.
Istruzioni di lavoro
Durante il lavoro tenere sem-
pre l’apparecchio ben saldo
in entrambe le mani e prestare attenzione ai piedi. Rischio
di indicente a causa delle
lame da taglio. Attenzione
quando si cammina all’indietro. Rischio di inciampare!
Non toccare gli ingranaggi –
possono surriscaldarsi quando si lavoro per un periodo
prolungato. Rischio di bruciature!
Dopo il lavoro e durante il trasporto
spegnere l’apparecchio, tirare la
spina di rete e attendere l’arresto
delle lame da taglio.
Per evitare danni all’appa-
recchio e ferite:
• Non sollevare o tirare l’apparecchio mai con il motore acceso.
• Sollevare l’apparecchio duran-
te il trasposto su superci dure
come mattonelle o scale.
• Condurre l’apparecchio a passo
d’uomo, possibilmente con traiettorie dritte.
11
Page 12
IT MT
• Lavorare sempre allontanandosi
dalla presa. Assicurarsi che il
cavo sia lontano dalla zona di
lavoro. Il clip per la cinta (12)
fornito per il ssaggio della prolunga vi aiuta in tal senso.
Protezione di sovraccarico:
in caso di sovraccarico il motore si
spegne automaticamente. A quel
punto l’apparecchio può essere
azionato solo dopo il completo raffreddamento.
Pulizia/Manutenzione
Fare eseguire i lavori non descritti
nelle presenti istruzioni dal nostro
centro di assistenza. Utilizzare solo
componenti originali.
Prima di tutti i lavori di manutenzio-
ne e pulizia, spegnere l’appa-
recchio, staccare la spina di rete
e attendere l’arresto delle lame da
taglio. Esiste un pericolo di ferite e
il rischio di scosse elettriche.
Eseguire i seguenti lavori di manutenzione
e riparazione ad intervalli regolari. In questo modo si garantisce un uso duraturo e
afdabile.
Lavori di pulizia e manutenzione generali
Durante i lavori di pulizia e manu-
tenzione indossare guanti di prote-
zione per evitare ferite da taglio.
Dopo ogni utilizzo pulire l’apparecchio a
fondo. Tenere l’apparecchio sempre pulito.
Non utilizzare detergenti o solventi.
• Rimuovere i residui di terriccio e di
sporco dalle lame da taglio (11),
dall’albero motore (10), dalla supercie dell’apparecchio e dalle feritoie di
ventilazione (7) con una spazzola o un
panno asciutto.
• Applicare olio biodegradabile sulle
lame da taglio (11).
• Pulire i manici sporchi con un panno
umido.
• Dopo ogni utilizzo controllare se l’ap-
parecchio presenta difetti visibili come
parti allentate, consumate o danneggia-
te. Controllare il ssaggio di tutti i dadi,
bulloni e viti.
• Controllare eventuali danneggiamenti
e la corretta sede delle coperture e dei
dispositivi di sicurezza. Eventualmente
sostituirli.
Sostituzione delle lame da
taglio
L’apparecchio è dotato di quattro lame da
taglio (11), che possono essere sostituiti
senza problemi in coppia. Le due coppie
di lame da taglio possono essere inserite a
scelta a sinistra o a destra.
Non sciacquare l’apparec-
chio con acqua e non pulirlo
con acqua corrente. Esiste il
rischio di scosse elettriche e
che l’apparecchio possa essere danneggiato.
12
Sostituire sempre le due coppie
di lame contemporaneamente,
per evitare danni all’apparecchio a causa di squilibri.
Spegnere l’apparecchio, staccare
la spina di rete e attendere l’arresto
dei.
Page 13
IT MT
D
D
D
E
1. Allentare la vite esagonale (19)
e il dado autobloccante (20) sulla coppia di lame da taglio (11).
2. Staccare la coppia di lame da
taglio dall’albero motore (10).
3. Pulire l’albero motore con olio
biologico.
4. Inserire la nuova lama da taglio
sull’albero motore in modo tale
che i fori dell’asse delle lame
corrispondano con i fori sull’al-
bero motore (vedi
I fori sull’asse delle lame e sull’albe-
ro motore sono disposte in ordine
asimmetrico. In questo modo le
lame non possono essere montate
nella direzione di rotazione errata
(vedi
5. Inserire la vite esagonale nel
)
.
foro e avvitare un nuovo dado
autobloccante (compreso nel
volume di fornitura di una nuova
lama da taglio)
).
(vedi D )
.
Deposito
• Lasciare raffreddare il motore prima di
depositare l’apparecchio in un luogo
chiuso.
• Tenere l’apparecchio pulito, asciutto e
fuori dalla portata di bambini.
• Non avvolgere l’apparecchio con sac-
chetti di plastica in quanto potrebbe
formarsi umidità.
Ribaltare il apparecchio
Allentare i dadi a farfalla (15) e ri-
baltare i manici a forcella verso il
basso, in modo tale che l’apparecchio occupi poco spazio.
La staffa della barra serve anche
per appendere l’apparecchio nel
luogo di deposito.
I cavi non devono essere schiacciati.
L’apparecchio non deve es-
sere utilizzato con staffa del
manico ribaltata. Pericolo di
lesioni.
Smaltimento/
Tutela dell’ambiente
Effettuare lo smaltimento dell’apparecchio,
degli accessori e della confezione nel
rispetto dell’ambiente presso un punto di
raccolta per riciclaggio.
Elettrodomestici non rientrano nei
riuti domestici.
• Consegnare l’apparecchio ad un centro di riciclaggio ab. Le parti di plastica e di metallo utilizzate possono esse-
re smaltite nella raccolta differenziata
e quindi riciclate. A tale proposito consultare il nostro centro di assistenza.
• Per lo smaltimento dell’imballaggio,
introdurre il cartone nel contenitore della carta. Le parti di plastica vengono
smaltiti nei sistemi duali.
Pezzi di ricambio
È possibile ordinare pezzi di ricam-
bio e accessori all’indirizzo
www.grizzly-service.eu
Se non si dispone di una connessione In-
ternet, contattare telefonicamente il centro
di assistenza (vedere “Service-Center” a
pag.15). Tenere a portata di mano i numeri d’ordine riportati in basso.
Set di lame da taglio
destra/sinistra .......n. d’ordine 30261000
13
Page 14

IT MT
Garanzia
Gentile cliente,
Su questo apparecchio Le viene concessa
una garanzia di 3 anni a partire dalla
data di acquisto.
In caso di difetti di questo prodotto può
avanzare diritti legali nei confronti del
venditore del prodotto. Tali diritti legali non
vengono limitati dalla nostra garanzia qui
di seguito rappresentata.
Condizioni di garanzia
Il termine di garanzia inizia con la data di
acquisto. La preghiamo di conservare in
un luogo sicuro lo scontrino scale originale. Questo documento viene richiesto come
prova d’acquisto.
Qualora subentrasse un difetto di materiale
o di fabbricazione entro tre anni a partire
dalla data di acquisto di questo prodotto,
il prodotto verrà riparato o sostituito – a
nostra discrezione - gratuitamente da noi.
Questa prestazione di garanzia presuppone che venga presentato entro il termine di
tre anni l’apparecchio difettoso e la prova
d’acquisto (scontrino scale) e descritto
brevemente per iscritto in che cosa consiste
il difetto e quando si è vericato.
Se il difetto è coperto dalla nostra garan-
zia, riceverà il prodotto riparato oppure
un prodotto nuovo. Con la riparazione o
la sostituzione del prodotto non inizia un
nuovo periodo di garanzia.
Volume di garanzia
L’apparecchio è stato prodotto accuratamente secondo severe direttive di qualità
e controllato con coscienza prima della
consegna.
La prestazione di garanzia vale per difetti
di materiale o di fabbricazione. Questa
garanzia non si estende ai componenti del
prodotto che sono soggetti a normale usura e che quindi possono essere visti come
parti di usura (p. es. ltri o inserti) oppure
per danneggiamenti delle parti fragili (p.
es. interruttori, accumulatori o elementi di
vetro).
Questa garanzia decade se il prodotto è
stato danneggiato, non usato correttamente o non manutenuto. Per un uso corretto
del prodotto devono essere osservate tutte
le indicazioni riportate nelle istruzioni per
l’uso. Destinazioni d’uso e azioni sconsigliate nelle istruzioni d’uso o dalle quali
si viene avvertiti, sono tassativamente da
evitare.
Il prodotto è destinato esclusivamente all’uso commerciale. In caso di uso improprio,
esercizio della forza e interventi non effettuati dalla nostra liale di assistenza tecni-
ca autorizzata, decade la garanzia.
Svolgimento in caso di garanzia
Per garantire una rapida elaborazione della Sua pratica, La preghiamo di seguire le
seguenti indicazioni:
Tempo di garanzia e diritti legali
per vizi della cosa
Il periodo di garanzia non viene prolungato. Questo vale anche per parti sostituite
e riparate. Difetti e vizi presenti già al momento dell’acquisto devono essere segnalati
immediatamente dopo la rimozione dall’imballaggio. Riparazioni che accorrono dopo
il periodo di garanzia sono a pagamento.
14
• per tutte le richieste tenere a portata
di mano lo scontrino scale e il codice
di identicazione (IAN 102836) come
prova d’acquisto.
• I codici articolo sono riportati sulla targhetta del tipo.
• Nel caso in cui si dovessero vericare
difetti funzionali o altri vizi, La preghia-
mo di contattare telefonicamente o per
Page 15

IT MT
e-mail. Riceverà ulteriori informazioni
sullo svolgimento del Suo reclamo.
• Un prodotto rilevato come difettoso
può essere inviato con porto franco
all’indirizzo di assistenza comunicato,
previa consultazione del nostro servizio di assistenza tecnica, allegando
la prova d‘acquisto (scontrini scali)
e l’indicazione, in che cosa consiste
il difetto e quando si è vericato. Per
evitare problemi di accettazione e costi
aggiuntivi, usare tassativamente solo
l’indirizzo che Le è stato comunicato.
Assicurarsi che la spedizione non avvenga in porto assegnato, con merce
ingombrante, corriere espresso o altro
carico speciale. Spedire l’apparecchio
inclusi tutti gli accessori forniti insieme
al momento dell’acquisto e garantire
un imballaggio di trasporto sufcientemente sicuro.
Servizio di riparazione
Riparazioni non soggette alla garanzia
possono essere effettuate dietro fattura dalla nostra liale di assistenza tecnica previo
preventivo gratuito da parte della stessa.
Possiamo lavorare solo apparecchi che
vengono spediti sufcientemente imballati
e affrancati.
Attenzione: Spedire l’apparecchio alla
nostra liale in condizioni pulite e con l’indicazione del difetto.
Apparecchi spediti in porto assegnato con merce ingombrante, corriere espresso
o altro carico speciale - non vengono
accettati.
Lo smaltimento degli apparecchi difettosi
spediti viene effettuato da noi gratuitamen-
te.
Service-Center
Assistenza Italia
IT
Tel.: 02 36003201
E-Mail: grizzly@lidl.it
IAN 102836
Assistenza Malta
MT
Tel.: 80062230
E-Mail: grizzly@lidl.com.mt
IAN 102836
Importatore
Non dimenticare che il seguente indirizzo
non è un indirizzo di assistenza tecnica.
Contattare prima di tutto il centro di assistenza tecnica sopra nominato.
Grizzly Tools GmbH & Co. KG
Stockstädter Straße 20
63762 Großostheim
Germania
www.grizzly-service.eu
15
Page 16

PT
Indice
Introdução .................................16
Utilização ...................................17
Descrição geral ..........................17
Volume de fornecimento ..................17
Vista de conjunto ...........................17
Descrição de funcionamento ...........18
Dados técnicos ...........................18
Medidas de segurança ...............19
Símbolos no aparelho ..................... 19
Símbolos no manual de instruções ....19
Medidas de segurança gerais .........19
Montagem .................................23
Montagem dos punhos no arco .......23
Manejo do aparelho ..................23
Ligar e desligar .............................23
Indicações para o trabalho com o
aparelho ....................................... 24
Limpeza/Manutenção ................24
Trabalhos gerais de limpeza e de
manutenção ..................................25
Substituição das lâminas ................. 25
Armazenamento ........................26
Reciclagem/Protecção ambiental ..26
Peças sobressalentes/Acessórios ..26
Garantia ....................................27
Serviço de reparação .................28
Service-Center ............................28
Importador ................................28
Tradução do original da
Declaração de conformidade CE ... 53
Designação de explosão ................ 57
Este dispositivo pode ser utilizado
por crianças a partir de 8 anos de
idade e por pessoas com capacidades físicas, sensoriais ou mentais
reduzidas, ou falta de experiência
e conhecimento, contanto que supervisionadas ou instruídas acerca
da utilização segura do dispositivo
e desde que estejam conscientes
dos riscos daí resultantes. As crianças não podem brincar com o
aparelho. A limpeza e a manutenção não podem ser efetuadas por
crianças sem supervisão.
Introdução
Parabéns pela compra do seu novo aparelho. Com a sua compra, decidiu-se por um
produto de alta qualidade.
Este aparelho foi testado durante a produção em relação à qualidade e submetido
a uma inspeção nal. A funcionalidade do
seu aparelho está desta forma garantida.
Em casos isolados, não é de excluir a ausência total de quantidades residuais de
água ou lubricantes no ou dentro do aparelho, ou nas canalizações de mangueira.
Isto não representa contudo nenhuma
deciência ou defeito e não é motivo para
preocupações.
O manual de instruções é uma parte
integrante deste artigo. Ele contém
indicações importantes referentes à
segurança, utilização e eliminação. Familiarize-se com todas as indicações de utilização e de segurança do artigo. Utilize
este artigo da forma que é descrita e apenas para as nalidades indicadas. Guarde
bem o manual e, se transmitir o artigo a
terceiros, entregue também todos os respetivos documentos.
16
Page 17

PT
A
B
C
D
Utilização
Este aparelho destina-se a triturar e a
fragmentar solos com torrões grossos e a
escaricar e incorporar o solo com fertilizantes, turfa e composto. Destinado ao uso
doméstico.
Qualquer outro uso contrário àquele que
foi autorizado explicitamente neste manual
de instruções pode causar danos no aparelho e constituir um sério perigo para o seu
utilizador.
O operador ou utilizador são responsáveis
por acidentes ou danos que possam ser
causados a outras pessoas ou à sua propriedade.
Este aparelho destina-se a ser utilizado por
adultos. Crianças, assim como pessoas
que não estejam familiarizadas com este
manual não devem utilizar o aparelho. É
proibido utilizar o aparelho à chuva ou em
sítios húmidos.
O fabricante não se responsabiliza pelos
danos causados pela utilização abusiva ou
pelo uso indevido do parelho.
Descrição geral
• Punho de forquilha esquerdo
• Barra transversal com a cablagem
• Acessórios para montagem, 2 braça-
deiras para a xação do cabo e clip
de cinto
• Manual de instruções
Vista de conjunto
1a Punho de forquilha direito com
alavanca de arranque, botão de
bloqueio e compensador de tracção
1b Punho de forquilha esquerdo
2 Cabo de ligação à corrente
3a Braçadeira maior
3b Braçadeira menor
4 Barra transversal de material sin-
tético
5 Duas barras centrais
6 Barra em forma de arco
7 Ranhuras de ventilação
8 Chassis do motor
9 Engrenagem
10 Eixo do motor
11 Lâminas (Garras)
12 Clip de cinto
As ilustrações encontram-se nas
abas dianteiras deste manual
de instruções.
Volume de fornecimento
Retire o aparelho cuidadosamente da em-
balagem e verique se ele inclui as peças
seguintes:
• Chassis do motor com as lâminas (gar-
ras) e a barra em forma de arco
• Duas barras centrais
• Punho de forquilha direito com o interruptor de ligar/desligar e o cabo de
ligação à corrente xo
13 Parafusos fornecidos para o
efeito
14 Parafusos fornecidos
15 Borboleta fornecidos
16 Compensador de tracção
17 Botão de bloqueio
18 Alavanca de arranque
19 Cabeça sextavada
20 Porca autofrenante
17
Page 18
PT
Descrição de funcionamento
Este moto enxada eléctrica por comando
simples manual vem equipado com um
motor eléctrico que não necessita de manu-
tenção e tem uma engrenagem lubricada
a banho de óleo.
Este aparelho possui como dispositivo de
corte quatro lâminas (garras) rotativas de
aço que penetram automaticamente no
solo.
As suas colunas de alumínio são fáceis de
dobrar, possibilitando uma boa armazenagem.
Para car a conhecer a função dos acessórios leia, por favor, as descrições técnicas
seguintes:
Dados técnicos
Moto enxada eléctrica ............ FGH 710 A1
Absorção de potência do motor .... 710 W
Tensão de rede .................230 V~, 50 Hz
Classe de protecção ...........................
Classe de protecção ......................... IP24
Largura útil de trabalho ..............360 mm
Profundidade de trabalho
no máximo .................................180 mm
Quantidade das lâminas .......................4
Número de rotações
em funcionamento ........cerca de 230 min
Peso .......................................... 7,85 kg
Nível de pressão acústica
(L
) .................. 81 dB(A); KpA = 3 dB(A)
pA
Nível de potência acústica (L
garantido ............................... 93 dB(A)
medido .............91 dB(A); K
Vibração (a
) ........ 2,7 m/s2; K = 1,4 m/s2
h
)
wA
= 2 dB(A)
wA
Design e características técnicas sujeitos
a alterações sem aviso prévio. Não nos
responsabilizamos, por isso, por todas as
medidas, indicações e informações contidas neste manual de instruções. Títulos que
possam ser feitos valer devido às informações deste manual não poderão, por isso,
ser postos em vigor.
O valor de emissão de vibrações indicado
foi medido através de um método de ensaio
normalizado e pode ser usado para com-
parar uma ferramenta eléctrica com outra.
O valor de emissão de vibrações indicado
também pode ser usado para uma primeira avaliação da exposição.
Aviso:
Durante a utilização real da ferra-
menta eléctrica, o valor de emissão
de vibrações pode divergir do
valor indicado, dependendo da
forma como a ferramenta eléctrica
II
for utilizada.
É necessário determinar medidas de
segurança para proteger o utilizador com base numa avaliação da
exposição em condições reais de
utilização (deverão ser ponderadas
todas as componentes do ciclo de
-1
funcionamento, por exemplo, os
períodos durante os quais a ferra-
menta eléctrica está desligada e
também os períodos em que está
ligada, mas a trabalhar em vazio).
Os valores de ruído e de vibração foram
apurados de acordo com as normas e disposições mencionadas na declaração de
conformidade.
18
Page 19

PT
Medidas de segurança
Este capítulo trata das medidas de segurança necessárias que deve tomar quando
estiver a trabalhar com o moto enxada
eléctrica.
Símbolos no aparelho
Atenção! É favor ler o ma-
nual de instruções.
Atenção! Proteger contra a
chuva e a humidade.
Perigo de lesões devido a peças
que podem ser arremessadas! As
pessoas que se encontram nas
imediações devem afastar-se da
área de perigo.
Atenção! Desligue o aparelho e
retire a cha da tomada de corrente antes de efectuar trabalhos
de limpeza e de manutenção do
aparelho.
Perigo devido a cabo de ligação
à corrente danicado. Mantenha
os cabos de ligação à corrente
afastados das lâminas do aparelho!
Perigo de lesões devido a peças
rotativas! Depois de desligar o
aparelho, as lâminas continuam a
rodar. Por favor, aguarde que elas
parem.
Indicação do nível de potência
L
WA
acústica LWA em dB.
dB
Classe de protecção II
Os aparelhos eléctricos não devem
ser deitados para o lixo doméstico.
Símbolos no manual de
instruções
Sinais de perigo para a pre-
venção de danos físicos ou
de danos materiais.
Sinais ordenativos (neste caso, em
vez de aparecer o ponto de exclamação, vem explicada a ordem)
para a prevenção contra danos.
Sinais indicativos com informações
de como trabalhar melhor com o
aparelho..
Medidas de segurança gerais
Aviso! Este aparelho pode causar
lesões graves se não for utilizado
devidamente. Antes de começar a
trabalhar com o aparelho leia, por
favor, atentamente as instruções e
familiarize-se com o manejo das
peças.
Quando o cabo de ligação deste
aparelho estiver danicado, ele terá
de ser substituído pelo fabricante,
por um Serviço à Clientela por ele
autorizado ou por uma pessoa qua-
licada para tal, a m de evitar-se
perigos.
Para evitar danos corporais e mate-
riais, leia as indicações de segurança dadas a seguir:
Antes de começar a trabalhar com
o aparelho:
• Este aparelho não se destina para ser
usado por pessoas com deciências
físicas, psíquicas e sensorais ou com
falta de experiência e/ou por falta de
19
Page 20

PT
conhecimento sobre o equipamento;
exceto na existência de uma pessoa
com instrução adequada sobre a utilização do aparelho a qual supervisiona
e assume a responsabilidade da segurança.
• Tomar as precauções necessárias para
que as crianças não brinquem com o
aparelho.
• A máquina só pode ser usada por
pessoas sucientemente familiarizadas
com o seu funcionamento.
• O aparelho não pode ser utilizado por
crianças. Pessoas que não conhecem
as instruções estão também proibidas
de trabalhar com o aparelho. As leis
e as disposições locais podem prever
uma idade mínima para a utilização
do mesmo.
• Nunca utilize o aparelho enquanto
pessoas – especialmente crianças e
animais – se encontrarem nas proximidades.
• Lembre-se de que o utilizador é responsável por acidentes ou danos causados
a outras pessoas ou aos bens que lhes
pertençam.
• Familiarize-se com os seus arredores
e verique se haverão alguns perigos
que possam surgir e que lhe tenham
passado despercebidos, enquanto estiver a trabalhar com o aparelho.
• Examine o terreno em que vai trabalhar e remova todas as pedras, paus,
pedaços de arame e outros corpos
estranhos que podem ser apanhados e
arremessados pelo aparelho.
• Use roupa de trabalho apropriada
como, por exemplo, sapatos fechados
de sola antideslizante e calças compridas de tecido resistente. Não utilize o
aparelho se estiver a andar descalço
ou se usar sandálias abertas.
• Utilize equipamento de proteção indivi-
dual e sempre uns óculos de proteção.
O uso de equipamento de proteção
individual, como máscara contra pó,
calçado de segurança antiderrapante,
capacete de segurança ou proteção
auditiva, de acordo com o tipo de apli-
cação das ferramentas elétricas, reduz
o risco de ferimentos.
• Não ligue o aparelho se este não se
encontrar em posição para trabalhar.
Deste modo, evitará feridas e lesões.
• Examine primeiro o seu aparelho antes de começar a trabalhar com ele.
Não utilize o aparelho se as peças do
dispositivo de segurança (p.ex. o dispositivo de bloqueio ou a cobertura de
protecção), as peças do dispositivo de
corte ou pinos faltarem, se estiverem
desgastados ou danicados. Certique-
-se especialmente se o cabo de ligação
à corrente e a alavanca de arranque
não estão danicados.
• Para se evitar uma deciência de equi-
libragem as peças e os pinos podem
ser somente substituídos em conjunto.
• Utilize somente peças sobressalentes
e acessórios que são fornecidos e
recomendados pelo fabricante. O uso
de peças não originais leva à perda
imediata da garantia.
Utilização do aparelho:
Mantenha as mãos e os pés longe
das lâminas do aparelho, sobretudo
enquanto estiver a trabalhar com o
mesmo. Perigo de lesões!
• Preste atenção às medidas contra a
poluição sonora e às regras locais.
• O aparelho não deve ser utilizado
para triturar pedras ou para escavar
relvados. Perigo de danicação do
aparelho.
20
Page 21

PT
• Não utilize o aparelho à chuva,
quando estiver mau tempo, em sítios
húmidos (p.ex. lagos ou piscinas). Trabalhe somente à luz do dia ou quando
houver uma boa iluminação.
• Seja sensato quando estiver a trabalhar. Não trabalhe com o aparelho
quando se sentir cansado ou se estiver
desconcentrado, depois de ter ingerido
álcool ou se tiver tomado comprimidos.
Faça sempre intervalos a tempo devido.
• Mantenha sempre uma posição segura
quando estiver a trabalhar com o aparelho, sobretudo se se encontrar em ladeiras. Trabalhe sempre na transversal
à ladeira, nunca trabalhe a subir ou a
descer. Tenha um cuidado especial se
mudar a sua direcção na ladeira. Não
trabalhe em sítios demasiado inclinados.
• Se houver o perigo de escorregar
na ladeira, uma outra pessoa deve
apoiar o aparelho com uma vara ou
uma corda. A pessoa acompanhante
deve posicionar-se acima do aparelho
mantendo uma distância suciente em
relação às ferramentas de trabalho.
• Segure no aparelho rmemente com
ambas as mãos quando estiver a trabalhar com ele.
• Preste atenção a que os punhos do
aparelho estejam secos e limpos.
Preste atenção quando estiver a andar
para trás. Perigo de tropeçar!
• Tenha especial atenção quando virar
a máquina ou quando a puxar para
junto de si.
• Se as lâminas de corte carem bloqueadas devido a um corpo estranho,
desligue a máquina e tire a cha da
tomada. Remova o corpo estranho (por
ex., uma raiz) antes de voltar a colocar
a máquina a trabalhar.
• Não trabalhe com um aparelho danicado, incompleto ou com um aparelho
que foi modicado sem a autorização
do fabricante. Nunca utilize um apa-
relho com um dispositivo de protecção
defeituoso ou incompleto.
• Não sobrecarregue o seu aparelho.
Trabalhe unicamente dentro dos limites
da potência indicada. Não use aparelhos de baixa potência para executar
trabalhos pesados. Não utilize o seu
aparelho em actividades para as quais
ele não foi concebido.
• Evite causar danos no aparelho. Não
carregue o aparelho com pesos adicionais e não o arraste por solos duros,
tais como, azulejos ou escadas.
Interrupção dos trabalhos:
Atenção! As lâminas continuam a
rodar ainda por alguns segundos depois de o aparelho se desligar. Faça
o favor de aguardar até as lâminas
pararem de rodar. Perigo de lesões.
• O aparelho não deve ser levantado ou
transportado enquanto o motor estiver a
trabalhar. Quando quiser mudar de sítio
onde está a trabalhar, desligue primeiro
o aparelho e espere até as lâminas
pararem de rodar. Em seguida, retire a
cha da tomada.
• Nunca deixe o seu aparelho fora de
vigilância no sítio em que está a trabalhar.
• Desligue o aparelho, espere que as
lâminas parem de rodar e, em seguida,
retire a cha da tomada:
- sempre que se afastar da máquina,
- quando estiver a remover pedaços de
terra e de plantas,
- quando não estiver a utilizar o apare-
lho,
21
Page 22

PT
- sempre que estiver a efectuar trabalhos de limpeza e de manutenção,
- quando o cabo de ligação estiver da-
nicado ou emaranhado,
- se sentir o aparelho bater num obstáculo ou se sentir alguma vibração
estranha. Neste caso, verique se o
aparelho apresenta quaisquer danos
e mande repará-lo.
• Não utilize o aparelho nas proximida-
des de líquidos facilmente inamáveis
ou de gases. O incumprimento desta
instrução implica o perigo de incêndios
ou de explosões.
Manutenção e armazenamento:
• Certique-se de que todas as porcas,
pinos e parafusos se encontram bem
apertados e de que o aparelho se en-
contra num estado de funcionamento
seguro.
• Não tente reparar o aparelho a não
ser que possua uma formação prossional nesta área. Todos os trabalhos
completos que não estejam discriminados neste manual de instruções podem
ser unicamente executados pelos nossos Serviços de Assistência Técnica.
• Guarde o seu aparelho em sítio seco e
fora do alcance das crianças.
• Trate do seu aparelho com cuidado.
Mantenha as ferramentas aadas e
limpas, de modo a poder trabalhar
melhor e de forma mais segura.
• Siga as instruções de manutenção des-
te manual.
Protecção contra choques eléctricos:
Atenção! O aparelho só pode ser
utilizado se o cabo de ligação à
corrente e o o de extensão estiverem intactos. Perigo de choque
eléctrico.
• Mantenha a linha de ligação à corren-
te afastada das ferramentas cortantes.
Leve o cabo de ligação à corrente sempre atrás do operador. Se a linha de
ligação à corrente se danicar durante
a sua utilização, desligue-a imediatamente da corrente. Não toque nunca
no cabo de ligação à corrente enquan-
to a cha estiver ligada à tomada.
• Certique-se de que a tensão de rede
corresponde às indicações mencionadas na chapa de características do
aparelho.
• Evite o contacto físico com peças ligadas à terra (p.ex. vedações, postes
metálicos).
• O acoplamento do cabo de extensão
tem de estar protegido contra os salpicos de água, ele tem de ser de borracha ou revestido de borracha. Utilize
somente cabos de extensão próprios
para serem utilizados no exterior e
que estejam devidamente assinalados
para tal. O corte transversal do cabo
de extensão deverá medir, pelo menos,
2,5mm
2
. Antes de qualquer utilização,
desenrole completamente o cabo do
tambor. Verique se o cabo apresenta
quaisquer danos.
• Para a colocação do cabo de extensão
utilize o suporte para cabos previsto
para o efeito.
• Não carregue com o aparelho pelo
cabo. Não puxe pelo cabo para retirar
a cha da tomada. Proteja o cabo
contra o calor, o óleo e as arestas cortantes.
• Se possível, ligue o aparelho a uma
tomada com dispositivo de protecção
contra corrente de defeito (aparelho
sensível à corrente diferencial-residual,
dispositivo de corrente residual RCD)
aplicando uma corrente nominal não
superior a 30 mA.
22
Page 23

PT
B
A
A
C
A
Montagem
Antes de começar a efectuar tra-
balhos de montagem no aparelho,
retire primeiro a cha da tomada.
Quando estiver a montar o apa-
relho, preste atenção para que o
cabo de ligação à corrente não
que entalado e esteja sucientemente folgado.
Montagem dos punhos no
arco
1. Encaixe os dois punhos de forquilha (1a/1b) na barra transversal de material sintético (3).
Em seguida, aparafuse-os pela
parte de trás nas perfurações
que se encontram na barra em
forma de arco, utilizando, para
tal, os parafusos fornecidos para
o efeito (13).
2. Desaparafuse as duas barras
centrais (5) das pegas (1a/1b).
Para o efeito, ene os parafusos
fornecidos (14) de fora para
dentro nos orifícios a xe-os com
as porcas de borboleta (15).
3. Posicione as hastes das pegas
com as extremidades dos tubos
do lado direito e esquerdo na
barra inferior (
com os parafusos (14) e as
porcas de borboleta (15) forneci-
dos.
A montagem terá sido realizada
correctamente quando as extremi-
dades das pegas carem viradas
para o lado oposto ao da frente da
máquina onde estão os rasgos de
ventilação (ver
6) e xe-as
7).
4. Fixe o cabo de ligação à corrente utilizando, para tal, as braçadeiras que vêm incluídas:
- Coloque a braçadeira maior
(3a) acima da barra transversal,
- e a braçadeira menor (3b) jun-
to à coluna.
Manejo do aparelho
Preste atenção às medidas contra a
poluição sonora e às regras locais.
Ligar e desligar
Antes de ligar o aparelho preste
atenção para que este não tenha
contacto com nenhuns objectos e
segure-o rmemente com as duas
mãos.
1. Ligue o cabo de extensão à cha
do aparelho.
2. Para compensação de tracção
forme uma laçada com um extremo do cabo de extensão e
pendure-a no compensador de
tracção (16).
3. Em seguida, ligue o aparelho à
tensão de rede.
4. Pendure o cabo de extensão no
clip de cinto (12), xando este
último no seu cinto.
5. Para ligar o aparelho prima o
botão de bloqueio (17) que se
encontra no punho, premindo,
em seguida, a alavanca de arranque (18). Largue o botão de
bloqueio (17).
As lâminas (
então a rodar e a escaricar o
solo.
11) começam
23
Page 24

PT
6. Para desligar o aparelho largue
a alavanca de arranque (18).
Atenção! Depois de desligar
o aparelho as lâminas (11)
continuam a rodar ainda por
alguns segundos. Não toque
ns lâminas rotativas. Perigo
de lesões.
Indicações para o trabalho
com o aparelho
Quando estiver a trabalhar
com o aparelho segure-o
sempre com as duas mãos e
preste atenção aos seus pés.
Perigo de acidentes devido às
lâminas (11).
Atenção quando estiver a
andar para trás. Perigo de
tropeçar!
Não toque na engrenagem –
esta pode aquecer sobretudo
se estiver a trabalhar muito
tempo com o aparelho. Perigo de queimaduras!
Depois de terminar de trabalhar
com o aparelho e, se o quiser transportar, desligue o aparelho, retire a
cha da tomada e aguarde até as
lâminas pararem de rodar.
Protecção contra danos no
aparelho e lesões:
• Nunca levante nem arraste o
aparelho enquanto o motor estiver a trabalhar.
• Levante o aparelho para o
transportar sempre que passe
por superfícies duras, tais como,
azulejos ou escadas.
• Transporte o aparelho muito devagar pelo solo, se possível indo
sempre a direito.
• Trabalhe sempre afastado da
tomada. Certique-se de que o
cabo ca fora da área em que
vai trabalhar. O clip de cinto que
vem incluido e que serve para
pendurar o cabo de extensão
ser-lhe-a muito útil.
Protecção contra sobrecarga:
Em caso de sobrecarga, o motor
desligar-se- a automaticamente.
Somente depois de o aparelho ter
arrefecido completamente é que
poderá trabalhar com ele de novo.
Limpeza/Manutenção
Cuidado! Trabalhos de limpeza e
de manutenção que não venham
descritos neste manual de instruções
devem ser efectuados pelos nossos
Serviços de Assistência Técnica. Por
favor, utilize exclusivamente peças
originais.
Retire a cha da tomada e espere
que as lâminas parem de rodar,
antes de começar a efectuar quaisquer trabalhos de limpeza e manutenção no seu aparelho.
Efectue os trabalhos de limpeza e de manutenção regularmente. Deste modo, car-lhe-
-a garantida uma utilização longa e segura
do aparelho.
24
Page 25

PT
D
D
Trabalhos gerais de limpeza
e de manutenção
Não salpique o aparelho com água
(especialmente se este se encontrar
sob alta pressão) e não o lave à
água corrente.
Use luvas protectoras sempre que
estiver a fazer a manutenção e a
limpeza do seu aparelho para se
proteger contra cortes e feridas.
Limpe o aparelho cuidadosamente cada
vez que o utilizar. Mantenha-o sempre
limpo. Não use produtos de limpeza ou
solventes para a limpeza do aparelho.
• Remova todos os restos de terra ou de
sujidade que caram agarrados às
lâminas (11), ao eixo do motor (10),
à superfície do aparelho e às ranhuras
de ventilação (7) utilizando, para tal,
uma escova e um pano seco.
• Pulverize ou esfregue as lâminas (11)
do aparelho com um pano embebido
em óleo biológico biodegradável.
• Limpe os punhos eventualmente sujos
com um pano húmido.
• Antes de utilizar o aparelho, verique
se este apresenta quaisquer danos visíveis, tais como, peças soltas, desgasta-
das ou danicadas. Verique se todas
as porcas, pinos e parafusos estão
bem apertados.
• Verique se as coberturas e os dispositivos de segurança estão bem colocados ou se nota alguns danos. Em caso
de necessidade, substitua-os também.
Substituição das lâminas
O aparelho vem equipado com quatro
lâminas (garras) que podem ser facilmente
substituídas aos pares. Os dois pares de
lâminas podem ser colocados facultativamente à esquerda ou à direita.
Substitua sempre os dois
pares de lâminas simultaneamente para evitar causar
danos ou ocasionar uma
deciência na calibragem do
aparelho.
Desligue o aparelho, retire a cha
da tomada e aguarde até as lâminas (11) pararem de rodar.
1. Desaperte o parafuso de cabeça
sextavada (19) e a porca auto-
frenante (20) que se encontram
junto de cada par de lâminas
(11).
2. Afaste o par de lâminas do eixo
do motor (10).
3. Limpe o eixo do motor com óleo
biológico.
4. Encaixe as novas lâminas (11)
no eixo do motor (10) de modo
a que as perfurações do eixo
das lâminas coincidam com as
perfurações do eixo do motor
(
ver
D )
Preste atenção a que o sentido de
direcção das lâminas (garras) esteja
correcto. As setas que se encontram
na engrenagem e nas lâminas devem estar a apontar para a mesma
direcção
5. Introduza o parafuso de cabeça sextavada na perfuração e
aparafuse uma nova porca autofrenante, que vem incluída jun-
tamente com as novas lâminas
(ver
.
(ver D )
)
.
.
25
Page 26

PT
E
Armazenamento
• Deixe o motor arrefecer antes de o
guardar em sítios fechados.
• Guarde o seu aparelho limpo, seco e
fora do alcance das crianças.
• Não tape o seu aparelho com sacos
de plástico pois, deste modo, pode
acumular-se humidade.
Desaperte as porcas de orelhas
(15) e dobre os punhos de forquilha para o aparelho ocupar menos
espaço.
A barra em forma de arco (6) serve
também para pendurar o aparelho
no local onde o vai guardar.
Os cabos não devem car entala-
dos.
O aparelho não deve ser
utilizado se os punhos ainda
estiverem dobrados.
Reciclagem/Protecção
ambiental
Peças sobressalentes/
Acessórios
Pode obter as peças de reposi-
ção e os acessórios em
www.grizzly-service.eu
Caso não tenha internet entre em contacto,
por telefone, com o centro de assistência
(ver “Service-Center“ página 28). Mantenha os números de encomenda, em baixo
mencionados, disponíveis.
Conjunto de lâminas (garras)
direita/esquerda:
N° de encomenda .................30261000
Por favor, coloque o aparelho, os acessórios e a embalagem nos respectivos ecopontos para serem reciclados.
Os aparelhos eléctricos não devem
ser deitados para o lixo doméstico.
Por favor, entregue o seu aparelho num
ponto de reciclagem. As peças de material
sintético e de metal podem ser sujeitas
a uma escolha selectiva e, deste modo,
prontas para serem recicladas. Para tal,
informe-se nos nossos Serviços de Assistência Técnica.
26
Page 27

PT
Garantia
Prezada cliente, prezado cliente,
Este aparelho tem uma garantia de 3 anos
a contar a partir da data da compra.
Em caso de deciências vericadas neste
produto, estão à sua disposição direitos
legais face ao vendedor. Estes direitos legais não são restritos pela nossa garantia
a seguir descrita.
Termos de garantia
O período de garantia começa a contar
da data da compra. Mantenha guardado
o talão de compra original. Esse documento é exigido como comprovativo de
compra.
Se no decorrer de três anos a partir da
data de aquisição deste produto, ocorrer
uma falha de material ou defeito de fabrico, o produto será substituído ou reparado
gratuitamente, de acordo com a nossa
escolha. Esta garantia exige que o dispositivo defeituoso e o talão de compra (recibo) sejam apresentados no decorrer de um
prazo de três anos e que seja brevemente
descrito por escrito, qual o defeito e quando é que ele ocorreu.
Se o defeito for coberto pela nossa garantia é coberta, receberá de volta o produto
reparado ou um novo produto. Com a
reparação ou substituição do produto
não é iniciado nenhum novo período de
garantia.
Período de garantia e reclamações
legais por defeitos
O período de garantia não é prolongado
pela prestação de garantia. Isto também
se aplica às peças substituídas e repara-
das. Quaisquer danos e defeitos eventualmente existentes vericados na altura da
compra deverão ser comunicados imediatamente após se ter desembalado o produ-
to. Após decorrido o período de garantia,
as reparações necessárias estão sujeitas a
pagamento.
Âmbito da garantia
O aparelho foi cuidadosamente produzido
de acordo com diretivas de qualidade
rigorosas e devidamente testado antes da
entrega.
A prestação de garantia aplica-se a falhas
de material ou defeitos de fabrico. Esta ga-
rantia não cobre os componentes do produto que estão sujeitos a desgaste normal
e que são portanto consideradas como
peças de desgaste (por exemplo, ltros
ou ensaios), nem os danos causados nas
partes frágeis (por exemplo, interruptores,
baterias recarregáveis ou as peças feitas
em vidro).
Esta garantia caduca, se o produto for danicado ou se não for devidamente usado
ou conservado. Para uma correta utilização do produto, deverão ser cumpridas todas as indicações descritas no manual de
instruções. Deverão ser impreterivelmente
evitados os usos e as ações desaconselhados no manual de instruções, ou para os
quais são feitas advertências.
Este produto foi concebido unicamente
para uso privado e não é indicado para
uso comercial. A garantia é anulada em
caso de uso abusivo e inadequado, do
uso de força, e em caso de intervenções
que não tenham sido realizadas pela nossa estação de serviço autorizada.
Procedimento em caso de reclamação de garantia
Para assegurar um processamento rápido
da sua reclamação, siga por favor as seguintes instruções:
• Mantenha à mão o talão de compra
e o número do artigo (IAN 102836),
27
Page 28

PT
como comprovativo da compra.
• Pode consultar o número do artigo na
placa de identicação.
• Se ocorrerem erros na funcionalidade
ou outros defeitos, contate imedia-
tamente por telefone ou e-mail o
departamento de serviços a seguir
designado. Receberá informações adicionais acerca do processamento da
sua reclamação.
• Após consulta do nosso serviço de
atendimento a clientes, pode enviar-
-nos um produto defeituoso com despesas de envio gratuitas para si, mediante a anexação do talão de compra
(recibo) e indicando onde e quando
surgiu o defeito, para o endereço de
serviço que lhe for comunicado. Para
evitar problemas de receção e custos
adicionais, use apenas o endereço
que lhe for comunicado. Certique-se
de que o envio não foi enviado livre
de franquia, através de serviço de
transporte de mercadorias pesadas,
serviço de envio expresso, ou qualquer
outro serviço de envio especial. Envie
o aparelho incluindo todas as peças
acessórias fornecidas aquando efetuada a compra e use uma embalagem
de transporte sucientemente segura.
Não serão aceites máquinas ou aparelhos
não franqueados, devolvidos como mercadorias volumosas, ou através de serviços
postais por expresso ou especiais.
Efetuamos gratuitamente a eliminação das
suas máquinas defeituosas enviadas.
Service-Center
Assistência Portugal
Tel.: 70778 0005 (0,12 EUR/Min.)
E-Mail: grizzly@lidl.pt
IAN 102836
Importador
Tenha em conta que o endereço seguinte
não é nenhum endereço de serviço. Entre
em contacto com o centro de atendimento
acima referido.
Grizzly Tools GmbH & Co. KG
Stockstädter Straße 20
63762 Großostheim
Alemanha
www.grizzly-service.eu
Serviço de reparação
As reparações que não sejam abrangidas
pela garantia podem ser efetuadas pelo
nosso centro de serviço, mediante fatura-
ção. Ele apresentar-lhe-á de bom grado
um orçamento dos custos.
Podemos reparar apenas os aparelhos que
tenham sido devidamente embalados e
enviados com franquia suciente.
Atenção: Por favor, envie o seu aparelho
limpo e mediante referência da falha ou
defeito para a nossa sucursal de serviços.
28
Page 29

GB MT
Contents
Introduction ...............................29
Intended purpose ......................29
General description ....................30
Scope of delivery .........................30
Functional description ...................30
Overview .................................... 30
Technical data ............................31
Safety precautions .....................31
Symbols used in the manual ........... 31
Symbols on the implement .............32
General notes on safety ................32
Assembly instructions .................35
Fitting the grip tubing .................... 35
Operation ..................................35
Switching on and off ..................... 35
Operating instructions ................... 36
Cleaning/Maintenance ...............36
General cleaning and maintenance
work ........................................... 36
Changing the tines .......................37
Storage ......................................37
Spare Parts/Accessories .............38
Disposal, environmental
protection ..................................38
Guarantee .................................38
Repair Service ............................39
Service-Center ............................39
Importer ....................................39
Translation of the original
EC declaration of conformity ......54
Exploded Drawing .....................57
Introduction
Congratulations on the purchase of your
new device. With it, you have chosen a
high quality product.
During production, this equipment has
been checked for quality and subjected
to a nal inspection. The functionality of
your equipment is therefore guaranteed. It
cannot be ruled out that residual quantities
of water or lubricants will remain on or in
the equipment/hose lines in isolated cases.
This is not a fault or defect and it represents no cause for concern.
The operating instructions constitute
part of this product. They contain
important information on safety, use
and disposal.
Before using the product, familiarise
yourself with all of the operating
and safety instructions. Use the
product only as described and for
the applications specied.
Keep this manual safely and in the
event that the product is passed on,
hand over all documents to the third
party.
Intended purpose
The tool is intended for breaking up and
tilling coarse soil for the purpose of mixing
in fertiliser, peat and compost in domestic
areas.
Any use other than that specically named
in this manual may lead to damage to the
tool and represents a serious injury hazard
for the operator.
The operator or user of the tool is responsible for any damage or injury caused to
other persons or property.
This tool is intended for use by adults.
29
Page 30

GB MT
A
B
C
D
Children and persons unfamiliar with the
manual must not be allowed to use the
tool. Do not use the tool in rain or damp
surroundings.
The manufacturer shall not be held liable
for damage arising from improper use or
incorrect operation of the tool.
General description
The major functional parts are
shown on the foldout pages.
Scope of delivery
Carefully remove the tool from the packaging and check that the following parts are
complete:
• Motor housing with tines and frame
tubing
• Right-hand fork with dead-man lever
and permanently xed mains cable
• Left-hand fork grip
• Plastic cross-plate with cable guide
• Assembly tools, 2 cable clips and belt
clip
• User manual
Overview
1a Right-hand fork grip with dead-
man lever, safety release catch
and cable tension relief
1b Left-hand fork grip
2 Mains cable
4 Plastic cross-plate
5 Two central tubes
6 Frame tubing
7 Vent
8 Motor housing
9 Gearbox
10 Driveshaft
11 Tines
12 Belt clip
13 Bolts provided
14 Screws
15 Wing nuts
16 Cable tension relief
17 Safety release catch
18 Dead-man lever
19 Hex bolt
20 Self-locking nut
Functional description
Your hand-operated garden tiller is
equipped with a maintenance free electric
motor and a gearbox with sump lubrication.
The tool is tted with four rotating tine
wheels that automatically dig themselves
into the ground.
The aluminium frame can be folded to aid
storage.
Please refer to the following descriptions
for the function of the controls.
30
Page 31

GB MT
Technical data
Garden Cultivator .................. FGH 710 A1
Motor power input ...................... 710 W
Rated input voltage .... 230 V~, 50 Hz AC
Safety class ......................................
Degree of protection ........................ IP24
Working width ..........................360 mm
Max working depth ............ max. 180 mm
Number of tine wheels .......................... 4
Nominal rotation rate ..... approx 230 rpm
Weight .................................... 7.85 kg
Acoustic pressure level
(L
) ............... 81 dB (A), KpA = 3 dB (A)
pA
Sound power level (L
Measured ..... 91 dB (A), K
)
wA
= 2 dB (A)
wA
Guaranteed ..........................93 dB (A)
Vibration at hand grip (a
) .........2.7 m/s
h
Kh = 1.4 m/s
Noise and vibration values have been
determined according to the standards and
regulations named in the declaration of
conformity.
Technical and optical alterations may be
made without notice for the purposes of
improvement. No guarantee can be given
for the accuracy of dimensions, notices
and specications stated in this manual.
The manufacturer shall therefore not accept
liability for statutory claims arising from the
manual.
II
Warning:
The vibration emission value may
differ during actual use of the
power tool from the stated value
depending on the manner in which
the power tool is used.
Safety precautions aimed at protect-
ing the user should be based on
estimated exposure under actual
usage conditions (all parts of the
operating cycle are to be consid-
ered, including, for example, times
during which the power tool is
turned off and times when the tool
is turned on but is running idle).
Safety precautions
2
2
This section deals with the basic safety
regulations while working with the electric
tiller.
Symbols used in the manual
Warning symbols with in-
formation on damage and
injury prevention.
Instruction symbols (the instruction is
explained at the place of the exclamation mark) with information on
preventing damage.
The stated vibration emission value was
measured in accordance with a standard
testing procedure and may be used to compare one power tool to another.
The stated vibration emission value may
also be used for a preliminary exposure
assessment.
Help symbols with information on
improving tool handling.
31
Page 32

GB MT
Symbols on the implement
Caution!
Read the user manual.
Caution! Protect from rain
and damp.
Danger of injury from objects
spinning off! Keep surrounding
persons away form the hazard
area.
Caution! Switch off the tool and
disconnect it from the mains before carrying out any cleaning or
maintenance work.
Danger from damaged mains
cable! Keep mains cables away
from tines.
Danger of injury from rotating
parts. The tines will continue to
rotate after the tool has been
switched off. Wait for them to
stop moving.
L
WA
Sound power level LWA in dB.
dB
Safety class II
Do not dispose of electrical equip-
ment in household waste.
General notes on safety
Warning! Improper use of this tool
may lead to serious injury. Read
this instruction manual carefully
before you start working with the
tool, and familiarise yourself with
its controls.
If the power cable for this equip-
ment is damaged, it must be replaced with a special power cable,
which is available from the manufacturer or a customer service agent
of the same.
Please read the following safety
guidelines in order to avoid risk of
re, electric shock, personal injury
and damage to objects:
Preparation:
• This appliance is not intended for use
by persons with reduced physical,
sensory or mental capabilities, or lack
of experience and knowledge, unless
they have been given supervision or
instruction concerning use of the appliance by a person responsible for their
safety.
• Children should be supervised to en-
sure that they do not play with the appliance.
• The equipment is to be used only by
people who are adequately trained.
• Never allow children or other persons
unfamiliar with the user manual to use
the shredder. Local regulations or bylaws may determine the minimum age
for using the device.
• Never use the tool while others, espe-
cially children or pets, are close by.
• Remember: the user is responsible for
accidents involving other people or
32
Page 33

GB MT
their property.
• Familiarise yourself with handling the
tool and pay attention to all possible
dangers that may be overheard while
working with the tool.
• Check the terrain on which you will
be using the tool, and remove stones,
sticks, wires or other foreign objects
that may be caught up and spun off.
• Wear proper working clothes, such as
rm footwear with non-slip soles and
strong long trousers. Do not use the
tool barefoot or wearing open-toed
sandals.
• Use personal protective equipment.
Always wear eye protection. Protective
equipment such as dust mask, non-skid
safety shoes, hard hat, or hearing protection used for appropriate conditions
will reduce personal injuries.
• To prevent injury from the tines, only
switch the tool on in its working position.
• Examine the tool beforehand every
time you use it. Do not use the tool
when the safety components (such as
the power safety catch or guard), cut-
ting parts or bolts are missing, worn
or damaged. In particular, check the
mains cable and dead-man lever for
damage.
• Only replace damaged bolts or tines in
complete sets to prevent imbalance.
• Only use replacement and accessory
parts delivered and recommended by
the manufacturer. Using foreign parts
will immediately lead to loss of guaran-
tee.
Working with the tool:
Keep your hands and feet away
from the tines while working, espe-
cially when starting up the tool – in-
jury hazard!
• Observe any noise-prevention regulations and local by-laws.
• Do not use the tool to chop up stones
or till lawn soil, as such use may damage the tool.
• Do not use the tool in rain, foul weather or damp surroundings (such as near
garden ponds or swimming pools).
Only use in daylight or good lighting
conditions.
• Be sensible. Do not use the tool if you
are tired or easily distracted, or after
the use of alcohol or medicines. Take a
break as soon as you need one.
• Make sure that you are standing rmly
when using the tool, especially on
slopes. If working on a slope, work
along the slope, not upwards or down-
wards. Be particularly careful when
changing direction on the slope. Do
not use the tool on excessively steep
slopes.
• If there is any danger of slipping on
sloped ground, have a second person
secure the tool with a rod or cable.
The second person should stand up the
slope at a safe distance from the tool.
• Always hold the tool securely in both
hands while working with it.
• Make sure that the grips are dry and
clean. Be careful while moving backwards – danger of tripping over!
• Take particular care when turning or
raising the machine.
• If the chopping knife is blocked by a
foreign body, switch off the equipment
and disconnect at the plug. Remove
the foreign body (e.g. root) before restarting the equipment.
• Do not use the tool if it is damaged,
incomplete or altered without the approval of the manufacturer. In particu-
33
Page 34

GB MT
lar, do not work with the tool if guards
or protection ttings are damaged or
missing.
• Do not overload the tool. Only work
in the performance range stated. Do
not use tools that do not have sufcient
power for heavy jobs. Do not use the
tool for any use other than that intended by the manufacturer.
• Avoid damage to the tool. Do not apply extra weight and do not drag the
tool over hard surfaces such as tiles or
steps.
Stopping work:
Warning! The tines will continue
to turn for a few seconds after you
switch the tool off. Wait until they
have stopped moving – injury hazard!
• Do not lift or transport the tool while
the motor is running. Turn the tool off
and wait for the tines to stop moving,
then disconnect the tool from the mains
before changing the area you are
working on.
• Never leave the tool unattended where
you were using it.
• Switch the tool off, wait for the tines to
stop moving and disconnect the tool
from the mains under the following circumstances:
- Always before leaving the tool.
- Before removing remnants of soil
and plants.
- When the tool is not in use.
- Before you conduct maintenance or
cleaning work on the tool.
- If the mains cable is damaged or
caught up.
- If the tool collides with an obstacle
or starts to vibrate in an unusual
manner. In this case, examine the tool
for damage, and have it repaired if
necessary.
• Use the tool away from ammable uids
or gases. Failure to do so may result in
re or explosion.
Maintenance and storage:
• Make sure that all nuts, bolts and
screws are tight and that the tool is in
safe working order.
• Do not attempt to repair the tool your-
self unless you are qualied to do so.
Return the tool to our service centre to
carry out any work not listed in the user
manual.
• Keep the tool in a dry place out of children’s reach.
• Be careful in handling the tool. Keep
the tines sharp and clean to improve its
working safety and effectiveness.
• Follow the maintenance regulations.
Electrical safety:
Warning! Do not use the tool if the
mains or extension cable is dam-
aged – danger of electrical shock.
• Keep the mains cable away from the
tines. Always trail the mains cable behind you or the person operating the
tool. If the cable becomes damaged
during use, immediately disconnect it
from the mains.
Never touch the mains cable before un-
plugging it from the mains.
• Make sure that the mains voltage matches the data on the tool’s rating label.
• Avoid skin contact with earthed objects
such as metal fences and posts.
• Make sure that the connector on the
extension cable is protected from splash
water, and is made of rubber or has a
34
Page 35

GB MT
B
A
A
C
rubber covering. Only use extension
cables that are intended for outdoor
use and are labelled as such. Use extension cables with a cable core diam-
eter of at least one square millimetre.
Always completely unwind the cable
reel before use. Check the cable for
damage.
• Use the cable hanger tted for the purpose when using an extension cable.
• Do not carry the tool by the cable. Do
not unplug the cable by tugging on it.
Keep the cable away from heat, oil
and sharp edges.
• Connect the appliance to a power
socket with a residual current circuit
breaker of rated residual current no
more than 30 mA.
Assembly instructions
Always disconnect the tool from the
mains before conducting any work
on it.
While assembling the tool, make
sure that the mains cable (2) does
not become caught and has enough
slack.
Fitting the grip tubing
1. Push the two fork grips (1a/1b)
into the plastic cross-plate (4),
and screw the plate into the corresponding holes in the grip tub-
ing from behind using the bolts
provided (13).
2. Screw both central tubes (5) onto
the fork handles (1a/1b). To do
this, push the enclosed screws
(14) inwards through the holes
from the outside and screw them
in place with the wing nuts (15).
3. Position the handle rod with the
pipe ends to the left and right
on the lower frame tubing (
6) and screw it in place with the
enclosed screws (14) and wing
nuts (15).
When assembled correctly, the
handle ends point away from the
equipment front with the ventilation
slits (see
4. Fasten the mains cable with the
cable clips supplied:
- Large cable clip (3a) above the
cross-plate
- Small cable clip (3b) at the
frame tubing.
7).
Operation
Observe noise-abatement laws and
local by-laws.
Switching on and off
Before switching the tool on, make
sure that the tool is not touching
any other objects and hold it rmly
in both hands.
1. Plug the tool into the extension
cable.
2. Loop the end of the extension
cable and hang it onto the cable
tension relief (16) to ease the
tension on the cable.
3. Plug the tool into the mains.
4. Hang the extension cable onto
the belt clip (12) and fasten it to
your trouser belt.
5. To switch on, press the safety
release catch (17) and then
squeeze the dead-man lever
35
Page 36

GB MT
A
(18). Release the safety release
catch (17).
The tines (
rotate and dig themselves into
the earth.
6. To switch off, release the dead-
man lever (18).
Warning! The tines will con-
tinue to turn for a few seconds after the tool has been
switched off. Do not touch
the rotating tines – injury
hazard!
11) will begin to
Operating instructions
Always keep a rm grip on
the tool with booth hands
and watch your feet.
The tines (11) may cause an
accident. Be careful while
moving backwards – danger
of tripping!
Do not touch the gearbox, as
it may become hot during operation – danger of burns!
Switch the tool off after working
with it and for transport; disconnect
from the mains and wait for the
tines to stop moving.
To avoid damage to the
tool:
• Never lift or drag the tool with
the motor running.
• Lift the tool while moving it over
hard surfaces such as tiles or
steps.
• Walk the tool through the soil
at normal pace and in a line as
straight as possible.
• Always work away from the
mains socket. Make sure that
the cable is kept well away from
the working area. Hanging the
cable into the belt clip included
in the package will help.
Overload protection: The motor
will cut out immediately if overloaded. The tool cannot be used until it
has completely cooled down again.
Cleaning/Maintenance
Always return the tool to the service
centre for work not described in the
manual. Only use original parts.
Switch the tool off, unplug it from
the mains, and wait for the tines
(11) to stop moving before carrying
out any maintenance or cleaning
work on the tool.
Perform regular maintenance and cleaning
on the tool. This will ensure long, reliable
service.
General cleaning and
maintenance work
Do not spray the tool down
with water (especially not
under pressure), and do not
clean it under running water.
Wear protective gloves when carry-
ing out maintenance and cleaning
work on the tool to avoid injury
from cuts.
Always clean the tool thoroughly after
each use. Always keep the tool clean. Do
not use cleaning uids or solvents.
36
Page 37

GB MT
D
D
D
D
E
• Remove any soil and dirt residues stuck
to the tines (11), driveshaft (10), tool
surface and vents (7) with a brush or
dry cloth.
• Spray or rub biodegradable oil into
the tines (11).
• Clean soiled grips with a damp cloth.
• Always check the tool for obvious damage such as loose, worn or damaged
parts before using it. Check that all
nuts, bolts, and screws are tight.
• Check the covers and guards for damage and correct t. Change them if
necessary.
Changing the tines
The tool is tted with four tine wheels that
can easily be changed in pairs. Both of the
tine-wheel pairs can be tted on the left or
right, as required.
Always change both tine
pairs at the same time to
avoid damage to the tool
from imbalance.
Switch the tool off, unplug it and
wait for the tines to stop turning.
1. Unscrew the hex bolt (19) and
the self-locking nut (20) on the
tine-wheel pair (11).
2. Slide the tine-wheel pair off the
shaft (10).
3. Clean the driveshaft with biologi-
cal oil.
4. Slide the new tines onto the
driveshaft with the holes on the
axles aligned to the holes on the
driveshaft (see
).
Make sure that the tines are set to
their proper turning direction. The
arrows on the gearbox and tines
should point the same way (see
).
5. Slide the hex bolt through the
hole and tighten on the self-locking nut (supplied with each new
tine wheel pair (see
)).
Storage
• Leave the motor to cool down before
you put the tool into a closed space.
• Keep the tool clean, dry and out of the
reach of children.
• Do not cover the tool in plastic bags as
moisture may form.
Unscrew the wing nuts
and fold the fork grips down to reduce the space taken by the tool.
The frame tubing (6) also serves as
a hook to hang up the tool at the
place of storage.
Make sure that the cable does not
become jammed.
Do not use the tool with the
handle folded closed. There is
a risk of injury!
37
Page 38

GB MT
Spare Parts/Accessories
Spare parts and accessories can be
obtained at
www.grizzly-service.eu
If you do not have internet access, please
contact the Service Centre via telephone
(see “Service-Center” Page 39). Please
have the order number mentioned below
ready.
Set of tines
Right/left ............... Order No. 30261000
Disposal, environmental
protection
Be environmentally friendly. Return the
tool, accessories and packaging to a recy-
cling centre when you have nished with
them.
Do not dispose of electrical appli-
ances in household waste.
Return the tool to a recycling centre. The
plastic and metal parts used can be sepa-
rated and sorted for recycling. Ask our
service centre for details.
Guarantee
Dear Customer,
This equipment is provided with a 3-year
guarantee from the date of purchase.
In case of defects, you have statutory rights
against the seller of the product. These
statutory rights are not restricted by our
guarantee presented below.
Terms of Guarantee
The term of the guarantee begins on the
date of purchase. Please retain the original
receipt. This document is required as proof
of purchase.
If a material or manufacturing defect
occurs within three years of the date of
purchase of this product, we will repair or
replace – at our choice – the product for
you free of charge. This guarantee requires
the defective equipment and proof of pur-
chase to be presented within the three-year
period with a brief written description of
what constitutes the defect and when it oc-
curred.
If the defect is covered by our guarantee,
you will receive either the repaired product
or a new product. No new guarantee pe-
riod begins on repair or replacement of the
product.
Guarantee Period and Statutory
Claims for Defects
The guarantee period is not extended by
the guarantee service. This also applies for
replaced or repaired parts. Any damages
and defects already present at the time of
purchase must be reported immediately after unpacking. Repairs arising after expiry
of the guarantee period are chargeable.
Guarantee Cover
The equipment has been carefully produced in accordance with strict quality
guidelines and conscientiously checked
prior to delivery.
The guarantee applies for all material and
manufacturing defects. This guarantee
does not extend to cover product parts
that are subject to normal wear and may
therefore be considered as wearing parts
(e.g. Set of tines) or to cover damage to
breakable parts (e.g. switches, batteries,
or parts made of glass).
This guarantee shall be invalid if the prod-
uct has been damaged, used incorrectly or
38
Page 39

GB MT
not maintained. Precise adherence to all of
the instructions specied in the operating
manual is required for proper use of the
product. Intended uses and actions against
which the operating manual advises or
warns must be categorically avoided.
The product is designed only for private
and not commercial use. The guarantee
will be invalidated in case of misuse or
improper handling, use of force, or inter-
ventions not undertaken by our authorised
service branch.
Processing in Case of Guarantee
To ensure quick handling of you issue,
please follow the following directions:
• Please have the receipt and identica-
tion number (IAN 102836) ready as
proof of purchase for all enquiries.
• Please nd the item number on the rat-
ing plate.
• Should functional errors or other defects occur, please initially contact the
service department specied below by
telephone or by e-mail. You will then
receive further information on the processing of your complaint.
• After consultation with our customer
service, a product recorded as defec-
tive can be sent postage paid to the
service address communicated to you,
with the proof of purchase (receipt)
and specication of what constitutes
the defect and when it occurred. In or-
der to avoid acceptance problems and
additional costs, please be sure to use
only the address communicated to you.
Ensure that the consignment is not sent
carriage forward or by bulky goods,
express or other special freight. Please
send the equipment inc. all accessories
supplied at the time of purchase and
ensure adequate, safe transport pack-
aging.
Repair Service
For a charge, repairs not covered by the
guarantee can be carried out by our service branch, which will be happy to issue
a cost estimate for you.
We can handle only equipment that has
been sent with adequate packaging and
postage.
Attention: Please send your equipment to
our service branch in clean condition and
with an indication of the defect.
Equipment sent carriage forward or by
bulky goods, express or other special
freight will not be accepted.
We will dispose of your defective devices
free of charge when you send them to us.
Service-Center
Service Great Britain
GB
Tel.: 0871 5000 720
(£ 0.10/Min.)
E-Mail: grizzly@lidl.co.uk
IAN 102836
Service Malta
MT
Tel.: 80062230
E-Mail: grizzly@lidl.com.mt
IAN 102836
Importer
Please note that the following address is
not a service address. Please initially con-
tact the service centre specied above.
Grizzly Tools GmbH & Co. KG
Stockstädter Straße 20
63762 Großostheim
Germany
www.grizzly-service.eu
39
Page 40

DE AT CH
Inhalt
Einleitung ...................................40
Bestimmungsgemäße
Verwendung .............................. 40
Allgemeine Beschreibung ..........41
Lieferumfang..................................41
Übersicht ......................................41
Funktionsbeschreibung ....................41
Technische Daten ........................42
Sicherheitshinweise ....................42
Symbole in der Betriebsanleitung .....42
Bildzeichen auf dem Gerät .............. 43
Allgemeine Sicherheitshinweise .......43
Montageanleitung ......................46
Griffholme montieren ...................... 46
Bedienung .................................47
Ein- und Ausschalten ...................... 47
Arbeitshinweise .............................47
Reinigung/Wartung ...................48
Allgemeine Reinigungs- und
Wartungsarbeiten ..........................48
Hackmesser austauschen.................49
Lagerung ...................................49
Entsorgung/Umweltschutz ..........50
Ersatzteile/Zubehör ...................50
Garantie ....................................51
Service-Center ............................52
Importeur ..................................52
Reparatur-Service ......................52
Original EG-Konformitäts-
erklärung ..................................55
Explosionszeichnung ..................57
Einleitung
Herzlichen Glückwunsch zum Kauf Ihres
neuen Gerätes. Sie haben sich damit für
ein hochwertiges Gerät entschieden. Dieses
Gerät wurde während der Produktion auf
Qualität geprüft und einer Endkontrolle
unterzogen. Die Funktionsfähigkeit Ihres
Gerätes ist somit sichergestellt. Es ist nicht
auszuschließen, dass sich in Einzelfällen
am oder im Gerät bzw. in Schlauchleitungen Restmengen von Wasser oder Schmier-
stoffen benden. Dies ist kein Mangel oder
Defekt und kein Grund zur Besorgnis.
Die Betriebsanleitung ist Bestandteil
dieses Gerätes. Sie enthält wichtige
Hinweise für Sicherheit, Gebrauch
und Entsorgung. Machen Sie sich
vor der Benutzung des Gerätes mit
allen Bedien- und Sicherheitshinweisen vertraut. Benutzen Sie das
Gerät nur wie beschrieben und für
die angegebenen Einsatzbereiche.
Bewahren Sie die Betriebsanleitung
gut auf und händigen Sie alle Unterlagen bei Weitergabe des Gerätes
an Dritte mit aus.
Bestimmungsgemäße
Verwendung
Das Gerät ist für das Hacken und Zerkleinern grobscholligen Bodens und für die
Einarbeitung von Dünger, Torf und Kompost
im häuslichen Bereich bestimmt.
Jede andere Verwendung, die in dieser
Betriebsanleitung nicht ausdrücklich zugelassen wird, kann zu Schäden am Gerät
führen und eine ernsthafte Gefahr für den
Benutzer darstellen.
Der Benutzer ist für Unfälle oder Schäden
an anderen Menschen oder deren Eigentum verantwortlich.
40
Page 41

DE AT CH
A
B
C
D
Das Gerät ist zum Gebrauch durch Erwachsene bestimmt. Kinder sowie Personen, die
mit dieser Betriebsanleitung nicht vertraut
sind, dürfen das Gerät nicht benutzen. Die
Benutzung des Gerätes bei Regen oder
feuchter Umgebung ist verboten. Dieses
Gerät ist nicht zur gewerblichen Nutzung
geeignet.
Bei gewerblichem Einsatz erlischt die Garantie.
Der Hersteller haftet nicht für Schäden, die
durch bestimmungswidrigen Gebrauch
oder falsche Bedienung verursacht wurden.
Allgemeine
Beschreibung
Die Abbildung der wichtigsten
Funktionsteile nden Sie auf
der Ausklappseite.
Lieferumfang
Nehmen Sie das Gerät vorsichtig aus der
Packung und prüfen Sie, ob die nachfolgenden Teile vollständig sind:
• Motorgehäuse mit Hackmessern und
Bügelholm.
• 2 Mittelholme
• Rechter Gabelgriff mit Starthebel und
fest montierter Netzanschlussleitung
• Linker Gabelgriff
• Querbügel (Kunststoff)
• Montagezubehör, 2 Kabelklemmen und
Gürtelclip
• Betriebsanleitung
Übersicht
1a Rechter Gabelgriff mit Starthebel,
Entriegelungsknopf und Zugentla-
stung
1b Linker Gabelgriff
2 Netzanschlussleitung
3a große Kabelklemme
3b kleine Kabelklemme
4 Querbügel (Kunststoff)
5 2 Mittelholme
6 Bügelholm
7 Lüftungsschlitze
8 Motorgehäuse
9 Getriebe
10 Antriebswelle
11 Hackmesser
12 Gürtelclip
13 Kreuzschlitzschrauben
14 Schrauben
15 Flügelmuttern
16 Zugentlastung
17 Entriegelungsknopf
18 Starthebel
19 Sechskantschraube
20 selbstsichernde Mutter
Funktionsbeschreibung
Der handgeführte Gartenkultivator ist mit
einem wartungsfreien Elektromotor und
einem Getriebe mit Ölbadschmierung ausgestattet.
Als Schneideinrichtung besitzt das Gerät
2Paar rotierende, gehärtete Hackmesser,
die selbsttätig in den Boden eindringen.
Die Griffholme sind zur besseren Lagerung
klappbar.
Die Funktion der Bedienteile entnehmen Sie
bitte den nachfolgenden Beschreibungen.
41
Page 42

DE AT CH
Technische Daten
Gartenkultivator ..........FGH 710 A1
Aufnahmeleistung des Motors ........ 710 W
Nenneingangsspannung ....230 V~, 50 Hz
Schutzklasse ......................................
Schutzart ....................................... IP 24
Arbeitsbreite ..............................360 mm
Arbeitstiefe .........................max. 180 mm
Anzahl der Hackmesser .........................4
Arbeitsdrehzahl ...............ca. 230 U/min
Gewicht ..................................... 7,85 kg
Schalldruckpegel (L
........................................ K
Schallleistungspegel (L
gemessen .......... 91 dB (A), K
) ................ 81 dB (A)
pA
)
wA
= 3 dB (A)
pA
= 2 dB (A)
wA
garantiert ................................. 93 dB (A)
Vibration am Handgriff (a
) ......... 2,7 m/s
h
.........................................Kh = 1,4 m/s
Lärm- und Vibrationswerte wurden entspre-
chend den in der Konformitätserklärung
genannten Normen und Bestimmungen
ermittelt.
Technische und optische Veränderungen
können im Zuge der Weiterentwicklung
ohne Ankündigung vorgenommen werden.
Alle Maße, Hinweise und Angaben dieser
Betriebsanleitung sind deshalb ohne Ge-
währ. Rechtsansprüche, die aufgrund der
Betriebsanleitung gestellt werden, können
daher nicht geltend gemacht werden.
II
Warnung: Der Schwingungsemis-
sionswert kann sich während der
tatsächlichen Benutzung des Elektrowerkzeugs von dem Angabewert
unterscheiden, abhängig von der Art
und Weise, in der das Elektrowerkzeug verwendet wird.
Es besteht die Notwendigkeit, Sicherheitsmaßnahmen zum Schutz
des Bedieners festzulegen, die auf
einer Abschätzung der Aussetzung
während der tatsächlichen Benutzungsbedingungen beruhen (hierbei
sind alle Anteile des Betriebszyklus
zu berücksichtigen, beispielsweise
Zeiten, in denen das Elektrowerkzeug abgeschaltet ist und solche,
2
2
in denen es zwar eingeschaltet ist,
aber ohne Belastung läuft).
Sicherheitshinweise
Dieser Abschnitt behandelt die grundlegen-
den Sicherheitsvorschriften bei der Arbeit
mit dem Gartenkultivator.
Symbole in der
Betriebsanleitung
Gefahrenzeichen mit Angaben
zur Verhütung von Personenoder Sachschäden.
Der angegebene Schwingungsemissions-
wert ist nach einem genormten Prüfverfahren gemessen worden und kann zum
Vergleich eines Elektrowerkzeugs mit einem
anderen verwendet werden.
Der angegebene Schwingungsemissionswert kann auch zu einer einleitenden
Einschätzung der Aussetzung verwendet
werden.
42
Gebotszeichen (anstelle des Ausru-
fungszeichens ist das Gebot erläutert) mit Angaben zur Verhütung von
Schäden.
Hinweiszeichen mit Informationen
zum besseren Umgang mit dem Gerät.
Page 43

DE AT CH
Bildzeichen auf dem Gerät
Achtung!
Betriebsanleitung lesen.
Achtung! Vor Regen und
Nässe schützen.
Verletzungsgefahr durch wegge-
schleuderte Teile! Umstehende Per-
sonen aus dem Gefahrenbereich
fernhalten.
Achtung! Vor Reinigungs- und
Wartungsarbeiten Gerät ausschalten und Netzstecker ziehen.
Gefahr durch beschädigte Netz-
anschlussleitung! Netzanschlussleitung von den Hackmessern
fernhalten.
Verletzungsgefahr durch rotieren-
de Teile! Nach dem Ausschalten
laufen Hackmesser nach. Stillstand
abwarten.
L
WA
Angabe des Schallleistungspegels
dB
L
in dB.
WA
Schutzklasse II
Elektrogeräte gehören nicht in den
Hausmüll.
Allgemeine
Sicherheitshinweise
Warnung! Dieses Gerät kann bei
unsachgemäßem Gebrauch ernst-
hafte Verletzungen verursachen.
Bevor Sie mit dem Gerät arbeiten,
lesen Sie sorgfältig die Betriebsanleitung und machen Sie sich mit
allen Bedienteilen gut vertraut.
Wenn die Anschlussleitung dieses
Gerätes beschädigt wird, muss sie
durch eine besondere Anschlussleitung ersetzt werden, die vom Hersteller oder seinem Kundendienst
erhältlich ist.
Lesen Sie zudem folgende Sicher-
heitshinweise, um Personen- und
Sachschäden zu vermeiden:
Vorbereitung:
• Dieses Gerät ist nicht dafür bestimmt,
durch Personen mit eingeschränk-
ten physischen, sensorischen oder
geistigen Fähigkeiten oder mangels
Erfahrung und/oder mangels Wissen
benutzt zu werden; es sei denn, sie
werden durch eine für ihre Sicherheit
zuständige Person beaufsichtigt oder
erhalten von ihr Anweisungen, wie das
Gerät zu benutzen ist.
• Kinder müssen beaufsichtigt werden,
um sicherzustellen, dass sie nicht mit
dem Gerät spielen.
• Das Gerät darf nur von ausreichend
geschulten Personen betrieben werden.
• Erlauben Sie niemals Kindern und
anderen Personen, die die Betriebsan-
leitung nicht kennen, das Gerät zu be-
nutzen. Örtliche Bestimmungen können
das Mindestalter der Bedienungsperson
festlegen.
43
Page 44

DE AT CH
• Setzen Sie das Gerät niemals ein, während Personen, besonders Kinder und
Haustiere, in der Nähe sind.
• Denken Sie daran, dass der Benutzer
für Unfälle mit anderen Personen oder
deren Eigentum verantwortlich ist.
• Machen Sie sich mit Ihrer Umgebung
vertraut und achten Sie auf mögliche
Gefahren, die beim Arbeiten unter Um-
ständen überhört werden können.
• Überprüfen Sie das Gelände, auf dem
das Gerät eingesetzt wird und entfer-
nen Sie Steine, Stöcke, Drähte oder
andere Fremdkörper, die erfasst und
weggeschleudert werden können.
• Tragen Sie geeignete Arbeitskleidung
wie festes Schuhwerk mit rutschfester
Sohle und eine robuste, lange Hose.
Benutzen Sie das Gerät nicht, wenn
Sie barfuß gehen oder offene Sandalen tragen.
• Tragen Sie persönliche Schutzausrüstung und immer eine Schutzbrille. Das
Tragen persönlicher Schutzausrüstung,
wie rutschfeste Sicherheitsschuhe,
Schutzhelm oder Gehörschutz verringert das Risiko von Verletzungen.
• Schalten Sie zur Vermeidung von
Schnittverletzungen das Gerät nicht
ein, wenn es sich nicht in Arbeitspositi-
on bendet.
• Führen Sie vor jeder Benutzung eine
Sichtprüfung des Gerätes durch. Benutzen Sie das Gerät nicht, wenn Sicherheitseinrichtungen (z.B. Einschaltsperre oder Sicherheitsabdeckung), Teile
der Schneideinrichtung oder Bolzen
fehlen, abgenutzt oder beschädigt
sind. Prüfen Sie insbesondere die Netz-
anschlussleitung und den Starthebel
auf Beschädigung.
• Zur Vermeidung einer Unwucht dürfen
beschädigte Werkzeuge und Bolzen
nur satzweise ausgetauscht werden.
• Benutzen Sie nur Ersatz- und Zubehörteile, die vom Hersteller geliefert und
empfohlen werden. Der Einsatz von
Fremdteilen führt zum sofortigen Verlust
des Garantieanspruches.
Arbeiten mit dem Gerät:
Halten Sie Füße und Hände beim
Arbeiten, insbesondere bei der Inbetriebnahme, von den Hackmessern
fern. Es besteht Verletzungsgefahr!
• Beachten Sie den Lärmschutz und ört-
liche Vorschriften.
• Das Gerät darf nicht zum Zerkleinern
von Steinen oder zum Umgraben von
Rasenächen verwendet werden. Es
besteht die Gefahr, das Gerät zu be-
schädigen.
• Benutzen Sie das Gerät nicht bei
Regen, bei schlechter Witterung, in
feuchter Umgebung (wie z.B. an Gartenteichen oder Schwimmbecken). Arbeiten Sie nur bei Tageslicht oder guter
Beleuchtung.
• Gehen Sie mit Vernunft an die Arbeit.
Arbeiten Sie mit dem Gerät nicht, wenn
Sie müde oder unkonzentriert sind oder
nach der Einnahme von Alkohol oder
Tabletten. Legen Sie immer rechtzeitig
eine Arbeitspause ein.
• Achten Sie beim Arbeiten auf einen
sicheren Stand, insbesondere an Hängen. Arbeiten Sie immer quer zum
Hang, niemals auf- oder abwärts.
Seien Sie besonders vorsichtig, wenn
Sie die Fahrtrichtung am Hang ändern.
Arbeiten Sie nicht an übermäßig steilen
Hängen.
• Besteht im abschüssigen Gelände die
Gefahr des Abrutschens, so ist das
44
Page 45

DE AT CH
Gerät von einer Begleitperson mit einer
Stange oder einem Seil zu halten. Die
Begleitperson muss sich oberhalb des
Gerätes in ausreichendem Abstand von
den Arbeitswerkzeugen benden.
• Halten Sie das Gerät während der Ar-
beit immer mit beiden Händen gut fest.
• Führen Sie das Gerät nur im Schritttempo.
• Achten Sie darauf, dass die Griffe trocken und sauber sind.
Achtung beim Rückwärtsgehen. Es be-
steht Stolpergefahr!
• Seien Sie besonders vorsichtig, wenn
Sie das Gerät wenden oder zu sich heranziehen.
• Falls es zu einer Blockierung der Hackmesser durch einen Fremdkörper kommt,
schalten Sie das Gerät aus und ziehen
Sie den Netzstecker. Entfernen Sie den
Fremdkörper (z.B. Wurzel), bevor Sie
das Gerät wieder in Betrieb nehmen.
• Arbeiten Sie nicht mit einem beschädigten, unvollständigen oder ohne die
Zustimmung des Herstellers umgebauten
Gerät. Arbeiten Sie insbesondere nicht
mit beschädigten oder fehlenden Sicherheitseinrichtungen.
• Überlasten Sie Ihr Gerät nicht. Arbeiten
Sie nur im angegebenen Leistungsbereich. Verwenden Sie keine leistungs-
schwachen Geräte für schwere Arbeiten. Benutzen Sie Ihr Gerät nicht für
Zwecke, für die es nicht bestimmt ist.
• Vermeiden Sie Beschädigungen am Ge-
rät. Bringen Sie keine Zusatzgewichte
an und ziehen Sie das Gerät nicht über
festen Untergrund wie Fliesen oder Treppen.
• Entfernen Sie regelmäßig Panzen und
Wurzelreste im Bereich der Antriebswelle. Sie vermeiden damit eine Überlastung und Beschädigung des Gerätes.
Arbeitsunterbrechungen:
Achtung! Nach dem Ausschalten
des Gerätes drehen sich die Hack-
messer noch für einige Sekunden
nach. Warten Sie, bis die Hackmesser stillstehen. Es besteht Verlet-
zungsgefahr.
• Das Gerät darf nicht angehoben oder
transportiert werden, solange der Mo-
tor läuft. Schalten Sie beim Wechseln
des Arbeitsbereiches das Gerät ab und
warten Sie, bis die Hackmesser stillste-
hen. Ziehen Sie dann den Netzstecker.
• Hinterlassen Sie das Gerät nie unbeauf-
sichtigt am Arbeitsplatz.
• Schalten Sie das Gerät aus, warten Sie
auf den Stillstand der Hackmesser und
ziehen Sie den Netzstecker:
- immer, wenn Sie das Gerät verlassen,
- wenn Sie Boden- und Panzenteile
entfernen,
- wenn das Gerät nicht verwendet
wird,
- bei allen Wartungs- und Reinigungsarbeiten,
- wenn die Anschlussleitung beschädigt oder verheddert ist,
- wenn das Gerät beim Arbeiten auf
ein Hindernis trifft oder wenn ungewohnte Vibrationen auftreten. Unter-
suchen Sie in diesem Fall das Gerät
auf Beschädigungen und lassen Sie
es ggf. reparieren.
• Benutzen Sie das Gerät nicht in der
Nähe von entzündbaren Flüssigkeiten
oder Gasen. Bei Nichtbeachtung be-
steht Brand- oder Explo sions gefahr.
Wartung und Lagerung:
• Sorgen Sie dafür, dass alle Muttern,
Bolzen und Schrauben fest angezogen
45
Page 46

DE AT CH
B
sind und das Gerät in einem sicheren
Arbeitszustand ist.
• Versuchen Sie nicht, das Gerät selbst
zu reparieren, es sei denn, Sie besitzen
hierfür eine Ausbildung. Lassen Sie
sämtliche Arbeiten, die nicht in dieser
Betriebsanleitung angegeben werden,
von unserem Service-Center ausführen.
• Bewahren Sie das Gerät an einem
trockenen Ort und außerhalb der Reich-
weite von Kindern auf.
• Behandeln Sie Ihr Gerät mit Sorgfalt.
Halten Sie die Werkzeuge scharf und
sauber, um besser und sicherer arbeiten zu können.
• Befolgen Sie die Wartungsvorschriften.
Elektrische Sicherheit:
Achtung! Das Gerät darf nur bei
unbeschädigtem Anschluss- und Verlängerungskabel benutzt werden.
Es besteht Gefahr durch elektrischen
Schlag.
• Halten Sie die Netzanschlussleitung
von den Schneidwerkzeugen fern.
Führen Sie die Netzanschlussleitung
grundsätzlich hinter der Bedienungsperson. Wird die Netzanschlussleitung
während des Gebrauchs beschädigt,
trennen Sie sie sofort vom Netz.
Berühren Sie auf keinen Fall die Netzanschlussleitung, solange der Netzstecker nicht gezogen ist.
• Achten Sie darauf, dass die Nenneingangsspannung mit den Angaben des
Typenschildes übereinstimmt.
• Vermeiden Sie Körperberührungen mit
geerdeten Teilen (z.B. Metallzäune,
Metallpfosten).
• Die Kupplung des Verlängerungskabels
muss vor Spritzwasser geschützt sein,
aus Gummi bestehen oder mit Gummi
überzogen sein. Verwenden Sie nur Ver-
längerungskabel, die für den Gebrauch
im Freien bestimmt sind und entsprechend gekennzeichnet sind. Der Litzenquerschnitt des Verlängerungskabels
muss mindestens 2,5 mm
Rollen Sie eine Kabeltrommel vor Ge-
brauch immer ganz ab. Überprüfen Sie
das Verlängerungskabel auf Schäden.
• Verwenden Sie für die Anbringung des
Verlängerungskabels die dafür vorgesehene Zugentlastung.
• Tragen Sie das Gerät nicht an der
Netzanschlussleitung. Benutzen Sie
die Netzanschlussleitung nicht, um den
Netzstecker aus der Steckdose zu ziehen. Schützen Sie die Netzanschlusslei-
tung vor Hitze, Öl und scharfen Kanten.
• Schließen Sie das Gerät nur an eine
Steckdose mit Fehlerstrom-Schutzeinrichtung (FI-Schalter/RCD) mit einem Auslösestrom von nicht mehr als 30 mA an.
2
betragen.
Montageanleitung
Ziehen Sie vor allen Arbeiten an
dem Gerät den Netzstecker.
Achten Sie bei der Montage darauf,
dass die Netzanschlussleitung (2)
nicht eingeklemmt wird und genügend Spiel hat.
Griffholme montieren
1. Schieben Sie die beiden Gabel-
griffe (1a/1b) in den Querbügel
(4). Schrauben Sie den Querbügel
mit den beiliegenden Kreuzschlitzschrauben (13) von hinten an den
Holmen der Gabelgriffe fest.
2. Schrauben Sie die beiden Mittel-
holme (5) an den Gabelgriffen
(1a/1b) an. Dazu schieben Sie
46
Page 47

DE AT CH
A
A
C
A
die beiliegenden Schrauben (14)
von außen nach innen durch die
Bohrungen und schrauben sie mit
den Flügelmuttern (15) fest.
3. Positionieren Sie die Griffholme
mit den Rohrenden seitlich rechts
und links am unteren Bügelholm
(
6) und schrauben dieses mit
den beiliegenden Schrauben (14)
und Flügelmuttern (15) fest.
Bei richtiger Montage zeigen die
Griff-Enden weg von der Gerätevorderseite mit den Lüftungsschlitzen
(siehe
4. Fixieren Sie die Netzanschluss-
- Kabelklemme mit großer Öff-
- Kabelklemme mit kleiner Öff-
7).
leitung (2) mit den beiliegenden
Kabelklemmen:
nung (3a) oberhalb des Querbügels,
nung (3b) am Holm.
Bedienung
3. Schließen Sie das Gerät an die
Netzspannung an.
4. Hängen Sie das Verlängerungskabel in den Gürtelclip (12) ein und
befestigen Sie diesen am Hosengürtel.
5. Zum Einschalten drücken Sie
den Entriegelungsknopf (17) am
Gabelgriff und danach den Start-
hebel (18). Lassen Sie den Entrie-
gelungsknopf los (17).
Die Hackmesser (
nen zu rotieren und graben sich
in den Boden ein.
6. Zum Ausschalten lassen Sie den
Starthebel (18) los.
Achtung! Nach dem Ausschal-
ten des Gerätes drehen sich
die Hackmesser (11) noch für
einige Sekunden nach. Berühren Sie die rotierenden Hackmesser (11) nicht. Es besteht
Verletzungsgefahr.
11) begin-
Arbeitshinweise
Beachten Sie den Lärmschutz und
örtliche Vorschriften.
Ein- und Ausschalten
Achten Sie vor dem Einschalten da-
rauf, dass das Gerät keine Gegenstände berührt und halten Sie es mit
beiden Händen gut fest.
1. Schließen Sie das Verlängerungskabel an den Netzstecker des
Gerätes an.
2. Zur Zugentlastung formen Sie aus
dem Ende des Verlängerungska-
bels eine Schlaufe und hängen diese in die Zugentlastung (16) ein.
Halten Sie das Gerät während
der Arbeit immer mit beiden
Händen gut fest und achten
Sie auf Ihre Füße.
Es besteht Unfallgefahr durch
die Hackmesser (11).
Achtung beim Rückwärtsgehen. Es besteht Stolpergefahr!
Getriebe nicht berühren -
kann nach längerem Arbeiten
heiß werden. Es besteht Verbrennungsgefahr!
Schalten Sie nach der Arbeit und
zum Transport das Gerät aus, ziehen Sie den Netzstecker und warten
47
Page 48

DE AT CH
Sie den Stillstand der Hackmesser
(11) ab.
Um Verletzungen und
Schäden zu vermeiden:
• Heben oder ziehen Sie das Ge-
rät niemals mit laufendem Motor.
• Heben Sie das Gerät zum Trans-
port über feste Oberächen wie
Fliesen oder Treppen an.
• Führen Sie das Gerät im Schritttempo in möglichst geraden Bahnen durch den Boden.
• Arbeiten Sie stets von der Steckdose weggehend. Achten Sie
darauf, dass das Kabel vom
Arbeitsbereich fern bleibt. Der
im Lieferumfang enthaltene Gür-
telclip (12) zum Einhängen des
Verlängerungskabels hilft Ihnen
dabei.
Überlastschutz: Bei Überlastung
schaltet der Motor automatisch ab.
Das Gerät ist erst nach vollständiger Abkühlung wieder betriebsbereit.
Reinigung/Wartung
Lassen Sie Arbeiten, die nicht in die-
ser Betriebsanleitung beschrieben
sind, von unserem Service-Center
durchführen. Verwenden Sie nur
Originalteile.
Schalten Sie vor allen Wartungs-
und Reinigungsarbeiten das Gerät
aus, ziehen Sie den Netzstecker
und warten Sie den Stillstand der
Hackmesser (11) ab. Es besteht
Verletzungsgefahr und die Gefahr
eines Stromschlags.
Führen Sie folgende Wartungs- und Reinigungsarbeiten regelmäßig durch. Dadurch
ist eine lange und zuverlässige Nutzung
gewährleistet:
Allgemeine Reinigungs- und
Wartungsarbeiten
Spritzen Sie das Gerät nicht
mit Wasser ab und reinigen
Sie es nicht unter ießendem
Wasser. Es besteht Gefahr von
Stromschlag und das Gerät
könnte beschädigt werden.
Tragen Sie bei Reinigungs- und
Wartungsarbeiten Schutzhandschuhe, um Schnittverletzungen zu
vermeiden.
Reinigen Sie das Gerät nach jedem Gebrauch gründlich. Halten Sie das Gerät
stets sauber. Verwenden Sie keine Reinigungs- bzw. Lösungsmittel.
• Entfernen Sie anhaftende Boden- und
Schmutzreste an Hackmessern (11) ,
Antriebswelle (10), Geräteoberäche
und Lüftungsschlitzen (7) mit einer Bür-
ste oder trockenem Lappen.
• Sprühen oder reiben Sie die Hackmesser (11) mit einem biologisch abbaubaren Öl ein.
• Reinigen Sie verschmutzte Griffe mit
einem feuchten Tuch.
• Kontrollieren Sie das Gerät vor jedem
Gebrauch auf offensichtliche Mängel
wie lose, abgenutzte oder beschädigte
Teile. Prüfen Sie den festen Sitz aller
Muttern, Bolzen und Schrauben.
• Überprüfen Sie Abdeckungen und
Schutzeinrichtungen auf Beschädi-
gungen und korrekten Sitz. Tauschen
Sie diese gegebenenfalls aus.
48
Page 49

DE AT CH
D
D
D
E
Hackmesser austauschen
Das Gerät ist mit vier Hackmessern (11)
ausgestattet, die problemlos paarweise zu
wechseln sind. Beide Hackmesserpaare
sind wahlweise links oder rechts einsetzbar.
Tauschen Sie immer beide
Messerpaare gleichzeitig aus,
um Schäden durch Unwucht
am Gerät zu vermeiden.
Schalten Sie das Gerät aus, ziehen
Sie den Netzstecker und warten Sie
den Stillstand der Hackmesser (11)
ab.
1. Lösen Sie die Sechskantschraube
(19) und die selbstsichernde
Mutter (20) am Hackmesserpaar
(11).
2. Ziehen Sie das Hackmesserpaar
von der Antriebswelle (10) ab.
3. Reinigen Sie die Antriebswelle
(10) mit biologisch abbaubarem
Öl.
4. Schieben Sie das neue Hackmes
ser (11) so auf die Antriebswelle
(10) auf, dass die Bohrungen
der Messerachse mit den Boh
rungen auf der Antriebswelle
(10) übereinstimmen (siehe
).
Achten Sie auf die korrekte Dreh-
richtung der Hackmesser (11). Die
Pfeile auf Getriebe (9) und Hack
messer (11) müssen in die gleiche
Richtung zeigen (siehe
-
-
).
rung und schrauben Sie eine
neue selbstsichernde Mutter (im
Lieferumfang eines neuen Hack
messers enthalten) auf (siehe D
).
Lagerung
• Lassen Sie den Motor abkühlen, bevor
Sie das Gerät in geschlossenen Räu
men abstellen.
• Bewahren Sie das Gerät gereinigt, tro
cken und außerhalb der Reichweite von
Kindern auf.
• Umhüllen Sie das Gerät nicht mit Kunst-
stoffsäcken, da sich Feuchtigkeit bilden
könnte.
Gerät zusammenklappen
Um Platz zu sparen, kann das Gerät zusammengeklappt werden.
Lockern Sie die Flügelmuttern (15)
und klappen Sie die Griffholme zusammen.
Der Bügelholm (6) dient auch zur
-
Aufhängung am Aufbewahrungsort.
Die Kabel dürfen dabei nicht eingeklemmt werden.
Das Gerät darf nicht mit
umgeklapptem Griffholm
benutzt werden. Es besteht
Verletzungsgefahr.
-
-
-
5. Schieben Sie die Sechskant
schraube (19) durch die Boh-
-
49
Page 50

DE AT CH
Entsorgung/
Umweltschutz
Führen Sie Gerät, Zubehör und Verpackung
einer umweltgerechten Wiederverwertung
zu.
Elektrogeräte gehören nicht in den
Hausmüll.
• Geben Sie das Gerät an einer Verwertungsstelle ab. Die verwendeten Kunst-
stoff- und Metallteile können sortenrein
getrennt werden und so einer Wieder-
verwertung zugeführt werden. Fragen
Sie hierzu unser Service-Center.
• Zur Entsorgung der Verpackung geben
Sie den Karton zum Papiermüll. Kunst-
stoffteile führen Sie dem Dualen System
zu.
Ersatzteile/Zubehör
Ersatzteile und Zubehör
erhalten Sie unter
www.grizzly-shop.de oder
www.grizzly-service.eu
Sollten Sie kein Internet haben, so wenden
Sie sich bitte telefonisch an das ServiceCenter (siehe Seite52). Halten Sie die
unten genannte Bestellnummer bereit.
Hackmesser-Satz
rechts/links ............. Bestellnr. 30261000
50
Page 51

DE AT CH
Garantie
Sehr geehrte Kundin, sehr geehrter Kunde,
Sie erhalten auf dieses Gerät 3 Jahre Garantie ab Kaufdatum.
Im Falle von Mängeln dieses Geräts stehen
Ihnen gegen den Verkäufer des Geräts
gesetzliche Rechte zu. Diese gesetzlichen
Rechte werden durch unsere im Folgenden
dargestellte Garantie nicht eingeschränkt.
Garantiebedingungen
Die Garantiefrist beginnt mit dem Kaufdatum. Bitte bewahren Sie den Original-
Kassenbon gut auf. Diese Unterlage wird
als Nachweis für den Kauf benötigt.
Tritt innerhalb von drei Jahren ab dem
Kaufdatum dieses Geräts ein Material- oder
Fabrikationsfehler auf, wird das Gerät von
uns – nach unserer Wahl – für Sie kostenlos
repariert oder ersetzt. Diese Garantieleistung setzt voraus, dass innerhalb der
Drei-Jahres-Frist das defekte Gerät und
der Kaufbeleg (Kassenbon) vorgelegt und
schriftlich kurz beschrieben wird, worin der
Mangel besteht und wann er aufgetreten ist.
Wenn der Defekt von unserer Garantie
gedeckt ist, erhalten Sie das reparierte oder
ein neues Gerät zurück. Mit Reparatur oder
Austausch des Geräts beginnt kein neuer
Garantiezeitraum.
Garantieumfang
Das Gerät wurde nach strengen Qualitäts-
richtlinien sorgfältig produziert und vor
Anlieferung gewissenhaft geprüft.
Die Garantieleistung gilt für Material- oder
Fabrikationsfehler. Diese Garantie erstreckt
sich nicht auf Geräteteile, die normaler
Abnutzung ausgesetzt sind und daher als
Verschleißteile angesehen werden können
(z.B. Hackmesser) oder für Beschädigungen an zerbrechlichen Teilen (z.B.
Schalter, Akkus oder die aus Glas gefertigt
sind).
Diese Garantie verfällt, wenn das Gerät
beschädigt, nicht sachgemäß benutzt oder
nicht gewartet wurde. Für eine sachgemäße
Benutzung des Geräts sind alle in der Be-
triebsanleitung aufgeführten Anweisungen
genau einzuhalten. Verwendungszwecke
und Handlungen, von denen in der
Betriebsanleitung abgeraten oder vor denen
gewarnt wird, sind unbedingt zu
vermeiden.
Das Gerät ist lediglich für den privaten
und nicht für den gewerblichen Gebrauch
bestimmt. Bei missbräuchlicher und unsachgemäßer Behandlung, Gewaltanwendung
und bei Eingriffen, die nicht von unserer
autorisierten Service-Niederlassung vorgenommen wurden, erlischt die Garantie.
Garantiezeit und gesetzliche
Mängelansprüche
Die Garantiezeit wird durch die Gewährleistung nicht verlängert. Dies gilt auch
für ersetzte und reparierte Teile. Eventuell
schon beim Kauf vorhandene Schäden und
Mängel müssen sofort nach dem Auspacken gemeldet werden. Nach Ablauf der
Garantiezeit anfallende Reparaturen sind
kostenpichtig.
Abwicklung im Garantiefall
Um eine schnelle Bearbeitung Ihres Anlie-
gens zu gewährleisten, folgen Sie bitte den
folgenden Hinweisen:
• Bitte halten Sie für alle Anfragen den
Kassenbon und die Identikationsnummer (IAN102836) als Nachweis für
den Kauf bereit.
• Die Artikelnummer entnehmen Sie bitte
dem Typenschild.
• Sollten Funktionsfehler oder sonstige
51
Page 52

DE AT CH
Mängel auftreten kontaktieren Sie
zunächst die nachfolgend benannte
Serviceabteilung telefonisch oder per
E-Mail. Sie erhalten dann weitere In-
formationen über die Abwicklung Ihrer
Reklamation.
• Ein als defekt erfasstes Gerät können
Sie, nach Rücksprache mit unserem
Kundenservice, unter Beifügung des
Kaufbelegs (Kassenbons) und der
Angabe, worin der Mangel besteht
und wann er aufgetreten ist, für Sie
portofrei an die Ihnen mitgeteilte
Service-Anschrift übersenden. Um Annahmeprobleme und Zusatzkosten zu
vermeiden, benutzen Sie unbedingt nur
die Adresse, die Ihnen mitgeteilt wird.
Stellen Sie sicher, dass der Versand
nicht unfrei, per Sperrgut, Express oder
sonstiger Sonderfracht erfolgt. Senden
Sie das Gerät bitte inkl. aller beim
Kauf mitgelieferten Zubehörteile ein
und sorgen Sie für eine ausreichend
sichere Transportverpackung.
Reparatur-Service
Service-Center
Service Deutschland
DE
Tel.: 0800 54 35 111
E-Mail: grizzly@lidl.de
IAN 102836
Service Österreich
AT
Tel.: 0820 201 222
(0,15 EUR/Min.)
E-Mail: grizzly@lidl.at
IAN 102836
Service Schweiz
CH
Tel.: 0842 665566
(0,08 CHF/Min.,
Mobilfunk max. 0,40 CHF/Min.)
E-Mail: grizzly@lidl.ch
IAN 102836
Importeur
Bitte beachten Sie, dass die folgende
Anschrift keine Serviceanschrift ist. Kon-
taktieren Sie zunächst das oben genannte
Service-Center.
Sie können Reparaturen, die nicht der Ga-
rantie unterliegen, gegen Berechnung von
unserer Service-Niederlassung durchführen
lassen. Sie erstellt Ihnen gerne einen
Kostenvoranschlag.
Wir können nur Geräte bearbeiten, die
ausreichend verpackt und frankiert eingesandt wurden.
Achtung: Bitte senden Sie Ihr Gerät gerei-
nigt und mit Hinweis auf den Defekt an
unsere Service-Niederlassung.
Nicht angenommen werden unfrei - per
Sperrgut, Express oder mit sonstiger Son-
derfracht - eingeschickte Geräte.
Die Entsorgung Ihrer defekten eingesendeten Geräte führen wir kostenlos durch.
52
Grizzly Tools GmbH & Co. KG
Stockstädter Straße 20
D-63762 Großostheim
www.grizzly-service.eu
Page 53

IT
MT
Traduzione della di-
chiarazione di con-
formità CE originale
PT
Tradução do original
da Declaração de
conformidade CE
Con la presente dichiariamo che
Elettrozappa
serie di costruzione FGH 710 A1
Numero di serie
201410000001 - 201412099208
a partire corrisponde alle seguenti direttive UE in materia nella rispettiva versione
valida:
Vimos, por este meio, declarar que o
Moto enxada eléctrica
da série FGH 710 A1
Número de série
201410000001 - 201412099208
no que diz respeito corresponde às respectivas normas da UE na sua versão em vigor:
2006/42/EC • 2004/108/EC • 2000/14/EC • 2005/88/EC • 2011/65/EU*
Per garantire la conformità sono state applicate le seguenti norme armonizzate e
anche le norme e disposizioni nazionali
che seguono:
Para garantir a conformidade, foram aplicadas as seguintes normas harmonizadas
bem como normas e disposições nacionais:
EN 709/A4:2009 • EN 60335-1:2012 • EN 62233:2008
EN 55014-1/A2:2011 • EN 55014-2/A2:2008
EN 61000-3-2/A2:2009 • EN 61000-3-3:2008
Si dichiara inoltre in conformità alla direttiva 2000/14/EC sull’emissione acustica
ambientale:
Livello di potenza sonora
garantita: 93 dB(A)
misurata: 91 dB(A)
Procedura della valutazione della con-
formità applicata come da allegato VI /
2000/14/EC
Autorità registrata: TÜV Süd, NB 0036
Il produttore è il solo responsabile della
stesura della presente dichiarazione di
conformità (14)**:
Adicionalmente declara-se de acordo com a
Directiva de Emissões Sonoras para o Ambiente da União Europeia 2000/14/EC:
Nível de potência acústica
garantido: 93 dB(A)
medido: 91 dB(A)
Foi aplicado o procedimento de avaliação
de conformidade de acordo com o Anexo VI
/ 2000/14/EC
Registado em: TÜV Süd, NB 0036
O fabricante é o único responsável pela
emissão desta declaração de conformidade
(14)**:
Grizzly Tools GmbH & Co. KG
Stockstädter Straße 20
D-63762 Großostheim, Germany
15.01.2015
* L’oggetto descritto sopra è conforme alle prescrizioni
della Direttiva 2011/65/EU del Parlamento Europeo e
del Consiglio dell’8 giugno 2011 sulla restrizione dell’uso di determinate sostanze pericolose nelle apparecchiature elettriche ed elettroniche.
V. Lappas (Encarregado de documentação,
Responsabile documentazione tecnica)
* O objeto acima descrito da declaração cumpre as
normas da diretiva 2011/65/UE do Parlamento Europeu e do Conselho do dia 8 de junho de 2011 sobre a
restrição da utilização de determinadas substâncias em
aparelhos elétricos e eletrónicos.
53
Page 54

GB
MT
Translation of the original
EC declaration of conformity
We hereby conrm that the
FGH 710 A1 series
garden cultivator
Serial number
201410000001 - 201412099208
conforms with the following applicable relevant version of the EU guidelines:
2006/42/EC • 2004/108/EC • 2000/14/EC • 2005/88/EC • 2011/65/EU*
In order to guarantee consistency, the following harmonised standards as well as national standards and stipulations have been applied:
EN 709/A4:2009 • EN 60335-1:2012 • EN 62233:2008
EN 55014-1/A2:2011 • EN 55014-2/A2:2008
EN 61000-3-2/A2:2009 • EN 61000-3-3:2008
We additionally conrm the following in accordance with the 2000/14/EC emissions
guideline:
Sound power level
Guaranteed: 93 dB(A)
Measured: 91 dB(A)
Compliance evaluation process accordance with appendix VI, 2000/14/EC
Registered Ofce: TÜV Süd, NB 0036
This declaration of conformity is issued under the sole responsibility of the manufactu-
rer:
Grizzly Tools GmbH & Co. KG
Stockstädter Straße 20
D-63762 Großostheim,
Germany
15.01.2015
* The object of the declaration described above satises the provisions of Directive 2011/65/EU of the European
Parliament and the Council of 8 June 2011 on limiting the use of certain harmful substances in electrical and electronic appliances.
Volker Lappas
Documentation Representative
54
Page 55

DE
AT
Original EG Konformitätserklärung
CH
Hiermit bestätigen wir, dass die
Gartenkultivator
Baureihe FGH 710 A1
Seriennummer
201410000001 - 201412099208
folgenden einschlägigen EU-Richtlinien in ihrer jeweils gültigen Fassung entspricht:
2006/42/EG • 2004/108/EG • 2000/14/EG • 2005/88/EG • 2011/65/EU*
Um die Übereinstimmung zu gewährleisten, wurden folgende harmonisierte Normen
sowie nationale Normen und Bestimmungen angewendet:
EN 709/A4:2009 • EN 60335-1:2012 • EN 62233:2008
EN 55014-1/A2:2011 • EN 55014-2/A2:2008
EN 61000-3-2/A2:2009 • EN 61000-3-3:2008
Zusätzlich wird entsprechend der Geräuschemissionsrichtlinie 2000/14/EG bestätigt:
Schallleistungspegel
Garantiert: 93 dB(A)
Gemessen: 91 dB(A)
Angewendetes Konformitätsbewertungsverfahren entsprechend
Anh. VI / 2000/14/EG
Benannte Stelle: TÜV Süd, NB 0036
Die alleinige Verantwortung für die Ausstellung dieser Konformitätserklärung trägt der
Hersteller:
Grizzly Tools GmbH & Co. KG
Stockstädter Straße 20
D-63762 Großostheim,
Germany
15.01.2015
* Der oben beschriebene Gegenstand der Erklärung erfüllt die Vorschriften der Richtlinie 2011/65/EU des
Europäischen Parlaments und des Rates vom 8. Juni 2011 zur Beschränkung der Verwendung bestimmter gefährlicher Stoffe in Elektro- und Elektronikgeräten.
Volker Lappas
Dokumentationsbevollmächtigter
55
Page 56

56
Page 57

Vista esplosa • Designação de explosão
Explosionszeichnung • Exploded Drawing
FGH 710 A1
17
18
19
20
21
22
23 26 27
16
15
14
13
12
62
61
60
63
37
57
64
59
58
38
4 378 5
2
1
6
6665
68
67
50
49
48
43
42
41
40
39
6
9
10
11
56
55
54
53
52
51
282524
313029
32
33 34
36
35
72
71
70
69
7 6
47
46
45
44
informativo, informativ, informative
2014-11-19_rev02_gs
57
Page 58

GRIZZLY TOOLS GMBH & CO. KG
Stockstädter Straße 20
D-63762 Großostheim
Versione delle informazioni · Estado das
informações · Last Information Update
Stand der Informationen: 09 / 2014
Ident.-No.: 76005563092014-IT/PT
IAN 102836
 Loading...