


User's Guide
NPD5128-00 EN
User's Guide
Copyright
Copyright
No part of this publication may be reproduced, stored in a retrieval system, or transmitted in any form or by any means, electronic, mechanical, photocopying, recording, or otherwise, without the prior written permission of Seiko Epson Corporation. No patent liability is assumed with respect to the use of the information contained herein. Neither is any liability assumed for damages resulting from the use of the information herein. The information contained herein is designed only for use with this Epson printer. Epson is not responsible for any use of this information as applied to other printers.
Neither Seiko Epson Corporation nor its affiliates shall be liable to the purchaser of this product or third parties for damages, losses, costs, or expenses incurred by the purchaser or third parties as a result of accident, misuse, or abuse of this product or unauthorized modifications, repairs, or alterations to this product, or (excluding the U.S.) failure to strictly comply with Seiko Epson Corporation's operating and maintenance instructions.
Seiko Epson Corporation and its affiliates shall not be liable for any damages or problems arising from the use of any options or any consumable products other than those designated as Original Epson Products or Epson Approved Products by Seiko Epson Corporation.
Seiko Epson Corporation shall not be held liable for any damage resulting from electromagnetic interference that occurs from the use of any interface cables other than those designated as Epson Approved Products by Seiko Epson Corporation.
© 2014 Seiko Epson Corporation. All rights reserved.
The contents of this manual and the specifications of this product are subject to change without notice.
2

User's Guide
Trademarks
Trademarks
EPSON®is a registered trademark, and EPSON EXCEED YOUR VISION or EXCEED YOUR VISION is a trademark of Seiko Epson Corporation.
PRINT Image Matching™ and the PRINT Image Matching logo are trademarks of Seiko Epson Corporation. Copyright © 2001 Seiko Epson Corporation. All rights reserved.
SDXC Logo is a trademark of SD-3C, LLC.
Memory Stick, Memory Stick Duo, Memory Stick PRO, Memory Stick PRO Duo, Memory Stick PRO-HG Duo, Memory Stick Micro, MagicGate Memory Stick and MagicGate Memory Stick Duo are trademarks of Sony Corporation.
PictBridge is a trademark.
Microsoft®, Windows®, and Windows Vista®are registered trademarks of Microsoft Corporation.
Apple, Macintosh, Mac OS, OS X are trademarks of Apple Inc., registered in the U.S. and other countries.
Adobe, Adobe Reader, Acrobat, and Photoshop are trademarks of Adobe systems Incorporated, which may be registered in certain jurisdictions.
ABBYY®and ABBYY FineReader® names and logos are registered trademarks of ABBYY Software House.
Intel® is a registered trademark of Intel Corporation.
General Notice: Other product names used herein are for identification purposes only and may be trademarks of their respective owners. Epson disclaims any and all rights in those marks.
3

User's Guide
Contents
Contents
Copyright
Trademarks
About This Manual
Introduction to the Manuals. . . . . . . . . . . . . . . . . . .6
Marks and Symbols. . . . . . . . . . . . . . . . . . . . . . . . . 6
Descriptions Used in this Manual. . . . . . . . . . . . . . . 6
Operating System References. . . . . . . . . . . . . . . . . . 7
Important Instructions
Safety Instructions. . . . . . . . . . . . . . . . . . . . . . . . . . 8
Printer Advisories and Warnings. . . . . . . . . . . . . . . 8
Advisories and Warnings for Setting Up/
Using the Printer. . . . . . . . . . . . . . . . . . . . . . . . . 8 Advisories and Warnings for Using Memory Cards. . . . . . . . . . . . . . . . . . . . . . . . . . . . . . . . . 9 Advisories and Warnings for Using the
Touchpad. . . . . . . . . . . . . . . . . . . . . . . . . . . . . 10
Printer Basics
Part Names and Functions. . . . . . . . . . . . . . . . . . . 11
Control Panel. . . . . . . . . . . . . . . . . . . . . . . . . . . . 13
Buttons. . . . . . . . . . . . . . . . . . . . . . . . . . . . . . . 13 Guide to the LCD Screen. . . . . . . . . . . . . . . . . . 14
Menu Options. . . . . . . . . . . . . . . . . . . . . . . . . . . . 15
Print Photos Mode. . . . . . . . . . . . . . . . . . . . . . . 15
Setup Mode. . . . . . . . . . . . . . . . . . . . . . . . . . . . 19
Back Up Data Mode. . . . . . . . . . . . . . . . . . . . . . 20
Loading Paper
Paper Handling Precautions. . . . . . . . . . . . . . . . . . 21
Available Paper and Capacities. . . . . . . . . . . . . . . . 22
List of Paper Types. . . . . . . . . . . . . . . . . . . . . . . 23
Loading Paper in the Rear Paper Feed. . . . . . . . . . . 24
Inserting a Memory Card
Supported Memory Cards. . . . . . . . . . . . . . . . . . . 27
Inserting and Removing a Memory Card. . . . . . . . .27
Loading a CD/DVD for Printing
Printable CD/DVDs. . . . . . . . . . . . . . . . . . . . . . . . 29
CD/DVD Handling Precautions. . . . . . . . . . . . . . . 29
Loading a CD/DVD. . . . . . . . . . . . . . . . . . . . . . . . 30
Removing a CD/DVD. . . . . . . . . . . . . . . . . . . . . . 31
Printing
Printing from the Control Panel. . . . . . . . . . . . . . . 33
Printing Photos by Selecting from a Memory
Card. . . . . . . . . . . . . . . . . . . . . . . . . . . . . . . . . 33 Printing Photos from a Memory Card onto a CD/DVD Label. . . . . . . . . . . . . . . . . . . . . . . . . 34 Printing Photos Using Other Features. . . . . . . . . 35
Printing from a Computer. . . . . . . . . . . . . . . . . . . 37
Printing Basics - Windows. . . . . . . . . . . . . . . . . 37 Printing Basics - Mac OS X. . . . . . . . . . . . . . . . .39 Printing on 2-Sides (for Windows only). . . . . . . .41 Printing Several Pages on One Sheet. . . . . . . . . . 42 Printing to Fit the Paper Size. . . . . . . . . . . . . . . .43 Printing Multiple Files Together (for
Windows Only). . . . . . . . . . . . . . . . . . . . . . . . . 44 Enlarged Printing and Making Posters (for Windows Only). . . . . . . . . . . . . . . . . . . . . . . . . 45 Printing Using Advanced Features. . . . . . . . . . . 51 Printing Photos Using Epson Easy Photo Printt. . 53 Printing a CD/DVD Label with Epson Print
CD. . . . . . . . . . . . . . . . . . . . . . . . . . . . . . . . . . 54
Printing from a Digital Camera. . . . . . . . . . . . . . . .54
Printing from a Digital Camera Connected
by USB Cable. . . . . . . . . . . . . . . . . . . . . . . . . . .54
Canceling Printing. . . . . . . . . . . . . . . . . . . . . . . . . 55
Canceling Printing - Printer Button. . . . . . . . . . .55
Canceling Printing - Windows. . . . . . . . . . . . . . 55
Canceling Printing - Mac OS X. . . . . . . . . . . . . . 56
Refilling Ink
Checking the Ink Levels. . . . . . . . . . . . . . . . . . . . . 57
Checking the Ink Levels - Windows. . . . . . . . . . .57
Checking the Ink Levels - Mac OS X. . . . . . . . . . 57
Ink Bottle Codes. . . . . . . . . . . . . . . . . . . . . . . . . . 58
Ink Bottle Handling Precautions. . . . . . . . . . . . . . . 58
Ref illing the Ink Tanks. . . . . . . . . . . . . . . . . . . . . . 59
Improving Print Quality
Checking and Cleaning the Print Head. . . . . . . . . . 63
Checking and Cleaning the Print Head -
Control Panel. . . . . . . . . . . . . . . . . . . . . . . . . . 63
4

User's Guide
Contents
Checking and Cleaning the Print Head -
Windows. . . . . . . . . . . . . . . . . . . . . . . . . . . . . . 64
Checking and Cleaning the Print Head - Mac
OS X. . . . . . . . . . . . . . . . . . . . . . . . . . . . . . . . . 64
Replacing Ink inside the Ink Tubes. . . . . . . . . . . . . 65
Replacing Ink inside the Ink Tubes - Windows. . .65 Replacing Ink inside the Ink Tubes - Mac OS X. . 65
Aligning the Print Head. . . . . . . . . . . . . . . . . . . . . 66
Aligning the Print Head - Control Panel. . . . . . . 66
Aligning the Print Head - Windows. . . . . . . . . . .66
Aligning the Print Head - Mac OS X. . . . . . . . . . 67
Cleaning the Paper Path. . . . . . . . . . . . . . . . . . . . . 67
Application Information
Necessary Applications. . . . . . . . . . . . . . . . . . . . . .69
Windows Printer Driver. . . . . . . . . . . . . . . . . . . 69
Mac OS X Printer Driver. . . . . . . . . . . . . . . . . . 72
Epson Easy Photo Print. . . . . . . . . . . . . . . . . . . 75
Epson Print CD. . . . . . . . . . . . . . . . . . . . . . . . . 75
E-Web Print (for Windows Only). . . . . . . . . . . . 76
EPSON Software Updater. . . . . . . . . . . . . . . . . .76
Uninstalling Applications. . . . . . . . . . . . . . . . . . . . 76
Uninstalling Applications - Windows. . . . . . . . . 76
Uninstalling Applications - Mac OS X. . . . . . . . . 77
Installing Applications. . . . . . . . . . . . . . . . . . . . . . 78
Updating Applications and Firmware. . . . . . . . . . . 78
Solving Problems
Checking the Printer Status. . . . . . . . . . . . . . . . . . 79
Checking Messages on the LCD Screen. . . . . . . . 79 Checking the Printer Status - Windows. . . . . . . . 80 Checking Printer Status - Mac OS X. . . . . . . . . . 80
Removing Jammed Paper. . . . . . . . . . . . . . . . . . . . 80
Removing Jammed Paper from the Rear
Paper Feed. . . . . . . . . . . . . . . . . . . . . . . . . . . . .81 Removing Jammed Paper from Inside the
Printer. . . . . . . . . . . . . . . . . . . . . . . . . . . . . . . .81
Paper Does Not Feed Correctly. . . . . . . . . . . . . . . .83
Power and Control Panel Problems. . . . . . . . . . . . . 83
Power Does Not Turn On. . . . . . . . . . . . . . . . . . 83 Lights Came On and then Went Out. . . . . . . . . . 83 Power Does Not Turn Off. . . . . . . . . . . . . . . . . . 84 LCD Screen Gets Dark. . . . . . . . . . . . . . . . . . . . 84
Printer Does Not Print. . . . . . . . . . . . . . . . . . . . . . 84
Printout Problems. . . . . . . . . . . . . . . . . . . . . . . . . 85
Print Quality Is Poor. . . . . . . . . . . . . . . . . . . . . 85 The Position, Size, or Margins of the Printout
Are Incorrect. . . . . . . . . . . . . . . . . . . . . . . . . . . 86
Paper Is Smeared or Scuf fed. . . . . . . . . . . . . . . . 87 Printed Characters Are Incorrect or Garbled. . . . 87 T he Printed Image Is Inverted. . . . . . . . . . . . . . . 88 The Printout Problem Could Not be Cleared. . . . 88
Printing Is Too Slow. . . . . . . . . . . . . . . . . . . . . . . . 88
Other Problems. . . . . . . . . . . . . . . . . . . . . . . . . . . 89
Slight Electric Shock when Touching the
Printer. . . . . . . . . . . . . . . . . . . . . . . . . . . . . . . .89 Operation Sounds Are Loud. . . . . . . . . . . . . . . . 89 Cannot Save Data to a Memory Device. . . . . . . . 89 Application Is Blocked by a Firewall (for
Windows Only). . . . . . . . . . . . . . . . . . . . . . . . . 89 "?" Is Displayed on the Photo Selection Screen. . . 90 A Message Prompting You to Reset the Ink
Levels is Displayed. . . . . . . . . . . . . . . . . . . . . . . 90
Appendix
Technical Specif ications. . . . . . . . . . . . . . . . . . . . . 91
Printer Specif ications. . . . . . . . . . . . . . . . . . . . . 91 Interface Specif ications. . . . . . . . . . . . . . . . . . . .92 External Storage Device Specif ications. . . . . . . . 92 Dimensions. . . . . . . . . . . . . . . . . . . . . . . . . . . . 94 Electrical Specif ications. . . . . . . . . . . . . . . . . . . 94 Environmental Specif ications. . . . . . . . . . . . . . . 95 System Requirements. . . . . . . . . . . . . . . . . . . . . 95
Regulatory Information. . . . . . . . . . . . . . . . . . . . . 95
Standards and Approvals for European Model. . . 95 Restrictions on Copying. . . . . . . . . . . . . . . . . . . 96
Checking the Total Number of Pages Fed
Through the Printer. . . . . . . . . . . . . . . . . . . . . . . . 96
Checking the Total Number of Pages Fed
Through the Printer - Control Panel. . . . . . . . . . 96 Checking the Total Number of Pages Fed
Through the Printer - Windows. . . . . . . . . . . . . 97 Checking the Total Number of Pages Fed
T hrough the Printer - Mac OS X. . . . . . . . . . . . . 97
Transporting the Printer. . . . . . . . . . . . . . . . . . . . .97
Accessing a Memory Card From a Computer. . . . . .99
Where to Get Help. . . . . . . . . . . . . . . . . . . . . . . . 100
Technical Support Web Site. . . . . . . . . . . . . . . .100
Contacting Epson Support. . . . . . . . . . . . . . . . 100
5

User's Guide
About This Manual
About This Manual
Introduction to the Manuals
The latest versions of the following manuals are available from the Epson support website.
http://www.epson.eu/Support (Europe)
http://support.epson.net/ (outside Europe)
Start Here (paper manual)
Provides you with information on setting up the printer, installing the software, using the printer basically, solving problems, and so on.
User's Guide (PDF manual)
This manual. Provides overall information and instructions on using the printer, and on solving problems.
As well as the manuals above, see the help included in the various Epson software applications.
Marks and Symbols
!Caution:
Instructions that must be followed carefully to avoid bodily injury.
cImportant:
Instructions that must be observed to avoid damage to your equipment.
Note:
Instructions containing useful tips and restrictions on printer operation.
& Related Information
Links to related sections.
Descriptions Used in this Manual
Screenshots of the printer driver screens are from Windows 8.1 or Mac OS X v10.9.x. The content displayed on the screens varies depending on the model and situation.
Illustrations of the printer used in this manual are examples only. Although there may be slight differences depending on the model, the method of operation is the same.
Some of the menu items on the LCD screen vary depending on the model and settings.
6

User's Guide
About This Manual
Operating System References
Windows
In this manual, terms such as "Windows 8.1", "Windows 8", "Windows 7", "Windows Vista", and "Windows XP" refer to the following operating systems. Additionally, "Windows" is used to refer to all versions.
Microsoft® Windows® 8.1 operating system
Microsoft® Windows® 8 operating system
Microsoft® Windows® 7 operating system
Microsoft® Windows Vista® operating system
Microsoft® Windows® XP operating system
Microsoft® Windows® XP Professional x64 Edition operating system
Mac OS X
In this manual, "Mac OS X v10.9.x" refers to "OS X Mavericks" and "Mac OS X v10.8.x" refers to "OS X Mountain Lion". Additionally, "Mac OS X" is used to refer to "Mac OS X v10.9.x", "Mac OS X v10.8.x", "Mac OS X v10.7.x" and "Mac OS X v10.6.x".
7

User's Guide
Important Instructions
Important Instructions
Safety Instructions
Read and follow these instructions to ensure safe use of this printer. Make sure you keep this manual for future reference. Also, be sure to follow all warnings and instructions marked on the printer.
Use only the power cord supplied with the printer and do not use the cord with any other equipment. Use of other cords with this printer or the use of the supplied power cord with other equipment may result in fire or electric shock.
Be sure your AC power cord meets the relevant local safety standard.
Never disassemble, modify, or attempt to repair the power cord, plug, printer unit, or options by yourself, except as specifically explained in the printer's manuals.
Unplug the printer and refer servicing to qualified service personnel under the following conditions:
The power cord or plug is damaged; liquid has entered the printer; the printer has been dropped or the casing damaged; the printer does not operate normally or exhibits a distinct change in performance. Do not adjust controls that are not covered by the operating instructions.
Place the printer near a wall outlet where the plug can be easily unplugged.
Do not place or store the printer outdoors, near excessive dirt or dust, water, heat sources, or in locations subject to shocks, vibrations, high temperature or humidity.
Take care not to spill liquid on the printer and not to handle the printer with wet hands.
If the LCD screen is damaged, contact your dealer. If the liquid crystal solution gets on your hands, wash them thoroughly with soap and water. If the liquid crystal solution gets into your eyes, flush them immediately with water. If discomfort or vision problems remain after a thorough flushing, see a doctor immediately.
Be careful not to touch any ink when you handle the ink tanks, ink tank caps, and opened ink bottles or ink bottle caps.
If ink gets on your skin, wash the area thoroughly with soap and water.
If ink gets into your eyes, flush them immediately with water. If discomfort or vision problems continue after a thorough flushing, see a doctor immediately.
If ink gets into your mouth, see a doctor right away.
Do not tilt or shake an ink bottle after removing its seal; this can cause leakage.
Keep ink bottles and the ink tank unit out of the reach of children. Do not allow children to drink from or handle the ink bottles and ink bottle cap.
Printer Advisories and Warnings
Read and follow these instructions to avoid damaging the printer or your property. Make sure you keep this manual for future reference.
Advisories and Warnings for Setting Up/Using the Printer
Do not block or cover the vents and openings in the printer.
Use only the type of power source indicated on the printer's label.
8
User's Guide
Important Instructions
Avoid using outlets on the same circuit as photocopiers or air control systems that regularly switch on and off.
Avoid electrical outlets controlled by wall switches or automatic timers.
Keep the entire computer system away from potential sources of electromagnetic interference, such as loudspeakers or the base units of cordless telephones.
The power-supply cords should be placed to avoid abrasions, cuts, fraying, crimping, and kinking. Do not place objects on top of the power-supply cords and do not allow the power-supply cords to be stepped on or run over. Be particularly careful to keep all the power-supply cords straight at the ends and the points where they enter and leave the transformer.
If you use an extension cord with the printer, make sure that the total ampere rating of the devices plugged into the extension cord does not exceed the cord's ampere rating. Also, make sure that the total ampere rating of all devices plugged into the wall outlet does not exceed the wall outlet's ampere rating.
If you plan to use the printer in Germany, the building installation must be protected by a 10 or 16 amp circuit breaker to provide adequate short-circuit protection and over-current protection for the printer.
When connecting the printer to a computer or other device with a cable, ensure the correct orientation of the connectors. Each connector has only one correct orientation. Inserting a connector in the wrong orientation may damage both devices connected by the cable.
Place the printer on a flat, stable surface that extends beyond the base of the printer in all directions. The printer will not operate properly if it is tilted at an angle.
When storing or transporting the printer, avoid tilting it, placing it vertically, or turning it upside down; otherwise ink may leak.
Allow space above the printer so that you can fully raise the printer cover.
Leave enough space in front of the printer for the paper to be fully ejected.
Avoid places subject to rapid changes in temperature and humidity. Also, keep the printer away from direct sunlight, strong light, or heat sources.
Do not insert objects through the slots in the printer.
Do not put your hand inside the printer during printing.
Do not touch the white flat cable and ink tubes inside the printer.
Do not touch the left lateral surface of the print head inside the printer when the printer is on.
Do not use aerosol products that contain flammable gases inside or around the printer. Doing so may cause fire.
Do not move the print head by hand; otherwise, you may damage the printer.
Do not continue printing when the ink level is below the lower line on the ink tank. Continued use of the printer when the ink level is below the lower line could damage the printer. Epson recommends filling all ink tanks to the upper line when the printer is not operating to reset the ink levels.
Always turn the printer off using the P button. Do not unplug the printer or turn off the power at the outlet until the P light stops flashing.
Before transporting the printer, make sure that the print head is in the home (far right) position.
If you are not going to use the printer for a long period, be sure to unplug the power cord from the electrical outlet.
Advisories and Warnings for Using Memory Cards
Do not remove a memory card or turn off the printer while the memory card light is flashing.
9
User's Guide
Important Instructions
The methods for using memory cards vary according to card type. Be sure to refer to the manual packaged with your memory card for details.
Use only memory cards compatible with the printer.
Related Information
& “Supported Memory Card Specifications” on page 92
Advisories and Warnings for Using the Touchpad
The LCD screen may contain a few small bright or dark spots, and because of its features it may have an uneven brightness. These are normal and do not indicate that it is damaged in any way.
Only use a dry, soft cloth for cleaning. Do not use liquid or chemical cleaners.
The exterior cover of the touchpad could break if it receives a heavy impact. Contact your dealer if the touchpad's surface chips or cracks, and do not touch or attempt to remove the broken pieces.
Press the touchpad gently with your finger. Do not press forcefully or operate with your nails.
The touchpad is a capacitive touch panel, which responds only when touched directly with a finger. The panel may not respond when touched with wet hands, gloved hands, or touched through a protective sheet or sticker.
Do not operate using sharp objects such as a ball point pen, pencil and so on.
Condensation inside the touchpad due to abrupt changes in temperature or humidity may cause performance to deteriorate.
10
User's Guide
Printer Basics
Printer Basics
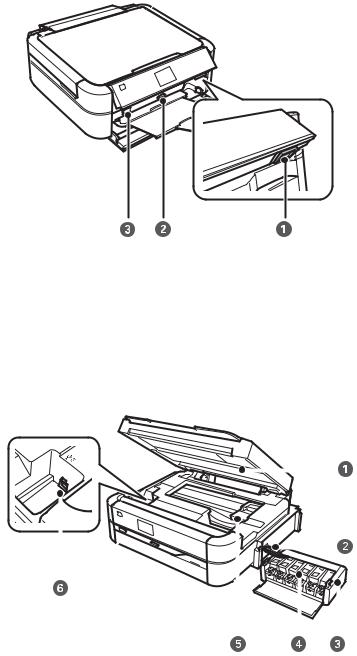
Part Names and Functions
A |
Control panel |
Operates the printer. |
||||||
|
|
|
|
|
|
|
|
|
B |
Front cover |
Prevents dust from entering the printer. |
||||||
|
|
|
|
|
|
|
|
|
|
|
|
|
|
|
|
|
|
|
|
|
|
|
|
|
|
|
|
|
|
|
|
|
|
|
|
|
|
|
|
|
|
|
|
|
|
|
|
|
|
|
|
|
|
A |
Edge guide |
Feeds the paper straight into the printer. Slide to the |
|
|
edges of the paper. |
|
|
|
B |
Paper support |
Supports loaded paper. |
|
|
|
C |
Rear paper feed |
Loads paper. Usually keep the rear paper feed closed to |
|
|
prevents foreign substance from entering the printer. |
|
|
|
D |
Output tray |
Holds the ejected paper. Before printing, raise the |
|
|
stopper to prevent the ejected paper from falling off |
|
|
the tray. |
|
|
|
E |
Tray lever |
Lower the lever when printing on a disc. When the lever |
|
|
is lowered, the output tray moves so that you can insert |
|
|
the CD/DVD tray. |
|
|
|
11
User's Guide
Printer Basics
A |
Unlock button |
To lower or close the panel, unlock by pushing this |
|||||||||
|
|
|
|
|
button at the rear, and then lower. |
||||||
|
|
|
|
|
|
|
|
|
|
|
|
B |
Memory card slot |
Insert a memory card. |
|||||||||
|
|
|
|
|
|
|
|
|
|
|
|
C |
External interface USB port |
Connects an external storage device or a PictBridge |
|||||||||
|
|
|
|
|
capable device. |
||||||
|
|
|
|
|
|
|
|
|
|
|
|
|
|
|
|
|
|
|
|
|
|
|
|
|
|
|
|
|
|
|
|
|
|
|
|
|
|
|
|
|
|
|
|
|
|
|
|
|
|
|
|
|
|
|
|
|
|
|
|
|
|
|
|
|
|
|
|
|
|
|
|
|
|
|
|
|
|
|
|
|
|
|
|
|
|
|
|
|
|
|
|
|
|
|
|
|
|
|
|
|
|
|
|
|
|
|
|
A |
Printer cover |
Open to remove jammed paper. This unit should |
|
|
usually be kept closed. |
|
|
|
B |
Ink tube |
Supplies ink to the print head. |
|
|
|
C |
Ink tank unit |
Contains the ink tanks. |
|
|
|
D |
Ink reservoir tanks (Ink tanks) |
Supplies ink to the ink tubes. |
|
|
|
E |
Print head |
Fires ink. |
|
|
|
F |
USB port |
Connects a USB cable to connect to a computer. |
|
|
|
12

User's Guide
Printer Basics
|
|
|
|
|
|
|
|
|
|
|
|
A |
AC inlet |
|
Connects the power cord. |
||
|
|
|
|
|
|
Control Panel
You can change the angle of the control panel.
Buttons
A |
|
Turns the printer on or off. |
|
|
Do not turn off while the power light is flashing (while the printer is operating or processing |
|
|
data). |
|
|
Unplug the power cord when the power light is off. |
|
|
|
B |
|
Displays the home screen. |
|
|
|
C |
|
Changes the view of photos or displays the crop setting screen. |
|
|
|
D |
|
Displays operating instructions, troubleshooting information, and the meaning of icons that |
|
|
appear on the LCD screen. |
|
|
|
13
User's Guide
Printer Basics
E |
- |
|
Displays menus and messages. |
|||
|
|
|
|
|
|
|
F |
|
|
|
|
|
Displays detailed setting items. |
|
|
|
|
|
||
|
|
|
|
|
||
|
|
|
|
|
||
|
|
|
||||
G |
u d l r OK |
Use the u d l r buttons to select a menu, and then press the OK button to open the selected |
||||
|
|
|
|
|
|
menu. |
|
|
|
|
|
|
|
H |
|
|
|
|
|
Returns to the previous screen. |
|
|
|
|
|
|
|
I |
|
|
|
|
|
Selects the number of pages to print. |
|
|
|
|
|
||
|
|
|
|
|
|
|
J |
|
|
|
|
|
Starts an operation such as printing. |
|
|
|
|
|
|
|
K |
|
|
|
|
|
Stops the current operation. |
|
|
|
|
|
|
|
Related Information
& “Menu Options” on page 15
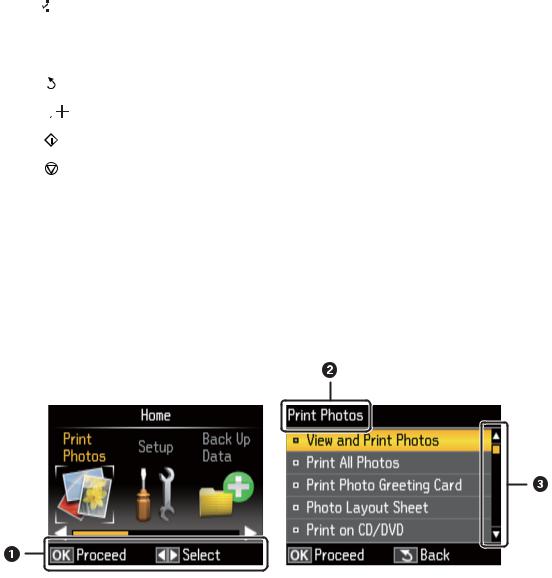
Guide to the LCD Screen
Menus and messages are displayed on the LCD screen. Select a menu or setting by pressing the u d l r buttons.
A |
Available buttons are displayed. In this example, you can proceed to the next screen by pressing the OK button, and |
|
select another menu by pressing the u d l r buttons. |
|
|
B |
The name of the screen displayed. |
|
|
C |
When u and d are displayed, you can scroll up or down. |
|
|
Related Information
& “Menu Options” on page 15
14

User's Guide
Printer Basics
Menu Options
Print Photos Mode
Menu |
Settings and Explanations |
|
|
|
|
View and Print |
You can select the photos on a memory card that you want to print while viewing them on the LCD |
|
Photos |
screen. |
|
|
|
|
Print All Photos |
You can print all photos on a memory card at the same time. |
|
|
|
|
Photo Layout |
You can print your photos in various layouts, such as printing multiple photos on a sheet of photo |
|
Sheet |
paper. |
|
|
|
|
Print on CD/DVD |
You can print the photos on a memory card onto a CD/DVD. |
|
|
|
|
Print Proof Sheet |
You can print all photos on a memory card as an index. Press the x button, and then select Print |
|
|
Settings to change the paper size and paper type. |
|
|
|
|
Slide Show |
You can print your photos on a memory card by viewing the photos with slide show. |
|
|
To make print settings, press the x button after selecting photos. See the list of menus in View and |
|
|
Print Photos for more details. |
|
|
|
|
Select Location |
Select Folder |
Select a folder to display the photos on the external storage device. |
|
|
|
|
Select Group |
If you have 1000 or more photos on your memory card, photos are |
|
|
automatically divided into groups containing a maximum of 999 photos. |
|
|
Select a group to display. |
|
|
|
Menu Options for View and Print Photos
To access the following menus, press the x button when a photo is displayed on a screen.
Menu |
Settings and Explanations |
|
|
|
|
Select |
Select All |
Select all the photos on the memory card and set the number of prints. |
Photos |
Photos |
|
|
|
|
|
Select by |
Displays the photos on the memory card sorted by date. Select a date to display all photos |
|
Date |
saved on that date. |
|
|
|
|
Cancel |
Returns the number of copies of all photos to 0 (zero). |
|
Photo |
|
|
Selection |
|
|
|
|
15
User's Guide
|
|
Printer Basics |
||
|
|
|
|
|
Menu |
Settings and Explanations |
|
||
|
|
|
|
|
Paper Size |
Select the paper size you loaded. |
|
||
Settings |
|
|
|
|
Paper Type |
Select the paper type you loaded. |
|
||
|
|
|||
|
|
|
|
|
|
Borderless |
Prints without margins around the edges. The image is enlarged a little to remove borders |
||
|
|
from the edges of the paper. |
|
|
|
|
|
|
|
|
Quality |
Select the print quality. Selecting Best provides higher quality printing, but the printing |
||
|
|
speed may be slower. |
|
|
|
|
|
|
|
|
Expansion |
With borderless printing, the image is enlarged a little to remove borders from the edges of |
||
|
|
the paper. Select how much to enlarge the image. |
||
|
|
|
|
|
|
Date |
Select a date format to print photos with a date. The date is not printed for some layouts or if |
||
|
|
date information is not included in the photo data. |
||
|
|
|
|
|
|
Fit Frame |
Trims your photo. This may not be available for panorama photos. The photo is always |
||
|
|
trimmed in Borderless, Upper 1/2, or Lower 1/2 |
||
|
|
|
|
|
|
|
On |
|
Crops the top and bottom or left and right of the image. |
|
|
|
|
|
|
|
Off |
|
Creates margins on the left and right or top and bottom of |
|
|
|
|
the image. |
|
|
|
|
|
|
Bidirection |
Prints while the print head moves to the left and to the right. Selecting Off (prints while |
||
|
al |
moving in one direction) provides higher quality printing, but the printing speed may be |
||
|
|
slower. |
|
|
|
|
|
|
|
Photo |
Enhance |
Select one of the image adjustment options. |
||
Adjustment |
|
PhotoEnhance: Produces sharper images and more vivid colors by automatically adjusting |
||
s |
|
|||
|
the contrast, saturation, and brightness of the original image data. |
|||
|
|
|||
|
|
P.I.M.: Adjusts the image based on the print information provided by a digital camera |
||
|
|
compatible with PRINT Image Matching. |
||
|
|
|
||
|
Scene |
Available when selecting PhotoEnhance as the Enhance setting. Improves the image quality |
||
|
Detection |
for photos of people, landscapes, and night scenes. |
||
|
|
|
||
|
Fix Red-Eye |
Fixes red-eye in photos. Corrections are not applied to the original file, only to the printouts. |
||
|
|
Depending on the type of photo, parts of the image other than the eyes may be corrected. |
||
|
|
|
|
|
|
Filter |
Prints in sepia or monochrome. |
|
|
|
|
|
||
|
Brightness |
Adjusts the brightness of the image. |
||
|
|
|
||
|
Contrast |
Adjusts the difference between the brightness and darkness. |
||
|
|
|
||
|
Sharpness |
Enhances or defocuses the outline of the image. |
||
|
|
|
||
|
Saturation |
Adjusts the vividness of the image. |
||
|
|
|
|
|
Maintenan |
You can access the menus for maintaining the printer. See the list of menus in Setup mode. |
|||
ce |
|
|
|
|
|
|
|
|
|
16

User's Guide
Printer Basics
Photo Layout Sheet
Menu |
Settings and Explanations |
|
|
|
|
|
|
Layout |
Select a layout. |
|
|
|
20-up: The serial number or date is printed below each photo. |
||
|
Sticker 16-up: Select when printing on photo stickers. |
||
|
P.I.F. is displayed if you have a P.I.F. frame on your memory card. |
||
|
|
|
|
Paper Size |
Select the paper size you loaded. |
||
|
|
|
|
Paper Type |
Select the paper type you loaded. |
||
|
|
|
|
Layout |
Select how to place the photos. |
|
|
method |
|
|
|
Automatic layout |
|
Photos are placed automatically using the selected layout. If the number of |
|
|
|
||
|
|
|
selected photos is less than that of the selected layout, blank spaces appear |
|
|
|
on the printout. |
|
|
|
|
|
Place photos manually |
|
Manually place the photos in a selected layout. Selecting Leave blank |
|
|
|
provides a blank space in the printout. |
|
|
|
|
Menu Options for Photo Layout Sheet
To access the following menus, press the x button on the photo selection screen.
Menu |
Settings and Explanations |
|
|
Select |
See the list of menus in View and Print Photos for more details. |
Photos |
|
|
|
|
|
Settings |
|
|
|
Photo |
|
Adjustment |
|
s |
|
|
|
Maintenan |
See the list of menus in Setup for more details. |
ce |
|
|
|
Print on CD/DVD
Note:
You can only print on an 8 cm disc when printing from a computer.
Menu |
Settings and Explanations |
|||
|
|
|
|
|
Layout |
Select the layout you want to use to print onto a CD/DVD. CD/DVD Variety automatically lays out the |
|||
|
10 photos you selected. |
|||
|
|
|
|
|
|
|
|
|
|
|
|
|
|
|
|
|
|
|
|
|
|
|
|
|
17
User's Guide
|
|
Printer Basics |
|
|
|
|
|
Menu |
Settings and Explanations |
||
|
|
|
|
Layout method |
Select how to place the photos. |
||
|
|
|
|
|
Automatic layout |
Photos are placed automatically using the selected layout. If the number of |
|
|
|
selected photos is less than that of the selected layout, blank spaces appear |
|
|
|
on the printout. |
|
|
|
|
|
|
Place photos |
Manually place the photos in a selected layout. Selecting Leave blank |
|
|
manually |
provides a blank space in the printout. |
|
|
|
|
|
Outer |
Specify the print range. Up to 120 mm for the outer diameter, and a minimum of 18 mm for the inner |
||
|
diameter can be specified. Depending on the setting, the CD/DVD or CD/DVD tray may get dirty. Set |
||
Inner |
|||
the range to fit the printable area of your CD/DVD. |
|||
|
|
||
Print on a CD/DVD |
Select whether to print a test on A4 size plain paper or print on a CD/DVD. |
||
|
|
|
|
Test print on A4 |
|
|
|
paper |
|
|
|
|
|
|
|
Menu Options for Print on CD/DVD
To access the following menus, press the x button when a photo is displayed on a screen.
Menu |
Settings and Explanations |
|
|
|
|
CD Density |
Set the density to use when printing onto a CD/DVD. |
|
Settings |
|
|
|
|
|
Photo |
See the list of menus in View and Print Photos for more details. |
|
Adjustment |
|
|
s |
|
|
|
|
|
Maintenan |
See the list of menus in Setup for more details. |
|
ce |
|
|
|
|
|
Related Information
&“Loading Paper in the Rear Paper Feed” on page 24
&“Inserting and Removing a Memory Card” on page 27
&“Printing from the Control Panel” on page 33
18
User's Guide
|
|
Printer Basics |
|
Setup Mode |
|
||
|
|
|
|
Menu |
Settings and Explanations |
||
|
|
|
|
Maintenanc |
Nozzle |
Prints a pattern to check if the print head nozzles are clogged. |
|
e |
Check |
|
|
|
|
|
|
|
Head |
Cleans clogged nozzles in the print head. |
|
|
Cleaning |
|
|
|
|
|
|
|
Head |
Adjusts the print head to improve print quality. |
|
|
Alignment |
|
|
|
|
|
|
|
Reset Ink |
Resets ink levels. |
|
|
Levels |
|
|
|
|
|
|
|
Paper Guide |
Use this feature to feed paper for cleaning when there are ink stains on the internal rollers |
|
|
Cleaning |
or a paper feed problem has occurred. |
|
|
|
|
|
Printer |
CD/DVD |
Adjusts the printing position of a CD/DVD. |
|
Setup |
|
|
|
Stickers |
Adjusts the printing position of a photo sticker. |
||
|
|||
|
|
|
|
|
Thick Paper |
Use this feature if ink smears and the paper gets dirty. When enabled, the printing speed |
|
|
|
may be slower. Only enable this setting when ink smears. It is disabled when the printer is |
|
|
|
turned off. |
|
|
|
|
|
|
Sound |
Adjust the volume and select the type of audio. |
|
|
|
|
|
|
Screen Saver |
By selecting Memory Card Data, photos are displayed sequentially when no operations are |
|
|
|
performed for about three minutes. |
|
|
|
|
|
|
Display |
Select the default setting to display the photos on the memory card. |
|
|
Options |
1 photo : Displays one photo on a screen. Information on settings, such as zoom, is also |
|
|
|
||
|
|
displayed. |
|
|
|
1 photo without Info : Displays one photo on a screen. Information on settings, such as |
|
|
|
zoom, is not displayed. |
|
|
|
Thumbnail: Displays nine photos on a screen. |
|
|
|
|
|
|
Power Off |
You can adjust the time before power management is applied. Any increase will affect the |
|
|
Timer |
product’s energy efficiency. Please consider the environment before making any change. |
|
|
|
|
|
|
Sleep Timer |
Select the time period before the printer enters sleep mode (energy saving mode) when no |
|
|
|
operations are performed. The LCD screen turns black when the set time passes. |
|
|
|
|
|
|
Language |
Select the display language. |
|
|
|
|
|
External |
Change the print settings to print directly from an external device such as a digital camera. |
||
Device |
|
|
|
Setup |
|
|
|
|
|
||
Restore |
Resets the selected settings to their defaults. |
||
Default |
|
|
|
Settings |
|
|
|
|
|
|
|
Related Information
& “Improving Print Quality” on page 63
19
User's Guide
Printer Basics
Back Up Data Mode
Back Up Memory Card allows you to save the data on a memory card to an external storage device such as a hard disk or USB flash memory without using a computer.
Menu |
Settings and Explanations |
|
|
Back Up |
Select this menu after connecting an external USB storage device. A folder is automatically created for each |
Memory |
photo. |
Card |
When saving the data to a disc, you can change the writing speed by pressing the x button, and then |
|
|
|
selecting Writing Speed. |
|
|
Related Information
&“Inserting and Removing a Memory Card” on page 27
&“External Storage Device Specifications” on page 92
20
User's Guide
Loading Paper
Loading Paper
Paper Handling Precautions
Read the instruction sheets supplied with the paper.
Fan and align the edges of the paper before loading. Do not fan or curl photo paper. Doing so may damage the printable side.
If the paper is curled, flatten it or curl it slightly in the opposite direction before loading. Printing on curled paper may cause paper jams and smears on the printout.
Do not use paper that is wavy, torn, cut, folded, damp, too thick, too thin, or paper that has stickers stuck to it. Using these types of paper causes paper jams and smears on the printout.
Fan and align the edges of the envelopes before loading. When the stacked envelopes are puffed up with air, press them down to flatten them before loading.
Do not use envelopes that are curled or folded. Using these envelopes causes paper jams and smears on the printout.
Do not use envelopes with adhesive surfaces on the flaps or window envelopes.
Avoid using envelopes that are too thin, as they may curl during printing.
Related Information
& “Printer Specifications” on page 91
21

User's Guide
Loading Paper
Available Paper and Capacities
Epson recommends using genuine Epson paper to ensure high-quality printouts.
Genuine Epson Paper
Media Name |
Size |
Loading |
Manual 2- |
Borderless |
|
|
Capacity |
Sided |
Printing |
|
|
(Sheets) |
Printing |
|
|
|
|
|
|
Epson Bright White Ink Jet |
A4 |
80*1 |
|
- |
Paper |
|
|
|
|
|
|
|
|
|
Epson Ultra Glossy Photo |
A4, 13 × 18 cm (5 × 7 in.), 10 × |
20 |
- |
|
Paper |
15 cm (4 × 6 in.) |
|
|
|
|
|
|
|
|
Epson Premium Glossy Photo |
A4, 13 × 18 cm (5 × 7 in.), 16:9 |
20 |
- |
|
Paper |
wide size (102 × 181 mm), 10 |
|
|
|
|
× 15 cm (4 × 6 in.) |
|
|
|
|
|
|
|
|
Epson Premium Semigloss |
A4, 10 × 15 cm (4 × 6 in.) |
20 |
- |
|
Photo Paper*2 |
|
|
|
|
Epson Photo Paper Glossy |
A4, 13 × 18 cm (5 × 7 in.), 10 × |
20 |
- |
|
|
15 cm (4 × 6 in.) |
|
|
|
|
|
|
|
|
Epson Matte Paper- |
A4 |
20 |
- |
|
Heavyweight |
|
|
|
|
|
|
|
|
|
Epson Double-Sided Matte |
A4 |
1 |
|
- |
Paper*2 |
|
|
|
|
Epson Photo Quality Ink Jet |
A4 |
100 |
- |
- |
Paper*2 |
|
|
|
|
Epson Photo Stickers 16 |
A6 |
1 |
- |
- |
|
|
|
|
|
Epson Iron-On Cool Peel |
A4 |
1 |
- |
- |
Transfer Paper*2 |
|
|
|
|
*1 For manual 2-sided printing, you can load up to 30 sheets for paper with one side already printed.
*2 Only printing from computer is available.
Note:
The availability of paper varies by location. For the latest information on paper available in your area, contact Epson support.
22
User's Guide
Loading Paper
Commercially Available Paper
Media Name |
Size |
Loading |
Manual 2- |
Borderless |
|
|
Capacity |
Sided |
Printing |
|
|
(Sheets) |
Printing |
|
|
|
|
|
|
Plain paper |
Letter*1, A4, B5*1, A5*1, A6*1 |
Up to the line |
|
- |
|
|
indicated by |
|
|
|
|
the triangle |
|
|
|
|
symbol on the |
|
|
|
|
edge guide.*2 |
|
|
|
Legal*1, User Defined*1 |
1 |
|
|
Envelope*1 |
Envelope #10, Envelope DL, |
10 |
- |
|
|
Envelope C6 |
|
|
|
|
|
|
|
|
*1 Only printing from computer is available.
*2 For manual 2-sided printing, you can load up to 30 sheets for paper with one side already printed.
Related Information
& “Technical Support Web Site” on page 100
List of Paper Types
To obtain optimum printing results, select the paper type that suits the paper.
Media Name |
Media Type |
|
|
|
|
|
Control Panel |
Printer Driver |
|
|
|
Epson Bright White Ink Jet Paper* |
Plain Paper |
plain papers |
Epson Ultra Glossy Photo Paper* |
Ultra Glossy |
Epson Ultra Glossy |
Epson Premium Glossy Photo Paper* |
Prem. Glossy |
Epson Premium Glossy |
Epson Premium Semigloss Photo Paper* |
- |
Epson Premium Semigloss |
Epson Photo Paper Glossy* |
Glossy |
Photo Paper Glossy |
Epson Matte Paper-Heavyweight* |
Matte |
Epson Matte |
Epson Double-Sided Matte Paper* |
- |
Epson Matte |
Epson Photo Quality Ink Jet Paper* |
Matte |
Epson Photo Quality Ink Jet |
Epson Photo Stickers 16* |
Photo Stickers |
Epson Photo Stickers |
Epson Iron-On Cool Peel Transfer Paper |
- |
plain papers |
|
|
|
Plain paper* |
Plain Paper |
plain papers |
Envelope |
- |
Envelope |
|
|
|
23
User's Guide
Loading Paper
*These paper types are compatible with Exif Print and PRINT Image Matching when printed by the printer driver. For more information, see the documentation that came with the Exif Print or PRINT Image Matching compatible digital camera.
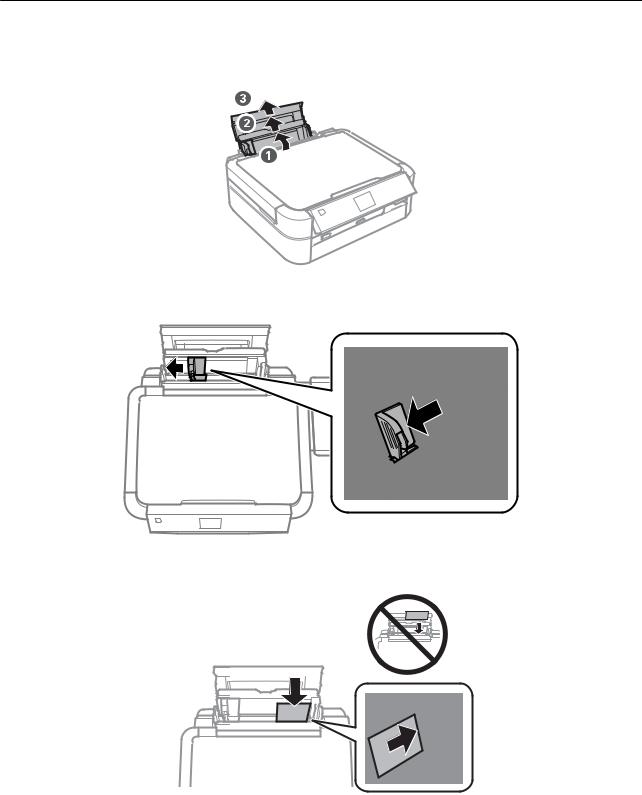
Loading Paper in the Rear Paper Feed
1.Open the rear paper feed, and then extend the paper support.
2.Slide the edge guide to the left.
3.Load paper vertically along the right side of the rear paper feed with the printable side facing up.
24
User's Guide
Loading Paper
cImportant:
Do not load more than the maximum number of sheets specified for the paper. For plain paper, do not load above the line indicated by the triangle symbol on the edge guide.
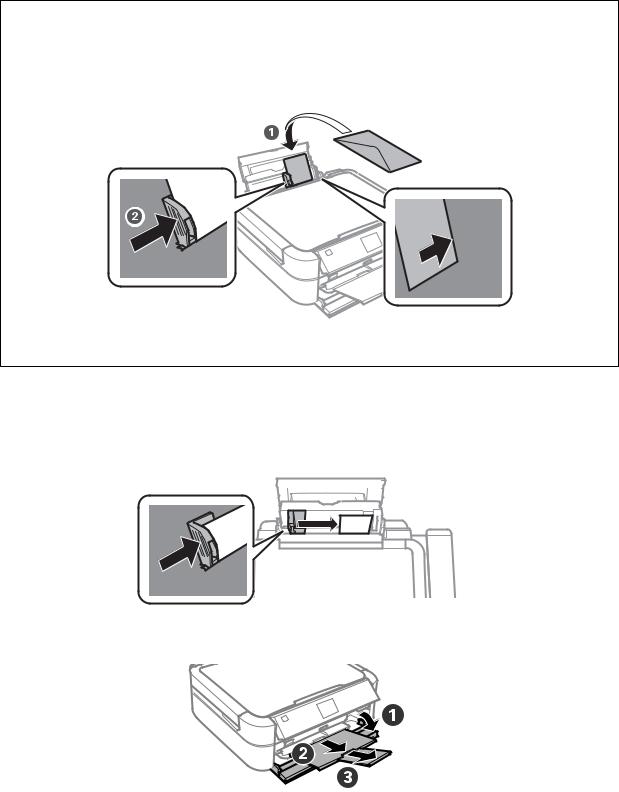
When loading envelopes, load the short edge first with the flap facing down and to the left.
Do not use paper with binding holes.
4.Slide the edge guide to the edge of the paper.
5.Open the front cover, and then slide out the output tray and the stopper.
25
User's Guide
Loading Paper
6.Make sure that the tray lever is in the up position.
cImportant:
Do not move the tray lever while the printer is operating.
Before you move the tray lever, make sure no paper or other objects are on the output tray and the output tray is not extended.
Do not touch the output tray when moving the tray lever.
Note:
Return the remaining paper to its package. If you leave it in the printer, the paper may curl or the print quality may decline.
Related Information
&“Paper Handling Precautions” on page 21
&“Available Paper and Capacities” on page 22
26
User's Guide
Inserting a Memory Card
Inserting a Memory Card
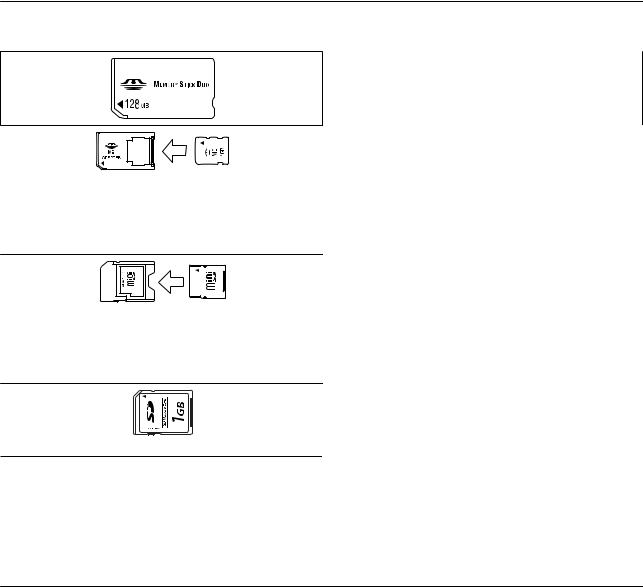
Supported Memory Cards
Memory Stick
Memory Stick PRO
MagicGate Memory Stick
Memory Stick Duo*
Memory Stick PRO Duo*
Memory Stick PRO-HG Duo*
Memory Stick Micro*
MagicGate Memory Stick Duo*
miniSD*
miniSDHC*
microSD*
microSDHC*
microSDXC*
SD
SDHC
SDXC
*Attach an adapter to fit the memory card slot. Otherwise, the card may get stuck.
Related Information
& “Supported Memory Card Specifications” on page 92
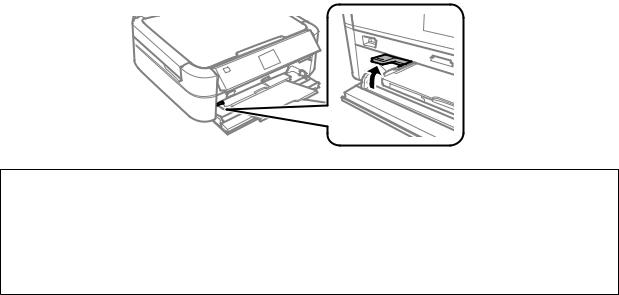
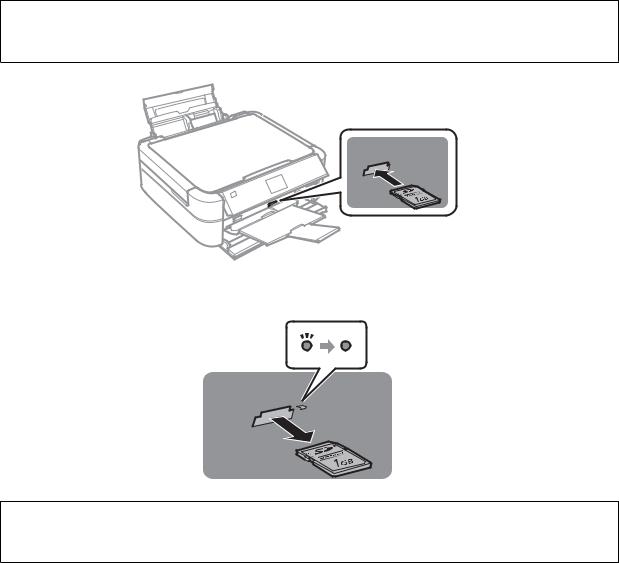
Inserting and Removing a Memory Card
1.Insert a memory card into the printer.
The printer starts reading the data and the light flashes. When reading is complete, the light stops flashing and remains on.
27
User's Guide
Inserting a Memory Card
cImportant:
Do not try to force the card all the way into the slot. It should not be fully inserted.
2.When you have finished using the memory card, make sure the light is not flashing, and then remove the card.
cImportant:
If you remove the memory card while the light is flashing, the data in the memory card may be lost.
Note:
If you access the memory card from a computer, you need to operate the computer to safely remove the removal device.
Related Information
& “Accessing a Memory Card From a Computer” on page 99
28

User's Guide
Loading a CD/DVD for Printing
Loading a CD/DVD for Printing
Printable CD/DVDs
You can print on a circular 12-cm or 8-cm CD/DVD labelled as suitable for printing, for example "printable on the label surface" or "printable with ink jet printers."
You can also print on a Blu-ray Discs™.
CD/DVD Handling Precautions
See the documentation provided with your CD/DVD for more information on handling the CD/DVD or writing data.
Do not print on the CD/DVD before writing your data to it. If you do, fingerprints, dirt, or scratches on the surface may cause errors while writing data.
Depending on the CD/DVD type or printing data, smearing may occur. Try making a test print on a spare CD/ DVD. Check the printed surface after waiting for one full day.
Compared to printing on genuine Epson paper, the print density is lowered to prevent ink from smearing on the CD/DVD. Adjust the print density as necessary.
Allow the printed CD/DVDs at least 24 hours to dry avoiding direct sunlight. Do not stack or insert the CD/ DVDs into your device until they are completely dry.
If the printed surface is sticky even after it has dried, lower the print density.
Reprinting on the same CD/DVD may not improve the print quality.
If the CD/DVD tray or the internal transparent compartment are accidentally printed on, immediately wipe off the ink.
Depending on the print area setting, the CD/DVD or CD/DVD tray may get dirty. Make settings to print on the printable area.
Related Information
&“Epson Print CD” on page 75
&“Printable Area” on page 91
29
User's Guide
Loading a CD/DVD for Printing
Loading a CD/DVD
cImportant:
Before printing on the CD/DVD, see the CD/DVD handling precautions.
Do not insert the CD/DVD tray while the printer is operating. This may damage the printer.
Do not insert the CD/DVD tray until you are instructed to do so.
Insert the CD/DVD tray while the power is on. Otherwise, automatic print position adjustment may not take place after inserting the CD/DVD tray.
Do not turn the printer on or off while the CD/DVD tray is inserted in the printer. This may damage the printer.
1.Send print data from a computer, or select the menu you want to use to print on a CD/DVD on the control panel.
2.When a message prompts you to load a CD/DVD, follow the instructions below to load the CD/DVD.
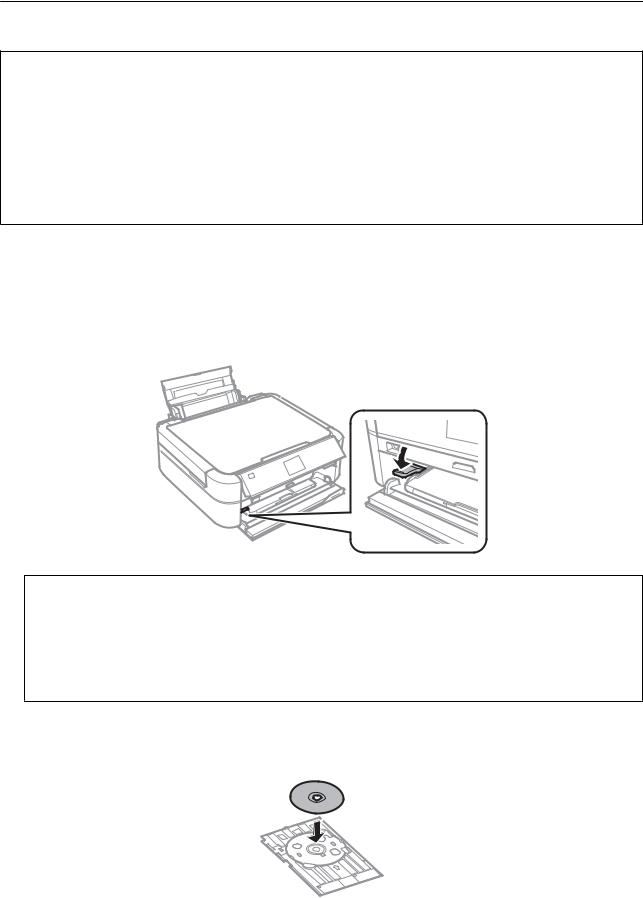
3.Open the front cover, and then move the tray lever down.
cImportant:
Do not move the tray lever while the printer is operating.
Before you move the tray lever, make sure no paper or other objects are on the output tray and the output tray is not extended.
Do not touch the output tray when moving the tray lever.
4.Place a CD/DVD on the CD/DVD tray with the printable side facing up.
When printing on a 12-cm CD/DVD, set it directly onto the CD/DVD tray, without the adapter.
30
 Loading...