


 Loading...
®
24-pin Dot Matrix Printer
All rights reserved. No part of this publication may be reproduced, stored in a retrieval system, or transmitted in any form or by any means, electronic, mechanical, photocopying, recording, or otherwise, without the prior written permission of SEIKO EPSON CORPORATION. The information contained herein is designed only for use with this EPSON printer. EPSON is not responsible for any use of this information as applied to other printers.
Neither SEIKO EPSON CORPORATION nor its affiliates shall be liable to the purchaser of this product or third parties for damages, losses, costs, or expenses incurred by the purchaser or third parties as a result of: accident, misuse, or abuse of this product or unauthorized modifications, repairs, or alterations to this product, or (excluding the U.S.) failure to strictly comply with SEIKO EPSON CORPORATION’s operating and maintenance instructions.
SEIKO EPSON CORPORATION shall not be liable for any damages or problems arising from the use of any options or any consumable products other than those designated as Original EPSON Products or EPSON Approved Products by SEIKO EPSON CORPORATION.
EPSON and EPSON ESC/P are registered trademarks and EPSON ESC/P2 is a trademark of SEIKO EPSON CORPORATION.
Microsoft, Windows, and Windows NT are registered trademarks of Microsoft Corporation.
IBM is a registered trademark of International Business Machines Corporation.
General Notice: Other product names used herein are for identification purposes only and may be trademarks of their respective owners. EPSON disclaims any and all rights in those marks.
Copyright © 2002 by SEIKO EPSON CORPORATION, Nagano, Japan.
Reference Guide

Contents
Chapter 1 Paper Handling
Selecting a Paper Source. . . . . . . . . . . . . . . . . . . . . . . . . . . . . . . . . . . . .2 Paper source and paper types. . . . . . . . . . . . . . . . . . . . . . . . . . . .2 Setting the paper release lever . . . . . . . . . . . . . . . . . . . . . . . . . . .3 Adjusting the Paper-Thickness Lever. . . . . . . . . . . . . . . . . . . . . . . . . .3 Loading Continuous Paper . . . . . . . . . . . . . . . . . . . . . . . . . . . . . . . . . .5 Positioning the continuous paper supply. . . . . . . . . . . . . . . . . .5 Loading continuous paper with the tractor . . . . . . . . . . . . . . . .6 Using the tear-off function . . . . . . . . . . . . . . . . . . . . . . . . . . . . .10 Loading Single Sheets . . . . . . . . . . . . . . . . . . . . . . . . . . . . . . . . . . . . . .12 Loading Special Paper . . . . . . . . . . . . . . . . . . . . . . . . . . . . . . . . . . . . .14 Multipart forms. . . . . . . . . . . . . . . . . . . . . . . . . . . . . . . . . . . . . . .14 Labels . . . . . . . . . . . . . . . . . . . . . . . . . . . . . . . . . . . . . . . . . . . . . . .15 Switching Between Continuous Paper and Single Sheets . . . . . . . .17 Switching to single sheets . . . . . . . . . . . . . . . . . . . . . . . . . . . . . .17 Switching to continuous paper. . . . . . . . . . . . . . . . . . . . . . . . . .18 Using the Micro Adjust Function . . . . . . . . . . . . . . . . . . . . . . . . . . . .19 Adjusting the tear-off position . . . . . . . . . . . . . . . . . . . . . . . . . .19 Adjusting the top-of-form position . . . . . . . . . . . . . . . . . . . . . .20
Chapter 2 Printer Software
About Your Printer Software . . . . . . . . . . . . . . . . . . . . . . . . . . . . . . . .24 Using the Printer Driver with Windows Me, 98, and 95 . . . . . . . . .24 Accessing the printer driver from Windows applications . . .25 Accessing the printer driver from the Start menu. . . . . . . . . .26 Changing the printer driver settings . . . . . . . . . . . . . . . . . . . . .27 Using the Printer Driver with Windows XP, 2000 and NT 4.0 . . . .28 Accessing the printer driver from Windows applications . . .28 Accessing the printer driver from the Start menu. . . . . . . . . .30 Changing the printer driver settings . . . . . . . . . . . . . . . . . . . . .32 Printer Driver Settings Overview . . . . . . . . . . . . . . . . . . . . . . . . . . . .33
iii

Using EPSON Status Monitor 3 . . . . . . . . . . . . . . . . . . . . . . . . . . . . . 34 Setting up EPSON Status Monitor 3 . . . . . . . . . . . . . . . . . . . . . 35 Accessing EPSON Status Monitor 3 . . . . . . . . . . . . . . . . . . . . . 36
Chapter 3 Control Panel
Buttons and Lights . . . . . . . . . . . . . . . . . . . . . . . . . . . . . . . . . . . . . . . . 38
Selecting a Font . . . . . . . . . . . . . . . . . . . . . . . . . . . . . . . . . . . . . . . . . . . 40
About Your Printer’s Default Settings. . . . . . . . . . . . . . . . . . . . . . . . 41
Understanding default settings. . . . . . . . . . . . . . . . . . . . . . . . . 41
Changing default settings . . . . . . . . . . . . . . . . . . . . . . . . . . . . . 47
Lock-Out Mode. . . . . . . . . . . . . . . . . . . . . . . . . . . . . . . . . . . . . . . . . . . 49
Turning on or off the lock-out mode . . . . . . . . . . . . . . . . . . . . 49
Changing the lock-out mode setting . . . . . . . . . . . . . . . . . . . . 49
Chapter 4 Troubleshooting
Using the Error Indicators. . . . . . . . . . . . . . . . . . . . . . . . . . . . . . . . . . 52
Problems and Solutions . . . . . . . . . . . . . . . . . . . . . . . . . . . . . . . . . . . . 53
Power supply problems . . . . . . . . . . . . . . . . . . . . . . . . . . . . . . . 54
Paper loading or feeding problems . . . . . . . . . . . . . . . . . . . . . 55
Printing position problems . . . . . . . . . . . . . . . . . . . . . . . . . . . . 60
Printing or printout quality problems . . . . . . . . . . . . . . . . . . . 62
Correcting USB Problems . . . . . . . . . . . . . . . . . . . . . . . . . . . . . . . . . . 68
Clearing a Paper Jam . . . . . . . . . . . . . . . . . . . . . . . . . . . . . . . . . . . . . . 71
Aligning Vertical Lines in Your Printout . . . . . . . . . . . . . . . . . . . . . 72
Printing a Self Test . . . . . . . . . . . . . . . . . . . . . . . . . . . . . . . . . . . . . . . . 73
Printing Hex Dump . . . . . . . . . . . . . . . . . . . . . . . . . . . . . . . . . . . . . . . 75
Contacting Customer Support . . . . . . . . . . . . . . . . . . . . . . . . . . . . . . 76
Chapter 5 Options and Consumables
Ribbon Cartridge . . . . . . . . . . . . . . . . . . . . . . . . . . . . . . . . . . . . . . . . 118
Genuine EPSON ribbon cartridge. . . . . . . . . . . . . . . . . . . . . . 118
Replacing the ribbon cartridge . . . . . . . . . . . . . . . . . . . . . . . . 118
Print Server . . . . . . . . . . . . . . . . . . . . . . . . . . . . . . . . . . . . . . . . . . . . . 122
iv

Appendix A Product Information
Safety Instructions . . . . . . . . . . . . . . . . . . . . . . . . . . . . . . . . . . . . . . . .124 Warnings, cautions, and notes . . . . . . . . . . . . . . . . . . . . . . . . .124 Hot parts caution symbol . . . . . . . . . . . . . . . . . . . . . . . . . . . . .124 Important safety instructions . . . . . . . . . . . . . . . . . . . . . . . . . .124 For United Kingdom users . . . . . . . . . . . . . . . . . . . . . . . . . . . .126
Printer Parts . . . . . . . . . . . . . . . . . . . . . . . . . . . . . . . . . . . . . . . . . . . . .128 Printer Specifications . . . . . . . . . . . . . . . . . . . . . . . . . . . . . . . . . . . . .129 Mechanical. . . . . . . . . . . . . . . . . . . . . . . . . . . . . . . . . . . . . . . . . .129 Electronic . . . . . . . . . . . . . . . . . . . . . . . . . . . . . . . . . . . . . . . . . . .131 Electrical. . . . . . . . . . . . . . . . . . . . . . . . . . . . . . . . . . . . . . . . . . . .133 Environmental . . . . . . . . . . . . . . . . . . . . . . . . . . . . . . . . . . . . . .133 Paper. . . . . . . . . . . . . . . . . . . . . . . . . . . . . . . . . . . . . . . . . . . . . . .133 Printable area . . . . . . . . . . . . . . . . . . . . . . . . . . . . . . . . . . . . . . .142 Standards and Approvals. . . . . . . . . . . . . . . . . . . . . . . . . . . . . . . . . .143 Command Lists . . . . . . . . . . . . . . . . . . . . . . . . . . . . . . . . . . . . . . . . . .144 EPSON ESC/P 2 control codes. . . . . . . . . . . . . . . . . . . . . . . . .144 IBM PPDS Emulation Control Codes . . . . . . . . . . . . . . . . . . .145 Cleaning the Printer . . . . . . . . . . . . . . . . . . . . . . . . . . . . . . . . . . . . . .146 Transporting the Printer . . . . . . . . . . . . . . . . . . . . . . . . . . . . . . . . . . .147
Glossary
Index
v

vi

Chapter 1
Paper Handling
Selecting a Paper Source. . . . . . . . . . . . . . . . . . . . . . . . . . . . . . . . . . . . .2 Paper source and paper types. . . . . . . . . . . . . . . . . . . . . . . . . . . .2 Setting the paper release lever . . . . . . . . . . . . . . . . . . . . . . . . . . .3
Adjusting the Paper-Thickness Lever. . . . . . . . . . . . . . . . . . . . . . . . . .3
Loading Continuous Paper . . . . . . . . . . . . . . . . . . . . . . . . . . . . . . . . . .5 Positioning the continuous paper supply. . . . . . . . . . . . . . . . . .5 Loading continuous paper with the tractor . . . . . . . . . . . . . . . .6 Using the tear-off function . . . . . . . . . . . . . . . . . . . . . . . . . . . . .10
Loading Single Sheets . . . . . . . . . . . . . . . . . . . . . . . . . . . . . . . . . . . . . .12
Loading Special Paper . . . . . . . . . . . . . . . . . . . . . . . . . . . . . . . . . . . . .14
Multipart forms. . . . . . . . . . . . . . . . . . . . . . . . . . . . . . . . . . . . . . .14
Labels . . . . . . . . . . . . . . . . . . . . . . . . . . . . . . . . . . . . . . . . . . . . . . .15
Switching Between Continuous Paper and Single Sheets . . . . . . . .17 Switching to single sheets . . . . . . . . . . . . . . . . . . . . . . . . . . . . . .17 Switching to continuous paper. . . . . . . . . . . . . . . . . . . . . . . . . .18
Using the Micro Adjust Function . . . . . . . . . . . . . . . . . . . . . . . . . . . .19 Adjusting the tear-off position . . . . . . . . . . . . . . . . . . . . . . . . . .19 Adjusting the top-of-form position . . . . . . . . . . . . . . . . . . . . . .20
1
1
1
1
1
1
1
1
1
1
1
1
Paper Handling |
1 |
Selecting a Paper Source
Your printer can print on single sheets, continuous paper, multipart forms, and labels.
cCaution:
Do not use paper that is folded, creased, curled, torn, stained, or stamped. Always use new, clean paper that meets the paper specifications. See “Paper” on page 133 for more detailed information.
Your printer can accommodate several paper types through two paper sources: paper guide or tractor. You should select the paper source depending on the type of paper you are using. You can select the paper source by setting the paper release lever. See “Printer Parts” on page 128 for more information.
Paper source and paper types
Basically, there are two paper types and two paper sources. The table below shows the relationship between paper sources and paper types, as well as paper loading and ejecting orientation.
|
Paper path |
Paper source |
|
|
selection |
|
|
|
Continuous paper * |
Tractor |
Tractor |
Single sheets ** |
Paper guide |
Manual feed |
*Continuous paper includes labels and multipart forms.
**Single sheets include labels and single-sheet multipart forms.
2 Paper Handling
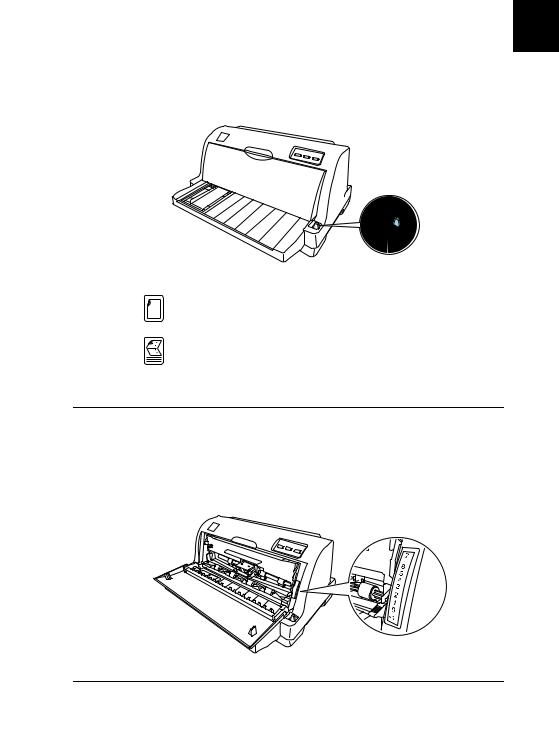
Setting the paper release lever
Set the paper release lever to select the paper-feeding method you want the printer to use. The paper release lever has two positions:  for tractor feeding and
  for single-sheet feeding, as explained below.
Single-sheet feeding position - to use the paper guide.
Tractor feeding position - to use the tractor.
Adjusting the Paper-Thickness Lever
You can get the best printing quality by adjusting the paper-thickness lever according to the thickness of the paper you are using.
1
1
1
1
1
1
1
1
1
1
1
1
Paper Handling |
3 |

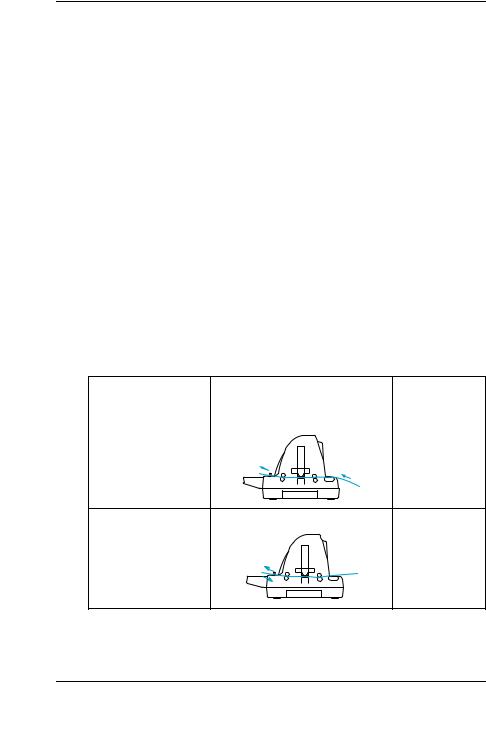
The higher the number you set the paper-thickness lever to, the wider the space between the platen and print head. If your printout appears faint or characters seem skipped or missing, this setting may be too high. On the other hand, if the setting is too low, your printout may appear smudged, the paper may not feed correctly, or the ribbon may become damaged.
The following table provides guidelines for selecting the appropriate lever position for the type of paper you are using.
Paper type |
Paper-thickness lever position |
|
|
Ordinary paper |
0 |
(single sheets or continuous paper) |
|
|
|
Multipart forms (carbonless) |
|
|
|
2 parts (original + 1 copy) |
1 |
3 parts (original + 2 copies) |
2 |
4 parts (original + 3 copies) |
3 |
5 parts (original + 4 copies) |
5 |
|
|
Labels |
2 |
|
|
4 Paper Handling
Loading Continuous Paper
Your printer can print on continuous paper from 101.6 to 254 mm (4.0 to 10.0 inches) wide. See “Continuous paper” on page 134 for detailed continuous paper specifications. You can load continuous paper from the tractor unit.
Positioning the continuous paper supply
When you load continuous paper, make sure to line up the paper supply with the tractor so the paper feeds smoothly into the printer as shown below.
1
1
1
1
1
1
1
1
1
1
1
1
Paper Handling |
5 |
Loading continuous paper with the tractor
When using continuous paper, it is a good idea to set the Auto tear-off function in the default-setting mode to on. For more information, see “About Your Printer’s Default Settings” on page 41.
1.Make sure that the paper release lever is set to the tractor feeding position.
2. Slide the edge guide all the way to the left.
6 Paper Handling

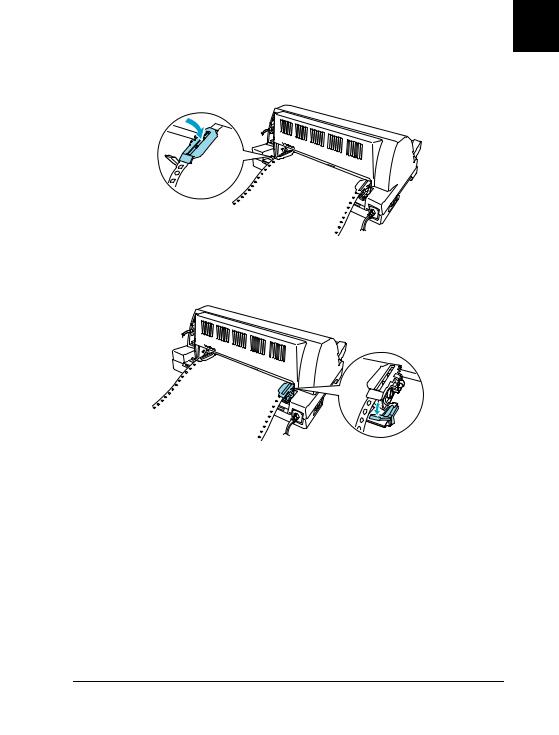
3.Facing the back of the printer, release the sprocket lock levers by pushing them up.
sprocket lock lever
4.Position the left sprocket so that the sprocket pins are to the left of the arrow mark (0 position) on the back of the printer. Then push down the lock lever to lock the sprocket in place.
Note:
Printing starts at the arrow mark (0 position) on the back of the printer.The unprintable area is to the left of the arrow mark.
5.Slide the right sprocket to roughly match the width of your paper, but do not lock it.
1
1
1
1
1
1
1
1
1
1
1
1
Paper Handling |
7 |
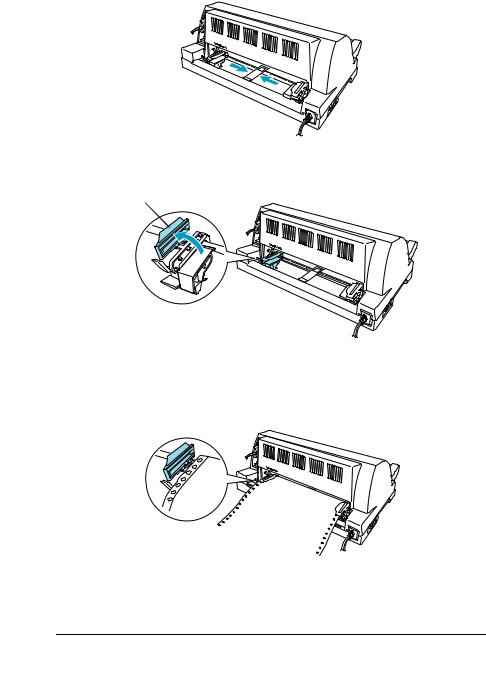
6.Slide the center paper support to the middle of the two sprockets.
7. Open the sprocket covers of the both sprockets.
sprocket cover
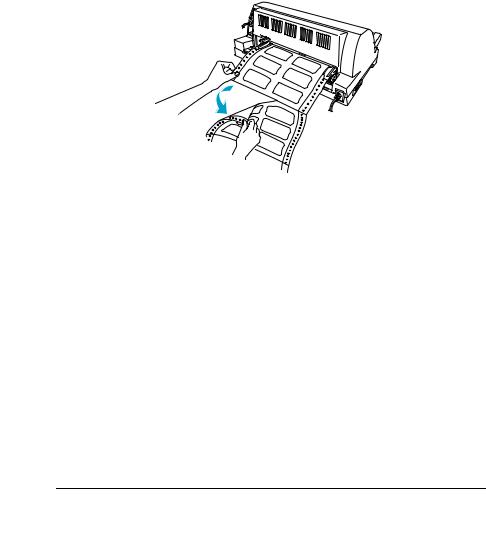
8.Fit the first two holes of the continuous paper over the sprocket pins on both sides. Be sure to position your paper supply so that the printable side faces up.
8 Paper Handling
cCaution:
Make sure the first sheet of your continuous paper has a clean, straight edge so that it can feed smoothly into the printer.
9. Close the sprocket covers.
10.Slide the right sprocket to remove any slack in the paper. Then push down the sprocket lock lever to lock the sprocket in place.
Note:
Before turning the printer on, install the ribbon cartridge. Otherwise, paper jams may occur.
11.Turn on the printer if it is turned off. The printer is ready to start printing.
1
1
1
1
1
1
1
1
1
1
1
1
Paper Handling |
9 |

Note:
Always make sure there is at least one more sheet than required; continuous paper may not feed properly if it is not fed through the sprockets.
Do not pull the loaded paper out of the tractor unit while the printer is on. Doing so may cause paper jams or printer malfunctions, also the top-of-form position setting may become misadjusted.
Do not pull out paper that is not ejected completely after pressing the Load/Eject button. Doing so may cause paper jams or printer malfunctions, also the top-of-form position setting may become misadjusted.
If the first line on your page appears too high or low, you can change its position by using the Micro Adjust function as described in “Adjusting the top-of-form position” on page 20.
Using the tear-off function
You can use the tear-off function to advance your continuous paper to the printer’s tear-off edge automatically when you finish printing. You can then easily tear off the printed sheets. When you resume printing, the printer automatically feeds the paper back to the top-of-form position so that you can save the paper normally lost between documents.
To use the tear-off function, turn on the Auto tear-off function and select the appropriate page length for continuous paper in the default-setting mode. See “Changing default settings” on page 47 for instructions on how to change the default settings.
If the perforation between pages is not aligned with the tear-off edge, you can adjust the position of the perforation using the Micro Adjust function. See “Adjusting the tear-off position” on page 19 for more information.
When Auto tear-off is on, the printer automatically advances the paper to the tear-off position whenever it receives a full page of data or a form feed command followed by no more data.
The steps below describe how to use Auto tear-off function.
10 Paper Handling
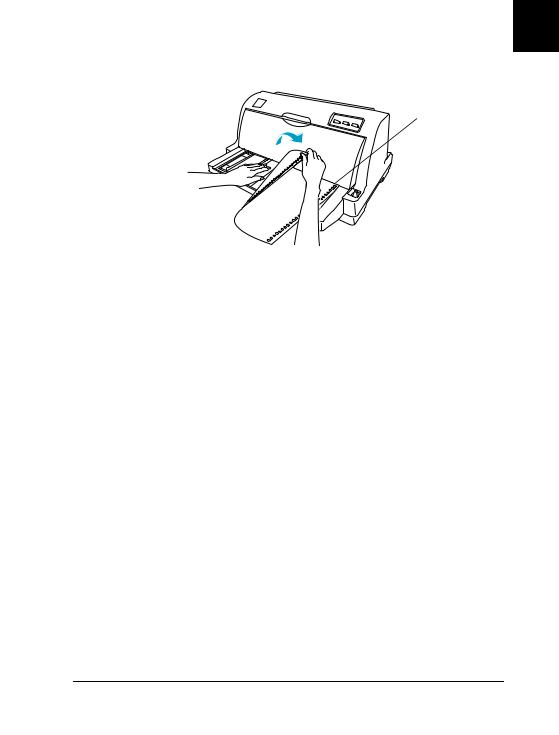
1.When printing is finished, the printer advances the perforation of the final printed page to the tear-off position.
Tear off all printed pages using the tear-off edge of the printer cover.
tear-off edge
Note:
If your paper’s perforation is not properly aligned with the tear-off edge, you can adjust the tear-off position using the Micro Adjust function as described in “Adjusting the tear-off position” on page 19.
2.When you resume printing, the printer feeds the paper back to the top-of-form position and begins printing.
Removing continuous paper
Follow these steps to remove continuous paper from the printer:
1.When the auto tear-off function is on, the printer advances the paper to the tear-off position automatically.
2.Tear off the printed pages.
3.Press the Load/Eject button to feed the continuous paper backward out of the printer and into the standby position.
4.To completely remove continuous paper from the printer, open the sprocket covers. Remove the paper from the tractor unit, and then close the sprocket covers.
1
1
1
1
1
1
1
1
1
1
1
1
Paper Handling |
11 |
Loading Single Sheets
Your printer can print on single sheets of paper from 90 to 257 mm (3.5 to 10.1 inches) wide. See “Single sheets” on page 134 for detailed single-sheet paper specifications.
Note:
If you load long paper (for example, legal size paper), leave enough space at the back of the printer so that the paper is not obstructed.
Follow these steps to load single sheets from the paper guide.
1.Make sure the paper guide and the ribbon cartridge are attached as described in the Setup Sheet. Then close the tractor unit sprocket covers located on the back of your printer and push down the sprocket lock levers to lock the sprockets in place.
Note:
Before turning the printer on, install the ribbon cartridge. Otherwise, paper jams may occur.
2.Turn on the printer.
3.Make sure that the paper release lever is set to the single-sheet feeding position.
12 Paper Handling
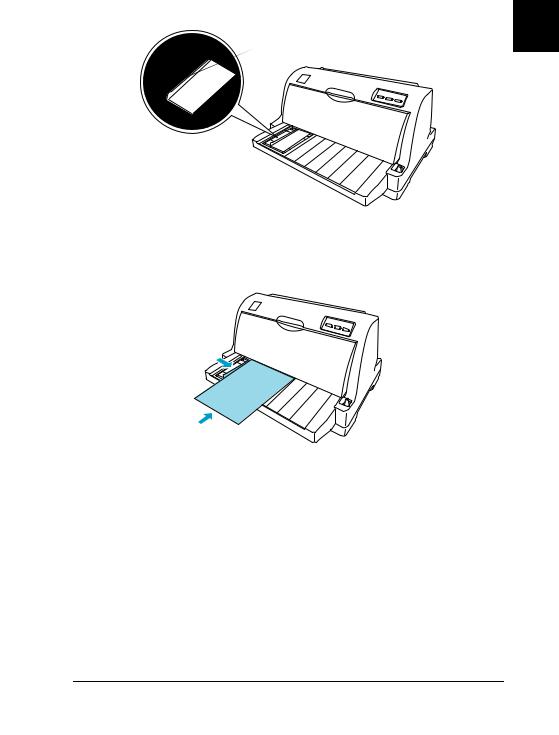
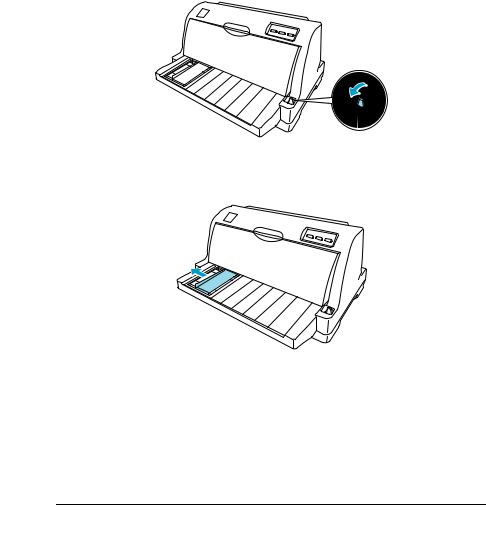
4. Slide the edge guide until it rests against the guide mark.
guide mark
5.While aligning the left side of a sheet of paper with the edge guide, insert it into the printer until it meets resistance. Be sure to load paper printable side up and the top of the paper first.
After a few seconds, the printer automatically advances the paper to the loading position. The printer is ready to start printing.
Note:
If the paper feed roller rotates but the printer does not load the paper, completely remove the paper and then insert it all the way into the printer again.
If the paper feeds before you can adjust its position properly, increase the Manual feed wait time in the default-setting mode. See “Changing default settings” on page 47 for more information.
1
1
1
1
1
1
1
1
1
1
1
1
Paper Handling |
13 |

If you need to adjust the position of the paper after it is loaded, see “Adjusting the top-of-form position” on page 20 and follow the instructions.
Do not pull out paper that is not ejected completely after pressing the Load/Eject button. Doing so may cause paper jams or printer malfunctions, also the top-of-form position setting may become misadjusted.
After printing a sheet, the printer ejects it onto the paper guide and the Paper Out and Pause lights come on. If you are printing a multiple-page document, remove the printed sheet and insert a new sheet into the paper guide. The printer automatically advances the paper and resumes printing.
Note:
If the printer does not eject the printed sheet, press the Load/Eject button.
Loading Special Paper
Multipart forms
Your printer can print on both single-sheet and continuous multipart forms. It can use multipart forms with up to five parts including the original.
cCaution:
Use only carbonless or carbon-backed multipart forms.
When using multipart forms with a line of glue at the top of the form, load the forms with the glued side first.
Before printing, set the paper-thickness lever to the appropriate position for your multipart forms referring to the table in “Adjusting the Paper-Thickness Lever” on page 3.
14 Paper Handling
You can load single-sheet multipart forms from the paper guide. For instructions, see “Loading Single Sheets” on page 12. You can load continuous multipart forms in the same way as you load ordinary continuous paper. For instructions, see “Loading Continuous Paper” on page 5.
cCaution:
When printing on multipart forms, make sure that your software
settings keep the printing entirely within the printable area of the forms. Printing on the edge of a multipart form can damage the print head. For information about the printable area, see “Printable area” on page 142.
Labels
You can use two types of labels: single-sheet and continuous forms. Do not use labels on shiny single-sheet backing, because the backing sheet tends to slip and may not feed properly.
Follow these steps to load labels:
cCaution:
Use labels only under normal operating conditions because labels
are especially sensitive to temperature and humidity.
1.Make sure of the following:
Your software settings keep the printing entirely within the printable area. For information about the printable area, see “Printable area” on page 142.
cCaution:
Printing on the edge of a label can damage the print head.
The auto tear-off function is turned off in the default-setting mode.
2.Load labels as described in “Loading Single Sheets” on page 12 or “Loading Continuous Paper” on page 5.
1
1
1
1
1
1
1
1
1
1
1
1
Paper Handling |
15 |
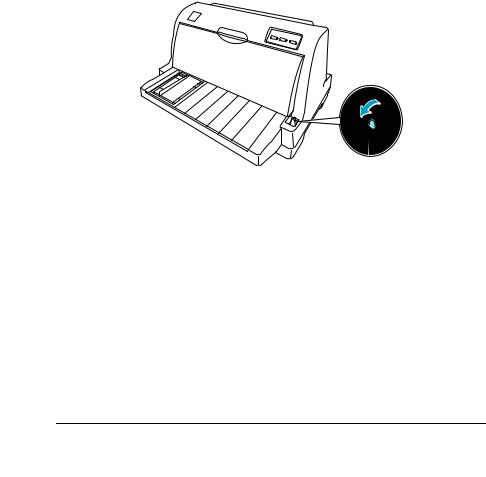
To tear off and eject labels
When using continuous forms, always tear off and eject labels as described below.
cCaution:
Never feed labels backward using the Load/Eject button. Labels can easily peel off their backing and jam the printer.
1.At the back of your printer, tear off the last label form that has entered the printer. See the illustration below.
2. Press the LF/FF button to eject the last label form forward.
cCaution:
Do not leave labels loaded in the printer between print jobs; they tend to curl and may come off their backing sheet and jam the printer when you resume printing.
16 Paper Handling

Switching Between Continuous Paper and
Single Sheets
You can easily switch between continuous paper and single sheets without removing the continuous paper from the tractor.
Switching to single sheets
Follow these steps to switch from continuous paper to single sheets:
1.When the Auto tear-off function is turned on, the printer advances the paper to the tear-off position automatically.
2.Tear off the printed pages.
cCaution:
Always tear off paper before feeding it backwards; feeding
too many sheets backwards can cause a paper jam.
Never feed labels backward using the Load/Eject button. Labels can easily peel off their backing and jam the printer. For information on removing labels from the paper path, see “To tear off and eject labels” on page 16.
3.Press the Load/Eject button to feed the continuous paper back to the standby position. The paper is still attached to the tractor, but is no longer in the paper path.
4.Set the paper release lever to the single-sheet feeding position.
Now you can load single sheets from the paper guide. See “Loading Single Sheets” on page 12 for more information.
1
1
1
1
1
1
1
1
1
1
1
1
Paper Handling |
17 |
Switching to continuous paper
Follow these steps to switch from single sheets to continuous paper:
1.If necessary, press the Load/Eject button to eject the last printed single sheet.
2.Make sure continuous paper is loaded in the printer as described in “Loading continuous paper with the tractor” on page 6.
3.Set the paper release lever to the tractor feeding position.
The printer automatically advances the continuous paper from the standby position to the loading position when it receives data.
18 Paper Handling

Using the Micro Adjust Function
The Micro Adjust function allows you to move the paper forward or backward in 0.141 mm (1/180-inch) increments so that you can make precise adjustments to the top-of-form and tear-off positions.
Adjusting the tear-off position
If your paper perforation is not aligned with the tear-off edge, you can use the Micro Adjust function to move the perforation to the tear-off position.
Follow these steps to adjust the tear-off position:
Note:
Your tear-off position setting remains in effect until you change it, even if you turn off the printer.
1.Make sure the paper is at the current tear-off position.
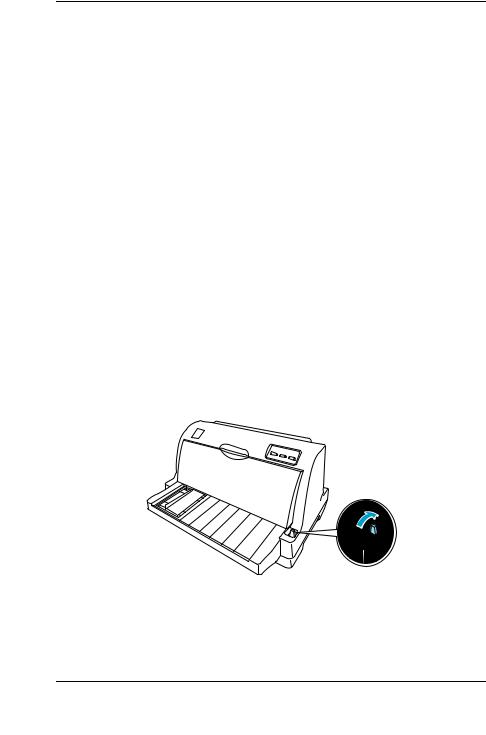
2.Hold down the Pause button for about three seconds. The Pause light begins flashing and the printer enters the Micro Adjust mode.
3.Press the LF/FF D button to feed paper forward, or press the Load/Eject U button to feed paper backward, until the paper perforation is aligned with the tear-off edge of the printer cover.
Power |
Paper Out |
LF/FF Load/Eject
 Micro Adjust
1
1
1
1
1
1
1
1
1
1
1
1
Paper Handling |
19 |

Note:
The printer has a minimum and a maximum tear-off position. If you try to adjust the tear-off position beyond these limits, the printer beeps and stops moving the paper.
4.Tear off the printed pages.
5.Press the Pause button to exit the Micro Adjust mode.
When you resume printing, the printer automatically feeds the paper back to the top-of-form position and begins printing.
Adjusting the top-of-form position
The top-of-form position is the position on the page where the printer starts printing. If your printing appears too high or low on the page, you can use the Micro Adjust function to adjust the top-of-form position.
Follow these steps to adjust the top-of-form position:
Note:
Your top-of-form position setting remains in effect until you change it, even if you turn off the printer.
The top margin setting made in some application software overrides the top-of-form position setting you make with the Micro Adjust function. If necessary, adjust the top-of-form position in your software.
1.Make sure the printer is turned on.
2.Press the Pause button to stop printing. The Pause light comes on.
3.Load paper. Press the Load/Eject button to advance continuous paper to the current top-of-form position. If necessary, lift up the printer cover so you can see the paper position.
20 Paper Handling

4.Hold down the Pause button for about three seconds. The Pause light starts flashing and the printer enters the Micro Adjust mode.
5.Press the LF/FF D button to move the top-of-form position down on the page, or press the Load/Eject U button to move the top-of-form position up on the page.
Note:
The printer has a minimum and a maximum top-of-form position. If you try to adjust it beyond these limits, the printer beeps and stops moving the paper.
When the paper reaches the default top-of-form position, the printer also beeps and stops moving the paper briefly. You can use the default setting as a reference point when adjusting the top-of-form position.
6.After you set the top-of-form position, press the Pause button to exit the Micro Adjust mode.
1
1
1
1
1
1
1
1
1
1
1
1
Paper Handling |
21 |

22 Paper Handling

Chapter 2
Printer Software
About Your Printer Software . . . . . . . . . . . . . . . . . . . . . . . . . . . . . . . .24
Using the Printer Driver with Windows Me, 98, and 95 . . . . . . . . .24 Accessing the printer driver from Windows applications . . .25 Accessing the printer driver from the Start menu. . . . . . . . . .26 Changing the printer driver settings . . . . . . . . . . . . . . . . . . . . .27
Using the Printer Driver with Windows XP, 2000 and NT 4.0 . . . .28 Accessing the printer driver from Windows applications . . .28 Accessing the printer driver from the Start menu. . . . . . . . . .30 Changing the printer driver settings . . . . . . . . . . . . . . . . . . . . .32
Printer Driver Settings Overview . . . . . . . . . . . . . . . . . . . . . . . . . . . .33
Using EPSON Status Monitor 3. . . . . . . . . . . . . . . . . . . . . . . . . . . . . .34 Setting up EPSON Status Monitor 3 . . . . . . . . . . . . . . . . . . . . .35 Accessing EPSON Status Monitor 3. . . . . . . . . . . . . . . . . . . . . .36
2
2
2
2
2
2
2
2
2
2
2
2
Printer Software |
23 |

About Your Printer Software
The EPSON printer software that comes with your printer includes the printer driver software and EPSON Status Monitor 3.
The printer driver is software that allows your computer to control the printer. You need to install the printer driver so your Windows software applications can take full advantage of the printer’s capabilities.
EPSON Status Monitor 3 allows you to monitor the status of your printer, alerts you when errors occur, and provides you with troubleshooting tips. EPSON Status Monitor 3 is automatically installed when you install the printer driver.
Note:
Before proceeding, make sure you have installed the printer driver on your computer as described in the Setup Sheet.
Only LQ-630 is displayed as the printer name in the printer driver, even if the printer is an LQ-630S model. Select LQ-630 when installing or using the printer driver, even if the printer being installed or used is an LQ-630S.
Using the Printer Driver with Windows Me, 98, and 95
You can access the printer driver from your Windows applications or from the Start menu.
When you access the printer driver from a Windows application, any settings you make apply only to the application you are using. See “Accessing the printer driver from Windows applications” on page 25 for more information.
24 Printer Software
Loading...