


 Loading...
EPSON®
LQ-800 and LQ-1000 Printers
User's Manual

FCC COMPLIANCE STATEMENT
FOR AMERICAN USERS
This equipment generates and uses radio frequency energy and if not installed and used properly, that is, in strict accordance with the manufacturer’s instructions, may cause interference to radio and television reception. It has been type tested and found to comply with the limits for a Class B computing device in accordance with the specifications in Subpart J of part 15 of FCC Rules, which are designed to provide reasonable protection against such interference in a residential installation. However, there is no guarantee that interference will not occur in a particular installation. If this equipment does cause interference to radio or television reception, which can be determined by turning the equipment off and on, the user is encouraged to try to correct the interference by one or more of
the |
following |
measures: |
|
|
- |
Reorient |
the |
receiving |
antenna |
- |
Relocate |
the |
computer |
with respect to the receiver |
-Plug the computer into a different outlet so that the computer and receiver are on different branch circuits.
If necessary, the user should consult the dealer or an experienced radio/television technician for additional suggestions. The user may find the following booklet prepared by the Federal Communications Commission helpful:
“How to Identify and Resolve Radio-TV Interference Problems.”
This booklet is available from the U.S. Government Printing Office, Washington, DC 20402. Stock No. 004-000-00345-4.
WARNING
The connection of a non-shielded printer interface cable to this printer will invalidate the FCC Certification of this device and may cause interference levels which exceed the limits established by the FCC for this equipment. If this equipment has more than one interface connector, do not leave cables connected to unused interfaces.
All rights reserved. No part of this publication may be reproduced, stored in a retrieval system, or transmitted, in any form or by any means, mechanical, photocopying, recording or otherwise, without the prior written permission of Seiko Epson Corporation. No patent liability is assumed with respect to the use of the information contained herein. While every precaution has been taken in the preparation of this book, Seiko Epson Corporation assumes no responsibility for errors or omissions. Neither is any liability assumed for damages resulting from the use of the information contained herein.
Apple is a registered trademark of Apple Computer, Inc. Applesoft is a trademark of Apple Computer, Inc.
Centronics is a registered trademark of Data Computer Corporation. Epson is a registered trademark of Seiko Epson Corporation.
IBM is a registered trademark of International Business Machines Corporation. Microsoft is a trademark of Microsoft Corporation.
QX-IO is a registered trademark, and QX is a trademark of Epson America, Inc.
Copyright © 1985 by Seiko Epson Corporation
Nagano, Japan
ii
Contents
|
Introduction . . . . . . . . . . . . . . . . . . . . . . . . . . . . . . . . . . . |
Intro-1 |
1 |
Setting Up Your LQ Printer . . . . . . . . . . . . . . . . . . . . . |
1-1 |
|
Unpacking Your Printer . . . . . . . . . . . . . . . . . . . . . . . . |
1-1 |
|
Installing the paper feed knob . . . . . . . . . . . . . . . . . |
1-3 |
|
Selecting the Right Location . . . . . . . . . . . . . . . . . . . . . |
1-4 |
|
Installing the Ribbon . . . . . . . . . . . . . . . . . . . . . . . . . . . |
1-5 |
|
Replacing the ribbon . . . . . . . . . . . . . . . . . . . . . . . . |
1-8 |
|
Loading Single-Sheet Paper . . . . . . . . . . . . . . . . . . . . . |
1-8 |
|
Installing the single-sheet guide . . . . . . . . . . . . . . . . |
1-8 |
|
Loading the paper . . . . . . . . . . . . . . . . . . . . . . . . . . . |
1-9 |
|
Adjusting the paper thickness lever . . . . . . . . . . . . . |
1-12 |
|
Turning On the Power . . . . . . . . . . . . . . . . . . . . . . . . . |
1-12 |
|
Operating the Control Panel . . . . . . . . . . . . . . . . . . . . |
1-14 |
|
OFF LINE/ON LINE . . . . . . . . . . . . . . . . . . . . . . . . . |
1-14 |
|
FORM FEED/LETTER QUALITY . . . . . . . . . . . . . . |
1-15 |
|
LINE FEED/DRAFT . . . . . . . . . . . . . . . . . . . . . . . . . |
1-15 |
|
Selecting the Letter Quality or Draft Mode . . . . . . . . . |
1-16 |
|
Running the Self Test . . . . . . . . . . . . . . . . . . . . . . . . . . . |
1-16 |
|
Connecting Your Printer to Your Computer . . . . . . . . |
1-17 |
|
The parallel interface . . . . . . . . . . . . . . . . . . . . . . . . . |
1-18 |
|
The serial interface . . . . . . . . . . . . . . . . . . . . . . . . . . . |
1-18 |
|
Printing Your First Document . . . . . . . . . . . . . . . . . . . . |
1-19 |
2 |
The Cut Sheet Feeder . . . . . . . . . . . . . . . . . . . . . . . . . . |
2-1 |
|
Installing the Cut Sheet Feeder . . . . . . . . . . . . . . . . . . . |
2-1 |
|
Preparing the Paper for Loading . . . . . . . . . . . . . . . . . |
2-5 |
|
Loading Paper . . . . . . . . . . . . . . . . . . . . . . . . . . . . . . . . |
2-6 |
|
Setting up your word processor for a cut sheet |
|
|
feeder . . . . . . . . . . . . . . . . . . . . . . . . . . . . . . . . . . . |
2-8 |
|
Printing with the Cut Sheet Feeder . . . . . . . . . . . . . . . . |
2-9 |
|
Removing the Cut Sheet Feeder . . . . . . . . . . . . . . . . . . |
2-10 |
|
Troubleshooting . . . . . . . . . . . . . . . . . . . . . . . . . . . . . . . |
2-12 |
|
Maintenance . . . . . . . . . . . . . . . . . . . . . . . . . . . . . . . . . . |
2-13 |
iii
3 |
The Tractor Unit . . . . . . . . . . . . . . . . . . . . . . . . . . . . . . |
3-1 |
|||
|
Setting Up the LQ for Continuous-feed Paper . . . . . . |
3-1 |
|||
|
Installing |
the Tractor Unit . . . . . . . . . . . . . . . . . . . . . . . |
3-2 |
||
|
Loading |
Paper |
. . . . . . . . . . . . . . . . . . . . . . . . . . . . . . . . |
3-3 |
|
|
Setting the top-of-page position . . . . . . . . . . . . . . . |
3-8 |
|||
|
Installing the paper separator and tractor cover . . . |
3-8 |
|||
|
Removing the Optional Tractor Unit . . . . . . . . . . . . . . |
3-11 |
|||
4 |
Using the LQ with Commercial Software . . . . . . . . . . |
4-1 |
|||
5 |
LQ Features . . |
. . . . . . . . . . . . . . . . . . . . . . . . . . . . . . . . |
5-1 |
||
|
ESCape and ASCII . . . . . . . . . . . . . . . . . . . . . . . . . . . . |
5-1 |
|||
|
Demonstration |
Programs . . . . . . . . . . . . . . . . . . . . . . . |
5-2 |
||
|
Running BASIC programs . . . . . . . . . . . . . . . . . . . . |
5-3 |
|||
|
Sending Control Codes to the Printer . . . . . . . . . . . . . |
5-4 |
|||
|
Basic Widths . . |
. . . . . . . . . . . . . . . . . . . . . . . . . . . . . . . . |
5-5 |
||
|
Pica |
printing |
. . . . . . . . . . . . . . . . . . . . . . . . . . . . . . . . |
5-5 |
|
|
Elite |
printing |
. . . . . . . . . . . . . . . . . . . . . . . . . . . . . . . . |
5-5 |
|
|
Fifteen mode printing . . . . . . . . . . . . . . . . . . . . . . . . |
5-5 |
|||
|
Letter Quality and Draft . . . . . . . . . . . . . . . . . . . . . . . . |
5-6 |
|||
|
Cancelling Modes . . . . . . . . . . . . . . . . . . . . . . . . . . . . . |
5-6 |
|||
|
Resetting |
the Printer . . . . . . . . . . . . . . . . . . . . . . . . . . . |
5-6 |
||
|
Disabling a program’s reset code . . . . . . . . . . . . . . . |
5-7 |
|||
|
Print Quality Command . . . . . . . . . . . . . . . . . . . . . . . . |
5-8 |
|||
|
Other Widths . |
. . . . . . . . . . . . . . . . . . . . . . . . . . . . . . . . |
5-8 |
||
|
Double-width |
printing . . . . . . . . . . . . . . . . . . . . . . . . |
5-8 |
||
|
Condensed printing . . . . . . . . . . . . . . . . . . . . . . . . . . |
5-9 |
|||
|
Print Enhancements . . . . . . . . . . . . . . . . . . . . . . . . . . . . |
5-10 |
|||
|
Emphasized mode . . . . . . . . . . . . . . . . . . . . . . . . . . . |
5-10 |
|||
|
Double-strike |
. . . . . . . . . . . . . . . . . . . . . . . . . . . . . . . |
5-11 |
||
|
Underline mode . . . . . . . . . . . . . . . . . . . . . . . . . . . . . |
5-12 |
|||
|
Proportional mode . . . . . . . . . . . . . . . . . . . . . . . . . . |
5-12 |
|||
|
Master |
Select |
. . . . . . . . . . . . . . . . . . . . . . . . . . . . . . . |
5-13 |
|
|
Superscript and subscript . . . . . . . . . . . . . . . . . . . . . |
5-15 |
|||
|
International |
characters . . . . . . . . . . . . . . . . . . . . . . . |
5-15 |
||
|
Page Formatting . . . . . . . . . . . . . . . . . . . . . . . . . . . . . . . |
5-18 |
|||
|
Margins . . . |
. . . . . . . . . . . . . . . . . . . . . . . . . . . . . . . . |
5-18 |
||
|
Skip-over-perforation . . . . . . . . . . . . . . . . . . . . . . . . |
5-19 |
|||
|
Linespacing |
. . . . . . . . . . . . . . . . . . . . . . . . . . . . . . . . |
5-19 |
||
|
Half-Speed Mode . . . . . . . . . . . . . . . . . . . . . . . . . . . . . . |
5-20 |
|||
|
Printing to the End of the Page . . . . . . . . . . . . . . . . . . |
5-20 |
|||
iv
6 |
Graphics and User-Defined Characters . . . . . . . . . . . . |
6-1 |
||
|
Graphics . . . . |
. . . . . . . . . . . . . |
. . . . . . . . . . . . . . . . . . . . |
6-1 |
|
The print head . . . . . . . . . . |
. . . . . . . . . . . . . . . . . . . . |
6-2 |
|
|
Dot patterns . . . . . . . . . . . . . |
. . . . . . . . . . . . . . . . . . . |
6-3 |
|
|
Eight-pin graphics . . . . . . . . |
. . . . . . . . . . . . . . . . . . . |
6-3 |
|
|
Twenty-four-pin graphics . . |
. . . . . . . . . . . . . . . . . . . |
6-3 |
|
|
Pin labels . |
. . . . . . . . . . . . . . . . . . . . . . . . . . . . . . . . |
6-3 |
|
|
Graphics Command . . . . . . . . |
. . . . . . . . . . . . . . . . . . . |
6-5 |
|
|
Column reservation numbers . . . . . . . . . . . . . . . . . . |
6-6 |
||
|
First graphics program . . . . |
to. .print. . . . .graphics. . . . . . . .......... |
6-6 |
|
|
Using hand-calculated data |
6-7 |
||
|
Individual graphics options |
commands . . . . . . . . . . |
6-10 |
|
|
Reassigning |
command . . . . . |
. . . . . . . . . . . . . . . . . . . |
6-10 |
|
User-Defined |
Characters . . . . . |
. . . . . . . . . . . . . . . . . . . |
6-11 |
|
Design grids . . . . . . . . . . . . . |
. . . . . . . . . . . . . . . . . . . |
6-11 |
|
|
Defining Your |
Own Characters . . . . . . . . . . . . . . . . . . |
6-13 |
|
|
Data numbers . . . . . . . . . . . |
. . . . . . . . . . . . . . . . . . . |
6-13 |
|
|
Sending information to the LQ . . . . . . . . . . . . . . . . |
6-14 |
||
|
Printing User-Defined Characters . . . . . . . . . . . . . . . . . |
6-16 |
||
|
Copying ROM to RAM . . . |
. . . . . . . . . . . . . . . . . . . |
6-17 |
|
|
Letter Quality characters . . . |
. . . . . . . . . . . . . . . . . . . |
6-18 |
|
|
Proportional mode characters . . . . . . . . . . . . . . . . . |
6-18 |
||
|
Superscripts |
and subscripts . |
. . . . . . . . . . . . . . . . . . . |
6-18 |
|
Mixing print styles . . . . . . . . |
. . . . . . . . . . . . . . . . . . . |
6-19 |
|
V
Appendixes
A |
The DIP Switches . . . . . . . . . . . . . . . . . . . . . . . . . . . . . |
B |
The LQ Character Set and ASCII Table . . . . . . . . . . . |
C Installing the Option Cartridge . . . . . . . . . . . . . . . . . . . |
|
|
The Identity Module . . . . . . . . . . . . . . . . . . . . . . . . . . . |
|
The Font Module . . . . . . . . . . . . . . . . . . . . . . . . . . . . . . |
|
Using the Option Cartridges . . . . . . . . . . . . . . . . . . . . . |
D |
Troubleshooting and Maintenance . . . . . . . . . . . . . . . . |
|
Diagnosing the Problem . . . . . . . . . . . . . . . . . . . . . . . . |
|
Beeper Error Warnings . . . . . . . . . . . . . . . . . . . . . . . . . |
|
Hex Dump Mode . . . . . . . . . . . . . . . . . . . . . . . . . . . . . . |
|
IBM PC BASIC Solutions . . . . . . . . . . . . . . . . . . . . . . . |
|
Applesoft BASIC Solutions . . . . . . . . . . . . . . . . . . . . . |
|
QX-10 and QX-16 Solutions . . . . . . . . . . . . . . . . . . . . . |
|
Maintenance . . . . . . . . . . . . . . . . . . . . . . . . . . . . . . . . . . |
|
Changing the print head . . . . . . . . . . . . . . . . . . . . . . |
E |
Widths of the Proportional Characters . . . . . . . . . . . . |
F |
The Parallel and Serial Interfaces . . . . . . . . . . . . . . . . . |
G Choosing and Setting Up Optional Interfaces . . . . . . . |
|
H |
Technical Specifications . . . . . . . . . . . . . . . . . . . . . . . . . |
I |
Command Summary . . . . . . . . . . . . . . . . . . . . . . . . . . . |
|
Index . . . . . . . . . . . . . . . . . . . . . . . . . . . . . . . . . . . . . . . . . |
A-1
B-1
C-1
C-2
C-3
C-3
D-1
D-1
D-4
D-4
D-6
D-7
D-8
D-8
D-8
E-1
F-1
G-1
H-1
I-1
Index-1
v i
1-1
1-2
1-3
1-4
1-5
1-6
1-7
1-8
1-9
1-10
1-11
1-12
1-13
1-14
2-1
2-2
2-3
2-4
2-5
2-6
2-7
2-8
2-9
3-1
3-2
3-3
3-4
3-5
3-6
3-7
3-8
3-9
3-10
3-11
3-12
3-13
Figures
The LQ-800 |
. . . . . |
. . . . . . . . . . . . . . . . . . . . . . . . . . |
1-2 |
|
The LQ-1000 |
. . . . |
. . . . . . . . . . . . . . . . . . . . . . . . . . |
1-2 |
|
Installing the paper feed knob . . . . . . . . . . . . . . . . |
1-3 |
|||
Tightening the ribbon . . . . . . . . . . . . . . . . . . . . . . . |
1-5 |
|||
Loading the LQ-800 ribbon cartridge . . . . . . . . . . |
1-6 |
|||
Loading the LQ-1000 ribbon cartridge . . . . . . . . . |
1-6 |
|||
Positioning the ribbon . . . . . . . . . . . . . . . . . . . . . . |
1-7 |
|||
Installing the single-sheet guide . . . . . . . . . . . . . . . |
1-9 |
|||
Loading single-sheet paper . . . . . . . . . . . . . . . . . . . |
1-10 |
|||
Paper thickness lever . . . . . . . . . . . . . . . . . . . . . . . |
1-12 |
|||
Turning on the power switch . . . . . . . . . . . . . . . . . |
1-13 |
|||
The LQ control panel . . . . . . . . . . . . . . . . . . . . . . . |
1-14 |
|||
LQ self test in draft and Letter Quality modes . . . |
1-17 |
|||
Connecting a parallel interface cable . . . . . . . . . . . |
1-18 |
|||
Preparing the printer for installation . . . . . . . . . . . |
2-1 |
|||
Installing the cut sheet feeder . . . . . . . . . . . . . . . . . |
2-2 |
|||
Installing |
the |
small |
brackets . . . . . . . . . . . . . . . . . . |
2-3 |
Installing |
the |
large |
bracket . . . . . . . . . . . . . . . . . . . |
2-4 |
The LQ-1000 model . . . . . . . . . . . . . . . . . . . . . . . . |
2-5 |
|||
Paper support and paper loading lever . . . . . . . . . |
2-6 |
|||
Loading paper; adjusting the right paper guide . . |
2-7 |
|||
Turning the power on . . . . . . . . . . . . . . . . . . . . . . . |
2-9 |
|||
Removing the cut sheet feeder . . . . . . . . . . . . . . . . |
2-11 |
|||
Continuous-feed paper with printer stand . . . . . . |
3-1 |
|||
Continuous-feed paper without stand . . . . . . . . . . |
3-2 |
|||
Installing |
the |
tractor unit . . . . . . . . . . . . . . . . . . . . |
3-2 |
|
Preparing for paper loading . . . . . . . . . . . . . . . . . . |
3-3 |
|||
Moving the pin-feed holders . . . . . . . . . . . . . . . . . |
3-4 |
|||
Opening the pin-feed covers . . . . . . . . . . . . . . . . . . |
3-5 |
|||
Installing the paper shelf . . . . . . . . . . . . . . . . . . . . . |
3-5 |
|||
Loading |
paper . . . |
. . . . . . . . . . . . . . . . . . . . . . . . . . |
3-6 |
|
Fitting the paper over the pin feeds . . . . . . . . . . . . |
3-7 |
|||
Top-of-page position . . . . . . . . . . . . . . . . . . . . . . . . |
3-8 |
|||
Installing the paper separator . . . . . . . . . . . . . . . . . |
3-9 |
|||
Installing the tractor cover . . . . . . . . . . . . . . . . . . . |
3-10 |
|||
Removing the optional tractor unit . . . . . . . . . . . . |
3-11 |
|||
vii
6-1
6-2
6-3
6-4
6-5
6-6
6-7
6-8
A-1
C-1
C-2
D-1
D-2
F-1
G-1 G-2 G-3 G-4
Pin numbering system . . . . . . . . . . . . . . . . . . . . . .
Calculations for pin patterns . . . . . . . . . . . . . . . . .
Pattern on grid . . . . . . . . . . . . . . . . . . . . . . . . . . . .
Data layout for 24-pin graphics . . . . . . . . . . . . . . .
Design grids . . . . . . . . . . . . . . . . . . . . . . . . . . . . . . .
User-defined character . . . . . . . . . . . . . . . . . . . . . .
Calculating the data . . . . . . . . . . . . . . . . . . . . . . . .
Grids for super/subscript characters . . . . . . . . . . .
The DIP switch panels . . . . . . . . . . . . . . . . . . . . . .
Plugging the identity and font
modules together . . . . . . . . . . . . . . . . . . . . . . . . .
Installing an option cartridge . . . . . . . . . . . . . . . . .
Print head replacement . . . . . . . . . . . . . . . . . . . . . .
Removing the ribbon cables . . . . . . . . . . . . . . . . . .
Parallel interface timing . . . . . . . . . . . . . . . . . . . . .
Removing the upper case . . . . . . . . . . . . . . . . . . . .
Removing the control panel . . . . . . . . . . . . . . . . . .
Main circuit board . . . . . . . . . . . . . . . . . . . . . . . . .
Interface board mounted on main circuit board . .
6-4
6-4
6-7
6-8
6-12
6-13
6-14
6-19
A-1
C-1
C-2
D-9
D-10
F-3
G-3
G-4
G-5
G-6
viii
5-1
5-2
5-3
5-4
5-5
6-1
6-2
6-3
6-4
A-1
A-2 A-3
A-4 A-5
C-1
E-1
F-1
F-2
F-3
G-1 G-2 G-3 G-4 G-5 G-6
Tables
LQ character widths . . . . . . . . . . . . . . . . . . . . . . . .
International characters in Letter Quality mode . . International characters in draft mode . . . . . . . . .
International characters in proportional mode . . .
Maximum right margin settings . . . . . . . . . . . . . . .
Graphics options . . . . . . . . . . . . . . . . . . . . . . . . . . .
Individual graphics options commands . . . . . . . . .
Character width limits . . . . . . . . . . . . . . . . . . . . . .
Super/subscript widths . . . . . . . . . . . . . . . . . . . . . .
DIP switch panel 1 .........................
DIP switch panel 2 .........................
International DIP switch settings . . . . . . . . . . . . . .
Interface selection . . . . . . . . . . . . . . . . . . . . . . . . . .
Baud rate selection . . . . . . . . . . . . . . . . . . . . . . . . .
Print styles . . . . . . . . . . . . . . . . . . . . . . . . . . . . . . . .
Proportional character widths . . . . . . . . . . . . . . . .
Pins and signals . . . . . . . . . . . . . . . . . . . . . . . . . . . .
Printing enabled/disabled signals and control conditions . . . . . . . . . . . . . . . . . . . . . . . . . . . . . .
Pins and signals . . . . . . . . . . . . . . . . . . . . . . . . . . . .
Baud rate settings for 8143 ...................
Baud rate settings for 8148 ...................
Baud rate settings for 8149 ...................
Parity check settings for 8143 ................
Parity check settings for 8148 ................
Parity check settings for 8149 ................
5-10
5-16
5-17
5-17
5-19
6-5
6-10
6-15
6-19
A-3 A-4 A-5 A-5 A-5
c-2
E-1
F-1
F-4
F-5
G-7 G-7 G-8 G-8 G-8 G-8
ix
Introduction
The Epson LQ-800 and LQ-1000 are state-of-the-art, X-pin dotmatrix printers that deliver exceptional speed and sharpness in either Letter Quality or draft style.
The LQ-800 and LQ-1000 are also capable of a wide variety of print enhancements, including:
LETTER QUALITY |
D R A F T |
B o l d |
Bold |
Italic |
Italic |
Underlining |
U n d e r l i n i n g |
S u b s c r i p t |
S u b s c r i p t |
S u p e r s c r i p t |
S u p e r s c r i p t |
D o u b l e - w i d t h D o u b l e w i d t h
The LQ-800 and LQ-1000 combine the versatility and reliability of Epson products, with a wide range of exciting new features.
•You can select either the Letter Quality or draft typestyle with a touch of a front panel button-there are no codes to learn.
•The 24-pin print head produces sharp, crisp draft characters, and Letter Quality characters that look like they came from a typewriter.
•The LQ has built-in connectors for both parallel and serial interface cables, so there’s no need for extra options or modifications.
•Option cartridges are available to further extend the capabilities of the LQ-800 and LQ-1000. These cartridges provide additional type fonts, and will also allow you to use programs designed for other popular printers.
Intro-1
•The compact design and light weight of the LQ make it ideal for home and business applications.
•A 7K buffer frees your computer so you can work on one document while printing another.
Using this manual
To make it easier to set up your new LQ-800 or LQ-1000, this manual includes a 10-step guide to setting up your printer. These steps take you from unpacking, through ribbon and paper loading, to printing your first document.
Easy-to-read tabs make it simple for beginners or experienced users to find information. Additional sections describe how to use your new printer with word processors, create graphics, define your own characters, and more.
If you are familiar with earlier Epson manuals, you’ll find two terms changed to make them more descriptive. In this manual, double- width is used instead of expanded, and condensed is used in place of compressed.
Intro-2

Chapter 1
Setting Up Your LQ Printer
Setting up your new LQ is easy. Simply follow the steps in this chapter.
Note
The LQ-800 and LQ-1000 are essentially the same printer except that the LQ-1000 can accept wider paper. Therefore, most of the illustrations in this manual show only the LQ-800. If there is a difference that you need to know about, a separate illustration shows the LQ-1000.
1 |
Unpacking Your Printer |
First, remove the printer from the box and take off all outside |
plastic covering and foam supports. See that you have received all the parts shown in the illustrations on the next page. (You’ll find the paper feed knob inserted in the foam packing material.)
1-1
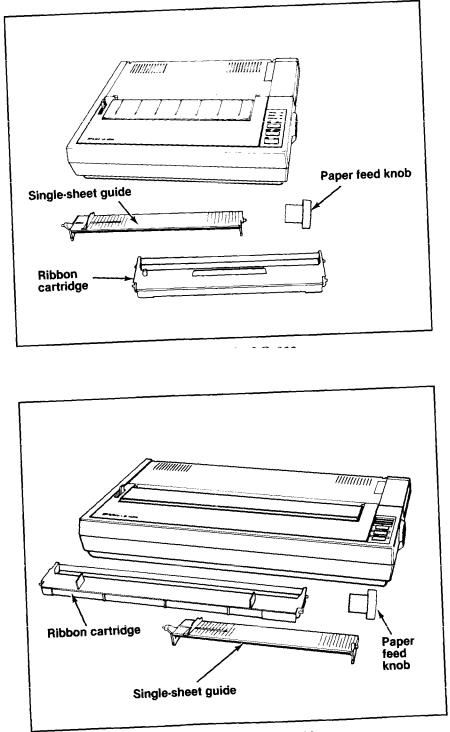
Figure 1-1. The LQ-800
Figure 1-2. The LQ-1000
1-2
Remove the tape that holds the dust cover in place during shipping and take the cover off the printer. Simply tilt the dust cover up and lift it off the printer.
WARNING
The print head is protected by two plastic bumpers during shipping. Both of these bumpers must be removed before turning on the printer. Remove the long bumper to the right of the print head first, then move the print head to the center of the LQ and remove the small bumper on the left side of the print head.
There is a clear plastic overlay on the control panel to protect it from scratching and discoloration. It’s up to you whether you remove the overlay or leave it on.
Installing the paper feed knob
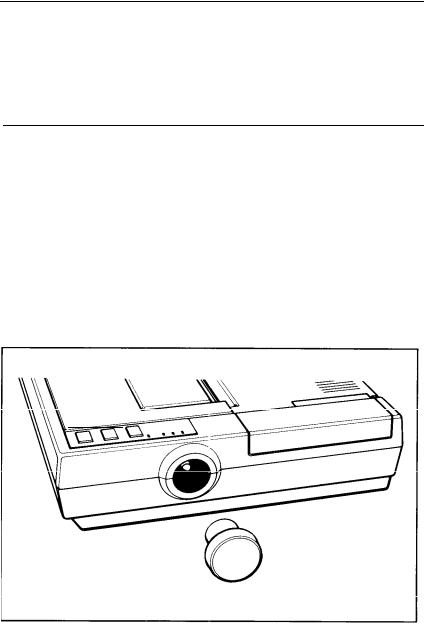
Next install the paper feed knob. To install the knob, simply push it onto the shaft on the right side of the printer, as shown in Figure 1-3. The shaft has one flat side that must be matched with the flat side of the hole in the knob.
Figure 1-3. Installing the paper feed knob
1-3
Now that you’ve installed the paper feed knob, use it to remove the sheet of paper wrapped around the printer’s platen (the black roller).
2 The most important consideration in choosing a location for your printer is that it be close enough to connect a cable to your computer. But also keep the following tips in mind:
•Place the printer or printer stand on a solid and level foundation. Avoid setting it on carpet, chairs, or unstable surfaces.
•Use a grounded outlet-one that has three holes to match the power plug on the printer. Don’t use an adapter plug.
•Avoid using electrical outlets that are controlled by wall switchesif you accidentally turn off a switch, you could wipe out valuable information and stop your printing.
•Keep your printer and computer away from base units for cordless telephones.
•Avoid using an outlet on the same circuit breaker with large electrical machines or appliances that might disrupt the flow of power to your printer.
•Protect your printer from direct sunlight, and keep it away from excessive heat, moisture, and dust. Make sure it’s not too close to a heater or any other heat source.
1-4
Installing the Ribbon
3 With the dust cover removed, you have easy access to the printer for ribbon installation and paper loading. The next time you install a ribbon or load paper, you can leave the cover on.
Now you’re ready to install the ribbon.
1. Manually move the print head to the middle of the platen.
WARNING
The power must be OFF when moving the print head. Moving the print head when the power is ON may damage your printer. If you’ve been using your printer just before changing the ribbon cartridge, be careful not to touch the print head because it becomes hot during use.
2.Before loading the cartridge into the printer, turn the small knob on top in the direction of the arrow to tighten the ribbon as shown in Figure 1-4.
Figure 1-4. Tightening the ribbon
1-5

3.For the LQ-800, hold the ribbon cartridge by the raised plastic fin on top of the cartridge; for the LQ-1000 hold the cartridge by the two plastic tabs. Lower the cartridge into the printer, guiding the two square pins on each. end of the cartridge into the slots in the printer frame, as shown in Figures 1-5 and 1-6. Press firmly on each end of the cartridge to make sure the pins are firmly seated in the slots.
Figure 1-5. Loading the LQ-800 ribbon cartridge
Figure 1-6. Loading the LQ-1000 ribbon cartridge
1-6

4.Now use the point of a pencil to guide the ribbon into place between the ribbon guide and the print head as shown in Figure 1-7. (There is also a diagram on the top of the ribbon cartridge itself.)
Figure 1-7. Positioning the ribbon
5.With the cartridge in place, again turn the ribbon knob in the direction of the arrow to tighten the ribbon.
And that’s it-the ribbon is now installed.
1-7
Replacing the ribbon. . .
When buying new ribbon cartridges for the LQ-800 or 1000, be sure you get a ribbon specifically for the LQ-800 or 1000. Ribbon cartridges for other Epson printers, such as the FX series, may closely resemble an LQ ribbon, but their use can damage the LQ print head. Also, ribbon cartridges for the LQ-1500 will not fit the LQ-800 or 1000, and the Epson ribbon replacement pack #8758 should not be used as a replacement ribbon.
The LQ uses a continuous-loop, inked fabric ribbon. When your printing becomes too light, replace the ribbon with a fresh cartridge. To replace the ribbon, just pull up on the raised fin on top of the LQ-800 cartridge, or the two plastic tabs on the LQ-1000 and lift the cartridge out of the printer. To install a new ribbon, follow the preceding steps.
Loading Single-Sheet Paper
4 When you receive your LQ, it is set up to print on single sheets of paper. Even if you have purchased one of the optional paper feeding systems (the cut sheet feeder or the tractor unit), you should first complete the remaining setup steps before installing either of the optional systems.
It is much easier to run the self test (Step 8) and to connect the LQ to your computer (Step 9) before you install an optional system. After completing the setup steps, see Chapter 2 for installing the cut sheet feeder, or Chapter 3 for installing the tractor unit.
Installing the single-sheet guide
Now install the single-sheet guide. It helps you feed individual sheets of paper into the LQ.
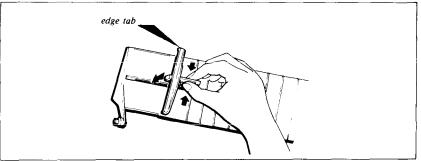
First, put the edge tab into the guide frame. Holding the plastic spring, insert it into the groove as shown below.
Assembling the single-sheet guide
1-8
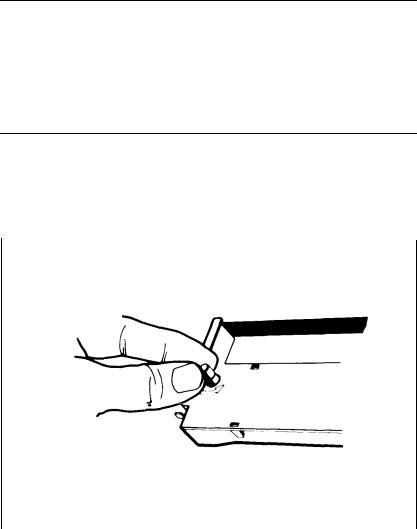
The guide has rounded pins on each end. These pins fit into notches on each end of the paper slot.
Slide one of the guide’s pins into one notch. Then, with gentle pressure, snap the other pin into the other notch as shown in Figure 1-8.
Figure 1-8. Installing the single-sheet guide
The edge tab on the left side of the guide is movable, with a click stop for its middle position. For standard-sized (8½-inch wide) paper, see that the tab is in the click-stop position.
Loading the paper
Loading single-sheet paper in the LQ is simple-it’s just like loading paper in a typewriter.
1-9
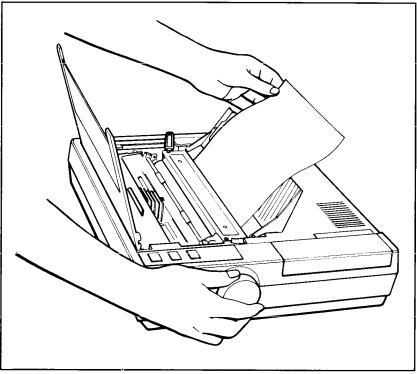
1.Check that the dust cover is tilted up to make it easier to see inside the printer, as shown in Figure 1-9.
2.Make sure the paper release lever is pushed back in the direction of the arrow in the figure, and that the paper bail is pulled away from the platen.
Figure 1-9. Loading single-sheet paper
3.Insert a single sheet of paper behind the platen as shown in Figure 1-9. Put the left edge of the paper against the edge tab on the single sheet guide.
4.With the power OFF use the paper feed knob to roll the paper into the printer far enough to be held by the paper bail. (If the power is ON, use the LINE FEED button as described in Step 6.)
5.Push the paper bail back against the paper, and the paper is ready.
1-10

Caution
Never use the manual paper feed knob while the power is ON because you can damage the paper feed motor. Always use the LINE FEED or FORM FEED button. You will also find that the paper feed knob turns easily when the power is OFF, but is difficult to turn while the power is ON.
When loading single-sheet paper, you may find that the LQ finishes pages at different places than your word processor or applications program does.
To ensure that your word processor and the LQ finish pages at the same point:
1.Print out a page on the LQ. Check that the LQ and your word processor have the same page length. If they differ, note how many lines they differ by. For example, if your word processor is set up to print 55 lines, but the LQ only prints 53 lines before ejecting the page, there is a difference of two lines.
2.You now have three choices:
a)Compensate for the two-line difference when rolling the paper into the printer.
b)Use the installation procedure on your word processor to change the default page length.
c)Use commands in your word processing program to alter the page or margin lengths in each file to accommodate the LQ’s page length.
3.Once you’ve established the best settings, always load the paper so that your printer starts at the same place on each page. For example, you may find that when you roll the paper one inch above the print head, the page finishes where you want it to-then each time you load paper, load it the same way.
With single-sheet paper, the key to consistent page formatting is to establish the settings that work best for you, then position the paper in the same place every time.
1-11
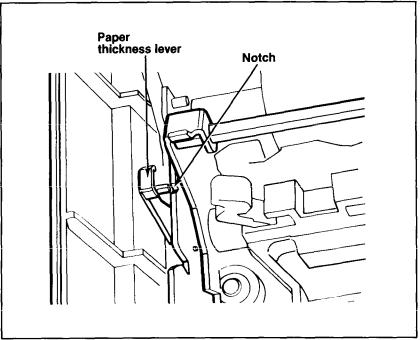
Adjusting the paper thickness lever
The LQ is equipped with a paper thickness lever that can be adjusted to accommodate varying thicknesses of paper.
The lever is located in front of the paper release lever on the left side of the printer as shown in Figure 1-10.
Figure 1-10. Paper thickness lever
When you receive your LQ, the lever is set for standard paper thickness (about 1/500th of an inch), with the small arm on the paper thickness lever set in the notch shown in Figure 1-10.
For thicker paper or multiple copies, pull the lever toward the front of the printer. To return the lever to the standard position, push it back until it clicks into the standard setting.
Turning On the Power
5 With the ribbon and paper installed in the LQ, it’s time to turn the printer on and become acquainted with the power-up sequence.
1-12
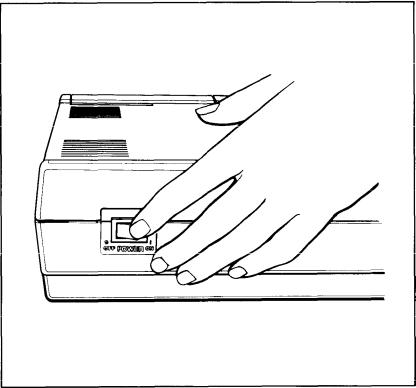
Plug in the printer’s power cord, making sure the outlet is properly grounded. Turn the power ON with the switch on the left side of the printer (see Figure 1-11).
Figure 1-11. Turning on the power switch
When the power is turned ON:
•The print head moves back and forth and stops at the left side of the printer.
•The printer is initialized-any previous settings are erased, and the printer is reset to its default (or preset) values. See Appendix I for a list of default values.
•The three green lights on the control panel--POWER, READY, and ON LINE-go on. (The red PAPER OUT light does not go on unless the printer is out of paper.)
1-13

6 Operating the Control Panel
Each of the three buttons on the LQ control panel (see Figure 1-12) has two functions-the functions marked in blue (ON LINE, LETTER QUALITY, and DRAFT) are active when the printer is on line; the functions marked in black (OFF LINE, FORM FEED, and LINE FEED) are active when the printer is off line. The printer is on line when the ON LINE light is on; it is off line when the ON LINE light is off.
Figure 1-12. The LQ control panel
OFF LINE/ON LINE
OFF LINE--If you press this button when the green light beside it is on, the ON LINE and READY lights go off, the print head moves to the center of the platen, and the printer is set off line-the power is still on but the LQ won’t print. This enables the form feed and line feed functions to work.
1-14

ON LINE-The green ON LINE light indicates that the printer is on line and ready to receive data. When the LQ is on line, you can select either the Letter Quality or draft mode.
FORM FEED/LETTER QUALITY
FORM FEED-Pressing this button advances the paper to the top of the next page if you’re using continuous-feed paper (see Chapter 3, “Installing the Tractor Unit”). If you’re using single-sheet paper, it fully ejects one sheet. The form feed function works only when the printer is off line.
LETTER QUALITY-Pressing this button selects the Letter Quality typestyle (for more information on Letter Quality, see Step 7). The printer beeps twice to acknowledge the Letter Quality selection. You can select the Letter Quality typestyle with this button only when the printer is on line.
LINE FEED/DRAFT
LINE FEED-Pressing this button advances the paper one line at a time, either while you’re loading paper, or when you’re adjusting where you want printing to begin. If you hold this button down, the paper advances continuously. The line feed function works only when the printer is off line.
DRAFT-Pressing this button selects the draft typestyle. The printer beeps once to acknowledge the draft selection. The draft function works only when the printer is on line.
Note
Use the LETTER QUALITY or DRAFT buttons before you tell the computer to print. Do not use them while the LQ is printing.
1-15
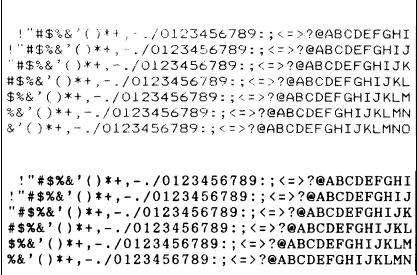
7 Selecting the Letter Quality or Draft Mode
When you receive your LQ, it is preset to print in the Letter Quality mode. As shown in the sample below, the Letter Quality characters are fully formed and are ideal for formal correspondence or other presentation-quality work.
For those times when you need only a rough draft, the LQ also has a draft mode, also shown below. In draft mode, the LQ prints more quickly, because fewer dots are used to form each letter.
This is the Letter Quality style
T h i s i s t h e d r a f t S t y l e
The LQ gives you three ways to select either the Letter Quality or draft mode.
•Control panel-You can choose between the Letter Quality and draft modes with the appropriate button on the control panel.
•DIP switch-A switch on the back of the printer selects either Letter Quality or draft as the default typestyle (the style in effect when you turn the power on). See Appendix A for details.
•Software command-You can also switch between the Letter Quality and draft modes by sending a command to the printer as explained in Chapter 5.
These three choices allow you to tailor the LQ to your printing needs. If you find you use the Letter Quality mode most of the time, you can leave the settings just as they are. If you print in draft mode more than Letter Quality, just reset the DIP switch as outlined in Appendix A. But no matter what you choose, you can always use the buttons on the control panel to switch between the two styles.
8 Running the Self Test
The LQ has a built-in self test function that automatically prints out all of the characters in the selected character set-either Letter Quality or draft.
Before running the self test, make sure that paper is loaded in the printer and that the power is turned OFF. If you have an LQ-1000, be sure to use 14-inch-wide paper to avoid printing on the platen.
1-16
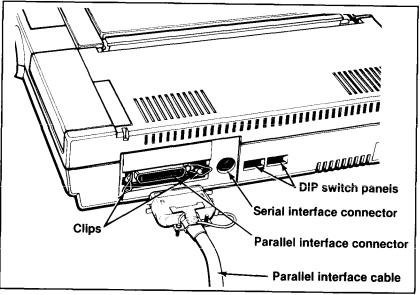
The parallel interface
The connector on a parallel interface cable, as shown in Figure 1-14, is secured to both the LQ and your computer by two clips. After plugging the cable into the LQ and your computer, be sure to snap the clips in place, and connect the ground strap if the cable is equipped with one.
Figure 1-14. Connecting a parallel interface cable
Once you’ve connected a parallel cable, you’re ready to print. The parallel interface does not require any additional settings.
The serial interface
If your computer is equipped with a serial interface, you should use an Epson serial interface cable-#8239 for the Apple® IIc, #8293 for the Apple IIe or Epson QX™-16, and #8294 for the IBM® PC. Plug the cable into the connector to the right of the parallel connector.
When using the serial interface, you need to reset four DIP switches so that your computer and printer will communicate properly. See Appendix A for a complete explanation of the DIP switches and how to set them for your serial interface.
1-18
Loading...