


EPSON® PowerLite® 503c/713c
Multimedia Projector
User’s Guide

Important Safety Information
WARNING: Never look into the projector lens when the lamp is turned on; the bright light can damage your eyes. Never let children look into the lens when it is on. Never open any cover on the projector, except the lamp and filter covers. Dangerous electrical voltages inside the projector can severely injure you. Except as specifically explained in this User’s Guide, do not attempt to service this product yourself. Refer all servicing to qualified service personnel.
WARNING: The projector and its accessories come packaged in plastic bags. Keep plastic bags away from small children to avoid any risk of suffocation.
Caution: When you replace the lamp, never touch the new lamp with your bare hands; the invisible residue left by the oil on your hands may shorten the lamp life. Use a cloth or glove to handle the new lamp.
Copyright Notice
All rights reserved. No part of this publication may be reproduced, stored in a retrieval system, or transmitted in any form or by any means, electronic, mechanical, photocopying, recording, or otherwise, without the prior written permission of SEIKO EPSON CORPORATION. The information contained herein is designed only for use with this EPSON product. EPSON is not responsible for any use of this information as applied to other products.
Neither SEIKO EPSON CORPORATION nor its affiliates shall be liable to the purchaser of this product or third parties for damages, losses, costs, or expenses incurred by purchaser or third parties as a result of: accident, misuse, or abuse of this product or unauthorized modifications, repairs, or alterations to this product, or (excluding the U.S.) failure to strictly comply with SEIKO EPSON CORPORATION’s operating and maintenance instructions.
SEIKO EPSON CORPORATION shall not be liable for any damages or problems arising from the use of any options or any consumable products other than those designated as Original EPSON Products or EPSON Approved Products by SEIKO EPSON CORPORATION.
EPSON is a registered trademark of SEIKO EPSON CORPORATION.
EPSON Connection, EPSON Store, and EPSON Extra Care are service marks; SizeWise is a trademark; and PrivateLine, Presenters Club, and PowerLite are registered trademarks of Epson America, Inc.
General Notice: Other product names used herein are for identification purposes only and may be trademarks of their respective owners. EPSON disclaims any and all rights in those marks.
Printed on recycled paper |
|
Printed in the U.S.A. |
CPD-12796 |
Copyright © 2001 by Epson America, Inc. |
8/01 |
ii

CContents
Welcome . . . . . . . . . . . . . . . . . . . . . . . . . . . . . . . . . . . . . 1 Getting the Most from Your Projector . . . . . . . . . . . . . . . . . 2 Using Your Documentation . . . . . . . . . . . . . . . . . . . . . . . . . 3 Reading This Manual Online . . . . . . . . . . . . . . . . . . . . . 3 Getting More Information . . . . . . . . . . . . . . . . . . . . . . . 4 Registration and Warranty . . . . . . . . . . . . . . . . . . . . . . . . . . . 5 Unpacking the Projector . . . . . . . . . . . . . . . . . . . . . . . . . . . . 6 Additional Components . . . . . . . . . . . . . . . . . . . . . . . . . 7 Optional Accessories . . . . . . . . . . . . . . . . . . . . . . . . . . . . 8
1 Setting Up the Projector . . . . . . . . . . . . . . . . . . . . . 9 Positioning the Projector . . . . . . . . . . . . . . . . . . . . . . . . . . . 10 Connecting to a Laptop Computer . . . . . . . . . . . . . . . . . . . 12 Connecting the Computer Cable . . . . . . . . . . . . . . . . . 12 Connecting the Cable for Remote Mouse Control . . . . 13 Amplifying Computer Audio . . . . . . . . . . . . . . . . . . . . 14 Connecting to Video Sources . . . . . . . . . . . . . . . . . . . . . . . 15 Connecting the RCA A/V Cable . . . . . . . . . . . . . . . . . . 15 Connecting S-Video . . . . . . . . . . . . . . . . . . . . . . . . . . . 16
iii

2
3
Using the Projector . . . . . . . . . . . . . . . . . . . . . . . . . 17 Turning On Your Equipment . . . . . . . . . . . . . . . . . . . . . . . 18 Turning On the Projector . . . . . . . . . . . . . . . . . . . . . . . 18 What To Do If You See a Blank Screen . . . . . . . . . . . . 20 Adjusting the Image . . . . . . . . . . . . . . . . . . . . . . . . . . . . . . 22 Focusing and Zooming Your Image . . . . . . . . . . . . . . . 23 Adjusting the Height of Your Image . . . . . . . . . . . . . . . 23 Adjusting the Image Shape . . . . . . . . . . . . . . . . . . . . . . 24 Shutting Down the Projector . . . . . . . . . . . . . . . . . . . . . . . . 25
Using the Remote Control . . . . . . . . . . . . . . . . . . |
27 |
Turning On and Using the Remote Control . . . . . . . . . . . . |
28 |
Installing Batteries . . . . . . . . . . . . . . . . . . . . . . . . . . . . |
28 |
Turning On the Remote Control . . . . . . . . . . . . . . . . . |
28 |
Using the Remote Control . . . . . . . . . . . . . . . . . . . . . . |
29 |
Controlling the Picture and Sound . . . . . . . . . . . . . . . . . . . |
30 |
Switching Between Picture Sources . . . . . . . . . . . . . . . . |
30 |
Adjusting the Volume . . . . . . . . . . . . . . . . . . . . . . . . . . |
30 |
Turning Off the Picture and Sound . . . . . . . . . . . . . . . |
31 |
Stopping Action . . . . . . . . . . . . . . . . . . . . . . . . . . . . . . |
31 |
Zooming Your Image . . . . . . . . . . . . . . . . . . . . . . . . . . |
31 |
Resizing the Image . . . . . . . . . . . . . . . . . . . . . . . . . . . . |
32 |
Displaying Picture-in-Picture Video . . . . . . . . . . . . . . . |
32 |
Highlighting Your Presentation . . . . . . . . . . . . . . . . . . . . . . |
33 |
Using the Pointer . . . . . . . . . . . . . . . . . . . . . . . . . . . . . |
34 |
Using Box Highlights . . . . . . . . . . . . . . . . . . . . . . . . . . |
34 |
Drawing Horizontal and Vertical Lines . . . . . . . . . . . . . |
35 |
Drawing Freehand Lines . . . . . . . . . . . . . . . . . . . . . . . . |
35 |
Using the Remote Control as a Wireless Mouse . . . . . . . . . |
36 |
iv

4
5
6
Fine-tuning the Projector . . . . . . . . . . . . . . . . . . . 37
Using the Projector’s Menu System . . . . . . . . . . . . . . . . . . . 38
Changing Menu Settings . . . . . . . . . . . . . . . . . . . . . . . 39
Adjusting the Image . . . . . . . . . . . . . . . . . . . . . . . . . . . . . . 40
Repositioning the Image . . . . . . . . . . . . . . . . . . . . . . . . 40
Adjusting Image Appearance . . . . . . . . . . . . . . . . . . . . 41
Adjusting the Sound . . . . . . . . . . . . . . . . . . . . . . . . . . . . . . 42
Customizing the Highlighting Tools . . . . . . . . . . . . . . . . . . 43
Creating Your Own Startup Screen . . . . . . . . . . . . . . . . . . . 44
Capturing the Image . . . . . . . . . . . . . . . . . . . . . . . . . . 44
Selecting When the Image Displays . . . . . . . . . . . . . . . 45
Customizing Projector Features . . . . . . . . . . . . . . . . . . . . . 46
Setting Advanced Features . . . . . . . . . . . . . . . . . . . . . . 48
Viewing Lamp Usage and Other Information . . . . . . . . . . . 49
Restoring the Default Settings . . . . . . . . . . . . . . . . . . . . . . . 50
Maintaining and Transporting
the Projector . . . . . . . . . . . . . . . . . . . . . . . . . . . . . . . . 51
Cleaning the Lens . . . . . . . . . . . . . . . . . . . . . . . . . . . . . . . 52
Cleaning the Projector Case . . . . . . . . . . . . . . . . . . . . . . . . 52
Cleaning and Replacing the Air Filter . . . . . . . . . . . . . . . . . 53
Replacing the Lamp . . . . . . . . . . . . . . . . . . . . . . . . . . . . . . 54
Transporting the Projector . . . . . . . . . . . . . . . . . . . . . . . . . 56
Solving Problems . . . . . . . . . . . . . . . . . . . . . . . . . . . . 57 Using On-Screen Help . . . . . . . . . . . . . . . . . . . . . . . . . . . . 58 What To Do When the Lights Flash . . . . . . . . . . . . . . . . . . 59 Solving Problems with the Image or Sound . . . . . . . . . . . . . 62 Solving Problems with the Remote Control . . . . . . . . . . . . 68 Where To Get Help . . . . . . . . . . . . . . . . . . . . . . . . . . . . . . 69
Telephone Support Services . . . . . . . . . . . . . . . . . . . . . 69
v

A
B
C
Appendix A: Connecting to Additional
Equipment . . . . . . . . . . . . . . . . . . . . . . . . . . . . . . . . . . 71 Installing the Projector . . . . . . . . . . . . . . . . . . . . . . . . . . . . 72 Connecting to an External Audio System . . . . . . . . . . . 72 Connecting to a PC Desktop Computer . . . . . . . . . . . . . . . 73 Connecting the Computer Cable . . . . . . . . . . . . . . . . . 74 Connecting the Mouse Cable . . . . . . . . . . . . . . . . . . . . 75 Connecting the Audio Cable . . . . . . . . . . . . . . . . . . . . . 76 Connecting to a Desktop Macintosh . . . . . . . . . . . . . . . . . . 77 Connecting the Computer Cable . . . . . . . . . . . . . . . . . 77 Connecting the Mouse Cable . . . . . . . . . . . . . . . . . . . . 78 Connecting the Audio Cable . . . . . . . . . . . . . . . . . . . . . 79 Connecting to a High-End Workstation . . . . . . . . . . . . . . . 79
Appendix B: Notices . . . . . . . . . . . . . . . . . . . . . . . . 81
Important Safety Instructions . . . . . . . . . . . . . . . . . . . . . . . 81
Remote Control Information . . . . . . . . . . . . . . . . . . . . . . . 83
Declaration of Conformity . . . . . . . . . . . . . . . . . . . . . . . . . 84
FCC Compliance Statement . . . . . . . . . . . . . . . . . . . . . . . . 85
Warranty . . . . . . . . . . . . . . . . . . . . . . . . . . . . . . . . . . . . . . . 86
Appendix C: Technical Specifications . . . . . . 89
General . . . . . . . . . . . . . . . . . . . . . . . . . . . . . . . . . . . . . . . . 89
Projection Lamp . . . . . . . . . . . . . . . . . . . . . . . . . . . . . . . . . 90
Remote Control . . . . . . . . . . . . . . . . . . . . . . . . . . . . . . . . . 90
Mouse Compatibility . . . . . . . . . . . . . . . . . . . . . . . . . . . . . 90
Dimensions . . . . . . . . . . . . . . . . . . . . . . . . . . . . . . . . . . . . . 90
Electrical . . . . . . . . . . . . . . . . . . . . . . . . . . . . . . . . . . . . . . . 90
Environmental . . . . . . . . . . . . . . . . . . . . . . . . . . . . . . . . . . . 91
Safety . . . . . . . . . . . . . . . . . . . . . . . . . . . . . . . . . . . . . . . . . 91
Compatible Video Formats . . . . . . . . . . . . . . . . . . . . . . . . . 92
Computer Video Port Pin Assignments . . . . . . . . . . . . . . . . 94
Index . . . . . . . . . . . . . . . . . . . . . . . . . . . . . . . . . . . . . . . . 95
vi

W-Welcome
The EPSON® PowerLite® 503c/713c are super-portable projectors that offer up to 1200 ANSI lumens of brightness. From boardrooms to auditoriums, your full-color presentations and videos will be bright and visible even in ordinary room lighting.
Images are displayed at a resolution of 1024 × 768 pixels (PowerLite 713c) or 800 × 600 pixels (PowerLite 503c). Three 0.9-inch LCDs provide a 400:1 contrast ratio for incredibly vivid images and clear text. Support for S-video contributes to theater-quality performance.
With EPSON’s patented SizeWise™ technology, the projector supports computer displays ranging from VGA through UXGA (PowerLite 713c) and from VGA through SXGA (PowerLite 503c).
You can connect the projector to a wide range of computers, including IBM® compatible PCs and laptops, Apple® Macintosh,® Power Macintosh™ series (including G3 and G4 systems), PowerBook® computers, many iMac™ and iBook™ series systems, and high-end workstations such as the Sun® SPARCstation.™
You can use any of the following video sources: VCR, DVD player, camcorder, digital camera, or laser disc player, supporting NTSC, PAL, or SECAM video.
Welcome 1

Getting the Most from Your Projector
Depending on your presentation, you can take advantage of any or all of these options:
■Connecting to a laptop or other computer
If you want to connect to a PC laptop or Macintosh PowerBook or iBook, see page 12. To connect to a desktop computer or workstation, see Appendix A.
■Connecting to video sources
You can connect a DVD player, VCR, camcorder, laser disc player, digital camera, or any other video source to your projector. You can connect both computer and video sources at the same time and easily switch between them. See page 15 for instructions.
■Using the remote control
The remote control lets you switch from computer to video source, with access to picture-in-picture, pointer, zoom, and many other projector features. For details, see Chapter 3.
By connecting an additional cable, you can also use the remote control as a wireless mouse. This lets you click through computer-based presentations (such as PowerPoint®) from up to 30 feet away. For more information, see page 36.
■Including sound in your presentation
If your presentation includes sound, you can connect an audio cable to use the projector’s built-in stereo speakers. For details, see page 14 (for laptops) or Appendix A (for other systems).
You can also connect external speakers or a public address system to the projector’s Audio Out port; see page 72.
2 Welcome

Using Your Documentation
To connect the projector to your laptop and get your presentation running fast, see the Quick Setup sheet that came in your Owner’s Kit.
This book contains all the information you need to set up and use your projector. Please follow these guidelines as you read through it:
■Warnings must be followed carefully to avoid bodily injury.
■Cautions must be observed to avoid damage to your equipment.
■Notes contain important information about your projector.
Reading This Manual Online
Your PowerLite 503c/713c CD-ROM includes an electronic copy of this manual. You may find it convenient to copy it onto your laptop’s hard drive so it’s always with you—for example, when taking your presentation on the road.
To view your electronic manual, you need to use Adobe® Acrobat® Reader. Just insert the PowerLite CD-ROM in your CD-ROM drive, select the Install/View User’s Guide button and click Install User’s Guide or View User’s Guide.
When you open the manual, you see this toolbar:
note
If you do not have Acrobat Reader, you can install it from the CD-ROM.
|
|
|
|
|
|
|
|
|
|
|
|
|
|
show navigation |
|
|
|
|
|
|
first page |
|
last page |
||||
pane |
|
|||||
|
|
|
|
|
||
|
|
|
|
|
|
|
|
|
previous page |
next page |
|||
You have several ways to navigate through the manual:
■Click in the table of contents on the left side of the screen to move quickly to the topic of your choice.
■Use the arrow buttons in the toolbar or on the vertical scroll bar on the right side of the screen to move through the manual.
Welcome 3

note
You don’t need to install any software to use your projector.
■If you hold your mouse pointer over text and the hand changes to an index finger, you can click to jump to a related topic.
For more information, see your Acrobat Reader online guide.
Getting More Information
Need tips on giving presentations? How about quick steps for setting up your projector? Here’s where you can look for help:
■www.presentersonline.com
Includes a library of articles covering presentation tips, tricks, and technology. The site provides templates, clip art and sound clips, as well as Presenters Services to use on the road. Even more resources and services are available if you register to join the Presenters Club®—and it’s free.
■Owner’s Kit envelope
Includes your Quick Setup sheet, warranty brochures, CD-ROM, and EPSON PrivateLine® Support card. Store this User’s Guide in the envelope and keep the envelope with your projector at all times.
■Quick Setup sheet
Gives you all the instructions you need to get your projector set up and connected to a laptop or PowerBook computer.
■Built-in help system
Provides assistance for common problems. Available from the Help button on the projector or the remote control. See page 58 for details.
■support.epson.com
Download FAQs and e-mail your questions to EPSON support.
■CD-ROM
The EPSON PowerLite 503c/713c CD-ROM lets you register electronically and includes the electronic copy of this book as well as a link to Presenters Online.
4 Welcome
If you still need help after checking this User’s Guide and the sources listed above, you can use the EPSON PrivateLine Support service to get help fast. Call (800) 637-7661 and enter the PIN on the card in your Owner’s Kit.
Registration and Warranty
Your projector comes with a basic carry-in warranty and an international warranty that let you project with confidence anywhere in the world. For details, see page 86 and the warranty brochure included in your Owner’s Kit.
In addition, for customers who register their projectors, EPSON offers free Extra CareSM Road Service. In the unlikely event of an equipment failure, you won’t have to wait for your unit to be repaired. Instead, EPSON will ship you a replacement unit anywhere in the United States or Canada, usually via overnight delivery. See the brochure in your Owner’s Kit for details.
To register, simply insert the PowerLite 503c/713c CD-ROM in your computer’s CD-ROM or DVD drive and select Register Online. Registering also lets you receive special updates on new accessories, products, and services. You can register through the Internet, by e-mail or 800-number modem connection, or by printing out the form to fax or mail.
Welcome 5
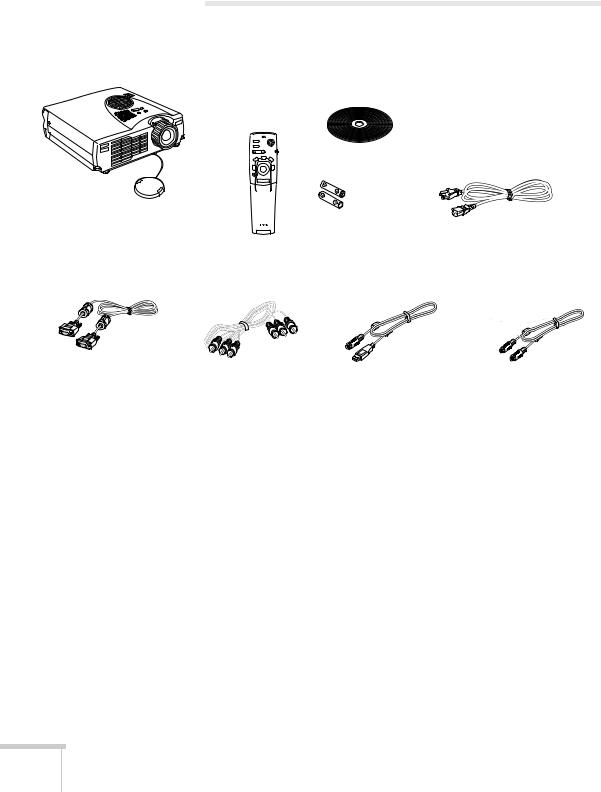
projector
computer cable
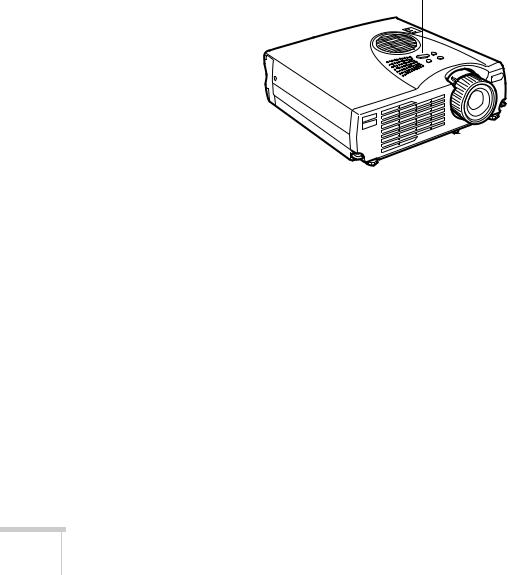
Unpacking the Projector
After unpacking the projector, make sure you have all the parts shown below:
EPSON PowerLite 503c/713c CD-ROM (not needed to use your projector)
|
Power |
Freeze |
|
A/V Mute |
|
E-Zoom |
R/C ON |
OFF |
|
|
3 |
2 |
4 |
1 |
5 |
|
Enter |
Esc
batteries
power cord
remote control
RCA AV cable |
USB mouse cable |
PS/2® mouse cable |
Save all packaging in case you need to ship the projector. Always use the original packaging (or the equivalent) when you need to send the projector to another location.
If you are moving the projector by hand, use a carrying case (such as the optional cases available from EPSON). See page 8 for more information about cases.
6 Welcome

Additional Components
Depending on how you plan to use the projector, you may need additional components:
■
■
To receive an S-video signal, you need an S-video cable. (One is usually provided with your video device.)
To amplify your computer’s audio through the projector’s sound system, you need a computer audio cable (male-to-male 3.5-mm stereo miniplug cable). See your computer or electronics dealer to obtain this cable.
■Some older PowerBooks and Macintosh desktop models may need the Macintosh adapter set shown on page 77 (available from EPSON; see page 8). Older iMac systems may need a special adapter to provide a VGA output port; see your computer dealer.
■Some systems may need an additional cable to use the remote control as a wireless mouse. If your Macintosh doesn’t have a USB port, you’ll need a Macintosh mouse cable. See your projector dealer to obtain the correct cable.
Welcome 7

Optional Accessories
To enhance your use of the projector, EPSON provides the following optional accessories:
|
Product |
Product |
number |
|
|
Replacement lamp and air filter |
ELPLP14 |
|
|
Soft carrying cases: |
|
Samsonite® wheeled soft case |
ELPKS35 |
Slimline soft shoulder bag |
ELPKS31 |
Notebook/projector soft shoulder bag |
ELPKS32 |
ATA molded hard shell case |
ELPKS30 |
|
|
Ceiling mount |
ELPMB32 |
|
|
Kensington® MicroSaver® security lock |
ELPSL01 |
Portable projection screens: |
|
50-inch screen |
ELPSC06 |
60-inch Insta-Theatre screen |
ELPSC07 |
80-inch Insta-Theatre screen |
ELPSC08 |
|
|
Wireless microphone and two satellite speakers |
ELPCVS1 |
|
|
Presentation audio system |
ELPPAS1 |
|
|
Macintosh adapter set (includes monitor adapter |
ELPAP01 |
and desktop adapter) |
|
|
|
VGA to 13W3 video cable (for connecting to certain |
ELPKC06 |
high-end workstations) |
|
|
|
You can purchase these accessories from your dealer or by calling EPSON at (800) 873-7766; or visit the EPSON StoreSM at www.epson.com (U.S. sales only). In Canada, please call (800) 873-7766 for dealer referral.
8 Welcome

1Setting Up the Projector
This chapter tells you how to set up the projector and connect it to a laptop computer or video source. If you need to connect the projector to a desktop or workstation computer, see Appendix A.
You’ll find instructions for the following in this chapter:
■Positioning the projector
■Connecting to a laptop computer
■Connecting to video sources
Setting Up the Projector 9
caution
Don’t hold or lift the projector by the lens, or you may damage it.
note
It’s easier to position the projector when the screen is directly in front of the room. If the screen is placed diagonally in a corner, it’s much more difficult to aim the projector correctly at the screen and get a rectangular image.
Positioning the Projector
Before connecting the projector, you need to decide where to place it. The location you choose depends on the size of the room and what you are projecting.
■Place the projector on a sturdy, level surface, between 3.6 and 45.5 feet from the screen.
■Make sure there is plenty of space for ventilation around and under the projector.
■Make sure the projector is within 6 feet of a grounded electrical outlet or extension cord and within 5 feet of your computer and/or video source.
■Place the projector directly in front of the center of the screen, facing it toward the screen squarely. Otherwise, your image will not be rectangular.
Most presenters find it convenient to place the projector in front of the audience, leaving as much space as possible between the projector and the screen to get a good-sized image. This lets the presenter stand in the front of the room, face the audience, and remain close enough to the equipment to be able to control it.
Use the figure below as a guideline to help you determine how far from the screen to place the projector. Image size generally increases with distance, but may vary depending on how you position the lens ring and whether you have adjusted the image size with other settings.
|
|
|
|
|
|
|
|
|
|
|
|
|
|
|
|
|
|
|
|
|
|
|
|
|
|
|
|
|
|
|
|
|
|
|
|
|
|
|
|
|
|
|
|
|
38 to 45 feet |
7 to 9 ft |
|
3.6 to 4.3 ft |
distance from screen |
||||||||||
10 Setting Up the Projector

If you place the projector below the level of the screen, you’ll have to tilt it up by extending the feet as shown. Tilting the projector upward causes the image to lose its rectangular shape, but you can correct the distortion by pressing the Keystone button as described in the next chapter.
ideal height
If you place the projector level with the bottom of the screen, the image will be rectangular and you won’t have to adjust it. If you place the projector higher than the bottom of the screen, the image will still be rectangular, but you won’t be able to fill the whole screen with the image.
note
After positioning the projector, you may want to connect a Kensington MicroSaver anti-theft device to the lock port on the projector’s left side. You can purchase this from EPSON; see page 8.
Setting Up the Projector 11
note
To connect to desktops and other computer systems, see Appendix A. If you have an iBook with an RCA videoout port, follow the instructions for connecting to a video device on page 15.
note
Laptop configurations vary. See your computer manual for the location of the ports needed to connect your projector.
Connecting to a Laptop Computer
You can connect the PowerLite projector to any computer that has a standard video output (monitor) port, including PC notebook and laptop computers, Macintosh PowerBooks, and hand-held devices.
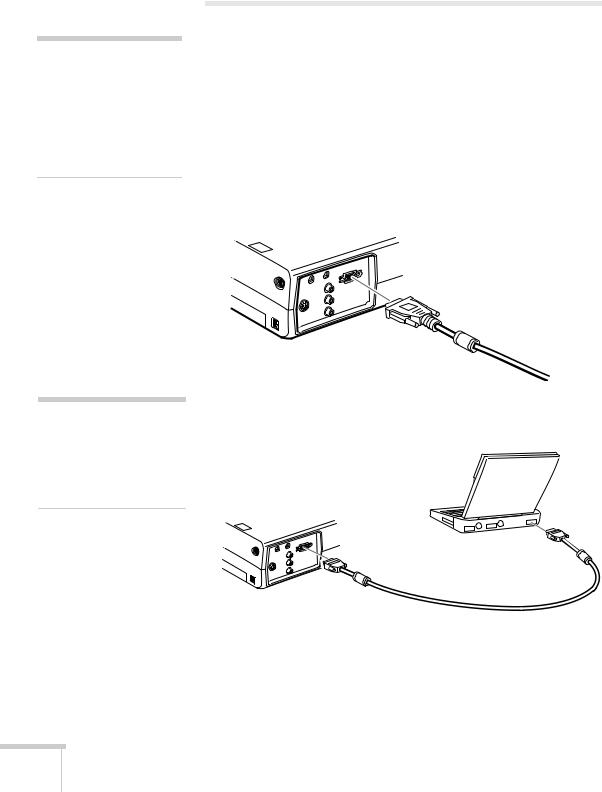
Connecting the Computer Cable
Before you start, make sure your computer and the projector are turned off.
1.Connect one end of the computer cable to the projector’s
Computer port.
2.Connect the other end of the computer cable to your laptop’s video-out or monitor port.
If you’re using a PowerBook and you can’t connect the cable, you may need to use the Macintosh desktop adapter as shown on page 77 (available from EPSON; see page 8).
3. Tighten the screws on the connectors.
12 Setting Up the Projector

If you don’t need to make any other connections, you can plug in your projector and turn it on. See page 18 for instructions.
Connecting the Cable for Remote Mouse Control
Using the remote control as a wireless mouse lets you click through slideshow-style presentations, such as PowerPoint, from up to 30 feet away (for details, see page 36). This gives you more flexibility in delivering your presentation, since you won’t need to stand near your computer.
You’ll use different cables and different ports on the projector, depending on whether your laptop has a round mouse port or a flat USB mouse port.
note
If you’re using a PowerBook that has a round mouse port, you’ll need a Macintosh mouse cable. See your projector dealer to obtain the correct cable.
Mouse/Com
Mouse/Com port
PS/2 mouse cable
USB port
USB mouse cable
1.Locate the cable you need, depending on whether your laptop has a round PS/2 mouse port or a flat USB port.
2.Connect one end of the appropriate mouse cable to the projector’s Mouse/Com or USB port, as shown.
connecting PS/2 mouse cable |
connecting USB mouse cable |
3.Connect the other end of the cable to the external mouse port or USB port on your laptop.
Setting Up the Projector 13

4.If necessary, configure your laptop to work with an external mouse.
If you don’t need to make any other connections, you can plug in your projector and turn it on. See page 18 for instructions.
Amplifying Computer Audio
Your laptop probably has its own sound system; however, it may not be adequate for your presentation. If you need more volume or better sound quality, you can connect a computer audio cable to take advantage of the projector’s built-in amplifier and speaker. You can obtain a computer audio cable (3.5-mm stereo miniplug cable) from a computer or electronics dealer.
1.Connect one end of the audio cable to the Audio In jack on the projector.
2.Connect the other end of the audio cable to your laptop’s  headphone jack or
 audio-out jack. (Jack locations vary; see
your computer manual if you’re not sure which jack to use.)
If you don’t need to make any other connections, you can plug in your projector and turn it on. See page 18 for instructions.
14 Setting Up the Projector
Connecting to Video Sources
You can connect a DVD player, VCR, camcorder, laser disc player, digital camera, or any other compatible video source to your projector.
The projector supports NTSC, PAL, and SECAM, and automatically detects the video format.
A standard RCA A/V cable is included with the |
1 |
2 |
projector. If your video source also has an S-video |
3 |
4 |
|
jack (as shown with an S-video plug at the right),
you can use it to provide a higher quality video image. However, you’ll need an S-video cable, which may be included with your video source, or may be purchased from an electronics store or video dealer.
Follow the instructions below for your type of connection.
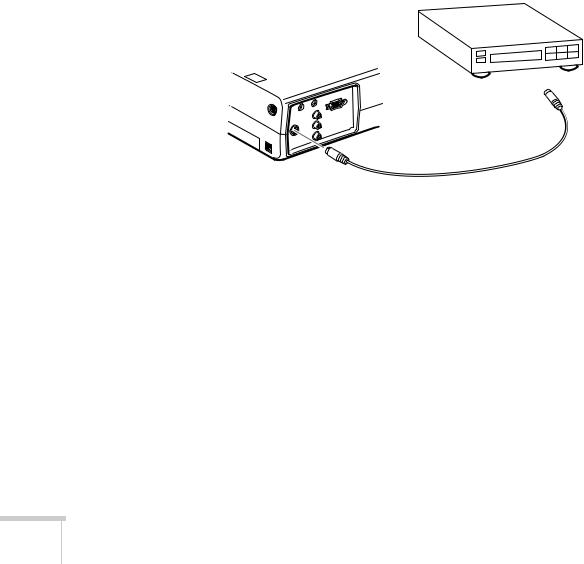
Connecting the RCA A/V Cable
Before starting, make sure the projector and your DVD player or other video source are turned off.
1.Connect the yellow plug on one end of the A/V cable to the projector’s Video jack. Then connect the audio plugs to the left and right Audio jacks (insert the white plug into the L port and the red plug into the R port).
note
The projector does not support TV antenna cable F connectors.
L port
R port
RCA A/V cable
Video jack
2.Connect the plugs on the other end of the cable to the video-out and audio output jacks on your video source.
Setting Up the Projector 15
Connecting S-Video
If your video source has an S-video jack, you can use it to project a higher quality video image. However, you’ll need an S-video cable, which may be included with your video source, or may be purchased.
Before starting, make sure the projector and your DVD player or other video source are turned off.
1.Insert one end of an S-video cable into the projector’s S-Video connector.
2.Insert the other end into the S-video output port of your video source.
S-Video cable
3.Connect the RCA A/V cable to the left and right Audio jacks on the projector. (Match the red and white plugs to the red and white jacks; you won’t need to use the yellow plug.)
4.Connect the plugs at the other end of the cable to the audio output jacks on your video source.
16 Setting Up the Projector

2Using the Projector
Once you’ve set up the projector, you’re ready to turn it on, adjust the image, and give your presentation.
Although you can operate the projector without it, the remote control lets you use additional features. See Chapter 3 for instructions on using the remote. This chapter covers the following:
■Turning on the projector and other equipment
■Adjusting the image
■Shutting down the projector
Using the Projector 17

Turning On Your Equipment
Make sure your projector and other equipment are set up and connected correctly, as described in Chapter 1 or Appendix A. Then turn on your projector, as described below, followed by any equipment you’ve connected to it. You can turn on your computer and video equipment in any order, but if you have both a computer and video source connected, you may have to switch to the desired source as described on page 20.
Turning On the Projector
Follow these steps to plug in and turn on the projector:
1. Connect one end of the power cord to the projector’s power inlet.


 power light
2.Connect the other end to a grounded electrical outlet.
The power light on top of the projector turns orange, indicating that the projector is receiving power but not yet turned on.
3.Use the tab on the lens ring to rotate the ring and extend the lens.
tab
18 Using the Projector

4. Squeeze the lens cap tabs and remove the lens cap.
squeeze here
5. Press the red Power button on top of the projector.
Power button
caution
Do not use the projector with the lens cap in place. The heat generated by the lens can damage the cap.
power light
The power light flashes green as the projector warms up, and the projection lamp comes on in about 30 seconds. The power light stays green.
warning
Never look into the lens when the lamp is on. This can damage your eyes, and is especially dangerous for children.
Using the Projector 19

6.Do one of the following:
■If you’re using a computer, turn it on or restart it. In a few moments, you should see your computer display projected.
(Windows® only: If you see a message saying that it has found a plug-and-play monitor, click Cancel.)
■If you’re projecting a video, press the Source button on top of the projector to switch to your video source, and press the Play button on your DVD player or other device.
If a projected image fails to appear, see the next section for help.
Once you see your image, turn to page 22 for instructions on focusing and making other image adjustments.
When you’re done with your presentation, shut down the projector as described on page 25. Shutting down the projector correctly prevents premature lamp failure and possible damage from overheating.
What To Do If You See a Blank Screen
If you see a blank screen or a blue screen with the message No Signal after turning on your computer or video source, try the following:
■Make sure the cables are connected correctly, as described on page 12 (for laptops) or in Appendix A (for other systems).
■Make sure the power light is green and not flashing and the lens cover is off.
■Try restarting your computer.
■Press the Source button on top of the projector to select the correct source. (Allow a few seconds for the projector to sync up after pressing the button.)
20 Using the Projector

If you’re using a Macintosh Laptop:
You may need to set up your system to display on the projector screen as well as the LCD screen. Follow these steps:
1.From the Apple menu, select Control Panels, then click
Monitors or Monitors and Sound.
2.Click the Arrange icon.
click here
drag one monitor icon on top of the other
3. Drag one monitor icon on top of the other.
If the Arrange icon isn’t available, you may need to select one of the Simulscan resolution settings:
1. Click the Monitor icon, if necessary.
click here
select a Simulscan resolution
2.Select a Simulscan resolution as shown. (Allow a few seconds for the projector to sync up after making the selection.)
Using the Projector 21

If you’re using a PC laptop:
■Hold down the Fn key and press the function key that lets you
display on an external monitor. It may have an icon such as  or it may be labelled CRT/LCD. Allow a few seconds for the
projector to sync up after pressing it. Check your laptop’s manual or online help for details.
On most systems, the  or CRT/LCD key lets you toggle between the LCD screen and the projector, or display on both at
the same time.
■Depending on your computer’s video card, you might need to use the Display utility in the Control Panel to make sure that both the LCD screen and external monitor port are enabled. See your computer’s documentation or online help for details.
Adjusting the Image
Once you see your image, you’ll need to make certain adjustments:
■To focus or zoom your image, see page 23.
■If the image is too high or too low, you can reposition it. See page 23.
■If the image isn’t square, see page 24.
22 Using the Projector

Focusing and Zooming Your Image
Rotate the focus ring to sharpen the image.
lens ring tab
focus ring
Use the tab to rotate the lens ring and reduce or enlarge the image.
You can also change the image size by moving the projector closer to or farther away from the screen. You can use the E-Zoom button on the remote control to zoom in on a portion of the image. See page 31 for instructions.
Adjusting the Height of Your Image
If the image is too low, you can raise it by extending the projector’s feet.
1.Stand behind the projector. Pull up the blue foot release levers and lift the front of the projector. This unlocks the feet.
2.Once the image is positioned where you want it, release the levers to lock the feet in position.
3.To fine-tune the height of the image, rotate the thumb wheels attached to the projector’s feet.
If the image is no longer rectangular after raising it, see the next section.
caution
Do not hold the projector by the lens; this can damage it.
Using the Projector 23
Adjusting the Image Shape
If the projected image isn’t rectangular or has a “keystone” shape, do one or more of the following:
■If your image looks like  or
or  , you’ve placed the projector off to one side of the screen, at an angle. Move it directly
in front of the center of the screen, facing the screen squarely.
■If your image looks like  or
or  , press the + or — side of the Keystone button to correct the shape of the image. After
correction, your image will be slightly smaller.
Keystone button
You can also perform electronic keystone correction using the projector’s Setting menu. See page 46.
24 Using the Projector
 Loading...