


EXD15DN3W |
EN |
DEHUMIDIFIER |
USER MANUAL |
2 |
EXD25DN3W |
SV |
AVFUKTARE |
BRUKSANVISNING |
11 |
|
DA |
AFFUGTER |
BRUGERVEJLEDNING |
20 |
|
NO |
AVFUKTER |
BRUKSANVISNING |
29 |
|
FI |
KOSTEUDENPOISTAJA |
KÄYTTÖOHJE |
38 |
2 |
www.electrolux.com |
|
CONTENTS |
|
|
|
Safety information ..................................................................................................... |
3 |
|
Before first use .......................................................................................................... |
4 |
|
Operating instructions ............................................................................................... |
5 |
|
Care and cleaning ..................................................................................................... |
8 |
|
What to do if… ......................................................................................................... |
9 |
|
Environment concerns ............................................................................................ |
10 |
WE'RE THINKING OF YOU
Thank you for purchasing an Electrolux appliance. You've chosen a product that brings with it decades of professional experience and innovation. Ingenious and stylish, it has been designed with you in mind. So whenever you use it, you can be safe in the knowledge that you'll get great results every time.
Welcome to Electrolux.
Visit our website for:
Get usage advice, brochures, trouble shooter, service information: www.electrolux.com
Register your product for better service:
www.electrolux.com/productregistration
Buy Accessories, Consumables and Original spare parts for your appliance: www.electrolux.com/shop
CUSTOMER CARE AND SERVICE
We recommend the use of original spare parts.
When contacting Service, ensure that you have the following data available. The information can be found on the rating plate. Model, PNC, Serial Number.
 Warning / Caution-Safety information
 General information and tips
 Environmental information
Subject to change without notice.

ENGLISH 3
SAFETY INFORMATION
This USER MANUAL provides specific operating instructions for your model. Use the room air conditioner only as instructed in this USER MANUAL. These instructions are not meant to cover every possible condition and situation that may occur. Common sense and caution must be practiced when installing, operating, and maintaining any appliance.
Warning! Avoid fire hazard or electric shock. Do not use an extension cord or an adaptor plug. Do not remove any prong from the power cord.
•Do not, under any circumstances, cut, remove, or bypass the grounding prong.
For your safety
Warning! Do not store or use gasoline or other flammable
vapors and liquids in the vicinity of this or any other appliance. Read product labels for flammability and other warnings.
Warning! Discard water from
bucket. Water is not potable and cannot be used for drinking.
Child safety precautions
Warning! Destroy the carton, plastic bags, and any packing
materials immediately after the dehumidifier is unpacked.
Children should never use these items for play.
Warning! Do not leave children unattended in an area where the appliance is operating.
Warning! Do not allow them to sit or stand on the appliance.
Electrical information
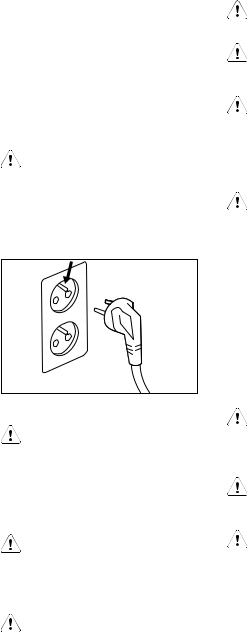
Warning! For your safety and protection, this dehumidifier
is equipped with a threeprong grounding plug on the power cord. Do not, under any circumstances, cut or remove
the round ground prong from the plug.
Warning! Your dehumidifier
must be plugged directly into a properly grounded and polarized three-prong receptacle. lf the wall receptacle you intend to use will not accept a three-prong plug, or if you are not sure the outlet is adequately grounded or protected by a time delay fuse or circuit breaker, have a qualified electrician install the proper outlet according to the National Electrical Code and applicable local codes and ordinances. Do not use an extension cord or an adapter plug.
Warning! Never unplug the dehumidifier by pulling on the
power cord. Always grip the plug firmly and pull straight out from the receptacle.
Warning! Do not pinch, bend, or knot the power cord.
Safety precautions
Caution! Avoid Serious Injury or Death.
•This dehumidifier contains no userserviceable parts. Always call an authorized Electrolux servicer for repairs.
•Do not insert or place fingers or objects into the air discharge area or front grille of the unit.
•Do not start or stop the dehumidifier by unplugging the power cord or turning off the power at the electrical box.

4 www.electrolux.com
•Do not cut or damage the power cord.
•If the power cord is damaged, it should only be replaced by an authorized Electrolux servicer.
•In the event of a malfunction (sparks, burning smell, etc.), immediately stop the operation, disconnect the power cord, and call an authorized Electrolux servicer.
•Do not operate the dehumidifier with wet hands.
•Do not pull on the power cord.
•Do not drink any water from the dehumidifier.
Caution! Avoid Injury or damage to the unit or other property
•Do not direct airflow at fireplaces or other heat related sources as this could cause flare ups.
•Do not climb on or place objects on the unit.
•Do not hang objects off the unit.
•Do not place containers with liquids on the unit.
•Turn off the dehumidifier at the power source when it will not be used for an extended period of time.
•Operate the unit with air filter in place.
•Do not block or cover the intake grille, discharge area and outlet ports.
•Ensure that any electrical/electronic equipment is one yard away from the unit.
•Do not use or store flammable gases near the unit.
BEFORE FIRST USE
Selecting a location
Important!
1.Dehumidifier must be operated in an enclosed area to be most effective. Close all doors, windows, and other outside openings to the room. The effectiveness of the dehumidifier depends on the rate at which new moisture-laden air enters the room.
2.Place dehumidifier in a location that does not restrict airflow through the front of the unit or out of the louvers on the left side of cabinet.
3.A dehumidifier operating in a basement will have little or no effect in drying an adjacent enclosed storage area, such as a closet, unless there is adequate circulation of air in and out of the area. lt may be necessary to install a second dehumidifier in the enclosed area for satisfactory drying.
4.The dehumidifier must be installed on a level floor that will support it with a full bucket of water.
5.There should be a minimum of 12 inches clearance around the dehumidifier.
How it works
When the unit is started, the fan begins to pull moisture-laden air across the dehumidifying coils. The coils condense or draw moisture from the air, and air flows through the side louvers into
the room as dry, warm air. Moisture removed from air is collected in a bucket on the front of the dehumidifier.
The unit is designed to operate between
5°C (41°F) and 35°C (96°F). The unit will not work properly if the temperature is out of this temperature range, or the performance of the unit will fall greatly.
The “Compressor" circuit has an automatic 3 minute time delayed start if the unit is turned off and on quickly. This prevents overheating of the
compressor and possible circuit breaker tripping. Make sure the tank is fitted correctly otherwise unit will not turn on.
ENGLISH 5
OPERATING INSTRUCTIONS
Allow the unit to reach room temperature before operating. To begin operating the dehumidifier, follow these steps:
Unit must be upright for one hour prior to operating.
1.Plug the power cord into a properly grounded 220 V AC outlet.
If the BUCKET FULL light is on, remove the bucket and re-install to reset the float switch.
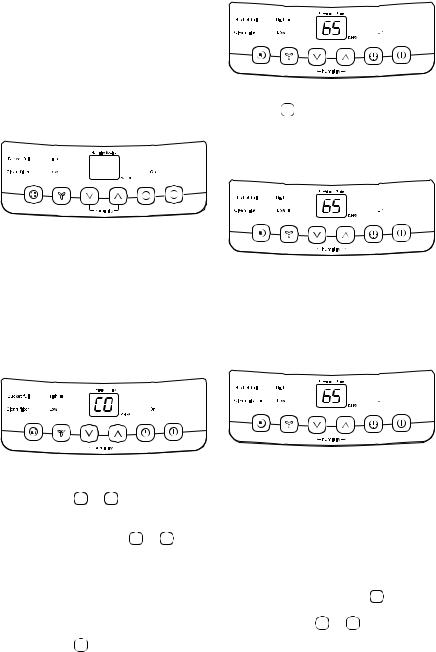
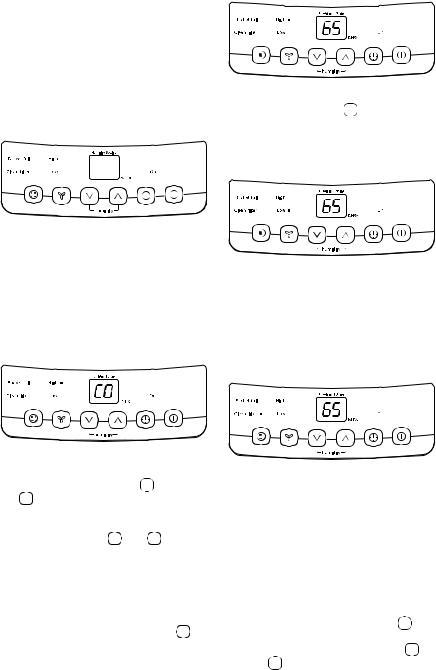
2.To turn the unit on, press the ON/
OFF button  . The unit will run in the factory setting of CONTINUOUS and high fan speed. In the CONTINUOUS mode, the unit will only display CO and not the room humidity. It is recommended you leave the unit running in the CONTINUOUS setting for the first three or four days until the sweating and dampness odors have stopped.
3.After a few days when the Relative Humidity has declined, press the HUMIDITY  or
or  buttons to choose a value between 35% to 85%, so the room is kept at a comfortable humidity. Pressing the
  or
or  buttons will change the humidity selection in 5% increments.
After you have set the desired humidity, the readout will display the actual room humidity. If at any time you want to return to the CONTINUOUS Mode, pressing the HUMIDITY  button will lower the Relative Humidity through the 5%
increments until the display reads CO.
4.You can also use the FAN SPEED button  to change the fan speed to HIGH or LOW. The indicator light will show the setting you have selected. A higher fan speed will result in quicker moisture removal.
5.The CLEAN FILTER light will illuminate after 250 hours of operation. At this time refer to the care and cleaning section to remove and clean the filter. Once the filter has been cleaned and replaced, simply press the FILTER button  to extinguish the light.
6.The TIMER function enables you to either Delay Start or Delay Stop the unit in the choice from 0.5 hour to 24 hours. If the unit is running, then selecting Timer will turn the unit off in
the hours that will be set (Delay Stop).
If the unit is off, then selecting Timer will turn the unit on in the hours that will be set (Delay Start).
TIMER setting:
First press TIMER button  , then adjust timer setting, by tapping or holding the
  or
or  button to
change the delay timer at 0.5 hour increments, up to 10 hours, then by 1 hour increments up to 24 hours. The control will count down the time
6 www.electrolux.com
remaining (8, 7.5, 7, etc.) until the unit either starts or stops.
For the Delay Start, the fan speed and humidity maintained will be the same as previous setting. After TIMER setting finishes, pressing TIMER button again at any time will stop the TIMER function. The Delay Start/Stop Feature will work until the unit either starts or stops. Once that happens the above steps have to be repeated.
–Before entering TIMER setting, make sure power is being supplied to the unit.
–Before entering TIMER setting, make sure pressing HUMIDITY  or
or  button sets one desired room humidity first.
7.To shut the unit down, press the ON/
OFF button  .
.
Fault codes
If the display reads "AS" or "ES" , a sensor has failed. Contact your Authorized Service Center.
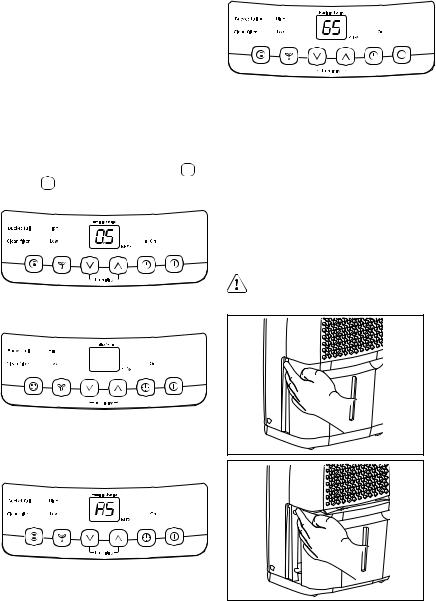
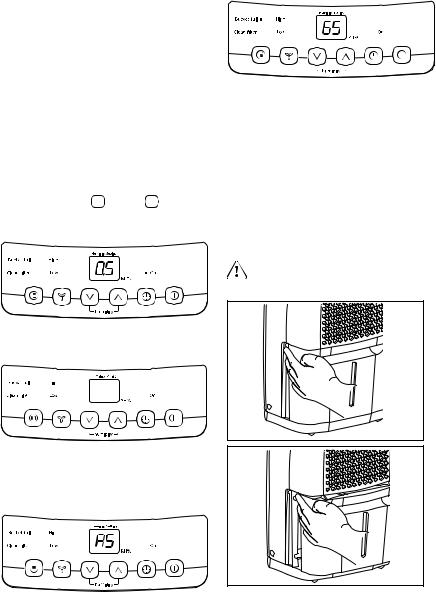
Removing collected water
–When the bucket is full, the unit will shut down and the BUCKET FULL indicator will illuminate.
–Do not move the unit at this time otherwise water may spill on the floor.
–Press sides of bucket gently to unclip the bucket from the unit.
–Remove the bucket as shown in the photographs below and empty the bucket.
–Replace the empty bucket back into the unit and once seated correctly, the unit will start up again.
–You should hear a click when the bucket is in the correct position
Warning! Discard water from bucket. Water is not potable and
cannot be used for drinking.
1. Emptying the Bucket:

ENGLISH 7
If the BUCKET FULL light does not extinguish, check that the float is correctly snapped in place as indicated by the diagram.
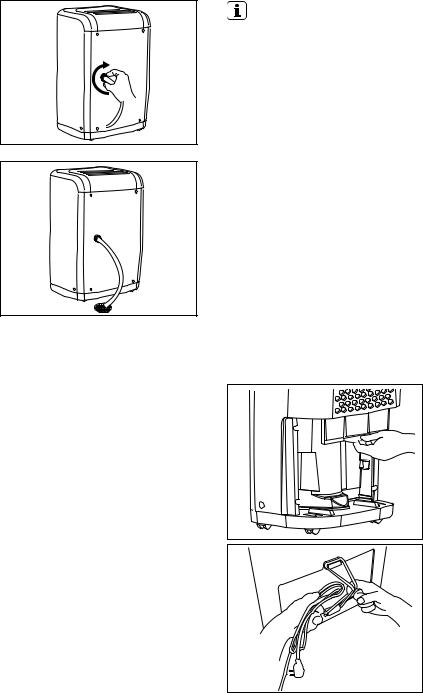
Continuous drain operation
For continuous drainage operation, you will need a garden hose and a drain nearby to discharge the water
1.Unscrew the drain cap on the back side of the unit. (fig.1)
2.Insert the female threaded end of the hose onto the drain connector of the unit (fig. 2).
3.Screw the garden hose onto the threaded portion of the connector.
(fig. 3)
4.Make sure all the connection is secure and there are no leaks.
5.Direct the hose toward the drain, making sure that there are no kinks that will stop the water flowing.
6.Place the end of the hose into the drain. (fig. 4)
7.Select the desired humidity setting and fan speed on the unit for continuous draining to start.
fig. 1
fig. 2
8 www.electrolux.com
Important!
1. Check the seal between the hose and the drain connector. If there is a small leak then replace the hose gasket and re-tighten the hose.
2. If the mode of continuous drainage is not chosen, the drain cap must be screwed securely to prevent leakage.
fig. 3
fig. 4
CARE AND CLEANING
1. |
Filter |
15 or 25 liter Dehumidifier: |
|
– Remove the filter every two |
|
|
weeks based on normal operating |
|
|
conditions. |
|
|
– To remove the filter, remove |
|
|
Bucket then pull filter downwards. |
|
|
– Wash the filter with clean water |
|
|
then dry. |
|
|
– Re-install the filter, then replace |
|
|
Bucket. |
|
2. |
Cabinet |
|
|
– Dust cabinet with an oil-free cloth, |
|
|
or using a damp cloth. |
|
|
– Vacuum grill using brush |
|
|
attachment. |
|
3. |
Water Bucket |
|
|
– Clean bucket with warm water and |
|
|
detergent. |
|
Storage
When unit is not in use, unplug and use the cord wrap shown for your model type.

ENGLISH 9
WHAT TO DO IF…
Before calling for service, review this list. It may save you time and expense. This list includes common occurrences
that are not the result of defective workmanship or materials in this appliance.
PROBLEM |
SOLUTION |
|
|
DEHUMIDIFIER DOES |
Wall plug disconnected. Push plug firmly into wall |
NOT OPERATE |
outlet. |
|
|
|
House fuse blown or circuit breaker tripped. Replace |
|
fuse with time delay type or reset circuit breaker. |
|
|
|
The dryness level you selected has been reached. |
|
Dehumidifier automatically shuts off when selected |
|
amount of moisture has been removed from the |
|
air. If you want to remove more moisture, Select |
|
CONTINUOUS by using the humidity button or knob. |
|
After the dehumidifier starts, reset the control to the |
|
desired setting. |
|
|
|
Bucket not installed properly. See “Removing |
|
Collected Water”. |
|
|
|
Water in the bucket has reached its preset level. |
|
Dehumidifier automatically turns off when this occurs. |
|
Empty bucket and return bucket to position. |
|
|
|
Dehumidifier is not turned on. Turn unit on. |
|
|
|
BUCKET FULL light is on. Remove bucket, empty |
|
water and re-install correctly. |
|
|
DEHUMIDIFIER RUNS |
Windows or doors near dehumidifier are open to |
TOO MUCH |
outdoors. Close all windows or doors to outside. |
|
|
|
Area to be dehumidified is too large. Check with your |
|
dealer to see if capacity is adequate. |
|
|
|
Air movement through dehumidifier is blocked. Grill |
|
may be dirty. Use brush attachment of vacuum |
|
cleaner to clean grill. See “Care and Cleaning“. |
|
Dehumidifier must be placed in a space that does not |
|
restrict air flowing into the rear coil or out of the front |
|
grill. |
|
|
|
Dehumidifier has been installed or restarted recently. |
|
The higher the moisture in the room, the longer the |
|
dehumidifier will operate. |
|
|
|
Dehumidifier is in the CONTINUOUS mode and will |
|
remain on in this mode, use the humidity button or |
|
knob to set a RH% higher level. |
|
|

10 www.electrolux.com
DEHUMIDIFIER IS |
Humidity setting is too high. Press the HUMIDITY |
OPERATING, BUT ROOM |
button or rotate knob to a lower setting or choose |
IS NOT DRY ENOUGH. |
CONTINUOUS for maximum dryness. |
|
|
|
Dehumidifier has been installed or restarted recently. |
|
The higher the moisture in the room air, the longer it |
|
takes for the room air to become dry. |
|
|
|
Dehumidifier does not have sufficient clearance |
|
to operate. Air flow to front grill is blocked. See |
|
“Selecting a Location“. |
|
|
|
Room temperature is too low. Unit will not operate |
|
satisfactorily if the room temperature is below 5°C |
|
(41°F). See “Operating Conditions“. |
|
|
|
Refer to causes under DEHUMlDIFIER RUNS TOO |
|
MUCH. |
|
|
FROST APPEARS ON |
Dehumidifier has been turned on recently. This is |
COILS ABOVE BUCKET. |
normal due to refrigerant rushing through the coil. |
|
Frost will usually disappear within 60 minutes. |
|
|
|
Room Temperature is too low. All models will operate |
|
satisfactorily at temperatures greater than 5°C (41°F). |
|
|
FAN NOISE. |
Air is moving through the dehumidifier. This is a |
|
normal sound. |
|
|
ENVIRONMENT CONCERNS
The symbol on the product or on its packaging indicates that this product may not be treated as household waste. Instead it should be taken
to the appropriate collection point for the recycling of electrical and
electronic equipment. By ensuring this product is disposed of correctly, you will help prevent potential negative consequences for the environment and human health, which could otherwise be caused by inappropriate waste handling of this product. For more detailed information about recycling
of this product, please contact your local council, your household waste disposal service or the shop where you purchased the product.
Warning! THIS PRODUCT CONTAINS ECOLOGICAL REFRIGERANT GAS R 134A
WITH O.D.P. = 0 (OZONE
DEPLETION POTENTIAL). AT THE END OF ITS SERVICE LIFE IT MUST BE DELIVERED TO THE SPECIAL COLLECTION CENTRES. ASK FOR INFORMATION FROM YOUR MUNICIPAL WASTE DISPOSAL SERVICE. Do not vent R-134A into atmosphere: R-134A is a fluorinated greenhouse gas, covered by Kyoto Protocol, with a Global Warming Potential
(GWP) = 1300.
11 www.electrolux.com |
|
INNEHÅLL |
|
Säkerhetsinformation .............................................................................................. |
12 |
Innan maskinen används första gången .................................................................. |
13 |
Bruksanvisning ....................................................................................................... |
14 |
Underhåll och rengöring .......................................................................................... |
17 |
Om maskinen inte fungerar ..................................................................................... |
18 |
Miljöskydd .............................................................................................................. |
19 |
WE’RE THINKING OF YOU
Tack för att du köpt en Electrolux-produkt. Du har valt en produkt som för med sig årtionden av yrkeserfarenhet och innovation. Genial och elegant har den utformats med dig i åtanke. Så när du än använder den kan du känna dig trygg med att veta att du får fantastiska resultat varje gång.
Välkommen till Electrolux.
Besök vår webbplats för:
Få användningsråd, broschyrer, felsökningshjälp och serviceinformation: www.electrolux.se
Registrera din produkt för bättre service:
www.electrolux.com/productregistration
Köp tillbehör, förbrukningsvaror och originalreservdelar till din produkt: www.electrolux.com/shop
KUNDTJÄNST OCH SERVICE
Vi rekommenderar du använder originalreservdelar.
I kontakt med Service ska du ha följande uppgifter tillhands.
Informationen står på typskylten. Modell, PNC, serienummer.
 Varning / säkerhetsföreskrifter
 Allmän information och tips
 Miljöinformation
Med reservation för ändringar.
SVENSKA 12
SÄKERHETSINFORMATION
I den här BRUKSANVISNINGEN finns specifika användningsanvisningar för din modell. Luftkonditioneringen får endast användas såsom anges i den här BRUKSANVISNINGEN. Denna bruksanvisning är inte avsedd att täcka alla möjliga tillstånd och situationer som kan uppstå. Sunt förnuft och försiktighet måste iakttas vid installation, användning och skötsel av alla produkter.
Varning! Undvik eldsvåda eller elstötar. Använd inte en förlängningssladd eller adapterkontakt. Ta inte bort något stift från nätsladden.
•Jordningsstiftet får under inga omständigheter skäras av, tas bort eller förbikopplas.
För din säkerhet
Varning! Lagra eller använd heller inte bensin eller andra
lättantändliga ångor och vätskor i närheten av denna eller någon annan apparat. Läs produktetiketterna för lättantändlighet och andra varningar.
Varning! Kassera vattnet från
hinken. Vattnet går inte att dricka och kan inte användas som dryck.
Barnsäkerhetsföreskrifter
Varning! Förstör kartongen, plastpåsar och allt förpackningsmaterial omedelbart efter avfuktaren har packats upp. Barn får aldrig leka med dessa föramål.
Varning! Lämna inte barn obevakade i ett rum där
produkten är igång.
Varning! Låt dem inte sitta eller stå på produkten.
Elektrisk information
Varning! För din säkerhet och
skydd är denna avfuktare försedd med en jordningskontakt med tre stift på nätsladden. Skär under inga omständigheter
bort eller avlägsna det runda jordningsstiftet från elkontakten.
Varning! Avfuktaren måste
anslutas direkt till ett ordentligt jordat och polariserat uttag med tre stift. Om vägguttaget du tänker använda inte är gjort för en kontakt med tre stift eller om du inte vet om uttaget är ordentligt jordat eller skyddat av en tidsfördröjningssäkring eller kretsbrytare ska en behörig elektriker installera rätt uttag enligt National Electrical Code och gällande lokala regler
och förordningar. Använd inte en förlängningssladd eller adapterkontakt.
Varning! Koppla aldrig ur avfuktaren genom att dra i
elsladden. Ta alltid ett fast grepp om kontakten och dra rakt ut från vägguttaget.
Varning! Kläm, böj eller knyt inte nätsladden.
Allmänna försiktighetsåtgärder
Obs! Undvik allvarliga personskador eller dödsfall.
•Avfuktaren innehåller inga delar som användaren kan serva. Kontakta alltid en av Electrolux auktoriserad serviceverkstad för reparationer.
•Stick inte in och sätt inte fingrar eller föremål i luftöppningarna eller frontgallret på enheten.
•Slå inte på eller av avfuktaren genom att dra ut nätsladden eller stänga av strömmen i elskåpet.

13 www.electrolux.com
•Skär inte i eller skada nätsladden.
•Om nätsladden är skadad får den bara bytas ut av en av Electrolux auktoriserad serviceverkstad.
•Vid fel (gnistor, bränd lukt osv.) ska du sluta använda produkten direkt, dra ut nätsladden och ringa en av Electrolux auktoriserad serviceverkstad.
•Använd inte avfuktaren med våta händer.
•Dra inte i nätsladden.
•Drick inte vattnet från avfuktaren.
Obs! Undvik skador på enheten eller annan egendom
•Rikta inte luftflödet mot eldstäder eller andra värmerelaterade källor eftersom detta kan orsaka att elden flammar upp.
•Klättra inte på och ställ inte föremål på enheten.
•Häng inte föremål från enheten.
•Placera inga vätskebehållare på enheten.
•Stäng av avfuktaren vid strömkällan när den inte ska användas under en längre tid.
•Använd enheten med ett luftfilter på plats.
•Blockera inte och täck inte över intagsgallret, utloppsdelen och utloppsportarna.
•Kontrollera att all elektrisk/ elektronisk utrustning är en meter från enheten.
•Använd inte och förvara inte lättantändliga gaser nära enheten.
INNAN PRODUKTEN ANVÄNDS FÖRSTA GÅNGEN
Välja en plats
Viktigt!
1.Avfuktaren måste användas i ett slutet rum för att vara som effektivast. Stäng alla dörrar, fönster och andra öppningar från utsidan till rummet. Avfuktarens effektivitet beror på hastigheten vid vilken ny fuktig luft kommer in i rummet.
2.Placera avfuktaren på en plats som inte begränsar luftflödet genom enhetens framsida eller ut ur öppningarna på skåpets vänstra sida.
3.En avfuktare som används i en källare har liten eller ingen effekt vid torkning av ett intilliggande lagringsrum, som t.ex. en garderob, om det inte finns tillräcklig luftcirkulation in och ut till rummet. Det kan vara nödvändigt att installera en avfuktare till i det stängda rummet för att få tillfredsställande torkning.
4.Avfuktaren måste installeras på ett jämnt golv som stödjer den med en hink full med vatten.
5.Det ska finnas minst 30 cm spelrum runt avfuktaren.
Så fungerar den
När enheten startats börjar fläkten dra fuktig luft genom avfuktningsspolarna. Spolarna kondenserar eller drar fukten ur luften och luften flödar genom sidoöppningarna in i rummet som torr, varm luft. Fukt som avlägsnas från luft samlas i en hink på framsidan av luftfuktaren.
Enheten är utformad att fungera mellan 5 °C och 35 °C. Enheten fungerar inte ordentligt om temperaturen ä utanför detta temperaturområde eller så sjunker enhetens prestanda avsevärt.
"Kompressor"-kretsen har en automatisk 3 minuters tidsfördröjd start om enheten stängs av snabbt. Detta förhindrar
att kompressorn överhettas och at huvudströmbrytaren utlöses. Kontrollera att tanken är ordentligt fastsatt, annars går det inte att starta enheten.
SVENSKA 14
BRUKSANVISNING
Låt enheten först kallna till rumstemperatur innan den slås på. Gör så här för att börja använda luftfuktaren:
Enheten måste stå upprätt i en timme före användning.
1.Anslut nätsladden till ett jordat 220 V växelspänningsuttag.
Om lampan för HINK FULL tänds tar du loss hinken och sätter tillbaka den för att återställa flottörbrytaren.
2.Slå på enheten genom att trycka på
PÅ/AV-knappen  . Enheten körs på fabriksinställningen KONTINUERLIG och hög fläkthastighet. I läget KONTINUERLIG visar enheten bara KO och inte rumsluftfuktigheten.
Du bör låta enheten gå i läget KONTINUERLIG under de första tre eller fyra dagarna tills svettoch fuktlukten upphört.
3.Efter några dagar när den relativa luftfuktigheten har försvunnit trycker du på LUFTFUKTIGHET  eller
eller
 -knapparna för att välja ett värde mellan 35 % och 85 % så att rummet hålls vid en komfortabel luftfuktighet. Om du trycker på
  eller
eller  ändras luftfuktigheten i ökande steg med 5 % åt gången.
När du har ställt in önskad luftfuktighet visar värdet den aktuella luftfuktigheten i rummet. Om du någon gång vill återgå till läget KONTINUERLIGT trycker du på LUFTFUKTIGHET 
så sänks den relativa luftfuktigheten i ökande steg med 5 % åt gången tills displayen visar KO.
4.Du kan också använda knappen FLÄKTHASTIGHET  för att ändra fläkthastigheten till HÖG eller LÅG. Kontrollampan visar den inställning du har valt. En högre fläkthastighet ger snabbare fuktborttagning.
5.Lampan RENGÖR FILTER tänds efter 250 driftstimmar. Nu är det dags att läsa avsnittet av underhåll och rengöring för at att ta loss och rengöra filtret.
När filtret har rengjorts och satts tillbaka trycker du bara på FILTERknappen  för att släcka lampan.
6.Med TIMER-funktionen kan du antingen använda Fördröjd start eller Fördröjt stopp och välja mellan 0,5 timme till 24 timmar. Om enheten är igång och du väljer Timer stängs
enheten av vid det antalet timmar som ställs in (Fördröj stopp). Om enheten
är avstängd och du väljer Timer slås enheten på vid det antalet timmar som ställs in (Fördröj start).
TIMER-inställning:
Tryck först på TIMER-knappen  , justera sedan timerinställningen genom att trycka på eller hålla in
eller  -knappen för att ändra fördröj stopp-timern i steg om 0,5 timme upp
15 www.electrolux.com
till 10 timmar, sedan i steg om 1 timme upp till 24 timmar. Kontrollen räknar ned återstående tid (8, 7.5, 7 osv.) tills enheten antingen startar eller stannar. För Fördröjd start är fläkthastigheten och luftfuktigheten samma som föregående inställning. När TIMERinställningen är klar och om du trycker på TIMER-knappen igen så stoppar TIMER-funktionen. Fördröjd start/ stopp-funktionen fungerar till enheten antingen startar eller stannar. När
det händer måste ovanstående steg upprepas.
–Innan du gör TIMER-inställningen måste strömmen vara ansluten till enheten.
–Innan du gör TIMER-inställningen ska du kontroller att du tryckt på FUKTIGHET  annars
  ställer knappen in önskad rumsfuktighet först.
7.Stäng av enheten genom att trycka på
PÅ/AV-knappen  .
.
Avlägsna uppsamlat vatten
1.Tömma hinken:
–När hinken är full stängs enheten av och indikeringen HINK FULL tänds.
–Flytta inte enheten vid den här tidpunkten. Om du gör det kan vatten spillas ut på golvet.
–Tryck försiktigt på hinkens sidor för att lossa hinken från enheten.
–Ta loss hinken såsom på bilden nedan och töm den.
–Sätt tillbaka den tomma hinken i enheten och när den är fastsatt korrekt startar den igen.
–Du ska höra ett klick när hinken är i rätt läge
Varning! Kassera vattnet från hinken. Vattnet går inte att dricka och kan inte användas som dryck.
Felkoder.
Om det står "AS" eller "ES" på displayen har en sensor gått sönder. Kontakta en auktoriserad serviceverkstad.
 Loading...