


 Loading...
Dell 2330d/dn
Service Manual
11 Dec 2008
Information in this document is subject to change without notice. 2010 Dell Inc. All rights reserved.
Reproduction in any manner whatsoever without the written permission of Dell Inc.is strictly forbidden. Trademarks used in this text: Dell and the DELL logo are trademarks of Dell Inc.
Other trademarks and trade names may be used in this document to refer to the entities claiming the marks and names of their products. Dell Inc. disclaims any proprietary interest in trademarks and trade names other than its own.

Table of Contents
Table of Contents. . . . . . . . . . . . . . . . . . . . . . . . . . . . . . . . . . . . . . . . . . . . . . . . . . . . . . . iii Notices and safety information . . . . . . . . . . . . . . . . . . . . . . . . . . . . . . . . . . . . . . . . . . vii
Laser notice . . . . . . . . . . . . . . . . . . . . . . . . . . . . . . . . . . . . . . . . . . . . . . . . . . . . . . . . . . . . . . . . . . . . . . . . . vii Safety information. . . . . . . . . . . . . . . . . . . . . . . . . . . . . . . . . . . . . . . . . . . . . . . . . . . . . . . . . . . . . . . . . . . . xiii
Preface . . . . . . . . . . . . . . . . . . . . . . . . . . . . . . . . . . . . . . . . . . . . . . . . . . . . . . . . . . . . . . xvi
Conventions. . . . . . . . . . . . . . . . . . . . . . . . . . . . . . . . . . . . . . . . . . . . . . . . . . . . . . . . . . . . . . . . . . . . . . . . . xvi
General information . . . . . . . . . . . . . . . . . . . . . . . . . . . . . . . . . . . . . . . . . . . . . . . . . . . . . . . . . . . . . . . . . . . . |
1-1 |
Maintenance approach . . . . . . . . . . . . . . . . . . . . . . . . . . . . . . . . . . . . . . . . . . . . . . . . . . . . . . . . . . . . . . . 1-1 Overview of the operator panel . . . . . . . . . . . . . . . . . . . . . . . . . . . . . . . . . . . . . . . . . . . . . . . . . . . . . . . . . 1-2 Specifications . . . . . . . . . . . . . . . . . . . . . . . . . . . . . . . . . . . . . . . . . . . . . . . . . . . . . . . . . . . . . . . . . . . . . . . 1-3 Memory . . . . . . . . . . . . . . . . . . . . . . . . . . . . . . . . . . . . . . . . . . . . . . . . . . . . . . . . . . . . . . . . . . . . . . . . 1-3 Print quality settings . . . . . . . . . . . . . . . . . . . . . . . . . . . . . . . . . . . . . . . . . . . . . . . . . . . . . . . . . . . . . 1-3 Connectivity and compatibility . . . . . . . . . . . . . . . . . . . . . . . . . . . . . . . . . . . . . . . . . . . . . . . . . . . . . 1-4 Media trays and supply capacity . . . . . . . . . . . . . . . . . . . . . . . . . . . . . . . . . . . . . . . . . . . . . . . . . . . 1-5 Types of print media . . . . . . . . . . . . . . . . . . . . . . . . . . . . . . . . . . . . . . . . . . . . . . . . . . . . . . . . . . . . . 1-6 Tips on preventing jams . . . . . . . . . . . . . . . . . . . . . . . . . . . . . . . . . . . . . . . . . . . . . . . . . . . . . . . . . . . . . . 1-7 Paper path . . . . . . . . . . . . . . . . . . . . . . . . . . . . . . . . . . . . . . . . . . . . . . . . . . . . . . . . . . . . . . . . . . . . . 1-7 Tools . . . . . . . . . . . . . . . . . . . . . . . . . . . . . . . . . . . . . . . . . . . . . . . . . . . . . . . . . . . . . . . . . . . . . . . . . . . . . . 1-8 Acronyms . . . . . . . . . . . . . . . . . . . . . . . . . . . . . . . . . . . . . . . . . . . . . . . . . . . . . . . . . . . . . . . . . . . . . . . . . . 1-9
Diagnostics information. . . . . . . . . . . . . . . . . . . . . . . . . . . . . . . . . . . . . . . . . . . . . . . . . . . . . . . . . . . . . . . . |
2-1 |
Start . . . . . . . . . . . . . . . . . . . . . . . . . . . . . . . . . . . . . . . . . . . . . . . . . . . . . . . . . . . . . . . . . . . . . . . . . . . . . . |
. 2-1 |
Overview of the operator panel and menus . . . . . . . . . . . . . . . . . . . . . . . . . . . . . . . . . . . . . . . . . . . . . . |
. 2-2 |
Indicator light . . . . . . . . . . . . . . . . . . . . . . . . . . . . . . . . . . . . . . . . . . . . . . . . . . . . . . . . . . . . . . . . . . . |
2-2 |
Buttons . . . . . . . . . . . . . . . . . . . . . . . . . . . . . . . . . . . . . . . . . . . . . . . . . . . . . . . . . . . . . . . . . . . . . . . . |
2-3 |
Diagram of the printer menus . . . . . . . . . . . . . . . . . . . . . . . . . . . . . . . . . . . . . . . . . . . . . . . . . . . . . . |
2-5 |
Messages and error codes . . . . . . . . . . . . . . . . . . . . . . . . . . . . . . . . . . . . . . . . . . . . . . . . . . . . . . . . . . . . |
2-6 |
User attendance messages . . . . . . . . . . . . . . . . . . . . . . . . . . . . . . . . . . . . . . . . . . . . . . . . . . . . . . . |
2-6 |
Cartridge error messages . . . . . . . . . . . . . . . . . . . . . . . . . . . . . . . . . . . . . . . . . . . . . . . . . . . . . . . . . |
2-9 |
Paper jam error codes (200-series) . . . . . . . . . . . . . . . . . . . . . . . . . . . . . . . . . . . . . . . . . . . . . . . . . |
2-9 |
Service error codes . . . . . . . . . . . . . . . . . . . . . . . . . . . . . . . . . . . . . . . . . . . . . . . . . . . . . . . . . . . . . |
2-15 |
Symptom tables . . . . . . . . . . . . . . . . . . . . . . . . . . . . . . . . . . . . . . . . . . . . . . . . . . . . . . . . . . . . . . . . . . . . |
2-20 |
POST symptom table . . . . . . . . . . . . . . . . . . . . . . . . . . . . . . . . . . . . . . . . . . . . . . . . . . . . . . . . . . . . |
2-20 |
Printer symptom table . . . . . . . . . . . . . . . . . . . . . . . . . . . . . . . . . . . . . . . . . . . . . . . . . . . . . . . . . . . |
2-21 |
Service checks . . . . . . . . . . . . . . . . . . . . . . . . . . . . . . . . . . . . . . . . . . . . . . . . . . . . . . . . . . . . . . . . . . . . . |
2-22 |
Controller board service check . . . . . . . . . . . . . . . . . . . . . . . . . . . . . . . . . . . . . . . . . . . . . . . . . . . |
2-22 |
Cooling fan service check . . . . . . . . . . . . . . . . . . . . . . . . . . . . . . . . . . . . . . . . . . . . . . . . . . . . . . . |
2-23 |
Cover interlock switch service check . . . . . . . . . . . . . . . . . . . . . . . . . . . . . . . . . . . . . . . . . . . . . . |
2-23 |
Dead machine service check . . . . . . . . . . . . . . . . . . . . . . . . . . . . . . . . . . . . . . . . . . . . . . . . . . . . . |
2-24 |
Fuser service check . . . . . . . . . . . . . . . . . . . . . . . . . . . . . . . . . . . . . . . . . . . . . . . . . . . . . . . . . . . . |
2-25 |
LVPS/HVPS service check . . . . . . . . . . . . . . . . . . . . . . . . . . . . . . . . . . . . . . . . . . . . . . . . . . . . . . . |
2-25 |
Main motor service check . . . . . . . . . . . . . . . . . . . . . . . . . . . . . . . . . . . . . . . . . . . . . . . . . . . . . . . |
2-26 |
Operator panel service check . . . . . . . . . . . . . . . . . . . . . . . . . . . . . . . . . . . . . . . . . . . . . . . . . . . . . |
2-27 |
Paper feed service checks . . . . . . . . . . . . . . . . . . . . . . . . . . . . . . . . . . . . . . . . . . . . . . . . . . . . . . . |
2-27 |
Parallel or USB port service check . . . . . . . . . . . . . . . . . . . . . . . . . . . . . . . . . . . . . . . . . . . . . . . . |
2-29 |
Print quality service checks . . . . . . . . . . . . . . . . . . . . . . . . . . . . . . . . . . . . . . . . . . . . . . . . . . . . . . |
2-30 |
Printhead service check . . . . . . . . . . . . . . . . . . . . . . . . . . . . . . . . . . . . . . . . . . . . . . . . . . . . . . . . . |
2-37 |
Transfer roll service check . . . . . . . . . . . . . . . . . . . . . . . . . . . . . . . . . . . . . . . . . . . . . . . . . . . . . . |
2-37 |
Tray 2 service check . . . . . . . . . . . . . . . . . . . . . . . . . . . . . . . . . . . . . . . . . . . . . . . . . . . . . . . . . . . . |
2-38 |
Table of Contents iii
Diagnostic aids . . . . . . . . . . . . . . . . . . . . . . . . . . . . . . . . . . . . . . . . . . . . . . . . . . . . . . . . . . . . . . . . . . . . . . . . . |
3-1 |
Accessing service menus . . . . . . . . . . . . . . . . . . . . . . . . . . . . . . . . . . . . . . . . . . . . . . . . . . . . . . . . . . . . . |
.3-1 |
Printing menus . . . . . . . . . . . . . . . . . . . . . . . . . . . . . . . . . . . . . . . . . . . . . . . . . . . . . . . . . . . . . . . . . |
.3-1 |
Configuration menu (CONFIG MENU) . . . . . . . . . . . . . . . . . . . . . . . . . . . . . . . . . . . . . . . . . . . . . . . . . . . |
.3-2 |
Entering Configuration Menu . . . . . . . . . . . . . . . . . . . . . . . . . . . . . . . . . . . . . . . . . . . . . . . . . . . . . |
.3-2 |
Available menus . . . . . . . . . . . . . . . . . . . . . . . . . . . . . . . . . . . . . . . . . . . . . . . . . . . . . . . . . . . . . . . . |
.3-2 |
Reset photoconductor maintenance counter (Reset PC Cnt) . . . . . . . . . . . . . . . . . . . . . . . . . . . |
.3-3 |
Print quality pages (Prt Quality Pgs) . . . . . . . . . . . . . . . . . . . . . . . . . . . . . . . . . . . . . . . . . . . . . . . . |
.3-3 |
Reports . . . . . . . . . . . . . . . . . . . . . . . . . . . . . . . . . . . . . . . . . . . . . . . . . . . . . . . . . . . . . . . . . . . . . . . |
.3-3 |
Panel Menus . . . . . . . . . . . . . . . . . . . . . . . . . . . . . . . . . . . . . . . . . . . . . . . . . . . . . . . . . . . . . . . . . . . |
.3-3 |
PPDS Emulation . . . . . . . . . . . . . . . . . . . . . . . . . . . . . . . . . . . . . . . . . . . . . . . . . . . . . . . . . . . . . . . . |
.3-3 |
Demo Mode . . . . . . . . . . . . . . . . . . . . . . . . . . . . . . . . . . . . . . . . . . . . . . . . . . . . . . . . . . . . . . . . . . . . |
.3-4 |
Factory Defaults . . . . . . . . . . . . . . . . . . . . . . . . . . . . . . . . . . . . . . . . . . . . . . . . . . . . . . . . . . . . . . . . |
.3-4 |
Energy Conserve . . . . . . . . . . . . . . . . . . . . . . . . . . . . . . . . . . . . . . . . . . . . . . . . . . . . . . . . . . . . . . . |
.3-4 |
Font Sharpening . . . . . . . . . . . . . . . . . . . . . . . . . . . . . . . . . . . . . . . . . . . . . . . . . . . . . . . . . . . . . . . . |
.3-4 |
Exit Configuration Menu (Exit Config Menu) . . . . . . . . . . . . . . . . . . . . . . . . . . . . . . . . . . . . . . . . . |
.3-4 |
Diagnostics menu . . . . . . . . . . . . . . . . . . . . . . . . . . . . . . . . . . . . . . . . . . . . . . . . . . . . . . . . . . . . . . . . . . . |
.3-5 |
Entering Diagnostics menu . . . . . . . . . . . . . . . . . . . . . . . . . . . . . . . . . . . . . . . . . . . . . . . . . . . . . . . |
.3-5 |
Available tests . . . . . . . . . . . . . . . . . . . . . . . . . . . . . . . . . . . . . . . . . . . . . . . . . . . . . . . . . . . . . . . . . . |
.3-5 |
Registration . . . . . . . . . . . . . . . . . . . . . . . . . . . . . . . . . . . . . . . . . . . . . . . . . . . . . . . . . . . . . . . . . . . . |
.3-6 |
Print tests . . . . . . . . . . . . . . . . . . . . . . . . . . . . . . . . . . . . . . . . . . . . . . . . . . . . . . . . . . . . . . . . . . . . . |
.3-7 |
Hardware tests . . . . . . . . . . . . . . . . . . . . . . . . . . . . . . . . . . . . . . . . . . . . . . . . . . . . . . . . . . . . . . . . . |
.3-8 |
Duplex tests . . . . . . . . . . . . . . . . . . . . . . . . . . . . . . . . . . . . . . . . . . . . . . . . . . . . . . . . . . . . . . . . . . . . |
.3-9 |
Input tray tests . . . . . . . . . . . . . . . . . . . . . . . . . . . . . . . . . . . . . . . . . . . . . . . . . . . . . . . . . . . . . . . . . |
3-10 |
Output bin tests . . . . . . . . . . . . . . . . . . . . . . . . . . . . . . . . . . . . . . . . . . . . . . . . . . . . . . . . . . . . . . . . |
3-11 |
Base sensor test (B. sensor test) . . . . . . . . . . . . . . . . . . . . . . . . . . . . . . . . . . . . . . . . . . . . . . . . . . |
3-11 |
Printer setup . . . . . . . . . . . . . . . . . . . . . . . . . . . . . . . . . . . . . . . . . . . . . . . . . . . . . . . . . . . . . . . . . . . |
3-12 |
EP setup . . . . . . . . . . . . . . . . . . . . . . . . . . . . . . . . . . . . . . . . . . . . . . . . . . . . . . . . . . . . . . . . . . . . . . . |
3-13 |
Event log . . . . . . . . . . . . . . . . . . . . . . . . . . . . . . . . . . . . . . . . . . . . . . . . . . . . . . . . . . . . . . . . . . . . . . |
3-14 |
Exit Diagnostics . . . . . . . . . . . . . . . . . . . . . . . . . . . . . . . . . . . . . . . . . . . . . . . . . . . . . . . . . . . . . . . . |
3-15 |
Printhead assembly electronic adjustment . . . . . . . . . . . . . . . . . . . . . . . . . . . . . . . . . . . . . . . . . . . . . . |
3-16 |
Printhead assembly mechanical adjustment . . . . . . . . . . . . . . . . . . . . . . . . . . . . . . . . . . . . . . . . . . . . . |
3-17 |
Repair information . . . . . . . . . . . . . . . . . . . . . . . . . . . . . . . . . . . . . . . . . . . . . . . . . . . . . . . . . . . . . . . . . . . . . |
4-1 |
Handling ESD-sensitive parts . . . . . . . . . . . . . . . . . . . . . . . . . . . . . . . . . . . . . . . . . . . . . . . . . . . . . . . . . .4-1 Removal procedures . . . . . . . . . . . . . . . . . . . . . . . . . . . . . . . . . . . . . . . . . . . . . . . . . . . . . . . . . . . . . . . . . .4-2 ACM pick tire roller removal . . . . . . . . . . . . . . . . . . . . . . . . . . . . . . . . . . . . . . . . . . . . . . . . . . . . . . .4-3 Bezel removal . . . . . . . . . . . . . . . . . . . . . . . . . . . . . . . . . . . . . . . . . . . . . . . . . . . . . . . . . . . . . . . . . . .4-5 Controller board removal . . . . . . . . . . . . . . . . . . . . . . . . . . . . . . . . . . . . . . . . . . . . . . . . . . . . . . . . . .4-6 Cover open sensor . . . . . . . . . . . . . . . . . . . . . . . . . . . . . . . . . . . . . . . . . . . . . . . . . . . . . . . . . . . . . . .4-8 Door mount removal . . . . . . . . . . . . . . . . . . . . . . . . . . . . . . . . . . . . . . . . . . . . . . . . . . . . . . . . . . . . . .4-9 Duplex removal . . . . . . . . . . . . . . . . . . . . . . . . . . . . . . . . . . . . . . . . . . . . . . . . . . . . . . . . . . . . . . . . .4-11 Duplex/main motor gear drive interface removal . . . . . . . . . . . . . . . . . . . . . . . . . . . . . . . . . . . . .4-13 Fan removal . . . . . . . . . . . . . . . . . . . . . . . . . . . . . . . . . . . . . . . . . . . . . . . . . . . . . . . . . . . . . . . . . . . .4-16 Front access door removal . . . . . . . . . . . . . . . . . . . . . . . . . . . . . . . . . . . . . . . . . . . . . . . . . . . . . . .4-17 Fuser removal . . . . . . . . . . . . . . . . . . . . . . . . . . . . . . . . . . . . . . . . . . . . . . . . . . . . . . . . . . . . . . . . . .4-20 Left side cover removal . . . . . . . . . . . . . . . . . . . . . . . . . . . . . . . . . . . . . . . . . . . . . . . . . . . . . . . . . .4-23 Lower front cover removal . . . . . . . . . . . . . . . . . . . . . . . . . . . . . . . . . . . . . . . . . . . . . . . . . . . . . . . .4-25 LVPS/HVPS removal . . . . . . . . . . . . . . . . . . . . . . . . . . . . . . . . . . . . . . . . . . . . . . . . . . . . . . . . . . . . .4-27 Main motor gear drive removal . . . . . . . . . . . . . . . . . . . . . . . . . . . . . . . . . . . . . . . . . . . . . . . . . . . .4-30 Manual feed clutch removal . . . . . . . . . . . . . . . . . . . . . . . . . . . . . . . . . . . . . . . . . . . . . . . . . . . . . . .4-32 Manual feed solenoid removal . . . . . . . . . . . . . . . . . . . . . . . . . . . . . . . . . . . . . . . . . . . . . . . . . . . . .4-34 Media ACM ASM feeder removal . . . . . . . . . . . . . . . . . . . . . . . . . . . . . . . . . . . . . . . . . . . . . . . . . . .4-37 Media feed clutch with cable removal . . . . . . . . . . . . . . . . . . . . . . . . . . . . . . . . . . . . . . . . . . . . . . .4-40 Media manual input sensor . . . . . . . . . . . . . . . . . . . . . . . . . . . . . . . . . . . . . . . . . . . . . . . . . . . . . . .4-42 Multipurpose feeder (MPF) removal . . . . . . . . . . . . . . . . . . . . . . . . . . . . . . . . . . . . . . . . . . . . . . . .4-45 Multipurpose feeder (MPF) feed clutch removal . . . . . . . . . . . . . . . . . . . . . . . . . . . . . . . . . . . . . .4-48 Nameplate removal . . . . . . . . . . . . . . . . . . . . . . . . . . . . . . . . . . . . . . . . . . . . . . . . . . . . . . . . . . . . . .4-50
iv
Operator panel removal . . . . . . . . . . . . . . . . . . . . . . . . . . . . . . . . . . . . . . . . . . . . . . . . . . . . . . . . . |
4-51 |
Paper input and duplex sensor assembly removal . . . . . . . . . . . . . . . . . . . . . . . . . . . . . . . . . . . |
4-52 |
Printhead removal . . . . . . . . . . . . . . . . . . . . . . . . . . . . . . . . . . . . . . . . . . . . . . . . . . . . . . . . . . . . . . |
4-53 |
Rear door and rear cover removal . . . . . . . . . . . . . . . . . . . . . . . . . . . . . . . . . . . . . . . . . . . . . . . . . |
4-54 |
Rear exit guide assembly with sensor and reversing solenoid removal . . . . . . . . . . . . . . . . . . |
4-56 |
Right side cover assembly removal . . . . . . . . . . . . . . . . . . . . . . . . . . . . . . . . . . . . . . . . . . . . . . . . |
4-58 |
Toner level sensor removal . . . . . . . . . . . . . . . . . . . . . . . . . . . . . . . . . . . . . . . . . . . . . . . . . . . . . . |
4-60 |
Top cover assembly removal . . . . . . . . . . . . . . . . . . . . . . . . . . . . . . . . . . . . . . . . . . . . . . . . . . . . . |
4-61 |
Transfer roll removal . . . . . . . . . . . . . . . . . . . . . . . . . . . . . . . . . . . . . . . . . . . . . . . . . . . . . . . . . . . . |
4-63 |
Upper front guide assembly removal . . . . . . . . . . . . . . . . . . . . . . . . . . . . . . . . . . . . . . . . . . . . . . |
4-64 |
Wear strip (tray 1 and 250-sheet tray 2) removal . . . . . . . . . . . . . . . . . . . . . . . . . . . . . . . . . . . . . |
4-65 |
Wear strip (550-sheet tray 2) removal . . . . . . . . . . . . . . . . . . . . . . . . . . . . . . . . . . . . . . . . . . . . . . |
4-66 |
Locations and connections . . . . . . . . . . . . . . . . . . . . . . . . . . . . . . . . . . . . . . . . . . . . . . . . . . . . . . . . . . . . 5-1
Locations . . . . . . . . . . . . . . . . . . . . . . . . . . . . . . . . . . . . . . . . . . . . . . . . . . . . . . . . . . . . . . . . . . . . . . . . . . 5-1 Front view . . . . . . . . . . . . . . . . . . . . . . . . . . . . . . . . . . . . . . . . . . . . . . . . . . . . . . . . . . . . . . . . . . . . . . 5-1 Rear view . . . . . . . . . . . . . . . . . . . . . . . . . . . . . . . . . . . . . . . . . . . . . . . . . . . . . . . . . . . . . . . . . . . . . . 5-1 Controller board connector pin values . . . . . . . . . . . . . . . . . . . . . . . . . . . . . . . . . . . . . . . . . . . . . . 5-2
Preventive maintenance. . . . . . . . . . . . . . . . . . . . . . . . . . . . . . . . . . . . . . . . . . . . . . . . . . . . . . . . . . . . . . . . 6-1
Safety inspection guide . . . . . . . . . . . . . . . . . . . . . . . . . . . . . . . . . . . . . . . . . . . . . . . . . . . . . . . . . . . . . . . 6-1 Lubrication specifications . . . . . . . . . . . . . . . . . . . . . . . . . . . . . . . . . . . . . . . . . . . . . . . . . . . . . . . . . . . . . 6-1
Parts catalog . . . . . . . . . . . . . . . . . . . . . . . . . . . . . . . . . . . . . . . . . . . . . . . . . . . . . . . . . . . . . . . . . . . . . . . . . . . . |
7-1 |
How to use this parts catalog . . . . . . . . . . . . . . . . . . . . . . . . . . . . . . . . . . . . . . . . . . . . . . . . . . . . . . . . . . 7-1
Index . . . . . . . . . . . . . . . . . . . . . . . . . . . . . . . . . . . . . . . . . . . . . . . . . . . . . . . . . . . . . . . . I-1 Part number index . . . . . . . . . . . . . . . . . . . . . . . . . . . . . . . . . . . . . . . . . . . . . . . . . . . . . I-3
Table of Contents v
vi

Notices and safety information
The following laser notice labels may be affixed to this printer.
Laser notice
The printer is certified in the U.S. to conform to the requirements of DHHS 21 CFR Subchapter J for Class I (1) laser products, and elsewhere is certified as a Class I laser product conforming to the requirements of IEC 60825-1.
Class I laser products are not considered to be hazardous. The printer contains internally a Class IIIb (3b) laser that is nominally a 7 milliwatt gallium arsenide laser operating in the wavelength region of 655-675 nanometers. The laser system and printer are designed so there is never any human access to laser radiation above a Class I level during normal operation, user maintenance, or prescribed service condition.
Laser
Der Drucker erfüllt gemäß amtlicher Bestätigung der USA die Anforderungen der Bestimmung DHHS (Department of Health and Human Services) 21 CFR Teil J für Laserprodukte der Klasse I (1). In anderen Ländern gilt der Drucker als Laserprodukt der Klasse I, der die Anforderungen der IEC (International Electrotechnical Commission) 60825-1 gemäß amtlicher Bestätigung erfüllt.
Laserprodukte der Klasse I gelten als unschädlich. Im Inneren des Druckers befindet sich ein Laser der Klasse IIIb (3b), bei dem es sich um einen Galliumarsenlaser mit 7 Milliwatt handelt, der Wellen der Länge 655-675 Nanometer ausstrahlt. Das Lasersystem und der Drucker sind so konzipiert, daß im Normalbetrieb, bei der Wartung durch den Benutzer oder bei ordnungsgemäßer Wartung durch den Kundendienst Laserbestrahlung, die Klasse I übersteigen würde, Menschen keinesfalls erreicht.
Avis relatif à l’utilisation de laser
Pour les Etats-Unis : cette imprimante est certifiée conforme aux provisions DHHS 21 CFR alinéa J concernant les produits laser de Classe I (1). Pour les autres pays : cette imprimante répond aux normes IEC 60825-1 relatives aux produits laser de Classe I.
Les produits laser de Classe I sont considérés comme des produits non dangereux. Cette imprimante est équipée d’un laser de Classe IIIb (3b) (arséniure de gallium d’une puissance nominale de 7 milliwatts) émettant sur des longueurs d’onde comprises entre 655 et 675 nanomètres. L’imprimante et son système laser sont conçus pour impossible, dans des conditions normales d’utilisation, d’entretien par l’utilisateur ou de révision, l’exposition à des rayonnements laser supérieurs à des rayonnements de Classe I .
Avvertenze sui prodotti laser
Questa stampante è certificata negli Stati Uniti per essere conforme ai requisiti del DHHS 21 CFR Sottocapitolo J per i prodotti laser di classe 1 ed è certificata negli altri Paesi come prodotto laser di classe 1 conforme ai requisiti della norma CEI 60825-1.
I prodotti laser di classe non sono considerati pericolosi. La stampante contiene al suo interno un laser di classe IIIb (3b) all’arseniuro di gallio della potenza di 7mW che opera sulla lunghezza d’onda compresa tra 655 e 675 nanometri. Il sistema laser e la stampante sono stati progettati in modo tale che le persone a contatto con la stampante, durante il normale funzionamento, le operazioni di servizio o quelle di assistenza tecnica, non ricevano radiazioni laser superiori al livello della classe 1.
Notices and safety information vii

Avisos sobre el láser
Se certifica que, en los EE.UU., esta impresora cumple los requisitos para los productos láser de Clase I (1) establecidos en el subcapítulo J de la norma CFR 21 del DHHS (Departamento de Sanidad y Servicios) y, en los demás países, reúne todas las condiciones expuestas en la norma IEC 60825-1 para productos láser de Clase I (1).
Los productos láser de Clase I no se consideran peligrosos. La impresora contiene en su interior un láser de Clase IIIb (3b) de arseniuro de galio de funcionamiento nominal a 7 milivatios en una longitud de onda de 655 a 675 nanómetros. El sistema láser y la impresora están diseñados de forma que ninguna persona pueda verse afectada por ningún tipo de radiación láser superior al nivel de la Clase I durante su uso normal, el mantenimiento realizado por el usuario o cualquier otra situación de servicio técnico.
Declaração sobre Laser
A impressora está certificada nos E.U.A. em conformidade com os requisitos da regulamentação DHHS 21 CFR Subcapítulo J para a Classe I (1) de produtos laser. Em outros locais, está certificada como um produto laser da Classe I, em conformidade com os requisitos da norma IEC 60825-1.
Os produtos laser da Classe I não são considerados perigosos. Internamente, a impressora contém um produto laser da Classe IIIb (3b), designado laser de arseneto de potássio, de 7 milliwatts ,operando numa faixa de comprimento de onda entre 655 e 675 nanómetros. O sistema e a impressora laser foram concebidos de forma a nunca existir qualquer possiblidade de acesso humano a radiação laser superior a um nível de Classe I durante a operação normal, a manutenção feita pelo utilizador ou condições de assistência prescritas.
Laserinformatie
De printer voldoet aan de eisen die gesteld worden aan een laserprodukt van klasse I. Voor de Verenigde Staten zijn deze eisen vastgelegd in DHHS 21 CFR Subchapter J, voor andere landen in IEC 60825-1.
Laserprodukten van klasse I worden niet als ongevaarlijk aangemerkt. De printer is voorzien van een laser van klasse IIIb (3b), dat wil zeggen een gallium arsenide-laser van 7 milliwatt met een golflengte van 655-675 nanometer. Het lasergedeelte en de printer zijn zo ontworpen dat bij normaal gebruik, bij onderhoud of reparatie conform de voorschriften, nooit blootstelling mogelijk is aan laserstraling boven een niveau zoals voorgeschreven is voor klasse 1.
Lasermeddelelse
Printeren er godkendt som et Klasse I-laserprodukt, i overenstemmelse med kravene i IEC 60825-1.
Klasse I-laserprodukter betragtes ikke som farlige. Printeren indeholder internt en Klasse IIIB (3b)-laser, der nominelt er en 7 milliwatt galliumarsenid laser, som arbejder på bølgelængdeområdet 655-675 nanometer. Lasersystemet og printeren er udformet således, at mennesker aldrig udsættes for en laserstråling over Klasse I-niveau ved normal drift, brugervedligeholdelse eller obligatoriske servicebetingelser.
viii

Laserilmoitus
Tämä tulostin on sertifioitu Yhdysvalloissa DHHS 21 CFR Subchapter J -standardin mukaiseksi luokan I (1) - lasertuotteeksi ja muualla IEC 60825-1 -standardin mukaiseksi luokan I lasertuotteeksi.
Luokan I lasertuotteita ei pidetä haitallisina. Tulostimen sisällä on luokan IIIb (3b) laser, joka on nimellisteholtaan 7 mW:n galliumarsenidilaser ja toimii 655 - 675 nanometrin aallonpituuksilla. Laserjärjestelmä ja tulostin ovat rakenteeltaan sellaisia, että käyttäjä ei joudu alttiiksi luokkaa 1 suuremmalle säteilylle normaalin käytön, ylläpidon tai huollon aikana.
Huomautus laserlaitteesta
Tämä kirjoitin on Yhdysvalloissa luokan I (1) laserlaitteiden DHHS 21 CFR Subchapter J -määrityksen mukainen ja muualla luokan I laserlaitteiden IEC 60825-1 -määrityksen mukainen.
Luokan I laserlaitteiden ei katsota olevan vaarallisia käyttäjälle. Kirjoittimessa on sisäinen luokan IIIb (3b) 7 milliwatin galliumarsenidilaser, joka toimii aaltoalueella 655 - 675 nanometriä. Laserjärjestelmä ja kirjoitin on suunniteltu siten, että käyttäjä ei altistu luokan I määrityksiä voimakkaammalle säteilylle kirjoittimen normaalin toiminnan, käyttäjän tekemien huoltotoimien tai muiden huoltotoimien yhteydessä.
VARO! Avattaessa ja suojalukitus ohitettaessa olet alttiina näkymättömälle lasersäteilylle. Älä katso säteeseen.
VARNING! Osynlig laserstrålning när denna del är öppnad och spärren är urkopplad. |
Betrakta ej strålen. |
Laser-notis
Denna skrivare är i USA certifierad att motsvara kraven i DHHS 21 CFR, underparagraf J för laserprodukter av Klass I (1). I andra länder uppfyller skrivaren kraven för laserprodukter av Klass I enligt kraven i IEC 60825-1.
Laserprodukter i Klass I anses ej hälsovådliga. Skrivaren har en inbyggd laser av Klass IIIb (3b) som består av en laserenhet av gallium-arsenid på 7 milliwatt som arbetar i våglängdsområdet 655-675 nanometer. Lasersystemet och skrivaren är utformade så att det aldrig finns risk för att någon person utsätts för laserstrålning över Klass I-nivå vid normal användning, underhåll som utförs av användaren eller annan föreskriven serviceåtgärd.
Laser-melding
Skriveren er godkjent i USA etter kravene i DHHS 21 CFR, underkapittel J, for klasse I (1) laserprodukter, og er i andre land godkjent som et Klasse I-laserprodukt i samsvar med kravene i IEC 60825-1.
Klasse I-laserprodukter er ikke å betrakte som farlige. Skriveren inneholder internt en klasse IIIb (3b)-laser, som består av en gallium-arsenlaserenhet som avgir stråling i bølgelengdeområdet 655-675 nanometer. Lasersystemet og skriveren er utformet slik at personer aldri utsettes for laserstråling ut over klasse I-nivå under vanlig bruk, vedlikehold som utføres av brukeren, eller foreskrevne serviceoperasjoner.
Notices and safety information ix

Avís sobre el Làser
Segons ha estat certificat als Estats Units, aquesta impressora compleix els requisits de DHHS 21 CFR, apartat J, pels productes làser de classe I (1), i segons ha estat certificat en altres llocs, és un producte làser de classe I que compleix els requisits d’IEC 60825-1.
Els productes làser de classe I no es consideren perillosos. Aquesta impressora conté un làser de classe IIIb (3b) d’arseniür de gal.li, nominalment de 7 mil.liwats, i funciona a la regió de longitud d’ona de 655-675 nanòmetres. El sistema làser i la impressora han sigut concebuts de manera que mai hi hagi exposició a la radiació làser per sobre d’un nivell de classe I durant una operació normal, durant les tasques de manteniment d’usuari ni durant els serveis que satisfacin les condicions prescrites.
x
Notices and safety information xi
xii

Safety information
•The safety of this product is based on testing and approvals of the original design and specific components. The manufacturer is not responsible for safety in the event of use of unauthorized replacement parts.
•The maintenance information for this product has been prepared for use by a professional service person and is not intended to be used by others.
•There may be an increased risk of electric shock and personal injury during disassembly and servicing of this product. Professional service personnel should understand this and take necessary precautions.
•CAUTION: When you see this symbol, there is a danger from hazardous voltage in the area of the product where you are working. Unplug the product before you begin, or use caution if the product must receive power in order to perform the task.
Consignes de sécurité
•La sécurité de ce produit repose sur des tests et des
agréations portant sur sa conception d'origine et sur des composants particuliers. Le fabricant n'assume aucune responsabilité concernant la sécurité en cas d'utilisation de pièces de rechange non agréées.
•Les consignes d'entretien et de réparation de ce produit s'adressent uniquement à un personnel de maintenance qualifié.
•Le démontage et l'entretien de ce produit pouvant présenter certains risques électriques, le personnel d'entretien qualifié devra prendre toutes les précautions nécessaires.
•ATTENTION : Ce symbole indique la présence d'une tension dangereuse dans la partie du produit sur laquelle vous travaillez. Débranchez le produit avant de commencer ou faites preuve de vigilance si l'exécution de la tâche exige que le produit reste sous tension.
Norme di sicurezza
•La sicurezza del prodotto si basa sui test e sull'approvazione del progetto originale e dei componenti specifici. Il produttore non è responsabile per la sicurezza in caso di sostituzione non autorizzata delle parti.
•Le informazioni riguardanti la manutenzione di questo prodotto sono indirizzate soltanto al personale di assistenza autorizzato.
•Durante lo smontaggio e la manutenzione di questo prodotto,
il rischio di subire scosse elettriche e danni alla persona è più elevato. Il personale di assistenza autorizzato deve, quindi, adottare le precauzioni necessarie.
•ATTENZIONE: Questo simbolo indica la presenza di tensione pericolosa nell'area del prodotto. Scollegare il prodotto prima di iniziare o usare cautela se il prodotto deve essere alimentato per eseguire l'intervento.
Sicherheitshinweise
•Die Sicherheit dieses Produkts basiert auf Tests und Zulassungen des ursprünglichen Modells und bestimmter Bauteile. Bei Verwendung nicht genehmigter Ersatzteile wird vom Hersteller keine Verantwortung oder Haftung für die Sicherheit übernommen.
•Die Wartungsinformationen für dieses Produkt sind ausschließlich für die Verwendung durch einen Wartungsfachmann bestimmt.
•Während des Auseinandernehmens und der Wartung des Geräts besteht ein zusätzliches Risiko eines elektrischen Schlags und körperlicher Verletzung. Das zuständige Fachpersonal sollte entsprechende Vorsichtsmaßnahmen treffen.
Safety information xiii

•ACHTUNG: Dieses Symbol weist auf eine gefährliche elektrische Spannung hin, die in diesem Bereich des Produkts auftreten kann. Ziehen Sie vor den Arbeiten am Gerät den Netzstecker des Geräts, bzw. arbeiten Sie mit großer Vorsicht, wenn das Produkt für die Ausführung der Arbeiten an den Strom angeschlossen sein muß.
Pautas de Seguridad
•La seguridad de este producto se basa en pruebas y aprobaciones del diseño original y componentes específicos. El fabricante no es responsable de la seguridad en caso de uso de piezas de repuesto no autorizadas.
•La información sobre el mantenimiento de este producto está dirigida exclusivamente al personal cualificado de mantenimiento.
•Existe mayor riesgo de descarga eléctrica y de daños personales durante el desmontaje y la reparación de la máquina. El personal cualificado debe ser consciente de este peligro y tomar las precauciones necesarias.
•PRECAUCIÓN: este símbolo indica que el voltaje de la parte del equipo con la que está trabajando es peligroso. Antes de empezar, desenchufe el equipo o tenga cuidado si, para trabajar con él, debe conectarlo.
Informações de Segurança
•A segurança deste produto baseia-se em testes e aprovações do modelo original e de componentes específicos. O fabricante não é responsável pela segunrança, no caso de uso de peças de substituição não autorizadas.
•As informações de segurança relativas a este produto destinam-se a profissionais destes serviços e não devem ser utilizadas por outras pessoas.
•Risco de choques eléctricos e ferimentos graves durante a desmontagem e manutenção deste produto. Os profissionais destes serviços devem estar avisados deste facto e tomar os cuidados necessários.
•CUIDADO: Quando vir este símbolo, existe a possível presença de uma potencial tensão perigosa na zona do produto em que está a trabalhar. Antes de começar, desligue o produto da tomada eléctrica ou seja cuidadoso caso o produto tenha de estar ligado à corrente eléctrica para realizar a tarefa necessária.
xiv

Informació de Seguretat
•La seguretat d'aquest producte es basa en l'avaluació i aprovació del disseny original i els components específics.
El fabricant no es fa responsable de les qüestions de seguretat si s'utilitzen peces de recanvi no autoritzades.
•La informació pel manteniment d’aquest producte està orientada exclusivament a professionals i no està destinada
a ningú que no ho sigui.
•El risc de xoc elèctric i de danys personals pot augmentar durant el procés de desmuntatge i de servei d’aquest producte. El personal professional ha d’estar-ne assabentat i prendre
les mesures convenients.
•PRECAUCIÓ: aquest símbol indica que el voltatge de la part de l'equip amb la qual esteu treballant és perillós. Abans de començar, desendolleu l'equip o extremeu les precaucions si, per treballar amb l'equip, l'heu de connectar.
Safety information xv

Preface
This manual contains maintenance procedures for service personnel. It is divided into the following chapters:
1.General information contains a general description of the printer and the maintenance approach used to repair it. Special tools and test equipment, as well as general environmental and safety instructions, are discussed.
2.Diagnostic information contains an error indicator table, symptom tables, and service checks used to isolate failing field replaceable units (FRUs).
3.Diagnostic aids contains tests and checks used to locate or repeat symptoms of printer problems.
4.Repair information provides instructions for making printer adjustments and removing and installing FRUs.
5.Connector locations uses illustrations to identify the connector locations and test points on the printer.
6.Preventive maintenance contains the lubrication specifications and recommendations to prevent problems.
7.Parts catalog contains illustrations and part numbers for individual FRUs.
Conventions
Note: A note provides additional information.
Warning: A warning identifies something that might damage the product hardware or software.
There are several types of caution statements:
CAUTION
A caution identifies something that might cause a servicer harm.
CAUTION
This type of caution indicates there is a danger from hazardous voltage in the area of the product where you are working. Unplug the product before you begin, or use caution if the product must receive power in order to perform the task.
CAUTION
This type of caution indicates a hot surface.
CAUTION
This type of caution indicates a tipping hazard.
xvi

1. General information
The Dell 2330d and Dell 2330dn are monochrome laser printers designed for single users or small workgroups.
Maintenance approach
The diagnostic information in this manual leads to the correct field replaceable unit (FRU) or part. Use the error code charts, symptom index, and service checks to determine the symptom and repair the failure. See
“Diagnostics information” on page 2-1 for more information. See “Repair information” on page 4-1 to help identify parts. After completing the repair, perform tests as needed to verify the repair.
General information 1-1

Overview of the operator panel
The operator panel consists of these items:
•A 2-line liquid crystal display (LCD) that shows text
• Six buttons: Menus |
, Back ,Navigation (with Left Menu , Select |
and Right Menu ), and |
Stop |
|
|
•An indicator light
Menus
Back |
Stop |
|
1-2

Specifications
Memory
Item |
|
|
Dell 2330d |
|
Dell 2330dn |
|
|
|
|
|
|
Standard memory |
|
|
32MB |
|
32MB |
|
|
|
|
|
|
Maximum memory |
|
|
288MB |
|
288MB |
|
|
|
|
|
|
Optional memory |
|
|
|
||
|
|
|
|
|
|
128MB |
|
|
|
|
|
|
|
|
|
|
|
256MB |
|
|
|
|
|
|
|
|
|
|
|
512MB |
|
|
x |
|
x |
|
|
|
|
|
|
Optional flash memory |
|
|
|
||
|
|
|
|
|
|
64MB |
|
|
|
|
|
|
|
|
|
|
|
256MB |
|
|
x |
|
x |
|
|
|
|
|
|
Optional font cards (DBCS) |
|
|
|
|
|
|
|
|
|
|
|
Option slots |
|
|
|
||
|
|
|
|
|
|
Memory slots |
|
|
1 |
1 |
|
|
|
|
|
|
|
Flash memory/option card |
|
|
2¹ |
2¹ |
|
|
|
|
|
|
|
¹ Only one slot is active for 64MB flash memory or font card. |
|
|
|||
|
|
|
|
|
|
Print quality settings |
|
|
|
||
|
|
|
|
|
|
Item |
|
Dell 2330d |
|
Dell 2330dn |
|
|
|
|
|
|
|
Print resolution |
|
|
|
||
|
|
|
|
||
1200 Image quality¹ |
|
|
|
|
|
|
|
|
|
|
|
2400 Image quality² |
|
|
|
|
|
|
|
|
|
|
|
600 X 600 dpi |
|
|
|
|
|
|
|
|
|
|
|
1200 X 1200 dpi³ |
|
|
|
|
|
|
|
|
|||
¹ 1200 Image quality is defined as 600 dpi with 2 bit IET (Image Technology) default mode for all models. |
|||||
|
|
|
|
||
² 2400 Image quality is defined as 600 dpi with 4 bit IET. |
|
|
|
||
|
|
|
|
||
³ True 1200 dpi at 1/2 the rated speed |
|
|
|
||
|
|
|
|
|
|
General information 1-3

Connectivity and compatibility
Item |
Dell 2330d |
Dell 2330dn |
|
|
|
Data stream emulations |
|
|
|
|
|
Host based printing |
|
|
|
|
|
PCL 5e and PCL 6 |
|
|
|
|
|
PostScript 3 |
|
|
|
|
|
PPDS migration tool |
|
|
|
|
|
PDF v1.6 |
x |
x |
|
|
|
XPS¹ |
x |
x |
|
|
|
HTML (including DBCS) |
x |
x |
|
|
|
Direct image |
x |
x |
|
|
|
Compatibility |
Windows/Macintosh/Linux |
Windows/Macintosh/Linux |
|
|
|
Standard local connections |
|
|
|
|
|
Parallel |
|
|
|
|
|
USB* |
|
|
|
|
|
Standard network connections |
|
|
|
|
|
Ethernet (10/100 Base Tx) |
x |
|
|
|
|
Wireless ethernet 802.11b/g/n |
x |
x |
|
|
|
Optional local connections |
|
|
|
|
|
Optional network connections: |
|
|
external print server support |
|
|
|
|
|
*All models are USB 2.0 Certified devices supporting Hi-Speed data transfer. ¹ Includes the HD photo image format
² Includes support for the following graphics formats: TIFF, TIF, JPG, GIF, PNG, BMP, PCX, AND DCX
1-4
Media trays and supply capacity
Item |
Dell 2330d |
Dell 2330dn |
|
|
|
Available input trays |
|
|
|
|
|
Integrated 250-sheet tray |
|
|
|
|
|
50-sheet MP feeder |
|
|
|
|
|
1-sheet manual feed slot |
x |
x |
|
|
|
|
|
|
Optional input sources |
|
|
|
|
|
250-sheet drawer |
|
|
|
|
|
550-sheet drawer |
|
|
|
|
|
|
|
|
Maximum input sheet capacity |
850 |
850 |
|
(excluding envelopes) |
(excluding envelopes) |
|
|
|
|
|
|
Manual/integrated print duplex |
Integrated |
Integrated |
|
|
|
|
|
|
Envelope conditioning |
x |
x |
|
|
|
|
|
|
Available output trays |
|
|
|
|
|
Standard 150-sheet sensing bin |
|
|
|
|
|
|
|
|
Toner and photoconductor |
|
|
|
|
|
Toner cartridge |
2,300 standard pages SWE¹ |
2,300 standard pages SWE¹ |
|
3,500 standard pages |
3,500 standard pages |
|
|
|
High toner cartridge |
9,000 standard pages |
9,000 standard pages |
|
|
|
Photoconductor kit |
Up to 30,000 ² |
Up to 30,000 ² |
|
|
|
¹ Declared value in accordance with ISO/IEC 19752
² Up to 30,000 pages, based on an average of 3 pages per job and approximately 5% coverage per page. Yields may vary based on customer usage.
General information 1-5

Types of print media
Note: Ensure trays are properly loaded. Never mix media types within a tray.
Source |
Sizes |
Types |
|
Weight |
Input capacity* (sheets) |
||
|
|
|
|
|
|
||
Input tray 1 |
A4, A5, A6,JIS¹-B5, |
Plain paper, |
60-90 g/m² |
• |
250 paper |
||
(250-sheet tray) |
letter, legal, executive, |
recycled, labels, |
(16-24 lb) |
• |
50 labels** |
||
oficio (Mexico)², folio², |
bond, letterhead, |
|
|
||||
|
|
|
|
|
|||
|
statement |
preprinted, colored |
|
|
|
|
|
|
|
paper, light paper, |
|
|
|
|
|
|
|
heavy paper, |
|
|
|
|
|
|
|
rough/cotton, |
|
|
|
|
|
|
|
custom type [x] |
|
|
|
|
|
|
|
|
|
|
|
||
2nd Drawer option |
A4, A5, JIS¹-B5, letter, |
Plain paper, |
60-90 g/m² |
• |
250 paper |
||
(250/550-sheet |
legal, executive, oficio |
recycled, labels, |
(16-24 lb) |
• |
550 paper |
||
(Mexico)², folio², |
bond, letterhead, |
• |
50 labels** |
||||
drawer) |
|
|
|||||
statement |
preprinted, colored |
|
|
||||
|
|
|
|
|
|||
|
|
paper, light paper, |
|
|
|
|
|
|
|
heavy paper, |
|
|
|
|
|
|
|
rough/cotton, |
|
|
|
|
|
|
|
custom type [x] |
|
|
|
|
|
|
|
|
|
|
|
||
Multipurpose |
A4, A5, A6,JIS¹-B5, |
Plain paper, |
60-163 g/m² |
• |
50 paper |
||
feeder |
letter, legal, executive, |
transparency, |
(16-43 lb) |
• |
15 labels** |
||
|
oficio (Mexico)², folio², |
recycled, labels, |
• |
10 transparencies |
|||
|
|
|
|||||
|
statement |
bond, letterhead, |
|
|
|||
|
|
|
|
|
|||
|
|
preprinted, colored |
|
|
|
|
|
|
|
paper, light paper, |
|
|
|
|
|
|
|
heavy paper, |
|
|
|
|
|
|
|
rough/cotton, |
|
|
|
|
|
|
|
custom type [x] |
|
|
|
|
|
|
|
|
|
|
|
|
|
|
|
Card stock*** |
• |
120-163 g/m² |
20 |
|
|
|
|
|
|
(16-43 lb) |
|
|
|
|
|
|
|
Index Bristol |
|
|
|
|
|
|
• |
75-163 g/m² |
|
|
|
|
|
|
|
(46-100 lb) |
|
|
|
|
|
|
|
Tag |
|
|
|
|
|
|
|
|
|
||
|
7 ¾, 9, 10, DL, C5, B5, |
Envelopes |
75 g/m² (20 lb) |
7 |
|
||
|
other |
Rough envelopes |
|
|
|
|
|
|
|
|
|
|
|
||
Duplex |
A4, letter, legal, oficio |
Plain paper, |
60-90 g/m² |
|
|
||
|
(Mexico)², folio² |
recycled, bond, |
(16-24 lb) |
|
|
||
|
|
letterhead, |
|
|
|||
|
|
|
|
|
|
||
|
|
preprinted, colored |
|
|
|
|
|
|
|
paper, light paper, |
|
|
|
|
|
|
|
heavy paper, |
|
|
|
|
|
|
|
custom type [x] |
|
|
|
|
|
|
|
|
|
|
|
|
|
* Capacity for 20 lb print media, unless otherwise noted. ** Use for occasional printing only.
*** Grain short is recommended. Use rear exit for best results. ¹Japanese Industry Standard
² If a source supports size sensing and is activated, then neither the “oficio” value nor the “folio” value appears in that source’s list of supported media sizes. These values only appear in a source’s list of supported media sizes either when the source is non-size sensing or when the source’s size sensing hardware is deactivated and then the device is power cycled.
1-6
Tips on preventing jams
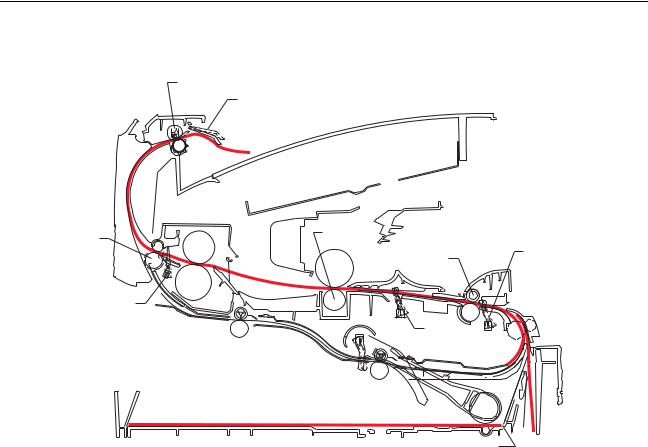
Paper path
I
J
F
G E
C B
H
D
K
L
M
A
A |
Paper path |
A-B |
125.3 mm |
B |
Manual feed sensor |
B-C |
9.0 mm |
C |
Upper end feed rolls |
C-D |
59.8 mm |
D |
Input sensor |
D-E |
44.9 mm |
E |
Transfer roll |
E-F |
112.7 mm |
F |
Fuser |
F-G |
21.4 mm |
G |
Fuser exit rolls |
G-H |
114.8 mm |
H |
Fuser exit sensor |
H-I |
7.5 mm |
I |
Exit rolls |
I-J |
17.0 mm |
J |
Exit sensor |
I-K |
211.7 mm |
K |
Duplex unit |
K-L |
93.4 mm |
L |
Duplex sensor |
L-M |
8.4 mm |
M |
Auto compensator |
|
|
General information 1-7

Most paper jams can be avoided by correctly loading paper and specialty media in the printer.
The following hints can help prevent paper jams:
•Use only the recommended print media.
•Do not overload the print media sources. Make sure the stack height does not exceed the maximum height indicated by the stack line on the labels in the sources.
•Do not load wrinkled, creased, damp, or curled print media.
•Flex, fan, and straighten print media before loading it. If jams do occur with the print media, then try feeding one sheet at a time through the manual feeder.
•Do not mix print media sizes, weights, or types in the same print media source.
•Push all trays in firmly after loading them.
Note: Make sure the media stack is below the maximum media fill indicators on the 250-sheet tray before pushing the tray into the printer.
•Make sure paper guides are positioned before loading the paper or specialty media.
•Do not remove trays while a job is printing.
•Before loading transparencies, fan the stack to prevent sheets from sticking together.
•Do not use envelopes that:
–Have excessive curl
–Are stuck together
–Are damaged in any way
–Contain windows, holes, perforations, cutouts, or embossments
–Have metal clasps, string ties, or metal folding bars
–Have postage stamps attached
–Have any exposed adhesive when the flap is in the sealed position
•Use only recommended media. Refer to the Card Stock & Label Guide available on the Dell Web site at www.dell.com for more information about which media provides optimum results for the current printing environment.
Tools
The removal and adjustment procedures require the following tools and equipment:
•Spring hook
•Needle nose pliers
•Volt-ohmmeter
•#1 and #2 Phillips screwdriver
•Slotted screwdriver
1-8

Acronyms
ACM |
Autocompensator Mechanism (or paper feed) |
ADC |
Analog-to-digital Converter |
ASIC |
Application Specific Integrated Circuit |
CBM |
Complete Bill of Material |
DEV |
Development Roll (of print cartridge/photoconductor |
|
system) |
DIMM |
Dual In-Line Memory Module |
ENA |
External Network Adapter |
FRU |
Field Replaceable Unit |
HBP |
Host Based Printing |
HVPS |
High Voltage Power Supply |
LCD |
Liquid Crystal Diode |
LED |
Light Emitting Diode |
LSU |
Laser Scanning Unit |
LVPS |
Low Voltage Power Supply |
NVRAM |
Nonvolatile Random Access Memory |
PC |
Photoconductor |
PCL |
Printer Control Language |
POR |
Power-On Reset |
POST |
Power-On Self Test |
PPDS |
Personal Printer Data Stream |
PRC |
People’s Republic of China |
TAR |
Toner Add Roll |
SDR |
Synchronous Dynamic RAM |
SWE |
Shipped With Equipment |
USB |
Universal Serial Bus |
V ac |
Volts alternating current |
V dc |
Volts direct current |
General information 1-9
1-10

2. Diagnostics information
Start
CAUTION: Unplug power from the printer before connecting or disconnecting any cable, assembly, or electronic card. This is a precaution for personal safety and to prevent damage to the printer.
This chapter contains the codes and diagnostic tools to aid in providing corrective action for a malfunctioning printer. To determine the corrective action to repair a printer, look for the following information:
•A description of a problem, see “Symptom tables” on page 2-20.
•Information from the operator panel of the printer.
–Models 2330d and 2330dn have an operator panel with messages. See “Overview of the operator panel and menus” on page 2-2.
Menus
Back |
Stop |
|
Power–On Self Test (POST) sequence
The following is an example of the events that occur during the POR sequence when the printer is turned on.
1.Diamonds are displayed on the operator panel.
2.While code is being loaded into DRAM, dots scroll across the operator panel.
3.A screen is displayed with the memory and processor speed. A typical example of this message is:
*
32 Mb |
400 Mhz |
4.Performing Self Test is displayed.
5.Busy is displayed.
6.Close Door will be displayed if the cover is open.
7.Any cartridge errors, such as Defective Cartridge, are displayed.
8.Applicable maintenance messages are displayed.
9.Applicable toner low messages are displayed.
10.The printer displays Ready.
Diagnostics information 2-1

Overview of the operator panel and menus
Menu |
LCD |
Indicator |
button |
display |
light |
Menus
Back
Stop
Back |
Left arrow |
Select |
Right arrow |
Stop |
button |
button |
button |
button |
button |
Indicator light
The indicator light gives information about the status of the printer.
If the light is |
The printer is |
|
|
Off |
Off |
|
|
On |
On, but idle |
|
|
Blinking |
On and busy |
|
|
2-2

Buttons
Use the six operator panel buttons to open a menu, scroll through a list of values, change printer settings, and respond to printer messages.
Note: Buttons act on the information displayed on the second line of the operator panel.
The use of the buttons and the layout of the display are described in the following table:
Button or control panel item |
Function |
|
|
Menus button |
Press and release |
to open the menus. The menus are available only when the |
|
|
printer is in the Ready state. |
||
|
Pressing |
also returns the operator panel to the top level menu screen if pressed |
|
|
while in a menu. |
|
|
Back button |
Press and release |
to return to the previous screen. |
|
Navigation buttons |
|
Left arrow menu button |
|
|
|
Right arrow menu button |
|
Press and release  or
or  to scroll through menus, menu items, or printer options, or to move between screens and menu options.
These buttons can also be used to automatically increase  or decrease
  the desired number of copies.
Select button
Press and release  to open a menu, to display the available values or settings, or to save the displayed value as the new user default setting.
Note: When a new setting is saved as the default setting, it remains in effect until new settings are saved or until factory defaults are restored. Settings chosen from a software program can also change or override the user default settings selected from the operator panel.
Stop button |
• |
Press |
once to return to the previous display screen while in the menus. |
|
• |
Press |
twice to exit the menus and return to the Ready state. |
|
• |
Press |
to stop printer activity. |
|
• |
Press |
to cancel a print job. Stopping will display momentarily. Stopped |
|
|
will then display to offer a list of settings that may be selected. |
|
Diagnostics information 2-3

Button or control panel item |
Function |
|
|
|
|
Display |
The display shows messages describing the current state of the printer and indicating |
|
|
possible printer problems that must be resolved. |
|
|
The top line of the display is the header line. It will display the current status and the |
|
|
Supplies (Warnings) status. This is where printer status, supplies messages, and |
|
|
show-me screens are viewed. |
|
|
|
|
Indicator light |
The indicator light indicates printer status. |
|
|
• |
If the light is off, then the printer power is off. |
|
• |
If the light is blinking green, then the printer is warming up, processing date, or |
|
|
printing. |
|
• |
If the light is solid green, then the printer is on, but idle. |
|
• |
If the light is blinking red, then operator panel intervention is needed. |
|
|
|
2-4
Loading...